
Split Shipping Packages lets you divide a WooCommerce cart into several shipping packages at checkout. You do this with rules. Each rule can define which products belong in a package, under what conditions the package is created, what the package is called, and which shipping methods are available for it.
WooCommerce then calculates shipping for each package separately. Customers see each package with its own title and its own shipping options.
Who should use it
↑ Back to topThis plugin is for stores where a single shipping calculation for the whole cart does not reflect reality. Typical examples:
- Stores that sell both bulky and small items
- Stores with products that need different carriers or delivery speeds
- Stores that ship from more than one location or supplier
- Stores that must restrict certain products from certain shipping methods
If every product in your catalogue ships the same way, you probably do not need it.
Setup and installation
↑ Back to topInstall the Plugin:
Purchase the product from WooCommerce.com
Download the ZIP file from your WooCommerce.com dashboard
Navigate to Plugins > Add New > Upload and select the ZIP file you just downloaded
Click on Upload Plugin and select the ZIP file.
Click Install Now and wait for the installation to complete.
Activate the Plugin:
After installation, click Activate to enable the Split Shipping Packages plugin on your site.
More information at Install and Activate Plugins/Extensions.
Getting started
↑ Back to topAfter activation, two new places appear in your admin:
- WooCommerce → Package Splitter: where you create and manage rules
- WooCommerce → Settings → Shipping → Split Shipping Packages: the global settings
Plugin settings overview
↑ Back to topOpen WooCommerce → Settings → Shipping → Split Shipping Packages. There are two settings.
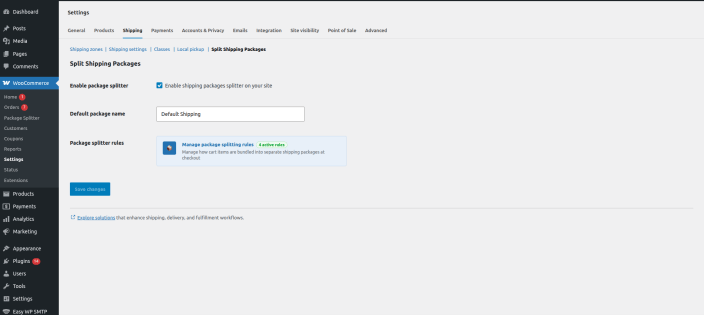
Enable package splitter
↑ Back to topWhat it does: This is the master switch. When ticked, the plugin checks your published and enabled rules during checkout. When unticked, no rules are evaluated and no extra packages are created, so WooCommerce behaves as if the plugin were not installed.
When to use it: Leave it ticked during normal operation. Untick it when you need to rule out the plugin while troubleshooting a shipping or checkout problem, or when you want to pause all splitting without touching individual rules.
Example: A customer reports odd shipping rates on a busy sales day. Untick this setting, place a test order, and see whether the problem disappears. If it does, the cause is in your rules. If it does not, the cause lies elsewhere.
Default package name
↑ Back to topWhat it does: Sets the title for the package that is automatically created for products that no rule has claimed.
When to use it: Set it to something customers will understand. “Standard delivery” or “Other items” reads better than a technical label.
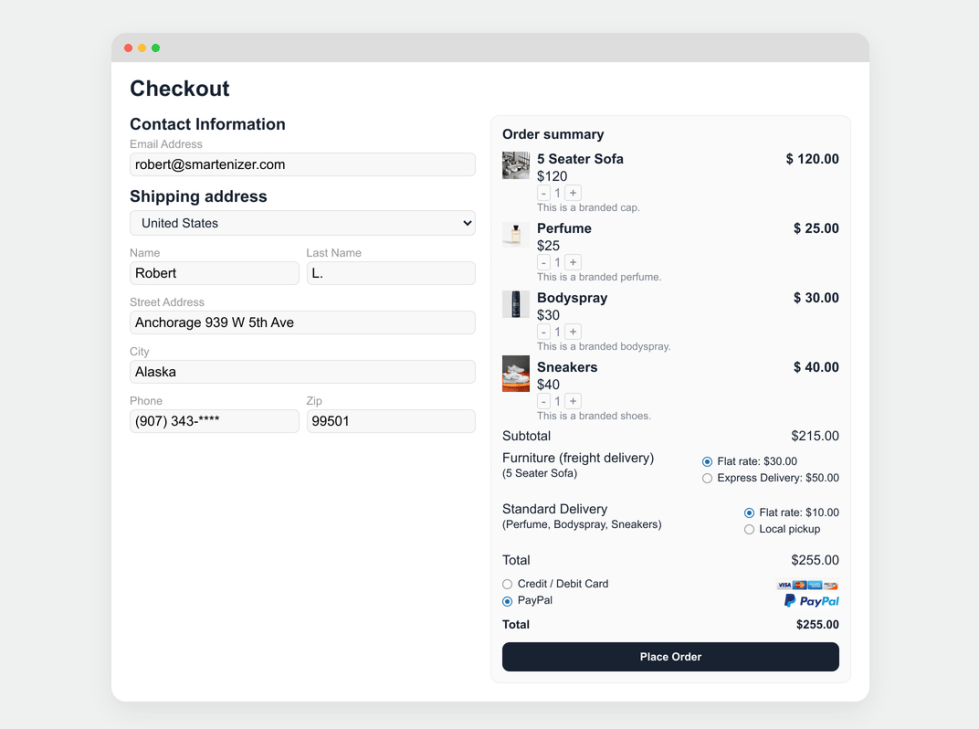
Example: Your cart has six products. A rule titled “Bulky items” claims four of them. The other two go into a package named by this setting, for instance “Standard delivery”. At checkout the customer sees two packages: “Bulky items” and “Standard delivery”.
Feature-by-Feature guide
↑ Back to topTo open the rules, go to WooCommerce → Package Splitter. Click Add New Rule to create a new one, or use the list to manage existing rules.
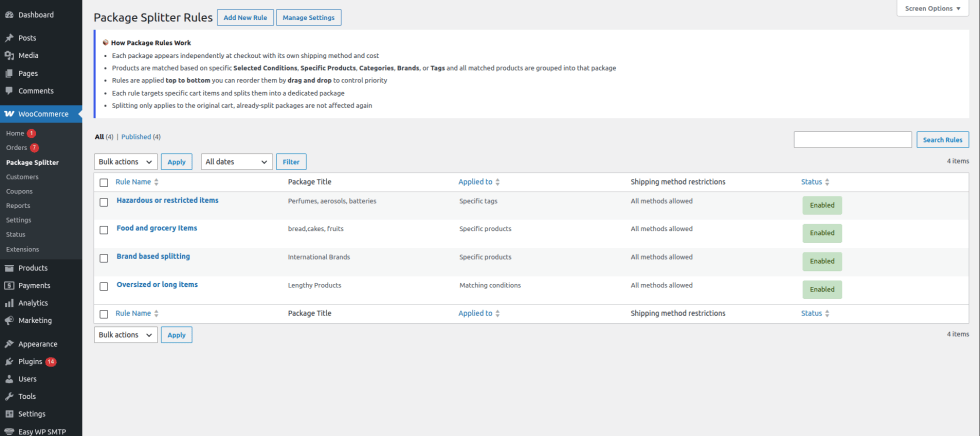
Rule name and publishing
↑ Back to topWhat it does: Each rule is a custom post type entry. The post title is the rule name. It is only for your reference and is not shown to customers.
How to enable it: Enter a title when creating the rule, then click Publish.
Important: A rule must be published to run on the storefront. A draft or pending rule is ignored even if everything else is configured correctly.
Example: “Furniture – freight only”.
Enable rule
↑ Back to topWhat it does: A checkbox that switches the rule on or off without deleting it.
Configuration: Tick it to activate the rule. Untick it to pause the rule while keeping its settings.
Remember: The rule needs both to be published and to have this box ticked. If either is missing, the rule will not run.
Package title
↑ Back to topWhat it does: Sets the label shown with this package on the checkout page.
Configuration: Enter customer-friendly text in the Package title field.
Example: “Ships separately by freight”. Customers immediately understand why there is more than one shipping section.
Shipping method restriction
↑ Back to topWhat it does: Controls which shipping methods are offered for this package.
Configuration: Choose one of three options.
| Option | What happens |
|---|---|
| Allow all shipping methods | Every available method shows for this package. |
| Allow only specific shipping methods | A multi-select field appears. Only the methods you select are shown for this package. |
| Exclude specific shipping methods | A multi-select field appears. The methods you select are hidden for this package. All other available methods still show. |
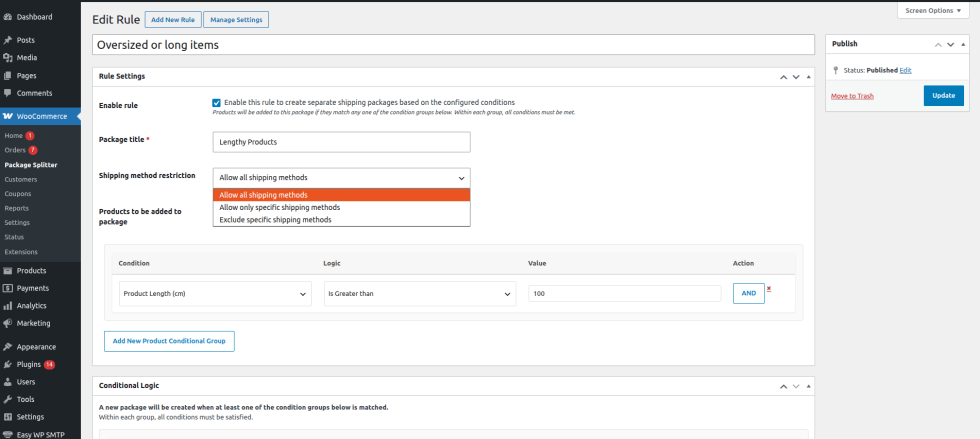
Example: For a rule that catches fragile goods, choose Allow only specific shipping methods and select your tracked courier. For a rule covering items that cannot be collected locally, choose Exclude specific shipping methods and select Local pickup.
Tip: Only methods that are actually available for the customer’s shipping zone can be shown. If a method you allowed does not appear, check that it is set up in the matching zone under WooCommerce → Settings → Shipping.
Products to be added to package
↑ Back to topWhat it does: Decides which cart products this rule claims. Choose one of six options.
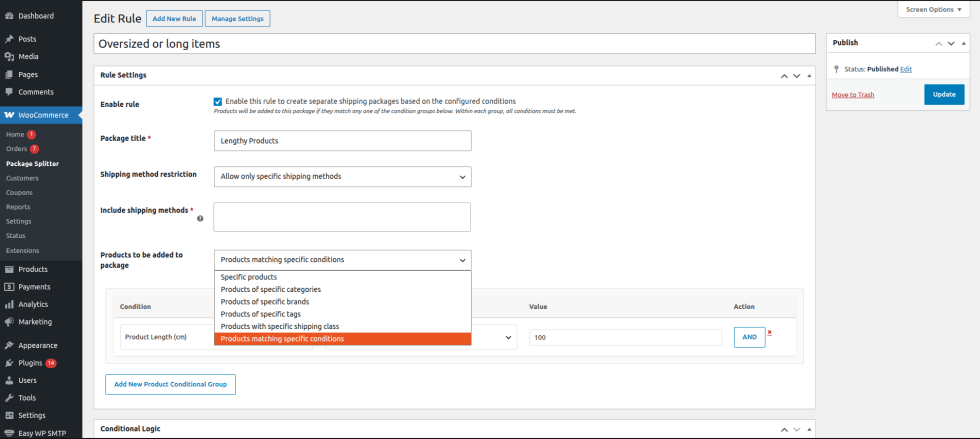
Specific products
A Select products multi-select appears. Choose the products to include. Whenever any of them is in the cart, it is added to this package.
Products of specific categories
A Select categories multi-select appears. Any product in the cart that belongs to a chosen category is added to the package.
Products of specific brands
A Select brands multi-select appears. Any product in the cart from a chosen brand is added.
Products of specific tags
A Select tags multi-select appears. Any product in the cart with a chosen tag is added.
Products with a specific shipping class
A Select shipping class multi-select appears. Any product in the cart with a chosen shipping class is added.
For categories, brands, tags, and shipping classes, only products currently in the cart are considered. Other products in those groups have no effect.
Products matching specific conditions
This opens the product condition builder. See section 4.6.
Product condition builder
↑ Back to topWhat it does: Lets you select products by their properties instead of by fixed lists.
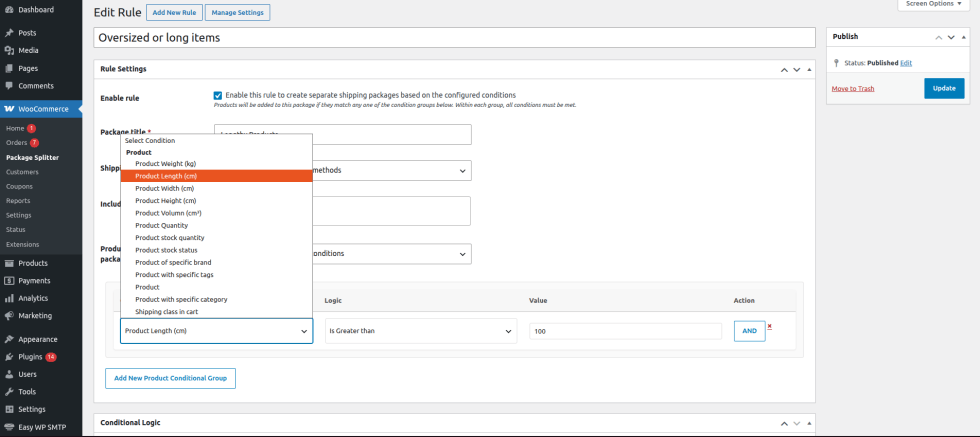
How to enable it: Under Products to be added to package, choose Products matching specific conditions.
The builder is a table with four columns: Condition, Logic, Value and Action.
Condition options:
- Product weight, length, width, height, and volume (shown in your WooCommerce weight or dimension unit)
- Product quantity
- Product stock quantity
- Product stock status
- Product of specific brand
- Product with specific tags
- Product (a specific product)
- Product with specific category
- Shipping class
Logic options depend on the condition you pick:
- Numeric conditions (weight, length, width, height, volume, quantity, stock): Is Equal to, Is Not Equal to, Is Greater than, Is Less than.
- Non-numeric conditions (stock status, brand, tags, category, shipping class, product): Is Equal to, Is Not Equal to.
Value field: For numeric conditions, a plain text field where you type a number. For brand, tag, category, shipping class, product, and stock status, a dropdown where you choose from the options available in your store.
Action column:
- AND button: adds another row to the same table. A product must satisfy every row in the table to match.
- × button: removes that row.
Add New Product Conditional Group: Click this button under the table to add a second table. Tables are connected by OR. A product matches if all rows in at least one table are satisfied.
Example scenario: You want a “Long or very heavy” package.
- Table 1: Product weight is greater than 25 AND Shipping class is equal to Bulky.
- Table 2: Product length is greater than 150.
A product goes into the package if it is both over 25 and in the Bulky class, or if it is longer than 150.
Note on dimensions: Weight and dimension values are compared in the units set under WooCommerce → Settings → Products. Make sure your product data uses the same units.
Conditional Logic (when to create the package)
↑ Back to topWhat it does: Decides whether this rule creates a package at all. The rule description in the editor reads: a new package will be created when at least one of the condition groups is matched.
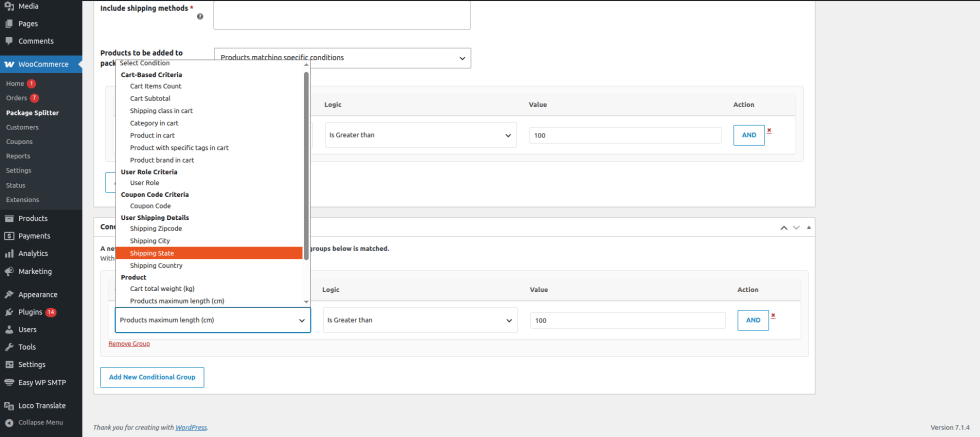
How it works: The box uses the same table structure as the product builder, with AND rows inside a table and OR between tables, but with a different list of conditions.
Cart-based conditions: Cart items count, cart subtotal, shipping class in cart, category in cart, product in cart, product with specific tags in cart, product brand in cart.
User role: The role of the customer, for example Customer or Wholesale Customer.
Coupon code: Is equal to, is not equal to, any coupon applied, or no coupon applied.
Shipping details: Shipping zip/postcode, city, state, or country.
Product conditions: Cart total weight, maximum product length, maximum product width, maximum product height, minimum product stock, and any product with a given stock status.
Logic options:
- Numeric conditions (cart item count, subtotal, weight, dimensions, stock) use: equal to, not equal to, greater than, less than.
- Shipping class, user role, tags, brands, and shipping location fields use: equal to, not equal to.
- Coupon code uses: Is Equal to, Is Not Equal to, Any Coupon Applied, No Coupon Applied.
- Category in cart uses: Cart contains category; Minimum 1 item not from this category; All items of the cart should contain category; No item in the cart contains category.
- Product in cart uses: Is in the cart, Is not in the cart.
Example scenario: Create a freight package only when the delivery country is Pakistan AND the cart total weight is over 30 kg. Add one table with two rows: Shipping Country is equal to Pakistan, and Cart total weight is greater than 30.
Rule order and priority
↑ Back to topWhat it does: Rules run from top to bottom in the Package Splitter list. The first rule that matches a product takes it. A product can only be in one package at a time.
How to change the order: Open WooCommerce → Package Splitter and drag rows up or down using the handle in each row.
Example: You have a “Hazardous items” rule and a broader “All items from Brand A” rule. A hazardous product from Brand A should follow hazardous handling, so place the hazardous rule above the brand rule.
Bulk actions
↑ Back to topWhat it does: Enables or disables multiple rules at once.
How to use it: In the Package Splitter list, tick the rules, choose the enable or disable bulk action from the dropdown, and click Apply.
Default package
↑ Back to topWhat it does: Collects every product not claimed by any rule into one package, named by the Default package name setting.
Nothing to configure per rule. It is created automatically whenever there are unclaimed products.
Use case walkthroughs
↑ Back to topWalkthrough 1: Ship heavy furniture by freight, everything else by courier
↑ Back to topGoal: Items in the Furniture category go out by freight. All other items ship normally.
- Go to WooCommerce → Settings → Shipping → Split Shipping Packages. Tick Enable package splitter and set Default package name to “Standard delivery”. Save.
- Go to WooCommerce → Package Splitter → Add New Rule.
- Title: “Furniture – freight”.
- Tick Enable rule.
- Package title: “Furniture (freight delivery)”.
- Shipping method restriction: Allow only specific shipping methods, then select your freight method.
- Products to be added to package: Products of specific categories, then select Furniture.
- Leave Conditional Logic empty if you want the rule to apply to every order. If you do add conditions, remember the package is created only when at least one condition group matches.
- Click Publish.
Result: A cart with a sofa and a mug shows two packages: “Furniture (freight delivery)” with only freight rates, and “Standard delivery” for the mug.
Walkthrough 2: Separate chilled items and restrict them to express delivery
↑ Back to topGoal: Products with the tag “chilled” must only be offered next-day delivery.
- Create a rule titled “Chilled items”.
- Package title: “Chilled – next-day delivery only”.
- Shipping method restriction: Allow only specific shipping methods, then select your next-day method.
- Products to be added to package: Products of specific tags, then select “chilled”.
- Publish and make sure Enable rule is ticked.
- Drag this rule above any broader rules that could claim the same products first.
Walkthrough 3: A custom package for oversized items
↑ Back to topGoal: Anything over 120 cm long, or over 20 kg, goes into a special package.
- Create a rule titled “Oversized or heavy”.
- Products to be added to package: Products matching specific conditions.
- In the first table, set Condition to Product Length, Logic to Is Greater than, Value to 120.
- Click Add New Product Conditional Group.
- In the second table, set Condition to Product Weight, Logic to Is Greater than, Value to 20.
- Set the package title and shipping method restriction as needed, then publish.
Why two tables: Tables are joined by OR, so a product only needs to meet one of them. If you used two rows in the same table, the product would need to meet both.
Walkthrough 4: A separate package for wholesale customers
↑ Back to topGoal: When a wholesale customer’s cart is over a set subtotal, products from the Bulk category go into their own package.
- Create a rule titled “Wholesale bulk”.
- Products to be added to package: Products of specific categories, then select Bulk.
- In Conditional Logic, add one table with two rows: User Role is equal to Wholesale Customer, AND Cart Subtotal is greater than your chosen amount.
- Set the package title and shipping method restriction, then publish.
Walkthrough 5: Split by destination
↑ Back to topGoal: Only create a restricted-items package when shipping to specific countries.
- Create the rule and pick the products (for example, a shipping class for restricted goods).
- In Conditional Logic, choose Shipping Country, Is Equal to, and select the country.
- To cover several countries, click Add New Conditional Group for each extra country, because groups are joined by OR.
Troubleshooting
↑ Back to topMy rule isn’t creating a package at checkout. Check these in order:
- Is Enable package splitter ticked in the plugin settings?
- Is the rule published (not a draft)?
- Is Enable rule ticked on the rule?
- Do the Conditional Logic conditions match the current cart and customer? Remember that a package is created only when at least one group matches in full.
- Is another rule higher in the list claiming the same products?
- Are the products actually in the cart? Category, brand, tag, and shipping class selectors look only at cart items.
A product appears in the wrong package. Rules run top to bottom and the first match wins. Drag the more specific rule above the broader one in the list.
The shipping method I allowed does not appear. The method must also be available for the customer’s shipping address. Check your shipping zones under WooCommerce → Settings → Shipping and confirm the method is added to the matching zone and is enabled.
All shipping methods are showing even though I restricted them. Check the Shipping method restriction dropdown on that rule. If it is set to Allow all shipping methods, nothing is restricted. Also confirm the rule is the one that actually claimed the product.
Weight or dimension conditions are not matching as expected. Compare values in your store’s configured units (WooCommerce → Settings → Products). Also confirm that the product, or its variation, actually has weight and dimensions filled in. A product with an empty weight field cannot satisfy a weight condition.
The dynamic Value field is empty. The dropdown lists existing terms from your store. If you choose brands, tags, or categories, make sure at least one exists. For brands, your store needs a brand taxonomy available.
I see only one package at checkout. Either no rule matched, or all rules matched the entire cart. A single package is also what you will see if every product ended up in the same package.
Something is wrong on the live store and I need it fixed right now. Untick Enable package splitter in the plugin settings. This stops all rule evaluation immediately and restores standard WooCommerce behaviour.
Cached cart or shipping rates look stale. WooCommerce caches shipping rates in the session. After changing a rule, clear the cart or start a new session when testing, and exclude cart and checkout pages from any page cache.
Best practices
↑ Back to top- Name rules clearly. Rule names are only for admins, so use descriptive names such as “Furniture – freight” instead of “Rule 1”.
- Put specific rules first. The first matching rule wins, so order from most specific to most general.
- Use the simplest selector that works. If a category or shipping class describes the grouping well, use it. Reserve the condition builder for things the built-in selectors cannot express.
- Keep conditions minimal. Every extra row is another thing that must match. Add a row only when it changes the outcome.
- Use AND inside a table and OR between tables. Check which one you mean before adding rows or groups.
- Name packages for customers. Package titles appear at checkout, so they should explain the split in plain language.
- Keep product data clean. Weight, dimension, shipping class and stock data drive many conditions. Missing values cause missed matches.
- Test every rule as a customer. Add the relevant items to the cart with a matching address and check both the package titles and the shipping methods.
- Use drafts for work in progress. Unpublished rules do not run, so you can build and refine safely.
- Use the kill switch for diagnosis. If checkout behaves strangely, disabling the package splitter quickly tells you whether the plugin is involved.
- Review rules after catalogue changes. New categories, brands, or shipping classes may need to be added to existing rules.
- Keep a default package name that makes sense alone. Customers will see it whenever some products are not claimed by a rule.