Installation
↑ Back to topTo start using a product from WooCommerce.com, you can use the “Add to store” functionality on the order confirmation page or the My subscriptions section in your account.
- Navigate to My subscriptions.
- Find the Add to store button next to the product you’re planning to install.
- Follow the instructions on the screen, and the product will be automatically added to your store.
Alternative options and more information at:
Managing WooCommerce.com subscriptions.

Requirements
↑ Back to topBefore installing, confirm your site meets these requirements:
- WordPress 6.7 and above
- PHP 8.2 and above
- WooCommerce 9.5 or newer installed and activated
Recommended
↑ Back to top- WordPress 7
- WooCommerce 10.7 or newer
- PHP 8.2 or newer
More information: WooCommerce.com subscriptions.
Overview
↑ Back to topThe Overview page is the default landing when you open Seat Planner in the admin. It gives a quick summary of your venue bookings and links to the main sections of the plugin.
Where to Find It
↑ Back to topIn the WordPress admin sidebar, click Seat Planner. The first view is the Overview. You can also go to Seat Planner → Overview.
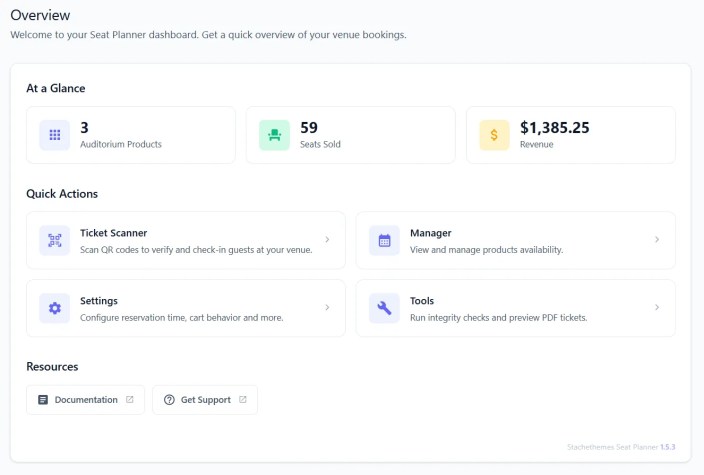
Stats
↑ Back to topThe page shows three summary cards:
- Products – Total number of published Auditorium (Seat Planner) products.
- Seats – Total number of seats sold across all products (all time).
- Revenue – Total revenue from those seat sales, formatted in your store currency.
Stats are loaded from the server when the page opens. If data is still loading, the cards show a loading state.
Quick Actions
↑ Back to topShortcuts to the main Seat Planner areas:
- Ticket Scanner – Open the QR code scanner to verify and check-in guests at your venue.
- Manager – View and manage product availability (products list, dates, availability grid, statistics).
- Settings – Configure reservation time, cart behavior, PDF/QR, reports, colors, and mobile app access.
- Tools – Run booking integrity checks, preview PDF tickets, and edit order items.
Clicking a card navigates to the corresponding section (Scanner, Manager, Settings, or Tools).
Help & Version
↑ Back to topThe page may include a help section and the current plugin version at the bottom.
Summary
↑ Back to top- Overview is the default Seat Planner dashboard: stats (products, seats sold, revenue) and quick links to Scanner, Manager, Settings, and Tools.
Creating an Auditorium Product
↑ Back to topOnce Seat Planner is installed, WooCommerce adds the Auditorium Product type for selling seats from a visual plan.
Steps
↑ Back to top- Go to Products → Add New. Enter Title, Description, and a Product image.
- In Product data, choose Auditorium Product from the product type dropdown.
- Open the Seat Planner tab and click Open Seat Planner.
- Place a Screen, drag Seat objects onto the canvas, and set each seat’s Label, unique Seat ID, and Price. Use Auto Increment to number many seats quickly.
- Click the back arrow to return to the product page and Publish.
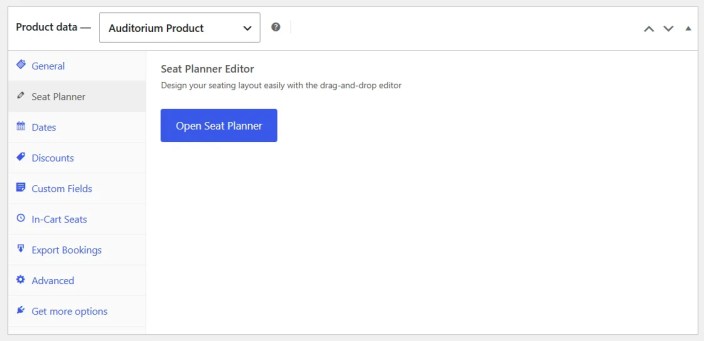
For seat statuses, groups, desirability, CSV import/export, and transform tools, see Seat Planner Editor.
Next steps
↑ Back to top- Adding Dates – Multiple show times or events.
- Adding Discounts – Student, senior, or group pricing.
- Custom Fields – Extra questions or paid add-ons per seat.
- Settings – Reservation time, QR/PDF tickets, cart behavior.
Auditorium products are virtual and sold individually; availability is tracked per seat (and per date when dates are configured).
Seat Planner Editor
↑ Back to topAfter you create an auditorium product, open Seat Planner → Open Seat Planner for the full visual editor. This section covers multiple layouts, advanced layout tools, seat statuses, and import/export.
Multiple seating layouts
↑ Back to topA single auditorium product can include up to 5 seating layouts (for example Stalls, Balcony, and VIP). Use this when one event sells different sections from one product instead of creating separate products.
- Workflow tabs – At the top of the editor, switch between layouts. Click Add Workflow to create another layout.
- Rename – Double-click a tab label or use the edit icon. Customers see this name in the front-end layout picker.
- Reorder – Drag the handle on a tab to change tab order on the storefront.
- Delete – Remove a layout when more than one exists (confirm in the dialog).
- Per-layout canvas – Each layout has its own seats, objects, dimensions, and background image. Product-wide rules (min/max seats, prevent single empty seats) apply to all layouts.
- Unique Seat IDs – Every Seat ID must be unique across all layouts on the product, not only within one layout.
On the storefront, when a product has more than one layout, customers see a Select layout tab bar above the seat map. They can switch layouts and add seats from different sections in one order; a badge shows how many seats are selected in each layout. Best available (when enabled in Settings) can search across layouts if the active layout cannot satisfy the request.
In Manager → Availability, use Filter by layout to focus on one section or view all layouts together.
Canvas elements
↑ Back to top- Screen – Marks the screen or stage direction.
- Seat – Purchasable seat; requires a unique Seat ID.
- Object – Static decoration (tables, walls, etc.).
- Text – Static labels (section names, row letters).
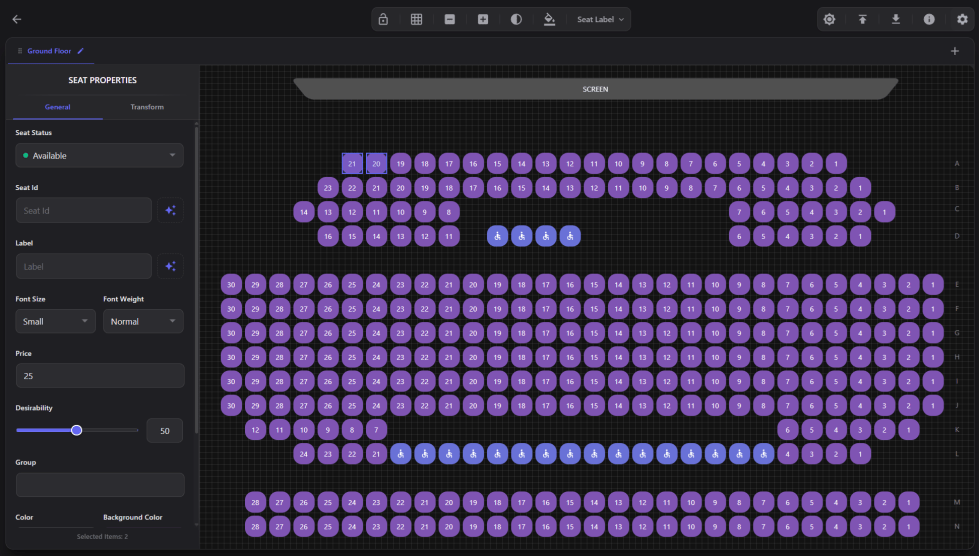
Seat properties
↑ Back to topFor each seat you can set:
- Label – Shown to customers (e.g. A1).
- Seat ID – Unique identifier stored on orders; duplicates are highlighted in red.
- Price – Base price (decimals supported).
- Seat group – Used with discounts limited to a group.
- Seat status – Default front-end behavior: Available, Unavailable, Sold out, Purchasable on Site (customer must buy at the venue), etc.
- Handicap seat – Marks accessible seating.
- Desirability – Heat-map value used by Best available when enabled in Settings. Hold Shift while adjusting to change delta for multiple selected seats.
Editor tools
↑ Back to top- Auto Increment – Pattern builder for labels or seat IDs (e.g. 1, 2, 3…).
- Auto-fill – Fill a grid area with seats quickly.
- Transform – Rotate, flip, and arc tools for selected objects.
- Lock / Snap to grid – Prevent accidental moves; align objects on a grid.
- Round corners – Slider for border radius on applicable elements.
- Round-shaped seats – Optional circular seat appearance.
- Z-index – Layer order for overlapping objects.
- Additional class name – Custom CSS class on objects for theme styling.
- Text direction – For text/object elements in RTL layouts.
- Background – Workflow settings (cogwheel): upload a background image for the front-end seat map frame.
Import and export layout (CSV)
↑ Back to topYou can export the current seat plan to CSV for backup or editing in a spreadsheet, and import a CSV to restore or migrate a layout. Multi-layout products export all workflows in one file (with workflowId and workflowName columns). Imports are validated for duplicate Seat IDs across workflows and a maximum of five layouts. Use this when cloning venues or maintaining layouts outside WordPress.
Save and return
↑ Back to topClick the back arrow to return to the product screen, then Update or Publish the product. Unsaved editor changes are stored in the product when you leave the editor according to the plugin save flow.
Summary
↑ Back to top- Use the editor for layout, per-seat price/status/groups, and desirability for Best available.
- Import/export CSV for backups; use General and Dates for product-wide rules.
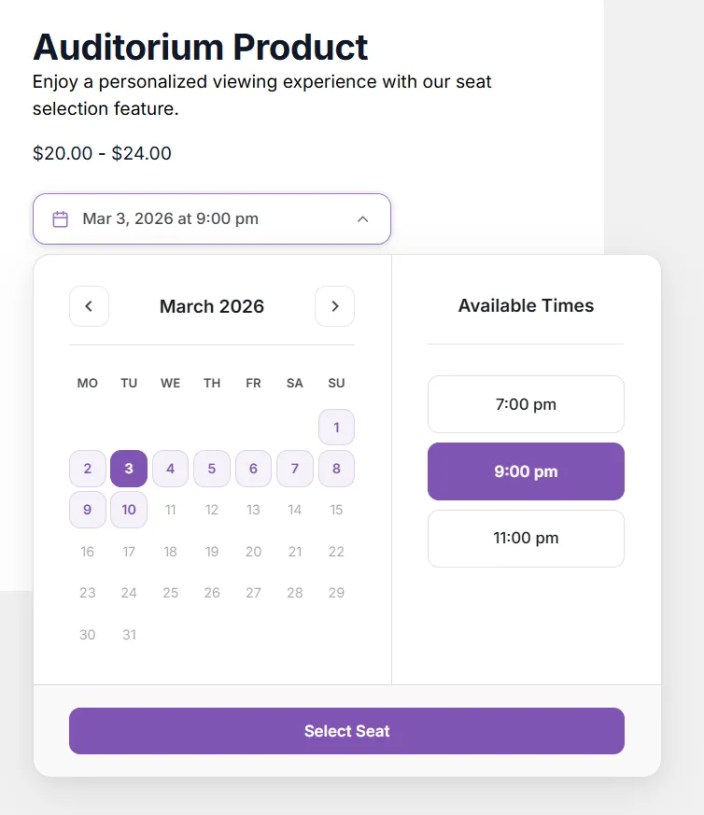
Adding Dates to a Product
↑ Back to topThe Dates tab lets you define when your event or show is available. Customers pick a date and time when selecting seats, and availability (e.g. sold-out seats) is tracked per date/time. If you leave dates empty, the product is treated as a single “no-dates” event.
Where to Add Dates
↑ Back to top- Edit a WooCommerce product of type Auditorium (Seat Planner product).
- In the product data tabs click the Dates tab.
- Use the options described below to set “Stop sales before the event” and to add date/time slots.
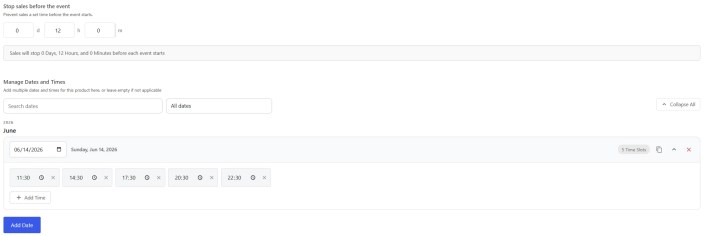
Stop Sales Before the Event
↑ Back to topAt the top of the Dates tab you can set Stop sales before the event. This prevents customers from buying tickets within a certain time before each event start (e.g. 2 hours, 1 day). The value is entered as days, hours, and minutes. Sales for a given date/time are blocked once that cutoff time has passed (based on server time).
- Set all three fields to 0 to allow sales right up until the event start (no cutoff).
- Example: 0 days, 2 hours, 0 minutes – sales stop 2 hours before each event’s start time.
Manage Dates and Times
↑ Back to topUse Add Date to create event slots. Each entry is a date with one or more times (e.g. one date with 10:00 and 14:00 for two showings that day).
- Add Date – Adds a new date card. The first date defaults to today; each new date defaults to the day after the last one, with a default time of 10:00.
- Date field – Use the date picker to set the event date. Past dates may be shown as expired in the admin; they are still stored and can be used for reporting or past bookings.
- Times – Each date card lists one or more times (e.g. 10:00, 14:00). Use the controls to add, edit, or remove times. Each combination of date + time (e.g. 2025-01-15 at 10:00) is one selectable “slot” for customers.
- Duplicate – Duplicates that date (and all its times) as a new card for the next day, so you can quickly build a run of dates.
- Remove – Removes that date and all its times.
Dates are stored as date-time strings (e.g. 2025-01-15T10:00). Duplicates are removed and the list is sorted when you save the product.
Filter dates in the admin
↑ Back to topWhen you have many date cards, use the list filters to find slots faster:
- Upcoming – Show future dates only.
- Expired – Show past dates.
- By month – Narrow the list to a specific month.
How Customers Use Dates
↑ Back to topOn the frontend:
- If the product has dates, customers choose a date and time (one of the slots you added) before or while selecting seats.
- Availability (taken/sold-out seats) is per date/time. A seat can be sold for one slot and still available for another.
- If the product has no dates, customers do not choose a date; the product behaves as a single event.
Summary
↑ Back to top- Open Product data → Dates.
- Optionally set Stop sales before the event (days, hours, minutes) so sales are blocked shortly before each event.
- Use Add Date to add dates, then add one or more times per date. Use Duplicate to copy a date to the next day.
- Save the product. Customers will see and select these date/time slots when booking seats.
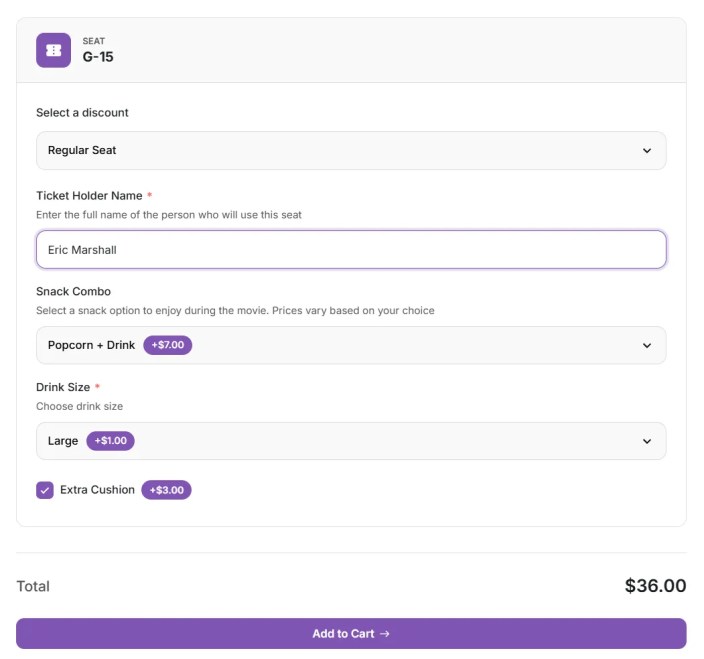
Adding Discounts
↑ Back to topDiscounts let you offer reduced prices on seats-either as a percentage off or a fixed amount. You can apply them to all seats or limit them by seat group and/or user role.
Where to Add Discounts
↑ Back to top- Edit a WooCommerce product of type Auditorium (Seat Planner product).
- Go to the product data tabs section and click the Discounts tab.
- Use Add Discount to create a new discount and configure it in the card that appears.
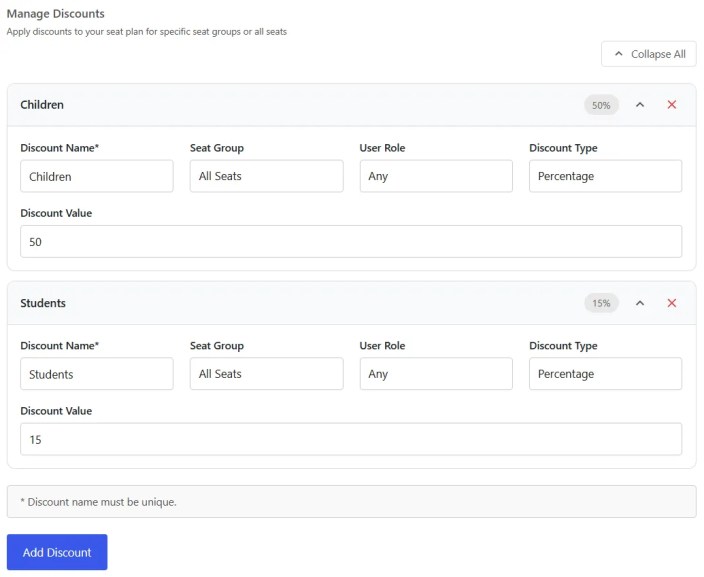
Discount Fields
↑ Back to topEach discount has the following options:
- Discount Name (required) – A unique label for this discount (e.g. “Children”, “Students”). Customers see this when choosing a discount for their seat.
- Seat Group – Leave as “All seats” to allow the discount on any seat, or choose a specific group so the discount is only available for seats in that group. Seat groups are defined on individual seats in the Seat Planner editor.
- User Role – Leave as “No role” to show the discount to everyone, or select a WordPress role (e.g. Customer, Subscriber) so only users with that role can use this discount.
- Discount Type – Percentage (e.g. 10% off) or Fixed (e.g. $5 off).
- Discount Value – The amount: a number between 0–100 for percentage, or a monetary value for fixed. The discount is applied to the base seat price; custom field surcharges are added after the discount.
Using Seat Groups with Discounts
↑ Back to topTo restrict a discount to certain seats:
- In the Seat Planner editor, assign a group to the relevant seats (each seat object can have a group name).
- Save the seat plan. The Discounts tab will list those group names in the “Seat Group” dropdown.
- When creating a discount, select that group so the discount is only offered for seats in that group. Customers will only see and can only apply that discount when selecting those seats.
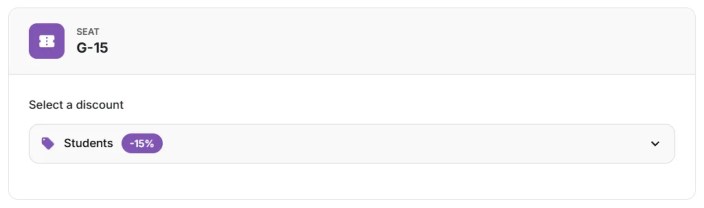
How Customers See Discounts
↑ Back to topOn the frontend, when a customer selects seats:
- If the product has discounts and the customer’s role (if required) and seat group (if set) match, they see a discount selector (e.g. “Select a discount”) for each seat or in the options area.
- They can choose one of the available discounts or “No discount”. The price updates according to the base seat price minus the chosen discount; custom field surcharges are then added.
- Discounts are validated at add-to-cart and in the Manager (e.g. when creating or editing orders). If a discount is not allowed for that seat or product, an error is shown.
Summary
↑ Back to top- Add discounts under Product data → Discounts.
- Set a unique name, type (percentage or fixed), and value.
- Optionally limit by Seat Group (assign groups to seats in the editor) and/or User Role.
- Customers choose an available discount when selecting seats; the final price is base price minus discount plus any custom field surcharges.
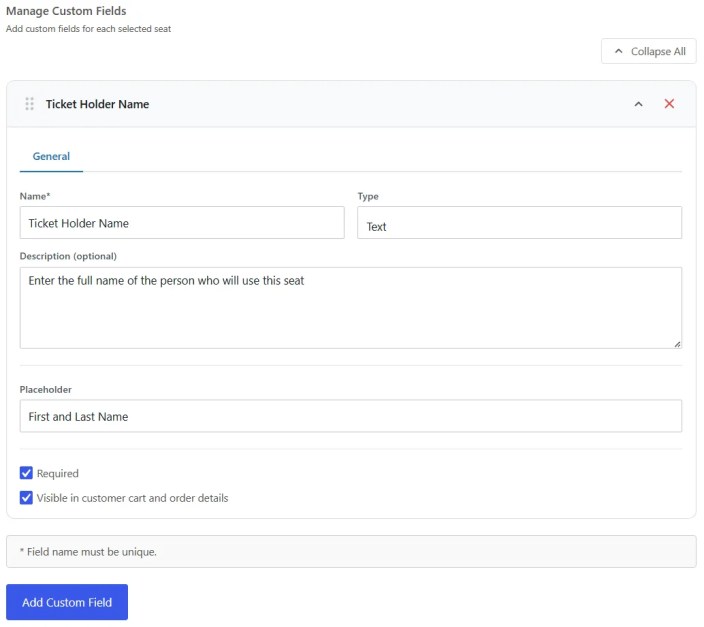
Custom Fields
↑ Back to topCustom fields let you collect extra information per seat (e.g. attendee name, dietary notes, add-ons). You can make fields required, show or hide them with display conditions, and add optional prices so that choices (e.g. a checkbox or select option) add a surcharge to the seat price. The surcharge is applied after the base seat price and any discount.
Where to Add Custom Fields
↑ Back to top- Edit a WooCommerce product of type Auditorium (Seat Planner product).
- In the product data tab click the Custom Fields tab.
- Use Add Custom Field to create a field and configure it in the card that appears. You can reorder fields by dragging the handle.
Note: Field labels should be unique (case-insensitive). The admin may warn if two fields share the same label.
Field Types
↑ Back to top- Text – Single-line text input. Optional placeholder.
- Textarea – Multi-line text input. Optional placeholder.
- Checkbox – Yes/no switch. You can set a label for the checked state (e.g. “Yes”) and an optional price; if set, checking the box adds that amount to the seat price.
- Select – Dropdown with predefined options. Each option has a label and an optional price; the selected option’s price (if any) is added to the seat price.
- Number – Numeric input. Optional min/max, placeholder, and optional price per unit; the surcharge is (price × value), e.g. “€2 per item” with value 3 adds €6.
- Meta – Read-only name-value pair. You set a fixed value in the admin; the customer does not edit it. The value is attached to the order (e.g. “Event” = “Summer Concert”). Meta fields are not shown in the seat form and are not included when you filter by “editable” fields.
- Info – Display-only text: label and description. No value is stored. Useful for instructions or notes; you can control visibility with display conditions.
Common Options (per field)
↑ Back to top- Label – Shown next to the input in the seat details form. Should be unique.
- Description – Optional helper text shown under the label on the front-end.
- Required – When enabled, the customer must fill this field (for editable types) before adding the seat to the cart.
- Visible – When enabled, this field’s label and value are shown in the cart and order details on the front-end. When disabled, the value is still stored but not displayed there.
Display Conditions
↑ Back to topFor field types other than Meta, you can add display conditions. The field is only shown to the customer when all conditions are met. For example:
- Show “Dietary requirements” only when “Vegetarian option” (checkbox) is checked.
- Show a message (info field) only when a select field has a specific option selected.
- Show a number field only when another number field is greater than 0.
Conditions can be based on: checkbox (checked/not checked), select (selected option), text/textarea (filled/empty), or number (equals, not equals, greater than, less than).
Mutual Exclusivity
↑ Back to topYou can mark a field as mutually exclusive with one or more other fields (by their UID). If the customer gives this field a value, the other specified fields are hidden. Useful when only one of several options should be chosen (e.g. “Option A” vs “Option B”).
How Customers See Custom Fields
↑ Back to top- When selecting seats, the seat details form shows all applicable editable custom fields (text, textarea, checkbox, select, number). Meta and info fields are handled as described above.
- Fields that have display conditions appear only when those conditions are satisfied. Mutually exclusive fields are hidden when another field in the group has a value.
- Values are saved with the cart item and the order. Any price set on checkbox, select options, or number (per unit) is added to the seat price after the base price and discount.
Summary
↑ Back to top- Add and manage fields under Product data → Custom Fields. Use unique labels and drag to reorder.
- Use Text, Textarea, Checkbox, Select, or Number for customer input; optionally set Required, Visible, and prices (checkbox/select/number) for surcharges.
- Use Meta for fixed key-value data on the order; use Info for display-only text.
- Use Display conditions and Mutual exclusivity to show or hide fields based on other fields’ values.
In-Cart Seats
↑ Back to topThe In-Cart Seats tab lists seats currently held in customer carts (reserved during checkout). Use it when seats look “stuck” as unavailable but no completed order exists.
Where to Find It
↑ Back to top- Edit an Auditorium Product.
- In Product data, open the In-Cart Seats tab.
What You See
↑ Back to topFor each reservation you typically see the seat ID, date/time (if applicable), and how long the hold may last. Reservations expire automatically after the Seat reservation time set in Settings → General if checkout is not completed.
Force release
↑ Back to topIf a seat remains reserved longer than expected (for example after a failed payment or abandoned cart), you can force-release reserved seats from this tab so they become selectable again on the front end.
Before releasing, check Tools → Booking Integrity for ghost or stalled orders if the same seat still appears wrong after release.
Summary
↑ Back to top- In-Cart Seats shows active cart reservations for this product.
- Reservations clear automatically when the cart timer expires; use force-release only when you need to free seats immediately.
Export Bookings
↑ Back to topThe Export Bookings tab lets you download the product’s bookings as a CSV file. You choose which columns to include and, for products with dates, optionally filter by event date. Only orders with status Completed are included in the export.
Where to Find It
↑ Back to top- Edit a WooCommerce product of type Auditorium (Seat Planner product).
- In the product data tabs, click the Export Bookings tab.
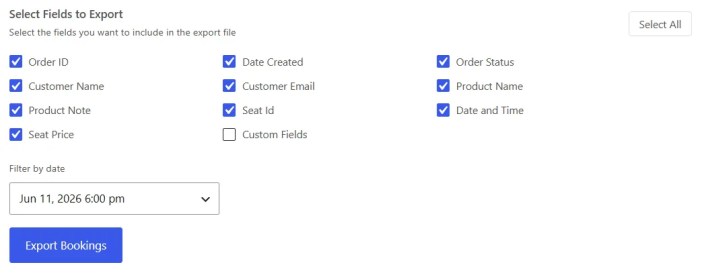
Select Fields to Export
↑ Back to topUse the checkboxes to choose which columns appear in the CSV. You can Select all or Deselect all. At least one field must be selected before exporting.
Available fields:
- Order ID – WooCommerce order ID.
- Date created – When the order was placed.
- Order status – Order status label (export only includes completed orders).
- Customer name – Billing first and last name.
- Customer email – Billing email.
- Product name – Name of the Auditorium product.
- Product note – Purchase note set on the product.
- Seat ID – Seat identifier from the seat plan.
- Date/Time – Event date and time for the seat (for dated products).
- Seat price – Line total for that seat in the order.
- Custom fields – When selected, one column is added per custom field that has values in the exported data (e.g. “Attendee name”, “Dietary requirements”).
Filter by Date
↑ Back to topIf the product has dates configured (in the Dates tab), a Filter by date dropdown appears. You can leave it as All dates to export every booking for this product, or pick a specific date/time to export only bookings for that event slot.
If the product has no dates, the date filter is hidden and the export includes all completed bookings for the product.
How to Export
↑ Back to top- Select one or more fields to include.
- Optionally choose a date in Filter by date (if the product has dates).
- Click Export Bookings. The list of bookings is loaded, then a CSV file is generated and downloaded. The file name includes today’s date and, when a date filter is used, the selected event date.
If there are no bookings for the product (or for the selected date), you’ll see a message and no file will be downloaded. The export uses the same data as the completed orders for this product; only Completed orders are included.
Summary
↑ Back to top- Open Product data → Export Bookings.
- Select the columns you want (order, customer, product, seat, date/time, seat price, custom fields).
- Optionally filter by event date if the product has dates.
- Click Export Bookings to download a CSV. Only completed orders are included.
Settings
↑ Back to topThe Settings page configures global Seat Planner behavior: reservations, cart redirects, Best available, QR/PDF, reports, colors, and Android app access. Click Save settings at the bottom after changes.
Where to Find It
↑ Back to topSeat Planner → Settings in the admin sidebar.
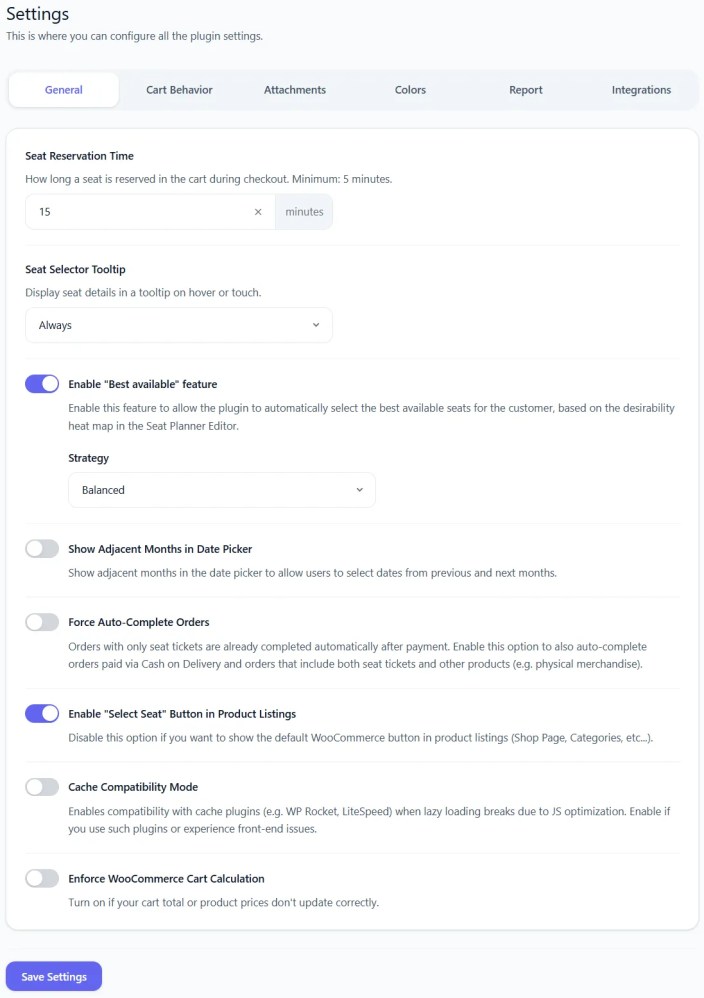
General
↑ Back to top- Seat reservation time – Minutes a seat stays reserved in the cart during checkout (minimum 5; default 15).
- Seat selector tooltip – When to show the seat tooltip: Disabled, Desktop only, Mobile only, or Always.
- Enable “Best available” feature – Lets customers use Best available on the front end to auto-pick seats using the desirability heat map from the editor.
- Strategy (when Best available is on) – Quality first (conservative), Balanced, or Together first (aggressive). Customers can also filter by price range when seats have different prices.
- Force Auto-Complete Orders – Orders that contain only auditorium seat tickets already move to Completed after payment. Enable this to also auto-complete orders paid via Cash on Delivery and mixed orders (seats plus other products, e.g. merchandise).
- Enable “Select seat” button in product loop – Show the button on shop/archive pages, not only the single product page.
- Show adjacent months in date picker – Show previous/next month in the front-end date picker for dated products.
- Compatibility mode – Enable if cache or JS optimization plugins (WP Rocket, LiteSpeed, etc.) break the seat selector.
- Compatibility calc totals – Recalculate cart totals when the cart loads from session; use if totals are wrong with some themes.
Cart Behavior
↑ Back to top- Redirect customers after successful addition – After adding seats: Disabled, Redirect to Cart, Redirect to Checkout, or Redirect to Custom Page.
- Custom Redirect URL – Full URL when using custom redirect (e.g. a thank-you or upsell page).
- Show redirect message – Inform customers they are being redirected.
- Custom Redirect Message Text – Optional override of the default message.
- Enable cart timer – Countdown in the cart for each reserved seat.
Attachments
↑ Back to top- Enable QR code – Include QR codes in order emails (disable to hide QR on tickets).
- Enable PDF attachments – Attach PDF tickets (with QR when enabled) to order emails.
- Enable PDF in My Account downloads – Let customers download tickets under My Account.
- PDF filename – Custom download name without
.pdf; blank uses default.
Colors
↑ Back to top- Accent color – Buttons, links, date picker, and cart timer on the front end.
- Front-end appearance – Dark Mode applies a dark theme to the date/time picker, seat selector fields, and cart timer.
Report
↑ Back to top- Enable report – Email when a product is fully booked or past its cut-off.
- Report e-mail – Recipient; empty uses the site admin email.
- Check interval – Every 15 minutes, Hourly, Twice daily, or Daily.
- Fields to include – Columns for the report body and optional CSV.
- Include CSV attachment – Attach booking CSV to the email.
- Include Seat Map Image (Beta) – Attach a color-coded PNG snapshot of the layout (booked, available, blocked). Beta: may not match the editor pixel-perfect.
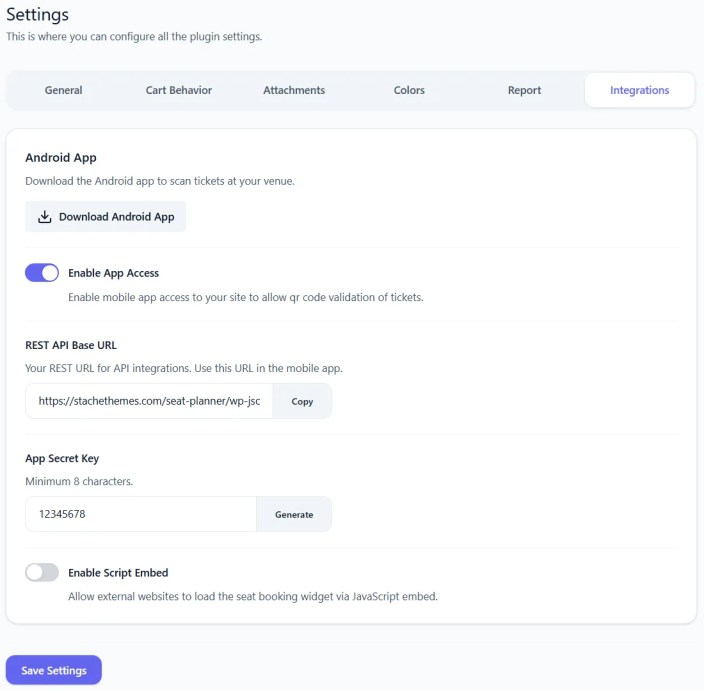
Integrations
↑ Back to topThe Integrations tab includes the Android scanner app and script embed.
Android app
- Android app – Download link for on-site scanning.
- Enable app access – Allow the app to validate tickets via your REST API.
- REST API base URL – Copy into the app.
- App secret key – Generate (min. 8 characters) and enter in the app.
For script embed on external sites, see the dedicated Script Embed guide (canonical setup steps).
Summary
↑ Back to top- Settings cover reservations, Best available, auto-complete, redirects (including custom URL), QR/PDF, dark mode, reports (with optional seat map image), and Android app access.
- Embed setup: Script Embed.
Script Embed
↑ Back to topScript embed lets customers select seats on an external website (partner site, landing page) while checkout still completes on your WooCommerce store.
Where to Configure It
↑ Back to topSeat Planner → Settings → Integrations tab. Enable embed, set allowed origins, and copy the generated script and placeholder HTML.
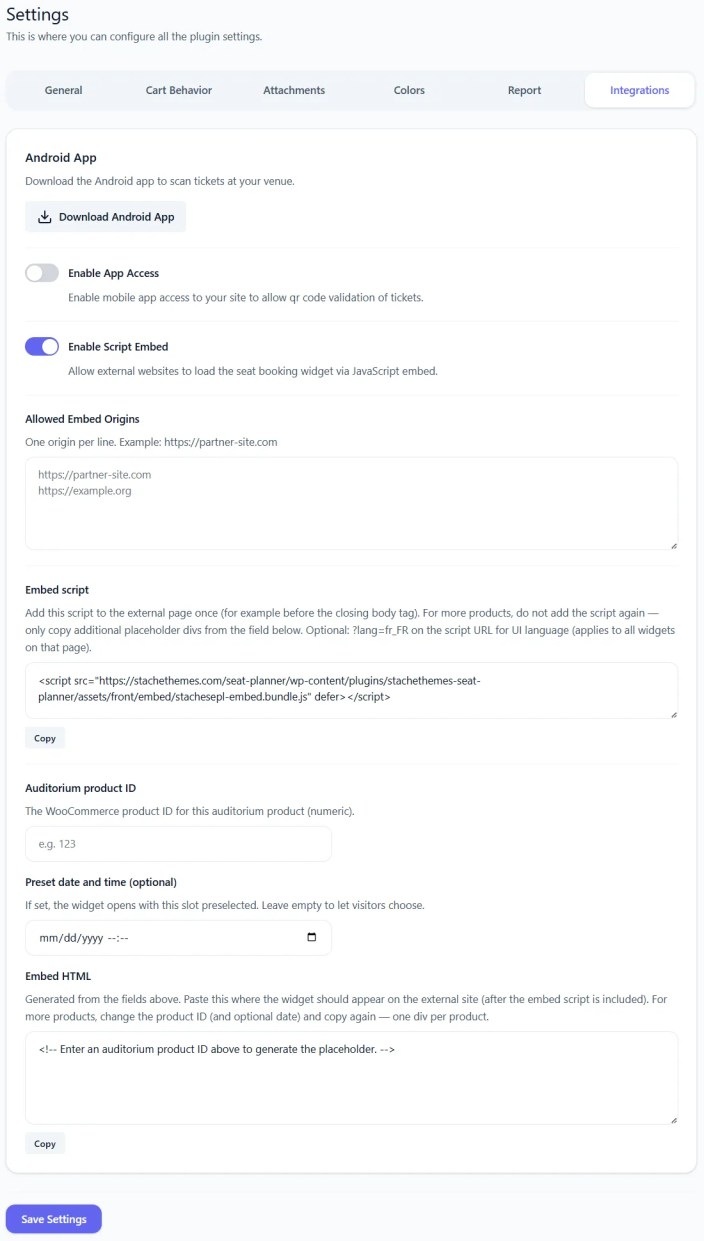
Step-by-step setup
↑ Back to top- Enable Script Embed and click Save settings.
- Under Allowed Embed Origins, add one full origin per line (scheme + host), for example
https://partner-site.com. Only listed origins may load the widget; this is required for security. - Copy the Embed script snippet and paste it once in the partner page
<head>or before</body>. Add?lang=fr_FRto the script URL if you need a fixed locale for all placeholders on that page. - For each auditorium product, enter the Auditorium product ID and optional Preset date and time, then copy the generated Embed HTML (
<div>placeholder) into the partner page where the widget should appear. One script can power multiple placeholders. - On the partner site, the customer selects seats in the embedded widget, then is redirected to your store to complete payment; the cart is updated on your WordPress site.
Android app (same tab)
↑ Back to topThe Integrations tab also configures the Android ticket scanner: download link, Enable app access, REST API base URL, and App secret key (minimum 8 characters; use Generate then enter the key in the app). See also Scanner.
Summary
↑ Back to top- Whitelist partner origins, paste one embed script, add per-product placeholder divs.
- Checkout always happens on your WooCommerce site after seat selection.
- Global reservation, PDF, and cart settings still apply from Settings.
Manager
↑ Back to topThe Manager is your control room for auditorium products: availability per date, overrides, manual orders, analytics, and exports. Open it from Seat Planner → Manager.
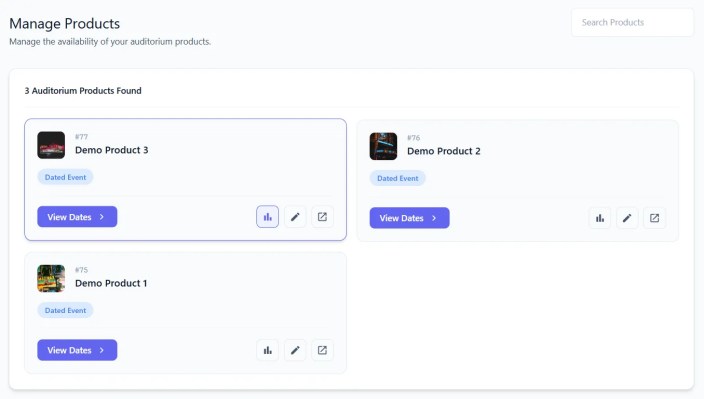
Flow
↑ Back to top- Product listing – Search and select an auditorium product.
- Dates and times – For dated products, pick a slot or open product-wide views.
- Availability or Statistics – Manage seats or view analytics.
Availability
↑ Back to topThe seat map shows sold, available, and overridden seats for the selected product and date.
- Edit seat – Click a seat to change status override, linked order, discount, or custom fields. Status override takes precedence over default product settings.
- Scanned filter – Use the Scanned toggle to show only seats whose QR ticket was checked in.
- Unscan ticket – On the edit-seat screen, view scan details and clear scan status if a ticket was scanned by mistake.
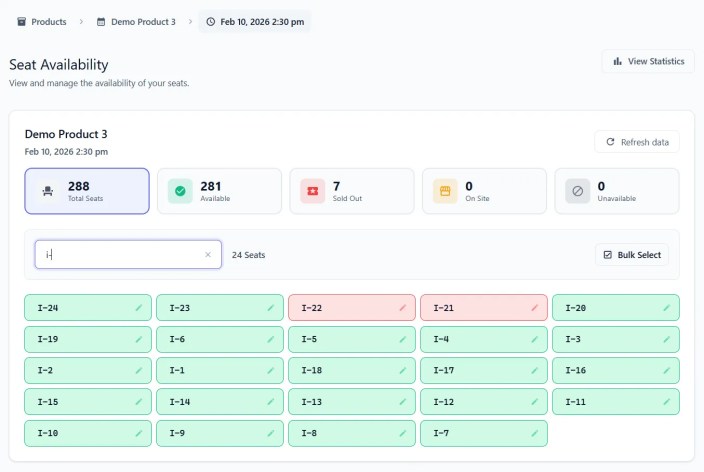
Bulk actions
↑ Back to topSelect multiple seats on the availability map, then choose a bulk action:
- Set status to – Apply a status override to selected seats (seats with existing orders may be skipped).
- Create Order – Create one WooCommerce order for multiple selected seats: enter customer details, per-seat discounts, and custom fields, then confirm.
- Move to Date (multi-date products only) – Move bookings and status overrides to another date/time. Optionally re-send order notifications to customers.
Statistics
↑ Back to topFrom the product’s dates screen, open Statistics for analytics (optionally per event date):
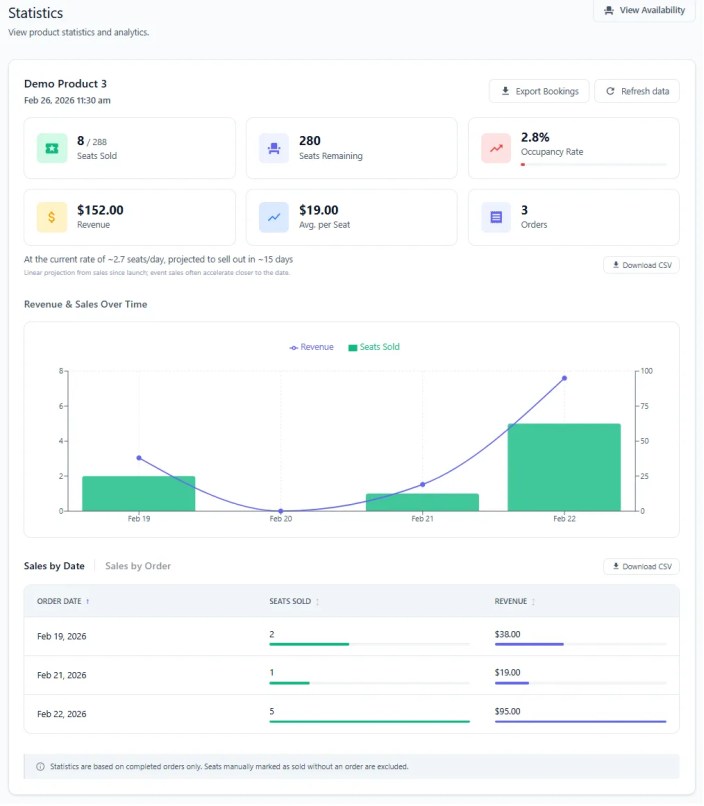
- Summary cards – Seats sold, occupancy, revenue, order count.
- Charts – Revenue and sales over time (by event date or order date).
- Tables – Sales by order and by date with CSV export.
- Velocity projection – Projected sales based on recent trends.
- Seat status breakdown – Distribution of available, sold, and other states.
For a simple CSV of completed bookings from the product edit screen, use Export Bookings on the product. Manager statistics adds dashboards and filters for ongoing operations.
Summary
↑ Back to top- Manager: products → dates → Availability (edit, scan filter, bulk actions) or Statistics (reports and CSV).
- Use with Tools for integrity checks and Scanner for door check-in.
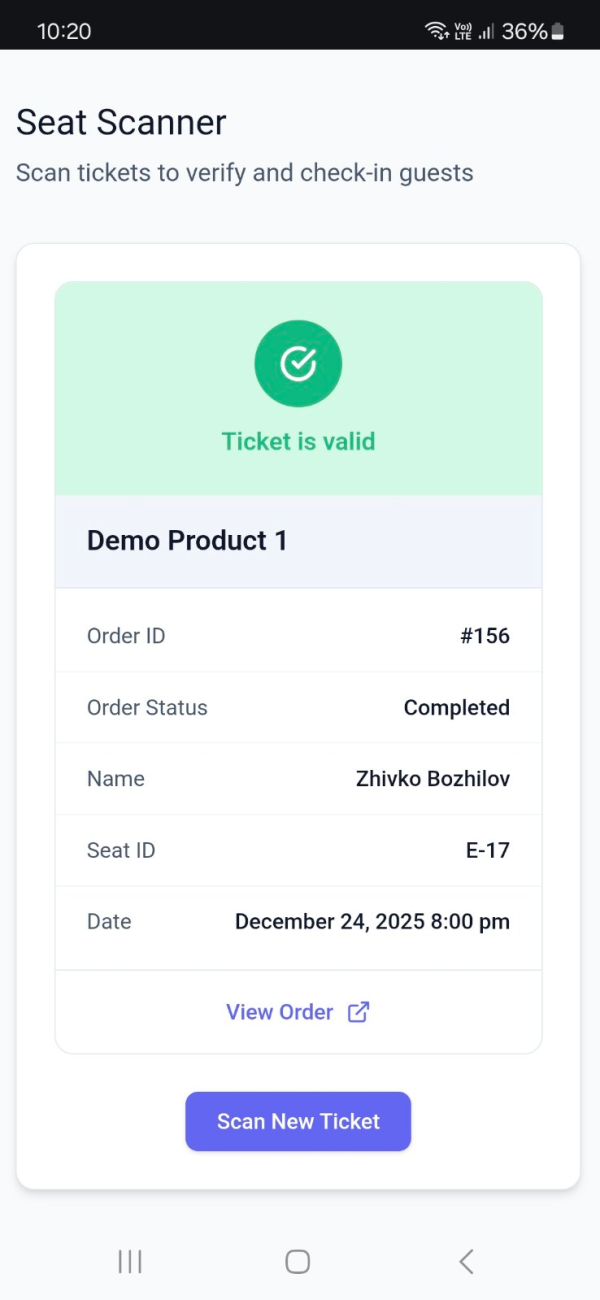
Scanner
↑ Back to topThe Scanner validates QR codes from Seat Planner tickets (email PDF or on-screen) and records check-in at your venue.
Where to Find It
↑ Back to topSeat Planner → Scanner. Also available from Overview → Ticket Scanner.
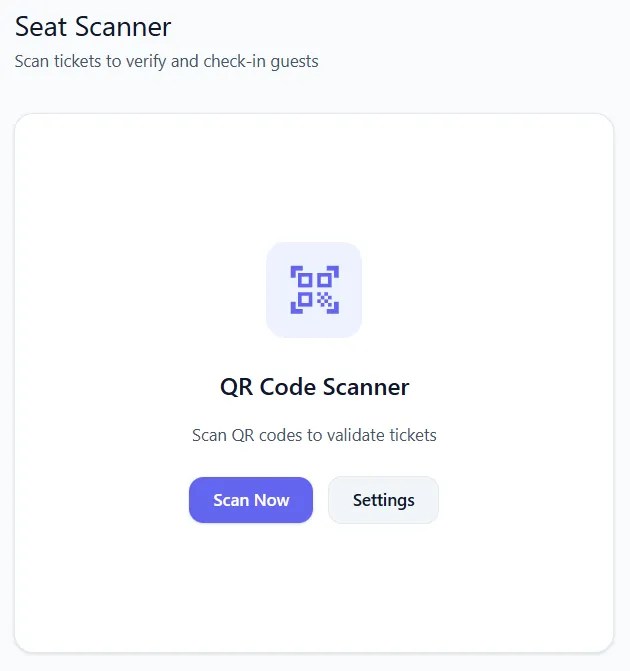
How to scan
↑ Back to top- Click to open the scanner (camera modal).
- If prompted, choose a camera device (useful on laptops with multiple cameras or when the wrong camera is selected). An automatic option picks the best available camera.
- Allow browser camera permission.
- Point at the ticket QR code. On success you see order and seat details; on failure you see an error (invalid code, wrong site, already scanned, etc.).
- Close the modal and scan the next guest.
Admin scanner vs Android app
↑ Back to top- Browser Scanner (this page) – Quick check-in from a laptop or tablet with a camera; no app install.
- Android app – Better for staff at the door on phones. Download from Settings → Integrations, enable app access, and set the secret key. Same QR codes as PDF/email tickets.
To clear a mistaken scan, use Manager → Availability → edit seat → Unscan Ticket.
Requirements
↑ Back to top- QR codes must be generated by Seat Planner (order email or PDF).
- HTTPS is recommended so browsers allow camera access.
Summary
↑ Back to top- Scanner: open camera, select device if needed, scan QR, view result.
- For high-volume entry, prefer the Android app configured in Settings.
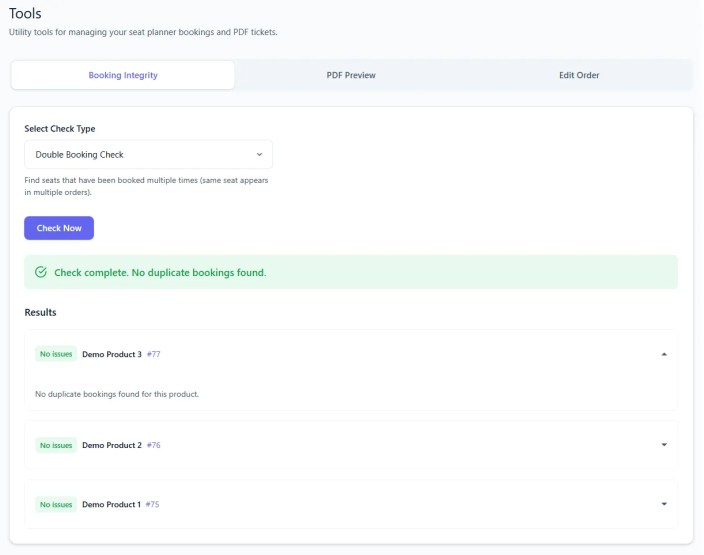
Tools
↑ Back to topThe Tools page provides utility tools for managing bookings and tickets: check for double bookings, ghost bookings, or stalled orders; preview PDF tickets; and edit order item data (seat, date, discount, custom fields) for existing orders.
Where to Find It
↑ Back to topSeat Planner → Tools in the admin sidebar. You can also open it from the Overview quick action “Tools”.
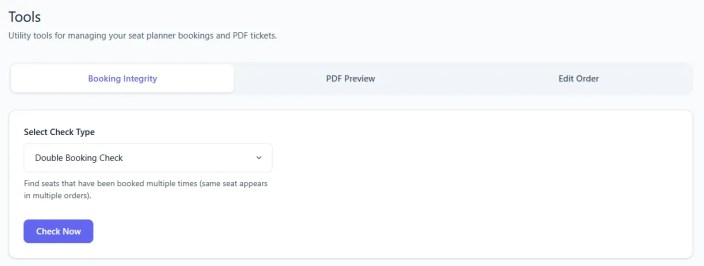
Booking Integrity
↑ Back to topRuns checks across your auditorium products to find:
- Double booking – The same seat (and date, for dated products) appearing in more than one order. This can indicate a data or process issue.
- Ghost booking – A seat marked as taken in product meta but with no matching order item (e.g. after a failed or partial cleanup). The tool can often fix these by syncing meta with actual orders.
- Stalled orders – Pending or failed orders that still hold seats and match the same “safe to auto-cancel” profile the plugin uses during checkout conflict resolution (for example: no payment markers and no active reservation lock). The check is read-only: it lists matching orders and seats so you can review or cancel them in WooCommerce; it does not cancel or change orders by itself.
Select the check type (double booking, ghost booking, or stalled orders), run the check, and review the results per product. For ghost bookings you may be able to fix issues from the results screen. Re-run after fixes to confirm.
PDF Preview
↑ Back to topPreview how the PDF ticket (attached to order emails) will look. You typically select a product and optionally an order or sample data so the PDF is rendered with realistic content (seat, date, QR placeholder, etc.). Useful to verify layout and text before sending to customers.
Edit Order
↑ Back to topFind an order by ID (or number) and open its seat planner line items. For each seat line item you can edit:
- Seat (change to another seat ID if the product allows it).
- Date/time (for dated products).
- Discount.
- Custom field values.
Changes update the order and item meta. Use this to correct mistakes (wrong seat, wrong date, wrong custom field) without deleting and re-creating the order. Validate that the new seat/date/discount are valid for the product.
Summary
↑ Back to top- Tools: Booking Integrity (double booking, ghost booking, and stalled-orders checks; optional fix for ghost bookings only), PDF Preview (preview ticket PDF), and Edit Order (edit seat, date, discount, custom fields on existing order items).
Shortcodes
↑ Back to topThe plugin provides two shortcodes: one to output the “Select seat” / add-to-cart button for an auditorium product, and one to display a count of seats (e.g. available or sold) for given product(s).
If you use Elementor, the same options are available as widgets – see Elementor.
Select seat / Add to cart button
↑ Back to topRenders the Select seat button for a specific auditorium product. Clicking it opens the seat selector (and date picker if the product has dates). Use it on a custom page or post when you don’t want to use the single product template.
Shortcode: [stachesepl_add_to_cart]
Parameters:
- product_id (required) – The WooCommerce product ID of the auditorium product. You can use
pas a shorthand. - date (optional) – For products with dates: the event date/time in
YYYY-MM-DDTHH:mmformat (e.g.2026-12-31T10:00). Shorthand:d. Omit to let the customer choose the date. - class (optional) – Extra CSS class(es) on the container. Shorthand:
c.
Examples:
[stachesepl_add_to_cart product_id=123]
[stachesepl_add_to_cart product_id=123 date=2026-12-31T10:00]
[stachesepl_add_to_cart p=123 d=2026-12-31T10:00 class=my-button]
If product_id is missing or invalid, or the product is not an auditorium product, the shortcode outputs nothing.
Seat count
↑ Back to topOutputs the number of seats that match the given product(s), date(s), and status. Useful for text like “42 seats available” or “10 sold”. The result is wrapped in a span, div, or p with the class stachesepl-count (plus any custom class you set).
Shortcode: [stachesepl_count]
Parameters:
- product_id – One product ID or comma-separated list (e.g.
123or123,456). Shorthand:p. - date – Event date(s) in
YYYY-MM-DDTHH:mmformat. Comma-separated for multiple dates. Empty: for dated products the first available date is used; for no-dates products leave empty. Shorthand:d. - status – Which seat statuses to count. Comma-separated. Values:
available,unavailable,sold-out,on-site. Default:available,on-site. Shorthand:s. - class – Extra CSS class(es) on the wrapper. Shorthand:
c. - wrapper – HTML wrapper:
span,div, orp. Default:span. Shorthand:w.
Examples:
[stachesepl_count product_id=123]
[stachesepl_count product_id=123,456]
[stachesepl_count p=123]
[stachesepl_count product_id=123 status=available date=2026-03-15T19:00]
[stachesepl_count p=123,456 s=sold-out d=2026-03-15T19:00,2026-03-16T19:00] [stachesepl_count product_id=123 wrapper=div class=seat-total]
Only auditorium products are included. Seats are counted from the seat plan data for the given product(s) and date(s); status is the seat’s current state (e.g. from orders or manager overrides).
Summary
↑ Back to top- stachesepl_add_to_cart – Show the Select seat button;
product_idrequired; optionaldate(YYYY-MM-DDTHH:mm) andclass. Invalid or non-auditorium IDs output nothing. - stachesepl_count – Display a seat count; optional
date,status,class, andwrapper. - Page builders: Elementor widgets wrap the same behavior.
Elementor
↑ Back to topIf you use Elementor, Seat Planner provides two widgets under the Stachethemes Seat Planner category in the widget panel.
Requirements
↑ Back to top- Elementor (or Elementor Pro) active on your site.
- Stachethemes Seat Planner plugin active.
- At least one published Auditorium Product.
Select Seat Button
↑ Back to topEmbeds the same flow as the [stachesepl_add_to_cart] shortcode: a Select seat button that opens the seat selector (and date picker when the product has dates).
Widget controls:
- Auditorium product (required) – Choose a published auditorium product.
- Event date (optional) – Preset date/time; leave empty so the customer chooses.
- CSS class (optional) – Extra class on the button wrapper.
Equivalent shortcode example: [stachesepl_add_to_cart product_id=123]. See Shortcodes.
Seat Count
↑ Back to topDisplays a number of seats matching the selected product(s), optional date, and status filter – same logic as [stachesepl_count].
Widget controls:
- Auditorium product(s) (required) – One or more products.
- Event date (optional) – For dated products; empty uses the first available date.
- Seat status – Which statuses to count (e.g. Available, Sold out). Default includes available and on-site.
- CSS class and HTML wrapper (span, div, or p) – For styling.
How to add a widget
↑ Back to top- Edit a page with Elementor.
- Search for Stachethemes or Seat Planner in the widget list.
- Drag Select Seat Button or Seat Count onto the page.
- Select the product and options, then update the page.
Summary
↑ Back to top- Elementor widgets mirror shortcode behavior; use whichever fits your page builder workflow.
- Invalid or missing product IDs render nothing on the live site (preview may show a placeholder in the editor).
WooCommerce Coupons (Seat Limits)
↑ Back to topStandard WooCommerce coupons can be extended with auditorium seat limits: the coupon applies only when the cart contains a minimum and/or maximum number of auditorium seats.
Where to Find It
↑ Back to top- Go to Marketing → Coupons (or WooCommerce → Coupons, depending on your WooCommerce version).
- Create or edit a coupon.
- Open the Usage restriction tab.
- Find the Auditorium Product Options section.
Options
↑ Back to top- Minimum seats required – Coupon is valid only if the cart has at least this many auditorium seat line items. Leave empty or 0 for no minimum.
- Maximum seats allowed – Coupon is valid only if the cart has at most this many auditorium seats. Leave empty or 0 for no maximum.
Only seats sold as Auditorium Product line items count toward these limits (not unrelated products in a mixed cart).
Example
↑ Back to topA “Group of 4” coupon might set Minimum seats required to 4 so it applies only when four or more seats are in the cart. A “Single seat promo” might set Maximum seats allowed to 1.
Relation to product discounts
↑ Back to topProduct discounts (on the auditorium product’s Discounts tab) apply per seat during selection. WooCommerce coupons apply at cart/checkout and can be combined with your store’s other coupon rules, subject to WooCommerce validation.
Summary
↑ Back to top- Configure min/max auditorium seats on the coupon Usage restriction tab.
- Useful for group offers, single-ticket promos, and cart-level campaigns.
Questions and support
↑ Back to topSomething missing from this documentation? Still have questions and need assistance?
- If you have a question about a specific extension or theme you’d like to purchase, contact us to get answers.
- If you already purchased this product and need some assistance, get in touch with a Happiness Engineer via our support page and select this product’s name from the Product dropdown.