StockTrack allows your WooCommerce store to manage inventory by warehouse and location. You can assign stock to specific locations, track stock movements, visualize your warehouse, and fulfill orders from the correct location — while keeping WooCommerce’s native stock totals accurate.
Read vendor documentation here…
Installation
↑ Back to topTo start using StockTrack from WooCommerce.com:
- Go to My Subscriptions in your WooCommerce.com account.
- Find StockTrack and click Add to store.
- Follow the on-screen instructions.
- The plugin will be installed and activated automatically.
More details:
Managing WooCommerce.com subscriptions
Setup and Configuration
↑ Back to topSettings
↑ Back to topGo to WooCommerce > Settings > StockTrack.
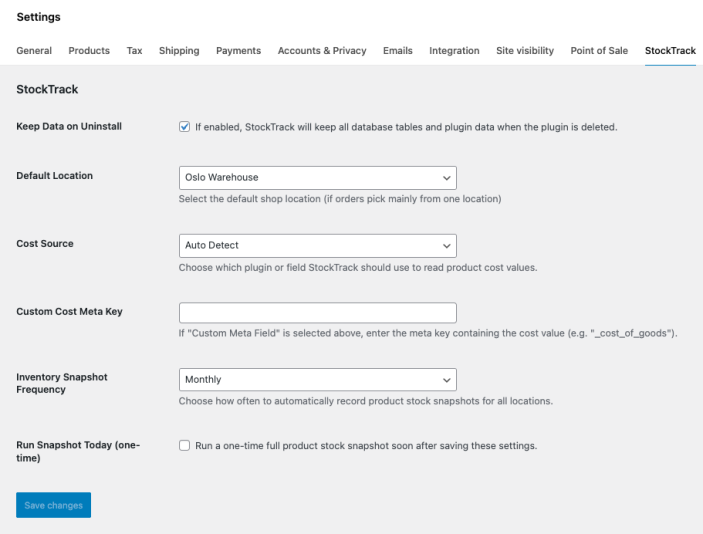
Available Options
- Keep Data on Uninstall
If enabled the data will be in the database (in case you want to install it again) - Default Location
Used as the default fulfillment location when editing orders. - Cost Source (COGS)
Select how product cost is detected or specify a custom meta key. - Inventory Snapshot Frequency
Enable daily, weekly or monthly snapshots. - Run Snapshot Today
Manually trigger a snapshot as a background task.
Save changes after updating settings.
Getting started
↑ Back to topFirst-Time Setup (Recommended Workflow)
After activation, follow these steps to get started quickly.
Step 1: Create Warehouses and Locations
- Go to WooCommerce > StockTrack > Locations.
- Create a parent location (for example, a warehouse).
- Optionally generate sub-locations such as areas, rows, or shelves.
- Save your locations.
You can edit or delete locations at any time.
Step 2: Assign Products to Locations
- Go to WooCommerce > StockTrack > Local Stock.
- Select the warehouse you want to work with.
- Assign a location to products (can be done in bulk).
- Set or adjust local stock values if needed.
At this point, local stock may be empty if products previously only used WooCommerce stock.
Step 3: Claim Existing WooCommerce Stock
If products already have WooCommerce stock:
- In the Local Stock screen, locate products with unassigned stock.
- Use the Claim from WooCommerce stock option.
- Stock will be moved into the selected location.
This ensures local stock and WooCommerce totals are synchronized correctly.
Usage
↑ Back to topLocal Stock (Tab)
↑ Back to topThe Local Stock tab is where you assign products to locations and manage stock per warehouse.
This is the main working area in StockTrack and the place you will use most often in daily operations.
You can find it under:
WooCommerce → StockTrack → Local Stock
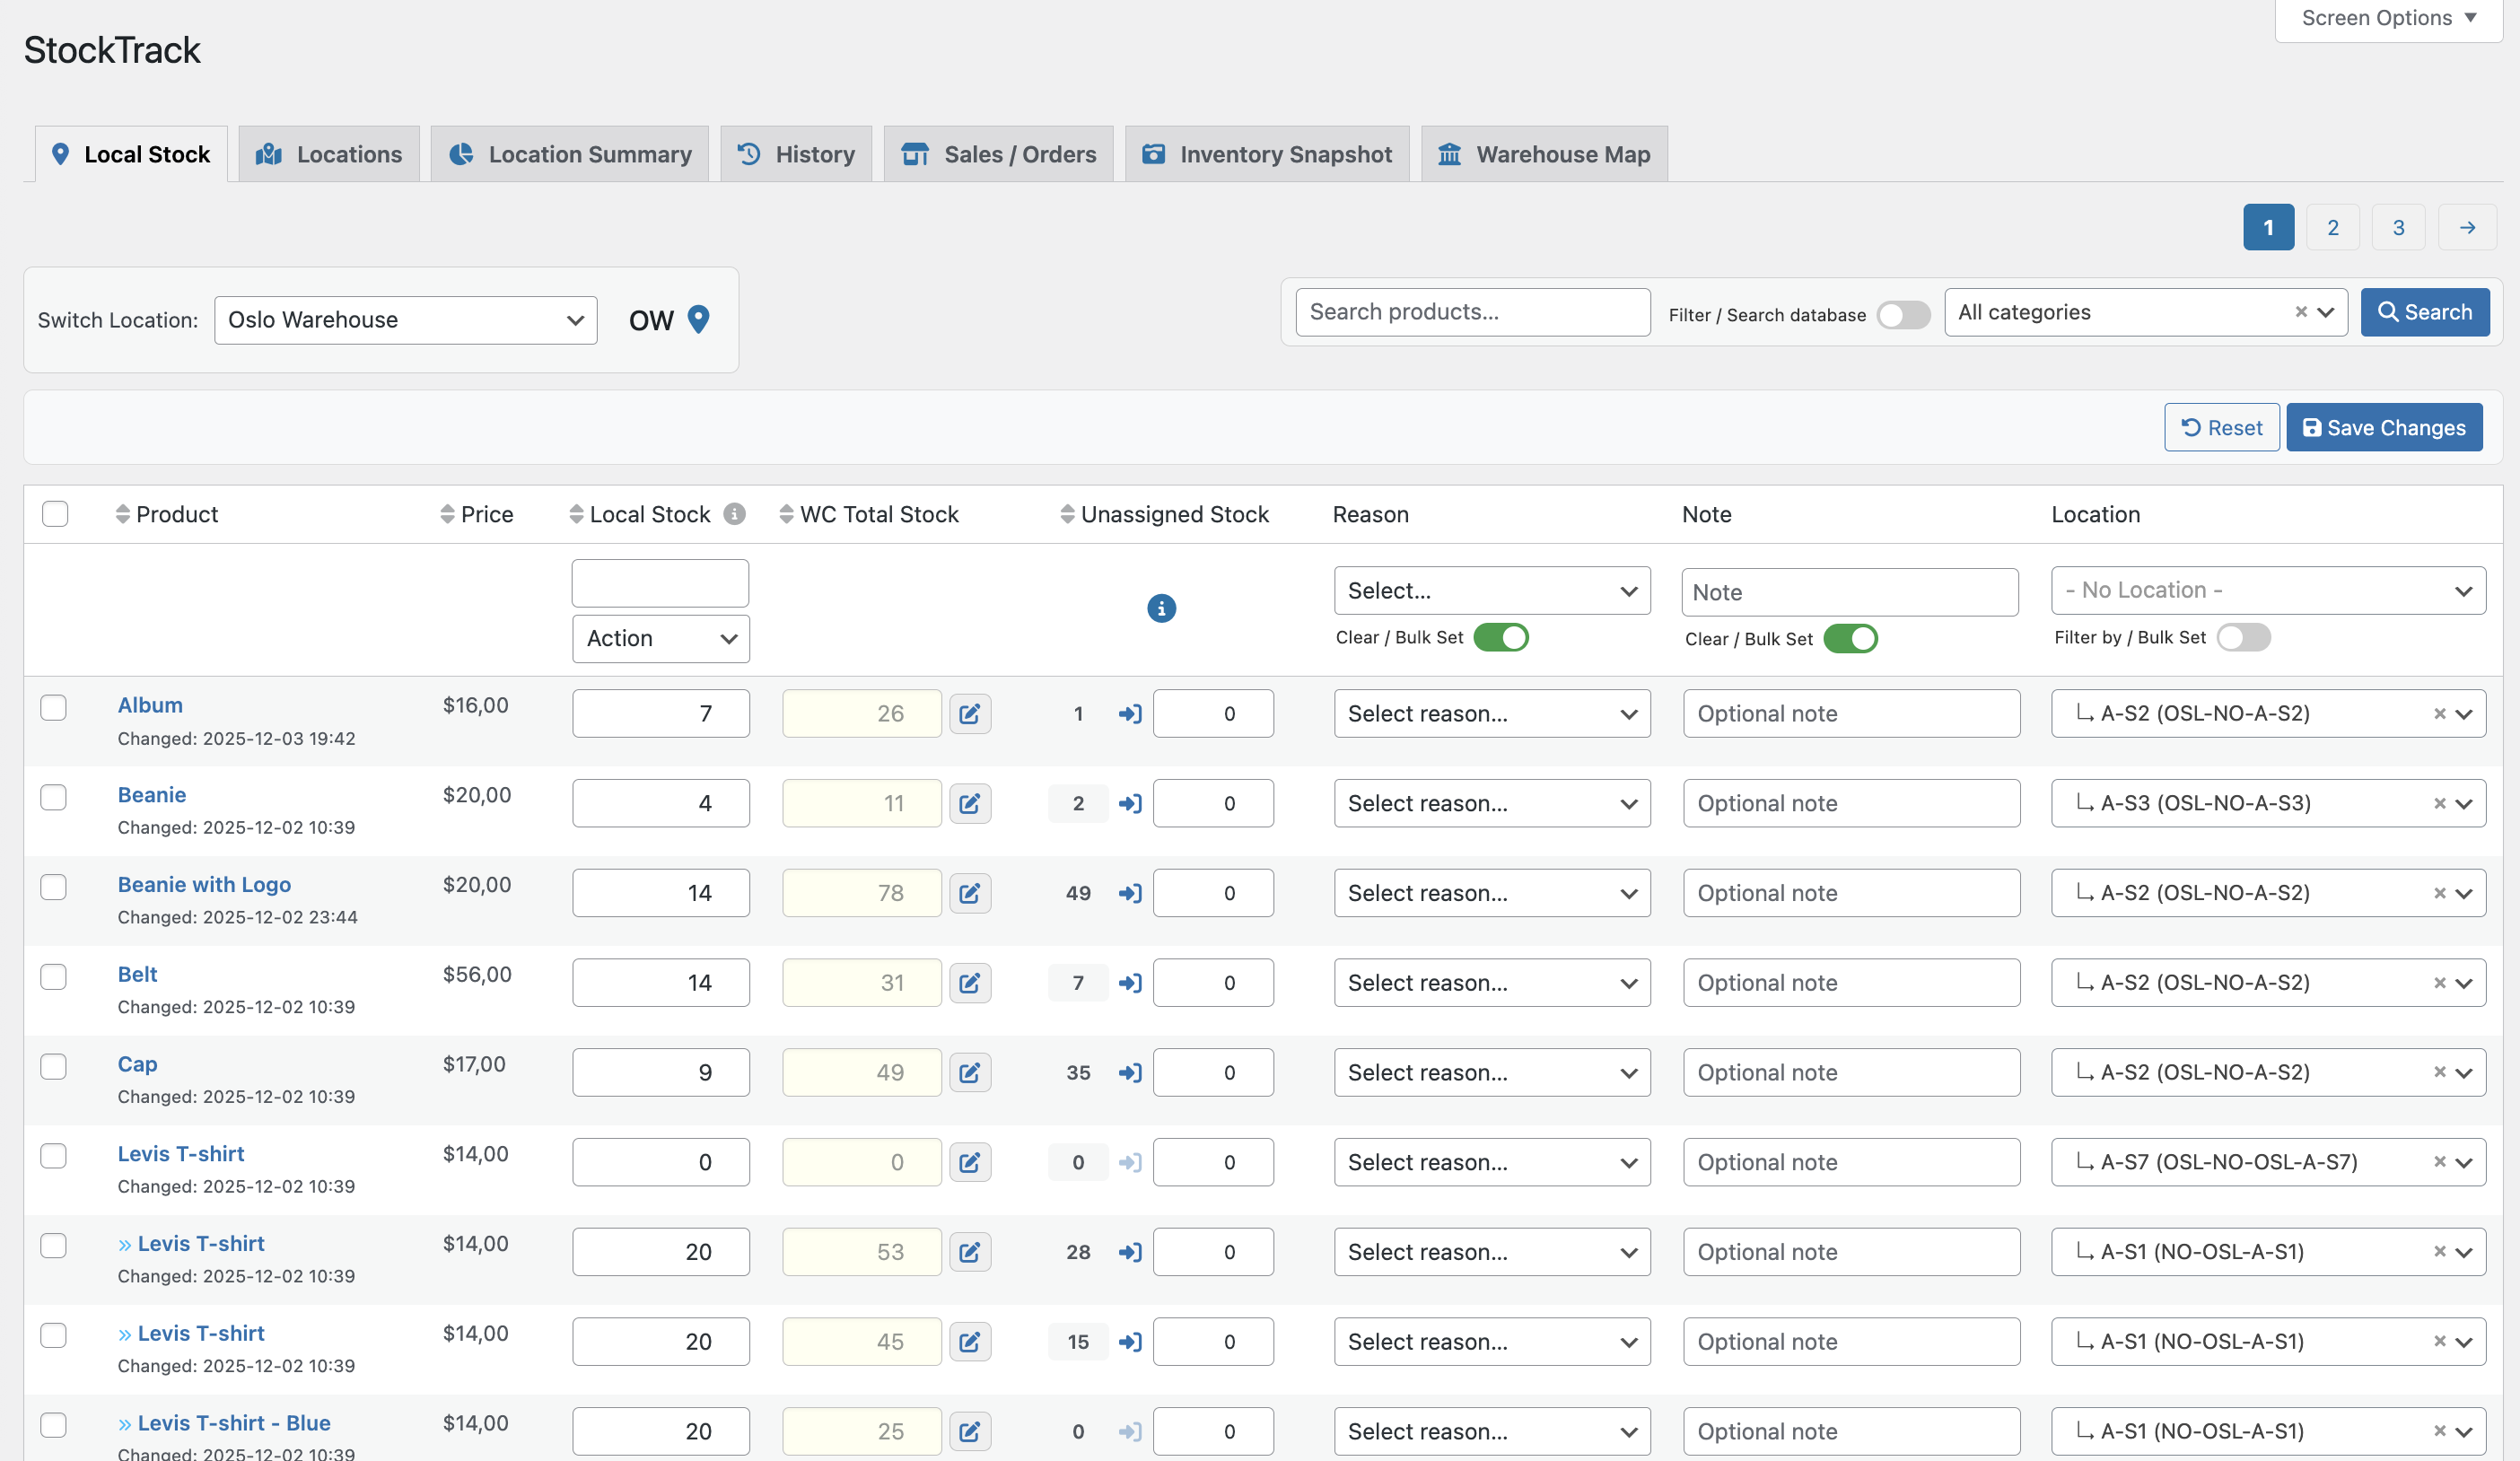
What You Use the Local Stock Tab For
Use the Local Stock tab to:
- Select which warehouse or sub-location you are working with
- Assign products to locations (individually or in bulk)
- Set, increase, or decrease local stock values
- Claim existing WooCommerce stock into a location
- Add reasons and notes for stock changes
- Review and adjust WooCommerce total stock when needed
It gives you a clear, location-specific view of your inventory.
Selecting a Location
At the top of the page, use the Location selector to choose the warehouse or sub-location you want to work with.
All changes on this page apply to the currently selected location.
Finding Products
The Local Stock screen includes tools to work efficiently with large catalogs:
- Search by product name
- Filter by category
- Use paging for large product lists
- Save or reset changes before applying them
Editing Stock
Local Stock
Enter a value directly to set stock for the selected location.
You can also use bulk actions to set, increase, or decrease stock across multiple products.
Claiming Unassigned Stock
When locations are first created, existing WooCommerce stock appears as Unassigned Stock.
Use Claim to move stock from WooCommerce into the selected location.
This is typically done once during initial setup.
Note: If both Local Stock and Claim are used in the same update, the Claim value takes priority.
WooCommerce Total Stock
The WC Total Stock column includes an edit option that shows:
- All locations for the product
- Local stock per location
- The WooCommerce total stock
Use this to review or correct stock distribution across warehouses.
Reasons, Notes, and Locations
Optional fields help track why stock changed:
- Reason – Restock, sale/order, manual adjustment, or return
- Note – Short comment for internal reference
- Location – Assign or change the product’s location
All of these can be applied in bulk.
Saving Changes
After making updates:
- Click Save
- StockTrack applies all changes
- Values are synchronized with WooCommerce
Use Reset to discard unsaved changes.
Best Practices
- Always confirm the selected location before editing
- Claim Unassigned Stock after creating locations
- Use bulk actions for onboarding many products
- Add reasons for important stock changes
- Use the WC Total Stock view when troubleshooting
Locations (tab)
↑ Back to topThe Locations tab is where you create and manage all warehouse locations used by StockTrack. Before you can assign local stock or track inventory across warehouses, you need to set up your location structure here.
You can find it under:
WooCommerce → StockTrack → Locations
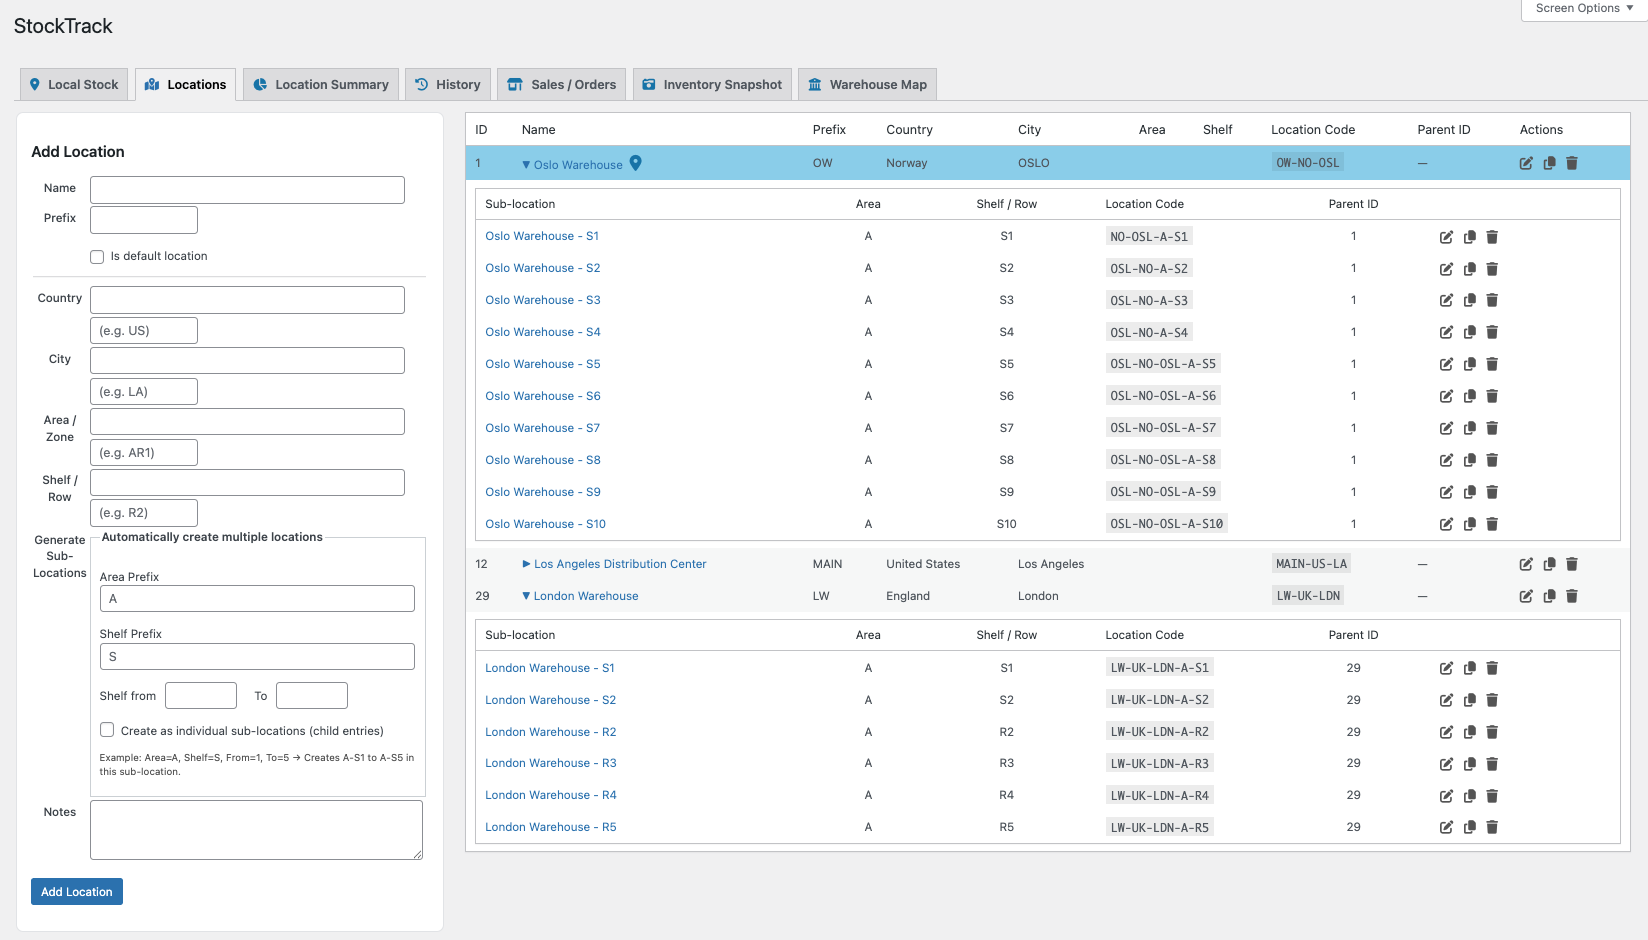
What You Use the Locations Tab For
Use the Locations tab to:
- Create parent warehouse locations
- Generate structured sub-locations (areas, rows, shelves)
- Edit, copy, or delete locations
- View your full location hierarchy
- Automatically generate and manage location codes
All local stock in StockTrack must belong to a location.
Creating a Warehouse (Parent Location)
To create a warehouse:
- Click Add Location
- Enter a Name (for example, “Los Angeles Warehouse”)
- Set a short Prefix used for location codes
- Optionally add country, city, or notes
- Save the location
StockTrack automatically generates a structured location code based on the values you enter.
Generating Sub-Locations
If your warehouse has a structured layout, you can generate sub-locations automatically.
Inside the Add Location form:
- Open Generate Sub-Locations
- Set prefixes for area and shelf/row
- Define a numeric range (for example 1–20)
- Enable Create as individual sub-locations
- Save the parent location
StockTrack creates all sub-locations with unique location codes.
Viewing and Managing Locations
All locations are listed in a table below the form.
- Parent locations can be expanded to show sub-locations
- Each location displays its generated code
- Actions are available for Edit, Copy, and Delete
This makes it easy to manage large or complex warehouse structures.
Editing, Copying, and Deleting
- Edit updates the name, prefix, or notes
- Copy duplicates a location structure
- Delete removes the location (products are not deleted)
If a deleted location had stock assigned, that stock becomes Unassigned until reassigned.
Best Practices
- Create parent warehouses before adding products
- Use the sub-location generator for structured layouts
- Keep prefixes short and consistent
- Avoid changing prefixes after stock has been assigned
- Remove any sample locations you don’t plan to use
Location Summary (Tab)
↑ Back to topThe Location Summary tab gives you a high-level overview of how stock is distributed across your warehouses and locations. It is designed for quick insight rather than day-to-day editing.
You can find it under:
WooCommerce → StockTrack → Location Summary
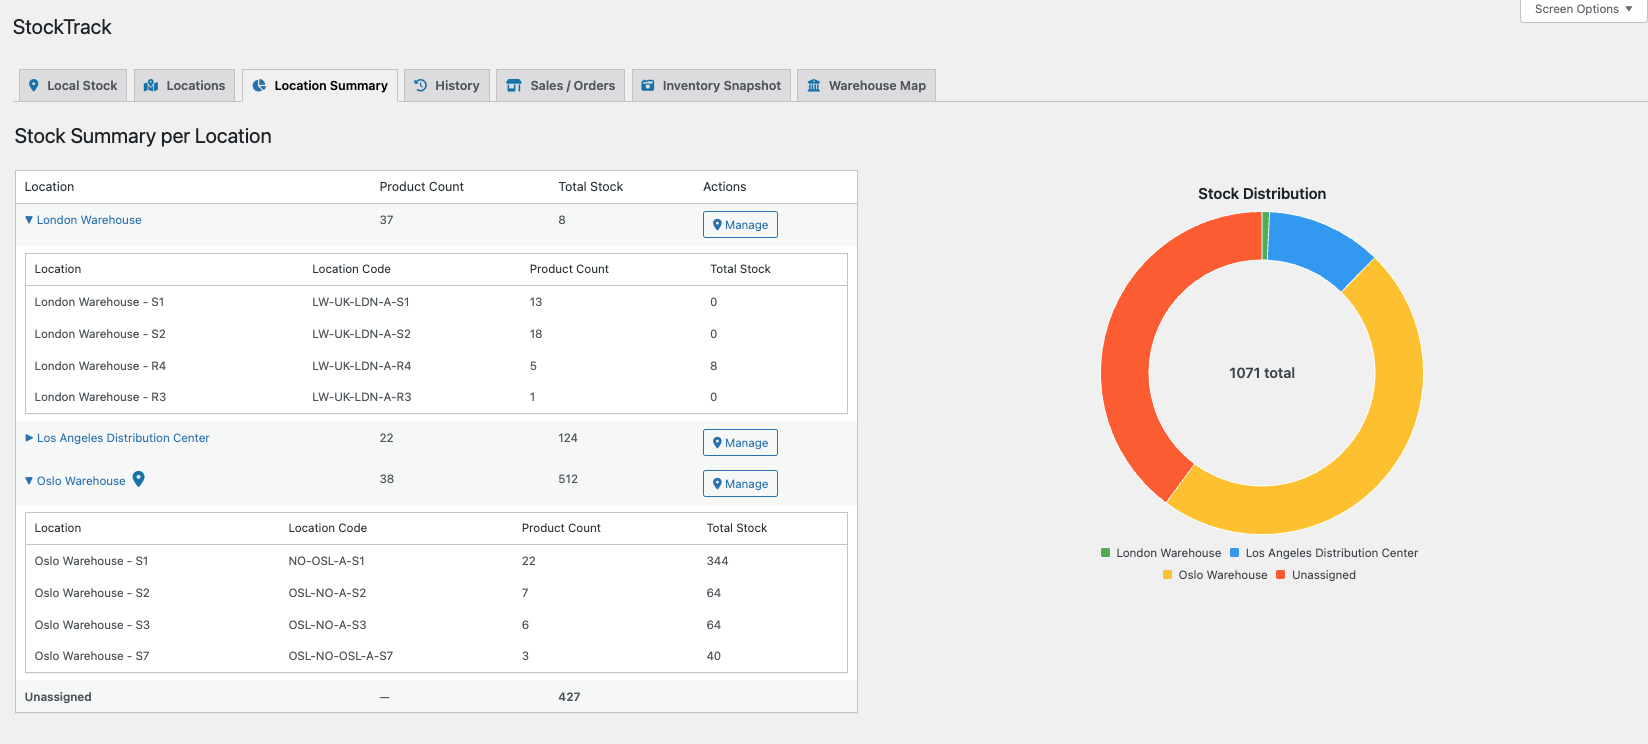
What You Use the Location Summary Tab For
Use the Location Summary tab to:
- See total stock per warehouse and location
- View how stock is distributed across parent locations
- Identify unassigned stock quickly
- Get a visual overview using the stock distribution chart
- Understand how many products are assigned to each location
This tab is especially useful for audits, planning, and management overview.
Summary Table
The summary table lists all locations and their stock totals.
- Parent (warehouse) locations are shown at the top
- Unassigned stock is listed separately
- Expand a parent location to see sub-locations
- Each row shows:
- Product count
- Total stock assigned to that location
- Sub-locations also display their location codes
This makes it easy to see where inventory is physically stored.
Stock Distribution Chart
The chart provides a visual breakdown of stock distribution:
- Each parent warehouse has its own color
- Unassigned stock is shown separately
- The chart updates automatically based on your data
This helps you quickly spot imbalances between warehouses.
When to Use This Tab
The Location Summary tab is best used when you want to:
- Review stock allocation across warehouses
- Check if stock is evenly distributed
- Identify products that still have unassigned stock
- Get a fast overview without editing data
History (tab)
↑ Back to topThe History tab shows every stock change recorded by StockTrack. This includes manual adjustments, restocks, returns, and any changes made through the Local Stock tab.
Find it under:
WooCommerce → StockTrack → History
What the History Tab Shows
Each entry includes:
- Date and time
- Product
- Old quantity
- New quantity
- Difference (green for increases, red for decreases)
- Reason (restock, order, adjustment, return)
- Location
- Note (if added)

Filters
Use the filters above the table to narrow results by:
- Search term
- Date range
- Reason
- Location
A Reset button clears all filters.
This makes it easy to review specific events, troubleshoot discrepancies, or audit recent changes.
When History Updates
History records changes when:
- You adjust Local Stock
- You claim Unassigned stock
- A manual correction is saved
- A return is processed
- Stock is withdrawn during order fulfillment (these also appear in the Sales/Orders tab)
Sales / Orders (tab)
↑ Back to topThe Sales / Orders tab shows how WooCommerce orders affect your local stock. Every time an order reduces stock from a specific location, StockTrack records the event here.
Find it under:
WooCommerce → StockTrack → Sales / Orders
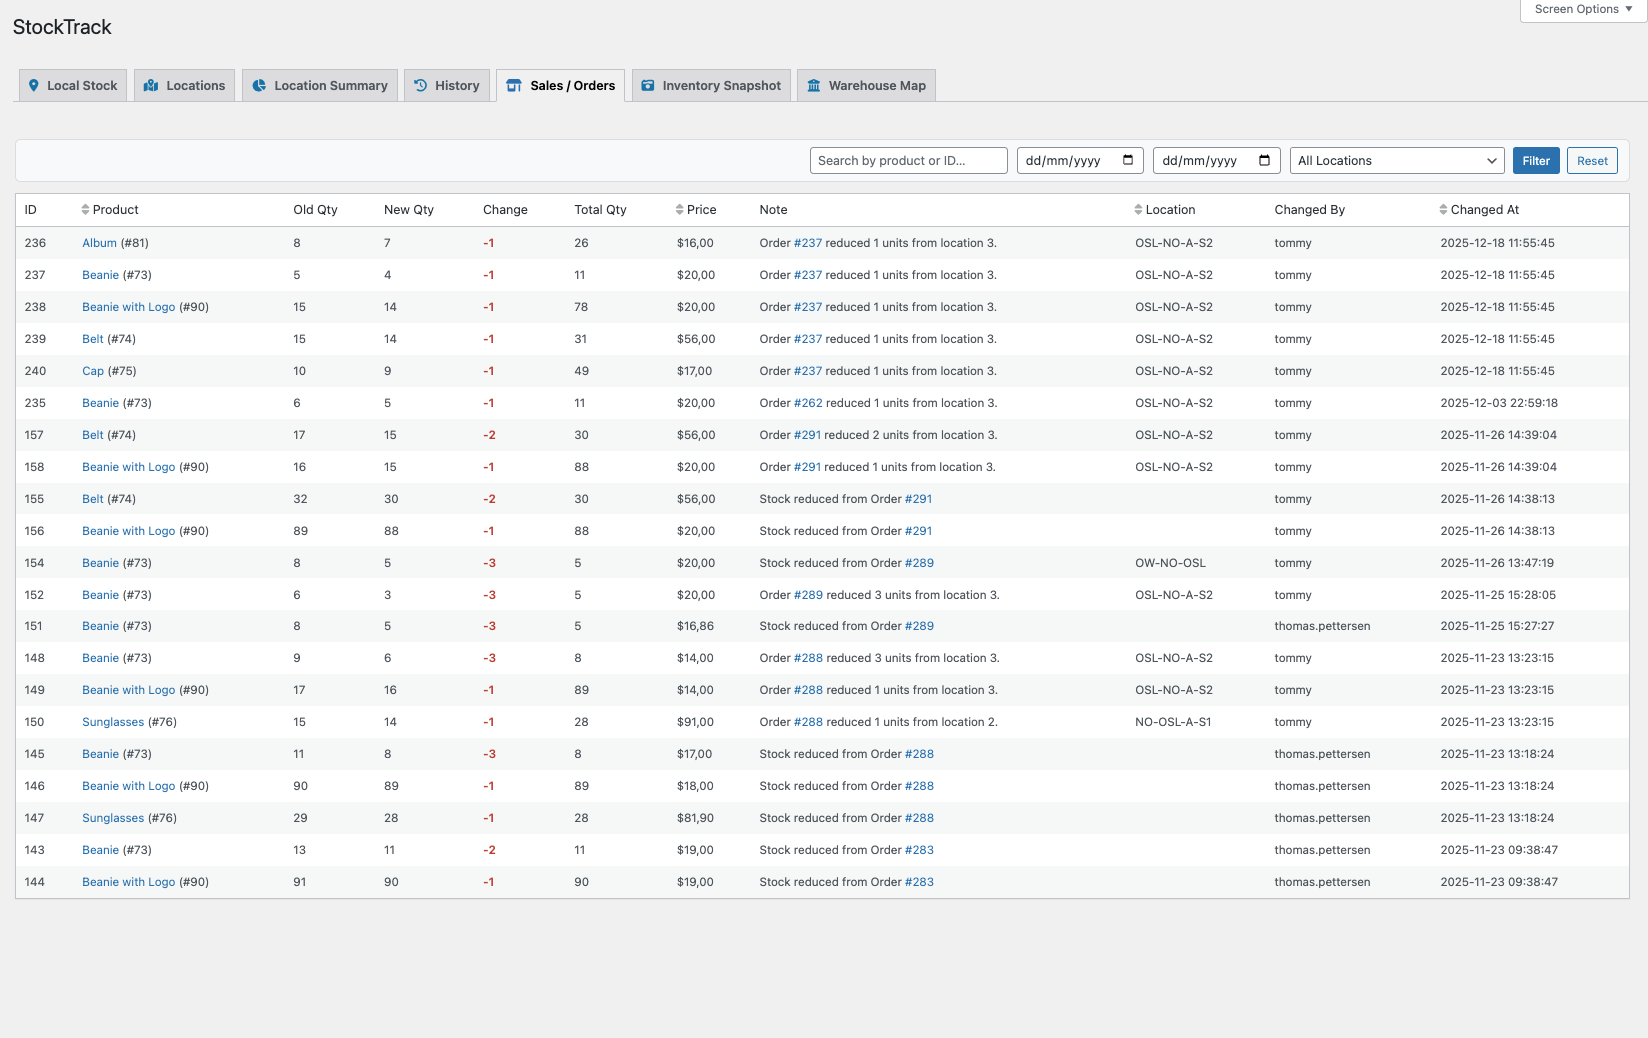
What This Tab Shows
Each entry includes:
- Order number (clickable link that opens the order in a new browser tab)
- Product
- Location stock was withdrawn from
- Quantity reduced
- Date and time
- Notes (for example: “Order #276 reduced 3 units from location 3”)
Filters
You can filter results by:
- Search term
- Date range
- Location
The Reset button clears the filters and shows all entries again.
When Entries Are Created
A new Sales/Orders entry appears when:
- You update an order in WooCommerce and StockTrack withdraws stock
- A product line is adjusted due to partial fulfillment
- Stock is moved out of a location because the order has changed status (for example: pending → processing → completed)
These logs make it easy to trace exactly where units were removed during fulfillment.
Inventory Snapshot (tab)
↑ Back to topThe Inventory Snapshots tab shows historical snapshots of your inventory. Snapshots record stock levels, cost (COGS), and total inventory value at a specific point in time.
Find it under:
WooCommerce → StockTrack → Inventory Snapshots
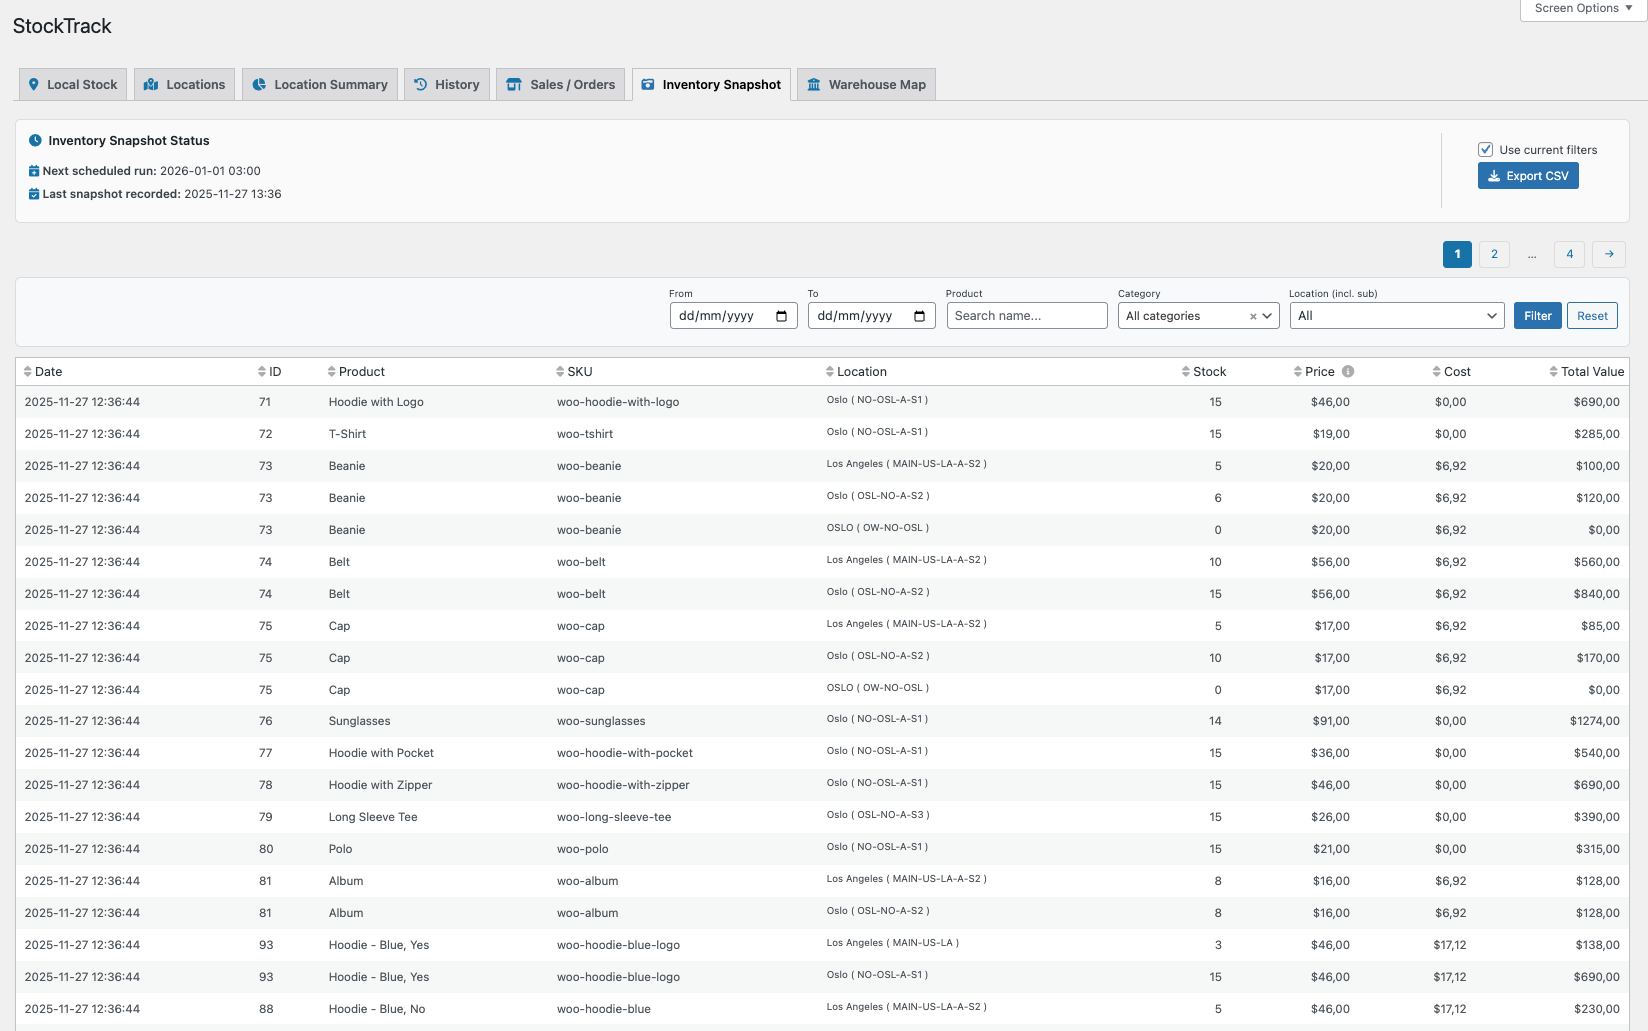
What Snapshots Contain
Each snapshot entry includes:
- Date and time of snapshot
- Product
- Stock quantity
- Cost (COGS)
- Total value (quantity × cost)
The table footer also shows totals for all visible rows, giving you an instant overview of stock value across your catalog.
Filters
You can filter snapshot data by:
- Search term
- Date range
- Location
- Category
Filtering allows you to review specific product groups, focus on certain dates, or check value changes over time.
When Snapshots Are Created
Snapshots can be created in three ways:
1. Automatically (Scheduled)
Set the frequency in the StockTrack settings:
- Weekly
- Monthly (first day of each month)
Snapshots run in the background using Action Scheduler.
2. Manually (Run Snapshot Today)
Check “Run snapshot today” in the settings to generate a snapshot immediately.
3. Plugin Activation / Initial Use
If you run a snapshot early, it can serve as your baseline before adjusting stock or moving locations.
What Snapshots Are Used For
Snapshots are ideal for:
- Tracking inventory value month to month
- Spotting trends in cost changes
- Recording stock quantity over time
- Auditing warehouse adjustments
- Producing basic financial reports
They do not affect product stock or settings. Snapshots are read-only records.
Warehouse Map (tab)
↑ Back to topThe Warehouse Map gives you a visual overview of your warehouse layout. Instead of working only with lists and grids, you can build a map that reflects your physical warehouse and see exactly where each location is placed.
This tool helps warehouse teams navigate faster, find products more easily, and keep a clear picture of how storage areas are organized.

Selecting a Warehouse
Start by choosing a parent warehouse from the dropdown on the left side.
When selected, all sub-locations for that warehouse will appear underneath, including:
- Manually created sub-locations
- System areas such as Pick Station, Ramp, Office, and Packing Table
These can all be added to the visual map.
Building Your Map
The map area lets you design a simple visual layout using drag and drop.
You can:
- Drag locations into the map
- Scale and resize each block
- Move locations freely
- Remove locations using the delete icon that appears on hover
- Save the map layout
This gives you a clear visual representation of shelves, rows, and stations exactly as they exist in your warehouse.
PDF Export
Once you have created a layout, you can export the entire map as a PDF, making it easy to print or share with warehouse staff.
This is especially useful for:
- Training new employees
- Physical warehouse labeling
- Pick routes
- External logistics partners
Finding Products in the Warehouse Map
Product Search
You can search for products directly from the Warehouse Map.
When searching for a product:
- Matching products are listed in a dropdown panel
- Clicking a product highlights its storage location(s) on the map
- Locations briefly blink so they are easy to spot
This makes it easy to find where a product is stored without interpreting location codes.
Finding Orders in the Warehouse Map
The Warehouse Map also supports order-based searching.
Order Search
By switching the search mode from Product to Order, you can:
- Enter an order ID
- Instantly highlight all locations used by products in that order
- See if an order requires picking from multiple areas
This provides a clear visual overview of where to pick items for a specific order.
Using the Warehouse Map from the Edit Order Screen
The Warehouse Map can also be accessed directly from the Edit Order screen.
In the StockTrack meta box on the Edit Order page, you will find a link to open the Warehouse Map for the current order.
When opened this way:
- The Warehouse Map automatically loads the order
- All product locations used by the order are highlighted on the map
This is the same functionality as using the Order search inside the Warehouse Map, but accessed directly from the order.
Use Cases
The Warehouse Map is ideal for:
- Large warehouses with many sub-locations
- Stores with dedicated picking or packing stations
- Training new staff
- Creating printed warehouse layouts
- Finding products quickly during fulfillment or audits
It turns your warehouse structure into a simple and intuitive visual tool.
Edit order (StockTrack widget)
↑ Back to topStockTrack integrates directly with the WooCommerce order edit screen. This allows you to withdraw stock from a specific warehouse or sub-location when processing orders.
You can find this feature by editing any order in:
WooCommerce → Orders → Edit Order
Enabling StockTrack in the Order Screen
Before you see the StockTrack widget, go to Screen Options (top-right corner of the order page) and enable StockTrack.
Once enabled, the widget appears in the widgets section (as seen below).

Withdrawing Stock From a Location
When an order reduces stock, StockTrack lets you control which location the stock is taken from.
Steps:
- Open the order in the WooCommerce admin.
- Scroll to the StockTrack widget.
- Select the location to withdraw stock from.
- Click Update (or Update Order).
StockTrack then adjusts the Local Stock for each product in the order based on the selected location.
If the Default Location is set in StockTrack settings, it will be pre-selected automatically. You can change it at any time before updating the order.
What Happens After Withdrawal
When you update the order:
- Each product line is marked as local stock updated: yes
- Local stock for the selected location is reduced
- A new entry appears in the Sales / Orders log
- History is updated if the withdrawal changes overall stock
Order adjustments created here behave the same way as manual stock actions everywhere else in StockTrack.
Changing Fulfillment Location Later
If you update an order again and select a different location:
- StockTrack adjusts the values accordingly
- Logs the change in the Sales / Orders tab
- Ensures the final numbers stay correct
Notes
- If an order has multiple products, all items in the order use the same selected location.
- If you need per-line control, you can adjust stock manually in Local Stock after the order is processed.
- Order-based deductions only run when the order is updated, not when it is viewed.
View Orders in the Warehouse Map
Overview
StockTrack for WooCommerce includes a direct link from the order edit screen to the Warehouse Map.
This makes it easy to visually locate all products in an order and understand where they are stored in the warehouse.
Instead of interpreting location codes or checking each product individually, the Warehouse Map gives you an instant visual overview.
What Happens When You Click the Link
When you click View order in Warehouse Map:
- The Warehouse Map opens in a new browser tab
- The map automatically switches to Order mode
- All products in the order are analyzed
- Each product’s storage location is highlighted (blinked) on the map
If an order contains products stored in multiple locations, all relevant locations will be highlighted, making it easy to plan an efficient picking route.
Why This Is Useful
- Quickly understand where order items are stored
- Reduce picking time and walking distance
- Avoid misinterpreting location codes
- Perfect for busy warehouses and new staff
This feature is especially useful during order fulfillment, picking, and packing workflows.
Example Use Case
A warehouse worker opens an order, clicks View order in Warehouse Map, and immediately sees:
- which shelves or zones contain the products
- whether the order requires picking from multiple areas
- how to approach the pick efficiently
No manual searching is required.
Frontend Stock Locations
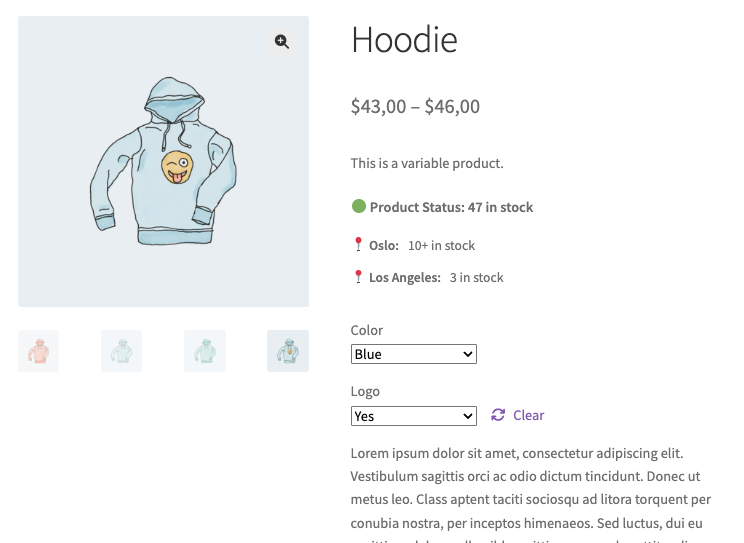
↑ Back to topStockTrack lets you show customers where products are available. This is optional, and it uses a shortcode that you can place anywhere on the product page.
Supporting Variable Products
When used on variable products, the shortcode updates dynamically when a variation is selected. Customers will only see locations and stock relevant to the chosen variation.
No additional configuration is needed.
Shortcode
Use the shortcode below to show stock by location:
[stocktrack_availability stock_values="true" max_display="10"]
Parameters
- stock_values=”true”
Shows exact quantities, for example:
Los Angeles — 9 in stock - stock_values=”false”
Hides quantities and only shows availability:
Los Angeles — in stock - max_display=”10″
Caps the number shown.
If actual stock is higher (for example 500), the output becomes:
Los Angeles — 10+ in stock - expanded_locations=”false” (default)
If false: locations are hidden until the customer clicks the toggle button
if true: locations are visible immediately when the product loads
You can add the shortcode to product descriptions, custom blocks, templates, or a snippets plugin.
Auto-Display on Product Pages (Code Example)
If you want StockTrack availability to automatically appear below the product summary, you can add this snippet using a code snippets plugin or in your theme’s functions.php.
add_action( 'woocommerce_single_product_summary', 'stocktrack_show_availability_in_product_page', 25 );
add_filter( 'woocommerce_get_stock_html', 'stocktrack_maybe_hide_stock_status', 10, 2 );

/**
 * Auto-display StockTrack availability below product summary.
 *
 * To disable, remove this hook or wrap in a conditional.
 */
function stocktrack_show_availability_in_product_page() {
    if ( ! is_product() ) {
        return;
    }

    global $product;
    if ( ! is_a( $product, 'WC_Product' ) ) {
        return;
    }

    echo do_shortcode( '[stocktrack_availability stock_values="true" max_display="10"]' );
}

/**
 * Hide WooCommerce stock field when using StockTrack locations.
 */
function stocktrack_maybe_hide_stock_status( $html, $product ) {
    if ( is_product() ) {
        return ''; // Hide default WooCommerce stock display
    }
    return $html;
}
Hiding WooCommerce’s Stock Display
If you use the shortcode, you likely want to hide the default WooCommerce stock message to avoid duplicates.
This is already handled in the snippet above, but you can use the filter alone if needed:
add_filter( 'woocommerce_get_stock_html', function() {
    return '';
});
Notes
- Frontend display is optional
- Customers only see what you choose to show
- The shortcode works on simple and variable products
- You can style the output with your theme’s CSS if needed
Troubleshooting
↑ Back to topBelow are common situations new users may encounter when setting up StockTrack.
Stock does not appear in a location
If products show zero local stock:
- Check if stock is still listed as Unassigned
- Use Claim from WooCommerce stock in the Local Stock tab
- Confirm the correct location is selected before editing
WooCommerce total stock looks incorrect
If totals do not match expectations:
- Open the WC Total Stock view for the product
- Review how stock is distributed across locations
- Check the History tab for recent adjustments or claims
Locations do not appear in Warehouse Map
If the map is empty or incomplete:
- Make sure locations are created under a parent warehouse
- Confirm sub-locations are saved correctly
- Select the correct warehouse in the Warehouse Map
FAQs
↑ Back to topHere is some commonly asked questions.
Does StockTrack replace WooCommerce stock?
No. StockTrack extends WooCommerce’s native inventory system. WooCommerce totals remain unchanged and compatible with reports and extensions.
Can I use StockTrack with only one warehouse?
Yes. StockTrack works with a single warehouse or multiple warehouses.
Does StockTrack support variable products?
Yes. Each variation has its own stock, locations, and history.
Where can I find full documentation?
Full documentation is available at:
https://www.consortia.no/documentation/stocktrack/