TIV Sales Assistant lets you create and manage product discounts from a single dashboard instead of editing each product individually.
Define a sale rule once — choose the discount, pick which categories, tags, or countries it applies to — and every matching product is updated automatically.
Installation
↑ Back to topTo start using a product from WooCommerce.com, you can use the “Add to store” functionality on the order confirmation page or the My subscriptions section in your account.
- Navigate to My subscriptions.
- Find the Add to store button next to the product you’re planning to install.
- Follow the instructions on the screen, and the product will be automatically added to your store.
Alternative options and more information at:
Managing WooCommerce.com subscriptions.

Setup and Configuration
↑ Back to topThe plugin provides two sale types:
- Calendar Sales — time-limited promotions with start and end dates.
- Flash Sales — always-on discounts with no date restrictions.
Getting started
↑ Back to topAfter activation, a new Sales Assistant menu appears in the admin sidebar.
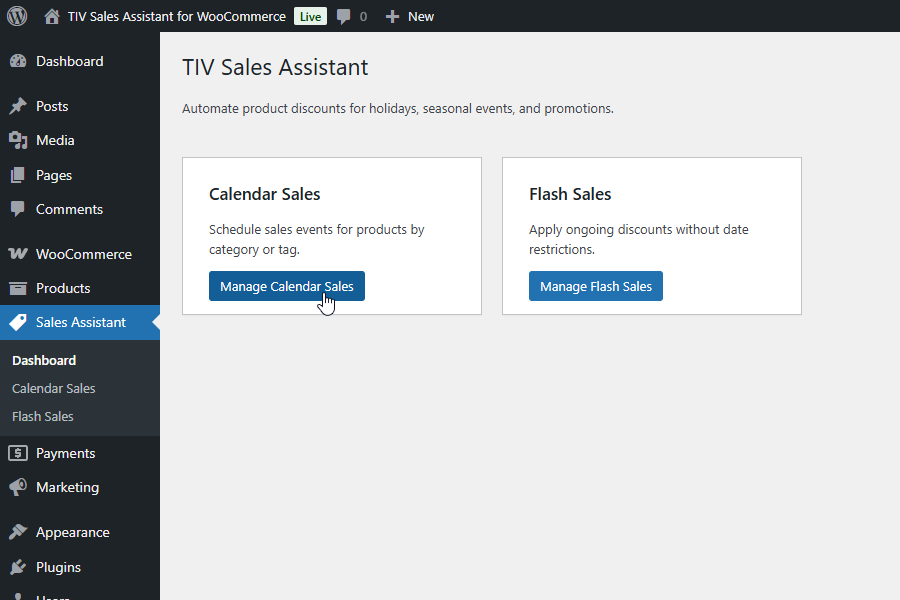
Dashboard
↑ Back to topNavigate to Sales Assistant in the admin sidebar to open the dashboard. It displays two cards:
- Calendar Sales — “Schedule sales events for products by category or tag.” Click Manage Calendar Sales to view, create, and edit Calendar Sales.
- Flash Sales — “Apply ongoing discounts without date restrictions.” Click Manage Flash Sales to view, create, and edit Flash Sales.
Creating a Calendar Sale
↑ Back to top- Go to Sales Assistant → Calendar Sales → Add New.
- Enter a descriptive title (e.g. “Black Friday 2026”).
- In the Calendar Sale Main settings metabox, fill in:
- Priority — a number from 1 to 99 (lower = higher priority).
- Discount % — the percentage off the regular price (0–99).
- Discount amount — alternatively, a fixed currency amount to subtract.
- In the Calendar Sale Dates metabox, set:
- Start date — when the sale activates.
- End date — when the sale deactivates.
- In the Calendar Sale Filter products metabox, optionally narrow which products are discounted.
- Click Publish.

Both date fields are optional. If Start date is left blank, the sale starts immediately when published. If End date is left blank, the sale runs indefinitely until you stop it manually.
You can stop a running sale at any time by setting an end date, moving it to Draft, or moving it to Trash. Moving to Draft lets you re-enable the sale later with new dates.
Creating a Flash Sale
↑ Back to top- Go to Sales Assistant → Flash Sales → Add New.
- Enter a descriptive title (e.g. “Clearance — Accessories”).
- In the Flash Sale Main settings metabox, set Priority and your discount (percentage or fixed amount).
- In the Flash Sale Filter products metabox, optionally select categories, tags, or countries.
- Click Publish. The discount takes effect immediately.
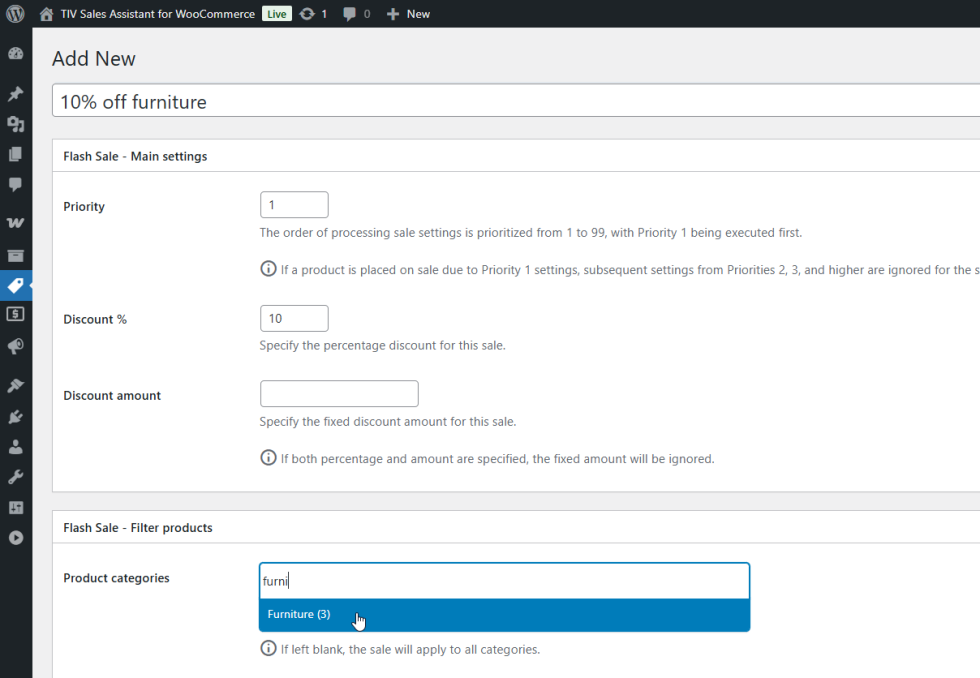
Flash Sales have no date fields — they remain active for as long as they are published.
Configuring Discounts
↑ Back to topEach sale rule offers two discount methods:
| Field | Description |
|---|---|
| Discount % | A percentage (0–99) subtracted from the regular price. For example, 20 means the customer pays 80% of the regular price. |
| Discount amount | A flat currency amount subtracted from the regular price. For example, if the regular price is $50 and the discount amount is $10, the sale price is $40. |
Note: If both Discount % and Discount amount are set on the same rule, the percentage discount is applied and the fixed amount is ignored.
Filtering Products
↑ Back to topThe Filter products metabox controls which products a sale applies to. All filters are optional — if you leave them all blank, the sale applies to every product in your store.
Product categories
↑ Back to topSelect one or more WooCommerce product categories. Only products belonging to at least one of the selected categories will be discounted. If left blank, all categories are included.
Product tags
↑ Back to topSelect one or more product tags to narrow the scope further. A product must have at least one of the selected tags. If left blank, tags are not considered.
Countries
↑ Back to topSelect one or more countries. The discount will only be visible to visitors located in the selected countries. If no country is selected, the sale applies to visitors from any country where your store sells.

Note:
Filters combine with AND logic. For example, if you select the category “Furniture” and the tag “wood”, only products that are both in Furniture and tagged “wood” will be discounted.
Important:
Country detection relies on WooCommerce geolocation. Make sure geolocation is enabled in WooCommerce → Settings → General.
Priority System
↑ Back to topEvery sale rule has a Priority field (1–99). When a product matches more than one active sale rule, the rule with the lowest number wins:
- Priority 1 is processed first.
- Once a product is placed on sale by a rule, all lower-priority rules (higher numbers) are ignored for that product.
- There is no stacking — each product receives exactly one discount.
Example
You have two active rules:
• Priority 1: 20% off all Clothing
• Priority 5: 10% off everything
A product in the Clothing category gets 20% off (Priority 1). A product in Electronics gets 10% off (Priority 5, since Priority 1 did not match it).
Managing Sales
↑ Back to topList view
↑ Back to topGo to Sales Assistant → Calendar Sales or Flash Sales to see all your sale rules in a list. The admin columns show key information at a glance:
Calendar Sales columns
- Priority
- Discount %
- Product categories
- Product tags
- Start date
- End date
Flash Sales columns
- Priority
- Discount (shows % or fixed amount)
- Product categories
- Product tags
The Priority, Discount, and date columns are sortable — click a column header to reorder the list.
Quick Edit
↑ Back to topHover over a sale in the list and click Quick Edit to modify fields inline without opening the full editor:
- Calendar Sales: Priority, Start date, End date.
- Flash Sales: Priority.
Bulk Edit
↑ Back to topSelect multiple sales using the checkboxes, choose Edit from the Bulk actions dropdown, and click Apply. You can change:
- Calendar Sales: Priority (dropdown 1–99), Start date, End date.
- Flash Sales: Priority (dropdown 1–99).
How Discounts Appear on the Storefront
↑ Back to topDiscounts are applied automatically — customers do not need to enter a coupon code or take any action. When a product matches an active sale rule, WooCommerce displays the standard sale indicators:
- The “Sale!” badge appears on the product thumbnail.
- The regular price is crossed out and the discounted price is shown next to it.
- This applies on product pages, shop/category archives, and in the cart.

Field Reference
↑ Back to top| Field | Type | Range / options | Default | Notes |
|---|---|---|---|---|
| Priority | Number | 1 – 99 | 1 | Required. Lower = higher priority. |
| Discount % | Number | 0 – 99 | — | Takes precedence over Discount amount. |
| Discount amount | Price | 0+ | — | Ignored if Discount % is set. |
| Start date | Date & time | — | — | Calendar Sales only. Blank = starts immediately. |
| End date | Date & time | — | — | Calendar Sales only. Blank = runs indefinitely. |
| Product categories | Multi-select | Your store’s categories | — | Blank = all categories. |
| Product tags | Multi-select | Your store’s tags | — | Blank = tags ignored. |
| Countries | Multi-select | WooCommerce allowed countries | — | Blank = all countries. Requires geolocation. |
Troubleshooting
↑ Back to topDiscount does not appear on the storefront
- Verify the sale is Published (not Draft or Trash).
- For Calendar Sales, check that the current date/time falls between the Start and End dates.
- Confirm the product belongs to a matching category and tag (if filters are set).
- If using country filtering, verify that WooCommerce geolocation is enabled and your test is from a matching country.
- Check whether a higher-priority rule (lower number) is already applying a different discount to the same product.
Country-based sale shows to all visitors
↑ Back to top- Make sure you have selected specific countries in the Countries field. If left blank, the sale applies everywhere.
- Confirm that WooCommerce geolocation is enabled: WooCommerce → Settings → General → Default customer location should be set to “Geolocate” or “Geolocate (with page caching support)”.
Wrong discount is applied
↑ Back to topRemember that if both Discount % and Discount amount are set on the same rule, the percentage is used and the fixed amount is ignored.
Check the Priority values of your sale rules. A rule with a lower priority number overrides higher ones for the same product.
FAQs
↑ Back to top
What happens if a product matches more than one sale rule?
The rule with the lowest priority number (highest priority) wins. For example, if a product matches a Priority 1 rule (20% off) and a Priority 5 rule (10% off), the 20% discount applies. There is no stacking.
Can I try it before buying?
Yes. A live demo is available where you can create your own sales rules and see them in action on the storefront: https://demo-sales-assistant.tiv.net/