Introduction
↑ Back to topWPGens Points and Rewards plugin helps you build customer loyalty by rewarding users with points for actions like purchases, sign-ups, referrals*, and more. These points can later be redeemed for discounts or rewards, encouraging repeat purchases and brand loyalty.
This guide walks you through setup, customization, and the key features of the plugin.
Key Features
↑ Back to top- Flexible earning/redemption rules
- Points redemption options
- Customizable display
- Email notifications
- Manual points adjustments
- Import/export points
- Klaviyo integration
- Refund orders in points
- Automatic points return
- Product-specific earning control
1. Installation & Activation
↑ Back to top1. Install the Plugin
↑ Back to topYou can install the plugin via the WordPress admin panel:
- Navigate to Plugins → Add New.
- Click Upload Plugin and select the plugin ZIP file you downloaded from the WooCommerce Marketplace.
- Click Install Now, then Activate the plugin.
2. Plugin Activation & Setup
↑ Back to topOnce activated, the plugin will appear under WooCommerce → Points and Rewards in the sidebar menu.
2. Setup
↑ Back to top- Navigate to Points & Rewards → Setup
- On this screen, you can view/configure the following options:
1. Program Activation
↑ Back to topTo begin using the loyalty system, ensure that your Points & Rewards Program is active.
Simply toggle the switch to activate the program. Once active, all incoming orders will be processed and eligible for point earnings and redemptions based on your configurations
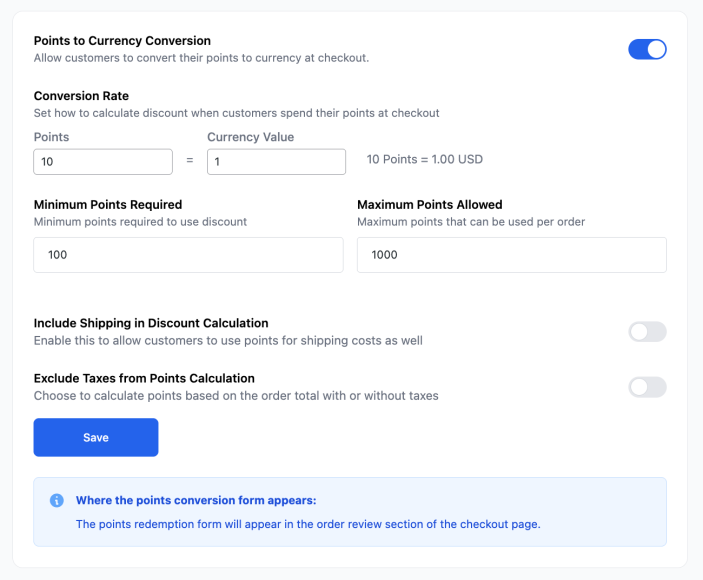
2. Set Conversion Rules
↑ Back to topIn the Points Conversion section, define how points translate into discounts:
- Conversion Rate – Set how many points equal a unit of currency (e.g., 10 points = $1).
- Minimum Points Required – Customers must reach this threshold to redeem.
- Maximum Points Allowed – Limit the number of points used per order.
- Include/Exclude Shipping or Taxes – Decide whether discounts apply to shipping or tax-inclusive totals.
Where it shows: The points conversion form will appear in the order review section of the checkout page.
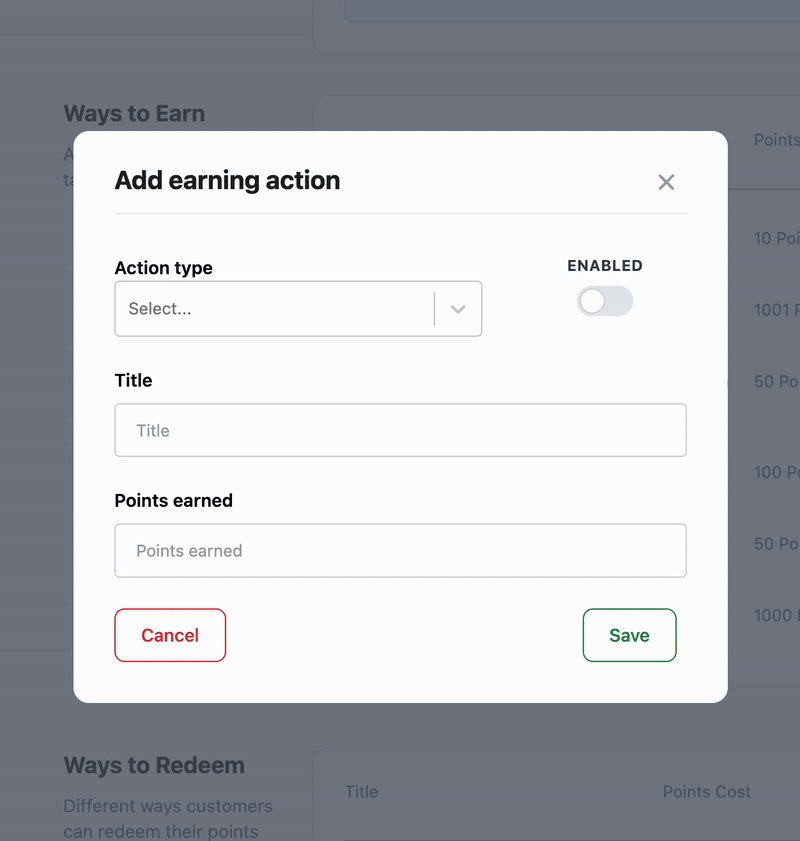
3. Ways to Earn Points
↑ Back to topTo reward your customers for different actions, you can set up the Ways to Earn Points:
On this screen, you can view/configure the following options:
- Making a purchase – Reward customers with points every time they place an order
- Registering an account – Give new users an incentive to sign up by awarding points upon registration
- Writing a product review – Encourage reviews by offering points for each product review submitted
- Liking/follow a page on socials – Encourage likes & follows by offering points
- Referring a friend – If you’re using the WooCommerce Refer a Friend PREMIUM plugin, you can reward users with points when someone they refer completes a purchase*
Each action can have different point values and conditions set according to your business needs.
4. Ways to Redeem Points
↑ Back to topTo configure how customers can redeem their points for discounts:
On this screen, you can view/configure the following options:
- Points cost – Define how many points are required to generate a coupon. For example, setting this to 100 means a customer needs 100 points to create one coupon based on the settings below.
- Coupon type – Choose the type of discount the coupon will apply:
- Fixed cart discount – Applies a fixed monetary discount to the entire cart
- Percentage discount – Applies a percentage-based discount to the total cart value
- Product discount – Applies a fixed discount to individual products in the cart
- Free shipping – Creates a coupon that grants free shipping on the order
- Coupon amount – Set the value of the coupon that will be generated when a customer redeems the specified number of points. The amount works in combination with the coupon type.
- Example: If the coupon type is “Fixed cart discount” and the amount is set to $5, customers redeeming 100 points will receive a $5 discount.

3. Settings
↑ Back to top- Navigate to Points & Rewards → Settings
- On this screen, you can view/configure the following options:
1. Program Activation
↑ Back to topThis screen also allows you to turn your program on or off.
NOTE: When the program is active, all incoming orders will be processed based on the setup configuration.
2. Award Points on Specific Order Statuses
↑ Back to topChoose when customers should receive their points based on the order’s status. Available options include:
- Completed
- Processing
- On-Hold
- Pending Payment
You can select multiple statuses depending on your fulfillment workflow.
Tip: If you only want points to be awarded when an order is marked “Completed,” uncheck the other statuses.

3. Assign Points to Guest Users
↑ Back to topWhen this option is enabled, guest users can still earn points if their billing email matches a registered user.
Tip: This allows users to earn points across multiple sessions, even if they weren’t logged in during the purchase.
4. Exclude Taxes from Points Calculation
↑ Back to topEnable this option if you want points to be calculated without including tax in the order total.
Tip: This is useful for stores operating in regions where taxes shouldn’t be counted toward loyalty earnings.
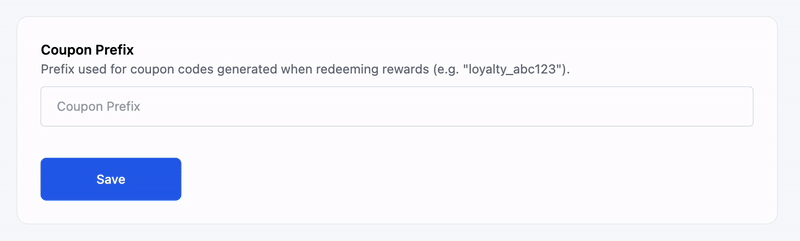
5. Coupon Prefix
↑ Back to topSet a prefix that will be used for all reward coupons generated by the system.
- Example:
loyalty_abc123
Tip: This feature helps you identify and manage loyalty-based coupon codes more easily in WooCommerce.
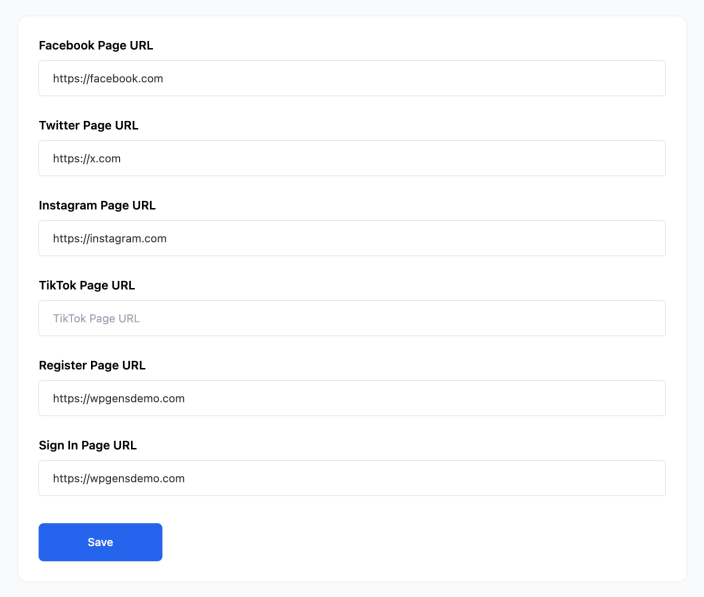
6. Social & Navigation Links
↑ Back to topThis section allows you to add URLs that will be used in social-based point earning actions (like following on Facebook or Instagram), as well as important user navigation:
Social Links
These are used when customers earn points for social interactions:
- Facebook Page URL
- Twitter Page URL
- Instagram Page URL
- TikTok Page URL
Make sure to enter the full URLs to your brand’s social profiles. These will be triggered when users click to follow or like your page (if those earning actions are enabled in your setup).
6.1 Navigation Links
Provide the direct paths for key user actions:
- Register Page URL
- Sign-in Page URL
NOTE: These links are useful if you’re placing call-to-action buttons in emails or on the landing page – ensuring users are sent to the correct place.
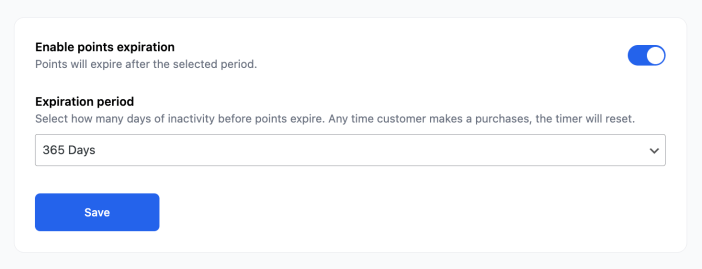
7. Points Expiration
↑ Back to topEnable this option if you want to expire customer points after a set period. Once enabled:
- Points will expire after the selected time frame
- 30 days
- 60 days
- 90 days
- 180 days
- 365 days
- A warning email can be configured and sent before the expiration occurs (see Email for customization).
Tip: This feature is useful to encourage point redemption and avoid indefinite liability on your store’s balance sheet.
4. Display Settings
↑ Back to topThe Display Settigns area allows you to customize how points and rewards appear across your store – from product pages to checkout. This ensures customers clearly see the value of participating in your loyalty program.
- Navigate to Points & Rewards → Frontend Display
- On this screen, you can view/configure the following options
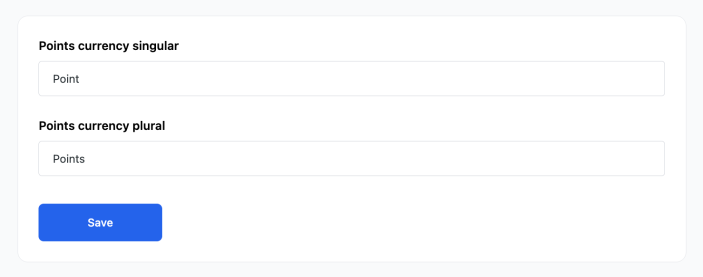
1. Points Branding
↑ Back to topCustomize the name of your store’s point currency to match your branding. This label will be used anywhere points are shown throughout the site.
Settings:
- Points currency singular – Example:
Point - Points currency plural – Example:
Points
2. Product Page
↑ Back to topDisplay the number of points customers will earn when purchasing a product, directly above the product price.
NOTE: This display only works if the “Place Order” earning action is enabled.
Settings:
- Show Points Earning Above Product Price – Toggle to enable/disable.
- Points Earning Template – Customize the message using HTML and dynamic tags:
{{points}}– Displays the number of points earned{{points_label}}– Displays “Point” or “Points” depending on quantity{{product_price}}– Displays the product price with currency symbol
Example Template:
Earn {{points}} {{points_label}} when you buy this product!3. Points Redemption Form
↑ Back to topControl how and when the points redemption form appears during the checkout process.
Settings:
- Hide Points Redemption Form if zero points balance – Hides the form for users with no points.
- Auto Open Points Redemption Form – Automatically opens the redemption form when the checkout page loads.
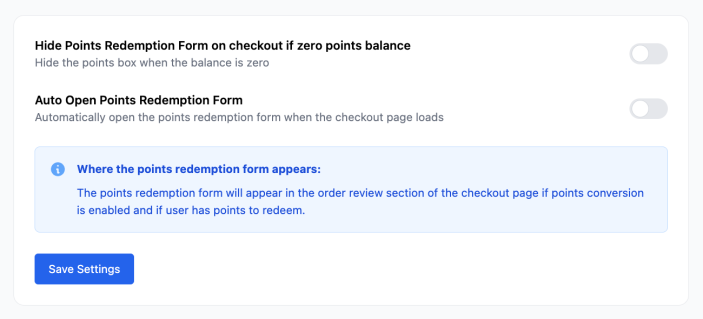
Tip: The redemption form appears in the order review section of the checkout page if points conversion is enabled and the user has redeemable points.
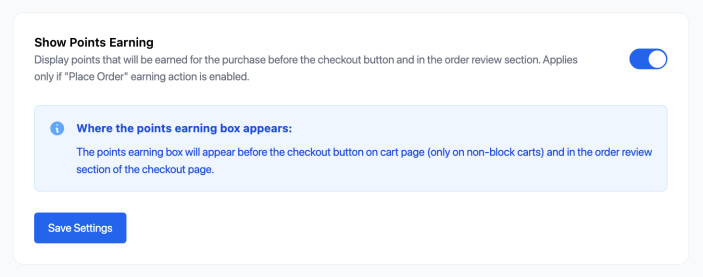
4. Points Earning Box
↑ Back to topThe Points Earning Box allows you to display the number of points a customer will earn from their current cart or order directly in the cart and checkout pages.
Where the Box Appears
- Cart Page – Above the checkout button (on non-block carts).
- Checkout Page – In the order review section.
When enabled, customers will see a message such as:
“Earn 18 Points when you complete this purchase.”
Tip: This subtle prompt can encourage customers to complete their order and continue participating in your loyalty program.
5. Members
↑ Back to topManaging customer points allows you to monitor, adjust, and review user points. This can be useful for administrative control or troubleshooting.
- Navigate to Points & Rewards → Members
- On this screen, you can view/configure the following options:
- Search members by name or email.
- View points balance – See how many points each user currently has.
- Track points collected and redeemed – Get a snapshot of how engaged each user is.
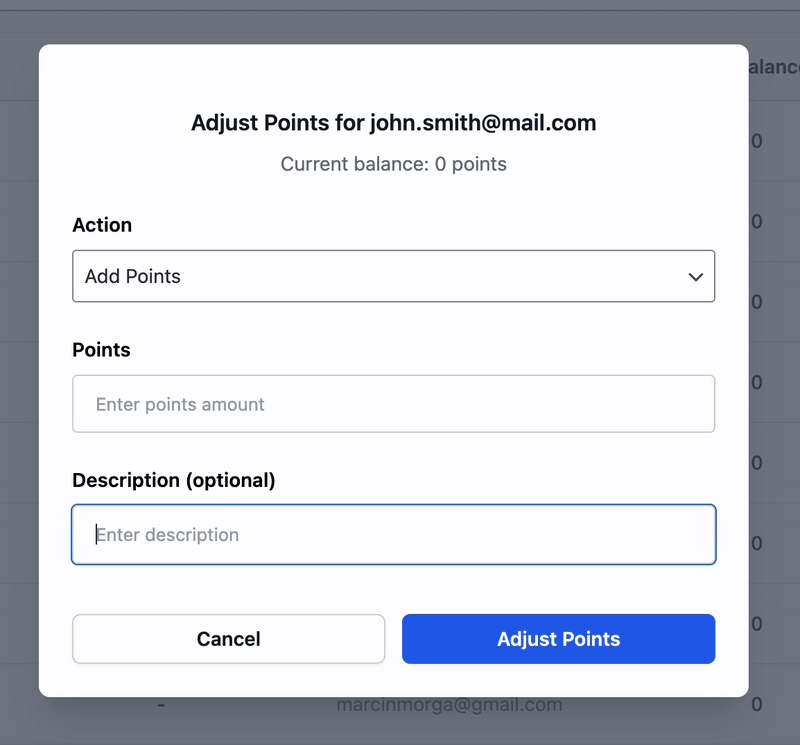
- Edit user points – Click the pencil icon under “Actions” to manually add or deduct points.
You can also:
- Download a CSV file – Export all member data for reports or backups.
- Import points – Bulk import points using a CSV file to assign or update points across multiple users.
Use this screen to monitor loyalty participation, reward high-value customers, or manually adjust point balances when needed.
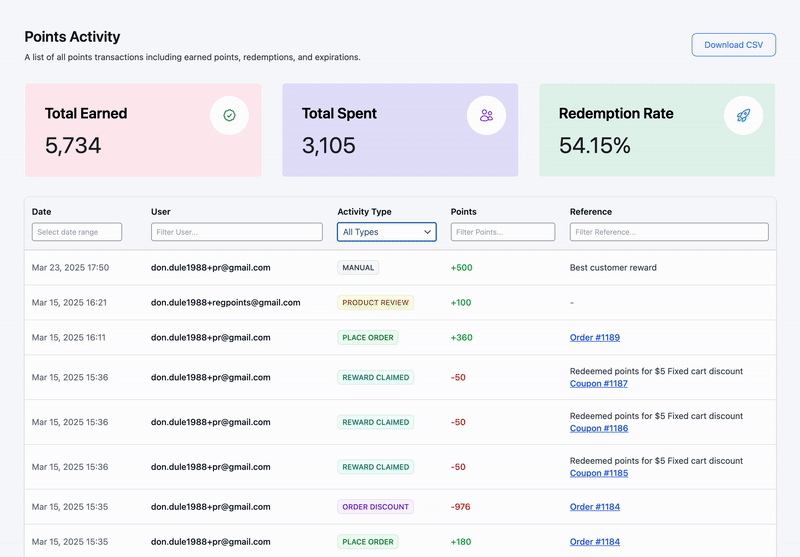
6. Points Activity
↑ Back to topTo track and review the history of points earned, redeemed, or adjusted by customers:
- Navigate to Points & Rewards → Dashboard
- On this screen, you can view/configure the following options:
- Total Earned / Spent / Redemption Rate – High-level metrics to track program performance.
- Filters – Narrow results by user, activity type, date, point value, or reference (e.g., coupon used).
- Activity Log:
- Date & time of the action
- Customer email
- Activity type (e.g., Registration, Reward Claimed, Manual)
- Points added or deducted
- Reference (e.g., Coupon #670, Free Gift)
You can also Download CSV to export activity logs for reports or audits.
Use this screen to monitor user engagement, adjust points, and ensure smooth operation of your rewards system.
7. Email Notifications
↑ Back to topSet up automatic email notifications to keep your customers informed about their points:
- Navigate to Points & Rewards → Email Settings
- On this screen, you can view/configure the following options:
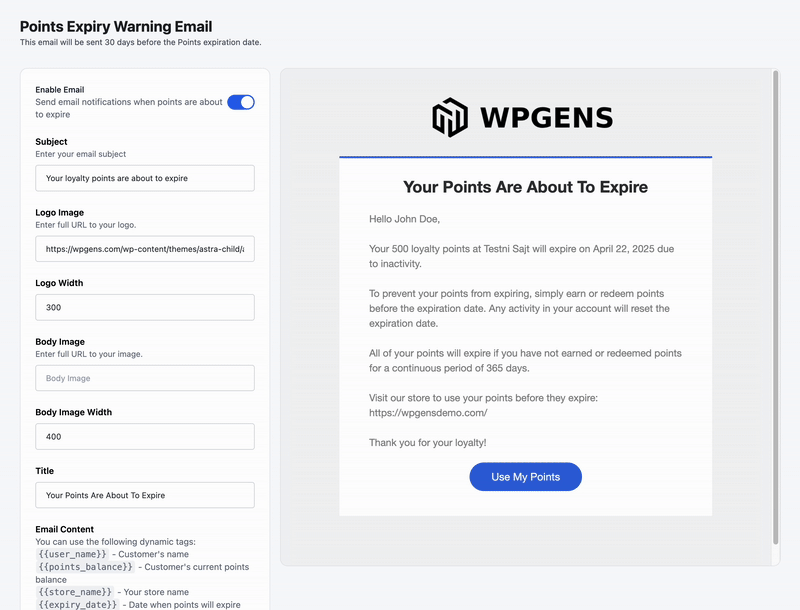
- Points expiry warning – Automatically notifies users before their points are set to expire, giving them a chance to redeem their rewards before losing them
- Reward redeemed – Sends a confirmation when users redeem points for a reward (e.g., discount coupon or free shipping).
These email templates can be tailored to match your brand’s voice, and the notifications help drive engagement by encouraging users to return, redeem points, and stay active in your loyalty program.
8. Integrations
↑ Back to top- Navigate to Points & Rewards → Integrations
- On this screen, you can view/configure the following options:
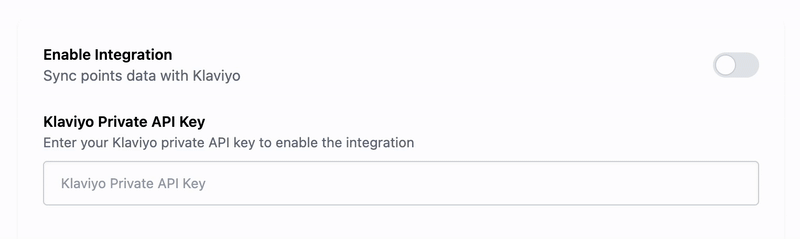
The Points and Rewards for WooCoommerce plugin integrates seamlessly with Klaviyo, allowing you to automate and enhance customer engagement.
1. Klaviyo Integration
↑ Back to topSync customer point data with Klaviyo to send targeted email campaigns based on the user’s points balance. This integration helps you create personalized marketing strategies.
For example, you can send campaigns like:
- Birthday reward emails
- Points expiry reminder emails
- Points earned notifications
More integrations coming soon!
Need Help?
↑ Back to topIf you have any questions or need assistance with setting up or customizing your Points & Rewards program, feel free to reach out:
- Knowledge Base: Visit our full knowledge base
- Contact Support: Get in touch with support or via our live chat at wpgens.com
Frequently Asked Questions
↑ Back to topHow do customers earn points?
↑ Back to topCustomers earn points by completing actions you set in the Ways to Earn section under Points & Rewards → Setup → Ways to Earn. Common actions include:
- Registering an account
- Placing orders
- Referring a friend*
- Writing product reviews
- Following on social media
- Celebrating a birthday
Each action can have custom point values. Active earning methods are shown on the customer’s Points & Rewards Landing Page.
How do customers redeem points?
↑ Back to topCustomers can redeem points at checkout if Points to Currency Conversion is enabled under Points & Rewards → Setup. You can also create specific rewards (e.g. “10% off for 100 points”) under the Ways to Redeem section.
Redeemable rewards and available point balance are shown on the customer’s Points & Rewards Landing Page.
Can I customize how and where points are shown to customers?
↑ Back to topYes. Under Display Settings, you can:
- Show earned points above the product price
- Display points balance in the cart and checkout
- Customize the Points and Rewards Landing Page shown using the shortcode
[WPGENS_POINTS_PAGE]
Can I limit how many points are used per order?
↑ Back to topYes. Go to Setup → Points Conversion and set the “Maximum Points Allowed” per order. You can also set the “Minimum Points Required”.
Can I send email notifications for points activity?
↑ Back to topYes! The plugin includes two email templates:
- Points expiry warning email – Sends a reminder before points expire.
- Reward redeemed email – Notifies customers when a reward has been claimed.
Both can be customized and previewed before sending.
Does the plugin integrate with email marketing platforms?
↑ Back to topYes. You can connect your Klaviyo account under Integrations to sync loyalty data like:
- Current points balance
- Last update date
Use this data to segment audiences and trigger email flows, such as reminding users of expiring points.