Version: 1.0.3
Last Updated: January 2026
Developer: WPExperts
Table of Contents
↑ Back to top- Plugin Overview
- Requirements
- Installation
- Initial Setup
- Understanding the Interface
- Core Features (Step-by-Step)
- Advanced Features
- Common Issues and Troubleshooting
- Frequently Asked Questions (FAQ)
- Uninstalling the Plugin
- Support and Updates
Plugin Overview
↑ Back to topBulk Product Editor is a powerful WooCommerce addon that lets you edit hundreds or thousands of products at once from a single, spreadsheet-like interface. Instead of opening each product individually, you can see all your products in a grid and make changes directly in the table.
Problems It Solves
- Time-Consuming Product Updates: Editing products one by one takes hours or days
- Price Changes: Updating prices across many products is tedious
- Inventory Management: Adjusting stock levels manually is error-prone
- Product Data Consistency: Keeping product information consistent is difficult
- Variation Management: Creating and editing variations is complex
- Import/Export: Moving product data in and out of WooCommerce is complicated
Key Benefits
- Save Time: Edit hundreds of products in minutes instead of hours
- Reduce Errors: Undo any mistakes with one click
- Spreadsheet Familiarity: Works like Excel/Google Sheets
- Advanced Filtering: Find exactly the products you need
- Bulk Operations: Change multiple products at once
- Import/Export: Move product data easily
- History Tracking: See all changes made to products
Typical Use Cases
- Seasonal Price Updates: Increase all winter clothing prices by 15%
- Stock Management: Update inventory across all products
- Sale Events: Apply discounts to specific categories
- Product Migrations: Import products from another store
- Data Cleanup: Fix incorrect SKUs, descriptions, or categories
- Variation Management: Generate and edit product variations in bulk
- SEO Updates: Update meta titles and descriptions across products
Requirements
↑ Back to top- Supported WordPress Versions
- WordPress: 5.0 or higher (tested up to 6.9)
- WooCommerce Requirements
- WooCommerce: 3.0 or higher (tested up to 10.4)
- WooCommerce must be installed and activated BEFORE activating Bulk Product Editor
- PHP: 7.4 or higher
- PHP Version Requirements
- Recommended: PHP 8.0 or higher for best performance
- Server Requirements
- Memory: Minimum 256MB PHP memory (512MB recommended for
- large catalogs)
- Execution Time: 60 seconds or higher for bulk operations
Theme or Plugin Dependencies
Required: – WooCommerce (3.0+)
Compatible With: – All standard WordPress themes – All standard WooCommerce themes – High-Performance Order Storage (HPOS) – WooCommerce Blocks
Installation
↑ Back to topUpload ZIP File (Manual Installation)
- Download the plugin ZIP file from your purchase location
- Log in to your WordPress Admin Dashboard
- Go to Plugins → Add New
- Click the Upload Plugin button at the top of the page
- Click the Choose File button
- Select the bulk-product-editor.zip file from your computer
- Click the Install Now button
- Wait for the installation to complete
- Click the Activate Plugin button
- You’ll see a success message with a link to the bulk editor
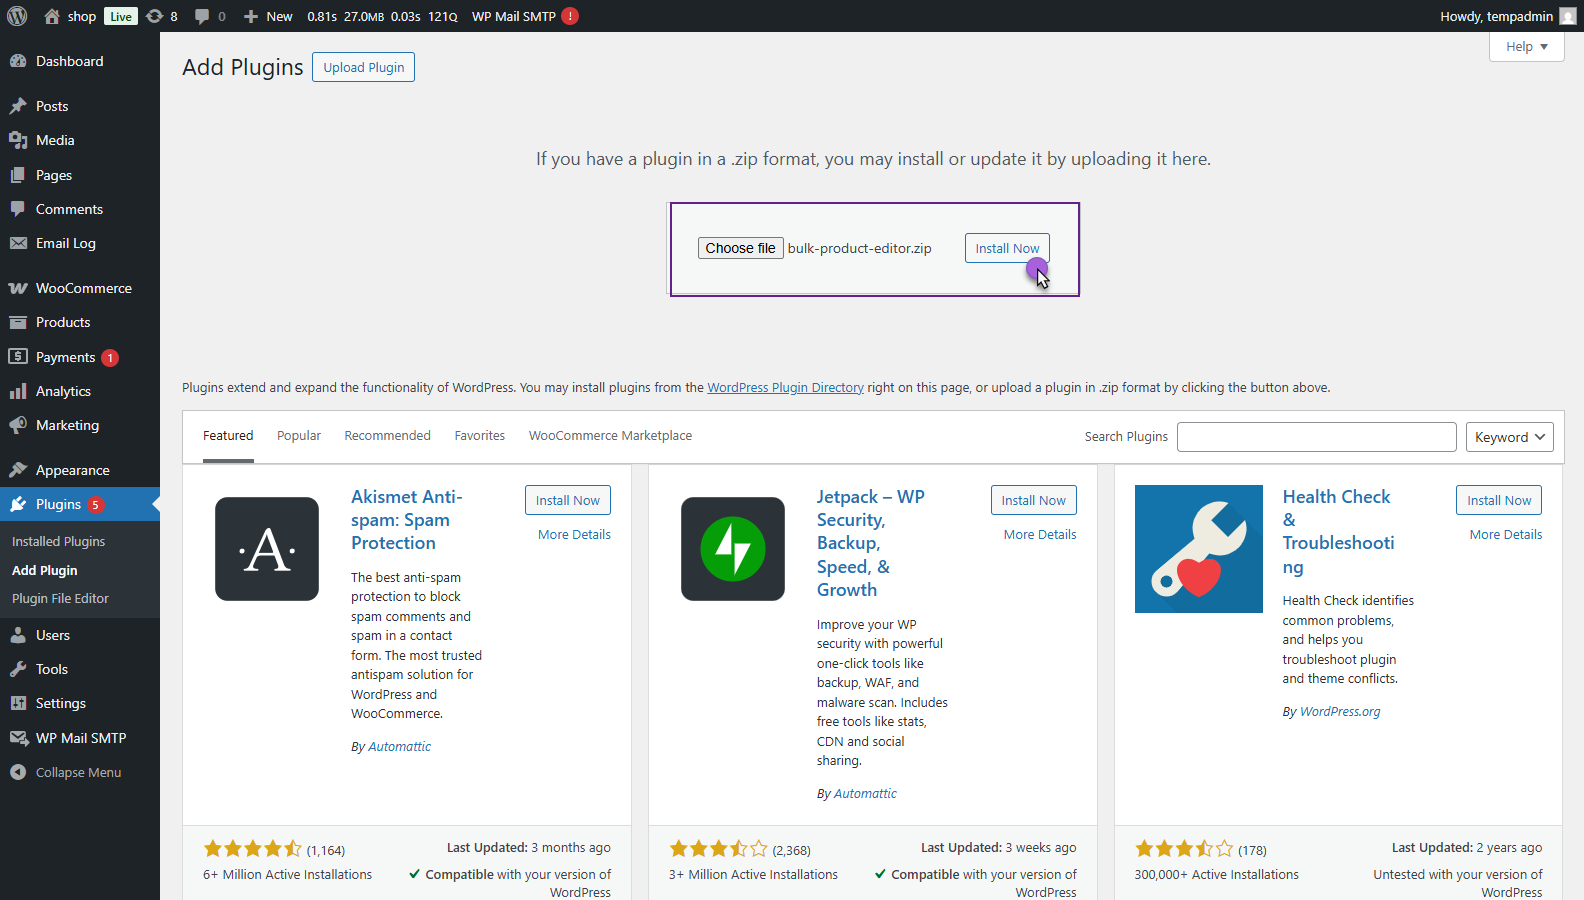
Important: If you see an error message about WooCommerce being required, install and activate WooCommerce first, then activate this plugin again.
Initial Setup
↑ Back to top- After activation, the plugin appears in your WordPress admin menu:
- Location: WooCommerce → Bulk Product Editor
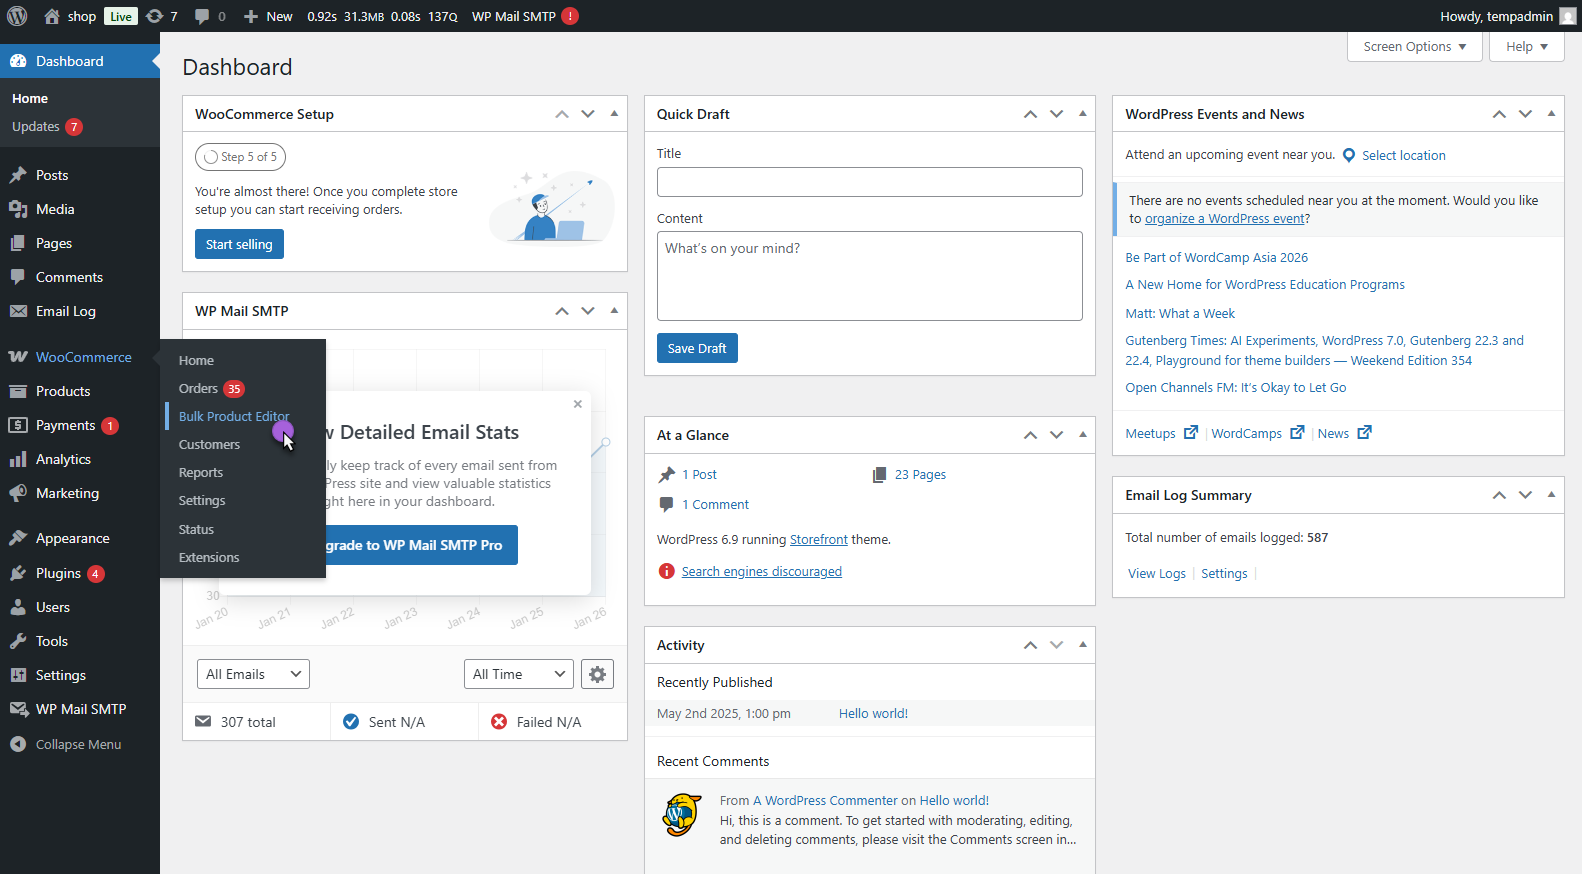
First-Time Access
- In WordPress Admin, go to WooCommerce → Bulk Product Editor
- The bulk editor page will load (may take a few seconds)
- You’ll see a spreadsheet-like grid with all your products
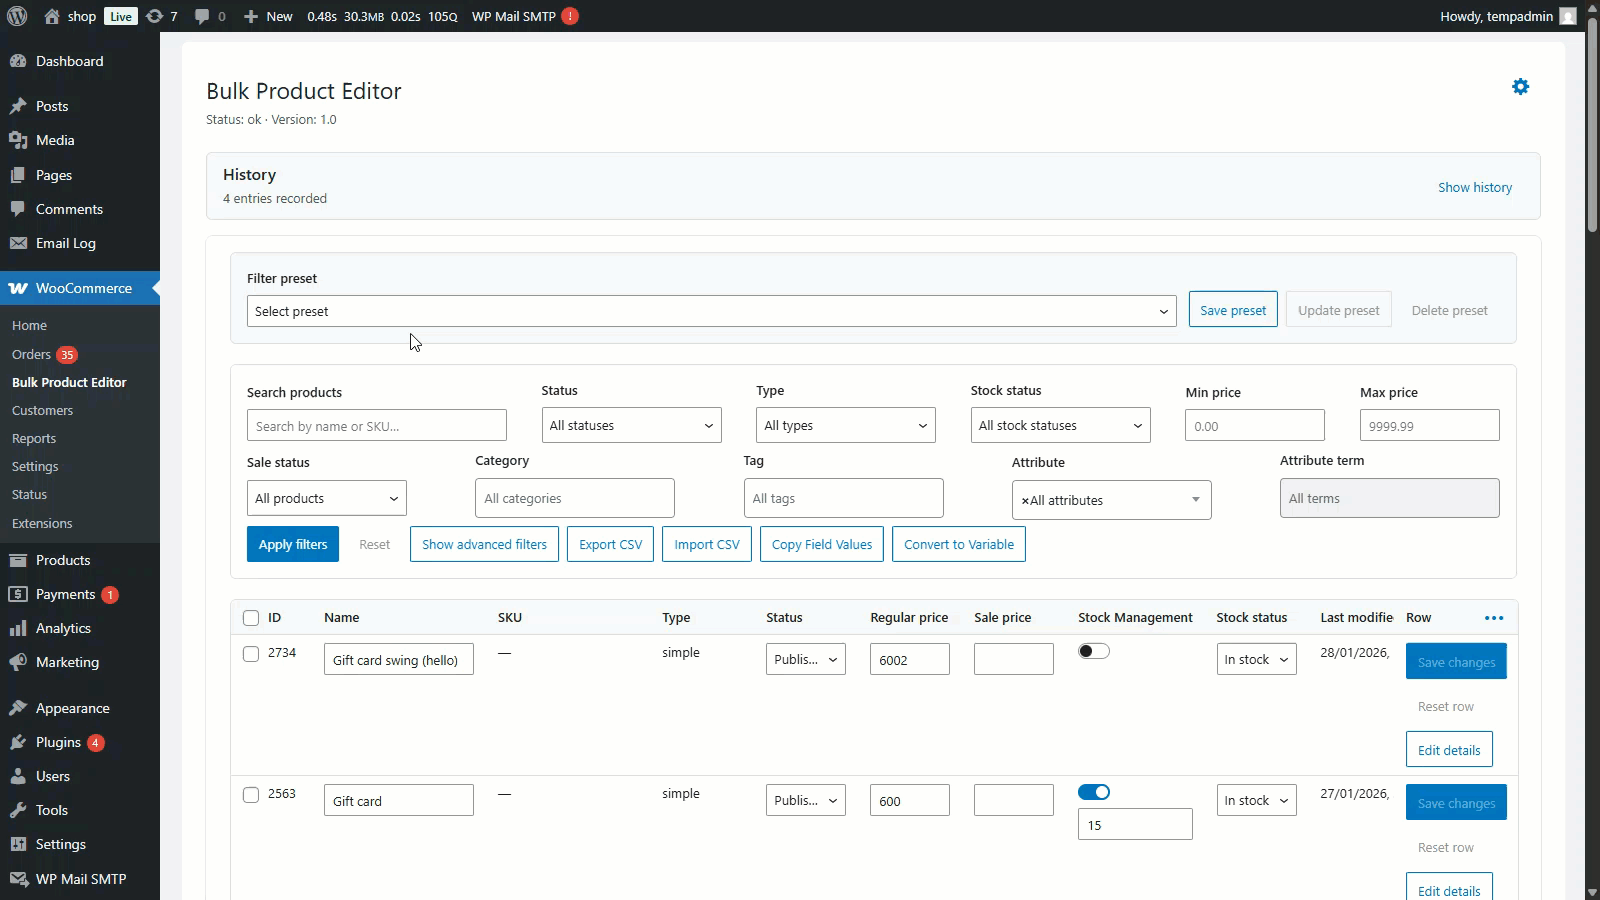
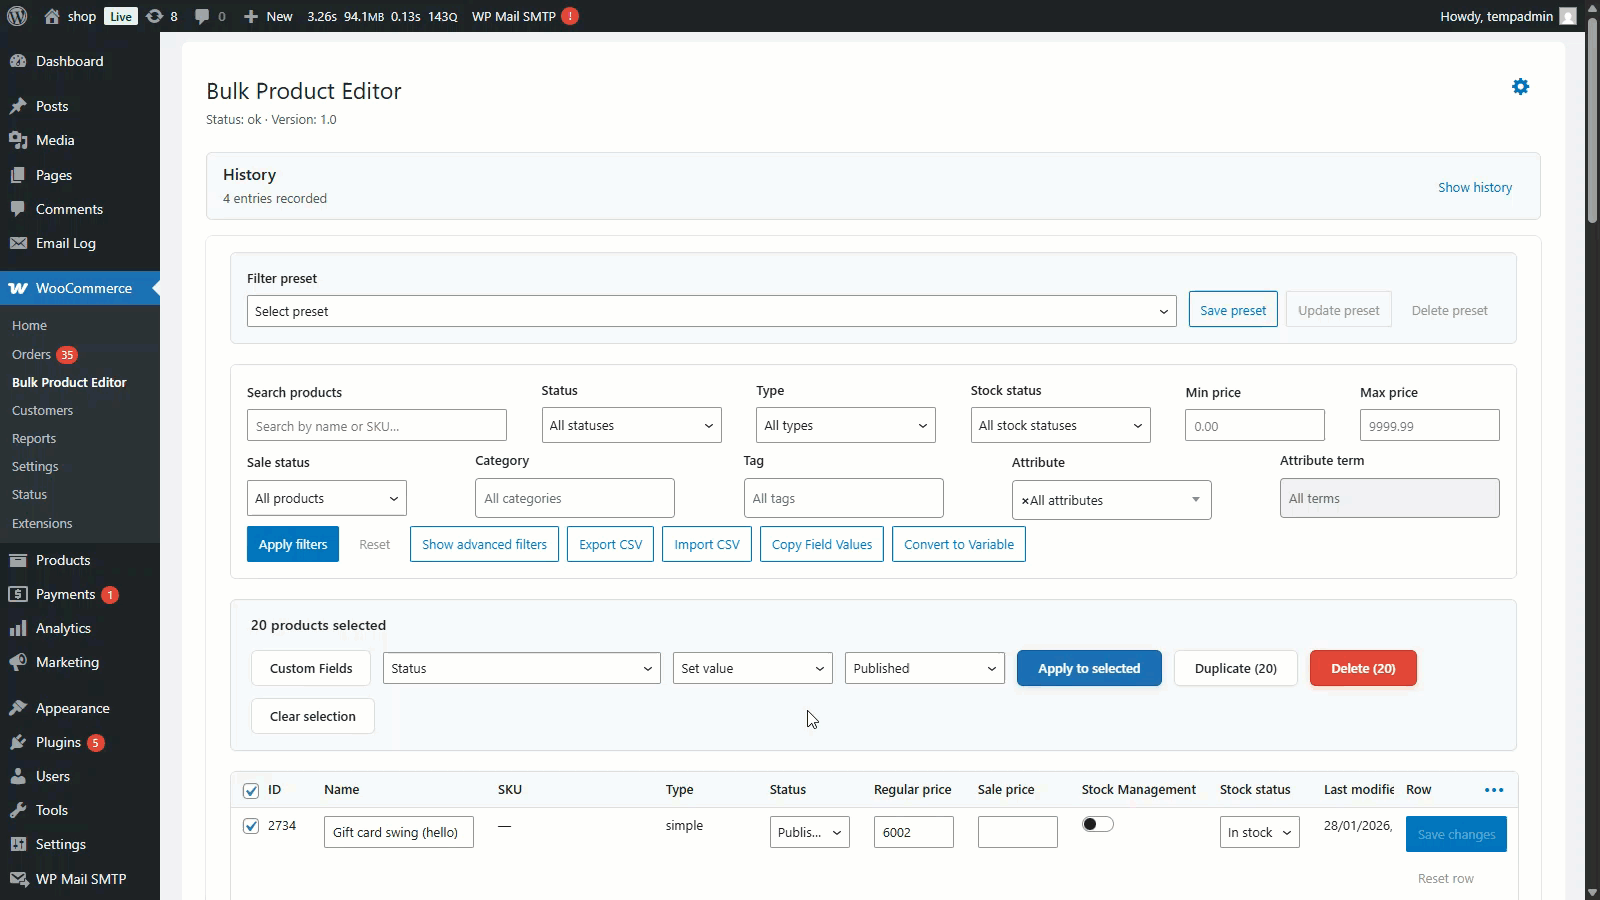
Initial Screen Overview
- When you first open the bulk editor, you’ll see:
- Top Toolbar: Buttons for bulk operations, import, export, and history
- Filter Panel: On the left side (can be collapsed)
- Product Grid: Main spreadsheet area showing your products
- Column Headers: Clickable to sort products
- Bottom Pagination: Navigate through pages of products
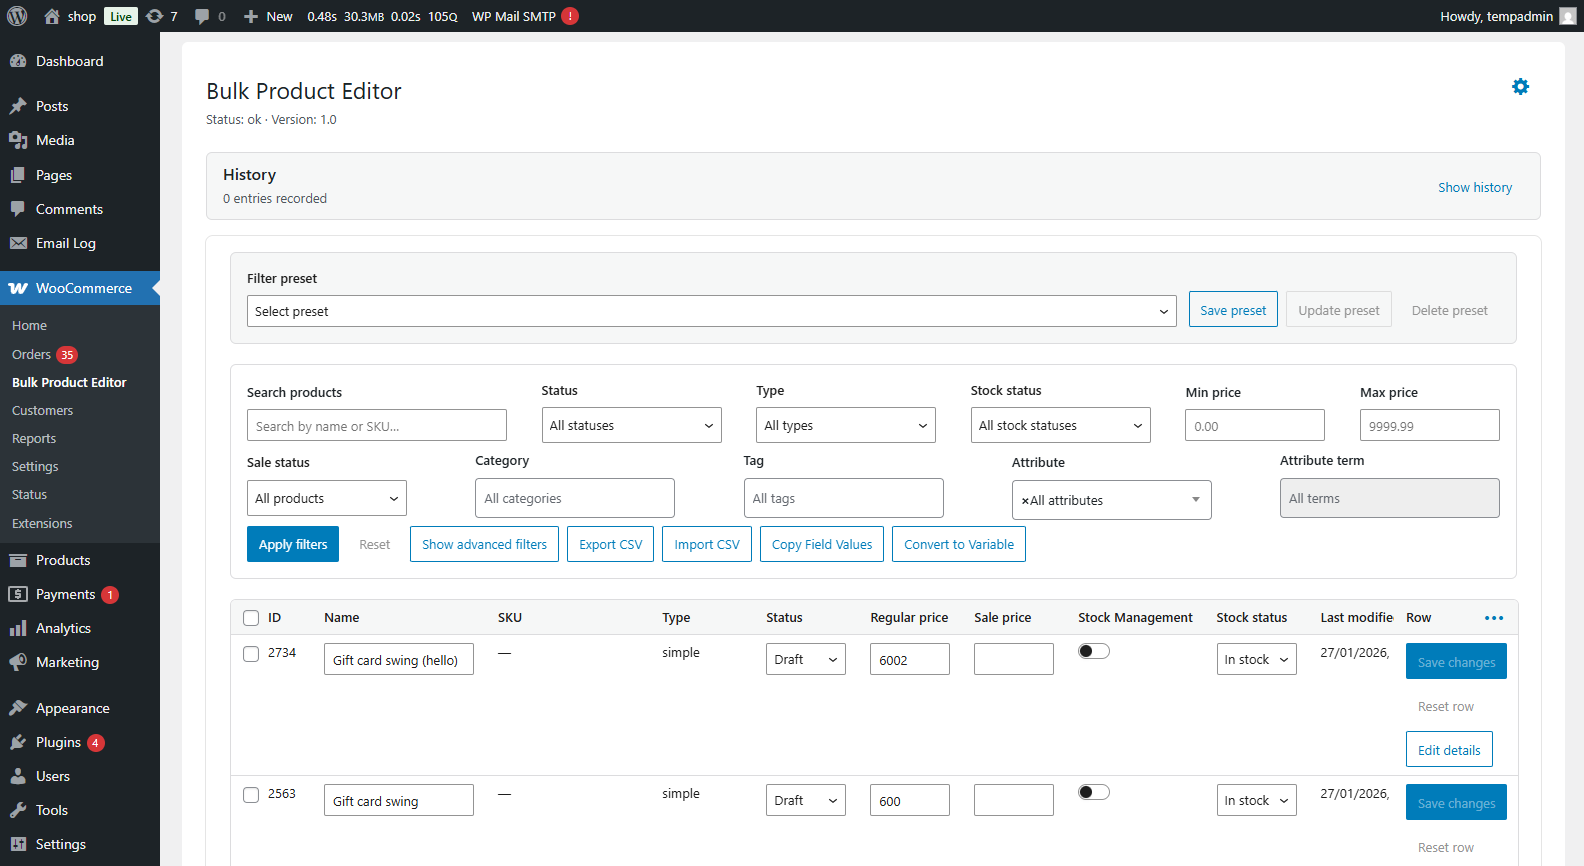
Default Settings
- The plugin works out-of-the-box with these defaults:
- Products Per Page: 50 products displayed at once
- All Product Types: Simple, variable, subscription, bookable products shown
- Editable Fields: All standard WooCommerce fields are editable
- Auto-Save: Changes save automatically when you click outside a cell
- History: All changes are tracked automatically
- No configuration required – you can start editing products immediately!
Plugin Settings and Configuration
↑ Back to topUnlike most plugins, Bulk Product Editor doesn’t have a separate settings page. All controls are built into the main editor interface.
Interface Controls
Filter Panel Settings: The filter panel on the left allows you to configure What products appear in the grid:
- Product Type – What it controls: Which product types to display – Options: All Products, Simple, Variable, Subscription, Bookable – Recommended: Keep All Products unless focusing on a specific type – When to change: When working only with variations or subscriptions
- Stock Status – What it controls: Filter by inventory status – Options: All, In Stock, Out of Stock, On Backorder – Recommended: “All” for general editing – When to change: When updating only out-of-stock products
- Category – What it controls: Show products from specific categories – Recommended: “All Categories” for full catalog view – When to change: When editing products in one category (e.g., “Shirts”)
- Price Range – What it controls: Filter products by regular price – Recommended: Leave blank for all prices – When to change: When targeting products in specific price ranges (e.g., items under $50)
- Display Settings Columns Visibility – What it controls: Which columns appear in the grid – Recommended: Show only the fields you’re editing – When to change: Click column headers to show/hide specific fields – Tip: Hiding unused columns makes the grid easier to read
- Products Per Page – What it controls: How many products display at once- Recommended: 50 for most computers – When to change: Reduce to 25 if page loads slowly; increase to 100 on fast computers
Core Features (Step-by-Step)
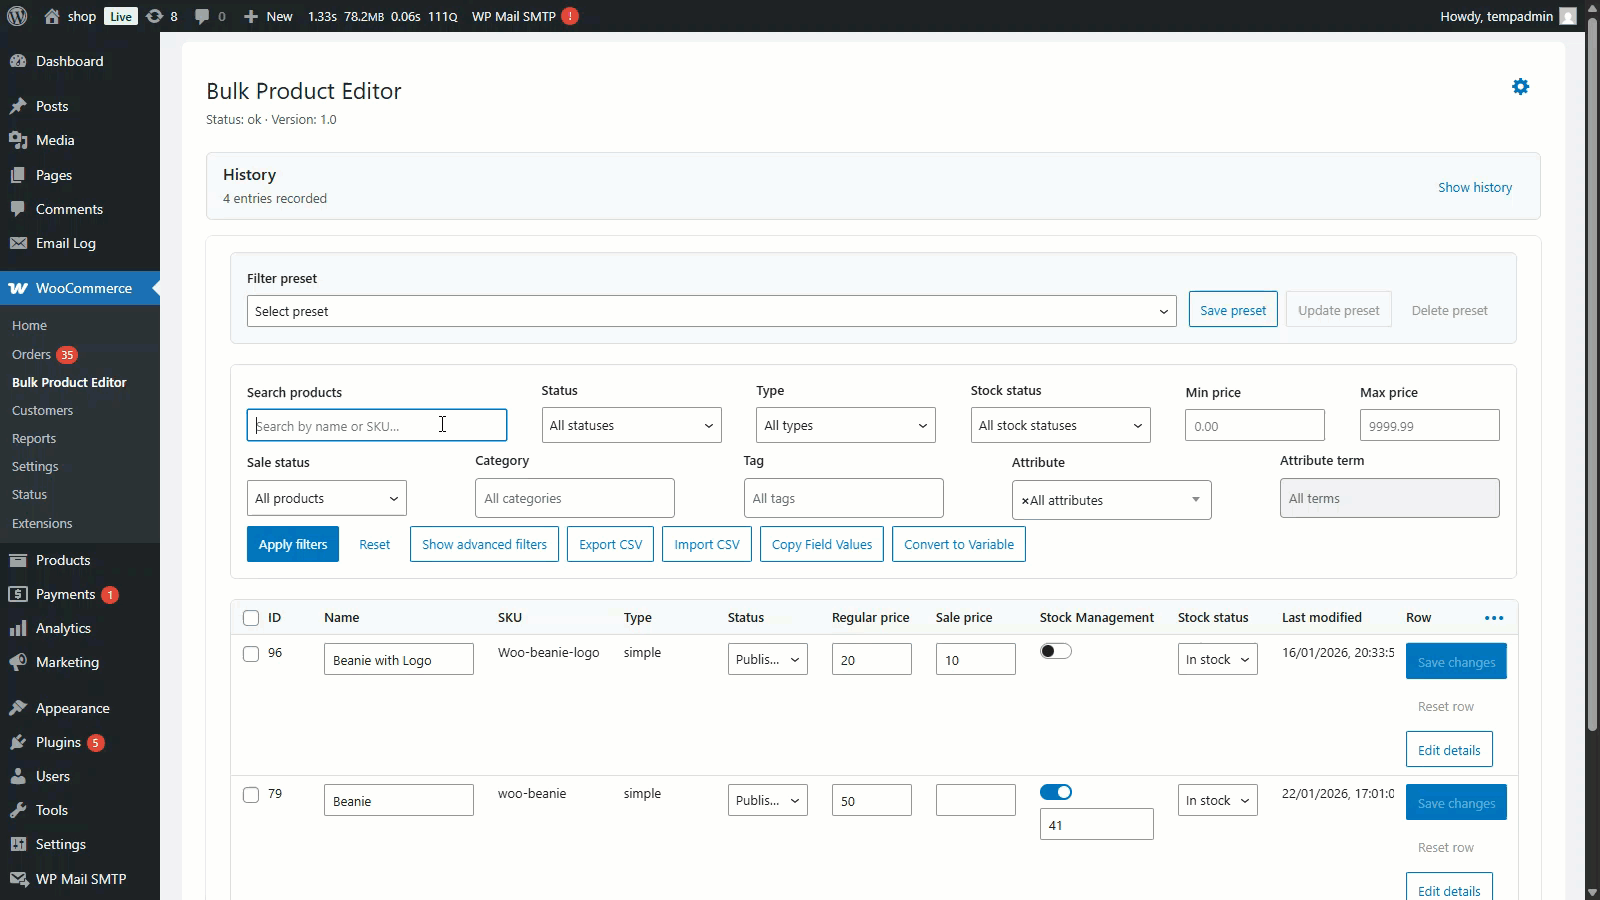
↑ Back to topInline Editing
Purpose: Edit individual product fields directly in the grid
When to Use: When you need to update a few products or make quick corrections
Step-by-Step Instructions
- Open WooCommerce → Bulk Product Editor
- Find the product you want to edit (use filters or search)
- Click on any cell in the product row
- Type the new value
- Press Enter or click outside the cell
- The value saves automatically (you’ll see a brief loading indicator)
What Fields Can You Edit?
- Product Name
- SKU (product code)
- Regular Price
- Sale Price
- Stock Quantity
- Weight and Dimensions
- Categories
- Tags
- Product Description
- Short Description
- Stock Status
- Manage Stock
- And many more…
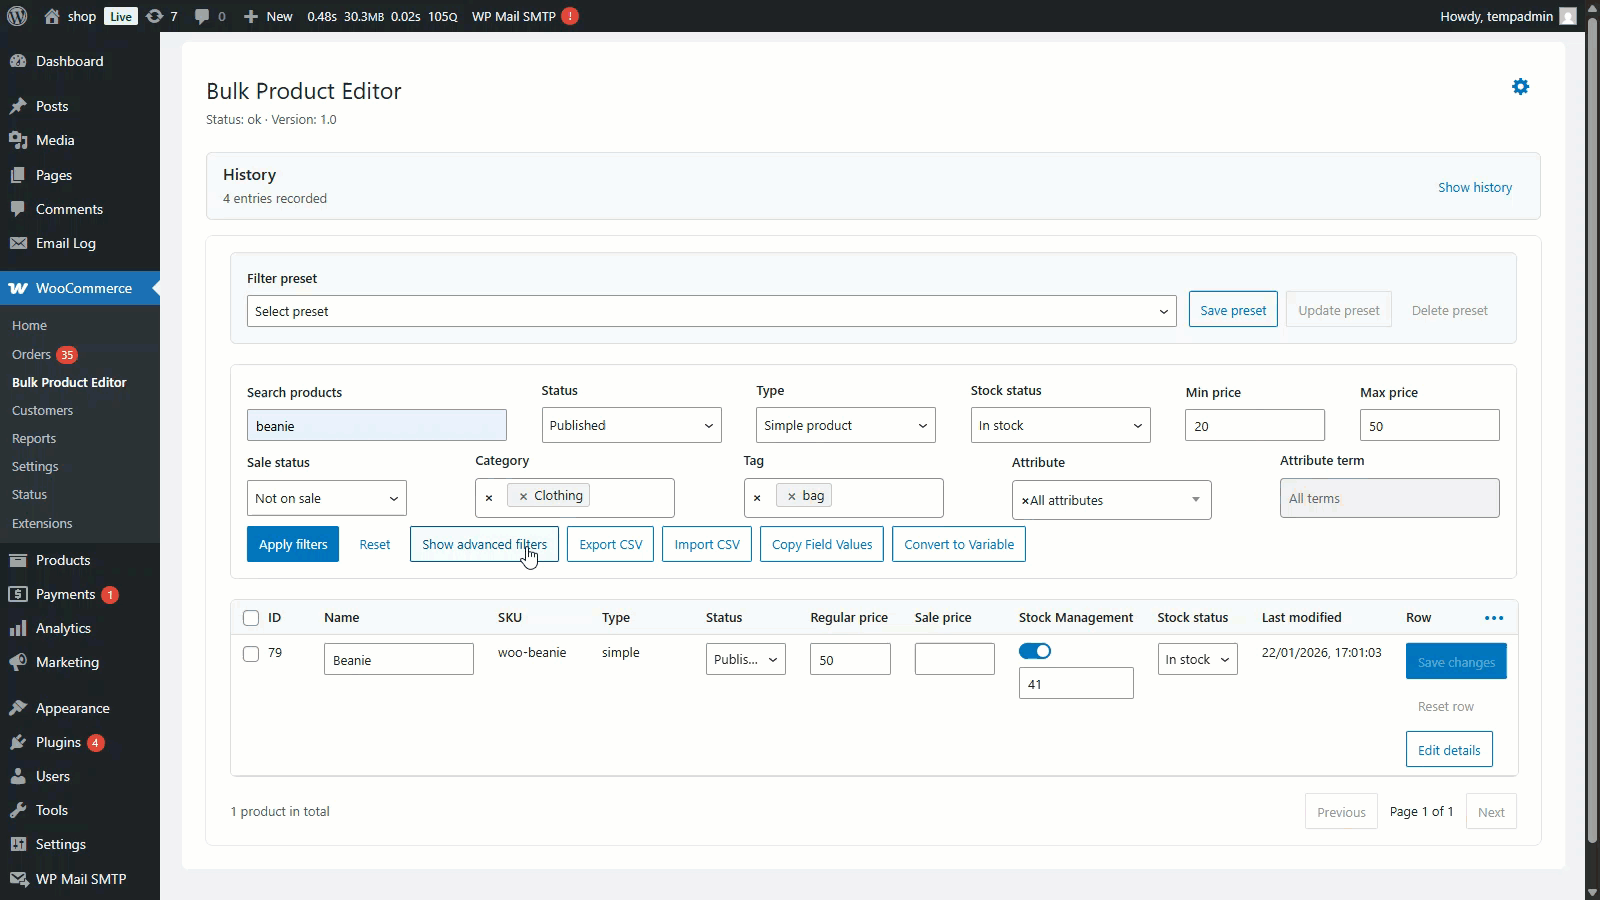
Filtering Products
Purpose: Display only the products you want to edit
When to Use: When working with specific categories, price ranges, or product types
Step-by-Step Instructions
- Open WooCommerce → Bulk Product Editor
- Look at the Filter Panel on the left side
- Choose your filters:
- By Category:
- Click the Category dropdown
- Select a category (e.g., “Electronics”)
- The grid refreshes to show only products in that category
- By Price Range:
- Enter a Minimum Price (e.g., 10)
- Enter a Maximum Price (e.g., 50)
- Click the Apply Filters button
- Grid shows only products between $10-$50
- By Stock Status:
- Click the Stock Status dropdown
- Select “Out of Stock”
- Grid shows only out-of-stock products
- Click the Clear Filters button to reset and see all products again
Saving Filter Presets. If you use the same filters often, save them as a preset:
- Apply your filters (e.g., Category = “Clothing”, Stock Status = “In
- Stock”)
- Click the Save Filter Preset button at the top of the filter panel
- Enter a name: “In-Stock Clothing.”
- Click Save
- Next time, click the Load Preset dropdown and select “In-Stock Clothing.”
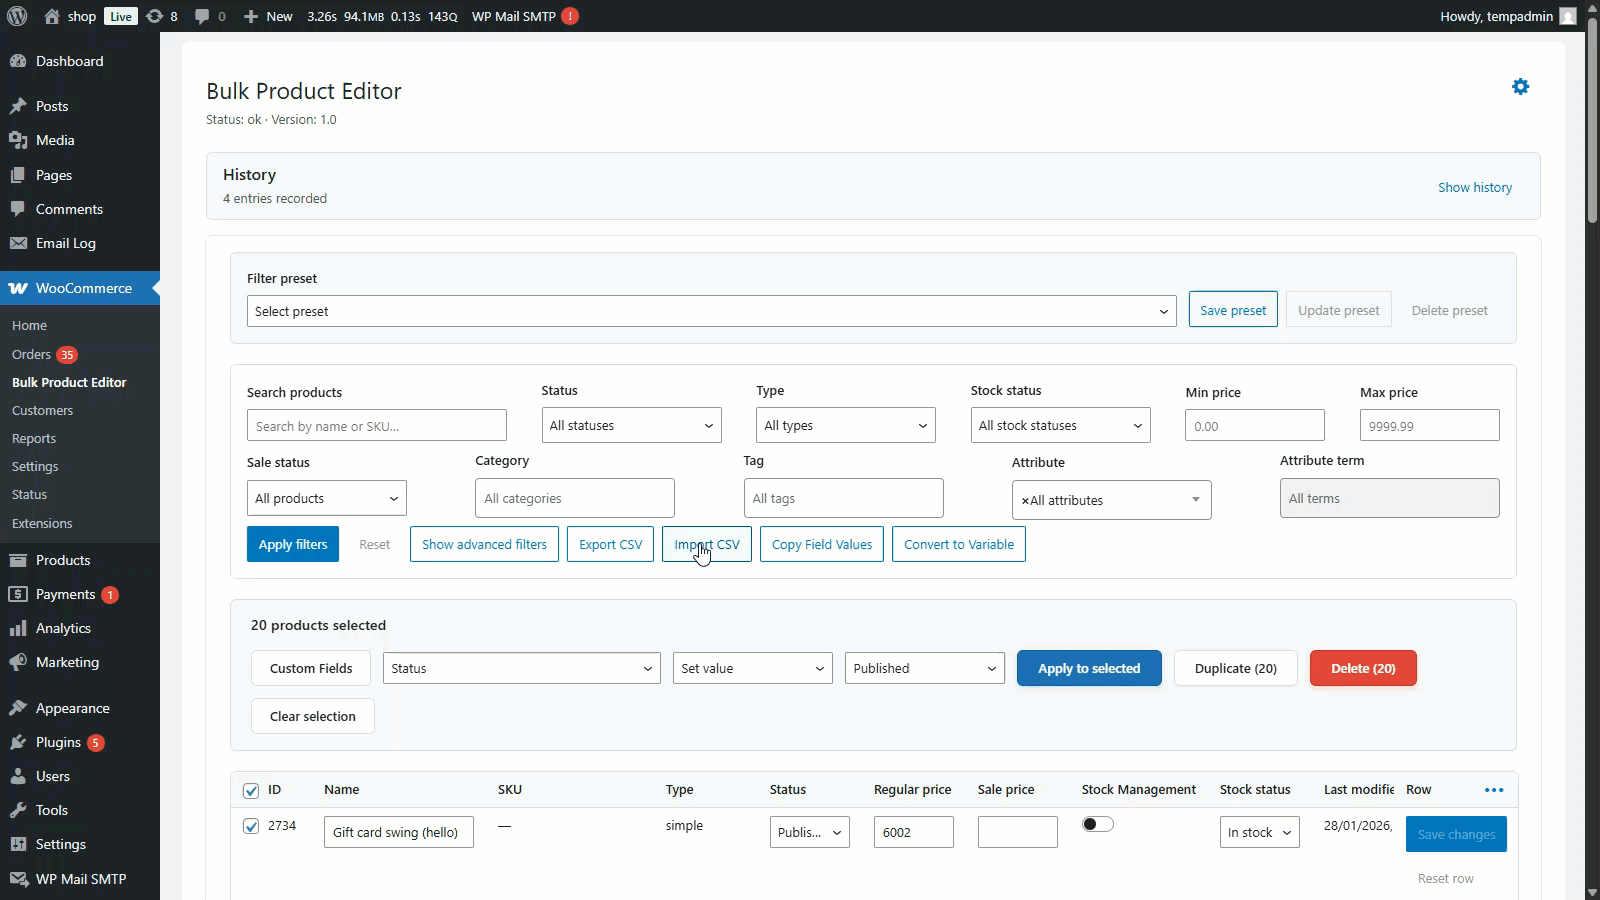
Bulk Set Values
Purpose: Set the same value across multiple products at once
When to Use: Setting all products to “In Stock” – Adding the same tag to multiple products – Setting a default weight for a category multiple products – Setting a default weight for a category
Step-by-Step Instructions
- Open WooCommerce → Bulk Product Editor
- Filter to the products you want to update (optional)
- Select products by clicking the checkbox at the start of each row
- Tip: Click the checkbox in the header row to select ALL products on the current page
- Click the Bulk Actions button in the top toolbar
- Click Set Value
- A pop-up appears:
- Field to Update: Choose the field (e.g., “Stock Status”)
- New Value: Enter or select the value (e.g., “In Stock”)
- Click the Apply button
- Confirmation message appears: “X products updated successfully.”
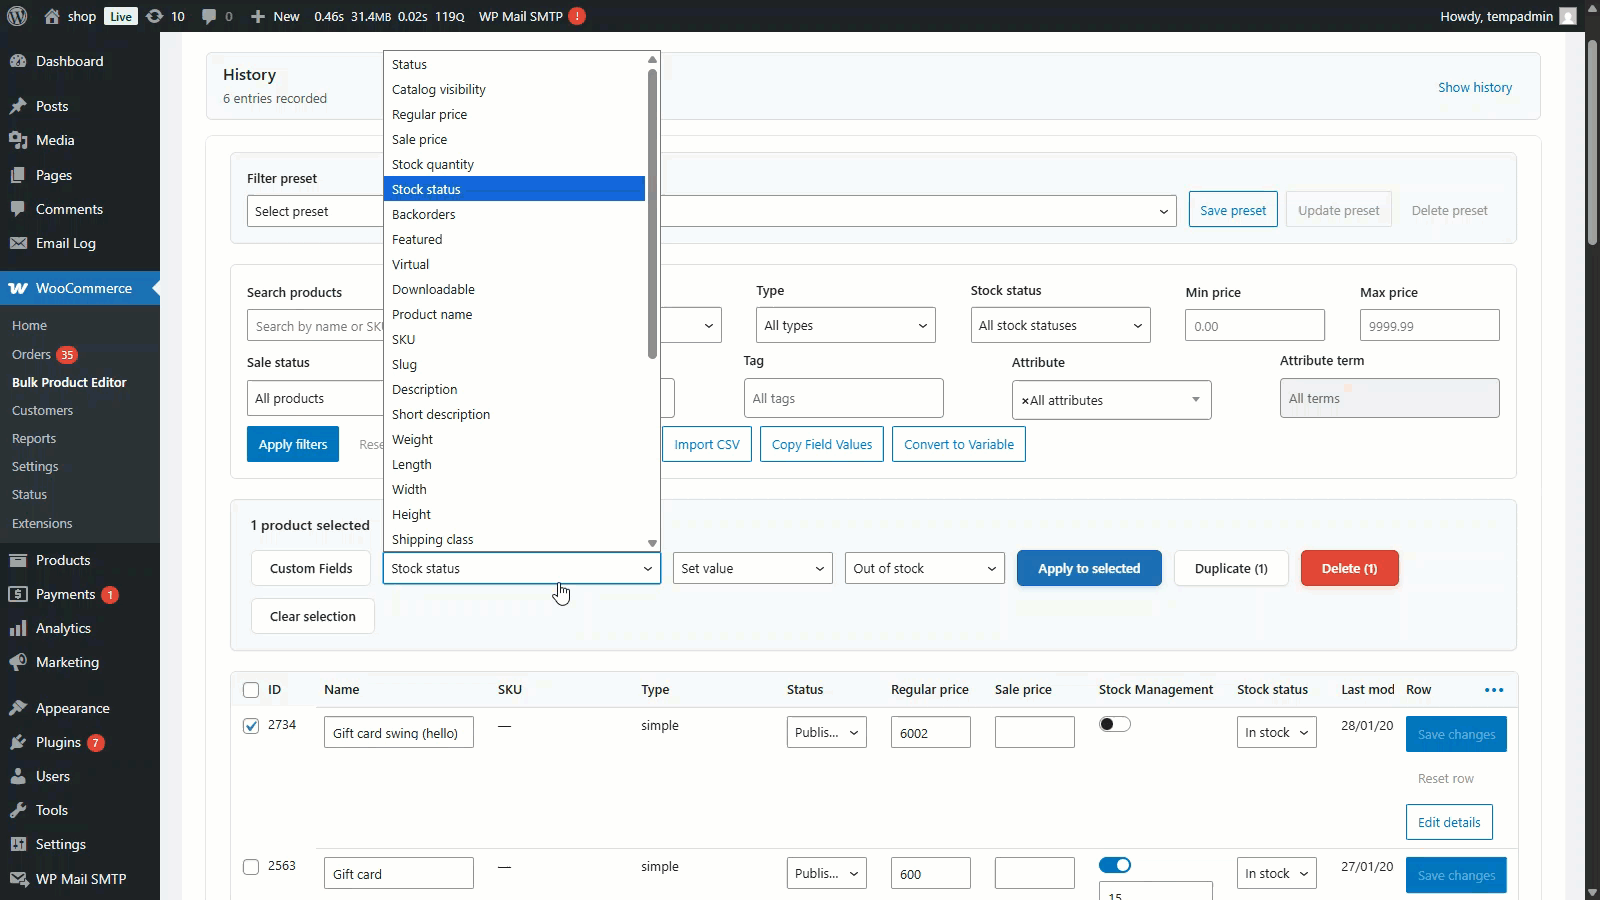
- Common Bulk Set Examples: Mark Products as In Stock – Select products – Bulk Actions → Set Value – Field: “Stock Status” – Value: “In Stock”.
Bulk Increase/Decrease Price
Purpose: Change prices by a fixed amount or percentage across multiple products
When to Use: Seasonal price increases – Sale events – Currency adjustments – Wholesale pricing updates
Step-by-Step Instructions: Increase by Percentage
- Open WooCommerce → Bulk Product Editor
- Select the products to update (or select all)
- Field: Select “Regular Price”
- Type: Select “Percentage”
- Value: Enter 15 (for 15% increase)
- If correct, click Apply
- Success message appears

Step-by-Step Instructions: Decrease by Fixed Amount
- Select products
- Click Bulk Actions → Decrease
- Field: Select “Regular Price”
- Type: Select “Percentage”
- Value: Enter 15 (for 15% decrease)
- If correct, click Apply
- Success message appears
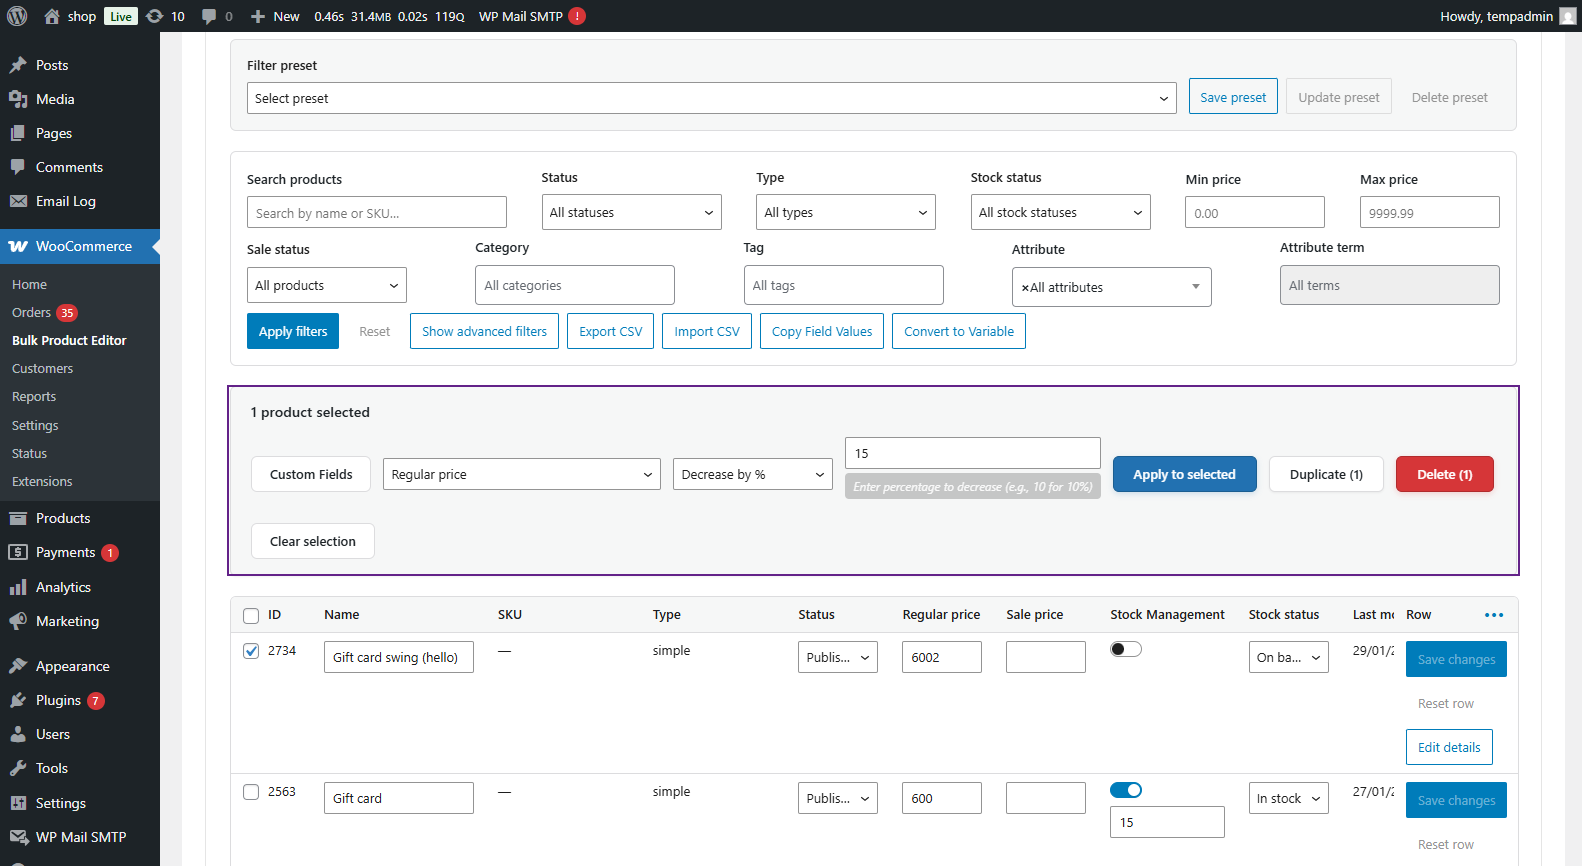
Important Notes
- Percentage increases are based on current prices
- Fixed amount adds/subtracts exactly that amount
- Changes are saved immediately
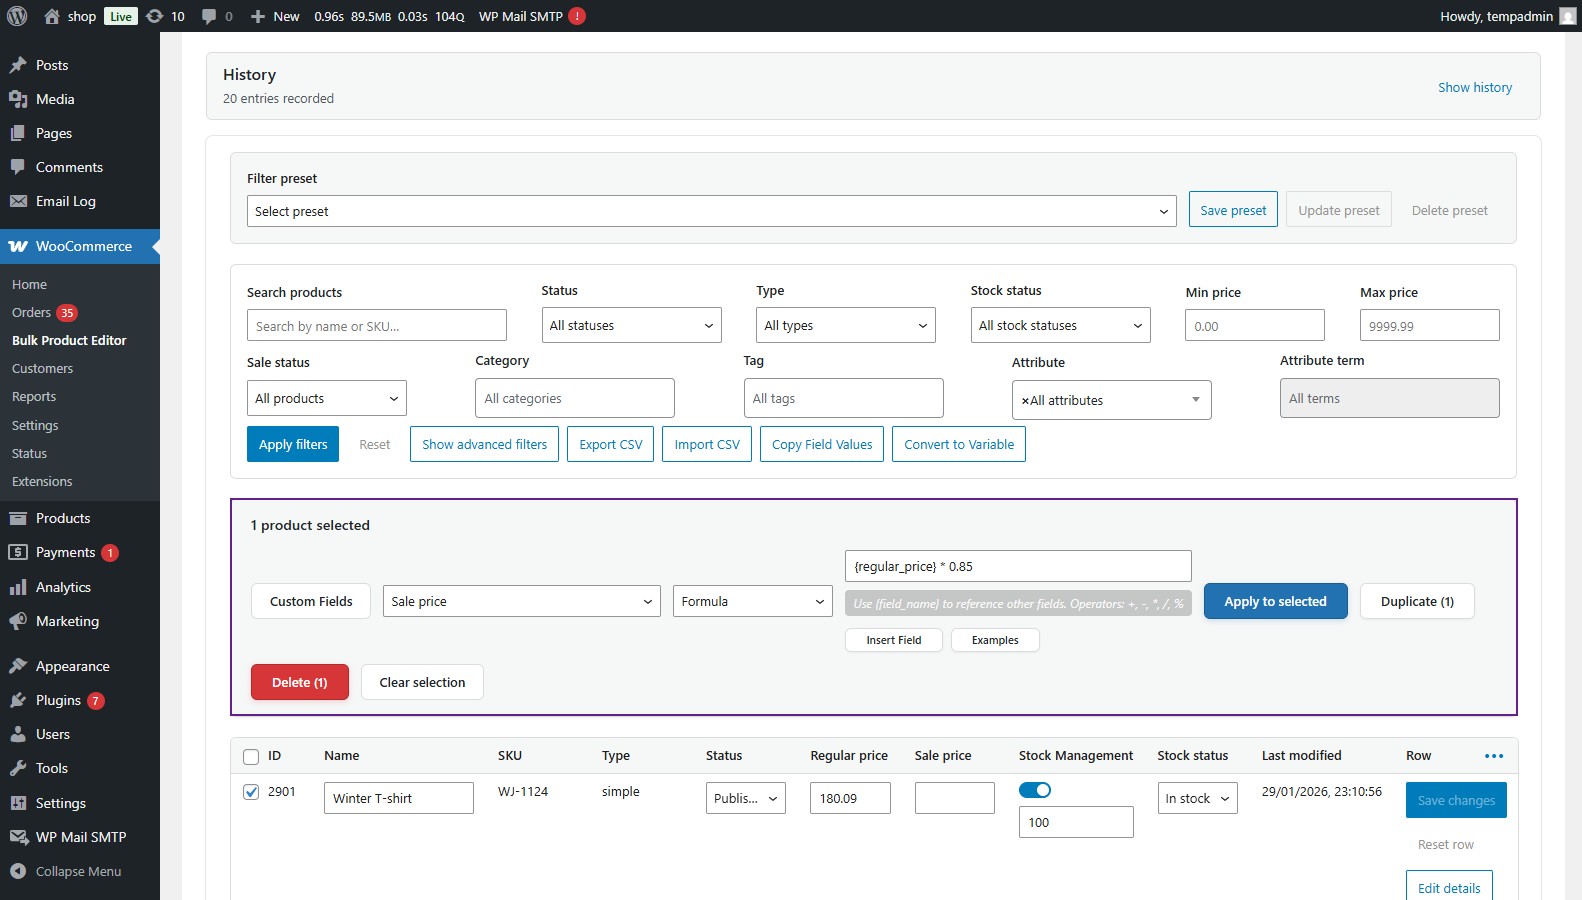
Calculate with Formulas
Purpose: Use math formulas to calculate new values based on existing product data.
When to Use:
- Setting sale prices as a percentage of regular prices
- Calculating prices based on cost
- Setting dimensions based on other fields
Step-by-Step Instructions
- Select products in the grid
- Click Bulk Actions
- Field to Update: Select “Sale Price”
- Formula: Enter {regular_price} * 0.85
- Round To: Select “2 decimals.”
- Click Preview to see calculated values
- Click Apply to save
- Available Formula Fields (use curly braces in formulas):
- {regular_price} – Product’s regular price
- {sale_price} – Product’s sale price
- {stock_quantity} – Stock quantity
- {weight} – Product weight
- {length}, {width}, {height} – Dimensions
- Formula Examples:
- Set Sale Price to 20% Off: {regular_price} * 0.80
- Calculate Price Including 10% Markup: {regular_price} * 1.10
- Increase Price by $10: {regular_price} + 10
- Calculate Based on Multiple Fields: ({regular_price} + {weight}) * 1.5
- Important Notes:
- Formulas can include any combination of available fields
- Always preview before applying to avoid errors
- Changes are applied immediately to selected products
Copy Values
Purpose: Copy values from one field to another across multiple products
When to Use:- Copying regular price to sale price – Copying product name to SKU – Copying descriptions between fields
Step-by-Step Instructions
- Select products
- Click Bulk Actions → Copy Field Values
- Source Field: Select field to copy FROM (e.g., “Regular Price”)
- Target Field: Select field to copy TO (e.g., “Sale Price”)
- Click Apply
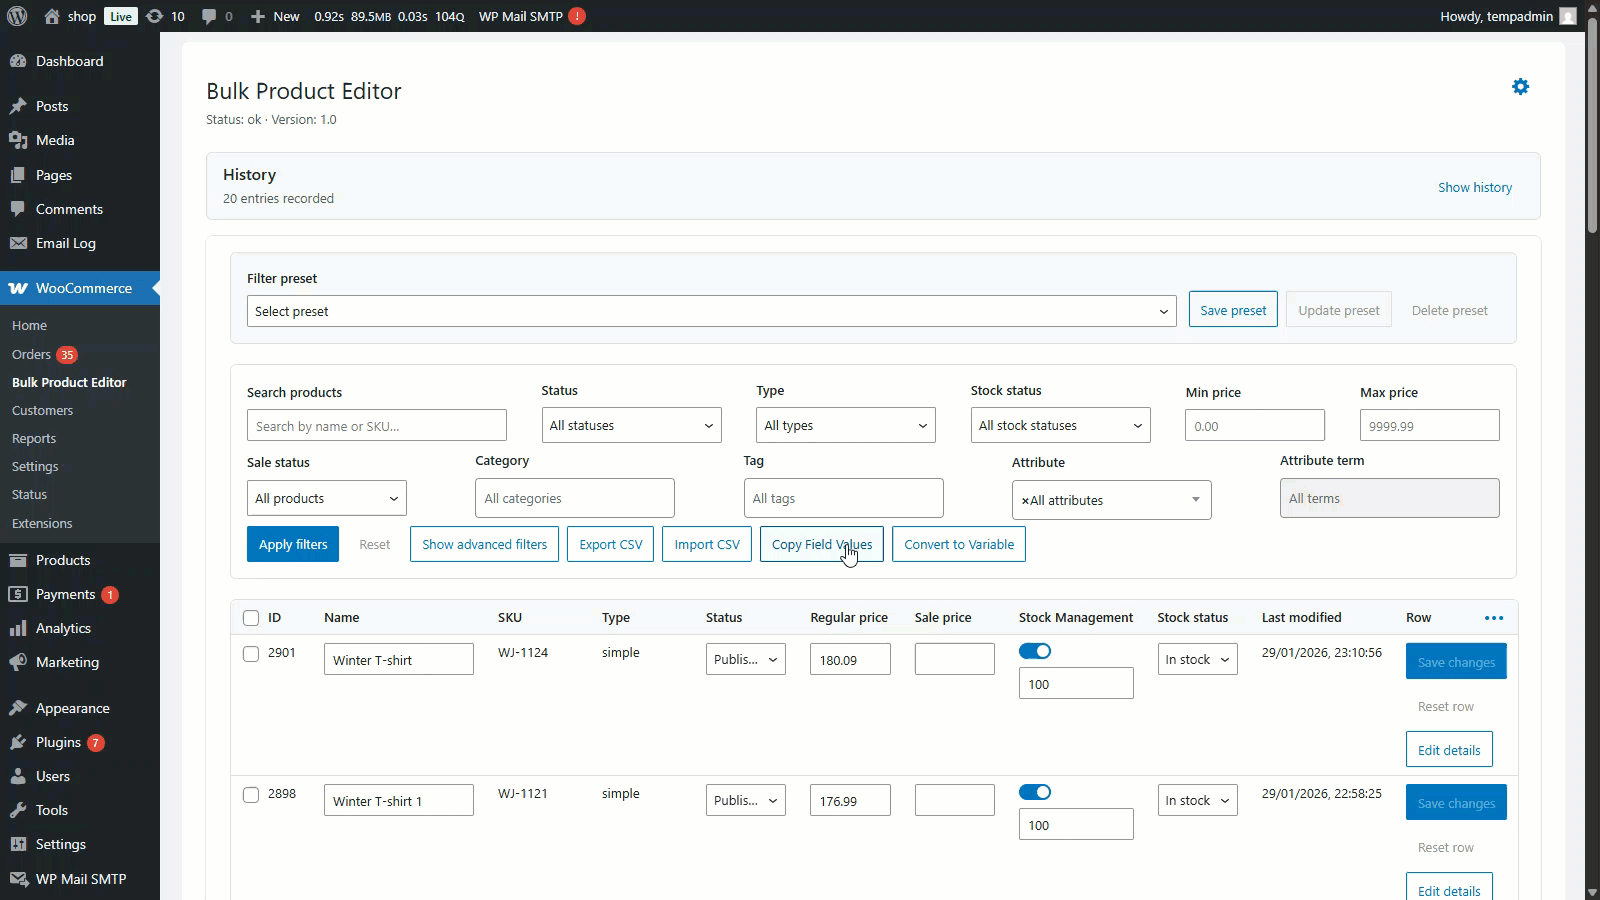
Common Copy Operations Make All Products On Sale: – Source: Regular Price – Target: Sale Price – Result: Sale price = regular price (products show as on sale)
Copy Short Description to Long Description: – Source: Short Description – Target: Description – Result: Both fields have same content
Find and Replace
Purpose: Find text in product fields and replace it with different text
When to Use: Fixing typos across products – Updating brand names – Changing URLs in descriptions Updating sizing information
Step-by-Step Instructions
- Select products (or select all)
- Click Bulk Actions → Find and Replace
- Field: Select which field to search in (e.g., “Product Name”)
- Find: Enter text to find (e.g., “T-Shirt”)
- Replace With: Enter replacement text (e.g., “T-shirt”)
- Case Sensitive: Check if exact case matters
- Click Preview to see how many matches were found
- Click Apply to replace
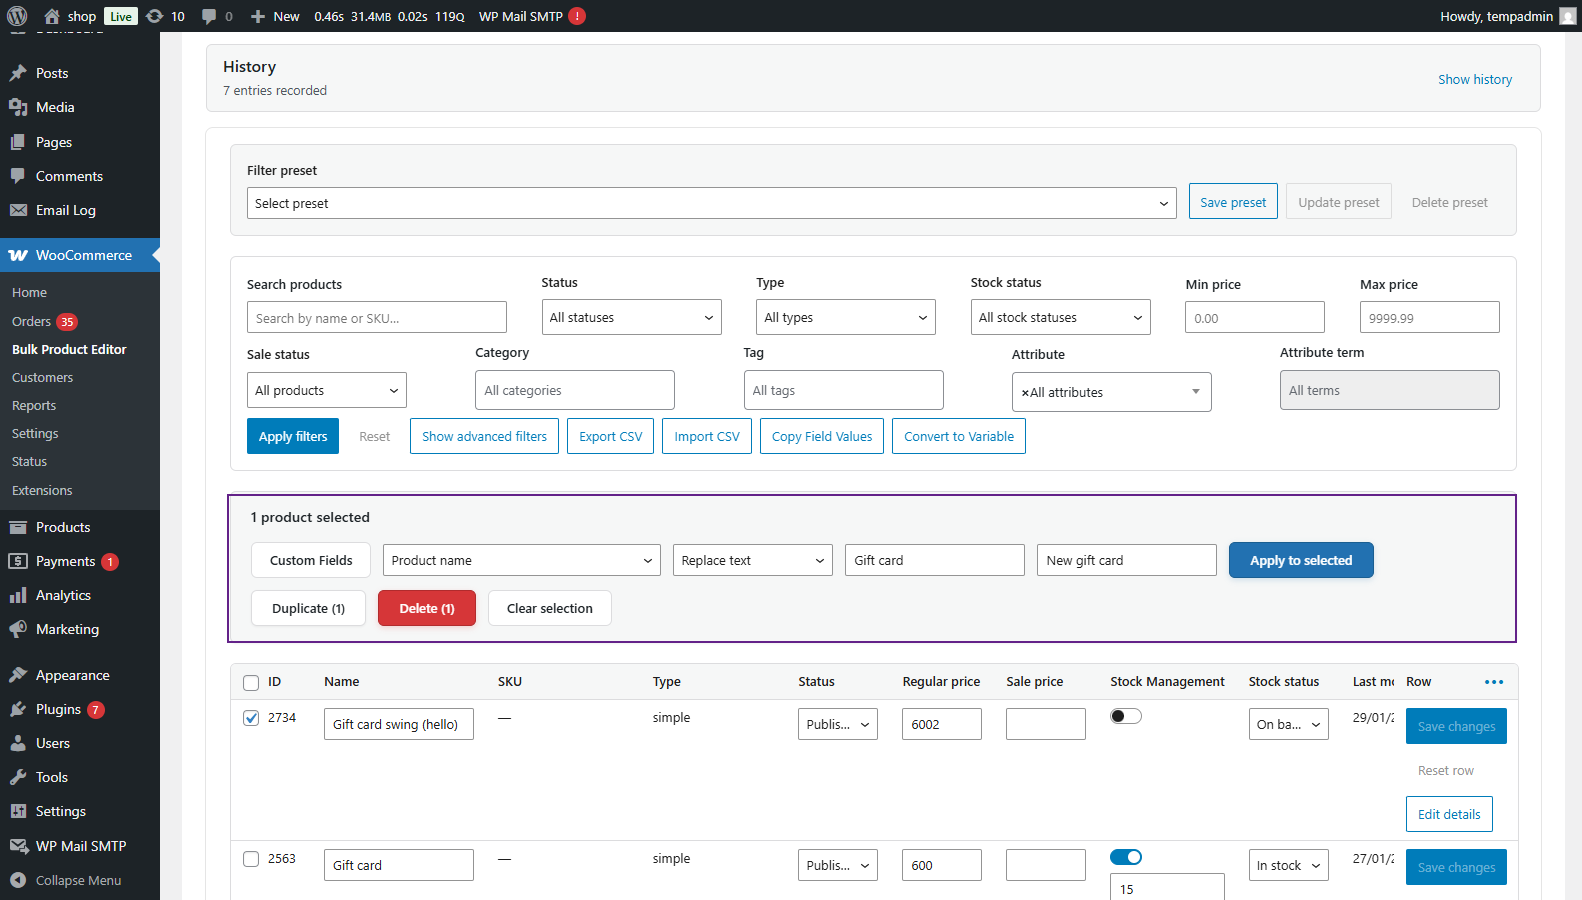
- Find and Replace Examples Fix Spelling Errors: – Field: Product Name- Find: “Tshirt” – Replace: “T-shirt”
- Update Brand Name: – Field: Description – Find: “OldBrand” – Replace: “NewBrand”
- Remove Text: – Field: Product Name – Find: “[DISCONTINUED]” – Replace: (leave empty) – Result: Removes the text
Export Products to CSV
Purpose: Export filtered products to a CSV file for editing in Excel or backup
When to Use: Creating backups before bulk changes – Editing products in Excel – Sharing product data with others – Analyzing product data
Step-by-Step Instructions
- Open WooCommerce → Bulk Product Editor
- Apply filters to select products to export (or export all)
- Click the Export button in the top toolbar
- A pop-up appears with export options:
- Export All Products: Exports all products in the database
- Export Filtered Products: Exports only products matching the current filters
- Export Selected Products: Exports only products with checked boxes
- Select which option you want
- Choose which fields to include:
- Select All Fields for complete export
- Or uncheck fields you don’t need
- Click the Export to CSV button
- File downloads automatically to your computer
- Open file in Excel, Google Sheets, or a text editor
Import Products from CSV
Purpose: Import products from a CSV file to create new products or update existing ones
When to Use: Migrating from another platform – Adding many products at once – Updating product data from a spreadsheet
Step-by-Step Instructions
- Prepare your CSV file:
- Open Excel or Google Sheets
- First row should be column headers (e.g., Name, SKU, Price, Stock)
- The following rows contain product data
- Save as CSV format
- In WordPress Admin, go to WooCommerce → Bulk Product Editor
- Click the Import button in the top toolbar
- Click Choose File and select your CSV
- Click Upload
- The Field Mapping screen appears
- Map CSV columns to WooCommerce fields:
- The left side shows your CSV columns
- The right side shows WooCommerce fields
- Match them up (e.g., “Name” → “Product Name”)
- Select import mode:
- Create New Products: Only add new products
- Update Existing: Only update existing products (matches by SKUor ID)
- Create or Update: Both (recommended)
- Click the Import button
- Wait for the import to complete
- The success message shows how many products were imported
History and Undo
Purpose: View all changes made and undo mistakes
When to Use: After making bulk changes you want to reverse – Checking who made what changes – Recovering from errors
Step-by-Step Instructions View History
- Open WooCommerce → Bulk Product Editor
- Click History button in the top toolbar
- You see a list of all bulk operations:
- Date and time
- What was changed (e.g., “Increased Regular Price by 10%”)
- How many products were affected
- Who made the change
- Click on any history item to see details
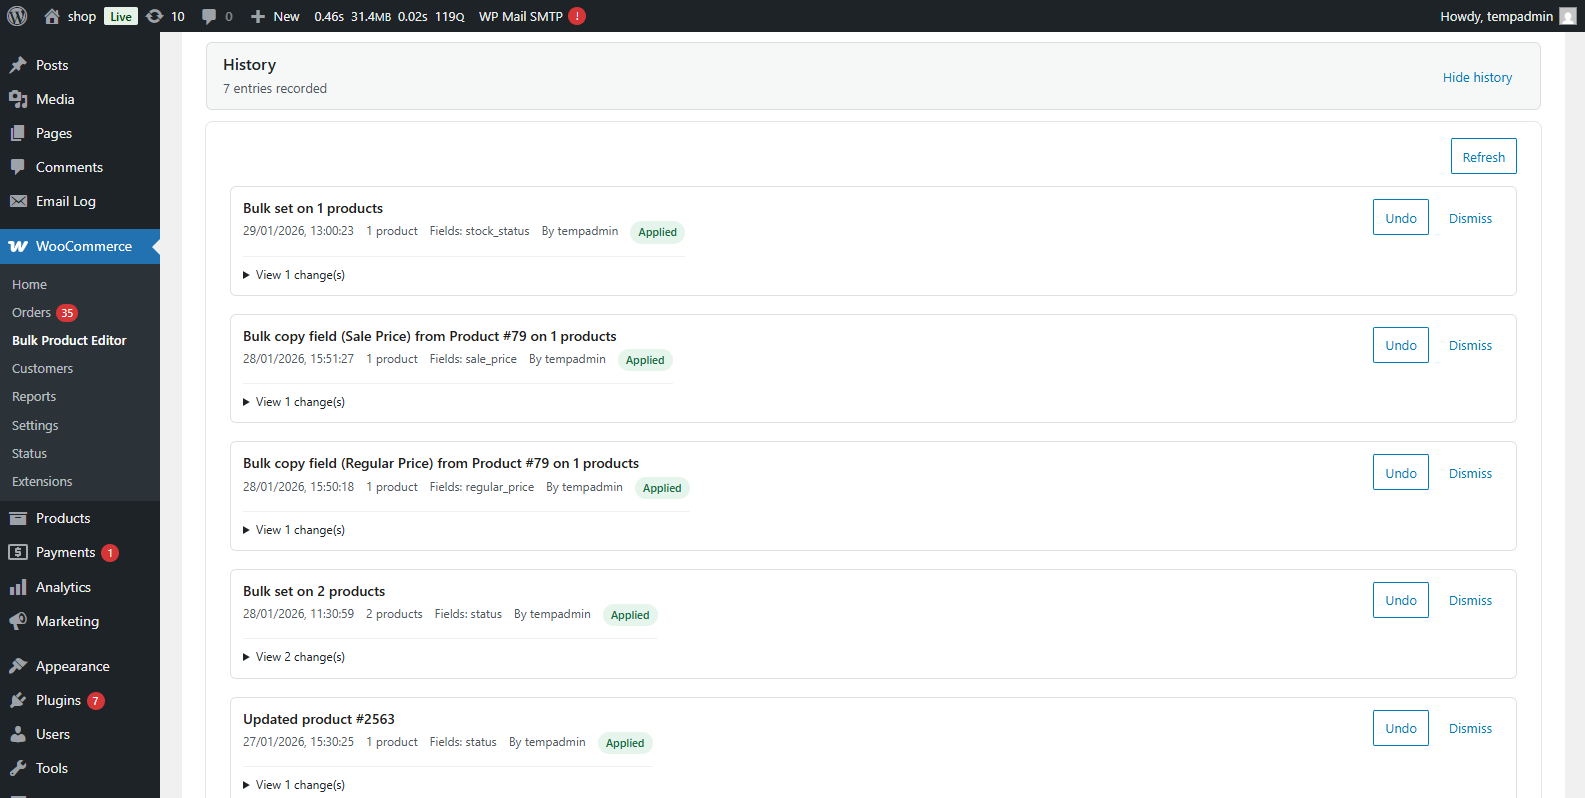
Step-by-Step Instructions View History
- Open History panel
- Find the operation you want to undo
- Click the Undo button next to that operation
- Confirmation dialog appears:
- “Are you sure you want to undo this operation?”
- Shows exactly what will be reversed
- Click Yes, Undo button
- Plugin restores the previous values
- Success message: “Operation undone successfully.”
Important: You can only undo operations that appear in history. Manual edits (inline editing) cannot be undone.
What Operations Can Be Undone? ff Can Undo: – Bulk Set Value – Bulk Increase/Decrease – Bulk Calculate – Bulk Find and Replace – Bulk Copy – Import operations
Cannot Undo: – Individual inline edits – Manual product deletion – Changes made outside the bulk editor
Advanced Search
Purpose: Find specific products quickly in large catalogs
When to Use: Finding products by name, SKU, or other attributes
Step-by-Step Instructions
- Open WooCommerce → Bulk Product Editor
- Look for the Search box at the top right of the grid
- Click inside the search box
- Type your search term:
- Product name: “Blue Shirt.”
- SKU: “TEE-001”
- Partial text: “Shirt” (finds all products with “Shirt” in name)
- Press Enter or click the search icon
- Grid updates to show only matching products
- Click X in the search box to clear and show all products again
Search Tips
- Search is instant – results appear as you type
- Searches multiple fields – name, SKU, description
- Not case-sensitive – “shirt” finds “Shirt” and “SHIRT.”
- Combine with filters – search within filtered categories
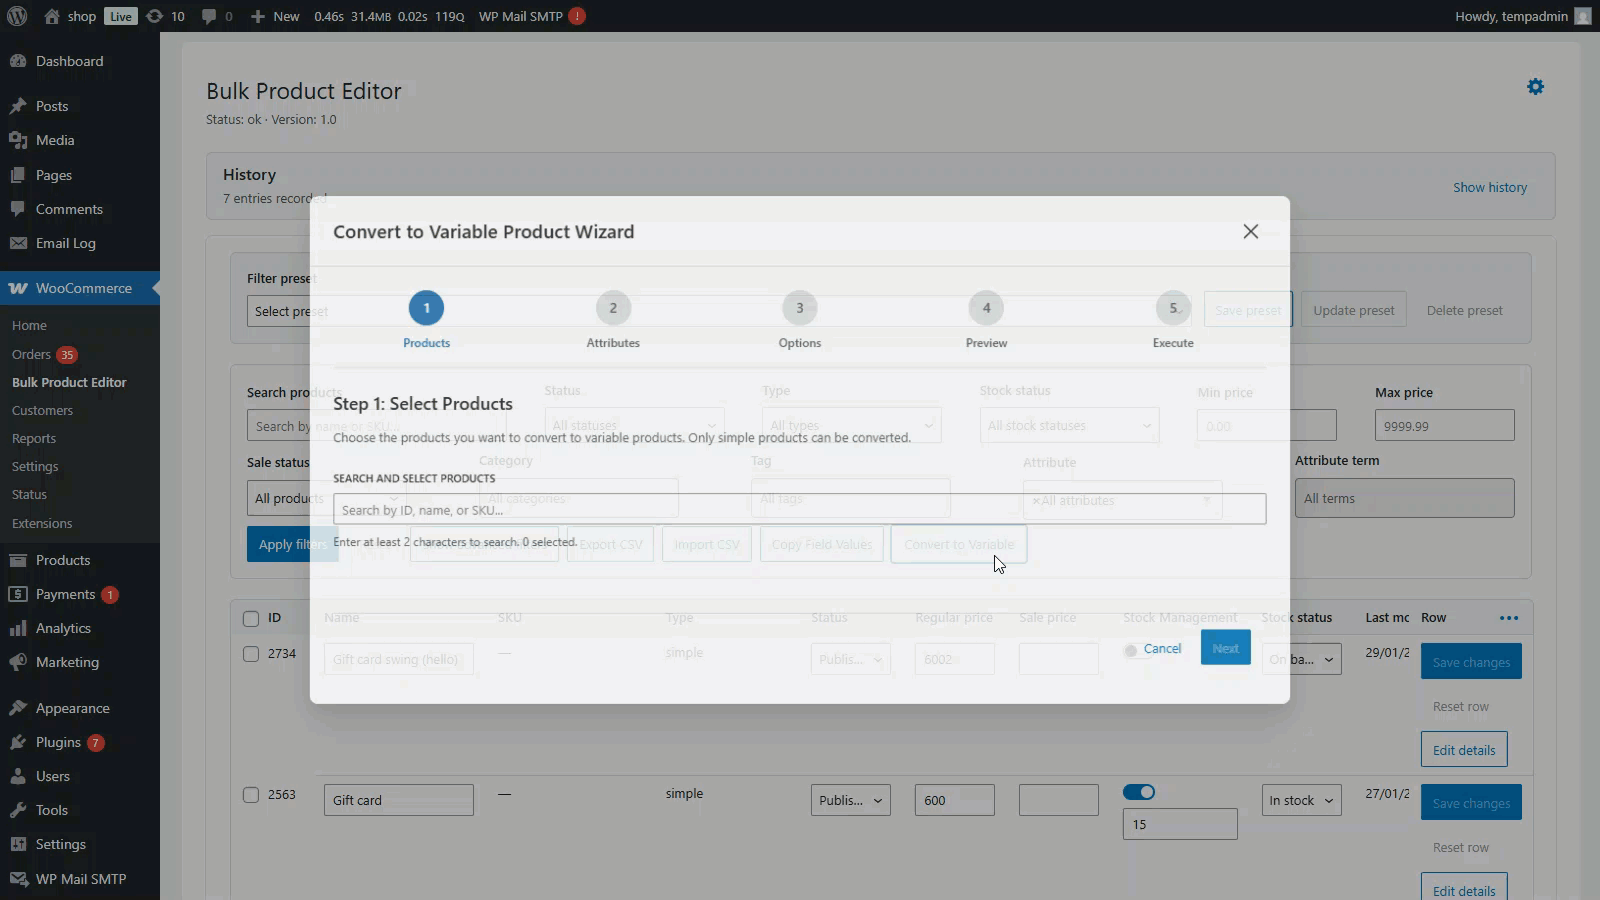
Converting Simple to Variable Products
Purpose: Convert simple products into variable products with attributes and variations
When to Use: When you need to add size, color, or other variations to existing simple products
Step-by-Step Instructions
- Find the simple product in the grid
- Select the product checkbox
- Click Bulk Actions → Convert to Variable
- In the popup:
- Add Attributes: Click “Add Attribute”
- Choose attribute (e.g., “Size”)
- Add values: S, M, L (separate with commas or add one by one)
- Click “Add Attribute” again for more (e.g., “Color”: Red, Blue)
- Check Generate Variations Automatically
- Click Convert
- Product converts to Variable product
- Variations are generated automatically
Advanced Features
Purpose: Edit custom meta fields created by other plugins or custom code
When to Use: When using plugins that add custom fields to products
Feature 1: Custom Meta Fields
How to Access
- Open WooCommerce → Bulk Product Editor
- Right-click on column headers
- Select Show/Hide Columns
- Scroll down to Custom Meta Fields section
- Check the custom fields you want to edit
- Click Apply
- Columns appear in the grid
Edit Custom Fields: – Click any custom field cell – Enter new value – Press Enter to save
Feature 2: Working with Attributes
Purpose: Manage product attributes and variations
Adding Attributes to Products
- Select products
- Click Bulk Actions → Set Value
- Field: “Attributes”
- Add attribute name and values
- Click Apply
Bulk Editing Attribute Values
- Find attribute columns in grid
- Click cells to edit attribute values
- Save changes inline
Feature 3: Saving Time with Keyboard Shortcuts
Purpose: Navigate and edit faster using keyboard
Available Shortcuts
- Tab: Move to next cell
- Shift + Tab: Move to previous cell
- Enter: Save current cell and move down
- Escape: Cancel editing and close cell
- Arrow Keys: Navigate between cells (when not editing)
- Ctrl/Cmd + A: Select all visible products
- Ctrl/Cmd + C: Copy cell value
- Ctrl/Cmd + V: Paste cell value
Common Issues and Troubleshooting
↑ Back to topIssue 1: Plugin Not Appearing in Admin Menu
Problem: Can’t find “Bulk Product Editor” in the WordPress menu
Solutions:
- Check WooCommerce is Active
- Go to Plugins → Installed Plugins
- Look for WooCommerce
- If it says “Inactive”, click Activate
- Refresh your admin page
- Check User Permissions
- You must have “Shop Manager” or “Administrator” role
- Only users with “manage_woocommerce” capability can access
- Ask site administrator to grant permissions
- Re-activate the Plugin
- Go to Plugins → Installed Plugins
- Find “Bulk Product Editor”
- Click Deactivate
- Click Activate again
- Check WooCommerce menu
Issue 2: Changes Not Saving
Problm: Can’t find “Bulk Product Editor” in the WordPress menu
Solutions:
- Check for JavaScript Errors
- Press F12 to open browser console
- Look for red error messages
- Refresh page and try again
- Clear Browser Cache
- Press Ctrl+F5 (Windows) or Cmd+Shift+R (Mac)
- Try editing again
- Check PHP Memory Limit
- If editing many products at once, you may need more memory
- Contact hosting provider to increase PHP memory to 512MB
- Check File Permissions
- Server must have write permissions
- Contact hosting support if issue persists
Issue 3: Page Loading Slowly
Problem: Bulk editor takes a long time to load or becomes unresponsive
Solutions:
- Reduce Products Per Page
- • Change from 100 to 50 or 25
- • Click “Products per page” dropdown at bottom
- • Select lower number
- Use Filters
- • Don’t try to edit all products at once
- • Filter by category or product type
- • Work in smaller batches
- Hide Unused Columns
- • Right-click column headers
- • Uncheck columns you don’t need
- • Fewer columns = faster loading
- Check Internet Connection
- • Plugin loads data via AJAX
- • Slow connection = slow loading
- • Try wired connection instead of WiFi
Issue 4: Conflicts with Other Plugins
Problem: Bulk editor doesn’t load or behaves strangely
Solutions:
- Disable Conflicting Plugins Temporarily
- Go to Plugins → Installed Plugins
- Deactivate other product management plugins one by one
- Test bulk editor after each deactivation
- Identify the conflicting plugin
- Common Conflicts:
- Other bulk edit plugins
- Product table plugins
- Custom admin plugins
- JavaScript optimization plugins
- Clear Cache
- If using a caching plugin (W3 Total Cache, WP Super Cache, etc.)
- Clear cache from plugin settings
- Try accessing bulk editor again
Frequently Asked Questions (FAQ)
↑ Back to topCan I use this plugin with any theme?
Yes! Bulk Product Editor is admin-only and doesn’t affect your frontend theme. It works with all WordPress and WooCommerce themes because it only operates in the WordPress admin area.
Is it compatible with page builders?
Yes! The plugin doesn’t interact with page builders. Page builders control frontend design, while Bulk Product Editor works in the admin area, so they won’t conflict.
Will this slow down my website?
No. The plugin only loads on the bulk editor page (WooCommerce → Bulk Product Editor). It doesn’t add any code to your frontend website, so customers won’t experience any slowdown.
Can I edit products from multiple categories at once?
Yes! You have multiple options:
Option 1: Set the Category filter to “All Categories.”
Option 2: Hold Ctrl (Windows) or Cmd (Mac) and select multiple categories.
Result: The grid will display products from all selected categories.
What happens to product images?
- Inline Editing: Images aren’t changed.
- Bulk Operations: Images aren’t affected unless you specifically target image fields.
- Import: You can import image URLs in a CSV file.
- Duplicate: Duplicated products copy all images from the original product.
Can I undo a bulk operation?
Yes, if you used a bulk operation from the Bulk Actions menu:
- Click the History button.
- Find the operation.
- Click Undo.
No, if you:
- Edited cells inline individually
- Deleted products permanently
- Made changes outside the bulk editor
How many products can I edit at once?
Technical Limits
- Depends on your server’s PHP memory and execution time.
- Most servers handle 500–1000 products per operation.
Recommended Limits
- Small operations (set value, copy): Up to 1000 products
- Complex operations (calculate, duplicate): 100–500 products
- Import: About 500 products per CSV file
If you have more products:
- Use filters to work in batches.
- Import in multiple files.
- Contact your hosting provider to increase limits.
Does it work with WooCommerce Subscriptions?
Yes! Full support for subscription products, including:
- Editing subscription pricing
- Managing billing periods
- Setting sign-up fees
- Configuring trial periods
- Editing all subscription fields
Does it work with WooCommerce Bookings?
Yes! Full support for bookable products:
- Edit booking duration
- Manage availability
- Set booking costs
- Configure booking rules
Can I restore deleted products?
Trashed Products – Yes
- Go to WooCommerce → Products
- Click the “Trash” link at the top
- Find the product
- Click Restore
Uninstalling the Plugin
↑ Back to topProper Deactivation Steps
Step 1: Export Your Data (Recommended)
Before uninstalling, create a backup to ensure your product data is saved and easily recoverable.
- Open WooCommerce → Bulk Product Editor.
- Click Export.
- Select Export All Products.
- Choose All Fields.
- Click Export to CSV.
- Save the file in a secure location.
Step 2: Deactivate the Plugin
- Go to Plugins → Installed Plugins.
- Find “Bulk Product Editor.”
- Click Deactivate.
The plugin will stop working, but your data will remain intact.
Step 3: Delete the Plugin (Optional)
Only perform this step if you are sure you will not use the plugin again.
- After deactivating, click Delete.
- A confirmation popup will appear.
- Click OK to confirm.
- Plugin files will be removed from the server.
Data Cleanup
What Gets Deleted
- Plugin files
- Plugin settings
- History records (if stored by the plugin)
What Stays
- All your products (unchanged)
- Product categories and tags
- Product images
- All WooCommerce data
Note: Deleting the plugin does NOT remove your products or product data. It only removes the bulk editor tool.
After Uninstalling
Your WooCommerce products will remain exactly as they were. You can:
- Continue managing products normally in WooCommerce
- Install the plugin again later if needed
- Use WooCommerce’s built-in product editor
Support and Updates
↑ Back to topWhere to Get Help
Official Support Channels
- Visit: https://wpexperts.io/
- Support Portal: https://woocommerce.com/my-account/create-a-ticket/
- Documentation: Check this manual first for guidance.
Before Contacting Support
- Read this manual thoroughly.
- Check the Troubleshooting section.
- Try deactivating other plugins to test for conflicts.
- Clear your browser cache.
Information to Provide
To help resolve your issue faster, include:
- WordPress version
- WooCommerce version
- PHP version (found in WooCommerce → Status)
- Description of the problem
- Steps to reproduce the issue
- Screenshots of any errors
How Updates Are Delivered
Automatic Updates (Recommended)
- Go to Dashboard → Updates.
- If a new version is available, it will appear in the list.
- Check the box next to “Bulk Product Editor.”
- Click Update Plugins.
- Wait for the update to complete.
Manual Updates
- Download the new version from your purchase location.
- Go to Plugins → Installed Plugins.
- Deactivate “Bulk Product Editor.”
- Click Delete.
- Navigate to Plugins → Add New → Upload Plugin.
- Upload the new ZIP file.
- Activate the plugin.
Recommended Backup Practices Before Updating
Always create a backup before updating any plugin.
Option 1: Export Products (Quick)
- Open WooCommerce → Bulk Product Editor.
- Click Export → Export All Products.
- Save the CSV file with a date format, for example:
products-2026-01-28.csv
Option 2: Full Site Backup (Recommended)
Use a backup plugin such as:
- UpdraftPlus (Free)
- BackWPup (Free)
- VaultPress (Premium)
A full backup includes:
- All WordPress files
- Complete database
- All product data
- All plugin files
Option 3: Database Backup
- Go to Tools → Export (or use phpMyAdmin).
- Select All Content.
- Click Download Export File.
- Save the XML file securely.
After backing up:
- Update the plugin safely.
- Restore the backup if anything breaks.
- Contact support if issues occur.
Additional Tips and Best Practices
↑ Back to topWorking with Large Catalogs (1000+ Products)
Tips for Better Performance
- Work in Batches
- Use filters to display around 500 products at a time.
- Make your changes, clear filters, and repeat as needed.
- Reduce Products Per Page
- Set products per page to 25 or 50 instead of 100.
- This improves loading and editing speed.
- Hide Unnecessary Columns
- Display only the fields you are actively editing.
- Right-click column headers → Hide unused columns.
- Use Specific Filters
- Start by filtering by category.
- Then filter by price range if needed.
- Narrow down results before editing for faster performance.