
WCMultiShipping — Mondial Relay, InPost & Chronopost for WooCommerce allows your WooCommerce store to offer Mondial Relay, InPost, Chronopost, and Chronofresh shipping methods, display pickup point selection during checkout, configure carrier-specific rates, and create shipping labels from your WooCommerce admin.
Installation
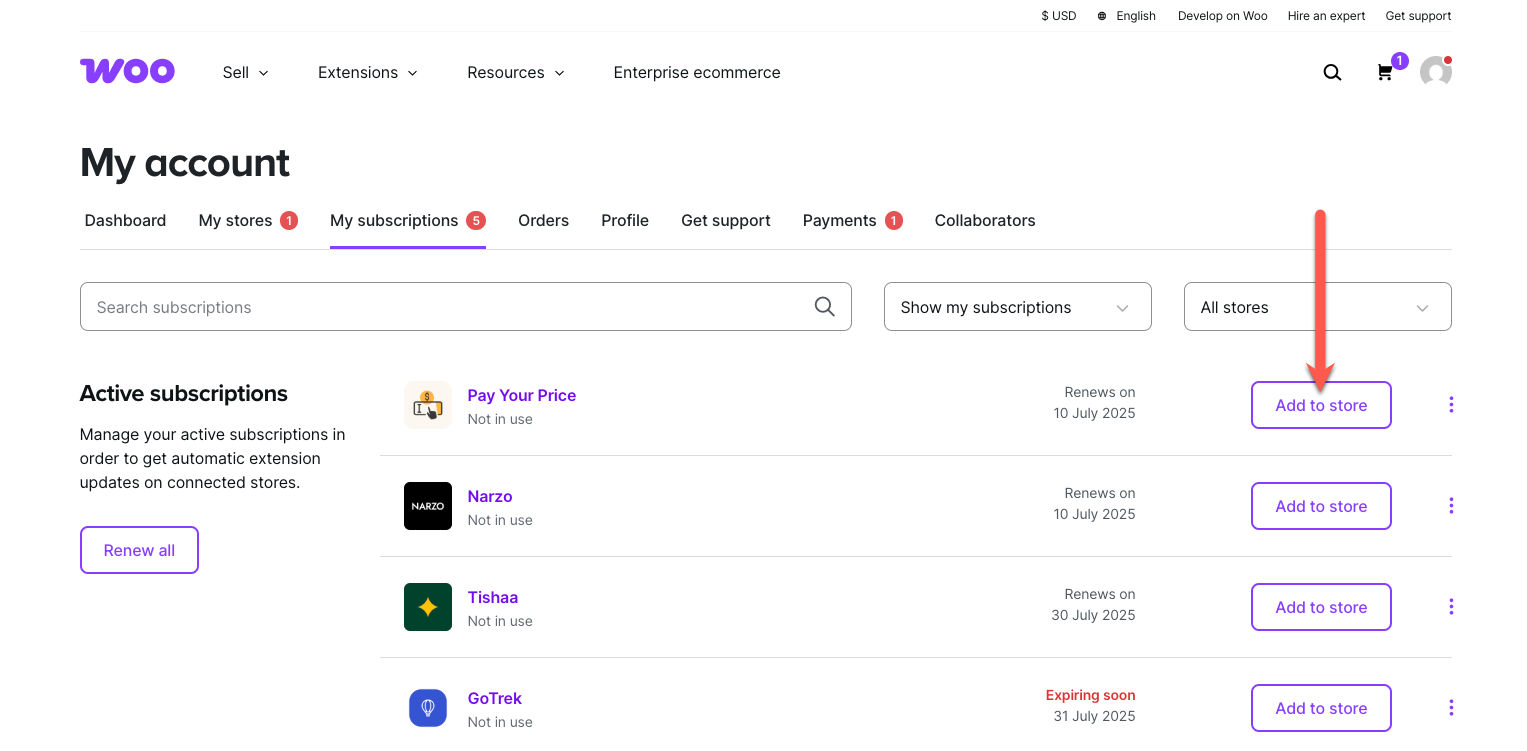
↑ Back to topTo start using a product from WooCommerce.com, you can use the “Add to store” functionality on the order confirmation page or the My subscriptions section in your account.
- Navigate to My subscriptions.
- Find the Add to store button next to the product you’re planning to install.
- Follow the instructions on the screen, and the product will be automatically added to your store.
Alternative options and more information at:
Managing WooCommerce.com subscriptions.
Setup and Configuration
↑ Back to top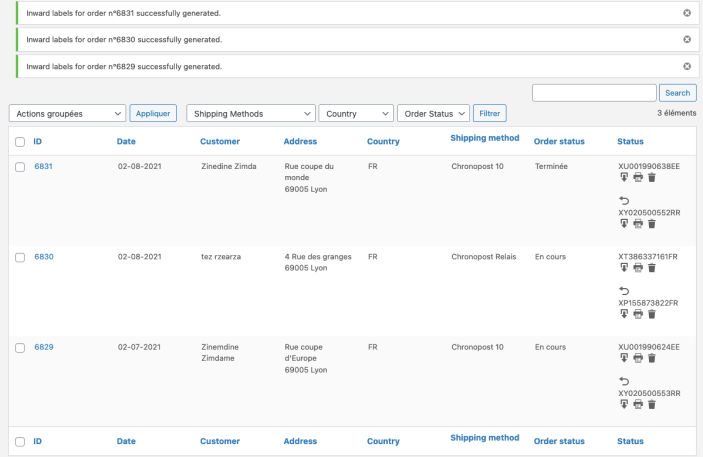
Getting started
↑ Back to topTo set up your store with WCMultiShipping:
- Install and activate the plugin from Plugins in your WordPress admin.
- Go to WooCommerce > Settings, then open the carrier tab you want to configure: Mondial Relay or Chronopost.
- Enable the shipping method.
- Enter your carrier account credentials. Mondial Relay requires the credentials provided with your account. Chronopost supports Classic Connection with account credentials and direct connection for Chronopost Pro accounts.
- Use the credentials test button, when available, to verify access before using the carrier at checkout.
- Configure the pickup point map. Available options depend on the carrier and license:
- OpenStreetMap: no Google Maps API key required.
- Google Maps: requires a Google Maps API key. See the Create a Google Maps API key section below.
- Mondial Relay Widget: available for Mondial Relay.
- Configure the sender address, parcel defaults, label options, debug mode, and error log settings.
- Go to WooCommerce > Settings > Shipping > Shipping zones, then add the WCMultiShipping methods you want to offer in each zone.
- For each shipping zone method, configure the checkout title, pricing condition, free-shipping threshold, management fees, packaging weight, and rates.
- Save your changes.
Pickup point map settings
↑ Back to topPickup point map settings are available in the carrier settings under WooCommerce > Settings > Mondial Relay or WooCommerce > Settings > Chronopost.
Available map providers are:
- OpenStreetMap: recommended if you do not want to use Google Maps. No API key is required.
- Google Maps: provides the Google Maps interface. A Google Maps API key must be entered in the carrier settings.
- Mondial Relay Widget: uses the official Mondial Relay pickup point selector. This option is available for Mondial Relay.
To use OpenStreetMap, select OpenStreetMap as the map provider and save the settings. No additional configuration is required.
To use Google Maps, select Google Maps, create an API key using the instructions below, enter it in the Google Maps API Key field, and save the settings.
Create a Google Maps API key
Google Maps requires a Google Cloud project with billing enabled and an API key. Restrict the key to your store domain to prevent unauthorized use.
- Sign in to the Google Cloud console with your Google account.
- Select an existing project or create a project for your store.
- Make sure billing is enabled for the project.
- Go to APIs & Services > Library, search for Maps JavaScript API, and enable it.
- Go to APIs & Services > Credentials.
- Select Create credentials > API key, then copy the generated key.
- Edit the key. Under Application restrictions, select Websites or HTTP referrers, then add your store domain. For example, add
https://example.com/*andhttps://*.example.com/*if the map must work on the root domain and its subdomains. - Under API restrictions, restrict the key to Maps JavaScript API, then save the key.
- In WordPress, go to WooCommerce > Settings > Mondial Relay or WooCommerce > Settings > Chronopost.
- Select Google Maps as the map provider, paste the key into Google Maps API Key, and save the settings.
- Open checkout and confirm that the pickup point selector loads.
If the pickup selector does not load, confirm that billing is active, the Maps JavaScript API is enabled, the API key is valid, and the website restrictions include the domain used at checkout. Changes to a new key or its restrictions may take a few minutes to apply.
Do not publish the API key in support requests, screenshots, or exported logs.
Carrier configuration
↑ Back to topMondial Relay lets you configure pickup point and home delivery services, including Point Relais, Lockers, Point Relais + Lockers, Colis Drive, and home delivery options.
Mondial Relay settings include the pickup point map provider, Google Maps API key, label format, sender address, insurance level, default shipping value, debug mode, and error log export.
Chronopost lets you configure Classic Connection or direct connection for Chronopost Pro accounts.
Available methods include Chronopost 10, Chronopost 13, Chronopost 18, Classic, Express, Relais, Relais Europe, 2Shop, Same Day, and temperature-specific Chronofresh methods.
Chronopost settings include the pickup point map provider, Google Maps API key, sender address, billing address, label format, Ad Valorem insurance, Saturday shipping rules, debug mode, and error log export.
Label generation
↑ Back to topFrom the WooCommerce order admin, store managers can create and download shipping labels for supported carriers.
Labels can also be generated automatically when orders reach selected WooCommerce statuses. The order status can be changed after label generation, and tracking links can be sent to customers by email.
Usage
↑ Back to topAt checkout, customers see the shipping methods enabled for their shipping zone.
For pickup point methods, customers select a relay point, locker, or access point from the pickup selector before placing the order.
The plugin supports WooCommerce classic checkout and WooCommerce Blocks checkout.
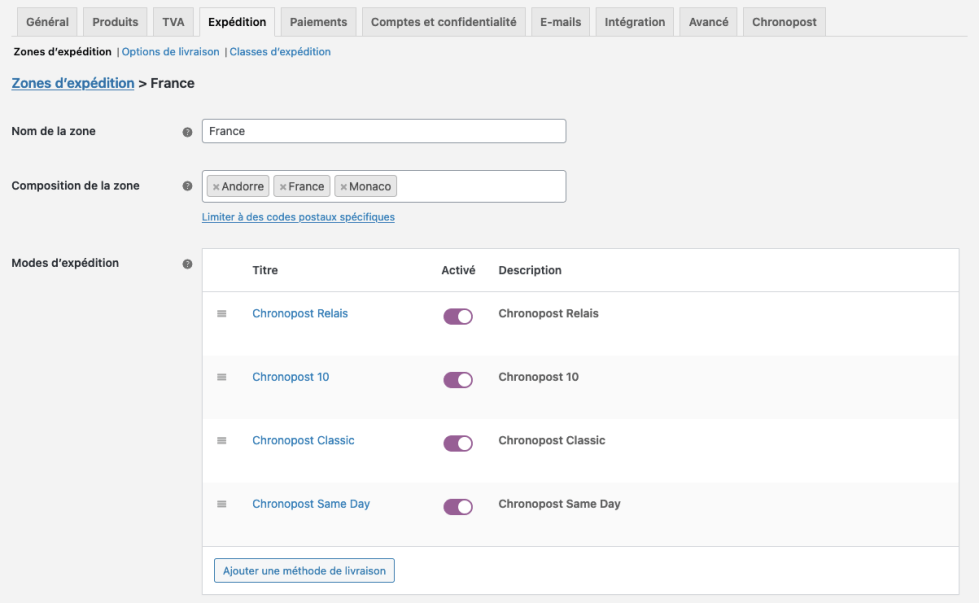
After an order is placed, administrators can manage carrier actions from WooCommerce orders. Depending on the configured carrier and license, this includes generating, downloading, printing, and deleting labels, and sending tracking links.
Troubleshooting
↑ Back to topShipping methods do not appear at checkout
↑ Back to topConfirm that WooCommerce is active and that the carrier is enabled in its WCMultiShipping settings tab.
Then open WooCommerce > Settings > Shipping > Shipping zones and confirm that the shipping method has been added to the correct zone.
The customer’s shipping country, state, and postcode must match the configured shipping zone. Also check that the cart contents meet the method’s weight, price, shipping class, and pricing conditions.
If the method is still unavailable, enable debug mode in the relevant carrier settings tab, reproduce the issue, and review the debug information displayed to administrators.
Pickup point selection does not open
↑ Back to topOpen the relevant carrier settings and check the selected pickup map provider.
If you use OpenStreetMap, no API key is required.
If you use Google Maps, confirm that a valid key is entered in the Google Maps API Key field. See the Create a Google Maps API key section if you need to create or replace the key.
Confirm that billing is active, the Maps JavaScript API is enabled, and the key’s website restrictions include the domain used at checkout.
After saving the settings, clear your website and browser cache, reload the checkout page, and test the pickup selector again.
You can also switch to OpenStreetMap or, for Mondial Relay, the Mondial Relay Widget.
Labels cannot be generated
↑ Back to topCheck the carrier credentials and use the credentials test button when available.
Verify the sender address, customer address, postcode, country, phone number, parcel weight, parcel dimensions, selected shipping method, and insurance settings.
Make sure the shipping method is supported by the carrier account and that the order contains complete billing and shipping information.
Enable debug mode in the relevant carrier settings tab, reproduce the issue once, then use the error log export option available in that tab.
Include the exported log when contacting support. Disable debug mode after testing.
Chronopost Pro connection does not work
↑ Back to topAllow pop-ups for your website in the browser.
In Chrome, click the pop-up blocked icon in the address bar, select Always allow pop-ups and redirects from this site, then reload the page.
In Firefox, open the browser settings, go to Privacy & Security > Permissions, find Block pop-up windows, and add your website to the allowed list.
Temporarily disable browser extensions that may block pop-ups, redirects, scripts, or cookies.
Return to the Chronopost settings tab and reconnect the shop. Confirm that the Chronopost Pro account is active and that the connection window was not blocked.
Debug information is required
↑ Back to topOpen the relevant carrier settings tab and enable debug mode.
Reproduce the problem once using the same cart, destination, and shipping method.
Export the error logs from the carrier settings page. If the page provides a specific export button, use it to download the log file.
Disable debug mode after testing. Debug logs may contain technical information about orders and customer data.
When contacting support, provide the exported logs, carrier, shipping method, WooCommerce version, WordPress version, and exact steps that reproduce the issue.
Remove passwords, API keys, tokens, and other private credentials before sharing the files.
FAQs
↑ Back to top
Which carriers are supported?
WCMultiShipping supports Mondial Relay, InPost, Chronopost, and Chronofresh shipping methods for WooCommerce.
Which pickup maps are available?
Depending on the carrier and license, you can use OpenStreetMap, Google Maps, or the Mondial Relay Widget. Google Maps requires a Google Maps API key.
How do I create a Google Maps API key?
Follow the Create a Google Maps API key instructions in the Pickup point map settings section on this page, then copy the key into the relevant carrier settings tab under WooCommerce > Settings.
Can customers choose pickup points at checkout?
Yes. For supported relay, locker, 2Shop, and access-point methods, customers can choose a pickup point during checkout using the configured map or pickup widget.
Can I configure custom shipping prices?
Yes. Each shipping zone method can use pricing conditions, free-shipping rules, management fees, packaging weight, and rate tables.
Does the plugin generate shipping labels?
Yes. Labels can be generated from WooCommerce orders for supported carriers. Automatic label generation by order status is also available.
Does the plugin support WooCommerce Blocks checkout?
Yes. WCMultiShipping includes WooCommerce Blocks checkout integration for pickup selection.
Where do I configure the plugin?
Carrier settings are available under WooCommerce > Settings > Mondial Relay or Chronopost. Checkout methods are added under WooCommerce > Settings > Shipping > Shipping zones.

