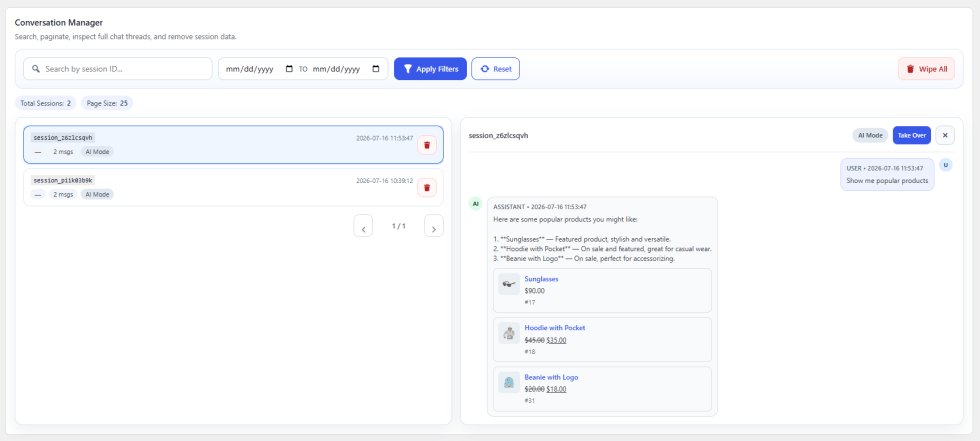
Enable AI Chatbot and Assistant for WooCommerce to give customers instant, AI-powered support trained on your own products and documents.
Installation
↑ Back to top- Download the AI Chatbot and Assistant.zip file from your WooCommerce account.
- Go to WordPress Admin > Plugins > Upload Plugin and choose the plugin .zip file.
- Then install and activate the plugin.
Configurations
↑ Back to topWithin the WordPress admin panel, go to WooCommerce > Settings and click on AI Chatbot. Here you will find the following settings.
General & AI API Settings
↑ Back to topClick on the General & AI API tab to configure the core AI engine and connect your OpenAI account:
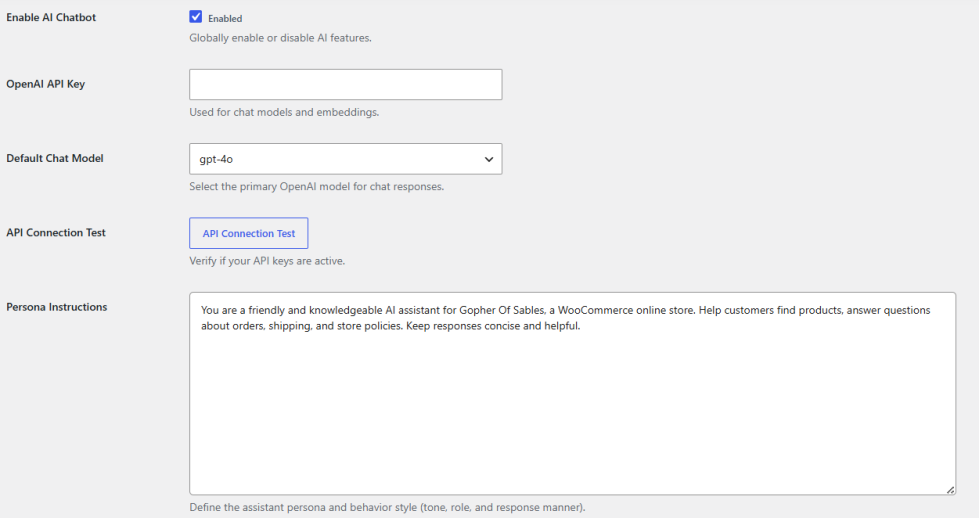
- Enable AI Chatbot: Checkbox to enable the AI chatbot globally.
- OpenAI API Key: Enter your OpenAI API key, used for chat models and embeddings.
- Default Chat Model: Select the primary OpenAI model used for chat responses, choosing from gpt-4o, gpt-4o-mini, gpt-4.1-mini, or gpt-3.5-turbo.
- API Connection Test: Button to verify if your API key is active.
- Persona Instructions: Define the assistant’s persona and behavior style, including tone, role, and response manner.
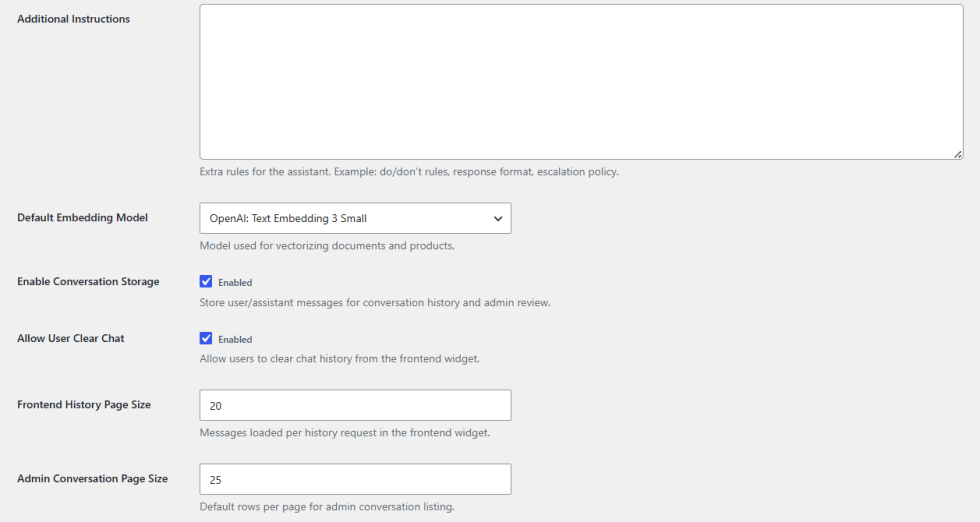
- Additional Instructions: Add extra rules for the assistant, such as do/don’t rules, response format, or escalation policy.
- Default Embedding Model: Choose the model used for vectorizing documents and products, selecting between OpenAI Text Embedding 3 Large or Text Embedding 3 Small.
- Enable Conversation Storage: Checkbox to store user and assistant messages for conversation history and admin review.
- Allow User Clear Chat: Checkbox to allow users to clear chat history from the frontend widget.
- Frontend History Page Size: Set the number of messages loaded per history request in the frontend widget.
- Admin Conversation Page Size: Set the default rows per page for the admin conversation listing.
Note: AI-generated responses can be inaccurate, incomplete, or misleading, and are not reviewed by a human before being shown to customers. Store owners are responsible for ensuring AI-generated content meets applicable laws and regulations. Enable Human Takeover for sensitive conversations, and use Persona and Additional Instructions to constrain what the assistant is allowed to say.
Knowledge Base & Embeddings Settings
↑ Back to topClick on the Knowledge Base & Embeddings tab to train your AI and manage indexed content:
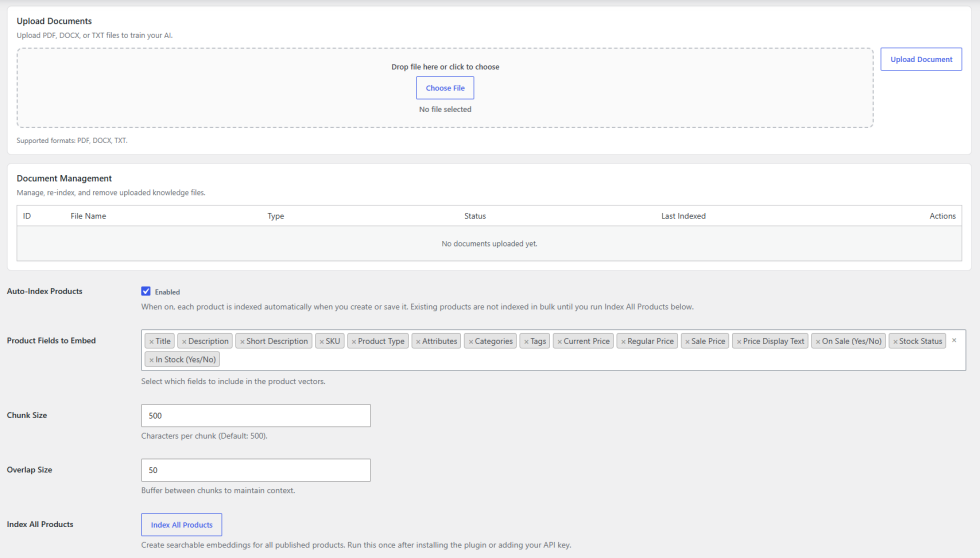
- Upload Documents: Upload a PDF, DOCX, or TXT file to train your AI.
- Document Management: Manage, re-index, and remove uploaded knowledge files.
- Auto-Index Products: Checkbox to automatically index each product when it’s created or saved. Existing products are not indexed in bulk until Index All Products is run.
- Product Fields to Embed: Select which product fields to include in the product vectors.
- Chunk Size: Set the number of characters per chunk (Default: 500).
- Overlap Size: Set the buffer between chunks to maintain context.
- Index All Products: Button to create searchable embeddings for all published products. Run this once after installing the plugin or adding your API key.
Logging & Debugging Settings
Click on the Logging & Debugging tab to manage technical logs and data retention:
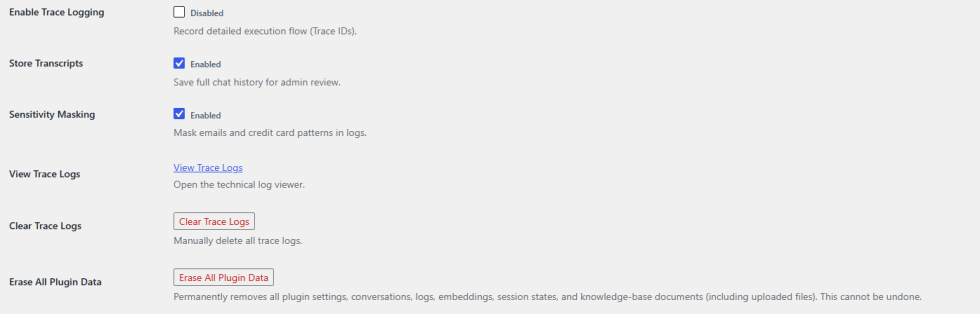
- Enable Trace Logging: Checkbox to record detailed execution flow using trace IDs.
- Store Transcripts: Checkbox to save full chat history for admin review.
- Sensitivity Masking: Checkbox to mask emails and credit card patterns in logs.
- View Trace Logs: Link to open the technical log viewer.
- Clear Trace Logs: Button to manually delete all trace logs.
- Erase All Plugin Data: Button to permanently remove all plugin settings, conversations, logs, embeddings, session states, and knowledge base documents. This cannot be undone.
Admin Notifications Settings
Click on the Admin Notifications tab to configure email alerts for chat activity:
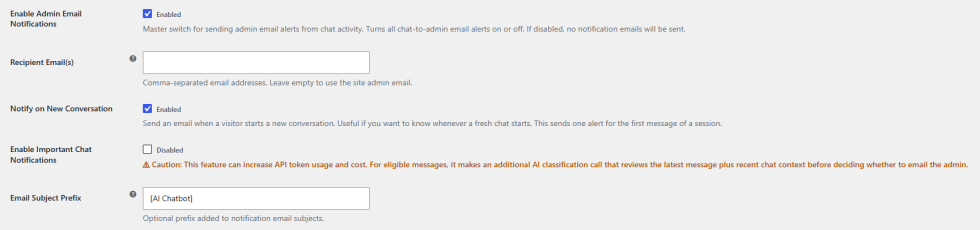
- Enable Admin Email Notifications: Checkbox to turn all chat-to-admin email alerts on or off. If disabled, no notification emails will be sent.
- Recipient Email(s): Enter comma-separated email addresses. Leave empty to use the site admin email.
- Notify on New Conversation: Checkbox to send an email whenever a visitor starts a new conversation.
- Enable Important Chat Notifications: Checkbox to enable notifications for important chat events, using an additional AI classification call to review context before alerting the admin.
- Email Subject Prefix: Set an optional prefix added to notification email subjects.
Widget UI & Customization Settings
Click on the Widget UI & Customization tab to configure the chat widget’s appearance and behavior:
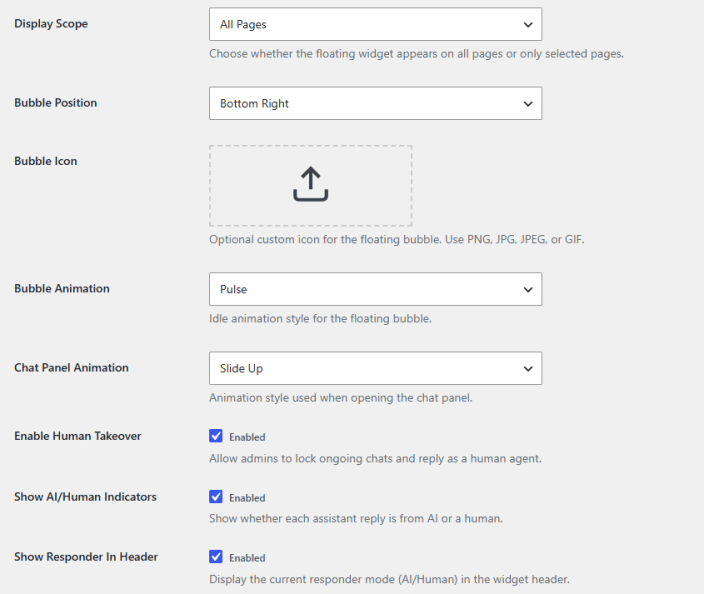
- Display Scope: Choose whether the floating widget appears on All Pages or only Specific Pages.
- Target Pages: Select specific pages where the widget should display.
- Bubble Position: Choose Bottom Right or Bottom Left for the floating bubble.
- Bubble Icon: Upload an optional custom icon for the floating bubble, in PNG, JPG, JPEG, or GIF.
- Bubble Animation: Choose the idle animation style for the floating bubble, selecting from None, Pulse, Float, or Wiggle.
- Chat Panel Animation: Choose the animation style used when opening the chat panel, selecting from Fade, Slide Up, Zoom, or Flip.
- Enable Human Takeover: Checkbox to allow admins to lock ongoing chats and reply as a human agent.
- Show AI/Human Indicators: Checkbox to show whether each assistant reply is from AI or a human.
- Show Responder In Header: Checkbox to display the current responder mode in the widget header.
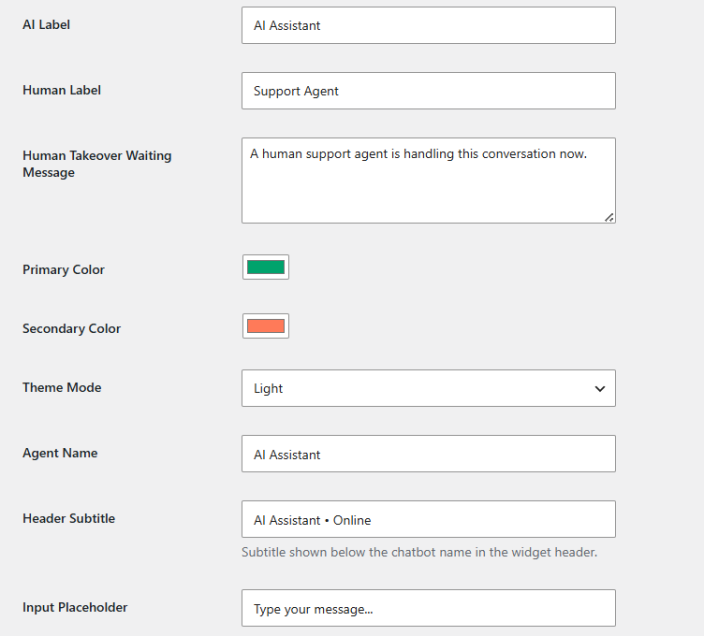
- AI Label: Set the label shown for the AI assistant.
- Human Label: Set the label shown for the human agent.
- Human Takeover Waiting Message: Set the message shown to users while waiting for a human agent to connect.
- Primary Color: Set the primary theme color of the widget.
- Secondary Color: Set the secondary theme color of the widget.
- Theme Mode: Choose Light, Dark, or Automatic.
- Agent Name: Set the name displayed for the chatbot.
- Header Subtitle: Set the subtitle shown below the chatbot name in the widget header.
- Input Placeholder: Set the placeholder text shown in the message input field.
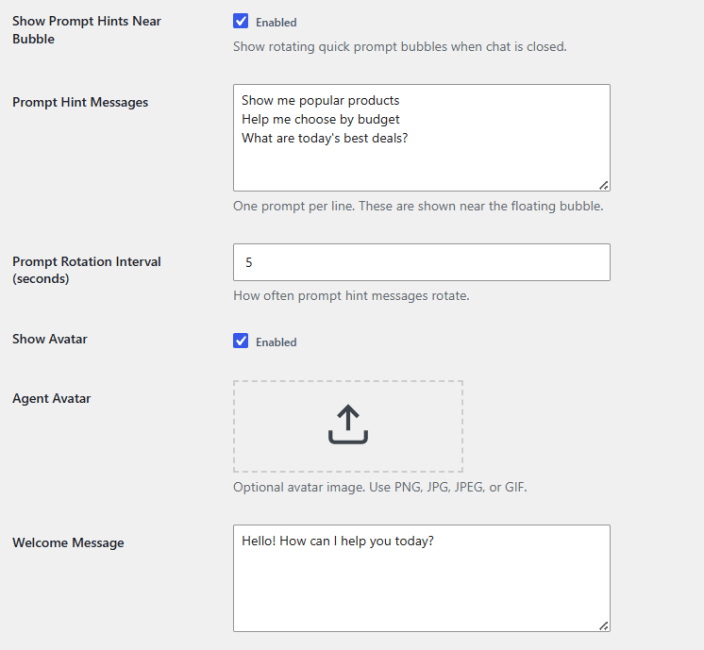
- Show Prompt Hints Near Bubble: Checkbox to show rotating quick prompt bubbles when the chat is closed.
- Prompt Hint Messages: Add prompt hint messages, one per line, shown near the floating bubble.
- Prompt Rotation Interval (seconds): Set how often prompt hint messages rotate.
- Show Avatar: Checkbox to display an avatar for the agent.
- Agent Avatar: Upload an optional avatar image, in PNG, JPG, JPEG, or GIF.
- Welcome Message: Set the message shown when a customer opens the chat.
Retrieval Logic Settings
Click on the Retrieval Logic tab to configure how the assistant finds products and order information:
- Structured Product Finding: Checkbox to run a real product search on your store using categories, price, and keywords, instead of pulling products from indexed text matches. Uploaded help documents are not used for that product reply.
- Customer Order Lookup: Checkbox to allow logged-in customers to ask about their own WooCommerce orders, including status, items, dates, and totals. Order access always uses the current login session.
- AI Order Query Builder: Checkbox to let the AI build order search filters from natural language, such as item name, total, date, status, or order number. Server phrase rules apply only if this step fails.

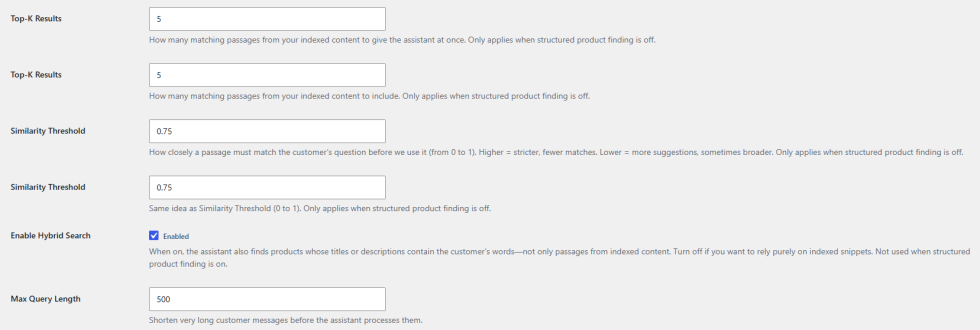
- Top-K Results: Set how many matching passages from indexed content are given to the assistant at once. Only applies when Structured Product Finding is off.
- Similarity Threshold: Set how closely a passage must match the customer’s question before it’s used, from 0 to 1. Higher values are stricter with fewer matches; lower values allow more, sometimes broader, suggestions. Only applies when Structured Product Finding is off.
- Enable Hybrid Search: Checkbox to also find products whose titles or descriptions contain the customer’s words, not only passages from indexed content. Not used when Structured Product Finding is on.
- Max Query Length: Set the character limit used to shorten very long customer messages before the assistant processes them.
Note: When Structured Product Finding is off, the assistant matches customer questions against indexed product descriptions, pages, and help documents, which works well for natural, conversational queries. When Structured Product Finding is on, the assistant runs a real search against your live catalog using filters like price, category, and keywords, which works well for precise, filter-style questions.
Conversations
Click on the Conversations tab to search, review, and manage chat sessions:
- Search by Session ID: Enter a session ID to locate a specific conversation.
- Date Range Filter: Set a start and end date to filter conversations by time period.
- Apply Filters: Button to apply the search and date filters.
- Reset: Button to clear all applied filters.
- Wipe All: Button to permanently remove all stored conversation data.
- Conversation List: View all matching sessions, including message count and mode (AI or Human). Select a conversation to view the full message thread.
- Delete Session: Remove an individual conversation session.