
Display shipping charges directly on product pages using Shipping Calculator on Product Page for WooCommerce extension. Allow customers to select an available shipping method and instantly view the estimated shipping cost before adding the product to their cart. Shop managers can choose to restrict the shipping calculator to specific product types, user roles, categories, tags, and brands. You can also choose to display the calculator as an in-page table or a popup. Moreover, you can style the shipping calculator popup using custom colors, fonts, and text.
Installation
↑ Back to top- Download the .zip file from your WooCommerce account.
- In your WordPress Admin, go to Plugins > Add New and upload the plugin by choosing the downloaded file.
- Click Install Now, then Activate the extension.
For further help, refer to Install and Activate Plugins/Extensions.
Setup and Configuration
After installing and activating the Shipping Calculator for WooCommerce plugin, a new Shipping Calculator option will appear in the WooCommerce settings. Now, you need to install the FedEx extension so that it can obtain rates dynamically from the FedEx API during cart/checkout. The plugin allows you to display a shipping calculator on product pages and provides real-time rates.
You can simply add FedEx as a new shipping zone and define tax status, packing methods, etc. Once it’s done, go back to the WooCommerce settings > Shipping calculator and choose to display it for all or specific product types, categories, tags, and brands.
Setting Up Shipping Calculator for WooCommerce
↑ Back to topDisplaying Shipping Calculator on Product Pages
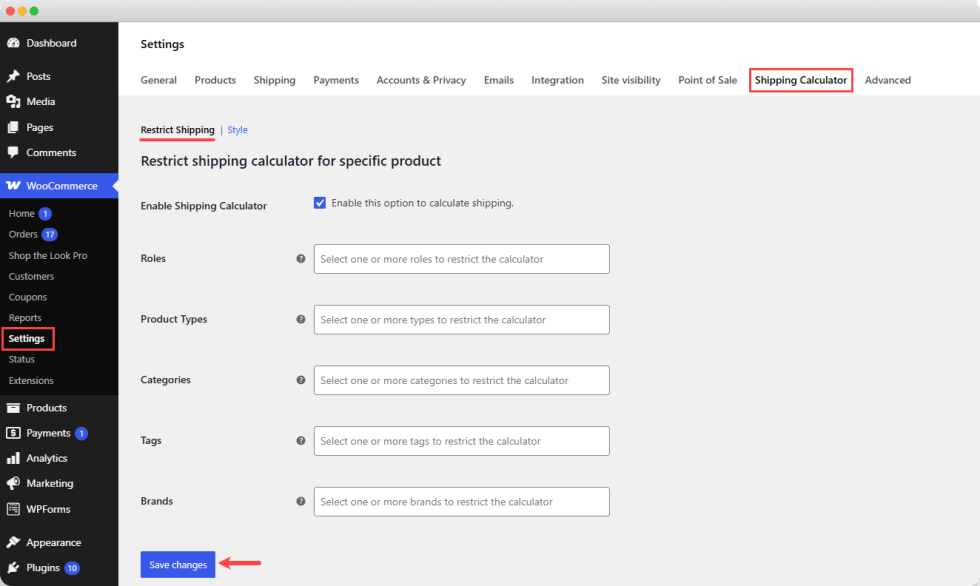
↑ Back to topGo to WooCommerce > Settings and select Shipping Calculator. Now fill in the following details:
- Enable Shipping Calculator: Check this option if you want to display the shipping calculator on your product pages. Uncheck it anytime to disable the shipping calculator.
- Roles: Choose to restrict the shipping calculator to the following user roles:
- Product Types: Choose to apply the shipping calculator to following product types:
- Simple product
- Grouped product
- Affiliate/external product
- Variable product
- Categories: Select the product categories for which you want to display the shipping calculator. Leave the field empty to apply it to all.
- Tags: Select tags for which you want to display the shipping calculator. Leave the field empty to apply it to all tags.
- Brands: Select specific brands and display shipping calculator only for them. Leave the field empty to apply it to all brands.
Setting Button Style and Calculator Box Style
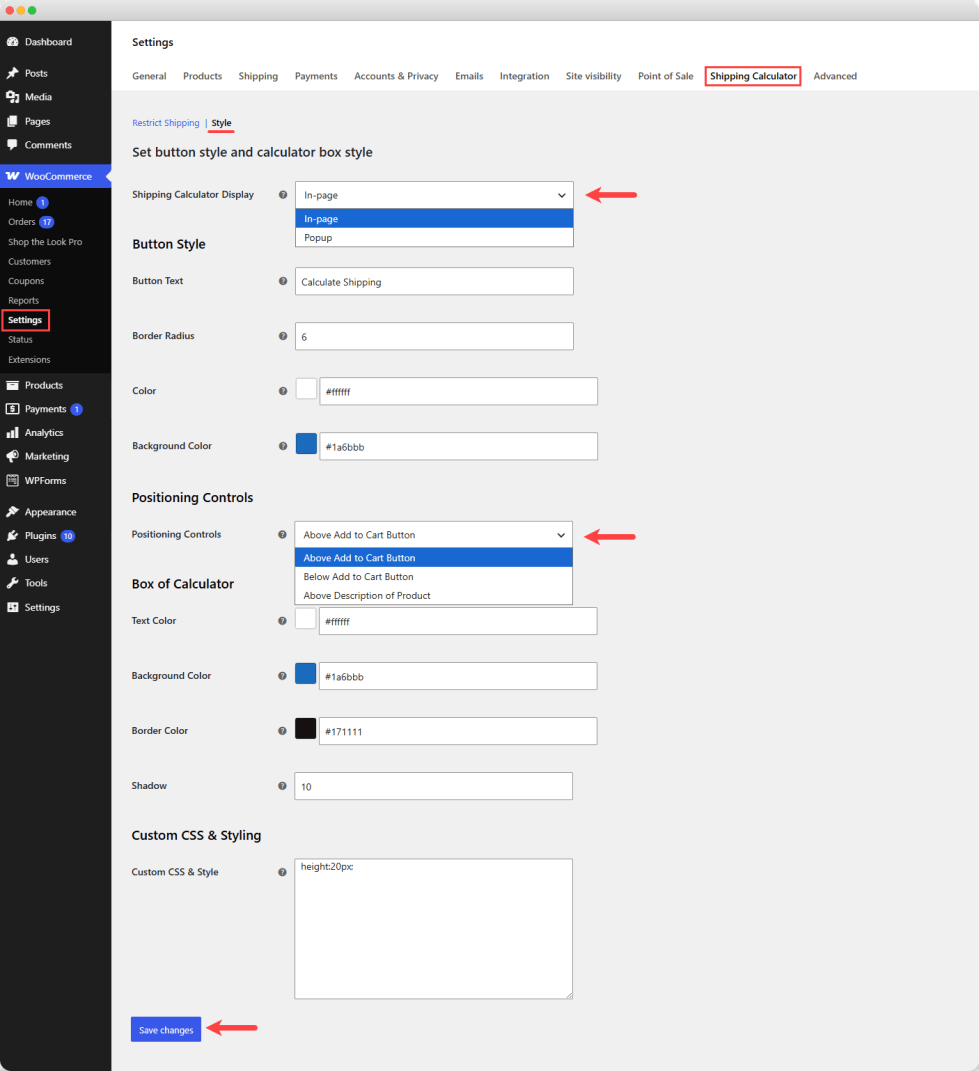
Go to WooCommerce > Settings > Shipping Calculator and select “Style”. Now fill in the following details:
- Shipping Calculator Display: Choose to display shipping calculator in form of a/an:
- In-page table
- Popup
Button Style
- Button Text: Add a custom button text for shipping calculator
- Border Radius: Add a specific border radius for the button
- Color: Select a custom color for the text
- Background color: From the color picker, select desired color for the button background
- Positioning Controls: Choose to display shipping calculator:
- Above add-to-cart button
- Below add-to-cart button
- Above product description
Box of Calculator
- Text color: Add text color for the shipping calculator box
- Background color: Select background color for the box
- Border Color: Select border color for the box
- Shadow: Change the shadow of the box according to your needs
Custom CSS & Styling
Custom CSS & Styling: Add custom CSS to customize the shipping calculator box according to your preferences.
Adding a New Shipping Zone (FedEx)
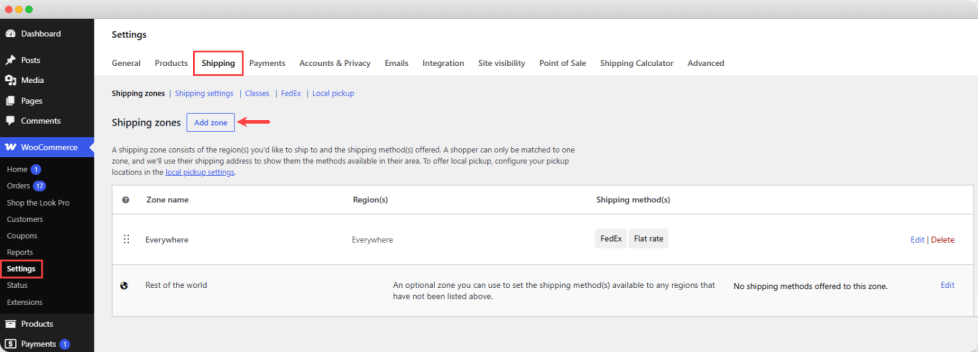
↑ Back to topGo to WooCommerce > Settings > Shipping and select “Add Zone”. Now, add the following details:
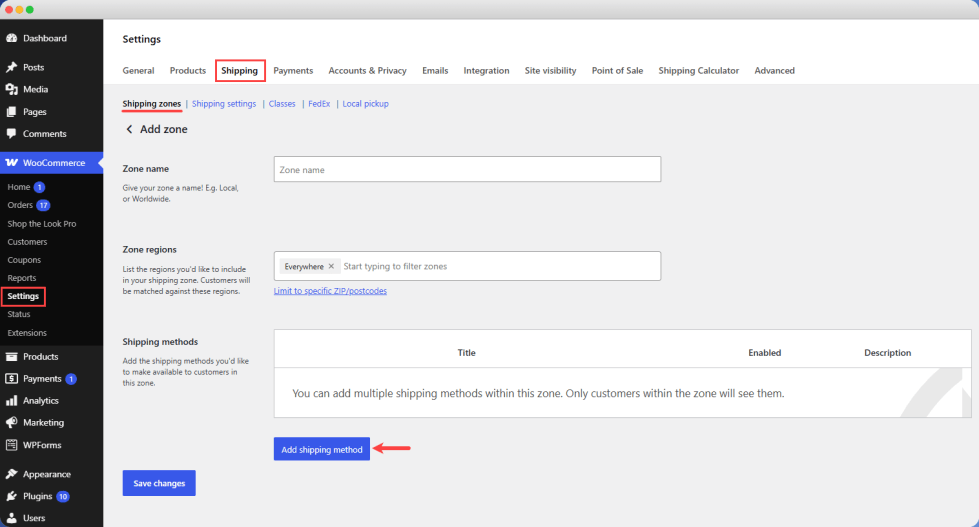
- Zone Name: Add a shipping zone name according to your needs. It can be Local, International, Worldwide, or any custom name.
- Zone Region: Select the regions you want to include in your shipping zone
- Shipping Method: Click “ Add Shipping Method,” select FedEx from the popup, and click Continue to add it to the selected shipping zone.
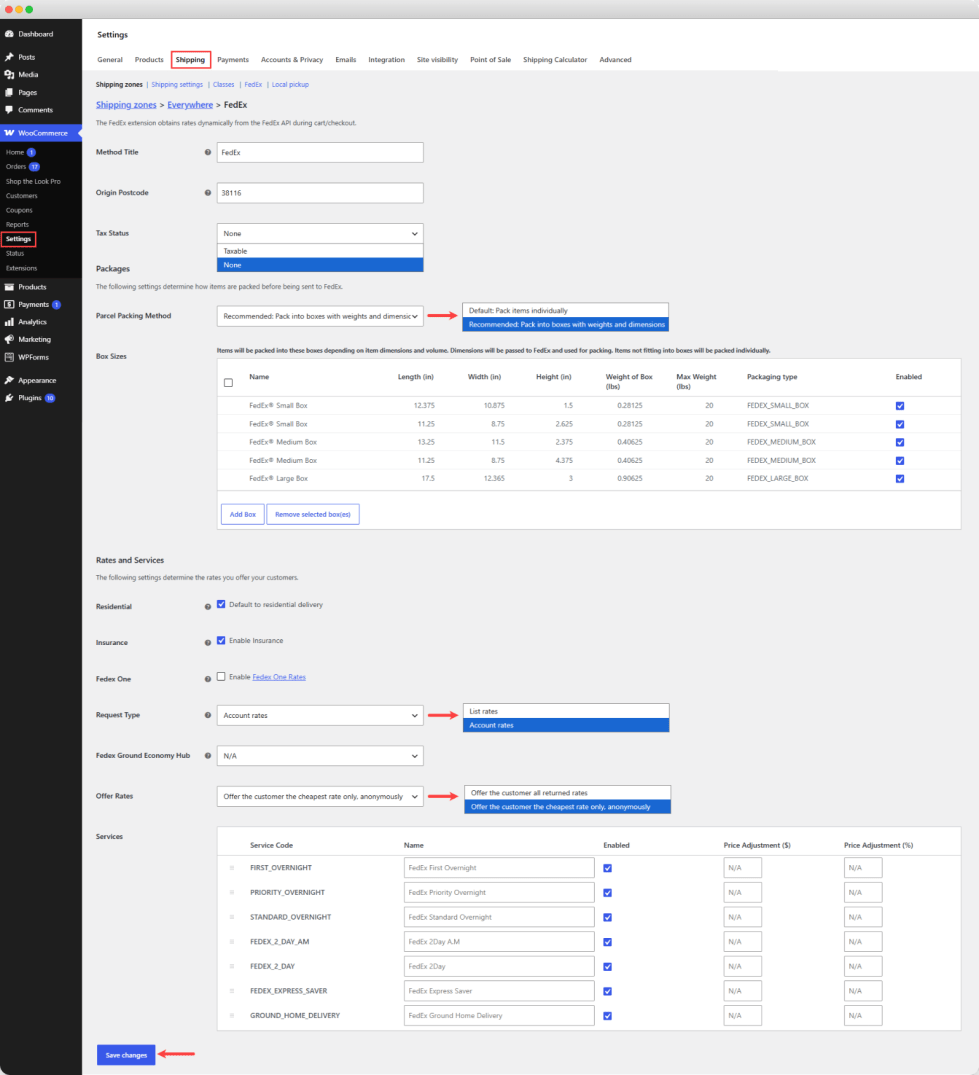
Now, from the shipping method table, you can select “Edit” and configure the following settings:
- Method Title: Add the shipping method title which users will see during the checkout
- Origin Postcode: Enter the postcode for the sender
- Tax Status: Choose to make this shipping option taxable or non-taxable
Packages
The following settings define how products are packed before being shipped through FedEx:
- Parcel Packing Method: From the dropdown, select:
- Pack items individually
- Pack into box with weight and dimensions
Rates and Services
The following settings define the rates you offer to your customers:
- Residential: Enable the option to automatically classify the delivery address as Residential if its classification is unknown or mixed
- Insurance: Enable the option to send the package value to FedEx for insurance
- FedEx One: Enable the option to display FedEx One Rate when the shipment qualifies, meaning the items are packed in an eligible FedEx One Rate box, and both the origin and destination addresses are in the US.
- Request Type: Choose whether to return List or Account ( discounted rates) from the API.
- FedEx Ground Economy Hub: Select the appropriate FedEx Ground Economy hub from the dropdown list based on your shipping requirements. You can also choose N/A if you do not want to specify a hub.
- Services: From the table, enter a custom name for each service code and configure the desired price adjustments to customize the displayed shipping rates.
Configuring FedEx Settings
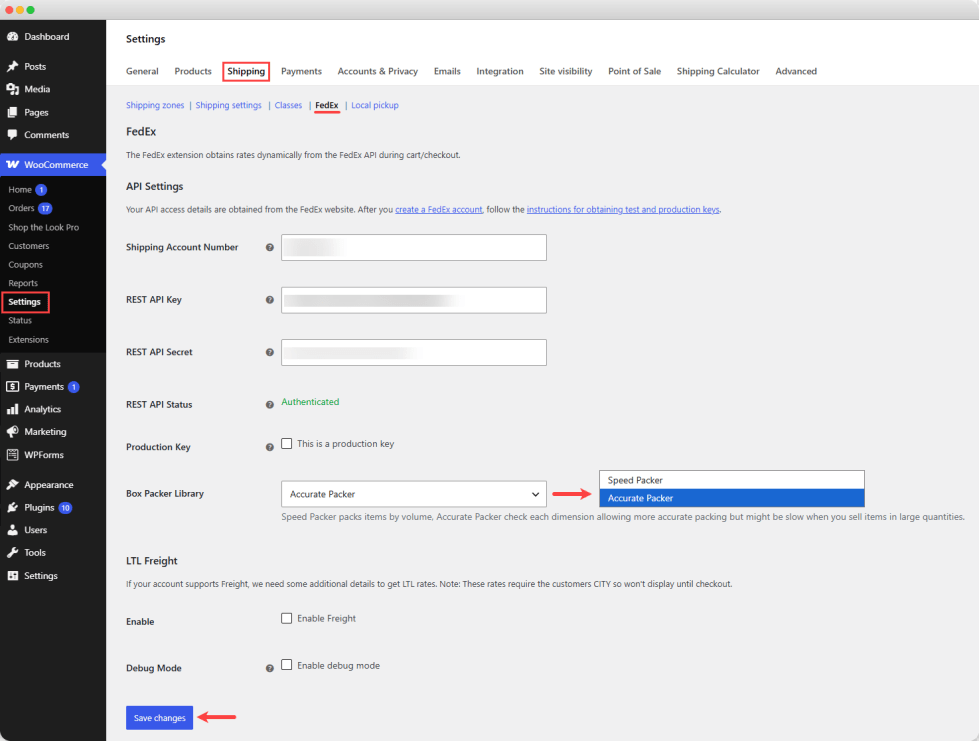
Go to WooCommerce> Settings >Shipping and select FedEx. Now fill in the following details:
API Settings
NOTE: The API access details are obtained from the FedEx website. You need to create a FedEx account and follow the listed instructions for obtaining test and production keys.
- Shipping Account Number: Locate your shipping account number in account management of your FedEx profile when using the SOAP API, or access it through your FedEx project settings when using the REST API.
- REST API Key: Create a project in the FedEx Developer Portal and get your REST API Key.
- REST API Status: The field displays the current FedEx REST Api authentication status.
- Production Key: Enable the option if the entered key is the production key instead of a developer key.
- Box Packer Library: From the dropdown, you choose how to pack the items:
- Accurate Packer: select this if you want to pack items by dimension
- Speed Packer: select this if you want to pack items by volume
LTL Freight
If your FedEx account supports Freight, then you need some additional details to get LTL rates.
- Enable: Check the button if you want to enable the Freight option.
- Freight Account Number: Enter your freight account number.
- Billing Street Address: Enter the billing street address associated with your freight account
- Billing Street Address: Enter the alternative billing address, if available.
- Billing City: Enter the billing city.
- Billing State Code: Enter the billing state or province code.
- Billing ZIP/Postcode: Enter the billing ZIP or postal code
- Billing Country Code: Enter the country code of your billing address
- Shipper Street Address: Enter the shipper’s street address
- Shipper Street Address 2: Enter the alternative address
- Shipper City: Enter the shipper’s city
- Shipper State Code: Enter the shipper’s state or province code
- Shipper ZIP/Postcode: Enter the shipper’s ZIP or postal code
- Shipper Country Code: Enter the shipper country code
- Residential: Enable this option if the shipper’s address is residential
- Default Freight Class: From the dropdown, add a default freight class for shipments.
Debug Mode: Enable debug mode to show debugging information on the cart or checkout.
FAQs of Shipping Calculator for WooCommerce
↑ Back to topQ1. How to add FedEx as a shipping method in WooCommerce?
To add FedEx as a shipping method, you can use Shipping Calculator for WooCommerce extension. Once the plugin is installed, you can follow the steps mentioned below:
- Activate the extension. Then go to WooCommerce > Settings > Shipping and select Add Zone.
- Now, from this section, you can add a specific zone name and select the regions you want to include in your shipping zone.
- Click Add Shipping Method and, from the popup, select FedEx. Select Continue, and your new shipping method will be added successfully.
- From the table, select Edit to configure detailed settings.
Q2. How to display a shipping calculator for specific products?
To display shipping calculator on product pages, you can use Koala App’s Shipping Calculator extension. Once the extension is installed and activated, you can follow the steps mentioned below:
- Go to WooCommerce> Settings and enable the Shipping Calculator option.
- By enabling the option, you can display a shipping calculator on your product pages.
- From Roles, select the user roles that can access the shipping calculator.
- Now scroll down to Product Types. Here you can choose form the following product types to display the shipping calculator only for those:
- Simple product
- Grouped product
- Affiliate/external product
- Variable product
- From the Categories section, select product categories for which you want to display the calculator.
- Similarly, add specific tags and brands to display the calculator only for selected items.
Q3. How to choose where the shipping calculator appears on product pages?
To choose how the shipping calculator is displayed on product pages, you can configure the display settings of Shipping Calculator for WooCommerce extension. Follow the steps mentioned below:
- Go to WooCommerce > Settings > Shipping Calculator and select Style.
- From the Shipping Calculator Display, choose to display the shipping calculator as an in-page table or a popup.
- Under Positioning Controls, choose where to display the shipping calculator.
- You can choose to display it:
- Above add-to-cart button
- Below add-to-cart button
- Above Product description
Q4. How to customize the shipping calculator button and box?
To customize the shipping calculator button and box, you can use styling options that are available in Shipping Calculator settings. To access these settings, you need to use the Shipping Calculator for WooCommerce extension. Follow the steps below for detailed configuration:
- Go to WooCommerce > Settings > Shipping Calculator and select Style
- Under the Button Style option, you can add custom button text and set the border radius
- Select a custom text and background color for the shipping calculator button
- Now, from the Box of Calculator settings, add a custom text color for the shipping box
- Select a custom background, border color, and change the shadow of the box according to your needs.
- You can also add custom CSS to customize the shipping box according to your specific brand.

