
The Advanced Shipping for WooCommerce plugin is very configurable, so explaining how to do every scenario is unobtainium. Instead, let me explain how the plugin works, what the conditions look for and how you can configure things to meet your requirements.
Installation
↑ Back to topTo start using a product from WooCommerce.com, you can use the “Add to store” functionality on the order confirmation page or the My subscriptions section in your account.
- Navigate to My subscriptions.
- Find the Add to store button next to the product you’re planning to install.
- Follow the instructions on the screen, and the product will be automatically added to your store.
Alternative options and more information at:
Managing WooCommerce.com subscriptions.

How to use the Advanced Shipping plugin
↑ Back to topThe Advanced Shipping for WooCommerce plugin is very configurable, so explaining how to do every scenario is unobtainium. Instead, let me explain how the plugin works, what the conditions look for and how you can configure things to meet your requirements.
Creating Advanced Shipping rates
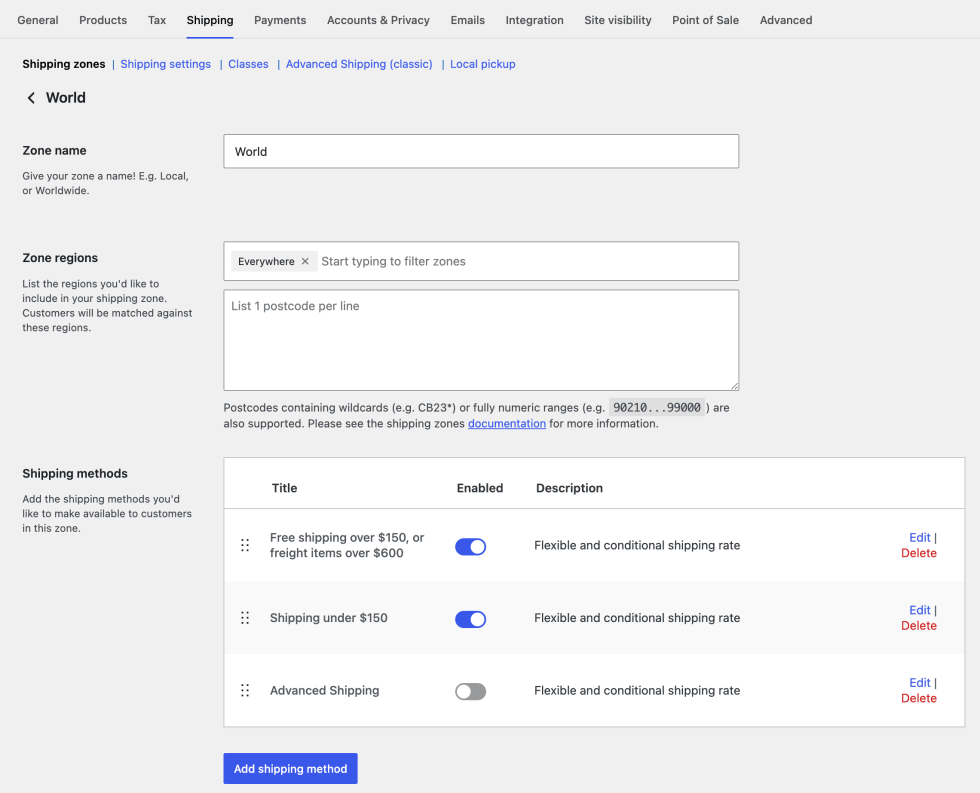
↑ Back to topThe first step is to create an Advanced Shipping rate. Similar to WooCommerce Core, you can head into the WooCommerce > Settings > Shipping section and you’ll be greeted by the Shipping Zones section. Create a new shipping zone, or edit an existing one. Click the ‘Add shipping method’ button and select the ‘Advanced Shipping’ and click ‘Continue’ in the popup that appears.
The Advanced Shipping rate is now created, but still needs to be configured. Click the ‘Edit’ link to configure the shipping rate.
The Classic way
There’s also a different way of creating Advanced Shipping rates. This is the ‘Classic’ method, which is more of a legacy way of creating shipping rates in WooCommerce, but it still works well, and it can be very useful in certain situations.
For example; you already have half a dozen shipping zones, and want a shipping rate that spans all of them. The Shipping Zones method would require you to create the shipping rate in each zone. Through this Classic method you can just setup 1 shipping rate that doesn’t adhere to the Shipping Zones.
To create a Classic Advanced Shipping rate, go to the WooCommerce > Settings > Shipping > Advanced Shipping (classic) section. That’s the only difference, the rest works the same.

Configuring Advanced Shipping rates
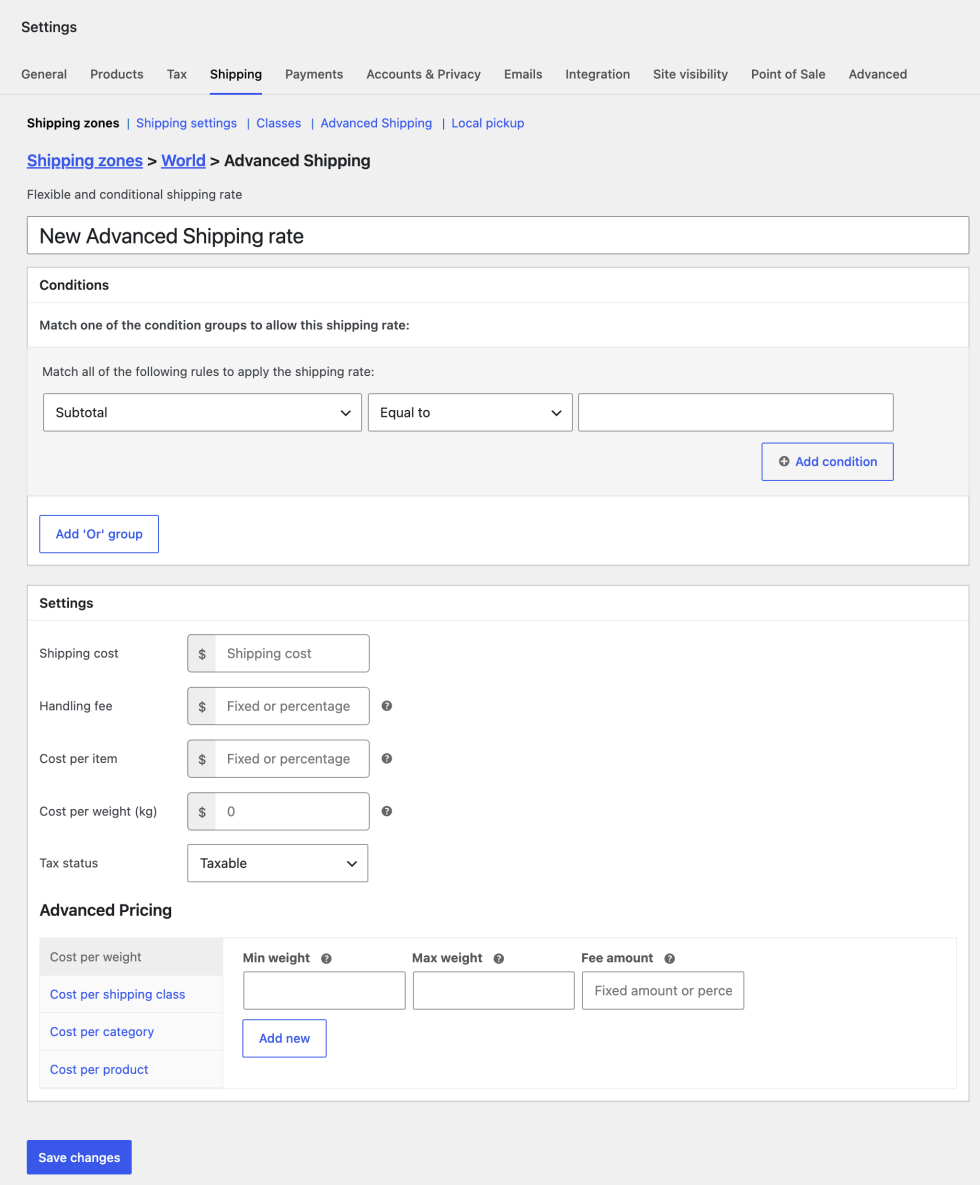
↑ Back to topEach shipping rate consists of two parts
- The Conditions that determine IF an shipping rate should appear
- The Settings that determine the shipping cost
Conditions
↑ Back to topA couple concepts that are important to understand here are:
- Condition groups are ‘OR’ groups. As long as all the conditions in one condition group of a shipping rate matches, the shipping rate will be available.
- The conditions within the group are ‘AND’ condition, but they do not combine.
What I mean with this is that setting a ‘Shipping class’ and ‘Quantity’ condition does not make it a ‘Shipping class quantity’. Each condition is matched independently from one another.
Helpful tips:
- Want to create a range? Use conditions with values like 0-10 and the next range go from 10.01-100.
- ‘Contains …’ conditions allow for other items to be in the cart.
- ‘Contains …’ conditions with the ‘Not equal’ operator means “the cart may not contain this item”
- Length / Width / Height conditions are based on the largest of the given dimension in the cart
- ‘Coupon’ condition can target coupon codes, or certain fixed (‘$’) or percentage (‘%’) values. Use the dollar sign (specifically dollar sign, not that of the shop currency) or percentage sign accordingly. Use a 📦 icon (copy it) to target any free shipping coupon.
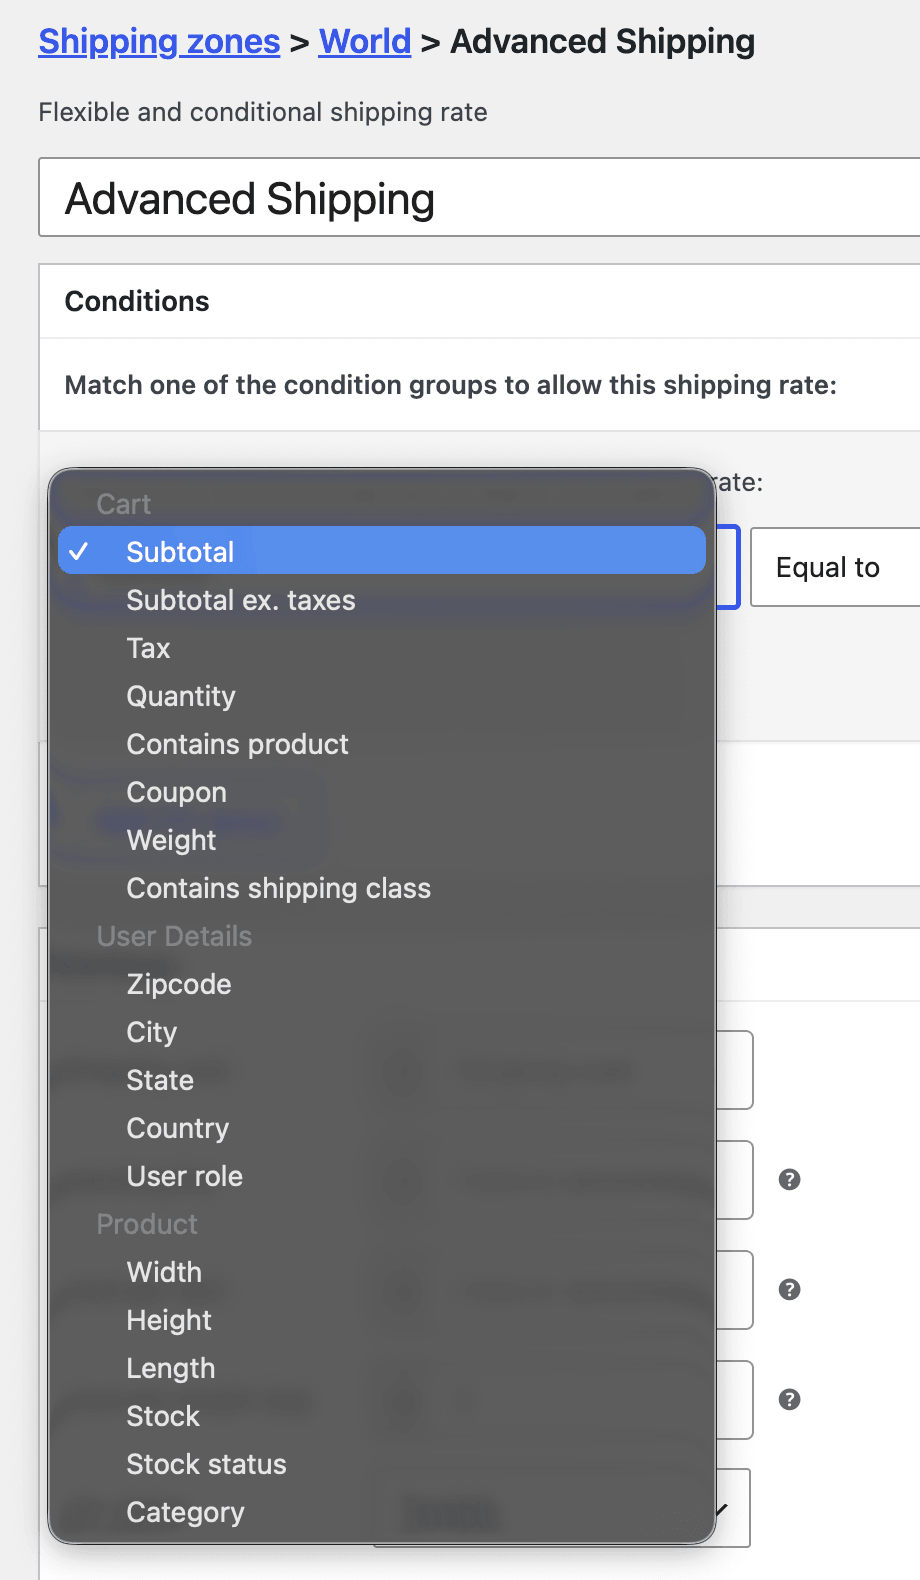
The following conditions are available out of the box with the plugin:
| Cart | User details | Product |
|---|---|---|
| Subtotal Subtotal excluding taxes Tax Quantity Contains product Coupon Weight Contains shipping class | Zipcode City State Country User role | Width Height Length Stock Stock status Category |
Settings
↑ Back to topThe Shipping cost field is to set your base shipping cost/rate. This is a flat rate field only.
Handling fee allows for setting a separate fee, this can be a flat amount or percentage.
Cost per item will be multiplied with the total cart quantity.
Cost per weight is a simple field that will multiply the cost with the weight that is in the cart. More advanced features for cost by weight below in the Advanced Pricing section.
Tax status determines if the shipping rate should have taxes calculated on it. WooCommerce Core does the calculation based on the tax settings (check the ‘Shipping’ checkbox with the tax rates you want to apply for shipping). Beware shipping costs are always excluding taxes in WooCommerce. This is not a plugin setting.
Advanced Pricing
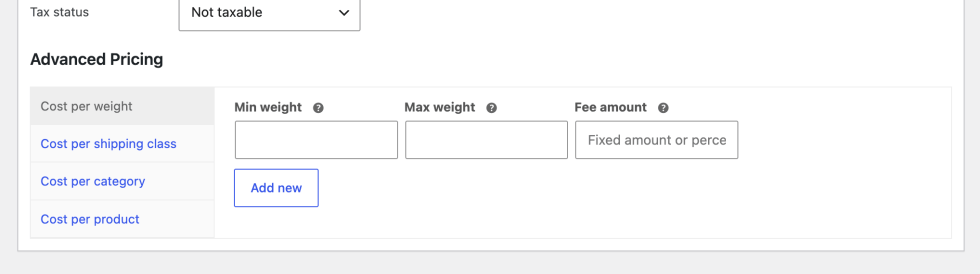
↑ Back to topThe Advanced Pricing feature allows for setting very advanced type of cost configurations. Each section within this feature has its own rows that can be configured. You can add as many rows as needed within each section.
The first fields in each section determine if the value set in the Fee amount field should be applied or not. The Fee amount field for each section has their own modifiers which can be used to change the fee amount. For example, adding an asterisk to the fee amount field in the ‘Cost per weight’ section will multiply the fee amount field with the weight in the cart. All modifiers are described below with each section.
Cost per weight
↑ Back to topThe min/max fields are based on the cart weight.
Available Fee amount modifiers:
% – (percentage sign) Use the percentage of the cart subtotal
– – (minus sign) Deduct the shipping cost with the set amount.
* – (asterisk) Multiply with the exact weight in the cart
** – (double asterisk) Multiply with the weight above the ‘Min’ field
\ – (backward slash) Multiply with the weight that is rounded down
/ – (forward slash) Multiply with he weight that is rounded up
Cost per shipping class
Select the Shipping class for which this row/fee should apply to.
The min/max fields are by default based on the quantity of the given shipping class that is in the cart.
Available modifiers for the Min/Max fields:
w – (letter) Changes the field to be based on the weight of the shipping class items.
$ – (dollar sign) Changes the field based on the shipping class amount
Available Fee amount modifiers:
* – (asterisk) Multiply with the quantity of shipping class items in the cart
% – (percentage sign) Use the percentage of the cart amount
%% – (double percentage sign) Use a percentage of the shipping class amount
– – (minus sign) Deduct the shipping cost with the set amount.
Cost per category
Select the Category for which this row/fee should apply to.
The min/max fields are by default based on the quantity of the given category that is in the cart.
Available modifiers for the Min/Max fields:
w – (letter) Changes the field to be based on the weight of the category items.
$ – (dollar sign) Changes the field based on the category amount
Available Fee amount modifiers:
* – (asterisk) Multiply with the quantity of category items in the cart
% – (percentage sign) Use the percentage of the cart amount
%% – (double percentage sign) Use a percentage of the category amount
– – (minus sign) Deduct the shipping cost with the set amount.
Cost per product
Select the Product or variation for which this row/fee should apply to.
The min/max fields are by default based on the quantity of the given shipping class that is in the cart.
Available modifiers for the Min/Max fields:
w – (letter) Changes the field to be based on the weight of the product/variation items.
$ – (dollar sign) Changes the field based on the product/variation amount
Available Fee amount modifiers:
* – (asterisk) Multiply with the quantity of product/variation items in the cart
% – (percentage sign) Use the percentage of the cart amount
%% – (double percentage sign) Use a percentage of the product/variation amount
– – (minus sign) Deduct the shipping cost with the set amount.
Front-end
↑ Back to topAfter you’ve configured the shipping rates and they’re enabled in the shipping zone they will start appearing for the customers as long as one of the condition groups are matching the conditions of the customer.
Troubleshooting
↑ Back to topThere’s a chance the shipping rates are not appearing as you may’ve expected them. The conditional logic determines if a rate appears, along with the shipping zone. You can enable the WooCommerce > Settings > Shipping > Shipping settings > Shipping debug mode to make sure shipping cache is not interfering. This will also display a notice at the top of the cart/checkout page showing which zone the customer is in.
If the zone matches as expected, take another look at your conditions. Is everything setup correctly? It could be the conditions are conflicting somewhere.
One good thing to test and to start debugging is determining if the rate is able to show up at all. This can be done by setting a single condition (group) such as ‘Subtotal – greater – 0’. This should make the rate always appear (within the shipping zone). Then start adding your own conditions one by one while testing in between to see which condition is making the rate disappear unexpectedly for your scenario.
If you need help, you can also always reach out through email through the support channel.
FAQs
↑ Back to topHelp customers by answering commonly asked questions.
Can I create a range of zipcodes?
Yes! Use a ‘-‘ sign between the zipcodes to create a range.
Can I create a comma separated list of values?
Yes, some conditions support a comma separated list of conditions. This includes the City, Zipcode and Coupon conditions