
Product Batch and Expiry Manager helps you manage WooCommerce inventory at the batch level. Instead of tracking only the total stock quantity of a product, you can maintain individual batches with their own quantities, expiry dates, costs, suppliers, and other details.
The plugin can automatically allocate stock from batches using FEFO (First Expired, First Out) or FIFO (First In, First Out). You can also manually change batch allocations for existing orders, monitor expiring inventory, receive email alerts, and trace which orders were fulfilled using a particular batch.
Installation
↑ Back to topTo start using a product from WooCommerce.com, you can use the “Add to store” functionality on the order confirmation page or the My subscriptions section in your account.
- Navigate to My subscriptions.
- Find the Add to store button next to the product you’re planning to install.
- Follow the instructions on the screen, and the product will be automatically added to your store.
Alternative options and more information at:
Managing WooCommerce.com subscriptions.
Getting Started
↑ Back to topTo start managing inventory by batch:
- Open Products → All Products.
- Find the product you want to manage and open its edit screen.
- Navigate to the Inventory tab in the Product Data section.
- Enable batch tracking for the product.
- Add a batch and enter its relevant details, including batch number, quantity, and expiry date.
- Save the product.
Once batch tracking is enabled and batches have been added, the plugin can manage the product’s inventory at the batch level.
You can also enable batch tracking and manage batches from the dedicated Batches screen or directly from the Products list.
Important: For variable products, enable batch tracking and add batches to individual variations rather than the parent product. Each variation maintains its own batch inventory.
Managing Batches
↑ Back to topYou can add and edit batches from four locations in your WooCommerce store:
- Product edit screen: Open a product and go to its Inventory tab.
- Variation Inventory panel: For variable products, manage batches separately from each variation’s Inventory panel.
- Products list: Use the Manage batches option to open a batch management modal without navigating to the full product edit screen.
- Batches screen: Go to Products → Batch & Expiry → Batches to manage batches grouped by product.
All four locations use the same inline editor, so adding and editing batches works consistently across them.
1. Adding a Batch
↑ Back to topTo add a new batch:
- Open one of the batch management locations described above.
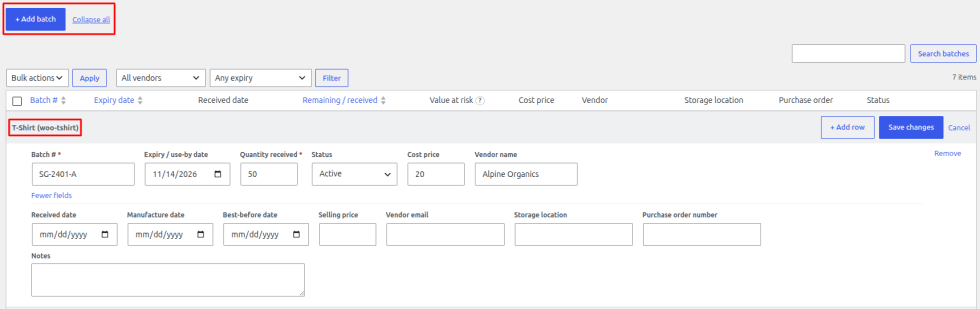
- Select the option to add a batch or use + Add batch on the Batches screen.
- A new blank row will appear in the batch table.
- Enter the batch number, expiry date, quantity received, and other available details.
- Select More fields to access additional information if it is not already displayed.
- Save the row by pressing Enter.
You can add multiple batch rows and save them together. The plugin validates each row separately and displays an error identifying the row that needs attention.
Required fields: Batch number and quantity received are required. These fields are marked with an asterisk (*).
2. Editing an Existing Batch
↑ Back to topYou can edit a batch directly from its row without opening a separate editing page.
- Locate the batch you want to update.
- Select Edit on its row.
- Update the required information in the inline editor.
- Press Enter to save your changes.
The inline editor uses appropriate input fields for different types of information, including date fields, numeric price fields, email fields, text areas, and status selectors.
If you navigate away while an editor contains unsaved changes, the plugin displays a warning to help prevent accidental loss of your updates.
3. Batch Information and Available Fields
↑ Back to topEach batch can contain the following information:
| Field | Description |
|---|---|
| Batch # | The unique batch or lot number used to identify the batch. |
| Expiry date | The batch’s expiry date. |
| Quantity received | The original quantity recorded when the batch was added. |
| Status | The current status of the batch. |
| Cost price | The cost price recorded for the batch. |
| Selling price | An optional selling price recorded for the batch. |
| Vendor name | The supplier or vendor associated with the batch. |
| Vendor email | The vendor’s email address. |
| Storage location | The location where the batch is stored. |
| Purchase order number | The purchase order reference associated with the batch. |
| Received date | The date the batch was received. |
| Manufacture date | The manufacturing date, when available. |
| Best-before date | The batch’s best-before date, when available. |
| Notes | Additional information about the batch. |
4.Using More Fields
↑ Back to topBy default, the batch editor displays the following fields directly on each row:
- Batch #
- Expiry date
- Quantity received
- Status
You can select More fields to display the remaining batch information.
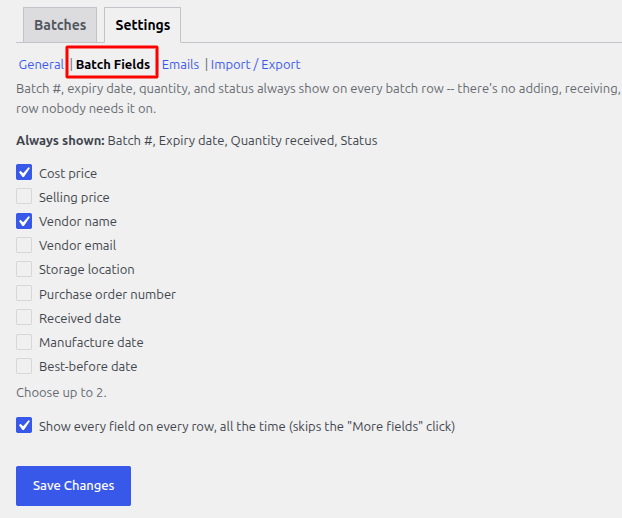
You can also configure which additional fields appear directly in the editor from Products → Batch & Expiry → Settings → Batch Fields.
The settings allow you to choose up to two additional fields to display on every row. By default, Cost price and Vendor name are selected.
If you prefer to display all fields without selecting More fields, enable the option:
Show every field on every row, all the time (skips the ‘More fields’ click).
The Notes field remains accessible through More fields.
5. Duplicating a Batch
↑ Back to topIf you receive a new shipment with details similar to an existing batch, you can use the Duplicate action to create a new batch row without entering all the shared information again.
- Locate the batch you want to duplicate.
- Open its three-dot (⋮) row menu.
- Select Duplicate.
- A new row will be added with selected information copied from the original batch.
- Enter the new shipment’s batch number, dates, quantity, purchase order number, and notes.
- Save the new batch.
The following information is copied automatically:
- Vendor name
- Vendor email
- Cost price
- Selling price
- Storage location
The following information is not copied because it relates to the specific shipment:
- Batch number
- Expiry date and other dates
- Quantity received
- Purchase order number
- Notes
Duplicating a batch does not modify the original batch.
6. Deleting a Batch
↑ Back to topTo delete an individual batch:
- Locate the batch in the batch table.
- Open its three-dot (⋮) row menu.
- Select Delete.
- Confirm the deletion when prompted.
When a batch is deleted, the plugin synchronizes the affected product’s WooCommerce stock quantity again.
You can also delete multiple batches together using the bulk Delete action on the Batches screen.
The Batches Screen
↑ Back to topThe Batches screen provides a central place to manage inventory batches across your store.
Go to Products → Batch & Expiry → Batches to open it.
1. Product Groups
↑ Back to topBatches are grouped by product. Each group displays the product name (linked to its edit screen), total active stock, and next expiry date.
All batch rows are expanded by default. Use Collapse all or Expand all to manage the view. The screen displays up to 20 product groups per page, with standard WordPress pagination.
2. Batch Table Columns
↑ Back to topThe table displays the following information:
| Column | Description |
|---|---|
| Batch # | Batch or lot number. |
| Expiry date | Expiry date with a relative indication, such as in 12 days or 62 days ago. |
| Received date | Date the batch was received. |
| Remaining / received | Remaining quantity compared with the original quantity. |
| Value at risk | Remaining quantity multiplied by cost price. |
| Cost price | Recorded batch cost. |
| Vendor | Associated vendor. |
| Storage location | Batch storage location. |
| Purchase order | Purchase order reference. |
| Status | Current batch status. |
Expired and soon-to-expire dates are visually highlighted. If no cost price is recorded, Value at risk displays a dash (—), not zero.
3. Customising Columns
↑ Back to topUse Screen Options at the top of the page to show or hide table columns.
The following columns are hidden by default: Cost price, Purchase order, and Received date. Enable them whenever you need additional information.
4. Filtering Batches
↑ Back to topUse the available filters to narrow down your batch records:
- Status: All, Active, Expired, Depleted, Damaged, or Archived. Each view displays its batch count.
- Vendor: Display batches associated with a selected vendor.
- Expiring within: Any expiry, 7 days, 30 days, 60 days, or 90 days.
Filters apply automatically when selected.
5. Searching Batches
↑ Back to topEnter a batch number or other search term in the Search batches field to find specific records without browsing through product groups.
6. Bulk Deleting Batches
↑ Back to topSelect the batches you want to remove, choose Delete from Bulk Actions, and confirm. The plugin displays the deletion count and synchronises WooCommerce stock for each affected product.
7. Needs Attention Summary
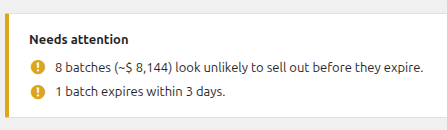
↑ Back to topThe Needs attention section highlights:
- Expired batches with remaining stock: Expired batches that still have unsold quantities.
- Unlikely to sell before expiry: Batches unlikely to sell out based on recent sales pace.
- Batches expiring within 3 days: Batches approaching expiry.
Where available, these notices link to the Batch expiry report for more details.
If no action is needed, the screen displays Nothing needs your attention right now.
Note: Monetary estimates exclude batches without a recorded cost price. Figures may therefore understate the actual inventory value.
Settings
↑ Back to top1. Automatic Stock Deduction (FEFO and FIFO)
↑ Back to topProduct Batch and Expiry Manager automatically allocates stock from available batches when WooCommerce reduces stock for an order.
You can choose between two stock allocation methods: FEFO (First Expired, First Out) and FIFO (First In, First Out).
2. Choosing an Allocation Method
↑ Back to topThe allocation method is configured store-wide under Products → Batch & Expiry → Settings → General.
FEFO – First Expired, First Out
FEFO allocates stock from the active batch with the nearest expiry date first. This helps stores selling perishable products prioritise inventory that needs to be sold sooner.
FEFO is the default allocation method.
FIFO – First In, First Out
FIFO allocates stock from the oldest received batch first. This is useful for stores that rotate inventory based on when products were received rather than their expiry dates.
Only batches with Active status and remaining stock are considered for automatic allocation.
Note: Batches without the relevant date are placed after batches with a date. If two batches have the same date, the batch ID is used to determine their order.

3. How Automatic Allocation Works
↑ Back to topWhen WooCommerce reaches its stock-reduction point for an order, the plugin:
- Identifies the products and variations that have batch tracking enabled.
- Finds eligible active batches with remaining stock.
- Sorts the batches according to the selected FEFO or FIFO method.
- Allocates the ordered quantity across the available batches.
- Saves the batch allocation against the corresponding order item.
- Synchronises the WooCommerce stock quantity with the remaining batch stock, when stock synchronisation is enabled.
If an order requires stock from multiple batches, the plugin can allocate the quantity across those batches according to the selected method.
4. What Happens When There Is Not Enough Batch Stock?
↑ Back to topIf the available batch quantities cannot cover the full order quantity, the order is not blocked.
The plugin allocates the available stock and records the uncovered quantity as an unassigned shortfall.
An order note is also added to notify the store administrator that the batch allocation needs review.
This allows the order to proceed while keeping the inventory discrepancy visible.
5. Stock Changes During the Order Lifecycle
↑ Back to topBatch quantities are updated when WooCommerce or an administrator changes order stock.
| Order event | Batch inventory behaviour |
|---|---|
| Order reduces stock | The ordered quantity is allocated across eligible batches using the selected FEFO or FIFO method. |
| Insufficient batch stock | Available quantities are allocated, and the remaining quantity is recorded as unassigned. An order note is added. |
| Order is cancelled or fails | Allocated quantities are returned to their original batches, starting with the most recent allocation. The allocation snapshot is cleared. |
| Administrator increases an order item’s quantity | Only the additional quantity is allocated from available batches. |
| Administrator decreases an order item’s quantity | Only the quantity difference is returned to the original batches. |
| Administrator deletes an order item | Its allocated quantity is returned to the original batches before the item is deleted. |
| Refund with Restock refunded items enabled | The refunded quantity is returned to its original batch or batches. |
| Refund without Restock refunded items enabled | No stock is returned. The quantity is still attributed to its original batch and recorded as a write-off. |
6. Expiry Alert Threshold
↑ Back to topSet how many days before expiry a batch should be treated as expiring soon.
The default value is 30 days.
This threshold is used by:
- The dashboard’s Right now cards, which highlight stock approaching expiry.
- The advance-notice email, which alerts you about batches approaching their expiry dates.
This setting is separate from the date-range filter on the Dashboard tab. The date-range filter only changes the historical reporting section of the dashboard; it does not change the expiry alert threshold.
7. Final Warning Email
↑ Back to topEnable this option to receive a second, more urgent email reminder closer to a batch’s expiry date.
You can also specify how many days before expiry this warning should be sent. The default is 3 days.
This setting is optional. It is particularly useful if your main expiry alert threshold is set to a longer period.
Example:
- Expiry alert threshold: 30 days
- Final warning: 3 days
With these settings, the plugin can send an advance notice when stock enters the 30-day expiry window and a separate final warning when it enters the 3-day window.

8. Near Expiry Category
↑ Back to topEnable this option to automatically assign a selected product category to products that have stock approaching expiry.
Choose the category you want the plugin to manage and specify the number of days before expiry that should trigger the assignment.
The category’s day window is independent of the Expiry Alert Threshold. For example, you can assign products to a Clearance category when their stock is within 14 days of expiry while keeping your email alert threshold at 30 days.
The plugin checks the qualifying stock during its daily background check.
Automatic category management:
- The selected category is added when a product has stock within the configured expiry window.
- The category is removed automatically when none of the product’s stock qualifies anymore. This can happen when the stock is sold, replaced with batches that have later expiry dates, or marked as expired.
- The plugin only removes category assignments that it added itself. Categories assigned manually by an administrator are not removed.
- For variable products, the category is assigned to the parent product when a variation’s batches qualify.
Important: Disabling this option does not immediately remove existing category assignments made by the plugin.

9. Shelf-Life Note
↑ Back to topEnable this option to display a minimum shelf-life message in the stock status text on the storefront for batch-tracked products.
You can customise the message and use the {days} placeholder to display the number of days remaining before the soonest-expiring batch currently in stock reaches its expiry date.
Example message:
Minimum {days} days shelf life on delivery.
If the soonest-expiring batch has 45 days remaining, customers will see:
Minimum 45 days shelf life on delivery.
The day count is based on the soonest-expiring batch that actually has stock remaining. This communicates the minimum shelf life customers can expect, rather than displaying the expiry date of a particular batch.
The message is displayed automatically on batch-tracked products and on individual variations. No additional product-level configuration is required.
Additional notes:
- This option is disabled by default.
- If you clear the custom message, the plugin uses its built-in default wording.
- The message is not displayed when the product is not batch-tracked, no active batch has an expiry date, or the soonest expiry date has already passed.
- The message follows your active theme’s stock status styling.

10. Keeping WooCommerce Stock in Sync
↑ Back to topThe plugin includes an option to keep WooCommerce’s stock quantity synchronised with the remaining quantities in its batches.
You can find this setting under:
Products → Batch & Expiry → Settings → General
The option is enabled by default:
Keep each tracked product’s WooCommerce stock quantity in sync with its batches
When enabled, the plugin updates WooCommerce’s stock quantity to match the actual combined remaining quantity of the tracked product’s batches.
This allows WooCommerce’s own stock features, including backorders and low-stock notifications, to continue working with the synchronised quantity.
The daily background check also synchronises the stock quantities of tracked products to correct any differences.
What happens if stock synchronisation is disabled?
Batch tracking and batch-based reports continue to work. However, the plugin no longer updates WooCommerce’s own stock quantity to match the batch totals.
As a result, the stock quantity displayed by WooCommerce may differ from the actual remaining batch inventory.
For most stores, we recommend keeping this setting enabled.

11. Important: Turning Batch Tracking Off
↑ Back to topYou can disable batch tracking for a product without deleting its existing batches.
However, while tracking is disabled, sales are no longer deducted from those batches. WooCommerce’s standard stock handling takes over instead.
When you enable tracking again:
- From the Products list or the Batches tab, WooCommerce stock is synchronised immediately.
- From the product’s Inventory tab, synchronisation does not happen immediately. Save a batch row to trigger synchronisation, or wait for the next order or daily background check.
Your existing batch records remain in place when tracking is switched off and back on.
Batch Reassignment and Order Traceability
↑ Back to top1. Manually Reassigning a Batch
↑ Back to topIf an order is fulfilled using a different batch than the one automatically allocated, you can correct the allocation from the order editor.
- Go to WooCommerce → Orders and open the relevant order.
- Find the product line item’s Batch cell.
- Click Reassign and select the batch actually used to fulfil the order.
The plugin returns the existing allocation to its original batches and deducts the full order quantity from the selected batch. If that batch does not have enough stock, the remaining quantity is recorded as unassigned rather than taken from another batch.
The product’s WooCommerce stock is synchronised, and an order note records the reassignment.
You can also reassign batches on completed orders.

2. Finding Orders by Batch
↑ Back to topThe plugin provides two ways to identify orders associated with a batch:
- From the Batches screen: Open the batch’s three-dot menu and select View orders to see orders fulfilled from that batch.
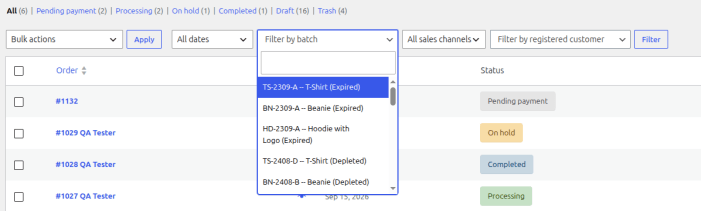
- From the Orders screen: Use the Filter by batch dropdown to search for and select a batch. The order list will display matching orders.
The filter supports searching by batch and displays the selected batch in a notice above the order list. Select Clear filter to remove it.
Order traceability works with both High-Performance Order Storage (HPOS) and WooCommerce’s legacy order storage.
Analytics Reports
↑ Back to topProduct Batch and Expiry Manager adds two reports under WooCommerce → Analytics to help you monitor upcoming expiries and understand inventory waste.
Both reports include product and vendor filters, allowing you to narrow the results to a specific product, variation, or vendor. Monetary values use your store’s currency and formatting settings.
1. Batch Expiry Report
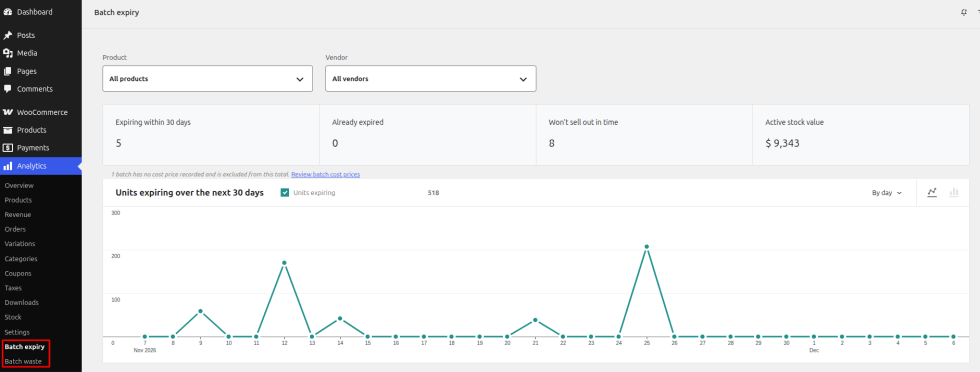
↑ Back to topGo to WooCommerce → Analytics → Batch Expiry to review your current batch inventory and identify stock that needs attention.
The report includes four summary cards:
- Expiring within N days: Stock approaching expiry, based on your configured expiry alert threshold.
- Already expired: Expired batches that still have unsold stock.
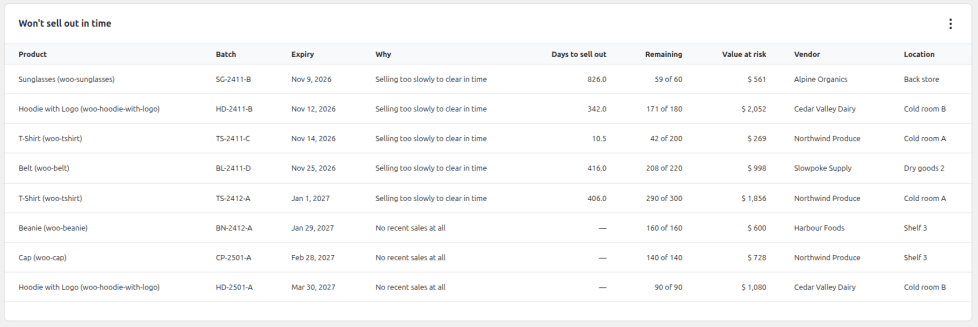
- Won’t sell out in time: Batches projected to remain unsold before their expiry date.
- Active stock value: The cost-based value of remaining active batch inventory.
A chart shows the number of units expected to expire over the coming days.
The report also includes tables for expired batches, sell-through risks, batches approaching expiry, and batch distribution by status.
This report focuses on the current inventory situation and does not include a date-range picker.
2. Batch Waste Report
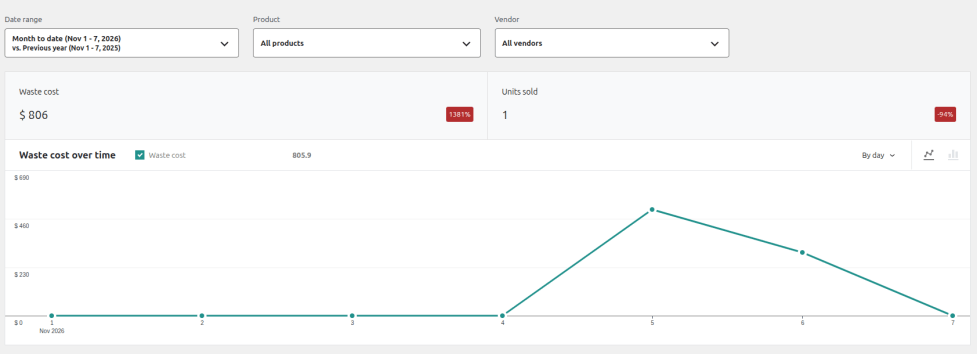
↑ Back to topGo to WooCommerce → Analytics → Batch Waste to review inventory waste and sales from tracked batches over a selected period.
The report includes two summary cards:
- Waste cost: The cost of expired stock that remained unsold, plus refunded stock that was not restocked.
- Units sold: The number of units sold from tracked batches during the selected period.
You can also view a waste-cost chart over time, a ranking of products by waste cost, and a supplier scorecard showing waste and expiry-related information.
Use the date picker to review different periods and compare performance with the previous period or previous year.
Note: Batches without a recorded cost price are excluded from monetary totals. The reports display a notice indicating how many batches were excluded when applicable.
Requirements: WooCommerce Analytics must be enabled. You can check this under WooCommerce → Settings → Advanced → Features.
Notifications
↑ Back to top1. Available Email Notifications
↑ Back to topThe plugin provides four WooCommerce email notifications:
- Batches Expiring Soon: Sent when a batch reaches the expiry alert threshold.
- Final Warning: Sends an additional reminder shortly before expiry. Disabled by default.
- Won’t Sell Out In Time: Alerts you when recent sales indicate that stock may remain unsold at expiry.
- Batches Expired: Notifies you when a batch expires with remaining stock.
2. Configuring Email Notifications
↑ Back to topGo to Products → Batch & Expiry → Settings → Emails.
You can view each notification, edit its template, and send a test email. Use Edit template to access standard WooCommerce email settings, including recipients, subject, heading, and email format.
3. Email Activity
↑ Back to topThe Recent Email Activity section displays the latest email attempts, including their date, recipient, status, and any error details.
Notifications are checked automatically once a day. Failed emails can be retried during the next scheduled check.

Import & Export
↑ Back to top1. Exporting Batch Data
↑ Back to topGo to Products → Batch & Expiry → Settings → Import / Export.
Click Export CSV to download all batch records, including product details, batch numbers, dates, quantities, prices, vendor information, and other batch fields.
2. Importing Batch Data
↑ Back to topUpload a CSV file to create new batches or update existing ones.
- Required fields: Batch Number and either Product ID or SKU.
- Column order does not matter.
- Extra columns are ignored.
- Existing batches are updated when their Batch ID matches; otherwise, a new batch is created.
3. CSV Column Mapping
↑ Back to topThe importer recognises common column names and aliases, such as Batch Number, Batch No, and Lot Number.
Download the Starter CSV Template from the Import / Export settings page to get the correct column headers.


