Key Features
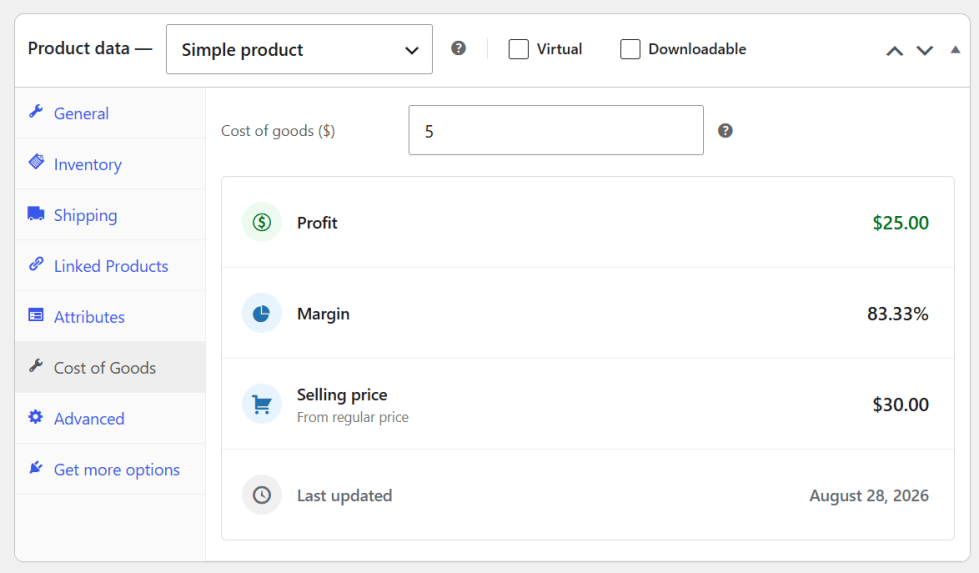
↑ Back to topReal-Time Profit & Margin Insights: A dedicated Cost of Goods tab on every product displays a live Insights Panel showing your net profit, margin percentage, and selling price — all updating instantly as you type.
Permanent Order Cost Snapshots: Every time a customer checks out, the plugin permanently locks the exact product cost onto the order, ensuring historical profit reports remain 100% accurate even when supplier prices change later.
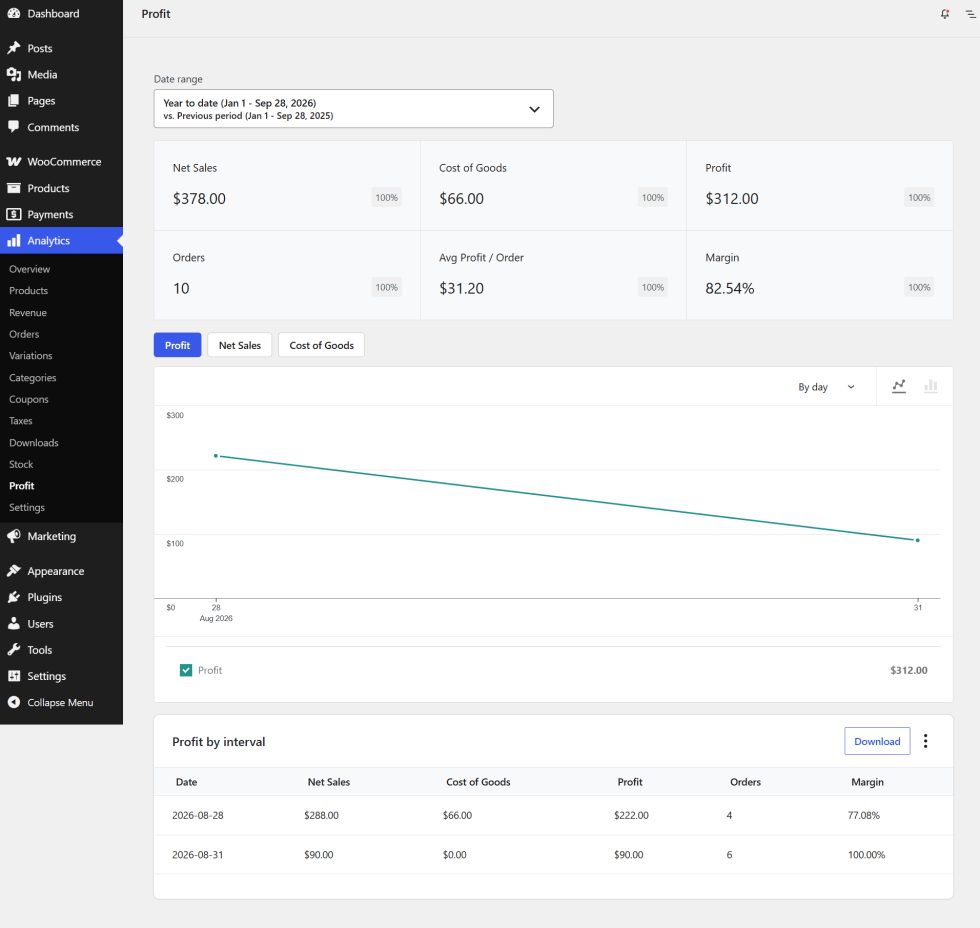
WooCommerce Analytics & Classic Reports Integration: View profit-by-date, product, category, and supplier breakdowns natively inside both the modern WooCommerce Analytics dashboard and Classic WooCommerce Reports.
Low Margin Alert System: Set a minimum margin threshold and receive real-time inline warnings on the product editor and an optional admin notice banner whenever any product dips below your target margin or sells at a loss.
Cost History Audit Log: Every cost change is automatically timestamped and stored. A Cost History metabox on each product’s edit page gives you a complete audit trail of every pricing change over time.
Bulk CSV Import & Export: Export your entire catalog’s costs and supplier data to a single CSV, update it in Excel or Google Sheets, then re-import to apply changes to thousands of products in seconds.
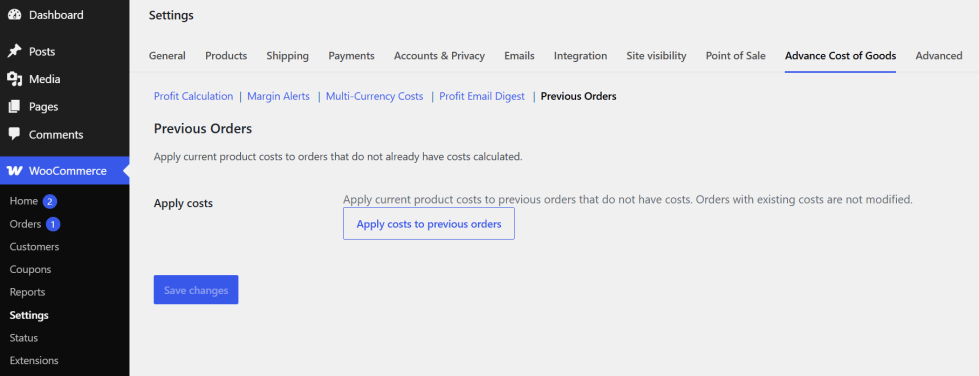
Historical Order Backfill: The one-click Backfill tool applies your current product costs to all previous WooCommerce orders missing cost data, giving you instant historical profit analytics from the moment you install the plugin.
Supplier Management & Profit Reporting: Create custom suppliers, assign them to products, and filter your profit analytics by vendor to identify which suppliers are driving the most profitability.
Automated Profit Email Digest: Receive weekly or monthly profit summary emails — including net sales, cost of goods, net profit, and top products — with optional CSV report attachments, delivered directly to your inbox.
Multi-Currency Cost Support & HPOS Compatible: Enter product costs in any foreign currency and the plugin auto-converts them to your store currency for accurate margins. Fully compatible with WooCommerce HPOS and Cart/Checkout Blocks.
1. Installation
↑ Back to top- Download the extension from your WooCommerce dashboard.
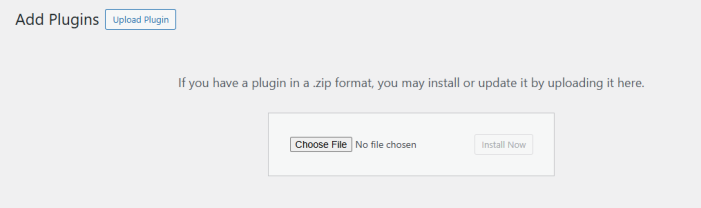
- Go to Plugins > Add New > Upload and select the ZIP file you just downloaded.
- Click Install Now and then Activate.
- Once activated, you can configure the plugin by going to WooCommerce > Settings > Advance Cost of Goods.
2. Global Settings
↑ Back to topNavigate to WooCommerce > Settings > Advance Cost of Goods to access the plugin settings. The settings are organized into five sub-sections, accessible via the sub-navigation bar directly below the main WooCommerce settings tabs.
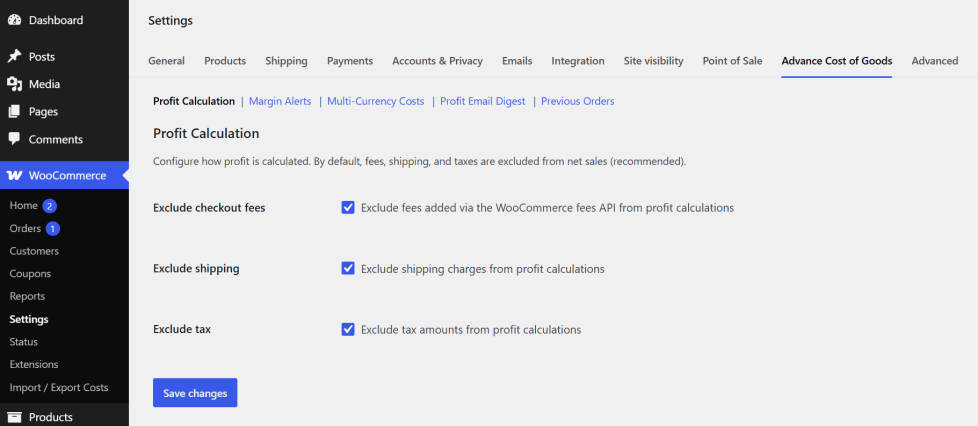
2.1 Profit Calculation
↑ Back to topPath: WooCommerce > Settings > Advance Cost of Goods > Profit Calculation
This is the default sub-section. It controls which order charges are deducted from revenue before calculating net profit.
| Setting | Description | Default |
|---|---|---|
| Exclude checkout fees | Exclude fees added via the WooCommerce fees API from profit calculations | Enabled |
| Exclude shipping | Exclude shipping charges from profit calculations | Enabled |
| Exclude tax | Exclude tax amounts from profit calculations | Enabled |
How profit is calculated:
Net Profit = Order Revenue - Cost of Goods Sold - Shipping (if excluded) - Taxes (if excluded) - Fees (if excluded) - Refunds (if any)
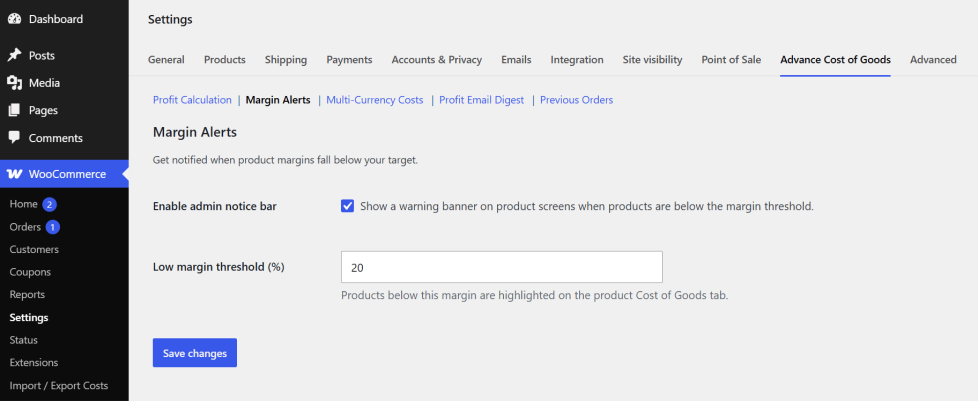
2.2 Margin Alerts
↑ Back to topPath: WooCommerce > Settings > Advance Cost of Goods > Margin Alerts
Configure automatic warnings that appear when products are priced below your minimum acceptable profit margin.
| Setting | Description | Default |
|---|---|---|
| Enable admin notice bar | Show a warning banner on product screens when products are below the margin threshold | Disabled |
| Low margin threshold (%) | Products below this margin percentage are highlighted. Accepts values 0–100 with decimal support. | 20 |
When the admin notice bar is enabled, it appears on:
- The Products list (Products > All Products)
- The Single product edit page
- The WooCommerce Analytics screen
The notice displays a count of how many products are currently below the threshold. Additionally, an inline visual warning always appears on the Cost of Goods tab of any individual product that is below the threshold or selling at a loss — this inline warning does not require the admin notice bar to be enabled.
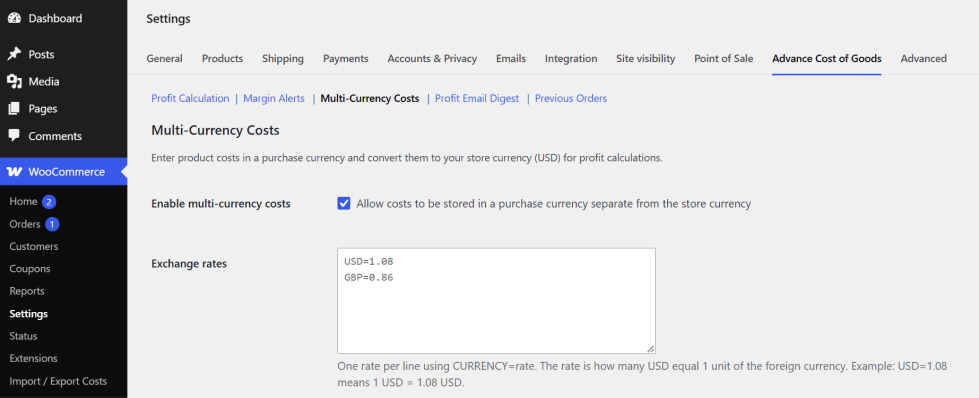
2.3 Multi-Currency Costs
↑ Back to topPath: WooCommerce > Settings > Advance Cost of Goods > Multi-Currency Costs
Enable this section if you source products in a currency different from your WooCommerce store currency.
| Setting | Description | Default |
|---|---|---|
| Enable multi-currency costs | Allow costs to be stored in a purchase currency separate from the store currency | Disabled |
| Exchange rates | One rate per line in the format CURRENCY=rate | Empty |
Exchange Rate Format:
Enter one exchange rate per line using CURRENCY=rate. The rate is how many units of your store currency equal 1 unit of the foreign currency.
USD=1.08GBP=0.86CNY=7.82
Example: If your store currency is EUR and you enter USD=1.08, then a product costing $10 USD will be stored as EUR 10.80.
When multi-currency is enabled, a Cost currency dropdown appears alongside every cost input field on product and variation edit screens. The plugin will also display a “Store currency cost:” preview in real-time as you type.
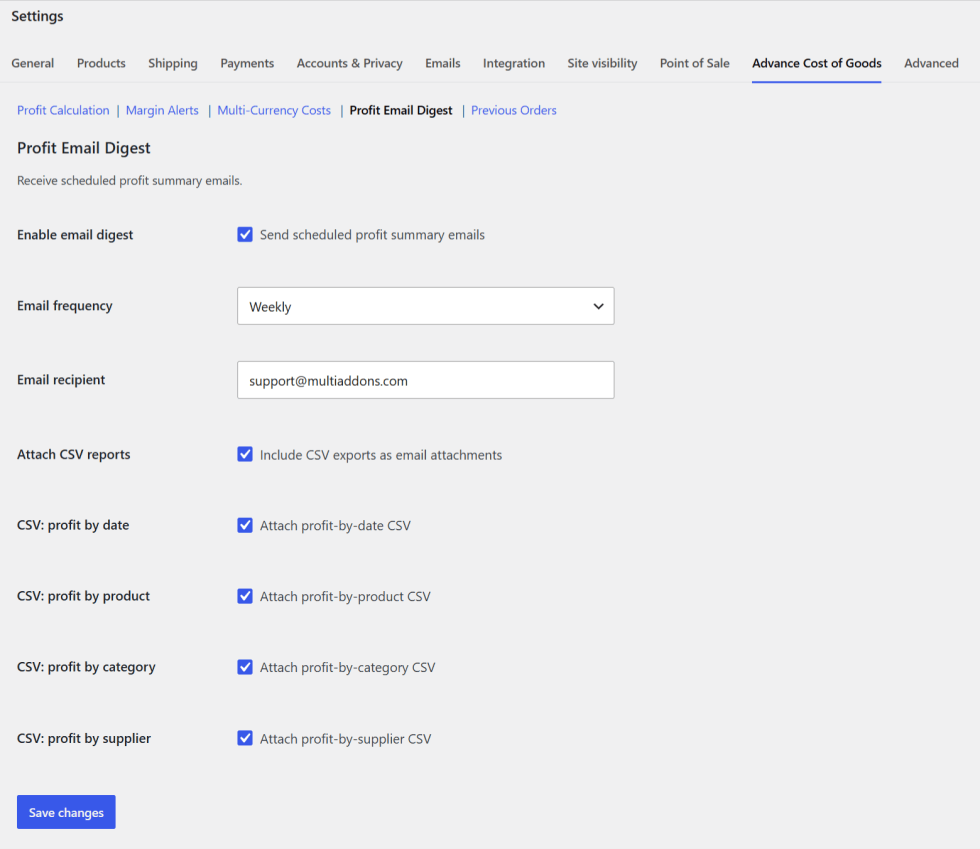
2.4 Profit Email Digest
↑ Back to topPath: WooCommerce > Settings > Advance Cost of Goods > Profit Email Digest
Configure automatic profit summary emails sent to a specified recipient on a recurring schedule.
| Setting | Description | Default |
|---|---|---|
| Enable email digest | Activate the scheduled email | Disabled |
| Email frequency | How often to send: Weekly or Monthly | Weekly |
| Email recipient | Destination email address | Store admin email |
| Attach CSV reports | Include CSV files as email attachments | Disabled |
| CSV: profit by date | Attach a profit-by-date CSV | Yes |
| CSV: profit by product | Attach a profit-by-product CSV | Yes |
| CSV: profit by category | Attach a profit-by-category CSV | Yes |
| CSV: profit by supplier | Attach a profit-by-supplier CSV | Yes |
Available frequencies: Weekly (covers last 7 days) | Monthly (covers last 30 days)
The email subject line will be: [Your Site Name] Profit digest
Each digest email body includes:
- Summary period (start date – end date)
- Net Sales
- Total Cost of Goods
- Net Profit
- Margin %
- Top 5 products by profit
2.5 Previous Orders (Backfill)
↑ Back to topPath: WooCommerce > Settings > Advance Cost of Goods > Previous Orders
Use this tool to apply your current product costs to historical WooCommerce orders that were placed before this plugin was installed, or before costs were added to products.
To run the backfill:
- First, ensure all your products have accurate and up-to-date costs assigned.
- Go to WooCommerce > Settings > Advance Cost of Goods > Previous Orders.
- Click the “Apply costs to previous orders” button.
- A success notice will confirm how many orders were updated (e.g. “Costs applied to 248 orders.”).
3. Adding Costs to Products
↑ Back to top3.1 Simple Products
↑ Back to top- Go to Products > All Products and edit a simple product.
- In the Product Data meta box (below the product description), click the Cost of Goods tab.
- Enter your purchase or manufacturing cost (excluding tax and shipping) in the Cost of goods field.
- The Insights Panel below the cost field will automatically display:
| Panel Row | What It Shows |
|---|---|
| Profit | Monetary profit amount based on current selling price minus cost |
| Margin | Profit margin as a percentage (shown in red if below threshold) |
| Selling price | The current price from the General tab (read-only, synced automatically) |
| Last updated | The date this product’s cost was last changed |
- Click Update to save.
Inline warnings shown on the Cost of Goods tab:
| Scenario | Message Displayed |
|---|---|
| Margin is below the configured threshold | “Margin is below your X% threshold.” |
| Cost exceeds the selling price (loss) | “You’re selling at a loss. Cost exceeds the selling price.” |
| No selling price set on General tab | “Set regular price on the General tab” |
| Cost field is empty | “Add cost to calculate margin” |
3.2 Variable Products
↑ Back to topVariable products support two levels of cost configuration:
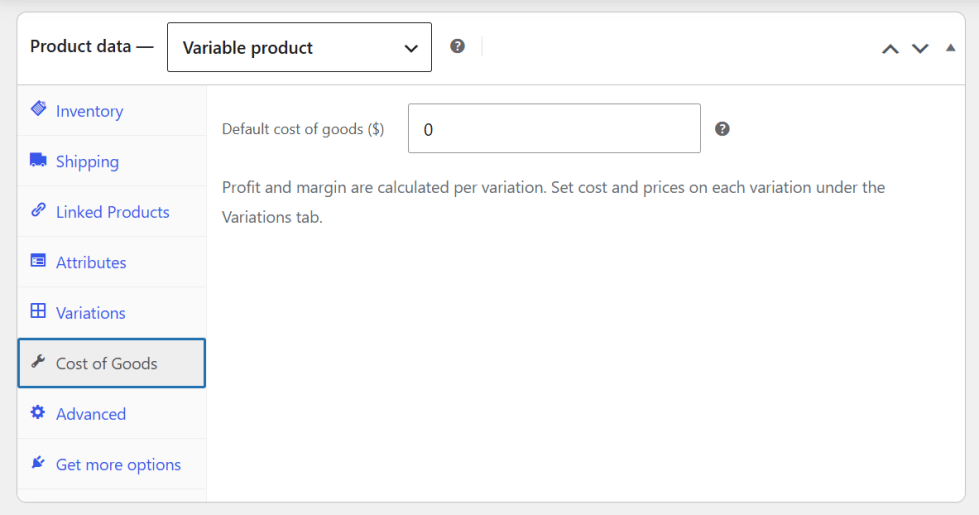
Level 1 — Default Cost (Cost of Goods tab on the parent product):
- Edit a variable product and click the Cost of Goods tab.
- Enter a Default cost of goods. This value is used as a fallback for any variation that does not have its own individual cost.
- A note on the panel states: “Profit and margin are calculated per variation. Set cost and prices on each variation under the Variations tab.”
Level 2 — Per-Variation Cost (Variations tab):
- Click the Variations tab in the Product Data meta box.
- Expand any individual variation panel.
- A Cost of goods field appears within that variation’s pricing section.
- Enter the variation-specific cost and click Save changes.
3.3 Quick Edit and Bulk Edit
↑ Back to topCosts can be updated directly from the Products > All Products list without opening the full product editor.
Quick Edit (one product at a time):
- Go to Products > All Products.
- Hover over a product row and click Quick Edit.
- A Cost of goods field appears in the inline edit panel.
- Enter the new cost and click Update.
Bulk Edit (multiple products at once):
- Go to Products > All Products.
- Check the boxes next to the products you want to update.
- From the Bulk actions dropdown, choose Edit and click Apply.
- A Cost of goods field appears in the bulk edit panel at the top.
- Enter the cost to apply to all selected products and click Update.
3.4 Cost History Log
↑ Back to topEvery time a product’s cost is changed and saved, the change is automatically recorded in the database. A Cost History metabox in the right-hand sidebar of the product edit page displays the full audit log for that product.
The table shows:
| Date | Old Cost | New Cost |
|---|---|---|
| 2026-09-15 10:32 | $8.00 | $9.50 |
| 2026-08-01 14:10 | $7.00 | $8.00 |
If no cost changes have been recorded yet, the metabox displays: “No cost changes recorded yet.”
The most recent entry in the Cost History is also used to populate the Last updated field in the Cost of Goods tab Insights Panel.
4. Managing Suppliers
↑ Back to topSupplier management allows you to group products by their vendor and filter profit reports by supplier.
Creating a Supplier:
- Go to Products > Suppliers in the WordPress admin sidebar.
- Enter the supplier Name (required), an optional Slug, and an optional Description.
- Click Add New Supplier.
Assigning a Supplier to a Product:
- Edit any product.
- In the right-hand sidebar, locate the Suppliers panel (similar to the Categories or Tags panels).
- Check the box next to the supplier name.
- Click Update to save.
5. Viewing Profit Data
↑ Back to topThe plugin surfaces profit data in five different locations across the WooCommerce admin.
5.1 Products List Column
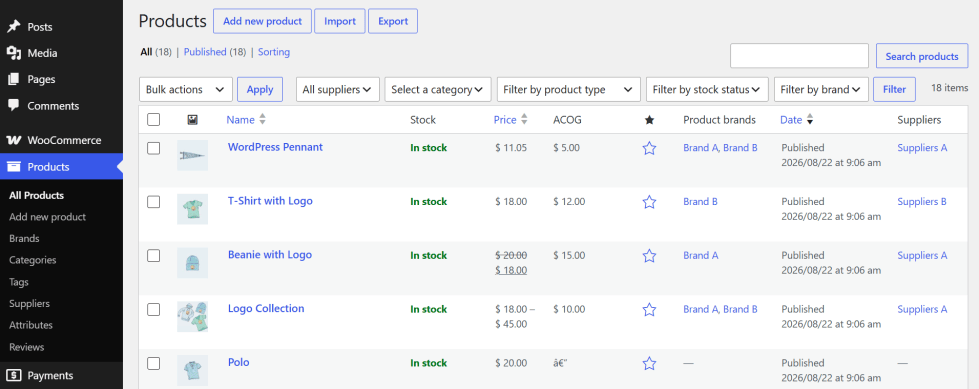
↑ Back to topAn ACOG column is added to Products > All Products, positioned directly after the Price column. It displays the stored cost for the product. For variable products, it shows a cost range (min–max across variations).
5.2 Orders List Column
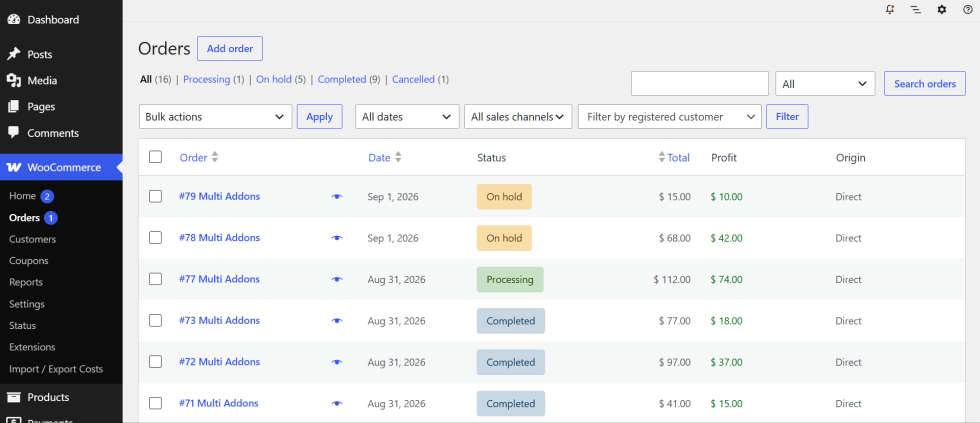
↑ Back to topA cost and profit column is added to WooCommerce > Orders. At a glance you can see the total cost of goods and the calculated net profit for every order in the list.
5.3 Single Order View
↑ Back to topWhen viewing an individual order (WooCommerce > Orders > [Order #]), a detailed cost breakdown appears for each line item, showing:
- Unit cost — the cost snapshotted at the time the order was placed
- Line cost — unit cost multiplied by quantity ordered
- Order total cost — the sum of all line item costs on the order
5.4 WooCommerce Analytics
↑ Back to topThe plugin integrates with both the modern WooCommerce Analytics (React-based) dashboard and the Classic WooCommerce Reports, ensuring compatibility regardless of which reporting interface your store uses.
Access analytics via: WooCommerce > Analytics
Available report breakdowns:
- Profit by Date — daily, weekly, or monthly profit trend charts
- Profit by Product — identifies your highest and lowest margin products
- Profit by Category — reveals which product categories are most profitable
- Profit by Supplier — attributes profit to each supplier for vendor comparison
All reports respect the Profit Calculation settings — fees, shipping, and taxes are included or excluded according to your configuration.
6. CSV Import and Export
↑ Back to topAll CSV operations are accessed from the dedicated menu page at WooCommerce > Import / Export Costs, which contains two tabs: CSV Import and CSV Export.
6.1 Exporting Costs
↑ Back to top- Go to WooCommerce > Import / Export Costs.
- Click the CSV Export tab.
- Click the Export button.
- A file named
product-costs.csvwill be downloaded immediately to your computer.
The exported file contains every product and variation that has a cost assigned. Products with no cost are omitted from the export.
6.2 Importing Costs
↑ Back to top- Go to WooCommerce > Import / Export Costs.
- Click the CSV Import tab.
- Prepare your
.csvfile. It must have at minimum anidcolumn and acostcolumn in the header row. - Click Choose File, select your CSV, and click Import.
- After processing, a success or warning banner will confirm how many products were updated.
Import rules:
- The
idmust match an existing WooCommerce product or variation ID. - Rows with an unrecognized ID or an empty/missing cost are silently skipped.
- The
suppliercolumn value must match the name or slug of an existing Supplier term — new suppliers are not created automatically. - Importing updates existing products only — it does not create new products.
Troubleshooting common import errors:
| Error Message | Likely Cause | Solution |
|---|---|---|
| “The CSV file is too large…” | File exceeds server PHP upload limits | Increase upload_max_filesize and post_max_size in php.ini |
| “No products were updated…” | Missing required columns or invalid product IDs | Export first and modify that file to ensure correct IDs |
| “Could not read the CSV file…” | Missing or malformed header row | Ensure row 1 contains column names, not data |
6.3 CSV Column Reference
↑ Back to top| Column | Type | Import | Description |
|---|---|---|---|
id | Integer | Required | WooCommerce product or variation ID |
name | String | Ignored | Product name — informational only, not written on import |
cost | Decimal | Required | Unit cost in store currency (or foreign currency if multi-currency is used) |
cost_original | Decimal | Optional | Original cost in foreign currency; used if cost column is absent |
cost_currency | String | Optional | 3-letter ISO 4217 currency code for the cost (e.g. USD, GBP) |
cost_variable | Decimal | Optional | Default variable cost in store currency (for parent variable products) |
cost_variable_original | Decimal | Optional | Default variable cost in foreign currency |
cost_variable_currency | String | Optional | Currency code for the default variable cost |
supplier | String | Optional | Supplier name or slug — must match an existing Supplier term |
price | Decimal | Ignored | Regular selling price — informational only, not written on import |
margin_percent | Decimal | Ignored | Calculated margin % — informational only, not written on import |
7. Low Margin Alerts
↑ Back to topThe plugin provides two distinct low margin alert mechanisms that work independently.
Mechanism 1 — Inline Product Tab Warning (always active, no setup required):
When editing any product on the Cost of Goods tab, the Insights Panel calculates the profit margin in real-time. If the margin falls below the configured threshold, or if the cost exceeds the selling price, a red warning notice appears directly inside the panel:
- Below threshold: “Margin is below your 20.00% threshold.”
- Selling at a loss: “You’re selling at a loss. Cost exceeds the selling price.”
This warning updates live as you type in the cost field or when prices are changed on the General tab.
Mechanism 2 — Admin Notice Bar (optional, must be enabled):
When enabled, a dismissible admin notice banner appears at the top of:
- Products > All Products
- Single product edit page
- WooCommerce Analytics
The banner shows a count of products below the threshold store-wide.
To enable and configure the admin notice bar:
- Go to WooCommerce > Settings > Advance Cost of Goods > Margin Alerts.
- Check Enable admin notice bar.
- Set your Low margin threshold (%) — the default is
20. Supports decimal values (e.g.15.5). - Click Save changes.
8. Automated Profit Email Digest
↑ Back to topThe Profit Email Digest delivers a periodic profit summary directly to a specified email address, keeping you informed without requiring a manual login.
Configuration steps:
- Go to WooCommerce > Settings > Advance Cost of Goods > Profit Email Digest.
- Check Enable email digest.
- Select Email frequency:
WeeklyorMonthly. - Enter the Email recipient address (defaults to the WordPress admin email).
- To include CSV report attachments, check Attach CSV reports, then select which reports to attach:
- Profit by Date
- Profit by Product
- Profit by Category
- Profit by Supplier
- Click Save changes. The cron schedule activates immediately.
Digest email content:
- Date range covered
- Net Sales total
- Total Cost of Goods
- Net Profit
- Overall Margin %
- Top 5 products by profit with amounts
- CSV attachments (if enabled)
Coverage periods:
- Weekly — covers the last 7 days
- Monthly — covers the last 30 days
9. Multi-Currency Costs
↑ Back to topMulti-currency cost support is designed for stores that source products internationally in currencies different from the WooCommerce store currency.
Initial setup:
- Go to WooCommerce > Settings > Advance Cost of Goods > Multi-Currency Costs.
- Check Enable multi-currency costs.
- Enter exchange rates in the Exchange rates textarea — one per line — using the format
CURRENCY=rate:
USD=1.08GBP=0.86CNY=7.82JPY=162.50
The rate is defined as: how many units of the store currency equal 1 unit of the foreign currency.
- Click Save changes.
Using currencies on products:
With multi-currency enabled:
- A Cost currency dropdown appears next to every cost input on the product editor and variation panels.
- Select the currency the cost is entered in.
- A “Store currency cost:” preview is shown in real-time, displaying the automatically converted store-currency equivalent.
Multi-currency on orders:
When a product cost is recorded in a foreign currency at checkout, the order line item stores:
- The original cost in the foreign currency
- The foreign currency code
- The exchange rate used at the time of the order
This preserves a complete and auditable record of the cost conversion for every historical transaction.
10. Order Cost Snapshots
↑ Back to topOrder Cost Snapshots are automatic and require no configuration. They are active as soon as the plugin is installed.
Why snapshots are essential:
In any store, product costs change over time as suppliers adjust their prices. A naive profit calculation that reads the current product cost when generating a report would corrupt all historical data every time a cost changes. Advance Cost of Goods solves this completely.
How it works:
At the precise moment a customer completes checkout — or when an admin manually creates an order — the plugin immediately records the product’s cost directly onto each individual order line item as permanent order metadata. This “snapshot” is entirely independent of the product’s current cost field.
Effect on your data:
If a product’s cost was $8.00 when an order was placed, that order will always report $8.00 as its cost — even if the cost is updated to $12.00 today. Your profit reports for past periods will never change retroactively due to a cost update.
What is stored per line item at checkout:
| Data Stored | Description |
|---|---|
| Unit cost | The cost per single unit in the store’s base currency |
| Line cost | Unit cost multiplied by the quantity ordered |
| Original cost (multi-currency only) | The cost in the original foreign currency |
| Currency code (multi-currency only) | The ISO currency code of the purchase currency |
| Exchange rate (multi-currency only) | The conversion rate used at time of checkout |
Coverage for admin-created orders:
Snapshots are also taken when an admin manually adds items to an order from the WooCommerce backend. If an item is added to an existing order, the snapshot for that item is recorded at the time the item is added and saved.
If I change a product's cost today, will it affect my past profit reports?
No. The plugin records a permanent cost snapshot at the exact moment of each checkout. Past reports are always based on the cost at the time of purchase and can never be retroactively altered by changes to the current product cost.
Does this plugin work with variable products and their variations?
Yes. Each variation can have its own individual cost. Profit and margin are calculated per variation. A default fallback cost can also be set at the parent variable product level for variations that do not have their own cost assigned.
Can I install this plugin on a store that already has thousands of past orders?
Yes. Use the Backfill tool under WooCommerce > Settings > Advance Cost of Goods > Previous Orders. Click “Apply costs to previous orders” to apply your current product costs to all historical orders that are missing cost data. The backfill is safe to run multiple times — it skips orders that already have costs recorded.
What cost does the backfill use for historical orders?
It uses each product’s current cost at the time the backfill is run. Assign accurate costs to all your products before running the backfill for the best results.
My CSV import completed but says no products were updated. What should I check
Check the following:
The CSV must contain a header row as the very first row, with column names including at minimumidandcost.
Theidvalues must be valid existing WooCommerce product IDs. Find IDs in Products > All Products (enable the ID column or hover over a product to see it in the URL).
Thecostcolumn must not be blank for rows you intend to update.
The recommended workflow is: Export first → modify the exported file → re-import to guarantee the IDs are correct.