
The Advanced Extra Fee for WooCommerce plugin enables WooCommerce store owners to add extra fees based on various conditions. It is an essential tool for businesses looking to increase revenue without modifying base product prices by adding dynamic fees at checkout.
This document provides insights into the plugin’s requirements, installation, functionality, and usage to help you maximize its features.
Requirements
↑ Back to top- WooCommerce 9.0.0 and above
- WordPress 6.0 and above
- PHP 7.4 and above
Installation
↑ Back to topTo start using a product from WooCommerce.com, you can use the “Add to store” functionality on the order confirmation page or the My subscriptions section in your account.
- Navigate to My subscriptions.
- Find the Add to store button next to the product you’re planning to install.
- Follow the instructions on the screen, and the product will be automatically added to your store.
Alternative options and more information at:
Managing WooCommerce.com subscriptions.

How does the Extra Fees Plugin work?
↑ Back to topThe Advanced Extra Fee Plugin for WooCommerce allows store owners to create unlimited fees with different rules based on various conditions. The plugin controls when and how extra fees are applied, such as by location, product type, weight, cart value, etc.
This enables you to set precise and strategic fees that fit your business needs, efficiently covering costs such as handling, transaction, and shipping fees.
Types of Extra Fee Rules
- Location-based: Country, State, Postal code, Zone
- Product-based: Product Name, SKU, Variable Product, Category, Tag
- Attribute-based: Brand, Color, Size
- User-based: User, User Role
- Cart-specific: Subtotal before/after discount, Cart Quantity, Coupon Code
- Shipping-based: Product Weight, Shipping Class
- Payment-based: Cash on delivery, Bank Transfer
- Date-based: You can set start and end dates for the extra fee.
1. Product Fee
Product fees allow you to apply additional costs directly to the products. This is useful for premium items or services like customization, handling, or packaging.
Configuration Options:
- Common Fee for All Products: You can set a universal fee that applies to every product in the store.
- Separate Fee for Each Product: A unique fee can be added to individual products. For instance, a special handling fee could be applied to fragile or oversized items.
- Different Fees for Each Product Category: Define fees based on the product category. For example, electronics may have an extra warranty fee, while clothing may have a restocking fee.
- Multiple Fees for a Product: You can configure more than one fee per product. For example, you could add a customization fee and a shipping insurance fee.
2. Payment Gateway Fee
Payment gateway fees are charged based on the customer’s chosen payment method. This can help recover transaction costs from expensive payment gateways (like credit cards or PayPal).
Configuration Options:
- Different Fees for Each Payment Gateway: Set up unique fees for each. For instance, charge an extra 2% for PayPal transactions.
3. Order Total Fee
Order total fees apply additional charges based on the cart’s total value. This fee is often used for small orders that don’t meet certain thresholds, such as minimum purchase amounts for free shipping.
Configuration Options:
- Range-Based Fees: Define the fee to apply only if the cart total is within a specified range. For example, charge an extra $5 for orders below $50.
4. Shipping Method Fee
Shipping method fees allow you to apply additional costs when customers choose a specific shipping option. This is helpful if certain shipping methods are more expensive or require special handling.
Configuration Options:
- Different Fees for Each Shipping Method: You can charge different fees based on the chosen shipping method. For example, an express shipping option may have a higher fee than standard shipping.
Examples:
- Charge $5 for orders under $50 or offer free shipping for specific locations.
- Add a rush fee for prioritized handling or apply extra handling costs for delicate items.
- Charge a higher fee for shipping heavy products or apply a flat fee for expedited shipping.
Getting Started: Creating WooCommerce Extra Fee
↑ Back to topTo understand how this plugin can be deployed to add different extra fee-related charges and rules for your WooCommerce store, you should understand it step-by-step. In this section, we are going to tell you about the main modules or functionalities of the plugin.
Adding a New Extra Fee
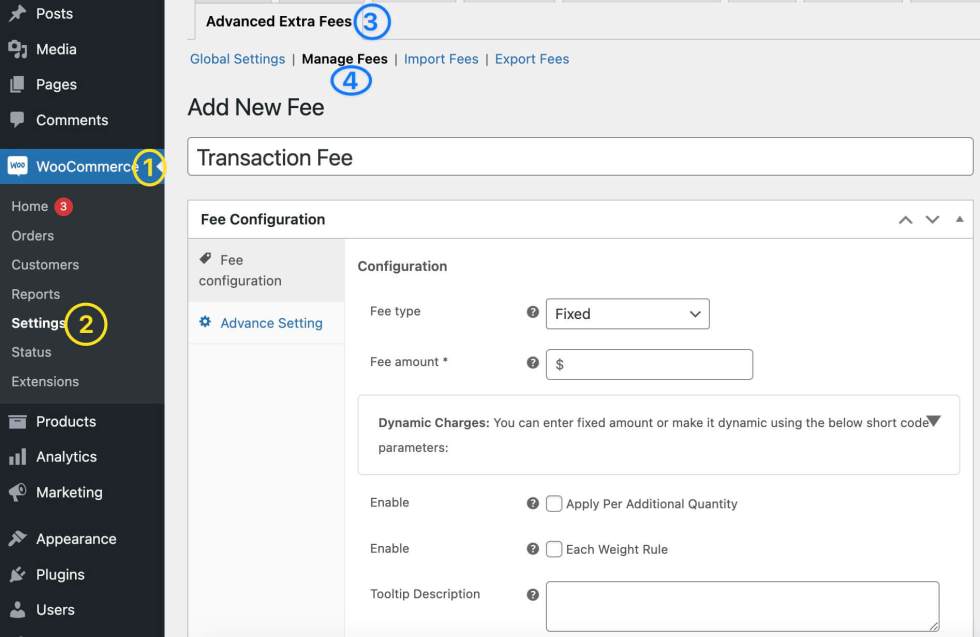
↑ Back to topFrom WooCommerce > Settings > Advanced Extra Fees > Manage Fees, click the Add Fee button to create a new fee. You will be directed to a fee configuration form where you can:
- Fee Title: This is the name of the fee that will be visible to customers at checkout.
- Fee Type: Choose whether the fee will be a fixed amount or a percentage of the order.
- Each Weight Rule: Set up rules based on product weight to determine the fee.
- Tooltip Description: Write a short description that appears when customers hover over the fee at checkout.
- Is Amount Taxable?: Select whether taxes should be applied to the fee.
- Apply Conditions: Define specific conditions for applying the fee, like location or product type.
- Start Date: Set a start date for when the fee will be active. Optional can be left blank.
- End Date: Set an end date to automatically disable the fee after a certain time. Optional can be left blank.
- Day of the Week: Choose specific days when the fee should apply.
- First Order: Apply the fee only on the customer’s first order (e.g., for installation fees).
- On Checkout Only: Display the extra fee on the checkout page if needed.
Conditional Rules for Fees: Flexible Customization for Every Scenario
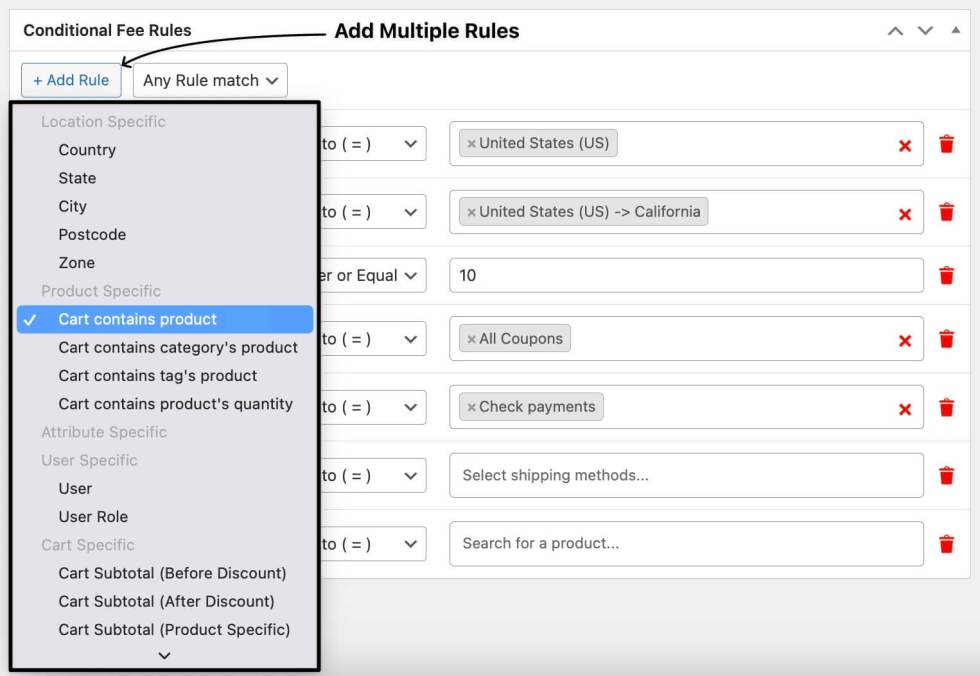
↑ Back to topOur plugin allows you to set multiple conditional rules for each fee, giving you full control over when and how fees are applied. These rules help define specific scenarios based on various parameters, ensuring the fees are charged only when necessary.
For each rule, you can use parameters like:
- Country: Charge fees based on the customer’s country or region.
- State or Postal Code: Apply fees specific to certain states or postal codes.
- Product Weight: Add extra fees for items over or under a specific weight limit.
- Cart Subtotal: Set fees for orders below or above certain amounts, encouraging higher spending.
- Product Quantity: Apply fees when a customer buys a certain number of items.
- User Role: Differentiate fees for wholesalers, members, or other user roles.
- Payment Method: Charge specific fees depending on the customer’s payment method.
Each condition can be created with operators like:
- Equal to: Apply the fee only if the parameter exactly matches a certain value (e.g., country equals “US”).
- Not equal to Apply the fee only if the parameter exactly does not match a certain value (e.g., country equals “US”).
- Greater than: Use this for scenarios where a fee applies when a value exceeds a threshold (e.g., cart total greater than $50).
- Greater than or equal: Use this for scenarios where a fee applies when a value exceeds a threshold (e.g., cart total greater than $50).
- Less than Charge fees when values fall below a certain point (e.g., product weight less than 5kg).
- Less than equal: Charge fees when values fall below a certain point (e.g., product weight less than 5kg).

Global Settings — Combine All Fees
↑ Back to topTo simplify the checkout process, you can merge all extra fees into a single combined fee in WooCommerce. This helps keep the checkout page clean and reduces customers’ confusion.
Steps:
- Navigate to WooCommerce > Advanced Extra Fees > Global Settings in your admin dashboard.
- Enable the “Combine Fees” option.
- Enable the option “Combine Fees Taxable” if you want all fees taxable
- Enable the “Combine Fees Label” option to set a custom label for the combined fee
- Add the Combine Fees Tooltip Text in the text box
- Save your changes.
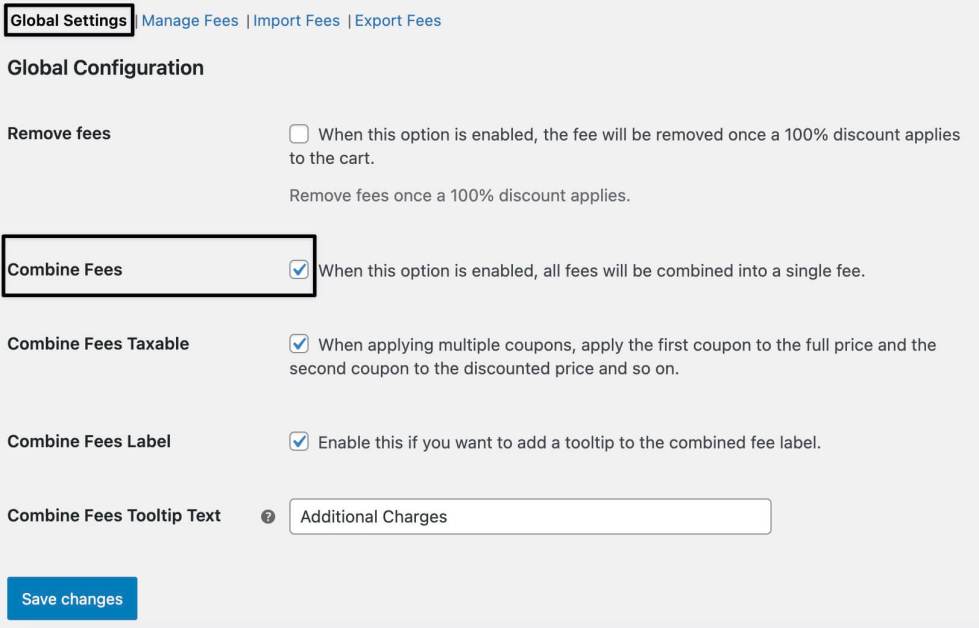
Now, all extra fees will appear as a single line item on the checkout page, providing clarity and a streamlined customer experience.
Apply Per Additional Quantity Product Fee
↑ Back to topAdvanced Extra Fee lets you add custom fees and surcharges to your WooCommerce store based on flexible conditions. The Apply Per Additional Quantity setting charges an extra fee for every additional unit a customer adds, either across the whole cart or on a specific product.
For example, if you sell custom-printed items and each extra unit adds handling work, you can charge a small percentage or fixed fee per additional quantity instead of a flat one-time fee.
How to Apply a Fee Per Additional Quantity
↑ Back to topStep 1: Open Manage Fee
Go to WooCommerce → Settings → Advanced Extra Fee → Manage Fee and open the fee rule you want to edit, or create a new one.
Step 2: Enable Apply Per Additional Quantity
Check the Apply Per Additional Quantity box to turn the setting on. Click the? icon next to any field if you need a quick explanation of what it does.
The checkbox next to “Apply Per Additional Quantity” turns the feature on for this fee rule.
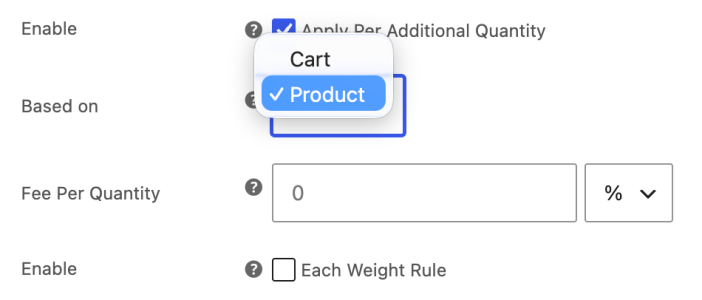
Step 3: Choose what the fee is based on
Set the Based on dropdown to control where the fee applies:
| Option | What it does |
| Cart | Applies the fee based on the total quantity across the cart |
| Product | Applies the fee only on a specific product’s quantity |
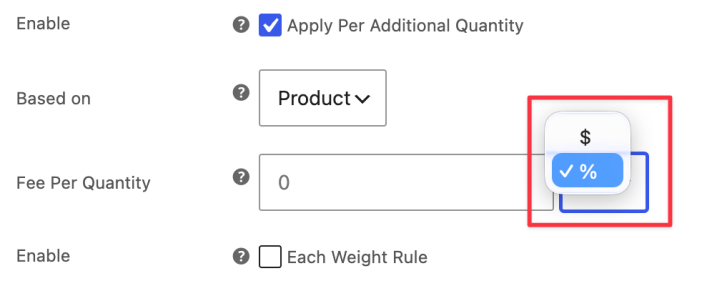
Step 4: Set the Fee Per Quantity
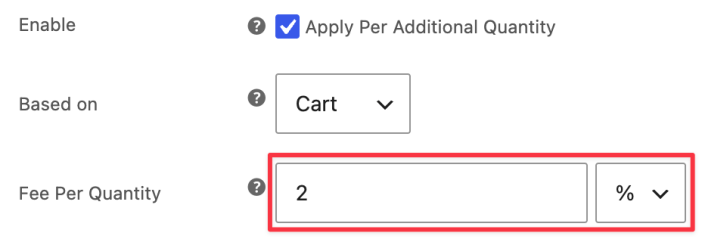
Enter the fee amount in the Fee Per Quantity field, then use the dropdown next to it to choose % (percentage) or Fixed Amount. This is the fee charged for each additional unit beyond the first.
The Fee Per Quantity field with the amount type dropdown set to %.
Step 5: Save and verify
Save the fee rule, then add multiple quantities of the relevant product to your cart and check that the fee shows up correctly at cart or checkout.
Example Use Cases
↑ Back to topBulk handling surcharge: If each extra unit in an order adds packing time, set Based on to Cart and charge a small fixed amount per additional quantity.
Product-specific fee: If only one product (like a custom or fragile item) needs an extra handling charge per unit, set Based on to Product and apply the fee there only.
Percentage-based scaling: If you want the fee to scale with order value rather than stay flat, use % instead of a fixed amount.
How to Set Up a Percentage Fee for Cost on Product in WooCommerce
↑ Back to topAdvanced Extra Fee lets you add custom fees to your WooCommerce store using rule-based conditions. Cost on Product charges a fee on a specific product, based on the quantity purchased, using either a fixed amount or a percentage.
For example, you could charge a 15% fee on custom hoodies when a customer orders between 1 and 10 units.
How to Set Up Cost on Product
↑ Back to topStep 1: Open the rule
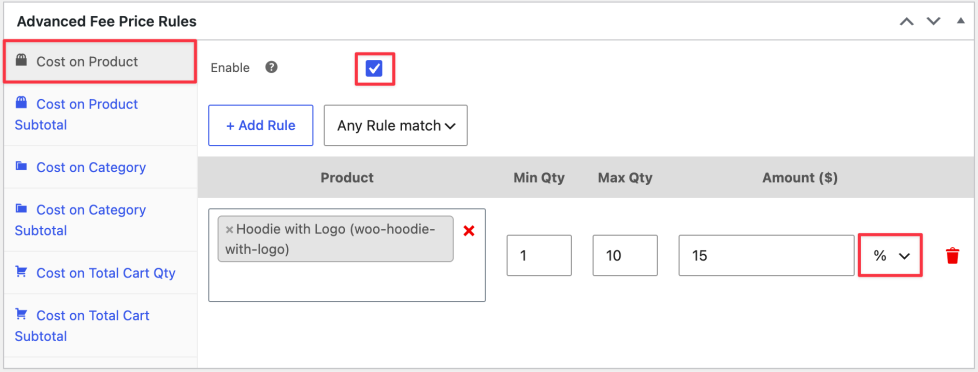
Go to WooCommerce → Settings → Advanced Extra Fee → Manage Fee, then go to the Advanced Fee Price Rules section and select Cost on Product from the rule type list on the left.
Step 2: Enable the rule
Check the Enable box to turn the rule on.
Step 3: Add a rule and select the product
Click + Add Rule, then choose the product this fee applies to (e.g., Hoodie with Logo). If you add more than one rule, use the match dropdown to set whether all rules must match or just one is enough.
Step 4: Set Min Qty, Max Qty, and Amount
Enter the quantity range in Min Qty and Max Qty, then enter the fee amount. Use the dropdown next to the amount field to switch it to % for a percentage-based fee instead of a fixed dollar amount.
Example: Hoodie with Logo, Min Qty 1, Max Qty 10, Amount 15%.
Step 5: Save and verify
Save your changes, then add the product to your cart within the quantity range and confirm the percentage fee applies correctly at checkout.
Example Use Case
↑ Back to topProduct-specific percentage surcharge: If a product incurs an extra production cost per order (like custom printing), set a Cost on Product rule with a % amount so the fee scales with the product’s price rather than staying flat.
How to Set Up a Percentage Fee for Cost on Category in WooCommerce
↑ Back to topAdvanced Extra Fee lets you add custom fees to your WooCommerce store using rule-based conditions. Cost on Category charges a fee on all products within a selected category, based on the quantity purchased, using either a fixed amount or a percentage.
For example, you could charge a 10% fee on any item from your “Custom Apparel” category whenever a customer orders between 1 and 10 units.
How to Set Up Cost on Category
↑ Back to topStep 1: Open the rule
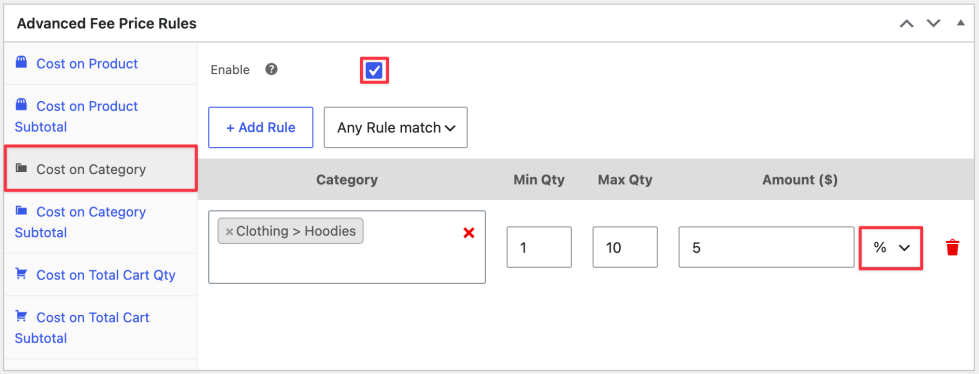
Go to WooCommerce → Settings → Advanced Extra Fee → Manage Fee, then go to the Advanced Fee Price Rules section and select Cost on Category from the rule type list on the left.
Step 2: Enable the rule
Check the Enable box to turn the rule on.
Step 3: Add a rule and select the category
Click + Add Rule, then choose the category this fee applies to. If you add more than one rule, use the match dropdown to set whether all rules must match or just one is enough.
Step 4: Set Min Qty, Max Qty, and Amount
Enter the quantity range in Min Qty and Max Qty, then enter the fee amount. Use the dropdown next to the amount field to switch it to % for a percentage-based fee instead of a fixed dollar amount.
Step 5: Save and verify
Save your changes, then add a product from that category to your cart within the quantity range and confirm the percentage fee applies correctly at checkout.
Example Use Case
↑ Back to topCategory-wide percentage surcharge: If every product in a category carries the same extra handling cost, set a Cost on Category rule with a % amount instead of adding a rule per product.
How to Set Up a Percentage Fee for Cost on Product Subtotal in WooCommerce
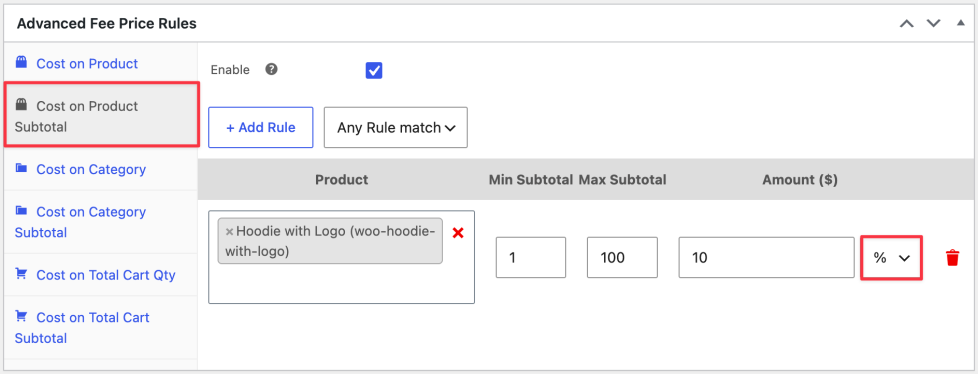
↑ Back to topAdvanced Extra Fee lets you add custom fees to your WooCommerce store using rule-based conditions. Cost on Product Subtotal charges a fee on a specific product based on its subtotal value (price × quantity), using either a fixed amount or a percentage.
For example, you could charge a 10% fee on a hoodie whenever its subtotal falls between $1 and $5.
How to Set Up Cost on Product Subtotal
↑ Back to topStep 1: Open the rule
Go to WooCommerce → Settings → Advanced Extra Fee → Manage Fee, then select Cost on Product Subtotal from the rule type list on the left.
Step 2: Enable the rule
Check the Enable box to turn the rule on.
Step 3: Add a rule and select the product
Click + Add Rule, then choose the product this fee applies to (e.g. Hoodie with Logo). If you add more than one rule, use the match dropdown to set whether all rules must match or just one is enough.
Step 4: Set Min Subtotal, Max Subtotal, and Amount
Enter the subtotal range in Min Subtotal and Max Subtotal, then enter the fee amount. Use the dropdown next to the amount field to switch it to % for a percentage-based fee instead of a fixed dollar amount.
Example: Hoodie with Logo, Min Subtotal 1, Max Subtotal 100, Amount 10%.
Step 5: Save and verify
Save your changes, then add the product to your cart so its subtotal falls within the range, and confirm the percentage fee applies correctly at checkout.
Example Use Case
↑ Back to topSubtotal-based surcharge: If you want a fee to kick in only once a product’s line total reaches a certain value, set a Cost on Product Subtotal rule with a % amount instead of tying it to quantity.
How to Set Up a Percentage Fee for Cost on Category Subtotal in WooCommerce
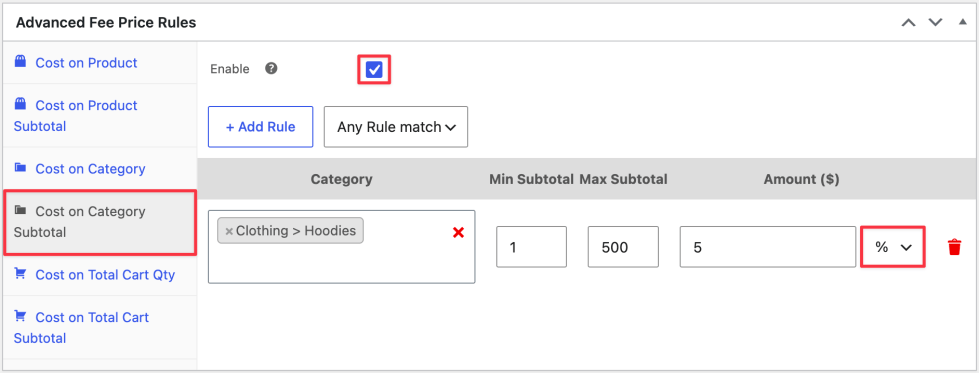
↑ Back to topAdvanced Extra Fee lets you add custom fees to your WooCommerce store using rule-based conditions. Cost on Category Subtotal charges a fee on products in a selected category based on their combined subtotal (price × quantity), using either a fixed amount or a percentage.
For example, you could charge an 8% fee whenever the subtotal for your “Custom Apparel” category falls between $50 and $200.
How to Set Up Cost on Category Subtotal
↑ Back to topStep 1: Open the rule
Go to WooCommerce → Settings → Advanced Extra Fee → Manage Fee, then select Cost on Category Subtotal from the rule type list on the left.
Step 2: Enable the rule
Check the Enable box to turn the rule on.
Step 3: Add a rule and select the category
Click + Add Rule, then choose the category this fee applies to. If you add more than one rule, use the match dropdown to set whether all rules must match or just one is enough.
Step 4: Set Min Subtotal, Max Subtotal, and Amount
Enter the subtotal range in Min Subtotal and Max Subtotal, then enter the fee amount. Use the dropdown next to the amount field to switch it to % for a percentage-based fee instead of a fixed dollar amount.
Step 5: Save and verify
Save your changes, then add products from that category to your cart so their combined subtotal falls within the range, and confirm the percentage fee applies correctly at checkout.
Example Use Case
↑ Back to topCategory subtotal surcharge: If you want a fee to kick in only once a customer’s spend within a category crosses a certain value, set a Cost on Category Subtotal rule with a % amount instead of tying it to quantity.
Examples
↑ Back to topEach example will have clear instructions on adding price rules and saving the settings. Screenshots, like adding rules and showing the final cart page, should be provided for better understanding.
Example 1: Applying Service Fee Based on Country, State, and Cart Total
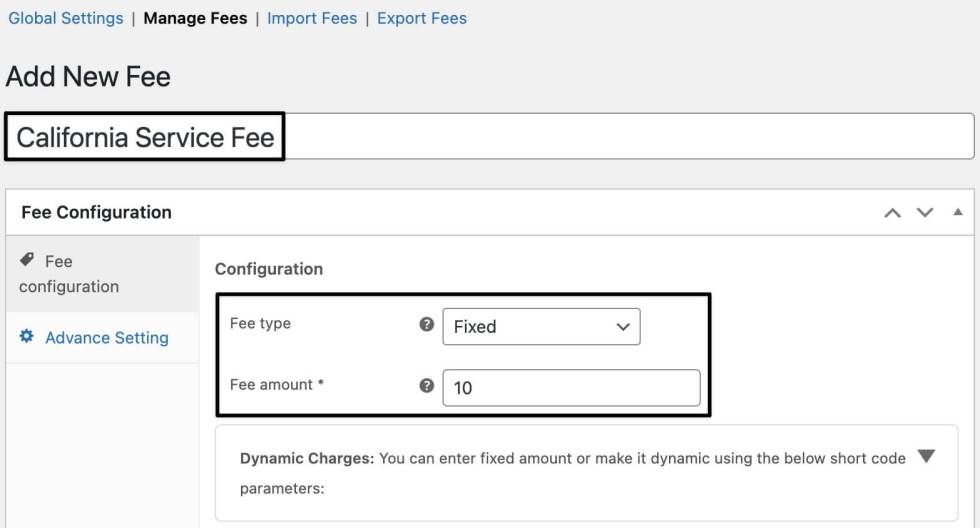
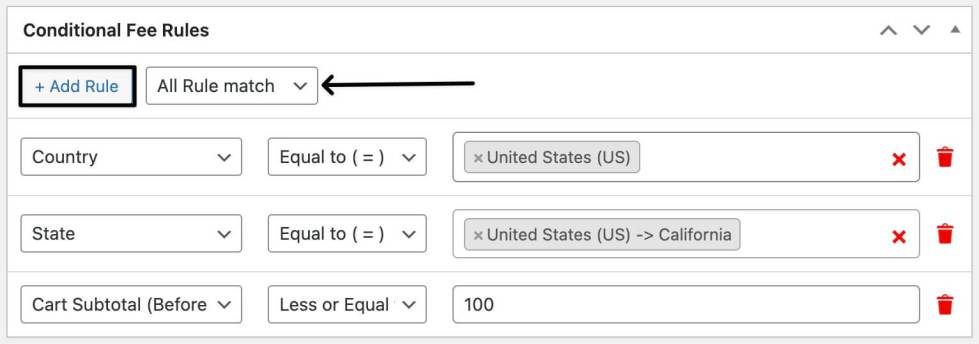
↑ Back to topScenario: You want to charge an additional $10 service fee for US customers who live in California, but only if their cart total is less than $100.
Steps to Create the Fee Rule:
- Go to the Extra Fees Settings:
- Add a New Fee:
- Click on the Add Fee button.
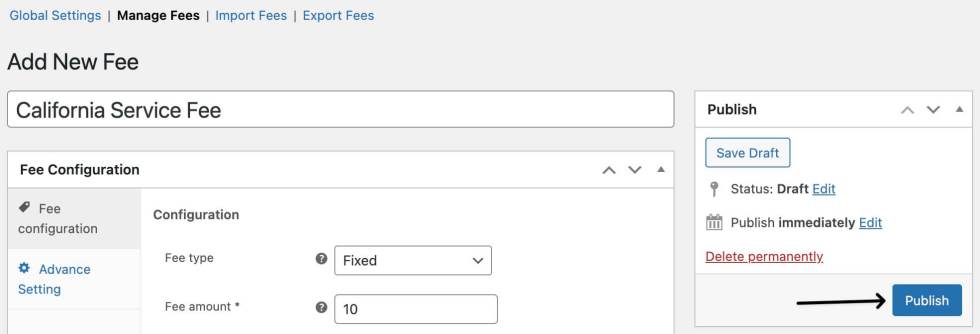
- Name the fee something like “California Service Fee” for easy reference.
- Set the fee amount to $10.
- Set Conditional Rules:
- In the Conditional Fee Rules section, click + Add Rule and set multiple rules based on country, state, and subtotal.
- Save the Fee:
- After defining the rules, click the Publish button to save and activate the fee.
- Checkout Page View:
- Now, if a customer from California with a cart total under $100 checks out, they will see the $10 fee added to their total.

Example 2: Applying a Transaction Fee Based on Product & Payment Method
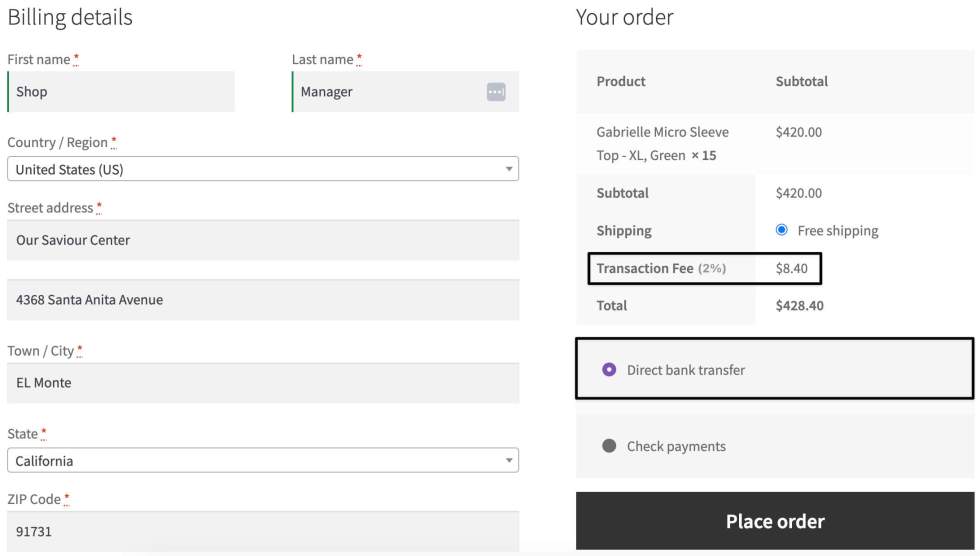
↑ Back to topScenario: You want to add a 2% fee for users purchasing a special product, “Micro Sleeve Top” if they choose to pay via Bank Transfer, but only for Shop Manager users.
Steps to Create the Fee Rule:
- Go to the Extra Fees Plugin Settings:
- In the admin dashboard, go to WooCommerce > Settings > Advanced Extra Fees > Manage Fees.
- Add a New Fee with Conditional Rules:
- Click on the Add Fee button.
- Set the fee type to Percentage and the amount to 2%.
- In the Conditional Fee Rules section, select the product and the user role

- Checkout Page View:
- When a Shop Manager purchases the Special Product using the Bank Transfer option, the 2% transaction fee will appear during checkout.
Example 3: Applying a Per-Product Quantity Fee Based on Shipping Method
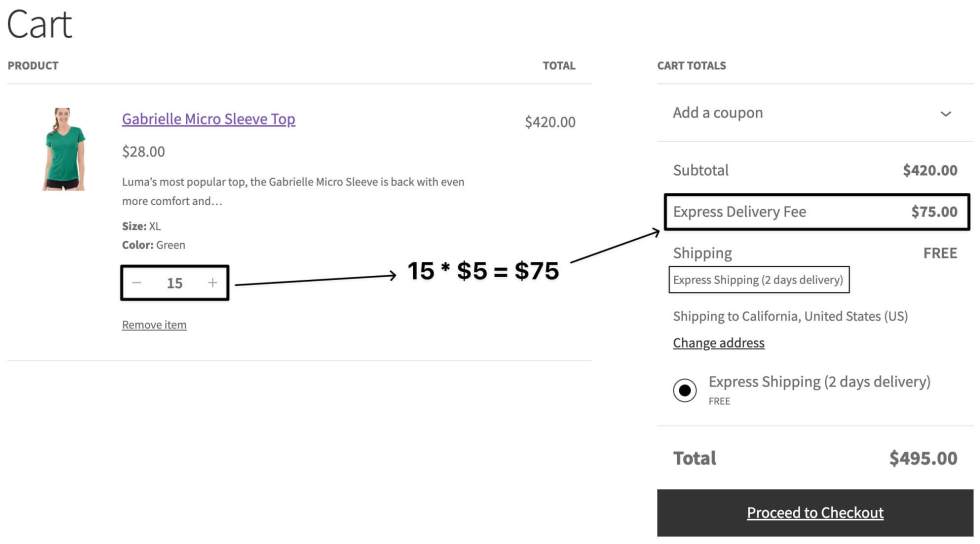
↑ Back to topScenario: You want to charge an additional $5 per item for orders shipped with express delivery, but only if the quantity of products in the cart exceeds 3.
Steps to Create the Fee Rule:
- Go to the Extra Fees Plugin Settings:
- In the admin dashboard, go to WooCommerce > Settings > Advanced Extra Fees > Manage Fees.
- Add a New Fee with Conditional Rules:
- Click on the Add Fee button.
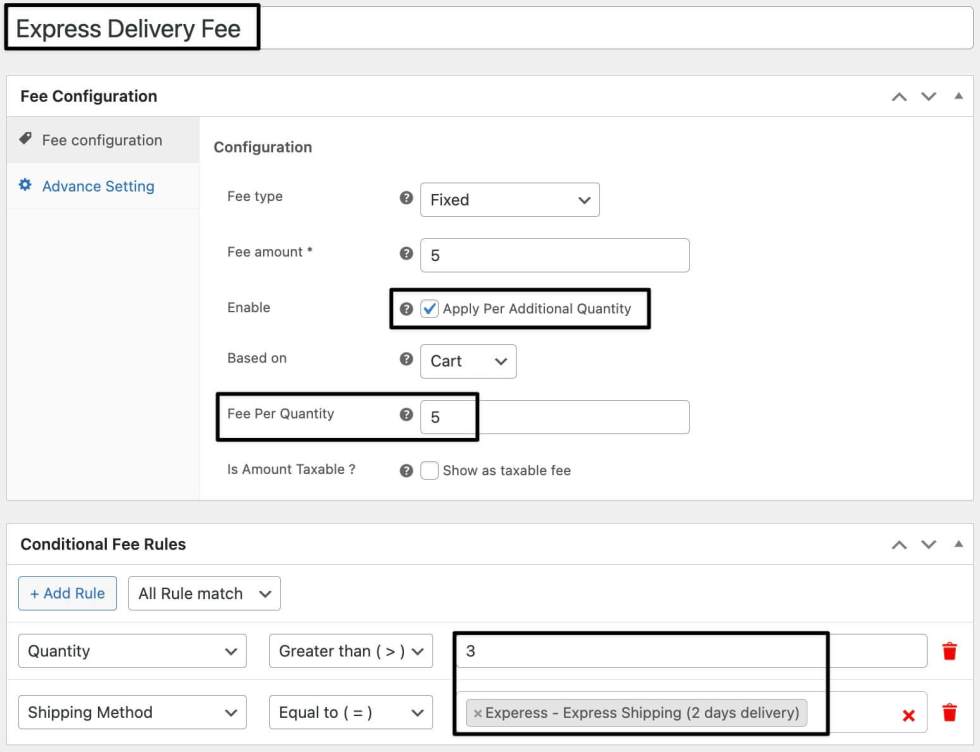
- Name the fee something like “Express Delivery Fee“.
- Set the fee amount to $5 using the Per Quantity option, then add $5 to that textbox.
- Set the Conditional Fee Rules section setting with Cart Quantity and Shipping Method selection.
- Save the Fee.
- Checkout Page View:
- If a customer chooses Express Delivery with more than 3 products in the cart, the $5 per product fee will be applied automatically.
By following the steps outlined for each example, you can create a variety of advanced fee structures using the WooCommerce Extra Fees plugin. Make sure to test your settings thoroughly and monitor the cart and checkout pages to confirm that the fees are being applied as expected.
Example 4: Applying Service Fee Based on Product Quantity
↑ Back to topThis enables granular fee control based on product quantity ranges, helping you handle bulk orders, packaging costs, or special handling fees efficiently.
Scenario:
You want to apply different extra fees based on quantity ranges for specific products, and also define separate rules for multiple products within the same fee.
For example:
- Charge a $3 fee when customers purchase 2–5 T-Shirts
- Charge a $2 fee when customers purchase 3–8 Polo Shirts
This setup allows you to create product-specific tiered fee structures using Advanced Fee Price Rules.
Steps to Configure:
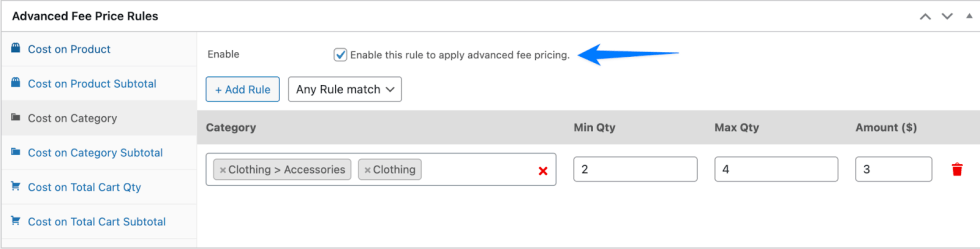
- Scroll to Advanced Fee Price Rules
- Enable the option: Enable this rule to apply advanced fee pricing
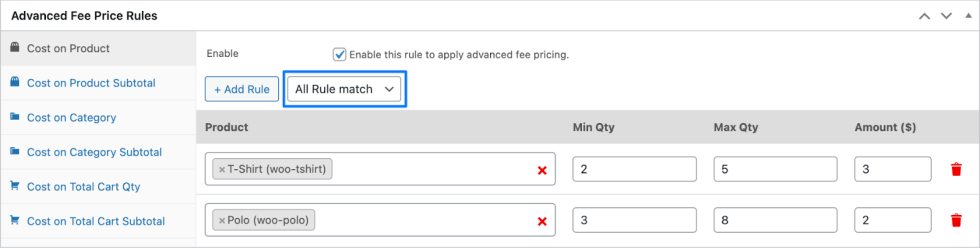
- Click “+ Add Rule” and configure as follows:
Rule 1: T-Shirt
- Product: T-Shirt
- Min Quantity: 2
- Max Quantity: 5
Amount: $3
Rule 2: Polo Shirt
- Product: Polo
- Min Quantity: 3
- Max Quantity: 8
- Amount: $2
- Select: All Rules Match (or Any Rule Match based on your logic)
How It Works
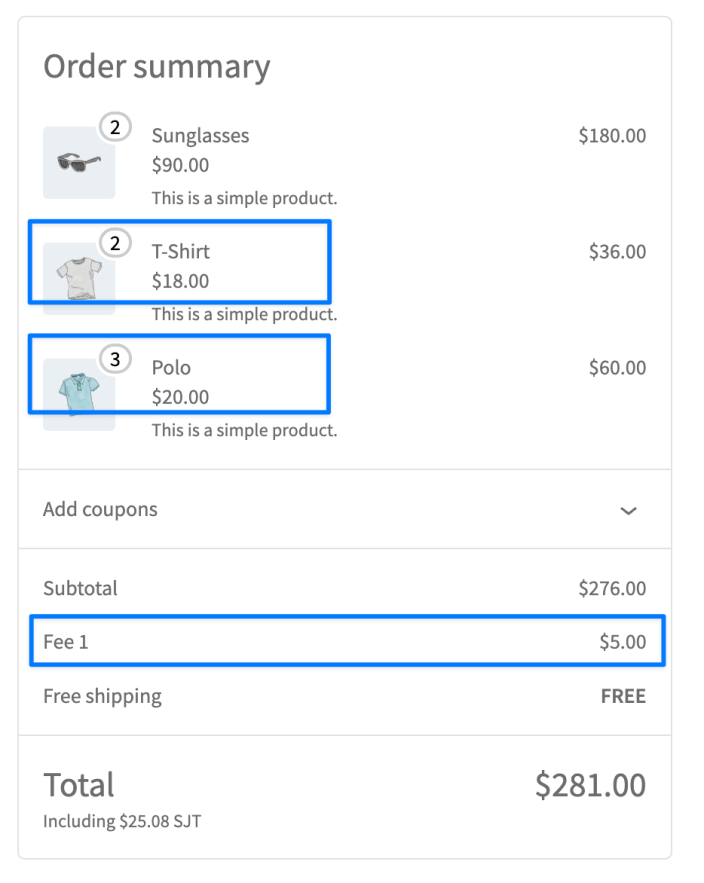
- If a customer adds 2–5 T-Shirts, a $3 fee is applied
- If a customer adds 3–8 Polo Shirts, a $2 fee is applied
- If both conditions are met, fees are applied based on the rule configuration
Example 5: Applying Extra Fee Based on Category Quantity Range
↑ Back to topScenario
You want to apply an extra fee based on the quantity of products from specific categories in the cart.
For example:
- If customers purchase 2 to 4 items from the Clothing or Clothing → Accessories categories
- Then apply a $3 extra fee
This helps you apply category-based handling or packaging charges depending on the number of items purchased within selected categories.
Steps to Configure
- Scroll to Advanced Fee Price Rules
- Select Cost on Category
- Enable this rule to apply advanced fee pricing
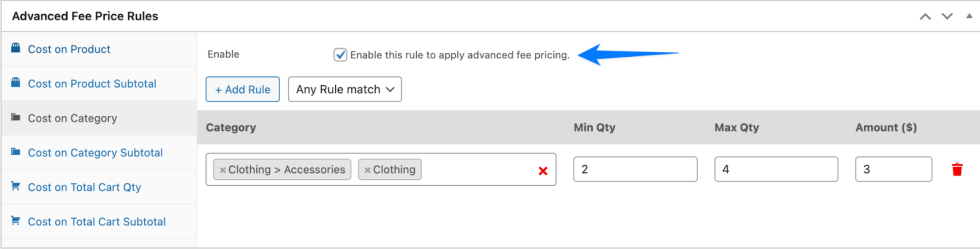
- Click + Add Rule and set:
- Category:
- Clothing
- Clothing → Accessories
- Min Quantity: 2
- Max Quantity: 4
- Amount: $3
- Select: All Rules Match (or Any Rule Match based on your logic)
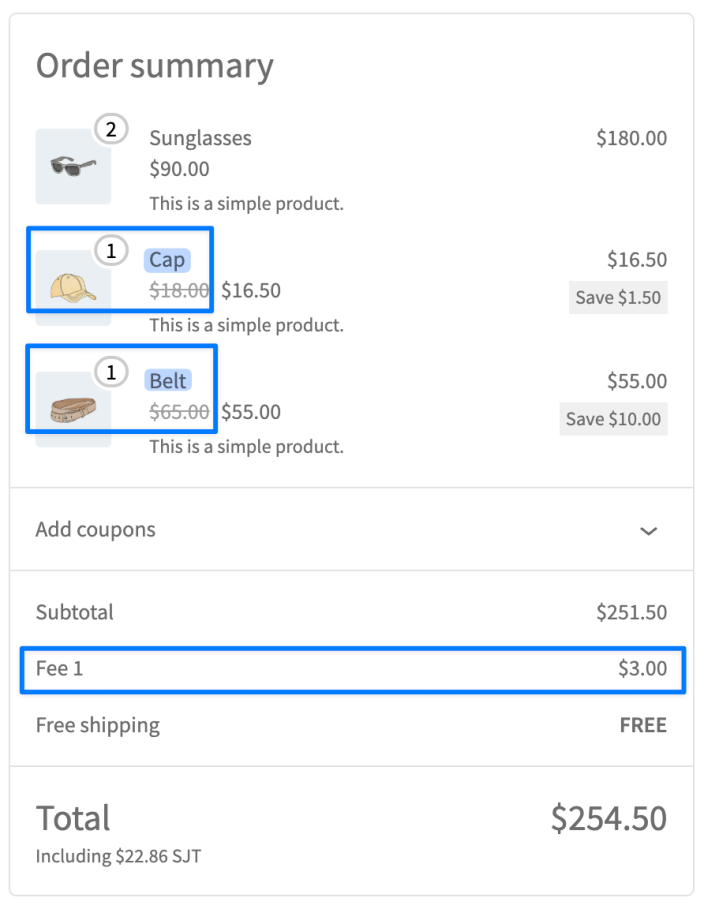
How It Works
- If the cart contains 2 to 4 products from either:
- Clothing
- Accessories (under Clothing)
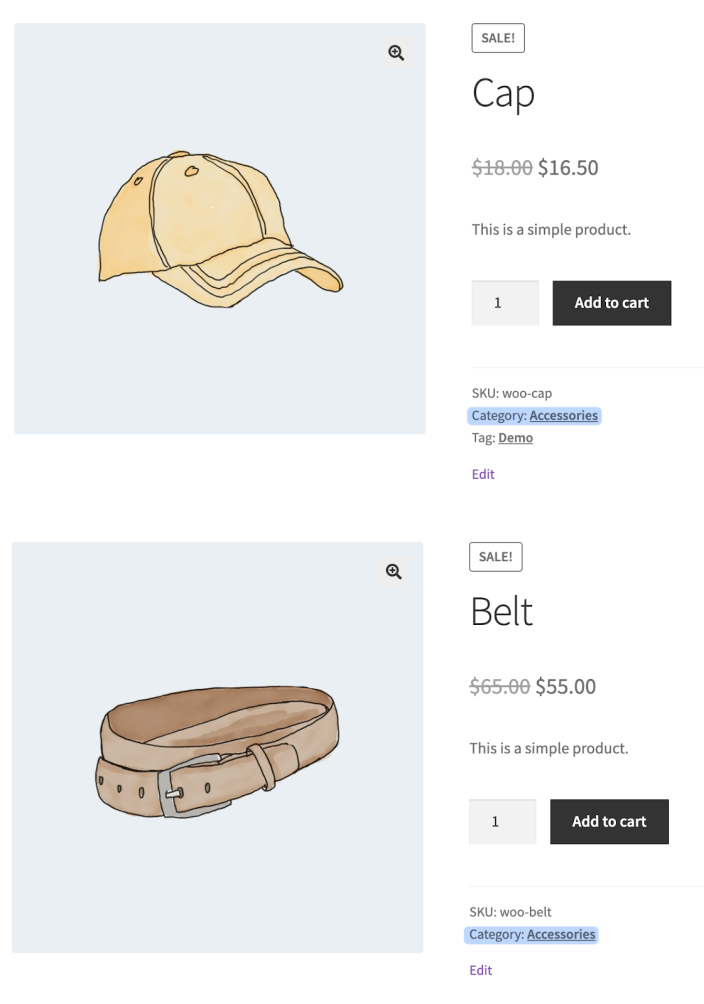
- A $3 fee is applied
- The fee triggers as soon as the category quantity condition is satisfied
Translation
↑ Back to topAdvanced Extra Fees for WooCommerce Plugin is translation-ready, meaning you can edit the PO files to translate the text into any language.
The steps to do the translation are as follows.
For eg let us consider translation to French.
Download and install Poedit
Open the file advanced-extra-fees-woocommerce -> languages folder -> advanced-extra-fees-woocommerce.pot using Poedit.
Create a new translation file by clicking the Create new translation button. Choose the Source text and set its corresponding French text in the Translation Text Area.
Save the changes.
Save the file name as advanced-extra-fees-woocommerce-fr_FR.po.
If you are using WordPress Version 3.9.13 or below, then in wp-config.php, define the WPLANG as French. Syntax is define(‘WPLANG’, ‘fr_FR’);
If you are using WordPress Version 4.0 or above, then go to the WordPress dashboard -> Settings -> General and select the Site Language as French.
FAQs
↑ Back to topQ1: Can I charge an extra fee when a specific user role purchases a product?
↑ Back to topYes, you can apply WooCommerce conditional logic based on user roles. For example, a 5% extra fee can be applied for customers with the “WHOLESALE” role.
Q2: Can I add an extra fee based on the product SKU?
↑ Back to topYes, WooCommerce conditional logic allows you to apply fees based on product SKU. For instance, a 5% fee can be added for products with the SKU “PROD21.”
Q3: Can I schedule extra fees for a limited period to charge extra fees?
↑ Back to topYes, you can set a date range in the admin panel to charge fees only during a specific period.
Q4: Can I charge extra fees based on delivery location?
↑ Back to topYes, you can add location-based fees by setting conditions for country, state, postcode, or zone.
Q5: Can I apply multiple conditions for charging extra fees?
↑ Back to topYes, you can set up rules based on multiple conditions like cart quantity, cart total, and delivery location.
Q6: What is the core feature of the WooCommerce Extra Fees plugin?
↑ Back to topThe core feature is the ability to charge customers for any additional services or product personalizations, ensuring you recover costs and maintain profitability.
Q7: Is it possible to restrict charging the Tax Cost on Product Fees?
↑ Back to topYes, it is possible. Please check by following the steps below.
In the admin dashboard, go to WooCommerce > Settings > Advanced Extra Fees > Manage Fees.
Add fee > Make the ‘Show as taxable fee’ option unchecked.
This plugin is perfect for WooCommerce store owners looking to enhance their checkout process, provide transparent pricing, and maximize their revenue through dynamic and flexible fee management.
Q8. Where can I request new features?
↑ Back to topYou can email us at hello@thedotstore.com or click here to add a new request.
Support
↑ Back to topIf you have any queries before making the purchase of this plugin, you can always reach out to us by filling out this pre-sale form. Additionally, you can send us plugin customization requests, too. However, it might add to the cost. If you’ve already purchased our plugin and want support, contact us through the helpdesk.

