Authorize-net-payments-for-woocommerce empowers your store with seamless and secure payment processing, supporting Credit Cards and eCheck transactions.
Safely store customer payment details using Authorize.Net’s Customer Information Manager (CIM), ensuring a smooth and reliable checkout experience.
Enhance transaction security with the Advanced Fraud Detection Suite (AFDS), helping protect your business from fraudulent activity.
Fully compatible with WooCommerce Subscriptions for effortless recurring payments.
Requirements
↑ Back to top- An Authorize.Net account
- An SSL certificate. An SSL certificate is also required on local test environments.
- WooCommerce 7.6+
- WordPress version6.1+
- PHP 8.0.0+
Installation
↑ Back to top- Ensure your store meets the plugin requirements.
- Download the extension from your WooCommerce dashboard.
- Go to Plugins > Add New > Upload and select the ZIP file you just downloaded.
- Click Install Now and then Activate.
- Click Configure and read the next section to learn how to setup the plugin.
Getting started
↑ Back to topTo begin using Authorize.Net, you must first connect the plugin to your Authorize.Net account. Follow the steps below to find your API credentials on Authorize.Net and setup the plugin:
- Login to your Authorize.Net account (Screenshots below are for both the “Old” Account User Interface and the “New” User Interface rolling out in 2026).
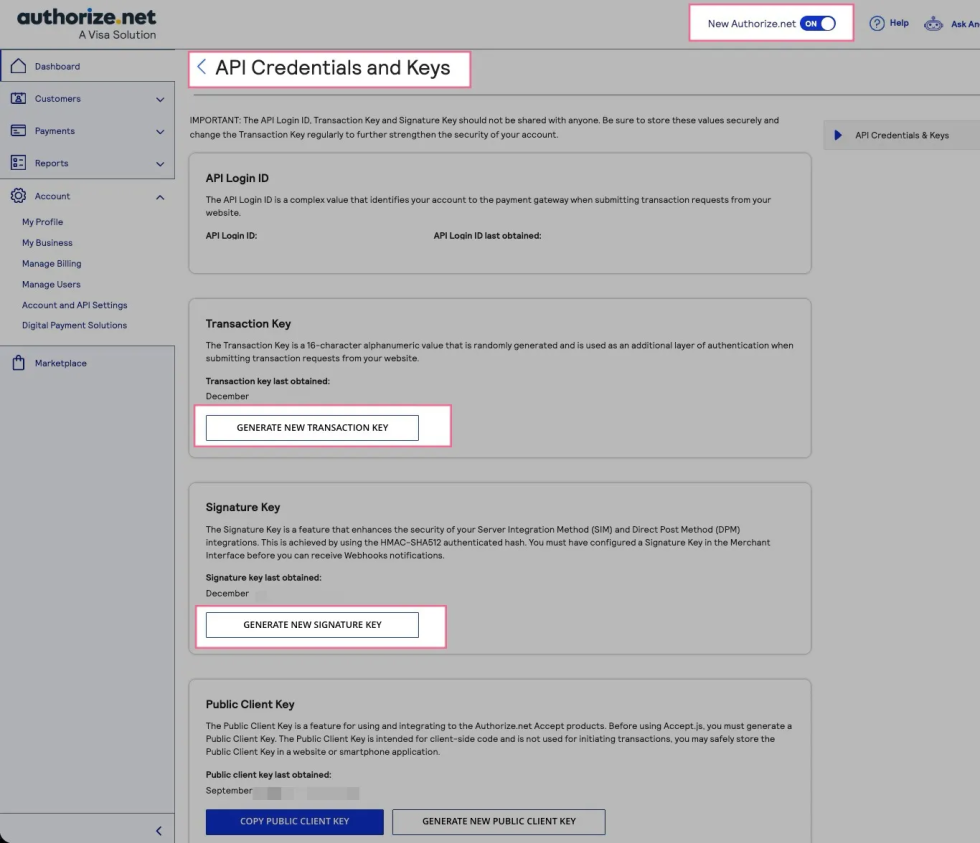
- Go to Accounts > Settings > API Credentials & Keys.

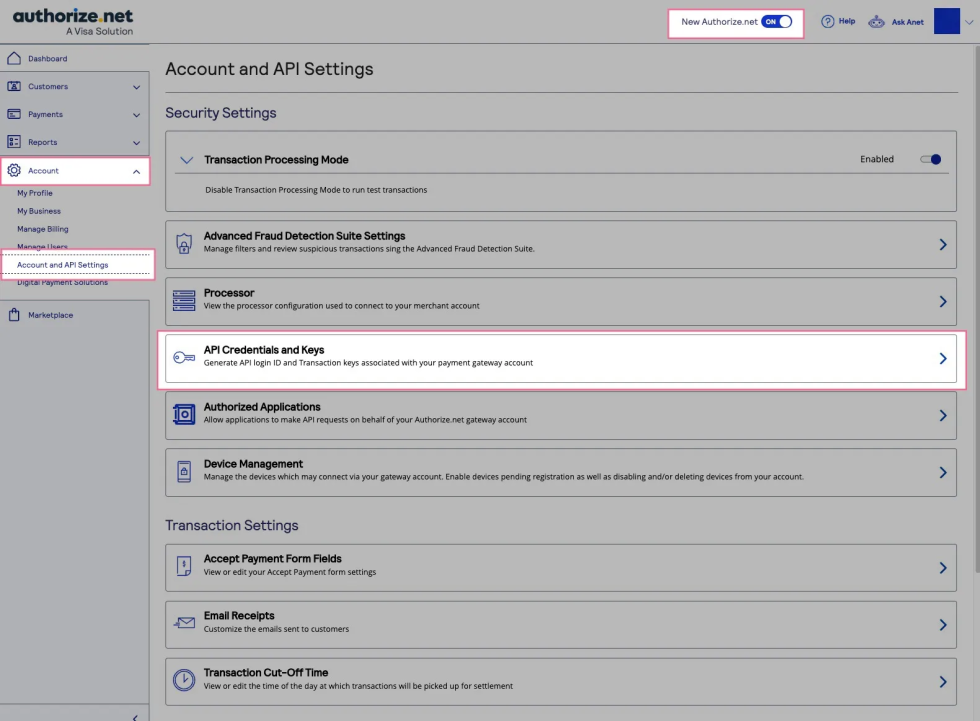
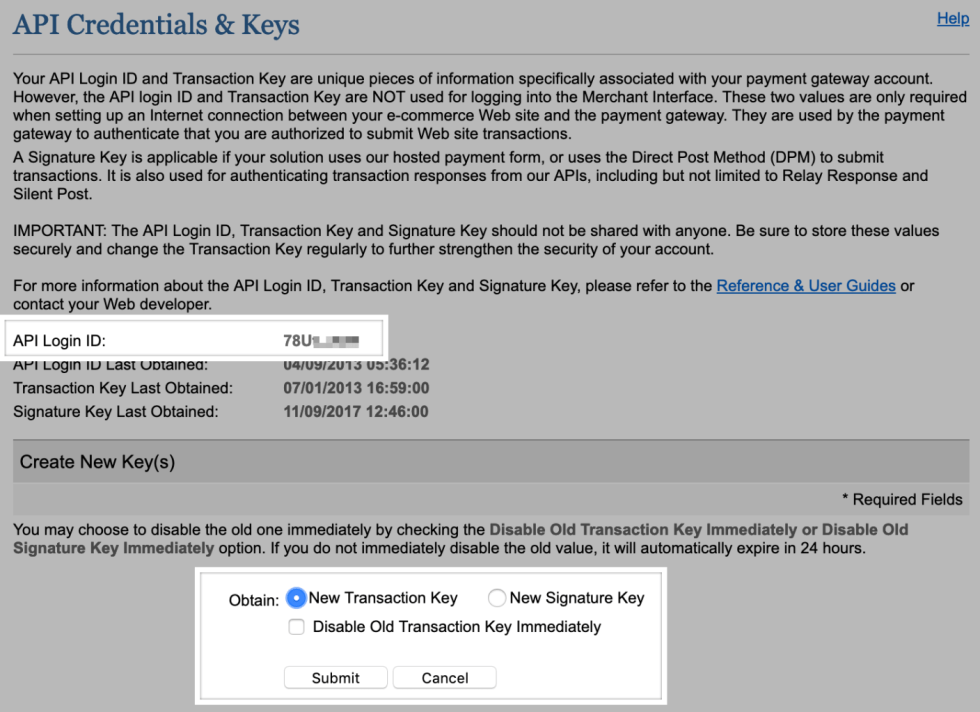
- Create and Copy your API Login ID.
- Select the New Transaction Key radio button and click Submit. Copy the Transaction Key.
- Now, log into your site and go to WooCommerce > Settings > Payments and select WooCommerce Authorize.Net.
- Paste the API Login ID, API Transaction Key, and API Signature Key, if applicable.
- Click Save Changes.
That’s it! You are now ready to start accepting credit cards / eCheck via Authorize.Net! Keep reading if you want to tweak settings and customize the checkout process.
Credit Card Configuration Settings
↑ Back to topYou can configure the following settings for the Authorize.Net credit card gateway:
- Enable / Disable: Allow customers to use this gateway to checkout.
- Title: The text shown for the payment during checkout and on the Order Received page.
- Description: The text shown under the gateway’s title during checkout. Limited HTML is allowed. If you enable test mode, this section will also display a notice along with test credit card numbers.
- Card Verification (CVV): Require customers to enter their card security codes when checking out. This can be useful if you have requirements in your Authorize.Net account for CV2 verification.
- Transaction Type: Controls how transactions are submitted to Authorize.Net. Select “Charge” to automatically capture payments. If you select “Authorization”, you must manually capture and settle payments in your Authorize.Net control panel or on the WooCommerce orders screen after the transaction has been submitted. This defaults to “Charge”.
- Charge Virtual-Only Orders: If Transaction Type is set to “Authorization”, enable this to automatically capture charges for orders with only virtual products. For downloadable products, this will grant downloads access right away.
- Capture Paid Orders: If Transaction Type is set to “Authorization”, enable this to automatically capture charges when orders move to a paid status.
- Accepted Cards: Determines which card logos are displayed during checkout. This has no impact on which cards are accepted by your merchant account.
- Tokenization: Let customers save their payment methods for future use at checkout. This is required for Subscriptions or Pre-Orders.
- Detailed Decline Messages: Display detailed messages to customers to provide reasoning for declines instead of a generic error message when possible. Click here to read more about detailed decline messages.
- Debug Mode: Enable when you’re having issues processing transactions. You can choose to log API requests directly on the checkout page, save them to the WooCommerce > Status > Logs page, or both. As a best practice, please do not enable this setting unless you’re having issues with the plugin.
- Environment: Switch between “Sandbox” and “Production” credentials. Enable “Sandbox” to send transactions to your Authorize.Net Sandbox Account. Note: This is not the “test mode” that is listed under your account. This is an entirely separate sandbox environment that requires a separate login and separate API credentials. Do not place your Test Account (or regular account) into “Test Mode” within the Authorize.Net control panel as transactions will not process at all if that mode is set.
- Share connection settings: If using the credit card and eCheck gateways, select this setting to share credentials between the gateways so you don’t have to enter them twice.
- API Login ID: Follow the steps above to retrieve your API Login ID.
- API Transaction Key: Follow the steps above to generate your API Transaction Key.
- API Signature Key: Optional. Only required if you want to enable webhooks for Authorize.Net account updates. Follow the steps above to generate your API Signature Key.
eCheck Configuration Settings
↑ Back to topYou can configure the following settings for the Authorize.Net eCheck gateway:
- Enable / Disable: Allow customers to use this gateway to checkout. You must enable eChecks on your Authorize.Net account to use the eCheck gateway. Follow the process below under eCheck Issues to get eChecks setup and enabled.
- Title: The text shown for the payment during checkout and on the Order Received page.
- Description: The text shown under the gateway’s title during checkout. Limited HTML is allowed. If you enable test mode, this section will also display a notice along with a test bank account number.
- Tokenization: Let customers save their payment methods for future use at checkout. This is required for Subscriptions or Pre-Orders.
- Authorization: Display an authorization message during the checkout process.
- Authorization Message: If Authorization is enabled, enter the message you want to show to your customers. You can use the following merge tags:
{merchant_name}: Your store name{order_date}: Date of purchase{order_total}: Total order value
- Recurring Authorization Message: If Authorization is enabled and WooCommerce Subscriptions is active on your site, you can enter the message you want to show your customers for recurring payments.
- Detailed Decline Messages: Display detailed messages to customers to provide reasoning for declines instead of a generic error message when possible. Click here to read more about detailed decline messages.
- Debug Mode: Enable when you’re having issues processing transactions. You can choose to log API requests directly on the checkout page, save them to the WooCommerce > Status > Logs page, or both. As a best practice, please do not enable this setting unless you’re having issues with the plugin.
- Environment: Switch between “Sandbox” and “Production” credentials. Enable “Sandbox” to send transactions to your Authorize.Net Sandbox Account. Note: This is not the “test mode” that is listed under your account. This is an entirely separate sandbox environment that requires a separate login and separate API credentials. Do not place your Test Account (or regular account) into “Test Mode” within the Authorize.Net control panel as transactions will not process at all if that mode is set.
- Share connection settings: If using the credit card and eCheck gateways, select this setting to share credentials between the gateways so you don’t have to enter them twice.
- API Login ID: Follow the steps above to retrieve your API Login ID.
- API Transaction Key: Follow the steps above to generate your API Transaction Key.
- API Signature Key: Optional. Only required if you want to enable webhooks for Authorize.Net account updates. Follow the steps above to generate your API Signature Key.
Managing Orders
↑ Back to topAs a site administrator, you can use the WooCommerce Authorize.Net gateway to manually capture charges and automatically refund/void transactions as needed.
Capture Charges
↑ Back to topIf you are using version 2.0+ of the Authorize.Net gateway and the Transaction Type setting is set to “Authorization”, you can manually capture these payments from the WooCommerce Orders page. Click here to read more about capturing charges.
Automatic Refunds
↑ Back to topIf you are using version 2.0+ of the Authorize.Net gateway and version 2.2+ of WooCommerce, you can process refunds for Credit Card transactions directly in WooCommerce without needing to log into your Authorize.Net account. Click here to read more about issuing automatic refunds from WooCommerce.
Void Transactions
↑ Back to topYou can void transactions directly in WooCommerce in the following circumstances:
- If your Transaction Type setting is set to “Authorization”, you can void when the transaction has been authorized but not yet captured.
- If your Transaction Type setting is set to “Charge”, you can void when the transaction has not yet been settled (e.g. funds haven’t been transferred from the customer’s account to your Authorize.Net account).
Authorize.Net does not accept partial voids. If a transaction is no longer eligible to be voided, you must refund the order. Click here to read more about voiding transactions in WooCommerce.
Gateway Features
↑ Back to topYour customers can take advantage of the following features when your site uses WooCommerce Authorize.Net.
Saving Payment Methods
↑ Back to topCustomers can save payment methods during the checkout process or from their My Account area. This lets them quickly select payment details during future checkouts.
To manage their saved payment methods, customers can go to My Account > Payment Methods. From here, they can add new payment methods (credit cards or eChecks), set their default method, and delete any old or expired methods. Click here to read more about managing saved payment methods.
Subscriptions Support
↑ Back to topWooCommerce Authorize.Net supports all features of WooCommerce Subscriptions
FAQs
↑ Back to topHelp customers by answering commonly asked questions.
How can I get a sandbox account?
Sign up here.
What are the required credentials to set up the plugin?
You will need your Authorize.net API Login ID, Transaction Key, and Client Key for both the sandbox (test) and production environments. The required credentials can be obtained from their respective environments, as described in our user guide. For additional information please visit Support or contact your reseller.
How can I test credit card transactions?
Configure Plugin in “Sandbox” Environment. Then submit an order with valid billing address and payment information according to our test documentation