“Add availability scheduling for limited-time only products and keep customers up-to-date on availability status through countdown timers and notification emails.”
Installation
↑ Back to top- Download the .zip file from your WooCommerce account.
- Go to: WordPress Admin > Plugins > Add New and Upload Plugin with the file you downloaded with Choose File.
- Install Now and Activate the extension.
More information at Install and Activate Plugins/Extensions.
Setup and Configuration
After activating the Product availability scheduling for the WooCommerce plugin, you will see the Product availability scheduler under the WooCommerce tab. From there, you can create multiple scenarios to add product availability scheduler (Globally).
To offer availability scheduling on specific products, you can apply product-level settings as well. Additionally, you can customize the availability scheduling countdown timer and messages from WooCommerce settings tab.
Apply Availability Scheduling in Bulk – Global Rule Application
↑ Back to topGo to WooCommerce > Availability Scheduler option. From there, you can create a new condition/rule. Simply click Add New Rule and then follow these settings:
- Rule title – Add rule title for future reference
Availability Restrictions
- Product Availability Rule – Select whether to apply rule on product:
- Availability – when product is available
- Unavailability – when product is unavailable
- Start & End Date – Add dates from/to product will be available or unavailable
- Start & End Timer – Add time from/to the count down timer will run (The Timer will reset after said time)
- Select Days – Select days on which you want to display the unavailability of product
- Hide Price – You can choose to:
- Hide price and replace with custom text
- Hide price only
- Custom Text – Add custom text in case you are hiding the price and replacing it with a custom text
- Availability Message – Add a message to display when the product is available and use variables like {start_date}, {start_time}, {end_time}, {end_date} to display real-time timing information
- Unavailability Message – Add a message to display when the product is unavailable and use variables like {start_date}, {start_time}, {end_time}, {end_date} to display real-time timing information
Counter Restrictions
- Enable Counter – Check to enable countdown timer if disabled the counter will not be displayed
- Counter Availability – Choose whether to show countdown timer:
- During Product Available
- Before Product Available
- Both
- Text Before Counter – Add text before countdown timer
- Text After Counter – Add text after countdown timer
Note: The timer runs daily from the selected start time to end time within the date range you set, not continuously from the start date and time to the end date and time.
Leave the time field empty to keep it running within the starting and ending dates.
User Roles
- User Roles – Select user roles to show the availability schedule to
- Specific Users – Select users to show he availability schedule to (Add multiple emails and separate them using a comma)
Note: Leave Empty to Apply on All
Countries Restriction
- Select Countries – Select countries to show availability status in
Note: Leave Empty to Apply on All
Product Restrictions
- Select specific products – Select products to apply availability scheduling on
- Select product categories – Select product categories to apply availability scheduling on
- Select product tags – Select product tags to apply availability scheduling on
- Select product type – Select product types to apply availability scheduling on
Note: Leave Empty to Apply on All

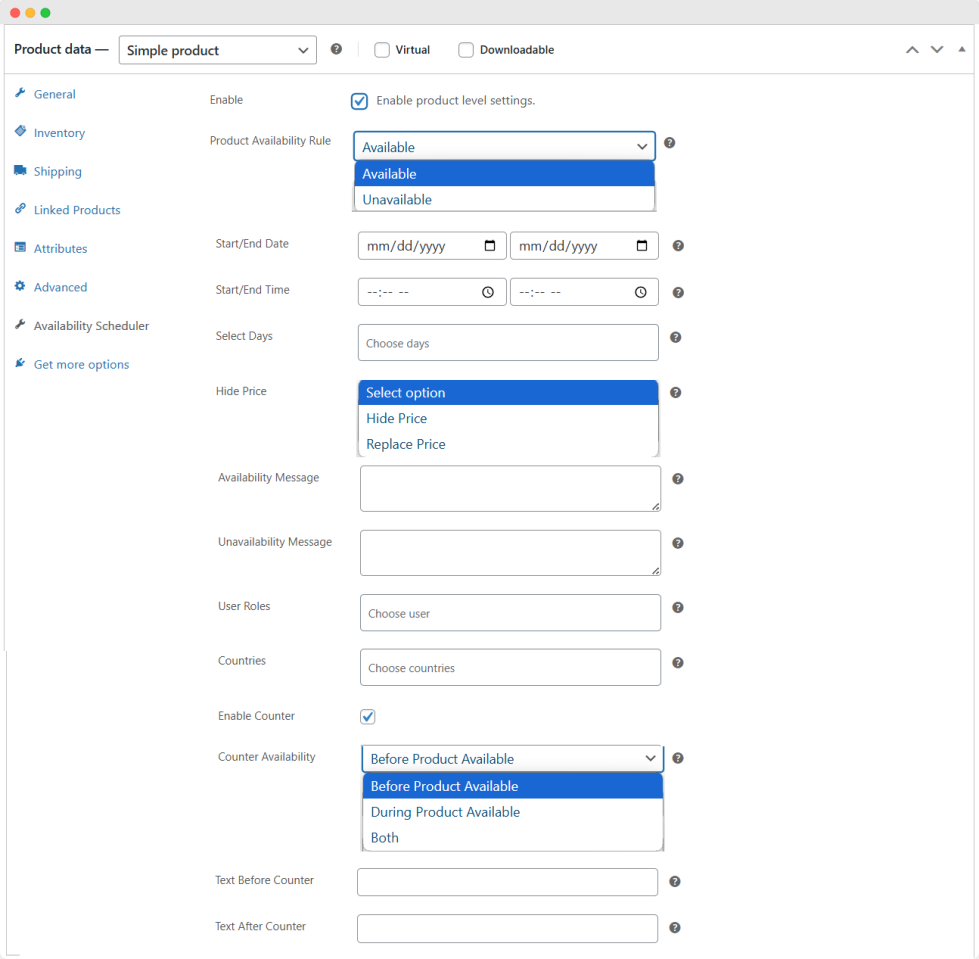
Apply Availability Scheduling on Specific Products – Product Level Application
↑ Back to topGo to WooCommerce > Products > Product Selection > Product Data > Availability Scheduler option. From there, you can create a new condition/rule on product level. Simply follow these settings:
- Product Availability Rule – Select whether to apply rule on product:
- Availability – when product is available
- Unavailability – when product is unavailable
- Start & End Date – Add dates from/to product will be available or unavailable
- Start & End Timer – Add time from/to the count down timer will run (The Timer will reset after said time)
- Select Days – Select days on which you want to display the unavailability of product
- Hide Price – You can choose to:
- Hide price and replace with custom text
- Hide price only
- Custom Text – Add custom text in case you are hiding the price and replacing it with a custom text
- Availability Message – Add a message to display when the product is available and use variables like {start_date}, {start_time}, {end_time}, {end_date} to display real-time timing information
- Unavailability Message – Add a message to display when the product is unavailable and use variables like {start_date}, {start_time}, {end_time}, {end_date} to display real-time timing information
- User Roles – Select user roles to show the availability schedule to
- Select Countries – Select countries to show availability status in
- Enable Counter – Check to enable countdown timer if disabled the counter will not be displayed
- Counter Availability – Choose whether to show countdown timer:
- During Product Available
- Before Product Available
- Both
- Text Before Counter – Add text before countdown timer
- Text After Counter – Add text after countdown timer
Note: The timer runs daily from the selected start time to end time within the date range you set, not continuously from the start date and time to the end date and time.
Leave the time field empty to keep it running within the starting and ending dates.
Availability Scheduler Settings
↑ Back to topYou can access these settings from WooCommerce > Settings > Availability Scheduler
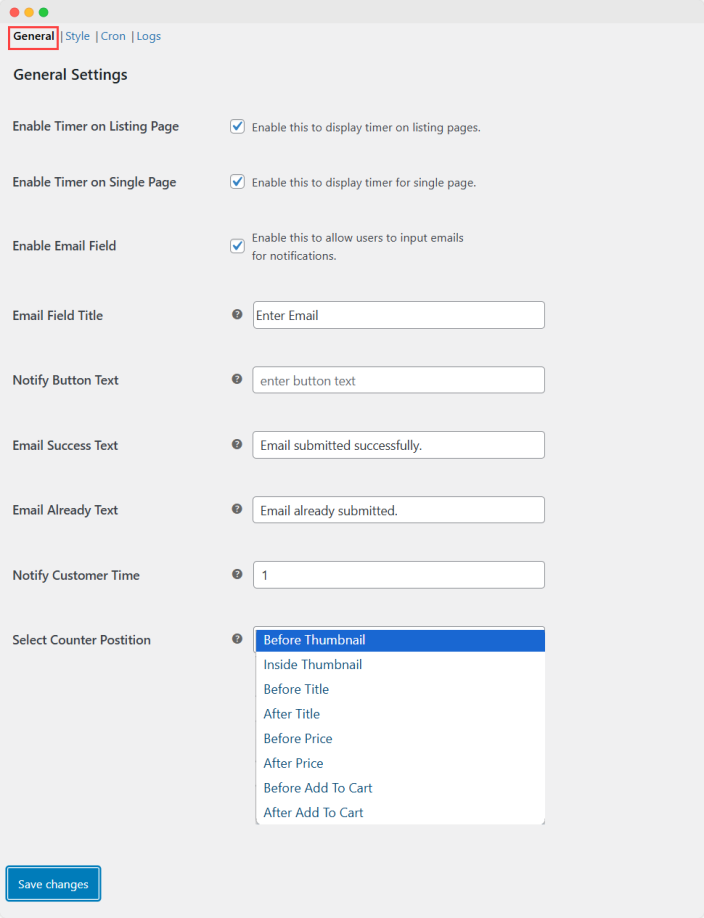
General
- Enable Timer on Listing Page – Check to enable timer on listing pages
- Enable Timer on Single Page – Check to enable timer on product pages
- Enable Email Field – Check to enable email field on product pages
- Email Field Title – Add title for email field
- Notify Button Text – Add text for notify buttons
- Email Success Text – Add message when email submitted successfully
- Email Already Text – Add error message to show when already entered email is use
- Notify Customer Time – Choose how many times a customer is notified on product availability
- Select Counter Position – Choose counter position
Counter Style
- Enable Style – Check to enable styling of countdown timer
- Number Color – Choose timer number color
- Font Color – Choose timer font color
- Digit Background Color – Choose timer digit background color
- Counter Background Color – Choose counter background color
- Availability Message Color – Choose availability message color
- Unavailability Message Color – Choose unavailability message color
- Number Font Size – Choose number font size
- Text Font Size – Choose text font size
- Number Font Weight – Choose number font weight
- Text Font Weight – Choose text font weight
- Select Labels – Select label style i.e YY, MM, DD
- Select Template – Choose template for countdown timer

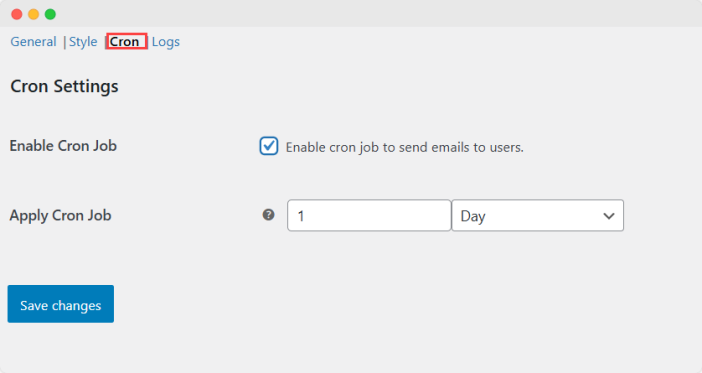
Cron
- Enable Cron Job – Check to enable cron job
- Apply Cron Job – Choose when to enable cron job
Logs
Email Logs – Here, all the emails will be listed for availability notification.
