Barcode & QR Code plugin lets you generate and manage barcodes and QR codes for your WooCommerce products. Use them for inventory tracking, order processing, and faster in-store or warehouse scanning. It supports multiple barcode formats and works seamlessly with existing product data.
Installation
↑ Back to top- Download the WooCommerce Barcode and QR code .ZIP file from your WooCommerce dashboard
- Go to Plugins, click on Add New, then Upload, and select the ZIP file that you downloaded.
- Click on “Install Now” and then “Activate”.
Configuration
↑ Back to topAfter the plugin is installed, go to WooCommerce > Settings > Bar and QR Code and configure the following settings.
Product Barcodes
↑ Back to topIn this section, you can configure the barcodes for the products in your store. Go to WooCommerce > Settings > Bar and QR Code > Product Barcodes and configure:
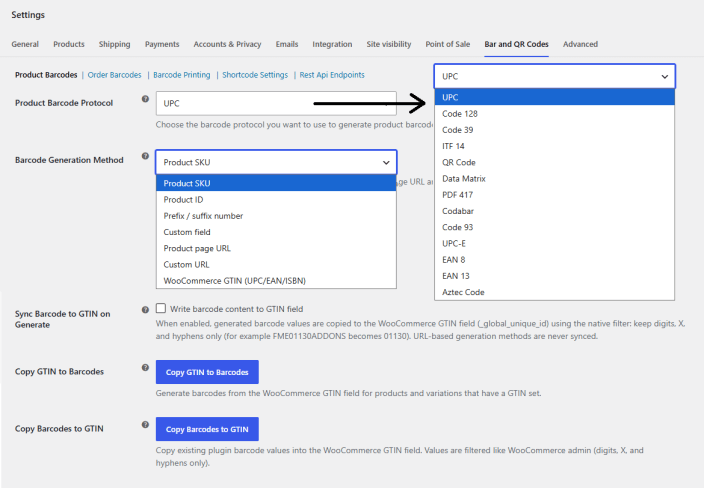
- Product Barcode Protocol: Choose the desired barcode protocol from the dropdown menu. You can choose from the following:
- UPC
- Code 128
- Code 39
- ITF 14
- QR Code
- Data Matrix
- PDF 417
- Codabar
- Code 93
- UPC-E
- EAN 8
- EAN 13
- Aztec Code
- Barcode Generation Method: Select the method based on which you want to generate the barcode for products. You can choose the following:
- Product SKU
- Product ID
- Prefix/Suffix Number
- Custom Field
- Product Page URL
- Custom URL
- WooCommerce GTIN (UPC/EAN/ISBN)
- Sync Barcode to GTIN on Generate: Enable to sync barcodes to GTIN. When enabled, generated barcode values are copied to the WooCommerce GTIN field (_global_unique_id) using the native filter: keep digits, X, and hyphens only (for example, FME01130ADDONS becomes 01130). URL-based generation methods are never synced.
- Copy GTIN to Barcodes: Generate barcodes from the WooCommerce GTIN field for products and variations that have a GTIN set.
- Copy Barcodes to GTIN: Copy existing plugin barcode values into the WooCommerce GTIN field. Values are filtered like WooCommerce admin (digits, X, and hyphens only).
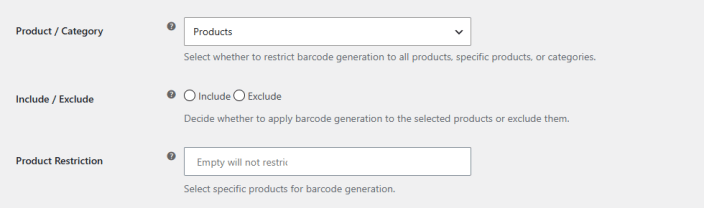
If you select Product SKU or Product ID, the following Settings will appear:
- Product / Category: Select how you want to restrict the barcode generation. You can choose from:
- All Products
- Products
- Categories
- Include / Exclude: Select “Include” or “Exclude” to restrict products or categories based on your preference.
- Product / Category Restriction: Select the products or categories that you want to include or exclude.
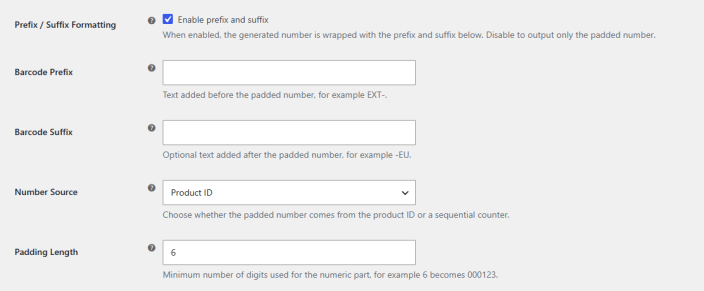
If you select Prefix/Suffix Number, the following Settings will appear:
- Barcode Prefix: Text added before the padded number, for example, EXT-.
- Barcode Suffix: Optional text added after the padded number, for example, -EU.
- Number Source: Choose the source for the padded numbers:
- Product ID
- Sequential Counter
- Padding Length: Minimum number of digits used for the numeric part, for example, 6 becomes 000123.
- Sequential Starting Number: First number used when Number Source is set to Sequential Counter.
If you select “Custom Field”, you will see:
- Custom Field Key: Enter the custom field key to use for barcode generation.

The settings below are not dependent on the generation method:
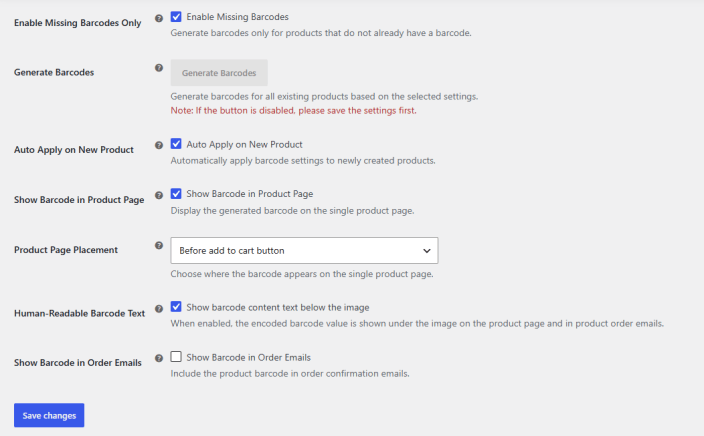
- Enable Missing Barcodes Only: Click the checkbox if you want to generate barcodes only for products that do not already have a barcode.
- Generate Barcodes: Click on the button to generate the barcodes. (Note: If the button is disabled, please save the settings first.)
- Auto Apply on New Product: Enable this checkbox to automatically apply barcode settings to newly created products.
- Show Barcode in Product Page: Click the checkbox to display the generated barcode on the single product page.
- Product Page Placement: Choose where the barcode appears on the single product page:
- Before Add to Cart Button
- After Add to Cart Button
- After Product Meta
- Human-Readable Barcode Text: When enabled, the encoded barcode value is shown under the image on the product page and in product order emails.
- Show Barcode in Order Emails: Enable the checkbox to include the product barcode in order confirmation emails.
Click on the “Save Changes” button to apply the configured settings.
Order Barcode
↑ Back to topIn this section, you can configure the barcodes for the orders in your store. Go to WooCommerce > Settings > Bar and QR Code > Order Barcodes and configure:
- Enable Order Barcodes: Click the checkbox to enable barcodes for orders.
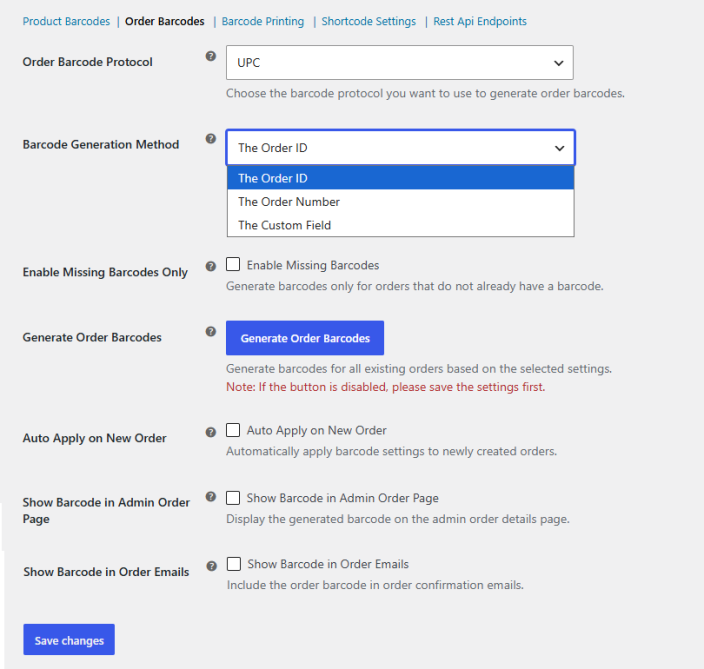
- Order Barcode Protocol: Choose the desired barcode protocol from the dropdown menu. You can choose from the following:
- UPC
- Code 128
- Code 39
- ITF 14
- QR Code
- Data Matrix
- PDF 417
- Codabar
- Code 93
- UPC-E
- EAN 8
- EAN 13
- Aztec Code
- Barcode Generation Method: Select the method based on which you want to generate the barcode for orders. You can choose the following:
- The Order ID
- The Order Number
- Custom Field
If you select “Custom Field”, you will also have to configure the “Custom Field Key” along with the above-mentioned fields.
- Enable Missing Barcodes Only: Click the checkbox if you want to generate barcodes only for orders that do not already have a barcode.
- Generate Barcodes: Click the button to generate the barcodes for orders. (Note: If the button is disabled, please save the settings first.)
- Auto Apply on New Order: Enable this checkbox to apply barcode settings to newly created orders automatically.
- Show Barcode in Admin Order Page: Click the checkbox to display the generated barcode on the admin order details page.
- Show Barcode in Order Emails: Enable the checkbox to include the product barcode in order confirmation emails.
Click on the “Save Changes” button to apply the configured settings.
Barcode Printing
↑ Back to topIn this section, you can configure the printing and downloading of barcodes for both orders and products. Go to WooCommerce > Settings > Bar and QR Code > Barcode Printing and configure the following:
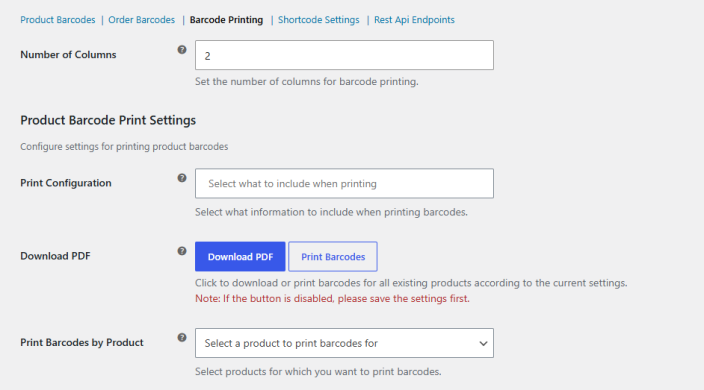
- Number of Columns: Set the number of columns for barcode printing.
Product Barcode Print Settings
- Print Configuration: Select what information to include when printing barcodes. You can select the following:
- Product Images
- Product Titles
- Product Prices
- Product SKUs
- Product Short Description
- Download PDF: Click to download or print barcodes for all existing products according to the current settings. Note: If the button is disabled, please save the settings first.
- Print Barcodes by Product: Select products for which you want to print barcodes.
Order Barcode Print Settings
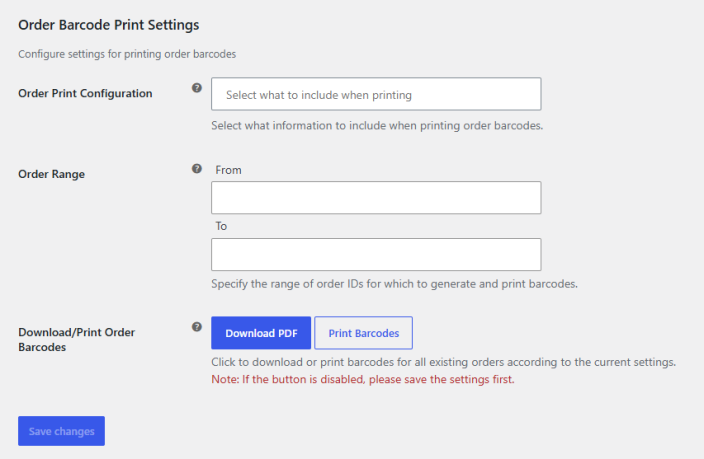
- Order Print Configuration: Select what information to include when printing order barcodes. You can select the following:
- Order Numbers
- Order Totals
- Order Dates
- Order Names
- Order Status
- Order Range: Specify the range of order IDs for which to generate and print barcodes.
- Download/Print Order Barcodes: Click to download or print barcodes for all existing orders according to the current settings. Note: If the button is disabled, please save the settings first.
Click on the “Save Changes” button to apply the configured settings.
Shortcode Settings
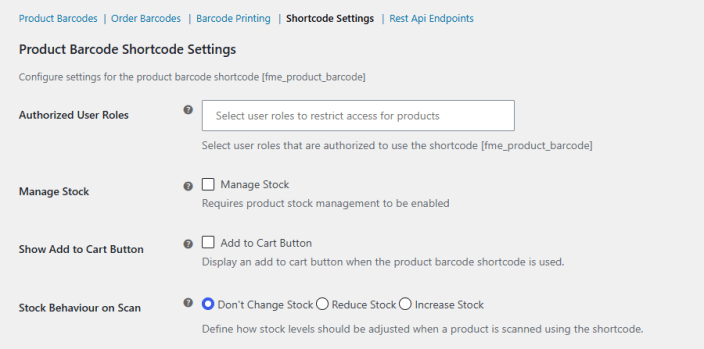
↑ Back to topIn this section, you can configure the shortcode settings for product and order barcodes. Go to WooCommerce > Settings > Bar and QR Code > Shortcode Settings and configure the following:
Product Barcode Shortcode Settings
Configure settings for the product barcode shortcode [fme_product_barcode]
- Authorized User Roles: Select user roles that are authorized to use the shortcode [fme_product_barcode]. You can select teh following user roles:
- Administrator
- Author
- Editor
- Contributor
- Subscriber
- Customer
- Shop Manager
- Guest
- Manage Stock: Click the checkbox to enable stock management when using the product barcode shortcode.
- Show Add to Cart Button: Enable if you want to display an add to cart button when the product barcode shortcode is used.
- Stock Behaviour on Scan: Define how stock levels should be adjusted when a product is scanned using the shortcode. You can choose from the following:
- Don’t Change Stock
- Reduce Stock
- Increase Stock
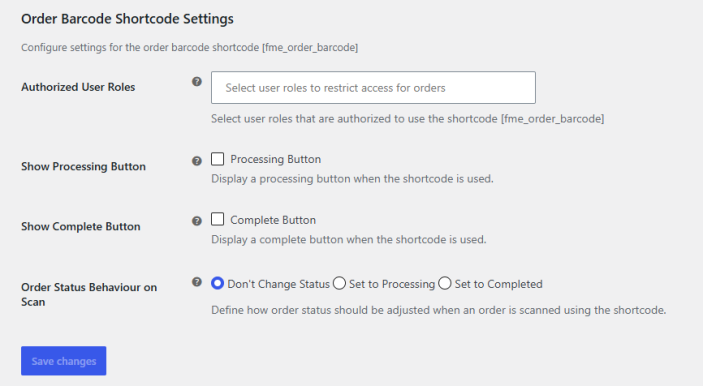
Order Barcode Shortcode Settings
Configure settings for the order barcode shortcode [fme_order_barcode]
- Authorized User Roles: Select user roles that are authorized to use the shortcode [fme_product_barcode]. You can select teh following user roles:
- Administrator
- Author
- Editor
- Contributor
- Subscriber
- Customer
- Shop Manager
- Guest
- Show Processing Button: Enable the checkbox to display a processing button when the shortcode is used.
- Show Complete Button: Click the checkbox to display a complete button when the shortcode is used.
- Order Status Behaviour on Scan: Define how order status should be adjusted when an order is scanned using the shortcode. You can choose the following:
- Don’t Change Status
- Set to Processing
- Set to Completed
Click on the “Save Changes” button to apply the configured settings.
REST API Endpoints
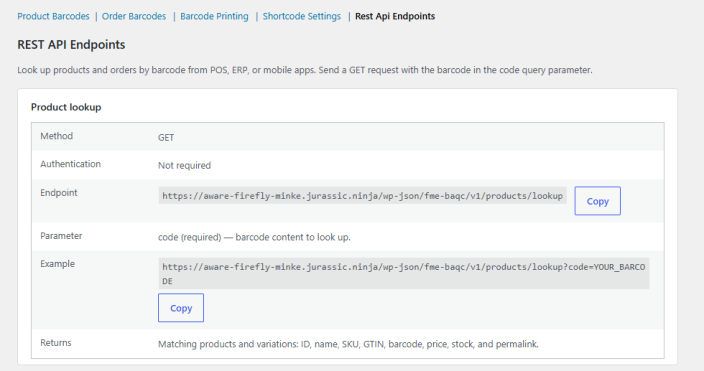
↑ Back to topIn this section, you can look up products and orders by barcode from a POS system, ERP, or mobile app. Go to WooCommerce > Settings > Bar and QR Code > REST API Endpoints to view the following endpoint details. Send a GET request with the barcode in the code query parameter.
Product Lookup
↑ Back to topUse this endpoint to fetch products and variations that match a scanned barcode.
- Method: GET
- Authentication: Not required.
- Endpoint: https://yourstore.com/wp-json/fme-baqc/v1/products/lookup (click the “Copy” button to copy the endpoint URL for your store).
- Parameter: code (required). The barcode content to look up.
- Example: https://yourstore.com/wp-json/fme-baqc/v1/products/lookup?code=YOUR_BARCODE (click the “Copy” button to copy the example request, then replace YOUR_BARCODE with the scanned value).
- Returns: Matching products and variations, including ID, name, SKU, GTIN, barcode, price, stock, and permalink.
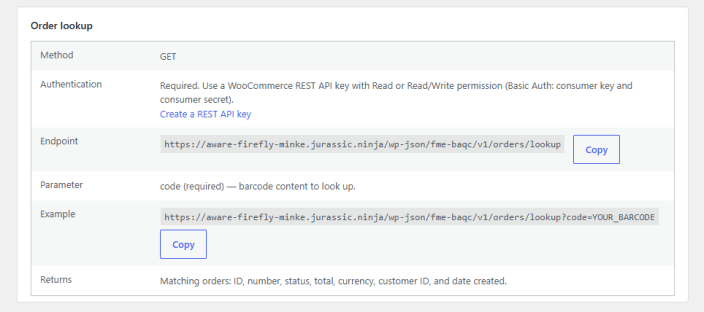
Order Lookup
↑ Back to topUse this endpoint to fetch orders that match a scanned barcode.
- Method: GET
- Authentication: Required. Use a WooCommerce REST API key with Read or Read/Write permission and authenticate using Basic Auth with the consumer key and consumer secret. Click the “Create a REST API key” link to generate one, or go to WooCommerce > Settings > Advanced > REST API.
- Endpoint: https://yourstore.com/wp-json/fme-baqc/v1/orders/lookup (click the “Copy” button to copy the endpoint URL for your store).
- Parameter: code (required). The barcode content to look up.
- Example: https://yourstore.com/wp-json/fme-baqc/v1/orders/lookup?code=YOUR_BARCODE (click the “Copy” button to copy the example request, then replace YOUR_BARCODE with the scanned value).
- Returns: Matching orders, including ID, number, status, total, currency, customer ID, and date created.
Product Level Settings for Barcode
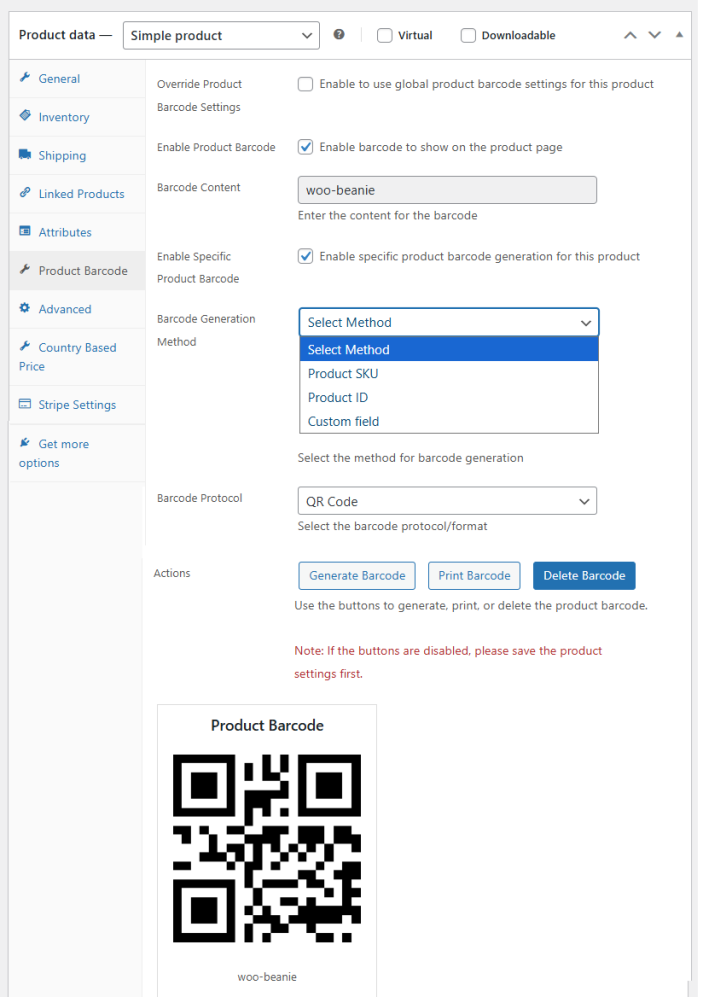
↑ Back to topYou can configure barcodes for each product on the product level as well. Go to Products > Select Product > Product Data > Product Barcode, and here you can configure the following settings for each product.
- Override Product Barcode Settings: Enable the checkbox to use global product barcode settings for this product
- Enable Product Barcode: Enable the barcode to show on the product page.
- Barcode Content: Enter the content for the barcode.
- Enable Specific Product Barcode: Click the checkbox if you want to enable specific product barcode generation for this product
- Barcode Generation Method: Select the method for barcode generation method. You can choose the following:
- Product SKU
- Product ID
- Prefix/Suffix Number
- Custom Field (If you select “custom field”, also enter the custom value for the barcode)
- Product Page URL
- Custom URL (Add the custom URL in teh field below)
- WooCommerce GTIN (UPC/EAN/ISBN)
- Barcode Protocol: Select the barcode protocol/format. You can select from the following:
- UPC
- Code 128
- Code 39
- ITF 14
- QR Code
- Data Matrix
- PDF 417
- Codabar
- Code 93
- UPC-E
- EAN 8
- EAN 13
- Aztec Code
- Actions: Use the buttons to generate, print, or delete the product barcode. Note: If the buttons are disabled, please save the product settings first.