Mix and Match for WooCommerce lets store owners create custom product boxes, allowing customers to build multiple boxes or bundles from available products.
Installation
↑ Back to top- Download Custom Mix & Match Product Boxes from your WooCommerce dashboard.
- At the WordPress admin panel, go to Plugins > Add New > Upload and select the .zip file you just downloaded.
- Click Install Now, and then Activate Plugin.
Configuration
↑ Back to topTo configure the extension, go to WooCommerce > Settings within the WordPress admin panel. Here, you will find the Custom Boxes tab.
Custom Boxes Settings
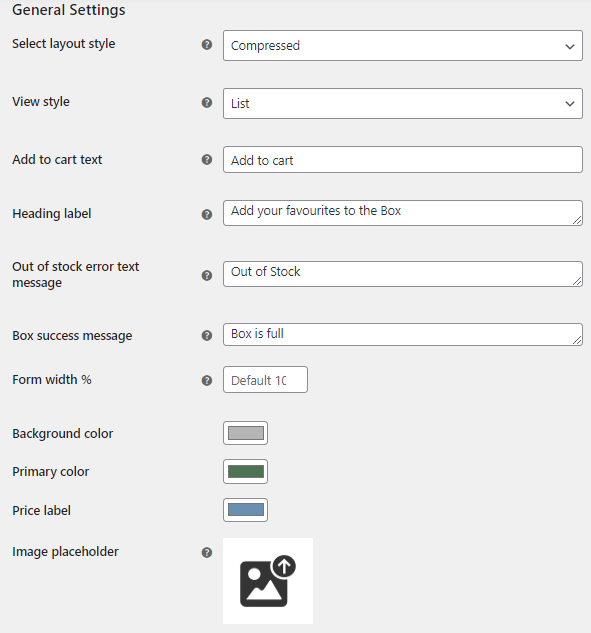
↑ Back to topWithin Custom Boxes > General Settings, you can configure the following options:
- Select Layout Style: Choose between Detailed (product description is visible) and Compressed to display the products on the front end.
- View Style: Choose to display the product boxes in List or Grid view.
- Add to Cart Text: Set custom text for add to cart button.
- Heading Label: Customize the heading label for product boxes.
- Out of Stock Error Text Message: Customize text to be shown when the product is out of stock.
- Box Success Message: Set a custom message when the product box is full.
- Form Width: Customize the width of the product boxes form according to your preference.
- Background Color: Customize the background color of the product boxes.
- Primary Color: Set the primary color of the product boxes to complement your store theme.
- Price Label: Customize the color of the price label text.
- Image Placeholder: Set the custom product image placeholder for an empty box
How to Create Custom Product Boxes
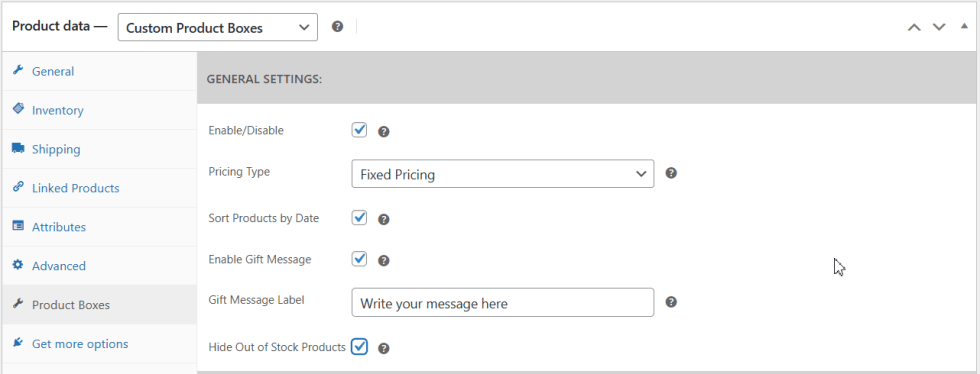
↑ Back to topTo create WooCommerce mix and match boxes, navigate to WooCommerce > Products > All Products > Add New. Within the Product Data tab, set the product type to Custom Product Boxes, and the “Product Boxes” tab will be added.
General Settings
- Enable / Disable: Enable or disable product boxes for a specific product.
- Pricing Type: From within the dropdown, select pricing type – options include:
- Fixed Pricing – Fixed price of a box.
- Per Item Price with Base Price – Includes item price and product price as well.
- Per Item Price Without Base Price – Includes only prices of the products in a box.
- Sort Products by Date: It displays newly added products on top in box.
- Enable Gift Message: Checkbox to enable the gift message.
- Hide Out of Stock Products: Click the checkbox to hide out of stock product or variation from the box.
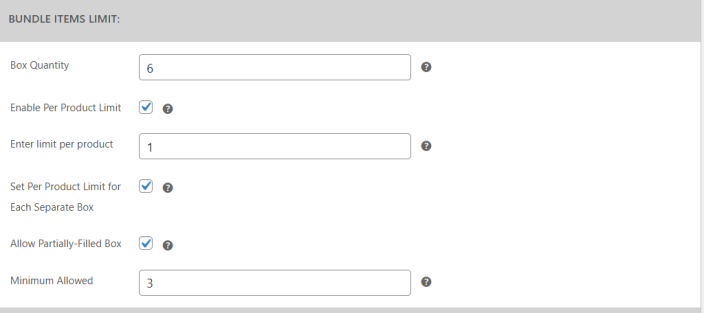
Bundle Items Limit
- Box Quantity: Set the number of product quantity in a box.
- Enable Per Product Limit: Enable a checkbox to limit product copies and set a quantity cap, preventing customers from adding the same product beyond the allowed limit.
- Set Per Product Limit for Each Separate Box: A checkbox to apply the product limit to each separate box instead of the entire order.
- Allow Partially Filled Boxes: Allow customers to check out without filling the entire box. You can set the minimum quantities allowed.
Bundle Layout Design
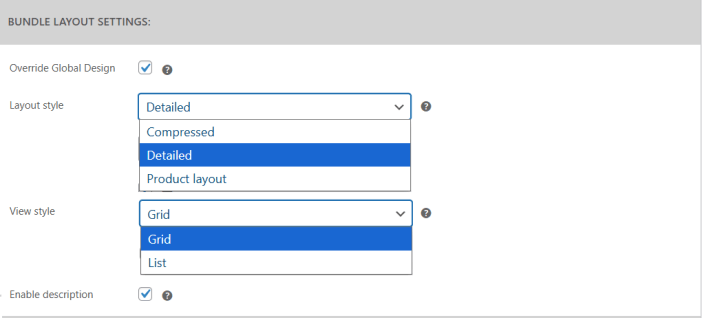
- Override Global Design: Checkbox to override the global box layout.
- Layout style: Choose between three types of layouts
- Compressed
- Detailed
- Product Layout
- View style: Select the style of the custom product boxes.
- Grid
- List
- Enable description: Check the box to enable the product description. It only works with Detailed Layout.
Add New Box Limit
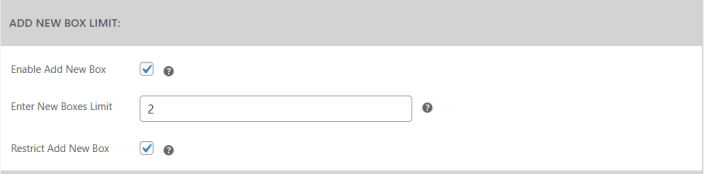
- Enable Add New Box: Check the box to allow customers to add multiple boxes.
- Enter New Boxes Limit: Set a limit to restrict customers to add specific number of mix and match boxes.
- Restrict Add New Box: Restrict customers from adding new boxes if the minimum product quantities are filled in the box. This feature is linked with the partially filled box setting.
Bundle Items
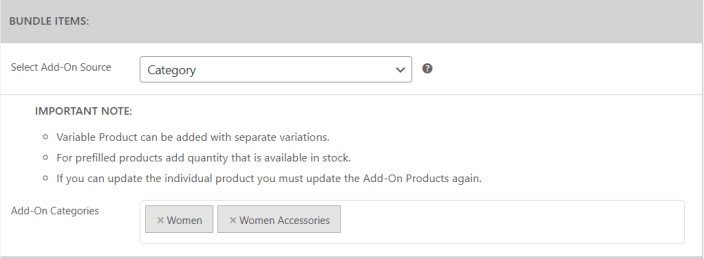
Select the products that you want to display in the custom products boxes. You can choose between Products or Categories.
Prefilled Items
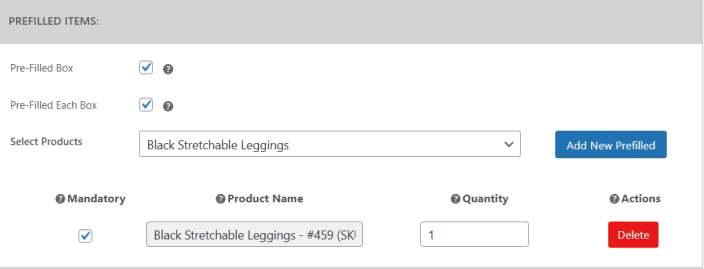
- Pre-Filled Box: Checkbox to enable the prefilled box.
- Pre-Filled Each Box: Allow prefilled items in each box, if a new box is added.
You can add the products and variations as pre-filled, while making them optional or mandatory.
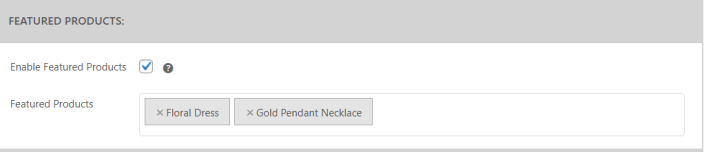
Featured Products
Set featured products that are included in the box to show at the top of the box.
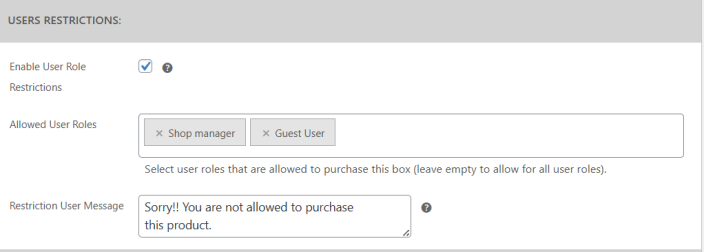
User Restrictions
- Enable User Role Restrictions: Checkbox to enable the user role restrictions. Select the allowed user roles that can purchase the product box.
- Restriction User Message: Set a custom message to restricted users who are not allowed to purchase the mix and match product box.
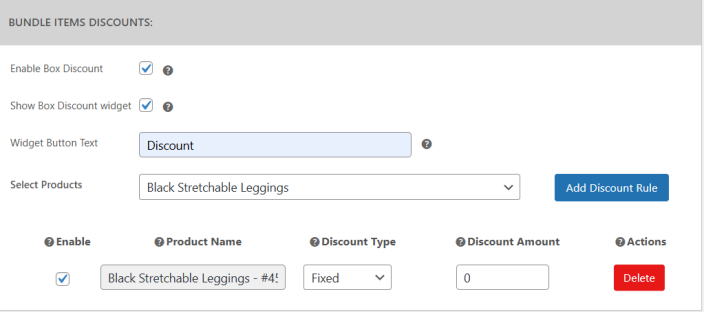
Bundle Items Discounts
- Enable Box Discount: Checkbox to enable the discount when the customer purchases a specific product.
- Show Box Discount widget: Display bundle item discount widget.
- Widget Button Text: Set custom discount widget button text.
- Select Products: Select the product or product variation and apply the discount on specific product. Set discount type (Fixed or Percentage) and discount amount.
The bundle item discount will only be displayed when the Per Item Price with Base Price or Per Item Price Without Base Price is selected.
Bundle Shortcode
- Product Box Shortcode: Copy the auto-generated shortcode and paste it into any page, post, or widget area to display the product box builder outside the product page.

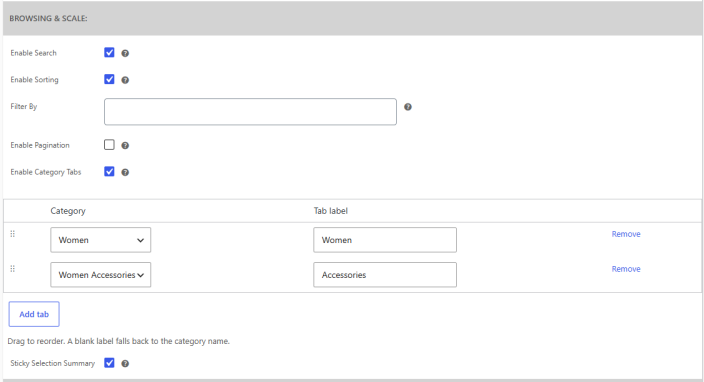
Browsing & Scale
- Enable Search: Checkbox to add a search bar to the product box so customers can quickly find products by name.
- Enable Sorting: Checkbox to allow customers to sort the products displayed in the box.
- Filter By: Set the filters customers can use to narrow down products within the box.
- Enable Pagination: Checkbox to split a long product list into multiple pages, keeping large boxes easy to browse.
- Enable Category Tabs: Checkbox to group box products into category tabs. Click Add tab, select a Category, and enter a Tab label for each tab.
- Reorder: Drag the tabs to change their display order.
- Tab Label: Leave the label blank to use the category name instead.
- Remove: Click Remove to delete a tab.
- Sticky Selection Summary: Checkbox to keep the summary of selected items visible while customers scroll through the products.
Sections
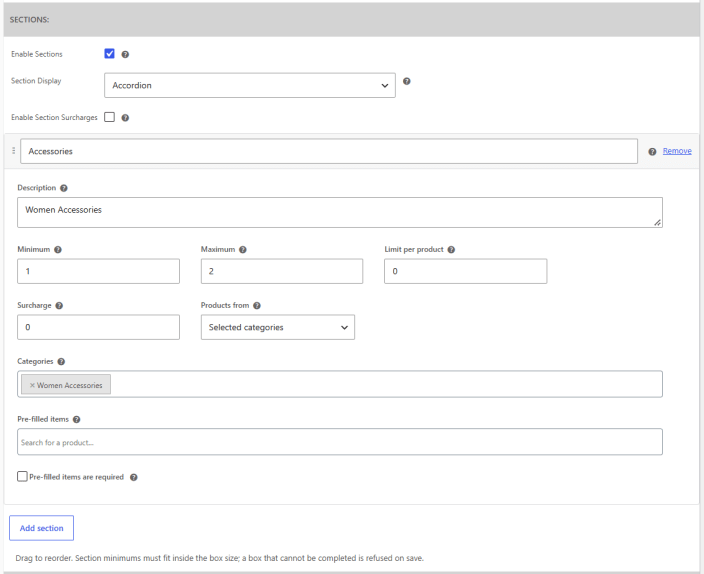
Divide the product box into sections, each with its own selection rules and product source.
- Enable Sections: Checkbox to enable sections within the product box.
- Section Display: Choose how sections are displayed on the front end, such as Accordion.
- Enable Section Surcharges: Checkbox to charge an extra amount for items added from specific sections.
Click Add section to create a new section and configure the following options:
- Section Title: Enter the section name displayed to customers.
- Description: Add a short description shown with the section.
- Minimum: Set the minimum number of items customers must select from the section.
- Maximum: Set the maximum number of items customers can select from the section.
- Limit per product: Limit how many copies of the same product can be added from the section. Set 0 for no limit.
- Surcharge: Set an additional charge for items selected from the section. It only works when Enable Section Surcharges is checked.
- Products from: Choose where section products come from, such as Selected categories.
- Categories: Select the categories whose products appear in the section.
- Pre-filled items: Search and add products that are placed in the section by default.
- Pre-filled items are required: Checkbox to prevent customers from removing the pre-filled items.
Drag sections to reorder them. Section minimums must fit within the box size, as a box that cannot be completed will not be saved.
Subscriptions
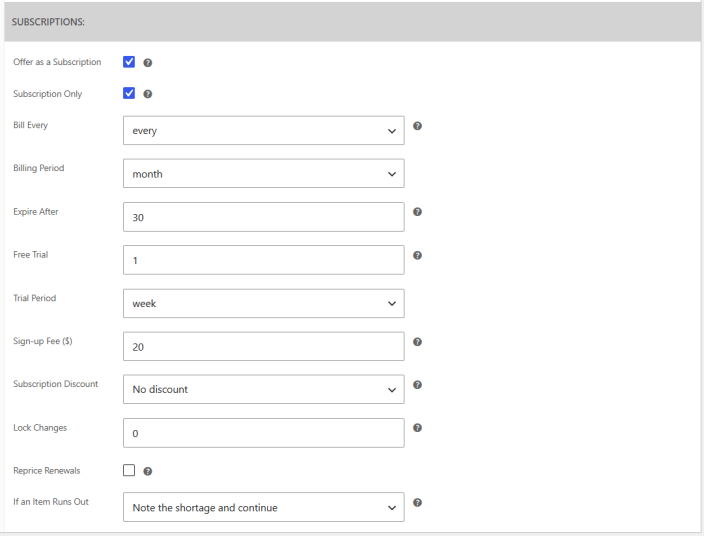
Sell the product box as a recurring subscription so customers receive their box on a set schedule.
Note: WooCommerce Subscription plugin is required
- Offer as a Subscription: Checkbox to offer the product box as a subscription.
- Subscription Only: Checkbox to sell the box only as a subscription and remove the one-time purchase option.
- Bill Every: Set the billing interval for the subscription.
- Billing Period: Choose the billing period, such as month.
- Expire After: Set the number of billing periods after which the subscription ends. Set 0 to keep renewing until cancelled.
- Free Trial: Set the length of the free trial. Set 0 to skip the trial.
- Trial Period: Choose the time unit for the free trial, such as month.
- Sign-up Fee ($): Charge a one-time fee when the customer signs up for the subscription.
- Subscription Discount: Offer a discount to customers who subscribe instead of buying the box once.
- Lock Changes: Set the number of days before renewal after which customers can no longer change their box contents.
- Reprice Renewals: Checkbox to recalculate the renewal price based on current product prices.
- If an Item Runs Out: Choose what happens when a box item is out of stock at renewal, such as Note the shortage and continue.
Shipping
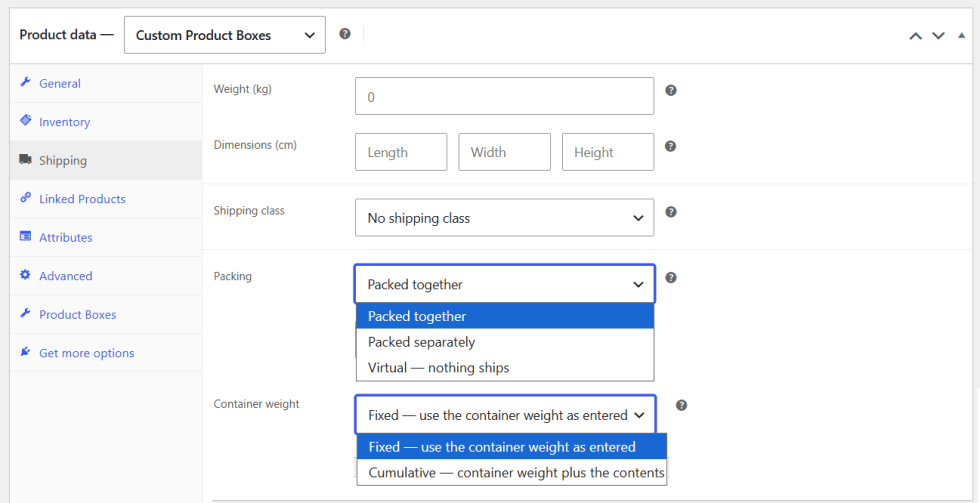
Within the Shipping tab of the Product Data section, set how custom product boxes are packed and weighed for shipping.
- Packing: Choose how the box and its contents ship. Options include:
- Packed together: Ship the box and all its items as a single package.
- Packed separately: Ship each item in the box as its own package.
- Virtual: Nothing ships, making it suitable for digital or service-based boxes.
- Container weight: Choose how the box weight is calculated. Options include:
- Fixed: Use the container weight exactly as entered.
- Cumulative: Add the weight of the box contents to the container weight.
Display Product Boxes with the Block Editor
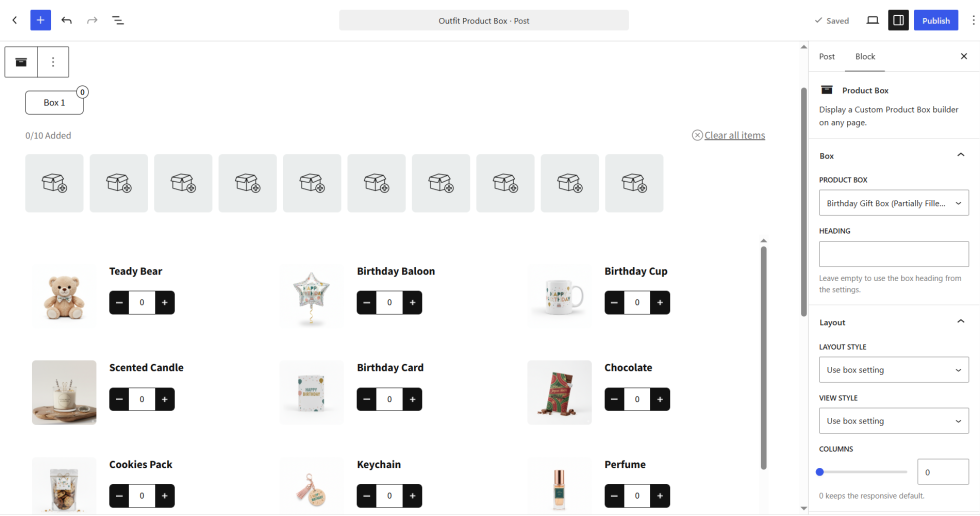
↑ Back to topAdd the Product Box block to any page or post to display a custom product box builder. Within the block settings, you can configure the following options:
- Product Box: Select the custom product box to display.
- Heading: Set a custom heading for the box. Leave it empty to use the box heading from the settings.
- Layout Style: Choose a layout style for the block or keep Use box setting.
- View Style: Choose a view style for the block or keep Use box setting.
- Columns: Set the number of product columns. Set 0 to keep the responsive default.
Edit Product Boxes from Orders
↑ Back to topNavigate to WooCommerce > Orders and open an order that contains a custom product box. Click the Edit box button below the product box item to update the products in the customer’s box. Each box item is listed separately in the order with an Included With label, showing which product box it belongs to.

How to Restrict Specific Product Only for Product Box?
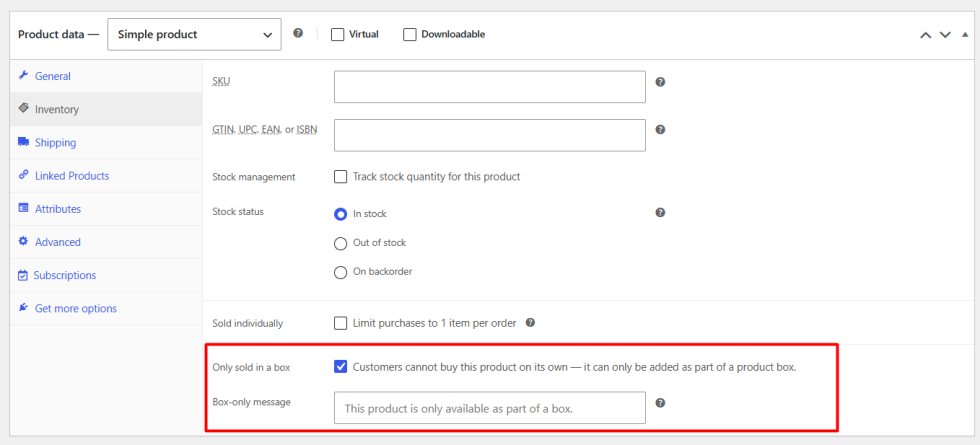
↑ Back to topGo to WooCommerce > Product, and edit any product which is a part of the product box. Scroll down to the product data section and go to the Inventory tab. Then check the Only sold in box option to restrict the specific product to only box purchase.