The Deposit and Partial Payment Plugin for WooCommerce lets your customers pay a deposit upfront and settle the remaining balance through flexible installment plans. This documentation walks you through every setting, from general configuration and payment automation to email templates, webhooks, and payment plan rules.
Configuration & Installation
↑ Back to top- Download the .zip file from your WooCommerce account.
- Go to: WordPress Admin > Plugins > Add New and upload the file you have downloaded.
- Install Now and Activate.
General Settings
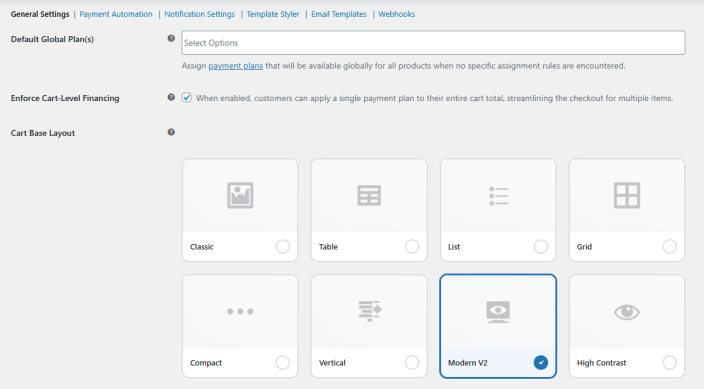
↑ Back to topGo to WooCommerce > Partial Payment Plan > General Settings. Here you can configure the following settings:
- Default Global Plan(s): Select one or more payment plans that will be available globally for all products when no specific assignment rules are encountered.
- Enforce Cart-Level Financing: Click the checkbox to allow customers to apply a single payment plan to their entire cart total, streamlining the checkout experience for orders with multiple items.
- Cart Base Layout: Choose how payment options are displayed to customers on the cart and checkout pages. The following layout options are available:
- Classic: Displays payment options in a traditional card-based format.
- Table: Presents payment options in a structured table layout.
- List: Shows payment options as a simple vertical list.
- Grid: Displays payment options in a grid.
- Compact: A condensed layout suited for minimal display.
- Vertical: Stacks payment options vertically for a clean, linear flow.
- Modern V2: A contemporary layout with a visually prominent design.
- High Contrast: A high-contrast layout for improved accessibility and readability.
Payment Automation
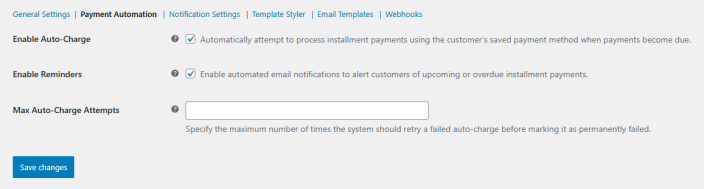
↑ Back to topGo to WooCommerce > Partial Payment Plan > Payment Automation. Here you can configure the following settings:
- Enable Auto-Charge: Click the checkbox to automatically attempt to process installment payments using the customer’s saved payment method when payments become due.
- Enable Reminders: Click the checkbox to enable automated email notifications that alert customers of upcoming or overdue installment payments.
- Max Auto-Charge Attempts: Enter the maximum number of times the system should retry a failed auto-charge before marking it as permanently failed.
Notification Settings
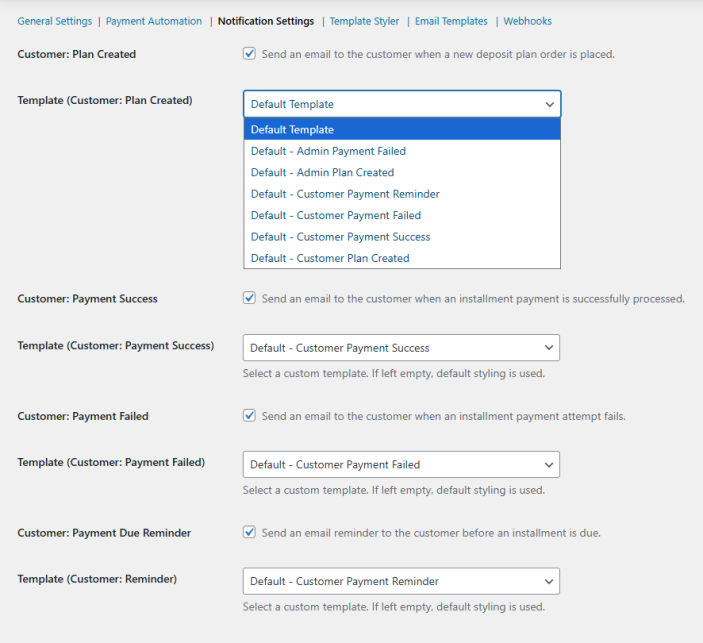
↑ Back to topGo to WooCommerce > Partial Payment Plan > Notification Settings. Here you can configure the following settings:
Customer Notifications
↑ Back to top- Customer: Plan Created: Click the checkbox to send an email to the customer when a new deposit plan order is placed.
- Template (Customer: Plan Created): Select a custom email template for the plan created notification. If left empty, default styling is used.
- Customer: Payment Success: Click the checkbox to send an email to the customer when an installment payment is successfully processed.
- Template (Customer: Payment Success): Select a custom email template for the payment success notification. If left empty, default styling is used.
- Customer: Payment Failed: Click the checkbox to send an email to the customer when an installment payment attempt fails.
- Template (Customer: Payment Failed): Select a custom email template for the payment failed notification. If left empty, default styling is used.
- Customer: Payment Due Reminder: Click the checkbox to send an email reminder to the customer before an installment is due.
- Template (Customer: Reminder): Select a custom email template for the payment due reminder notification. If left empty, default styling is used.
Admin Notifications
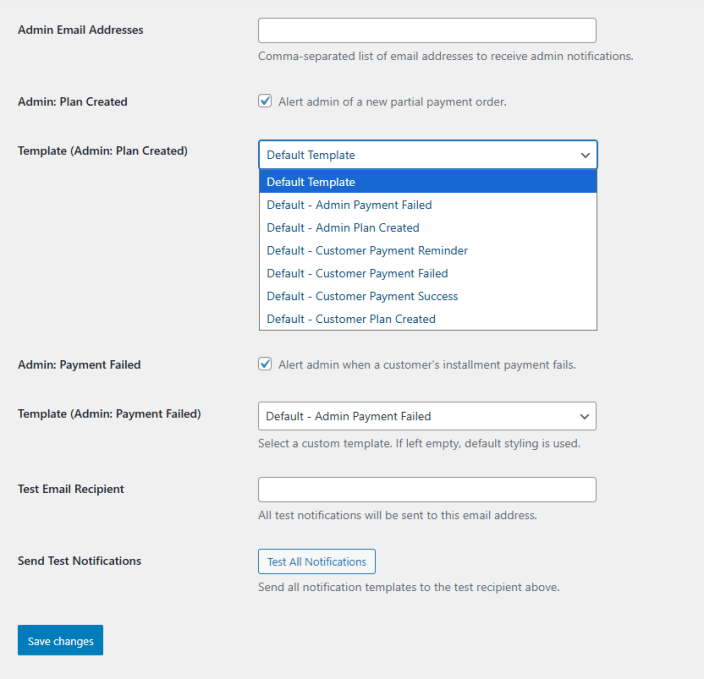
↑ Back to top- Admin Email Addresses: Enter a comma-separated list of email addresses to receive admin notifications.
- Admin: Plan Created: Click the checkbox to alert the admin when a new partial payment order is placed.
- Template (Admin: Plan Created): Select a custom email template for the admin plan created alert. If left empty, default styling is used.
- Admin: Payment Failed: Click the checkbox to alert the admin when a customer’s installment payment fails.
- Template (Admin: Payment Failed): Select a custom email template for the admin payment failed alert. If left empty, default styling is used.
- Test Email Recipient: Enter the email address to which all test notifications will be sent.
- Send Test Notifications: Click the Test All Notifications button to send all notification templates to the test recipient above.
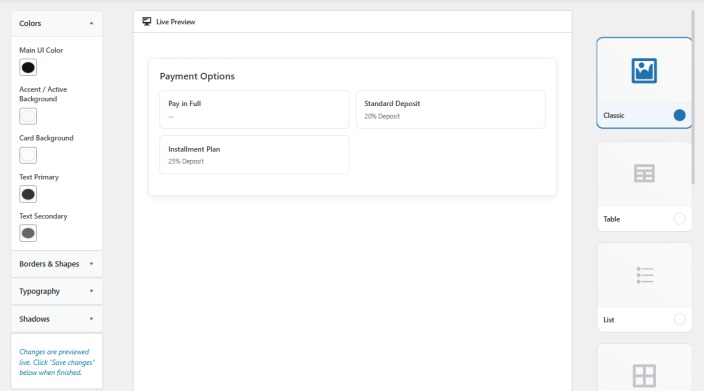
Template Styler
↑ Back to topGo to WooCommerce > Partial Payment Plan > Template Styler. Here you can customize the appearance of the payment options displayed to customers and preview changes in real time before saving. The following customization options are available:
- Colors: adjust different color settings
- Main UI Color: Set the primary color used across the payment option interface.
- Accent / Active Background: Set the background color for the active or selected payment option.
- Card Background: Set the background color for individual payment option cards.
- Text Primary: Set the color for primary text elements.
- Text Secondary: Set the color for secondary or supporting text elements.
- Borders & Shapes: Expand this section to configure border styles, widths, and corner radius settings for payment option cards.
- Typography: Expand this section to adjust font styles, sizes, and weights used within the payment options display.
- Shadows: Expand this section to configure shadow effects applied to payment option cards.
- Layout: Select the layout style for the payment options display from the panel on the right. The available layouts are Classic, Table, List, Grid, Compact, Vertical, Modern V2, and High Contrast. Changes are previewed live in the center panel before saving.
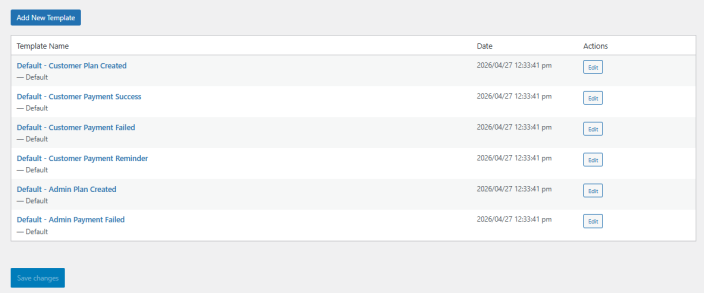
Email Templates
↑ Back to topGo to WooCommerce > Partial Payment Plan > Email Templates. This section displays all available email templates used across customer and admin notifications. The following default templates are included out of the box:
- Default – Customer Plan Created
- Default – Customer Payment Success
- Default – Customer Payment Failed
- Default – Customer Payment Reminder
- Default – Admin Plan Created
- Default – Admin Payment Failed
Each template can be edited by clicking the Edit button next to it. To create a new custom template, click the Add New Template button.
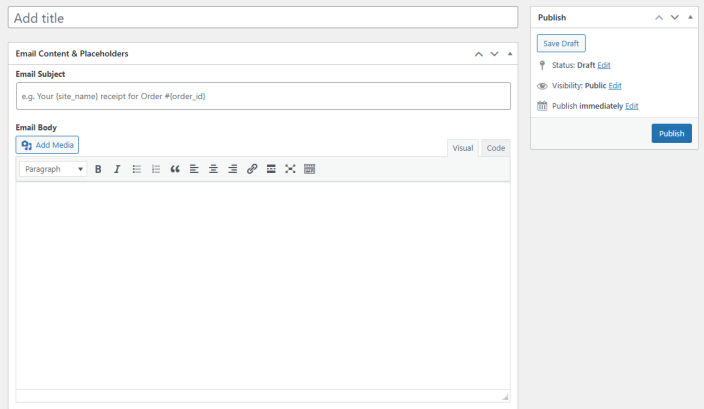
Adding or Editing a Template
↑ Back to topWhen adding or editing a template, you can configure the following:
- Title: Enter a name for the template to identify it in the template selection dropdowns across Notification Settings.
- Email Subject: Enter the subject line for the email. Placeholders can be used to populate order and customer details dynamically.
- Email Body: Compose the email content using the visual or code editor. You can add media, apply text formatting, insert links, and use placeholders to personalize the message.
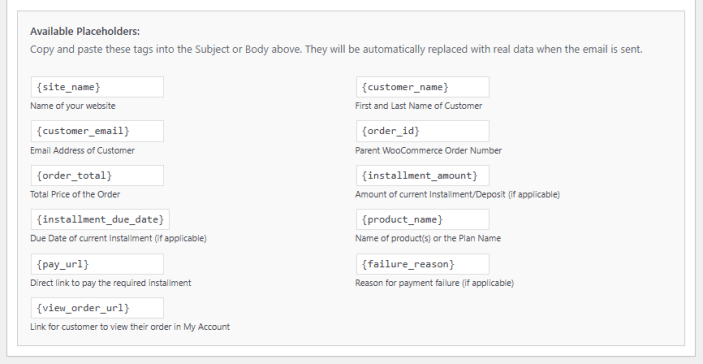
Available Placeholders
↑ Back to topCopy and paste the following tags into the subject or body of the email. They will be automatically replaced with real data when the email is sent.
- {site_name}: Name of your website.
- {customer_name}: First and last name of the customer.
- {customer_email}: Email address of the customer.
- {order_id}: Parent WooCommerce order number.
- {order_total}: Total price of the order.
- {installment_amount}: Amount of the current installment or deposit, if applicable.
- {installment_due_date}: Due date of the current installment, if applicable.
- {product_name}: Name of the product(s) or the plan name.
- {pay_url}: Direct link for the customer to pay the required installment.
- {failure_reason}: Reason for payment failure, if applicable.
- {view_order_url}: Link for the customer to view their order in My Account.
Webhooks
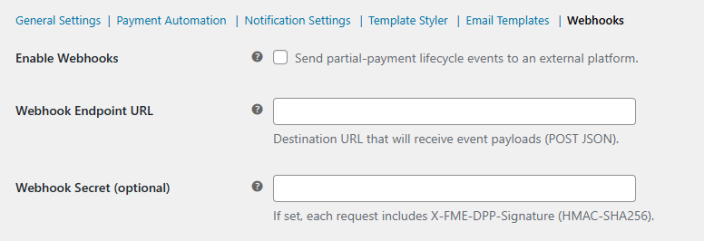
↑ Back to topGo to WooCommerce > Partial Payment Plan > Webhooks. Here you can configure the following settings:
- Enable Webhooks: Click the checkbox to send partial payment lifecycle events to an external platform.
- Webhook Endpoint URL: Enter the destination URL that will receive event payloads via POST JSON.
- Webhook Secret (optional): Enter an optional secret key. If set, each request will include an X-FME-DPP-Signature header using HMAC-SHA256 for verification.
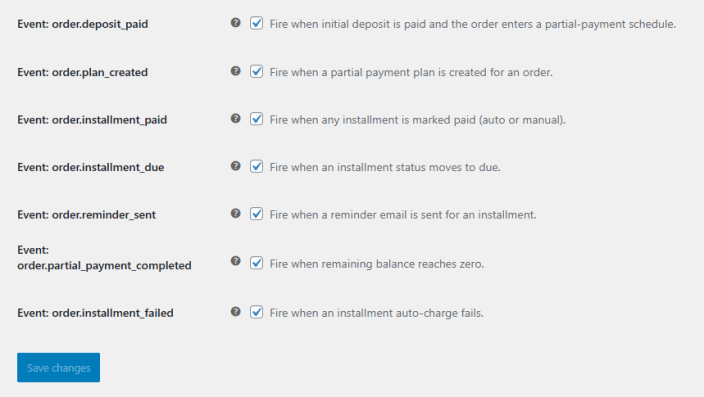
Webhook Events
↑ Back to topEnable or disable individual events to control which payment lifecycle actions trigger a webhook notification:
- Event: order.deposit_paid: Fires when the initial deposit is paid and the order enters a partial payment schedule.
- Event: order.plan_created: Fires when a partial payment plan is created for an order.
- Event: order.installment_paid: Fires when any installment is marked as paid, whether automatically or manually.
- Event: order.installment_due: Fires when an installment status moves to due.
- Event: order.reminder_sent: Fires when a reminder email is sent for an installment.
- Event: order.partial_payment_completed: Fires when the remaining balance reaches zero.
- Event: order.installment_failed: Fires when an installment auto-charge fails.
Payment Plans
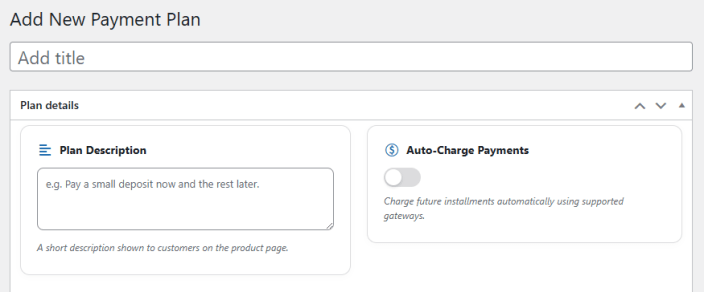
↑ Back to topGo to WooCommerce > Payment Plans. This section allows you to create and manage custom payment plans that can be assigned globally or to specific products. Click Add New Payment Plan to create a plan.
Plan Details
↑ Back to top- Title: Enter a name for the payment plan. This is used to identify the plan in the admin and in plan assignment rules.
- Plan Description: Enter a short description of the payment plan that will be shown to customers on the product page, for example: “Pay a small deposit now and the rest later.”
- Auto-Charge Payments: Toggle this on to automatically charge future installments using supported payment gateways.
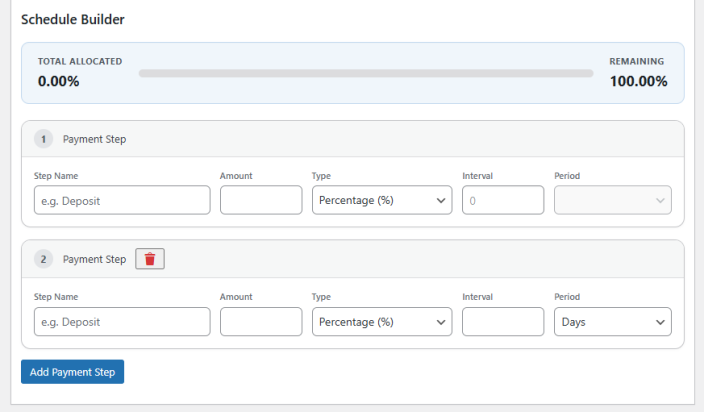
Schedule Builder
↑ Back to topThe Schedule Builder allows you to define the payment steps that make up the plan. A progress bar displays the total allocated percentage and the remaining amount as you add steps, ensuring the plan accounts for the full order value.
Click Add Payment Step to add a new step to the schedule. Each payment step can be configured with the following:
- Step Name: Enter a name for the payment step, for example: “Deposit” or “Final Payment.”
- Amount: Enter the amount to be collected at this step.
- Type: Select whether the amount is a fixed value or a percentage of the order total.
- Interval: Enter the number of time units after which this step becomes due.
- Period: Select the time period for the interval, such as Days, Weeks, or Months.
Additional steps can be added to build out a weekly, monthly, or any custom installment schedule. Steps can be removed individually using the delete button on each step.
Assignment Rules
↑ Back to topGo to WooCommerce > Assignment Rules. This section allows you to control which payment plans are presented for specific products, categories, or customer segments. Click Add New Assignment Rule to create a rule.
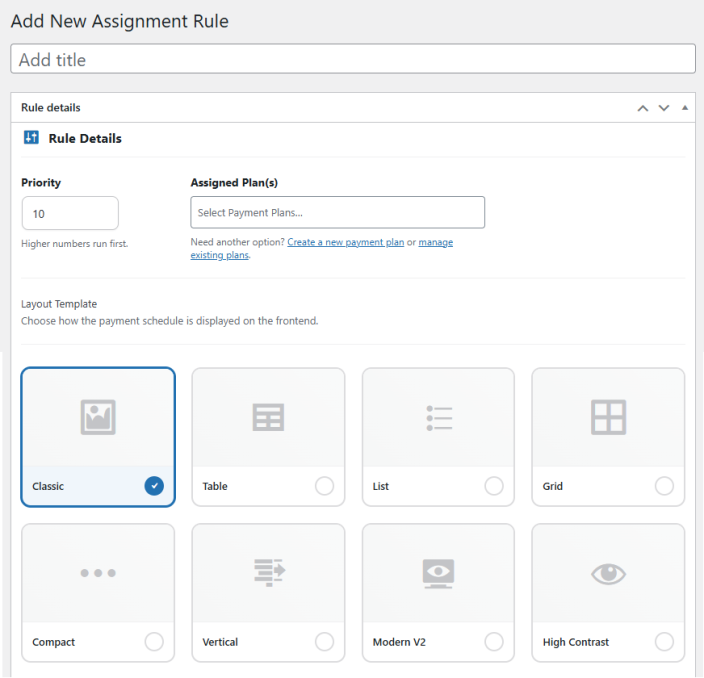
Rule Details
↑ Back to top- Title: Enter a name for the assignment rule to identify it in the admin.
- Priority: Enter a numeric priority for the rule. Higher numbers run first, allowing more specific rules to take precedence over broader ones.
- Assigned Plan(s): Select one or more payment plans to assign under this rule. You can also create a new payment plan or manage existing plans directly from this field.
- Layout Template: Choose how the payment schedule is displayed on the frontend for this rule. The following layout options are available:
- Classic: Displays payment options in a traditional card-based format.
- Table: Presents payment options in a structured table layout.
- List: Shows payment options as a simple vertical list.
- Grid: Arranges payment options in a grid format.
- Compact: A condensed layout suited for minimal display.
- Vertical: Stacks payment options vertically for a clean, linear flow.
- Modern V2: A contemporary layout with a visually prominent design.
- High Contrast: A high-contrast layout for improved accessibility and readability.
Rule Conditions
↑ Back to topDefine the conditions under which this rule applies. If no conditions are added, the rule applies to all products. You can set the rule to match all conditions using the Match All toggle. Each condition can be based on one of the following:
- Products: Apply the rule to specific products.
- Categories: Apply the rule to specific product categories.
- Tags: Apply the rule to products with specific tags.
- Brands: Apply the rule to products belonging to specific brands.
- User Roles: Apply the rule to customers with specific user roles.
- Specific Users: Apply the rule to individually selected customers.
