Documentation
This page walks through everything the plugin does: connecting an AI provider through WordPress’s own built-in AI Client, generating and applying content for a single product, bulk-filling a whole catalog, and troubleshooting when something goes wrong.
On this page
- Getting API keys
- Connecting an AI provider
- Choosing providers in this plugin
- Other settings
- Single product generation
- Bulk-filling many products
- Usage statistics
- AI content disclosure
- Troubleshooting
Getting API keys
↑ Back to topYou only need a key from the provider(s) you actually plan to use — one for text (descriptions and category/tag suggestions), one for images, or the same provider for both. Each is a separate account with that company, billed by them directly; this plugin never sees, stores, or transmits that key at all — it’s entered into a separate “Connector” plugin instead (see below), not into this plugin.
OpenAI
↑ Back to topCreate a key at platform.openai.com/api-keys (requires a funded/billed OpenAI account). Supports both text and image generation.
Google Gemini
↑ Back to topCreate a key at aistudio.google.com/apikey (Google AI Studio). Supports both text and image generation.
Anthropic Claude
↑ Back to topCreate a key at platform.anthropic.com. Text only — Anthropic has no image generation API, so it never appears as an Image provider option.
Connecting an AI provider
↑ Back to topThis plugin generates content through WordPress’s own built-in AI Client (requires WordPress 7.0 or newer) rather than storing an API key itself. That means the actual provider connection — OpenAI, Google Gemini, Anthropic Claude, or any other AI Client-compatible provider — is set up once, site-wide, and can then be reused by any plugin that supports it, not just this one.
- Install a “Connector” plugin for the AI provider you want to use (e.g. an OpenAI, Google, or Anthropic connector) and activate it, same as any other plugin.
- Go to Settings > Connectors and enter that provider’s API key there. This screen belongs to WordPress core, not this plugin — the key is stored and managed entirely by the Connector plugin.
- Repeat for a second provider if you want to use different providers for text vs. image generation.
This plugin never sees, stores, or transmits that API key — the Connector plugin makes the actual request to the provider entirely on its own.
Choosing providers in this plugin
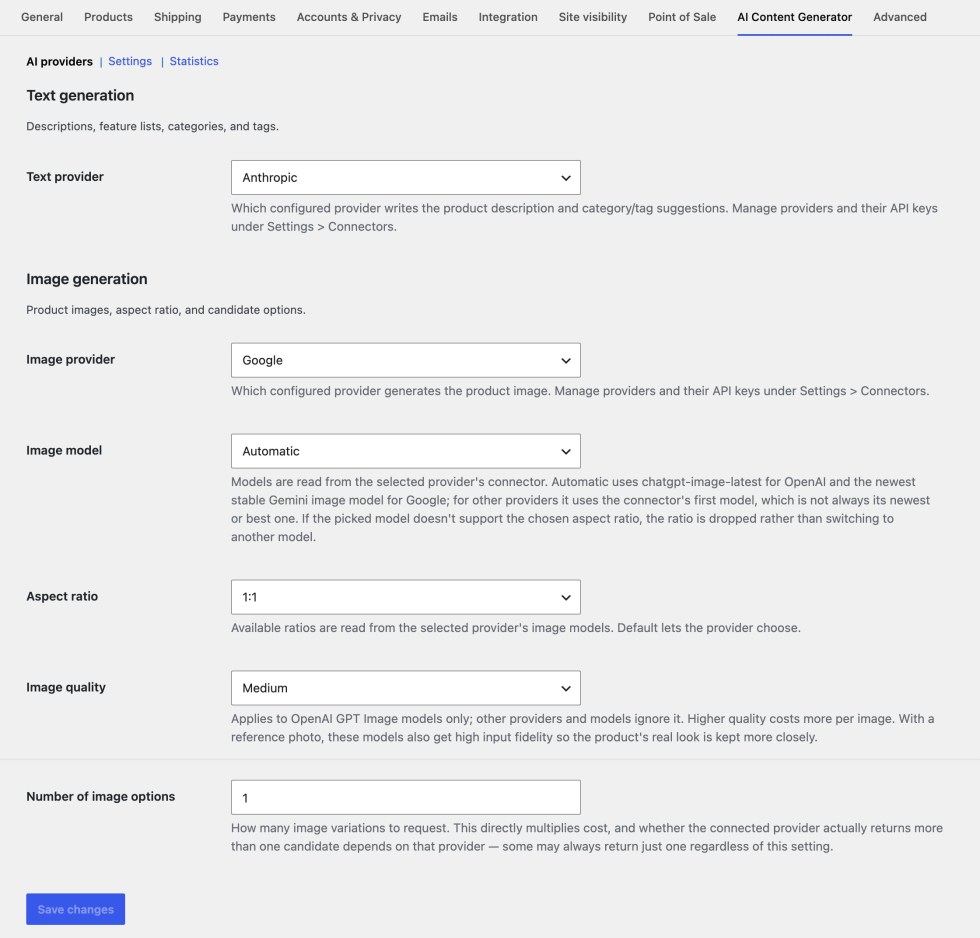
↑ Back to topOnce at least one provider is connected (see above), go to WooCommerce > Settings > AI Content Generator. The links at the top of the page switch between its three sections: AI providers, Settings and Statistics. Each section has its own Save changes button.
The AI providers section lists whichever connected providers actually support text or image generation, in two separate dropdowns.
Text generation (description + category/tag suggestions)
↑ Back to top- Pick a Text provider from the dropdown. If it’s empty, no connected provider currently offers text generation — go back and connect one first.
- Click Save changes at the bottom of the page.
Which text model that provider uses is decided by the Connector plugin (or WordPress itself), not set in this plugin.
Image generation
↑ Back to topOnly needed if you plan to generate product photos. Skip this section entirely if you only want descriptions and/or category suggestions. If no connected provider supports image generation, every image option on the product edit screen is hidden and bulk-fill fills in descriptions only.
- Pick an Image provider from the dropdown, same as for text.
- Optionally pick an Image model. The list comes from the selected provider’s Connector plugin. Automatic uses
chatgpt-image-latestfor OpenAI, the newest stable Gemini image model for Google, and the Connector’s first model for other providers. - Optionally set an Aspect ratio (e.g.
1:1,16:9). The list shows the ratios the selected model supports. New installs default to1:1; Default lets the provider choose. - Optionally set Image quality (Default, Low, Medium or High). This only applies to OpenAI GPT Image models; other providers ignore it. Higher quality costs more per image. New installs default to Medium.
- Optionally set Number of image options (1–8) — how many variations to request per click, so you can pick the best one. This directly multiplies API cost, and whether the connected provider actually returns more than one candidate depends on that provider.
Other settings
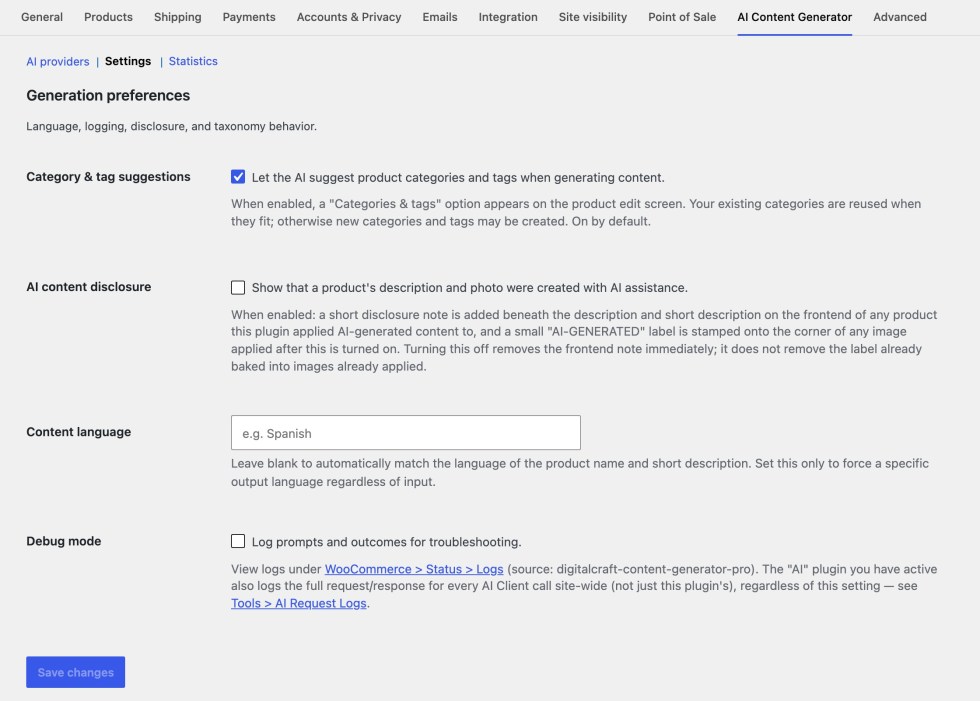
↑ Back to topIn the Settings section of the same page:
- Category & tag suggestions — on by default for new installs. Shows a “Categories & tags” option on the product edit screen, and has bulk-fill suggest and apply categories/tags for every product it generates content for. Your existing categories are reused when they fit; otherwise new categories and tags may be created.
- AI content disclosure — see the dedicated section below.
- Content language — leave blank to write in the same language as the product’s existing description (or the product name, if there is no description yet). Set it (e.g. “Spanish”) to always write in that language.
- Debug mode — logs prompts and outcomes to WooCommerce > Status > Logs. Turn this on when troubleshooting a failed or odd-looking generation.
Generating content for one product
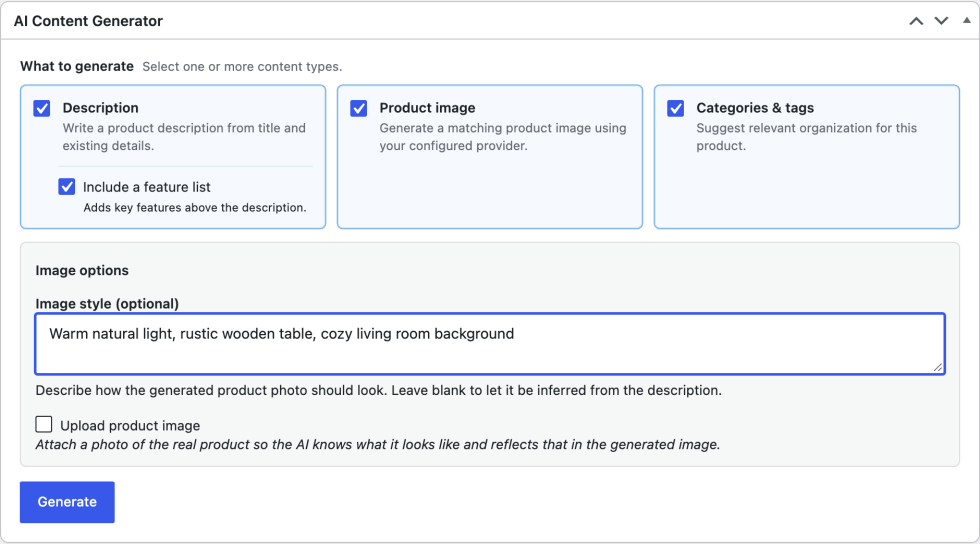
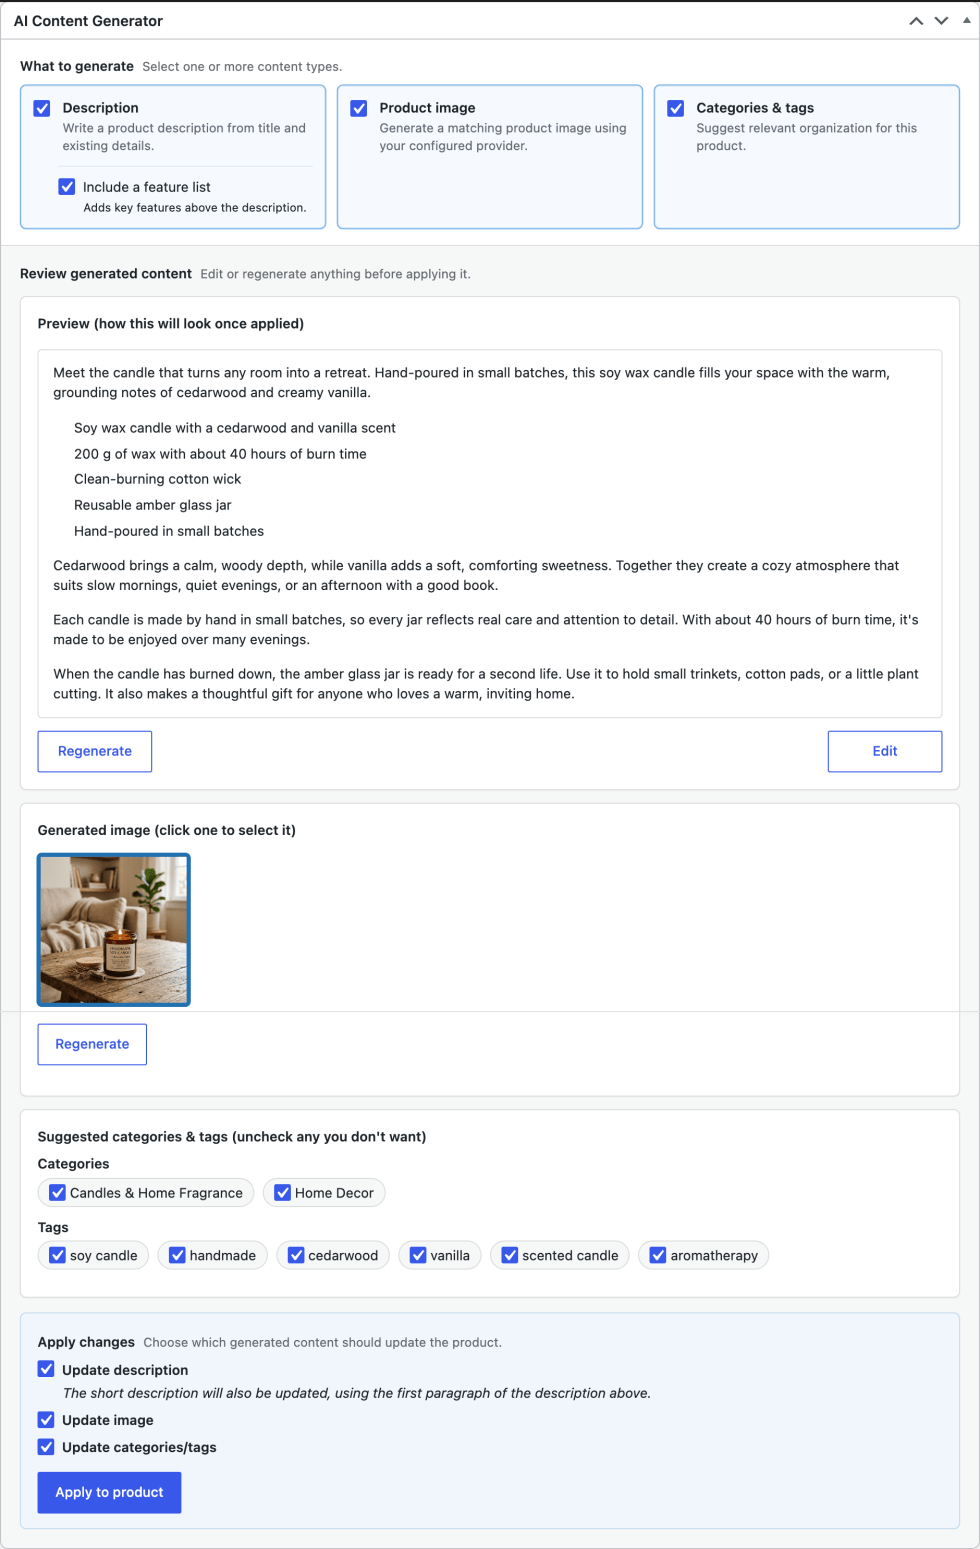
↑ Back to topOpen any product (new or existing) and find the AI Content Generator box below the product description editor.
Step 1 — choose what to generate
↑ Back to top- Description — always uses the product’s current “Description” field content as source material (even if not saved yet), or just the product name if the description is empty.
- Include a feature list (under Description) — adds a short bullet list of 3-5 key features or selling points after an opening paragraph, using only facts already given.
- Product image — reveals the Image options. In Image style (optional), describe how the photo should look (e.g. “white background, top-down flat lay, natural lighting”). Leave it blank and the photo defaults to a staged, luxury/upscale setting.
- Upload product image (in Image options) — opens WordPress’s media library so you can pick a real photo of the product as a visual reference.
- Categories & tags — shown while Category & tag suggestions is on in Settings (the default). Suggests a few relevant categories (reusing an existing one when it fits, or proposing a new one) and several tags.
Then click Generate.
Step 2 — review the results
↑ Back to top- The generated description appears as a preview of how it will look once applied. Click Edit to change the HTML directly, or Regenerate for a new version. Any existing technical or regulatory information (INCI names, CAS numbers, compliance limits, allergen percentages, storage instructions) is reproduced exactly, in its own clearly separated section — never paraphrased or dropped.
- If you generated a description without an image, you’re offered a one-click option afterward to also generate a matching image from it.
- Generated images appear as clickable thumbnails — click one to select it, or click Regenerate for a fresh batch of candidates.
- Suggested categories and tags appear as checkable “chip” pills, all checked by default — uncheck any you don’t want before applying.
Step 3 — apply
↑ Back to topCheck Update description, Update image, and/or Update categories/tags, then click Apply to product. Only the checked items are written to the product — generating something doesn’t commit it on its own. Applying the description also updates the product’s short description automatically, using the first paragraph. Applying an image sets it as the product image; the previous one stays in the media library.
Bulk-filling many products at once
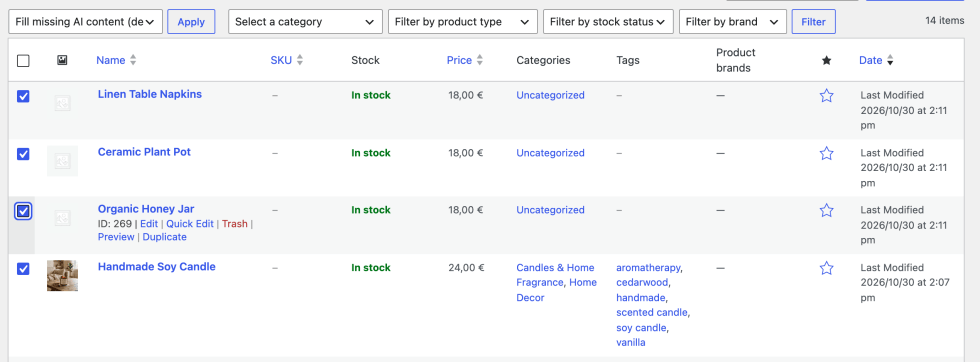
↑ Back to topFor catalogs with several products missing a description or photo, go to Products, select the ones you want (or all of them), choose “Fill missing AI content (description/image)” from the Bulk actions dropdown, and click Apply.
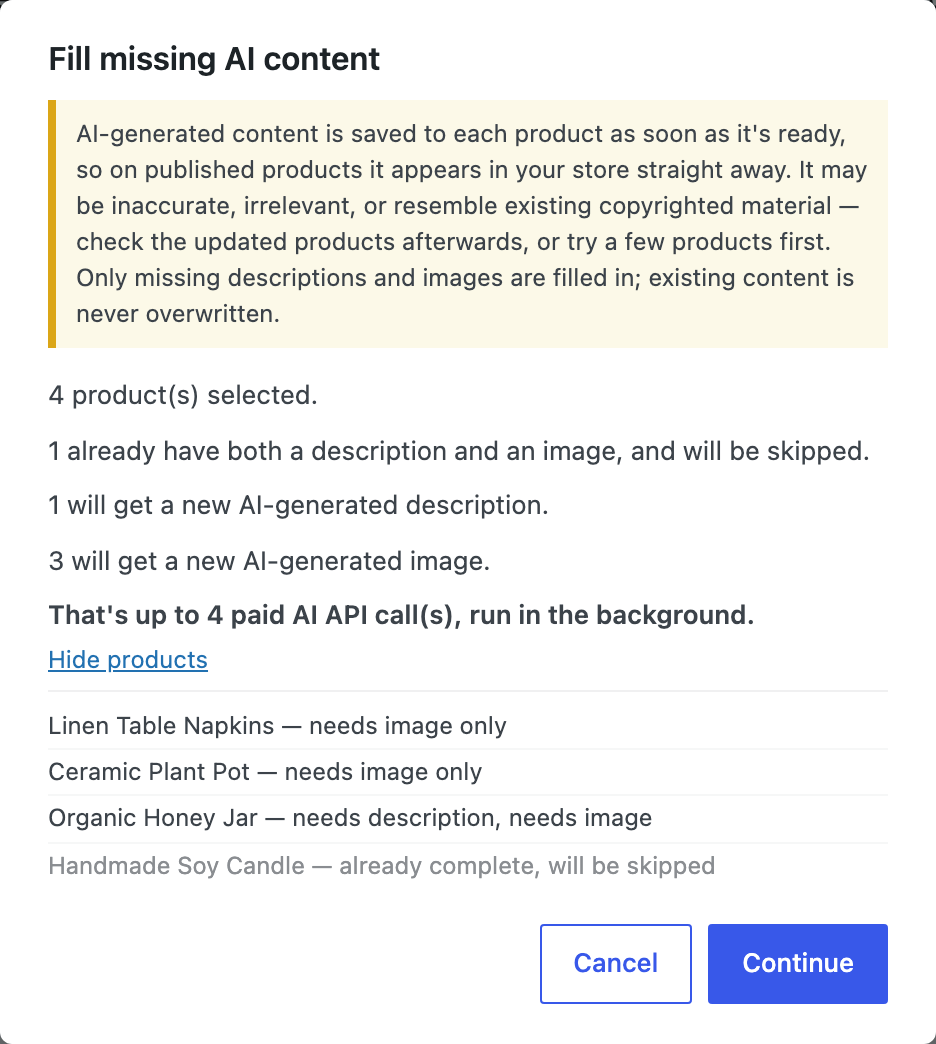
- A confirmation dialog first shows how many products already have both (skipped), how many need a description, how many need an image, and roughly how many paid AI calls that adds up to. Click “Show products” for the exact per-product breakdown, then Continue.
- Generated content is saved to each product as soon as it’s ready — there is no review step, unlike generating on a single product. On published products it appears in your store straight away, so check the updated products afterwards, or try a few products first.
- Only genuinely missing content is filled in — existing hand-written content is never overwritten.
- Each product is queued and processed in the background, spaced 20 seconds apart to avoid rate limits — you don’t need to keep the browser tab open.
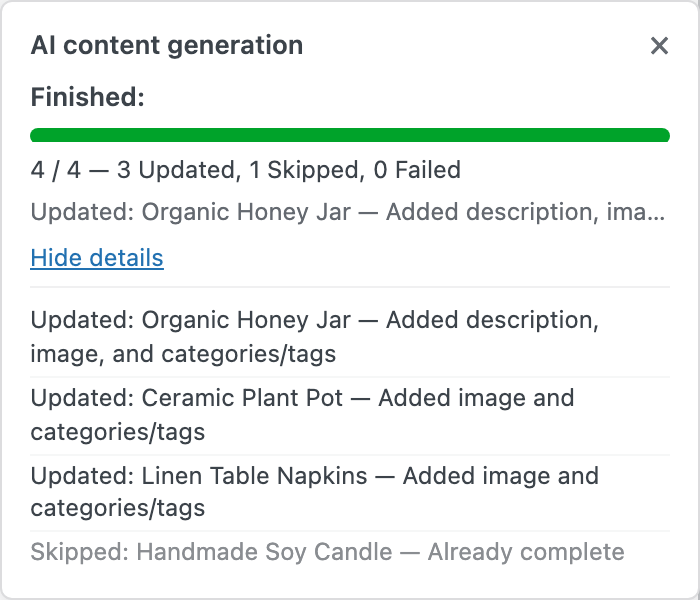
- A progress toast in the bottom-right corner shows a live count while the batch runs, and what was added to each product (e.g. “Added description and image”). It stays visible with the final summary once finished; click “View details” for the full list.
- “Cancel batch” stops anything not yet started; “Retry failed” re-queues just the products that failed.
- While Category & tag suggestions is on in Settings (the default), every product that gets a description and/or image in the batch also has categories/tags suggested and applied automatically.
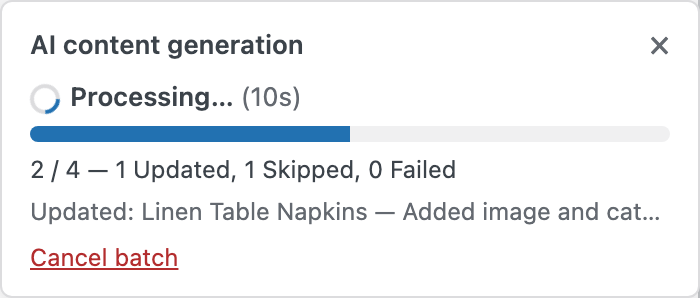
The result when product batch generation is completed:
Usage statistics
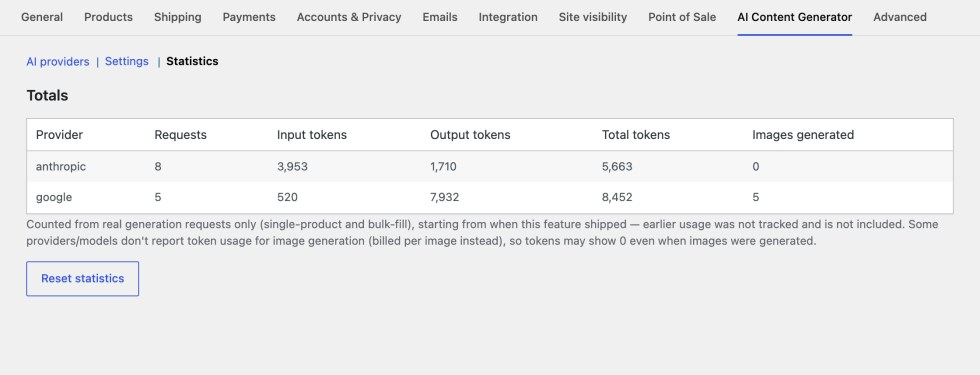
↑ Back to topThe Statistics section tracks real AI provider usage from every generation request (single-product and bulk-fill): request counts, input/output/total tokens, and images generated, in a table broken down by provider. Only counts from when this feature shipped onward. Some providers don’t report token usage for images (they bill per image instead), so tokens may show 0 even when images were generated. A “Reset statistics” button clears the log (with a confirmation, since it can’t be undone).
AI content disclosure
↑ Back to topTurn this on under Settings to show a short “created with the help of AI” note beneath the description and short description on the frontend of any product this plugin applied content to, and to stamp a small “AI-GENERATED” label into the corner of any image applied afterward. Turning it off removes the frontend note immediately; it does not remove the label already baked into images already applied.

Troubleshooting
↑ Back to top- “No text/image provider selected” — go to WooCommerce > Settings > AI Content Generator > AI providers and pick one. If the dropdown is empty, no connected provider currently supports that capability — connect one under Settings > Connectors first.
- A generation failure with any other message — that message comes directly from WordPress’s AI Client or the Connector plugin, not this plugin. Turn on Debug mode and check WooCommerce > Status > Logs (source:
digitalcraft-content-generator-pro) for the prompt that was sent, then check the Connector plugin’s own settings/API key. If you have the official “AI” plugin active, Tools > AI Request Logs shows the full request/response for every AI Client call site-wide, which is usually more useful than this plugin’s own log. - OpenAI says a model “does not exist” (e.g.
gpt-image-1) — your OpenAI account doesn’t have access to that model. Pick another one under AI providers > Image model, or set it to Automatic. - No image options on the product edit screen — no connected provider currently supports image generation. Connect one under Settings > Connectors (e.g. OpenAI or Google), then pick it as the Image provider.
- Generation is slow or times out — image generation can take a while, especially when requesting more than one option. Try lowering “Number of image options” or “Image quality”, or simply try again.
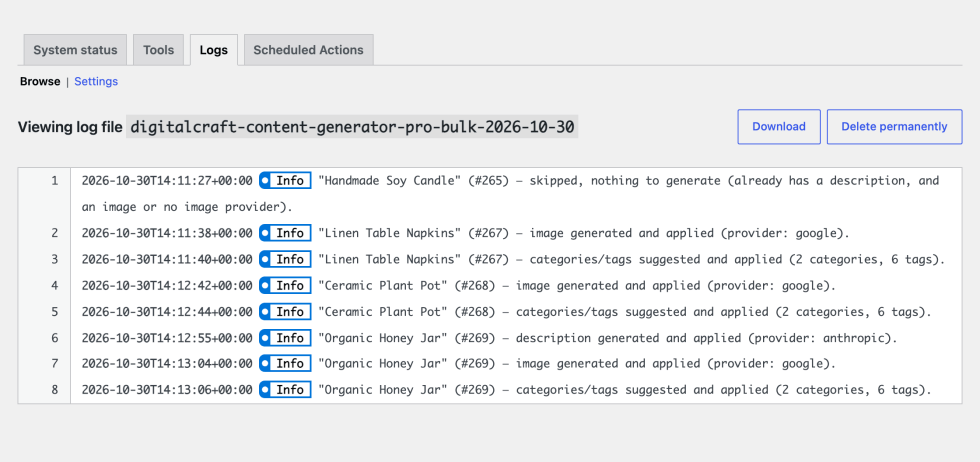
- Bulk-fill results — check WooCommerce > Status > Logs (source:
digitalcraft-content-generator-pro-bulk) for what happened to each product in a batch, including any that failed. - Settings not saving — the Settings page requires the “manage_woocommerce” capability (Shop Manager or Administrator). A user without it can’t see or save this page.