
This page explains how to credit or debit many wallets in one operation: by ticking wallets in a list, by describing an audience with conditions, or by uploading a CSV file of customers and amounts. It is for store owners and shop managers who run promotions, goodwill credits, or corrections at scale.
Three ways to pick who
↑ Back to top| Way | How you pick customers | Good for |
|---|---|---|
| Selected wallets | Tick wallets on the Wallets list and choose Credit selected… or Debit selected…. | A handful of customers you can see on one page. |
| Audience | Describe customers with conditions such as role, registration date, order history, or wallet balance. | “Everyone who” operations, for any number of customers. |
| CSV import | Upload a file of customers, optionally with an amount per customer. | A list prepared elsewhere, or different amounts per customer. |
All three share the same rules: every operation needs an amount and a reason, runs in the background, touches each customer at most once, and appears in the Operation history.
Open Bulk operations
↑ Back to topBulk operations is a screen under the Wallets tab. Open it either way:
- Go to WooCommerce > Elite Balance > Wallets and click the Bulk operations button beside the heading.
- On the Overview tab, click Bulk credit or debit under Quick actions.
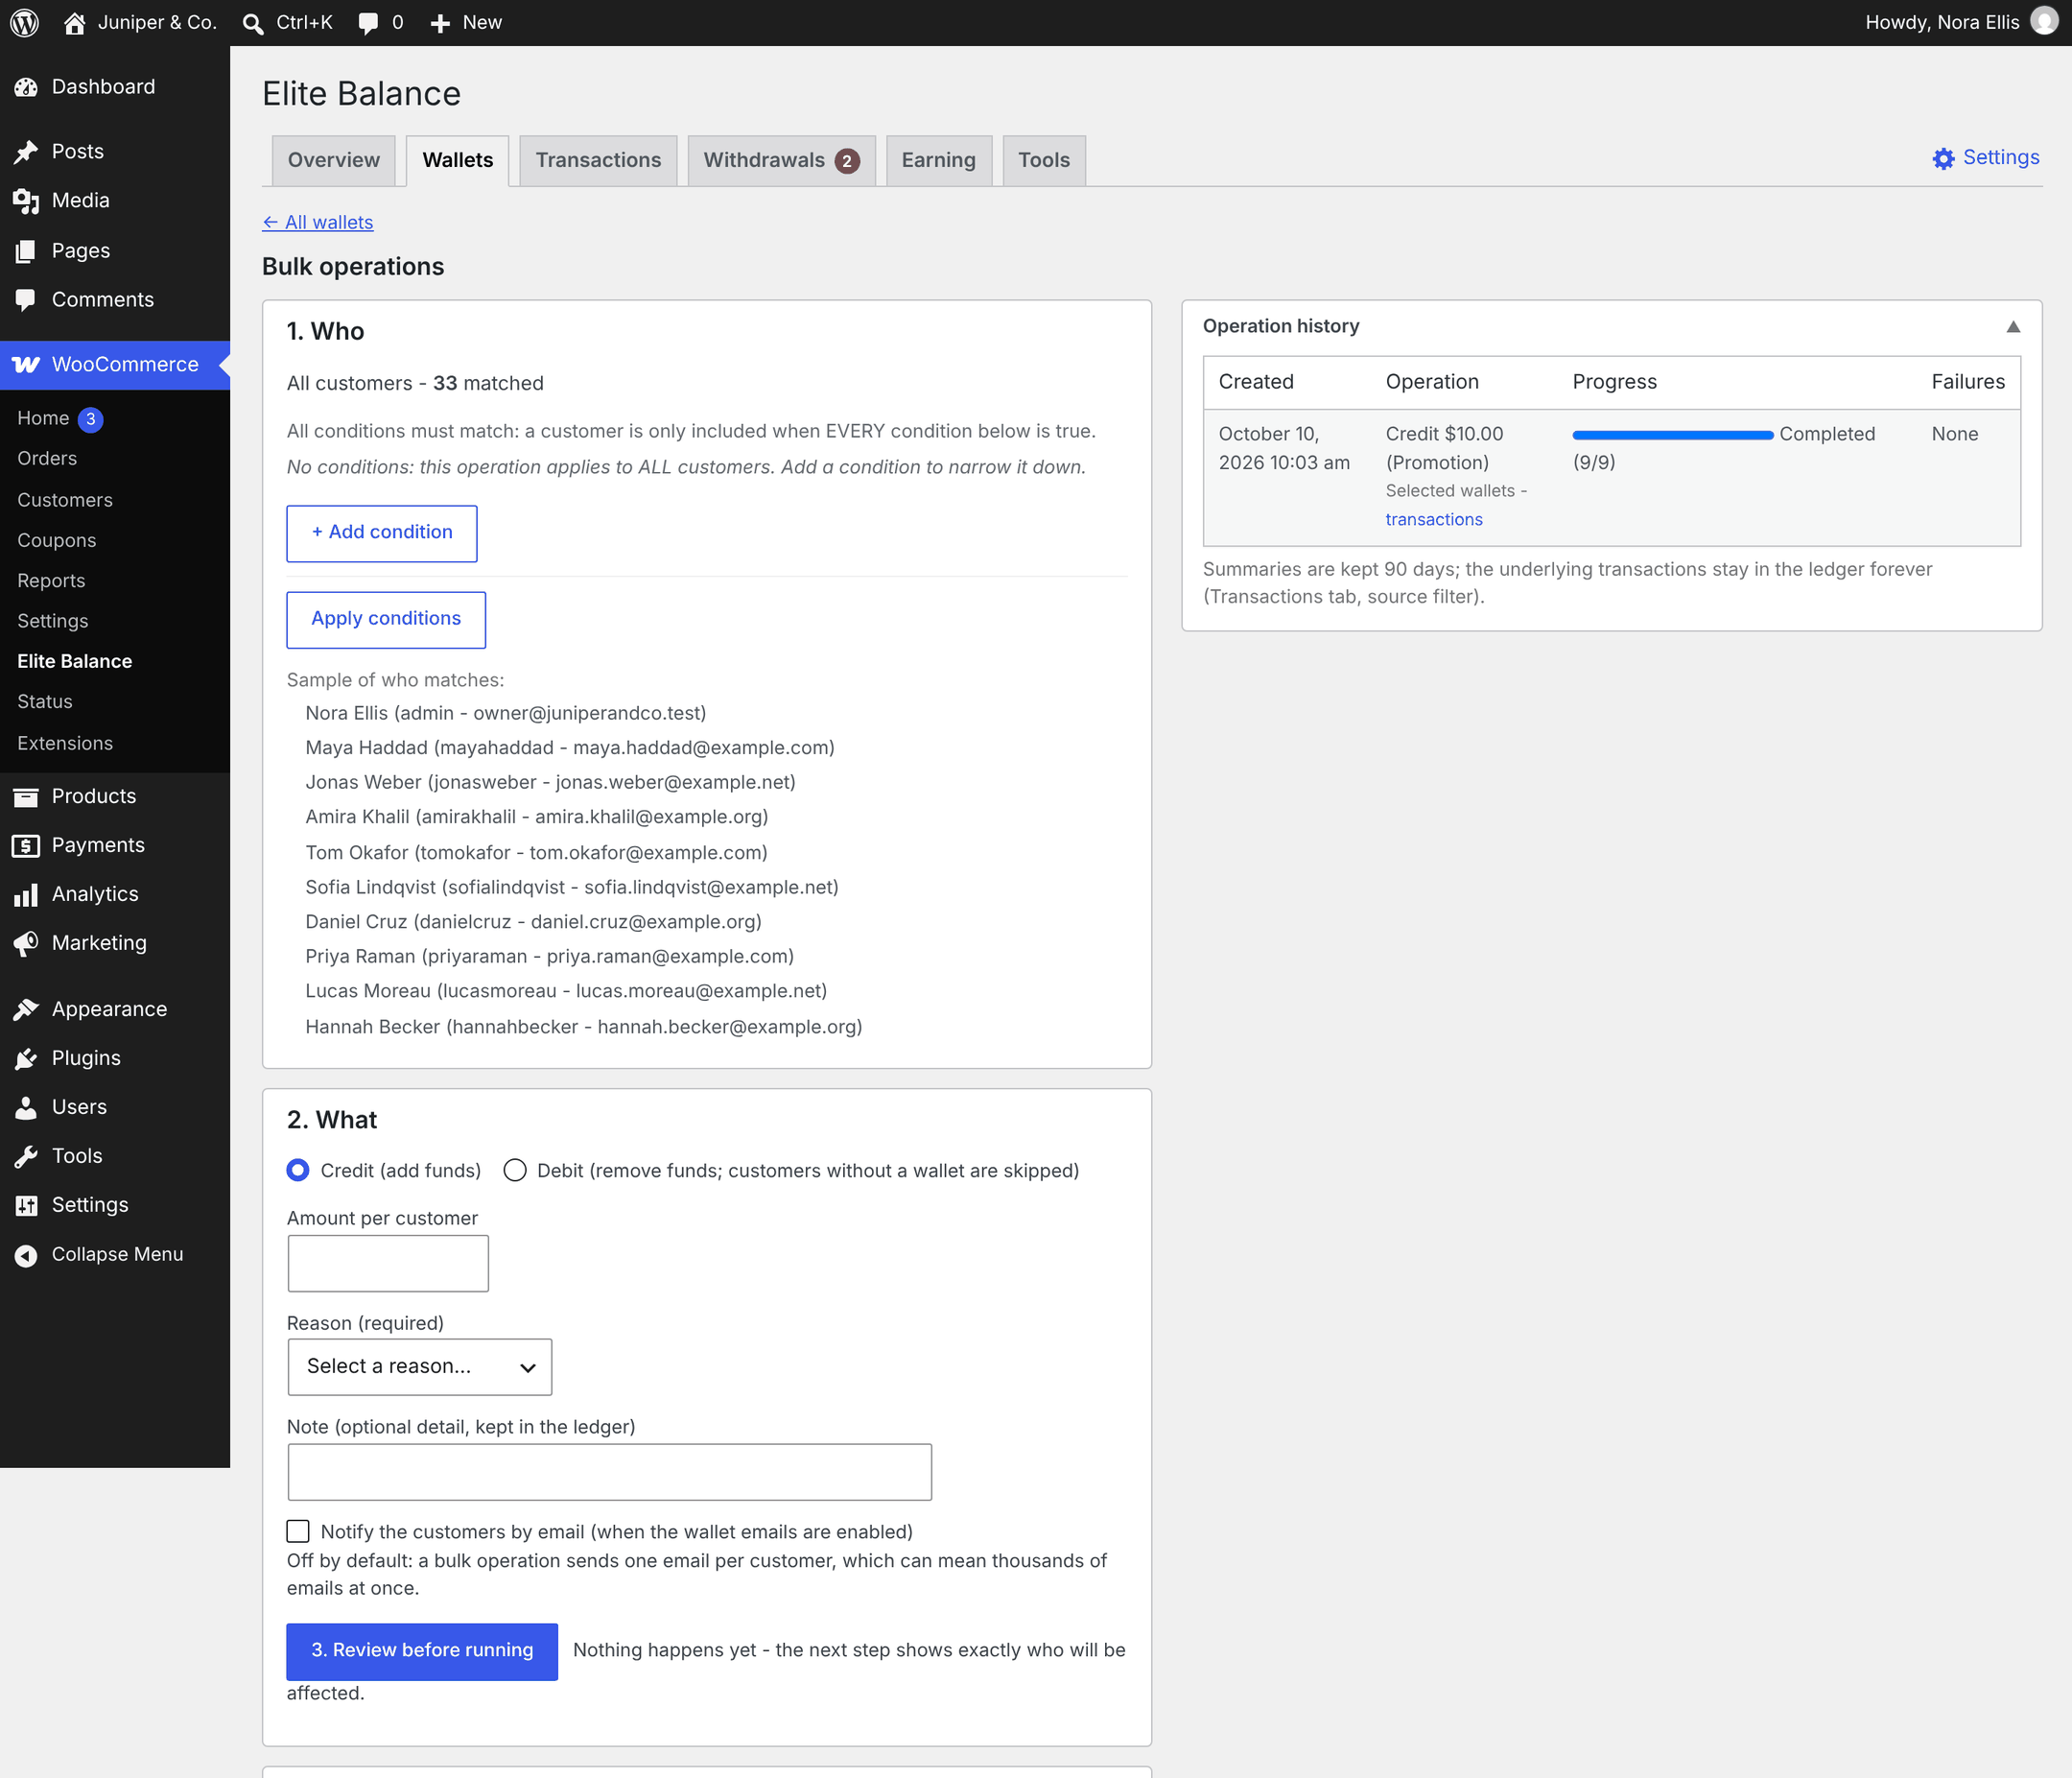
The screen shows the audience builder and the Import from CSV card on the left and the Operation history on the right. All wallets at the top takes you back to the Wallets list.
Build an audience
↑ Back to topStep 1. Who describes the customers. With no conditions, the audience is every user account on the site, shown as “All customers”.
Important: “All customers” really means every account, including administrators and shop managers. To limit an operation to shoppers, add the condition Role is Customer.
Click + Add condition and pick a condition from the menu. You can add up to 10 conditions. A customer is included only when every condition is true (there is no “or”).
| Condition | Options | Matches |
|---|---|---|
| Registered in the last … days | A number of days (1 to 3650) | Accounts created within that many days. |
| Not active for … days or more | A number of days (1 to 3650) | Customers whose last activity, as recorded by WooCommerce, is at least that old. Accounts with no recorded activity count from their registration date, so a new account is never inactive. |
| Order history | has placed at least one order or has never placed an order | Any order of any status counts, except trashed and draft orders. |
| Wallet balance | has no wallet, is empty (zero or no wallet), is below an amount, or is at least an amount | Compares the stored balance; money reserved by holds is not subtracted. A customer without a wallet counts as 0. |
| Role is | Any role on your site | Accounts that have that role. |
Click Apply conditions to refresh the sentence (for example “Customers with the role Customer”), the number matched, and a Sample of who matches (up to 10 customers). When you change a condition, the screen reminds you to press Apply.
Note: To keep the screen fast, the live count stops at 10,000 and shows “10,000+”. Only the preview is capped, not the operation. The exact total is counted when the operation starts and shows in the Operation history.
Choose what happens
↑ Back to topStep 2. What sets the operation:
| Field | Default | What it does |
|---|---|---|
| Credit (add funds) or Debit (remove funds; customers without a wallet are skipped) | Credit | The direction of the operation. |
| Amount per customer | Empty (required) | The amount added to or removed from each matched customer. |
| Reason (required) | None selected | One of your adjustment reasons, or Other (type your own). It is stored with every transaction. |
| Note (optional detail, kept in the ledger) | Empty | Extra detail stored with the reason. |
| Notify the customers by email (when the wallet emails are enabled) | Off | Sends each customer the Wallet credited or Wallet debited email. Off by default because one operation can mean thousands of emails. |
Adjustment reasons are set at WooCommerce > Settings > Elite Balance > General under Adjustment reasons.
Review and run
↑ Back to top- Click 3. Review before running. Nothing changes yet.
- Read the review page. It restates the audience in plain words, for example “Customers with the role Customer. $10.00 will be added to the wallet of each of the 120 matched customers.”, shows a sample of the audience, and says whether emails will be sent.
- Click Credit N customers or Debit N customers to start, or Cancel (or Back (nothing has been changed)) to change something.
- For a debit, your browser asks you to type the exact per-customer amount. If it does not match, nothing runs.
What an operation does
↑ Back to top- Credits create a wallet for any matched customer who does not have one yet.
- Debits skip customers without a wallet (shown as “skipped: no wallet” in the progress). A debit larger than a customer’s available balance, or on a locked wallet, fails for that customer only and is listed under Failures. Nobody is partially charged, and the rest of the operation continues.
- Each customer at most once. If the form is submitted twice, the second submission is ignored (“This bulk operation was already submitted; it was not run again.”). If a background step is retried after an error, customers already processed are not charged or credited again.
- Who is included: the audience covers accounts that exist when you start. Accounts created afterwards are not included. Conditions are checked again as each batch runs, so a customer whose situation changes during a long run may be included or left out accordingly.
- What customers see: each transaction appears on their wallet page as “Balance adjustment”. Your reason and note stay internal.
Running in the background
↑ Back to topOperations run in small batches through Action Scheduler, the background queue built into WooCommerce: 25 wallets per batch for selected wallets and CSV imports, 100 customers per batch for audiences. You see “The bulk operation is running in the background. Its live progress shows under Operation history.” and can leave the page; the work continues without it.
- Progress updates live in the Operation history and, while something is running, in a Running now box on the Overview. You do not need to reload.
- Background tasks need WordPress cron or site traffic to run. If an operation does not move, check WooCommerce > Status > Scheduled Actions for pending actions in the
elite-balancegroup. - On a site where Action Scheduler is not available, the operation runs immediately in the same request and you see “The bulk operation finished. See Operation history for the result.”
Operation history
↑ Back to topThe Operation history on the Bulk operations screen lists every operation, newest first, 20 per page:
| Column | What it shows |
|---|---|
| Created | When the operation was started. |
| Operation | Credit or Debit, the amount (or “per-row amounts” for a CSV import), the reason, what it applied to (“Selected wallets”, the audience sentence, or “CSV import: file name”), and a transactions link. |
| Progress | A progress bar with “Running (x/y)” or “Completed (x/y)”, plus how many customers were skipped for having no wallet. |
| Failures | “None”, or the number that failed with the first few listed by wallet or user ID and the reason, each linking to the customer’s wallet. |
The transactions link opens the Transactions list showing exactly the rows that operation created. Summaries in the history are kept for 90 days. The transactions themselves stay in the ledger permanently; find them any time with Transactions > All sources > Bulk operations.
Credit or debit selected wallets
↑ Back to top- Go to WooCommerce > Elite Balance > Wallets. Use the views and search to find the customers.
- Tick their wallets. Selection works on the current page; increase the rows per page in Screen Options (up to 200) to see more at once.
- Choose Credit selected… or Debit selected… in Bulk actions and click Apply.
- On the confirmation screen, check the list of customers and their current balances. Enter the Amount to add to EACH wallet (or Amount to remove from EACH wallet), the Reason (required), an optional note, and whether to notify customers.
- Click Credit all selected wallets or Debit all selected wallets. A debit asks you to type the per-wallet amount again.
Back to all wallets (nothing has been changed) leaves without doing anything. One operation takes up to 500 wallets.
CSV import
↑ Back to topUse the Import from CSV card on the Bulk operations screen when you already have a list of customers, or when each customer needs a different amount.
File format
↑ Back to top- Header row: required.
- Customer column: named
customer,email, oruser(any capitalization). If the file has more than one,customeris used first, thenemail, thenuser. - Amount column: optional, named
amount. Rows with an empty amount use the default amount you enter on the review step. - Other columns: ignored, so you can upload an export with extra columns.
- Separator: commas. Files that use semicolons (common from spreadsheet apps in some countries) are detected from the header row.
- Encoding: UTF-8. A byte order mark at the start of the file is handled.
Each customer value is recognized on its own:
| Value | Read as | Example |
|---|---|---|
| Contains @ | Email address | jane@example.com |
| Only digits | User ID | 1024 |
| Anything else | Username | some_username |
Emails and usernames match regardless of capitalization. Amounts must be a positive number with a dot as the decimal separator and at most four decimals, such as 25 or 10.50. Do not include currency symbols or thousands separators.
Tip: A username made only of digits is read as a user ID. For those customers, use their email address instead.
Click Download a sample file on the card to get this example:
customer,amount
jane@example.com,25.00
some_username,
1024,10.50
Upload and review
↑ Back to top- In Import from CSV, choose the CSV file and click Upload and review.
- Read the review. It shows how many customers matched (“N customers matched.”), how many rows carry their own amount and their total, how many will use the default amount, a sample of up to 10 matched customers with their amounts, and any skipped rows.
- Choose Credit (add funds; customers without a wallet get one automatically) or Debit (remove funds; customers without a wallet are skipped).
- If some rows have no amount, enter the Default amount (for rows without their own amount). The field only appears when it is needed.
- Pick a Reason (required), add an optional note, and decide whether to notify the customers by email (off by default).
- Click Run the import for N customers. For a debit, your browser asks you to type the number of customers that will be debited. To stop instead, click Cancel and discard the upload.
Rows with problems are skipped and are not part of the operation. The review lists them with their line number (the header is line 1), the value, and the problem. Up to 100 are listed; the count is always exact.
| Problem shown | Cause |
|---|---|
| No customer value | The customer cell is empty. |
| No matching customer account | No account has that email, username, or ID. |
| Duplicate: this customer already has a row above | The same customer appears twice; only the first row is used. |
| Invalid amount (positive number, up to four decimals) | The amount is zero, negative, or not a plain number. |
If no row matched, there is nothing to run: fix the file and upload it again.
Limits and upload errors
↑ Back to top| Limit | Value | Notes |
|---|---|---|
| File size | 1 MB | Larger files show “The file is too large for the CSV import.” |
| Rows per file | 10,000 | Data rows, including rows with problems. Blank lines are not counted. Larger files show “The file has too many rows for one import. Split it and upload the parts separately.” |
| File type | .csv or .txt | Other files show “That file could not be read as a CSV. Upload a .csv file with a header row.” |
| Time to confirm | 1 hour | An upload you do not run or cancel is discarded after an hour (“This upload is no longer available. Upload the file again.”). |
A file without a usable customer column shows “No customer column was found. The header row needs a column named customer, email, or user.” An empty file shows “The file has no data rows.”
Note: The uploaded file is read during the upload and is not saved to your media library or uploads folder. Only the parsed result (matched user IDs, amounts, and the skipped rows) is kept in the database until you run or cancel the import, or for one hour.
Emails
↑ Back to topWhen Notify the customers by email is ticked, each customer receives the Wallet credited or Wallet debited email, as long as that email is enabled under WooCommerce > Settings > Emails. When it is unticked, no wallet email is sent for the operation, including the low balance email. See Wallet Emails.
For developers
↑ Back to toprb_elite_balance_audience_conditions: add or change audience conditions.rb_elite_balance_import_max_bytes(default 1 MB) andrb_elite_balance_import_max_rows(default 10,000): CSV import limits.rb_elite_balance_import_pending_ttl: seconds an unconfirmed upload is kept (default 3600).rb_elite_balance_batch_retention_days: days operation summaries are kept (default 90).
To credit or debit a single customer from the command line, see WP-CLI Commands.