
Welcome to the documentation for the Helcim for WooCommerce (v5) extension. Here, you’ll find everything you need to know about setting up, configuring, and managing secure credit card payments on your WooCommerce site via Helcim.
This guide covers essentials from initial account linking, customizing your checkout look, to processing refunds directly within your dashboard—ensuring you have all the tools and information at your fingertips for a seamless online selling experience.
What is Helcim for WooCommerce?
↑ Back to topThe Helcim Commerce for WooCommerce extension is designed to bridge the gap between your WooCommerce storefront and Helcim’s powerful, transparent payment engine. Version 5.0.0 is utilizing HelcimPay.js to deliver a standardized, ultra-secure, and highly reliable checkout flow.
Secure payments & reduced PCI scope
↑ Back to top- Hosted Payment Layer: The extension processes payments using HelcimPay.js—a secure, hosted checkout modal that overlays on your site.
- Drastic PCI Scope Reduction: Because sensitive credit card numbers are entered into an off-site hosted layer, payment details never touch or store on your WordPress server. This drastically minimizes your PCI compliance paperwork and security overhead.
- Fraud Mitigation: Built-in safeguards improve transaction reliability, prevent accidental duplicate charges, and ensure accurate checkout data mapping.
Transparent pricing advantages
↑ Back to top- Interchange-Plus Model: Say goodbye to expensive flat-rate markups. Payments run on Helcim’s transparent interchange-plus model, meaning you pay the true cost from the card networks plus one clear margin.
- Automatic Volume Discounts: There are $0 monthly fees, and your processing margin drops automatically as your monthly sales volume grows—allowing you to keep more of your hard-earned revenue.
Flexibly branded checkout options
↑ Back to top- Tailored to Your Brand: Match your store’s aesthetics instead of relying on rigid, cookie-cutter forms. Easily customize the checkout modal layout with your logo, brand colors, and clear descriptions.
- Modern Wallet Support: Meet buyers exactly where they are with built-in, native support for Google Pay.
- Saved Cards for Returning Customers: Give shoppers a frictionless repeat checkout experience by letting them securely tokenize and save their card details for future purchases.
Requirements
↑ Back to topTo successfully deploy this extension, your store environment must meet the following criteria:
- WordPress Version: 6.6+
- WooCommerce Version: 10.5+
- PHP Version: 7.4+
- Security: A valid SSL certificate (HTTPS) configured and active on your store.
- Location & Currency: A business physically based in the United States or Canada, processing transactions in USD or CAD.
- Helcim Account: A free Helcim account (no setup paperwork, no monthly fees).
Setup and configuration
↑ Back to topThe Helcim for WooCommerce plugin allows you to seamlessly integrate Helcim’s payment processing capabilities into your online store. Follow this step-by-step guide to get up and running.
Step 1: Get a Helcim account
↑ Back to topFirst, create your free Helcim account.
Step 2: Generate and configure your API access
↑ Back to topOnce you have an approved Helcim account, you’ll need to create a special code that allows the Helcim plugin to securely connect to your Helcim account. This code is called an API access token.
Here’s how to create it:
- Log in to your Helcim account.
- Click on All Tools and select Integrations from the menu.
- Click on API Access Configurations > New API Access from the main page.
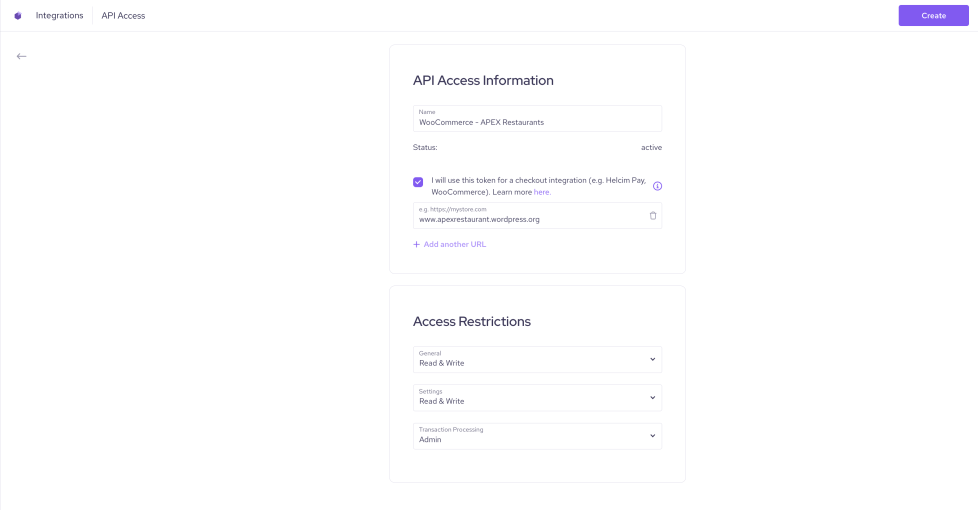
- Check the box for “I will use this token for a checkout integration (e.g. Helcim Pay, WooCommerce)” and add your store’s URL.
- Create an API Access Configuration using the following settings:
- Name: WooCommerce
- Access Restrictions:
- General: Read & Write
- Settings: Read & Write
- Transaction Processing: Admin
- Click Create to save your new configuration.
This will create a unique API Access token that you will copy and paste into your WooCommerce settings later in the configuration process.
Step 3: Install your plugin
Now that you’ve set up your Helcim account, you can connect it to your WooCommerce plugin.
To do this, first you have to install the plug-in. You can do it in three ways:
- WordPress plugin marketplace: The easiest way to install the plugin is to search for “Helcim for WooCommerce“ in the WordPress plugin repository (Plugins > Add New) and install it directly from there.
- WooCommerce marketplace: You can also browse, select, and connect the plugin through the official WooCommerce Extension Marketplace or via the WooCommerce > Extensions tab right inside your WordPress dashboard.
- Direct download: Lastly, you can also download the plugin files. Then extract the .zip folder and upload it directly to your website’s /wp-content/plugins/ directory.
Step 4: Adjust your WooCommerce settings
↑ Back to topNow, link your WooCommerce or WordPress site to Helcim:
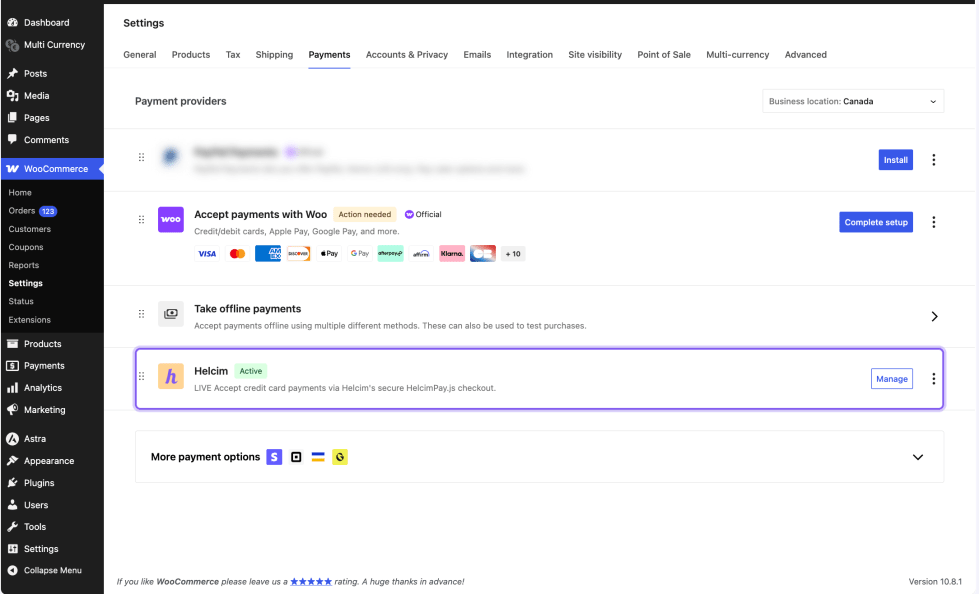
- In your WordPress dashboard, navigate to WooCommerce > Settings and click the Payments tab.
- Locate Helcim for WooCommerce and click Manage.
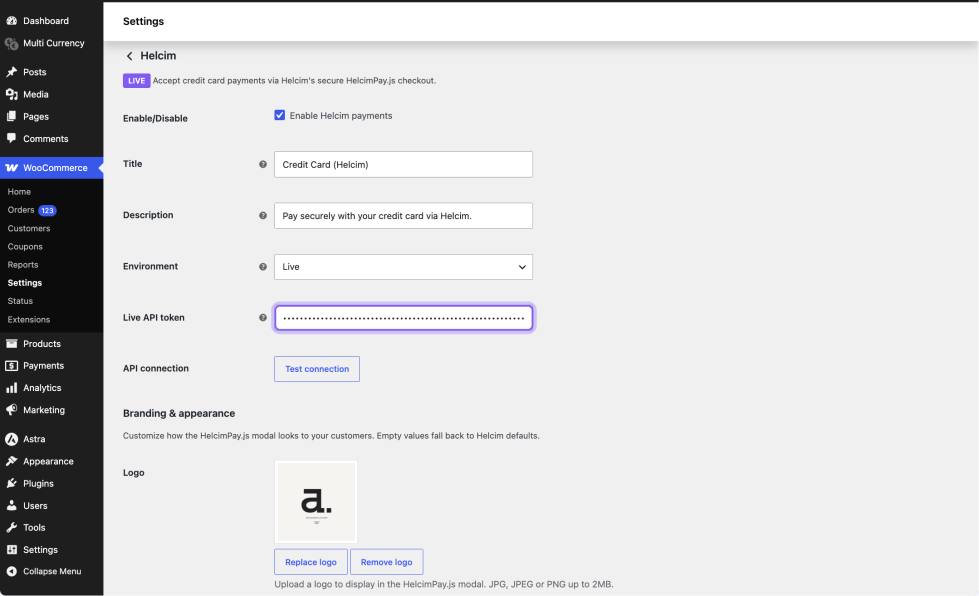
- Configure your preferences:
- Title/Description: Customize what your customers see at checkout.
- Environment: Select Sandbox for testing or Live for real transactions.
- Live API Token: Paste the unique token you generated in Step 1.
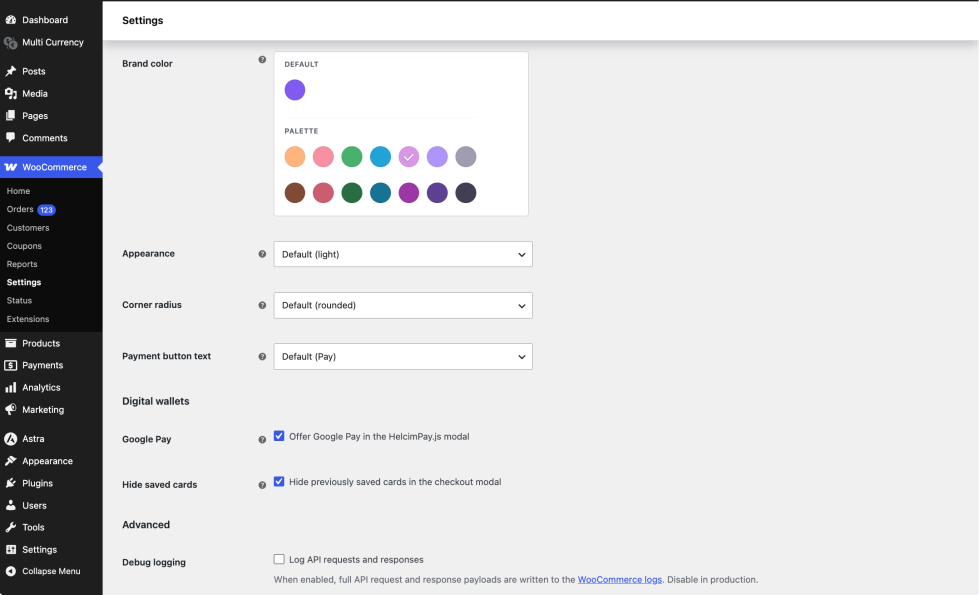
- Branding & Add-ons: Customize your checkout colors, add your company logo, enable Google Pay, or allow customers to securely save their card details.
- Click Save Changes
Usage
↑ Back to topUnderstanding how your buyers interact with your payment checkout ensures an optimized path to conversion.
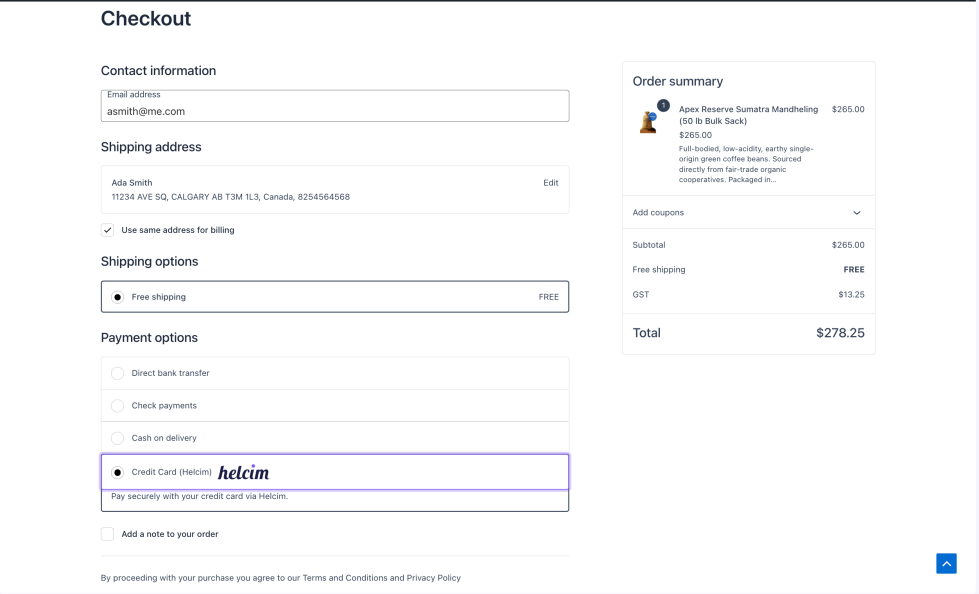
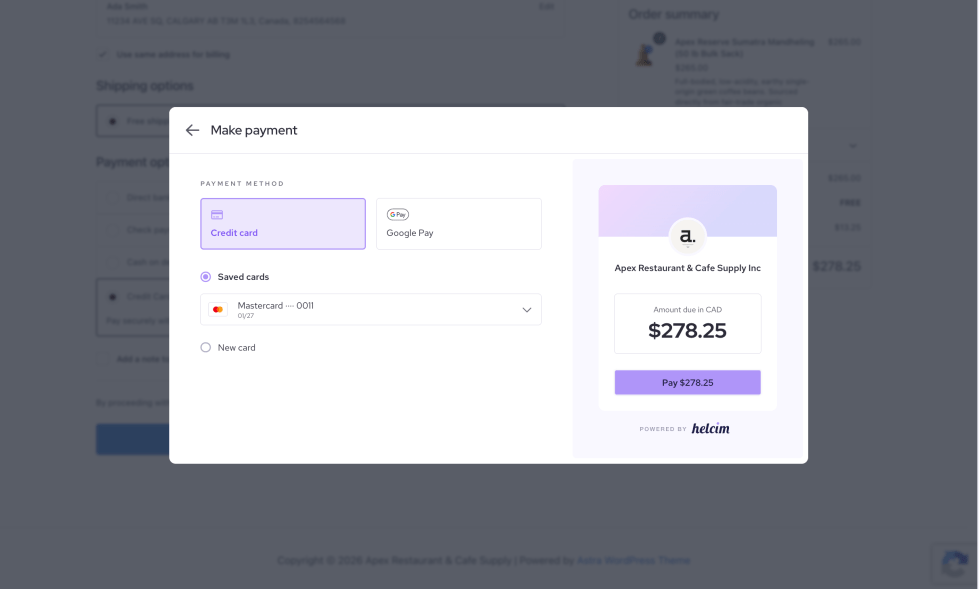
When a customer proceeds to checkout and selects Helcim as their payment method, the custom-branded HelcimPay.js modal smoothly overlays on their mobile or desktop screen.
- Paying with Cards: Customers input their card details securely. The interface provides real-time card validation feedback.
- Paying with Digital Wallets: If enabled, a dedicated Google Pay button will display within the interface, allowing customers to complete their purchases with biometric authentication or pre-saved wallet details.
- Using Tokenized Saved Cards: Logged-in, returning customers can check a box to securely save their card details. On future visits, they can select their saved tokenized card to bypass typing their 16-digit card number again.
Admin experience with Helcim for WooCommerce
↑ Back to topManaging day-to-day operations remains simple, centralized, and clean.
Handling orders
↑ Back to topWhile payments process securely across Helcim’s cloud infrastructure, your day-to-day order management lives natively within your WooCommerce dashboard.
How do I refund orders paid via Helcim?
↑ Back to topYou do not need to log out of WordPress to process returns. The plugin fully supports integrated refund management:
- Go to WooCommerce > Orders and select the order you wish to refund.
- Click the native Refund button.
- Enter the quantity or monetary value for a full or partial refund.
- Click Refund via Helcim. The plugin communicates directly with the API to return the funds to the customer’s card and updates the WooCommerce order ledger automatically.
Troubleshooting
↑ Back to topIf you experience an issue while testing or launching Helcim Commerce for WooCommerce (v5), use the resources below to get your checkout back on track.
Error: “Missing Cardholder Name / Address / Postal Code”
- Why it happens: This occurs if your WooCommerce checkout layout is customized to only require or display a shipping address. Helcim’s fraud and security protocols require standard billing address parameters to process payments safely.
- The fix: Ensure your WooCommerce checkout forms are set up to collect primary Billing Address information. Shippers can still use a checkbox to duplicate these details into the shipping fields.
Error: “INVALID RESPONSE – Missing or Invalid Fields – Account ID”
- Why it happens: The connection token or credentials specified in your WooCommerce settings do not completely align with the environment configuration inside your Helcim dashboard.
- The Fix: Go to WooCommerce › Settings › Payments › Helcim and verify your API token. Ensure you didn’t accidentally paste a Sandbox token into the Live token field, or vice versa.
Transactions aren’t processing (Stuck in test mode)
- Why it happens: A disconnect between your plugin deployment settings and your actual Helcim platform rules.
- The fix: Verify that the Environment switch inside your WordPress Helcim settings matches the active gateway state you want. If you are ready for real revenue, ensure this toggle is flipped to Live and that you are not testing with mock test card numbers.
Still need help?
↑ Back to topIf your issue isn’t covered by the quick fixes above, Helcim provides multiple self-service and human-to-human channels to resolve your technical roadblocks.
Self-service learn center
↑ Back to topFor in-depth tutorials, structural overviews, and comprehensive error-code documentation, visit the official Helcim Learning Center.
Contact dedicated support
↑ Back to topIf you need direct assistance from a human specialist to review your merchant connection, debug an integration anomaly, or ask about multi-currency routing setups, our support team is ready to jump in. Email us at: help@helcim.com
💡 Tip for faster resolution: When emailing support, please include your Helcim Account ID, your current WordPress/WooCommerce system version numbers, and a clear screenshot or copy-paste of the specific error message your system is throwing at checkout.

