
LoginKit seamlessly enhances the default WooCommerce login, registration, and lost password experience by replacing standard forms with conversion-focused popups and slide-in panels. With the built-in Style Builder, you can fully customize the look and feel of your forms with a live preview. LoginKit keeps users on their current page with seamless AJAX submissions, ensuring a fast and modern shopping experience that reduces cart abandonment, encourages customer authentication before checkout, and boosts customer engagement.
Installation
↑ Back to topTo start using a product from WooCommerce.com, you can use the “Add to store” functionality on the order confirmation page or the My subscriptions section in your account.
- Navigate to My subscriptions.
- Find the Add to store button next to the product you’re planning to install.
- Follow the instructions on the screen, and the product will be automatically added to your store.
Alternative options and more information at:
Managing WooCommerce.com subscriptions.

Setup and Configuration
↑ Back to topOption 1:

Once the plugin is activated, you will see a Settings link on the Plugins page (as shown in the image above). Click the link to quickly access the configuration panel.
Option 2:
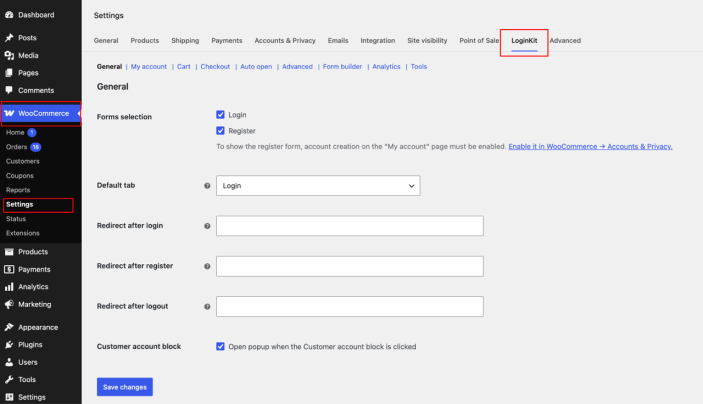
- Go to your WordPress Admin Sidebar.
- Navigate to WooCommerce → Settings → LoginKit (as shown in the image above).
- This will open the settings panel, where you can configure LoginKit options.
General Settings
↑ Back to top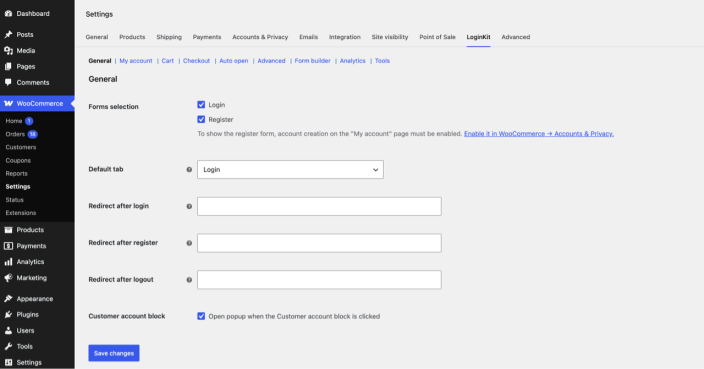
- Forms selection – Choose whether the panel shows the Login tab, the Register tab, or both.
Note: The Register tab only appears if WooCommerce’s “Allow customers to create an account” setting is enabled under WooCommerce → Settings → Accounts & Privacy. - Default tab – Which tab (Login or Register) is active when the panel first opens.
- Redirect after login / register / logout – Where to send the customer after each action. Login and register default to My Account; logout defaults to the homepage.
- Customer account block – When enabled, clicking the WooCommerce “Customer account” block opens the LoginKit panel instead of navigating to the My Account page.
My Account
↑ Back to top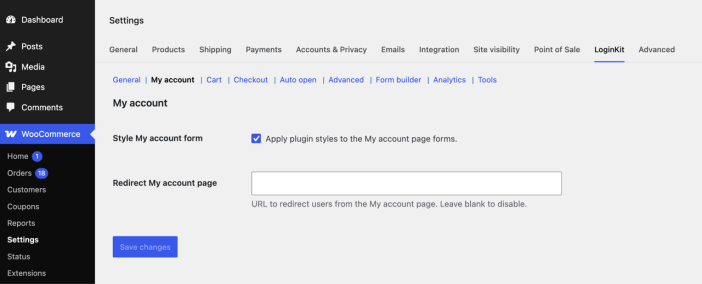
- Style My account form – Applies your Style Builder design to the default WooCommerce My Account login/register/lost-password forms — for stores that display that page directly rather than the popup or slide-in panel.
- Redirect My account page – Optionally redirect visitors away from the My Account page entirely (e.g., to a custom dashboard). Leave blank to disable.
Cart
↑ Back to top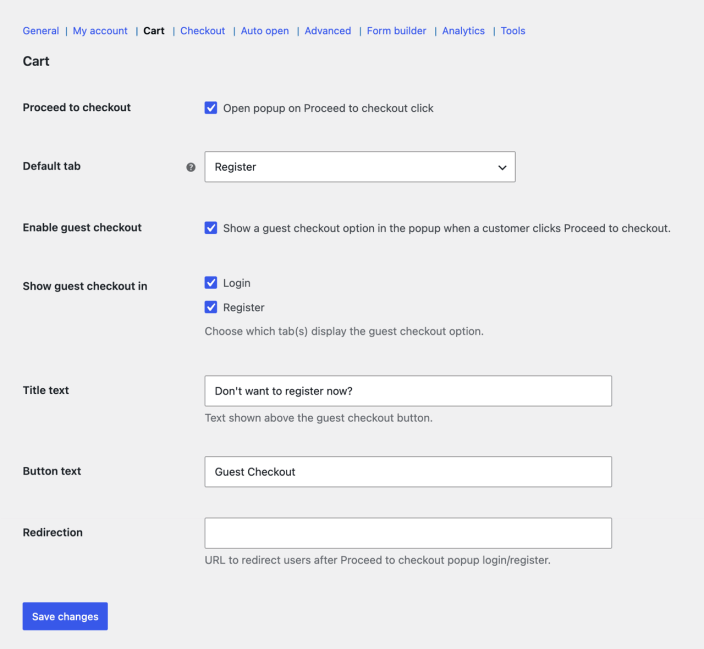
- Proceed to checkout – When enabled, guests clicking “Proceed to checkout” on the cart page see the LoginKit panel instead of going straight to checkout.
- Default tab – Which tab opens from that click — defaults to Register, to encourage account creation.
- Enable guest checkout – Shows a “continue as guest” option inside the panel so customers aren’t forced to log in or register.
- Show guest checkout in – Choose whether the guest-checkout option appears on the Login tab, the Register tab, or both.
- Title text / Button text – Customize the guest-checkout prompt (default:
Don't want to register now?) and button label (default:Guest Checkout). - Redirection – Where to send the customer after logging in or registering from this panel — defaults to the checkout page.
Checkout
↑ Back to top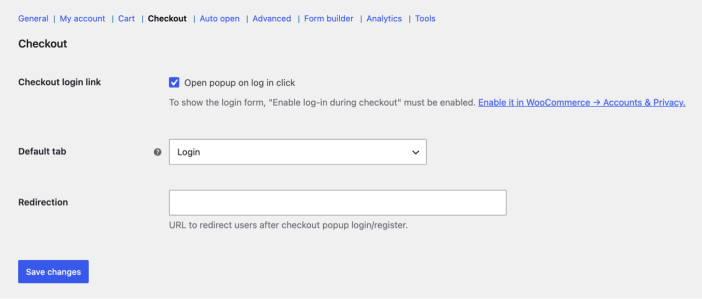
- Checkout login link – Intercepts the “Log in” link WooCommerce shows guests on the checkout page, opening the LoginKit panel instead.
Note: WooCommerce’s “Enable log-in during checkout” setting under WooCommerce → Settings → Accounts & Privacy — otherwise WooCommerce never shows the link to intercept. - Default tab – Which tab (Login or Register) opens from that link.
- Redirection – Where to send the customer after logging in or registering from this panel — defaults to the checkout page.
Auto Open
↑ Back to topAutomatically opens the panel without the customer clicking anything.
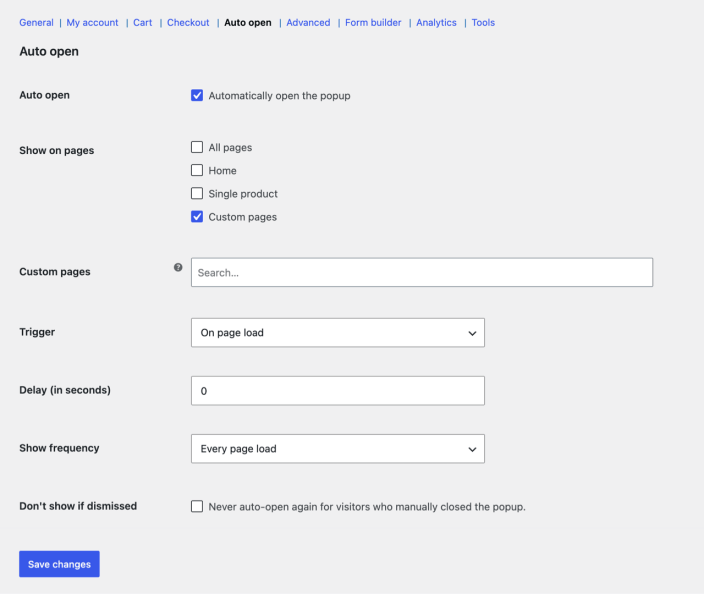
- Auto open – Master on/off switch for the feature.
- Show on pages – All pages, Home, Single product, and/or specific Custom pages via a searchable page picker.
- Trigger – On page load, or after scroll % — paired with the Scroll threshold field.
- Delay (seconds) – Wait before opening, 0–60 seconds. Used with the page-load trigger.
- Scroll threshold (%) – How far down the page a visitor must scroll before it opens, 1–100%.
- Show frequency – Every page load, once per session, or once ever.
- Don’t show if dismissed – Once a visitor manually closes the auto-opened panel, don’t show it to them again.
Advanced
↑ Back to top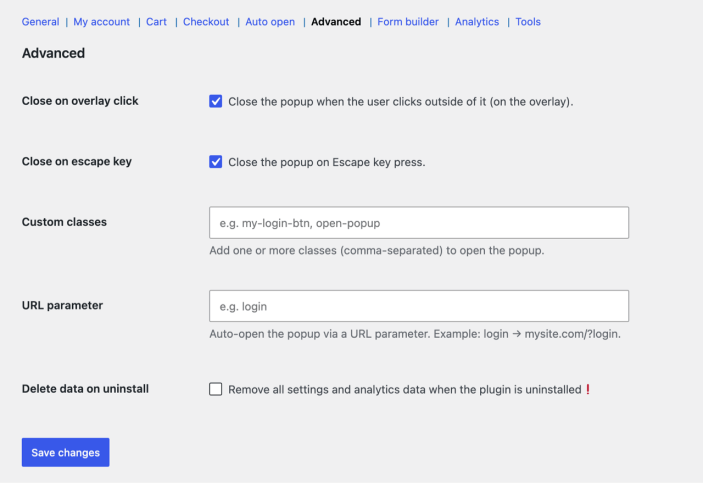
- Close on overlay / Escape key – Standard dismiss behavior for the panel, on by default.
- Custom classes – Comma-separated CSS classes; any element with one of these classes opens the panel when clicked. LoginKit also ships a built-in
loginkit-triggerclass that always works, no configuration needed. - URL parameter – Pick a query-parameter name (e.g.
login) so a link likeyoursite.com/?loginopens the panel automatically when visited. - Delete data on uninstall – When checked, all LoginKit settings and analytics data are removed if the plugin is deleted. Off by default, so reinstalling preserves your configuration.
Form Builder (Style Builder)
↑ Back to topA visual, live-preview editor for the panel’s appearance.
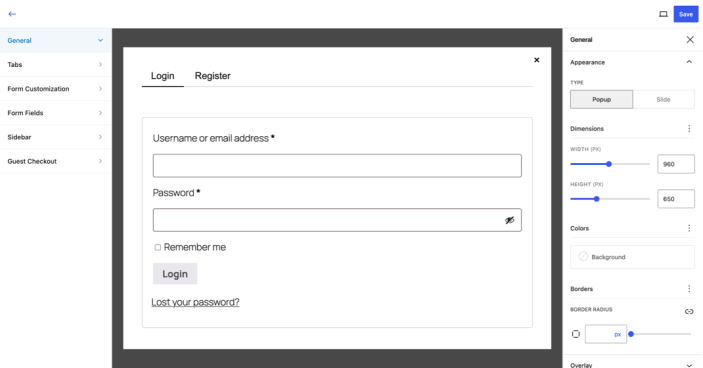
- General – Options like Appearance (Popup or Slide-in), Dimension, Background, Border, etc of the form.
- Tabs – Lets you customize the tabs. Options like Label, Border, Colors, Background, Hover Colors, etc.
- Form Customization – Options to customize the form, background color, text color, button, inputs, etc.
- Form Fields – Options to customize the appearance of forms, fields, elements, etc. Major options are show or hide labels, show or hide icons, icon colors, label of each input, icon picker, placeholder text, etc.
- Sidebar – Optional image or promotional panel shown alongside the form. Configure position (left/right), width, and image with focal-point control.
- Guest checkout – Style the guest-checkout prompt and button of the cart page that pops up when the “Proceed to checkout” button is clicked.
Analytics
↑ Back to topA read-only dashboard showing how the panel performs, broken down by where it was opened.
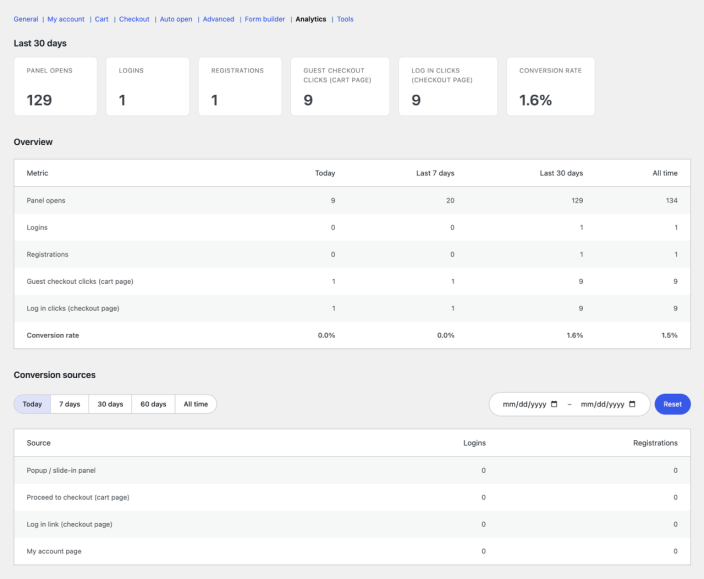
- Panel opens – Total times the panel was opened, from any source.
- Logins / Registrations – Successful auth events, recorded server-side.
- Guest checkout clicks – Clicks on the guest-checkout button in the cart page.
- Checkout “Log in” clicks – Clicks on the intercepted checkout login link.
- Conversion rate – Percentage of successful login or registration.
- Conversion sources – Logins/registrations by source: panel, cart, checkout, or My Account — filterable by Today / 7 / 30 / 60 days / All time, or a custom range.
- Last 14 days – Daily breakdown with a bar chart of panel opens
Only anonymous daily aggregate counters are stored — no IP addresses or other personal data. GDPR-safe by design.
Tools
↑ Back to top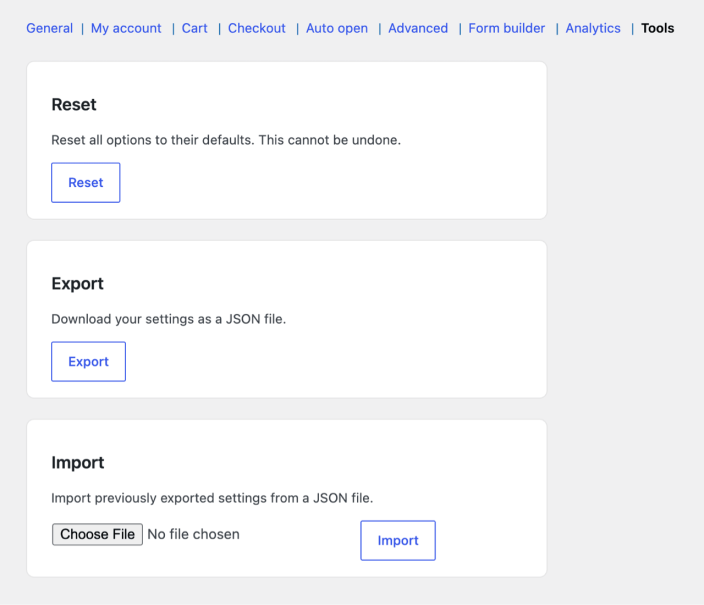
- Reset – Reset all options to their defaults. This cannot be undone.
- Export – Download all current Style Builder and settings values as a JSON file.
- Import – Upload a previously exported JSON file to apply those settings — handy for copying a design from staging to production, or between sites.
Adding Your Own Trigger Buttons
↑ Back to topAny link or button on your site can open the LoginKit panel. Three ways to wire one up:
1. Built-in class
Add loginkit-trigger to any element. Works immediately, no settings needed.
<a href="#" class="loginkit-trigger">Sign in</a>2. Custom classes
List your own class name(s) in Advanced → Custom classes, if you’d rather not use the built-in one.
3. URL parameter
Configure a parameter name in Advanced → URL parameter, then link to “yoursite.com/?login” to open the panel automatically on load.
Troubleshooting
↑ Back to top1. Register tab doesn’t appear
WooCommerce → Accounts & Privacy → “Allow customers to create an account” is disabled.
2. Checkout “Log in” link isn’t intercepted
WooCommerce → Accounts & Privacy → “Enable log-in during checkout” is disabled.
3. Panel doesn’t auto-open
Check the page is included in “Show on pages,” the frequency setting has already suppressed it for this visitor, or “Don’t show if dismissed” is blocking a returning visitor.
4. Custom trigger button doesn’t work
Confirm the class name matches exactly (case-sensitive) what’s saved in Advanced → Custom classes, or use the built-in loginkit-trigger class instead.
5. Style changes aren’t visible
Confirm changes were saved in Form builder — the live preview does not auto-save.
FAQs
↑ Back to top
Does it work with the block-based Customer Account experience?
Yes, LoginKit integrates with the WooCommerce Customer Account block.
Can I open the login popup from a custom button or link, not just the default triggers?
Yes. Simply add the class “loginkit-trigger” to any button, link, or other clickable element, and LoginKit will open the login panel when it’s clicked.
If you prefer, you can also define your own custom trigger class(es) in Advanced Settings. Any element using one of those classes will open the panel.
Can I add a custom image next to the login form?
Yes, an optional sidebar lets you display a custom image or promotional content alongside the panel.
Can the popup open automatically without a click?
Yes, Auto Open can trigger it on page load or after a set scroll percentage, with an optional delay. You control how often it reappears — every visit, once per session, or only once ever and it can skip visitors who already dismissed it.
Does LoginKit have conversion analytics?
It has a built-in Analytics dashboard showing panel opens, logins, registrations, and guest-checkout clicks, broken down by where they happened (cart, checkout, My Account, or a general panel), plus a conversion rate.
Can I redirect customers to a different page after login, registration, or logout?
Yes, redirect URLs can be set independently for after login, after registration, after logout, and after checkout login/registration — each falls back to a sensible default (like My Account) if left blank.

