Mastercard Merchant Cloud is a powerful and secure extension designed to seamlessly integrate with your Woo store, enabling you to accept and process payments with ease. This plugin provides a reliable and user-friendly payment solution, ensuring a smooth checkout experience for your customers while maintaining the highest security standards.
Who should use this plugin
↑ Back to top- WooCommerce merchants
- Merchants with an existing Mastercard merchant account
- Merchants wanting Hosted or Redirect checkout flows
Requirements
↑ Back to top- A Mastercard merchant account (existing account or sign up for a new one)
- An SSL certificate (payments will fail without HTTPS)
- PHP 8.0 or later
- WooCommerce 9.0 or later
- WordPress 6.0 or later
For additional information, read the WooCommerce requirements and server recommendations.
Getting started
↑ Back to topSetup and configuration
↑ Back to topYou can install the Merchant Cloud extension in various ways. The easiest way is to connect your store to woocommerce.com and use the auto-installer feature.
Install the Mastercard Merchant Cloud extension
↑ Back to topBefore installing the extension, check whether it is already installed on your store.
1. Log in to your WooCommerce site’s administrator dashboard.
2. Navigate to Plugins → Installed Plugins.
3. Look for “Mastercard Merchant Cloud” in the list.
- If the extension is already installed, make sure it is activated, then proceed to the Connect and setup your account section.
- If the extension is not installed, follow one of the installation methods below.
Option 1: Install using the WooCommerce auto-installer (recommended)
1. Click the Add to Store button on the extension page.
2. If prompted, enter your store URL.
3. Connect your store to WooCommerce.com.
4. Once connected, the Mastercard Merchant Cloud extension will be automatically installed on your site.
5. After installation completes, ensure the plugin is activated.
Option 2: Install the extension manually
1. Log in to your account on WooCommerce.com and go to My Subscriptions.
2. Click the three-dot menu next to “Mastercard Merchant Cloud” and select Download extension.
3. A .zip file will be downloaded to your computer.
4. Log in to your WordPress admin dashboard.
5. Navigate to Plugins → Add New.
6. Click Upload Plugin at the top of the page.
7. Select the downloaded .zip file and click Install Now.
8. Once installation completes, click Activate Plugin.
You can find more detailed information about managing installations and subscriptions in the Managing WooCommerce.com Subscriptions documentation.
General settings
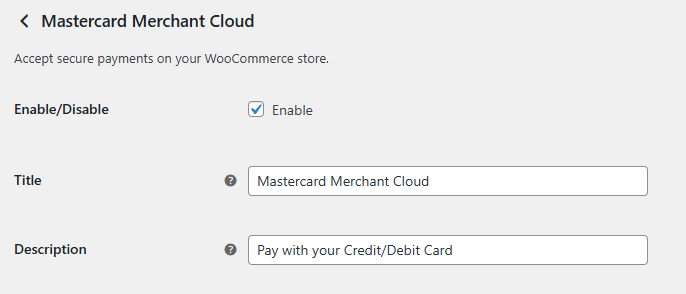
↑ Back to topThis section defines how the payment gateway will be displayed to customers at checkout.
- Enable/Disable: This toggle allows you to quickly enable or disable the plugin.
- Title: The payment method name displayed to customers at checkout.
- Description: Additional text shown under the payment method to help customers understand how they will pay.
Get your Mastercard merchant account
↑ Back to topIn order to use the Mastercard Gateway, you need a Mastercard merchant account. To request an account, contact your payment service provider (PSP), following this documentation.
Merchant account details
↑ Back to topAfter activating the plugin for the first time, you will be redirected automatically to the plugin’s configuration page (in this case, you can skip to number 3). The configuration page can be visited at any time by doing the following steps:
1. Navigate to WooCommerce → Settings → Payments tab.
2. Click the Finish set up button for the Mastercard Merchant Cloud payment method.
3. Select your merchant’s region and enter your Merchant ID and your API password.
- Test Mode: Turns the plugin into testing mode, allowing you to simulate test transactions. Note: credentials are different between live and test mode.
- Merchant Region: The region from your PSP.
- Merchant ID: Identifies your merchant account.
- Integration Authentication Password: Authenticates API requests.
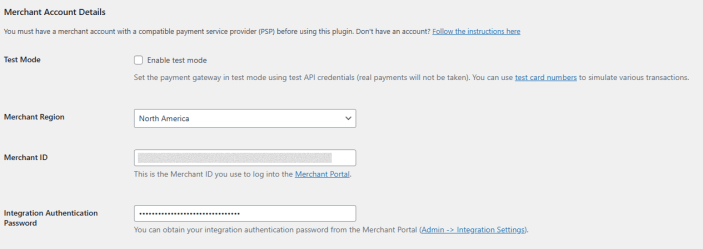
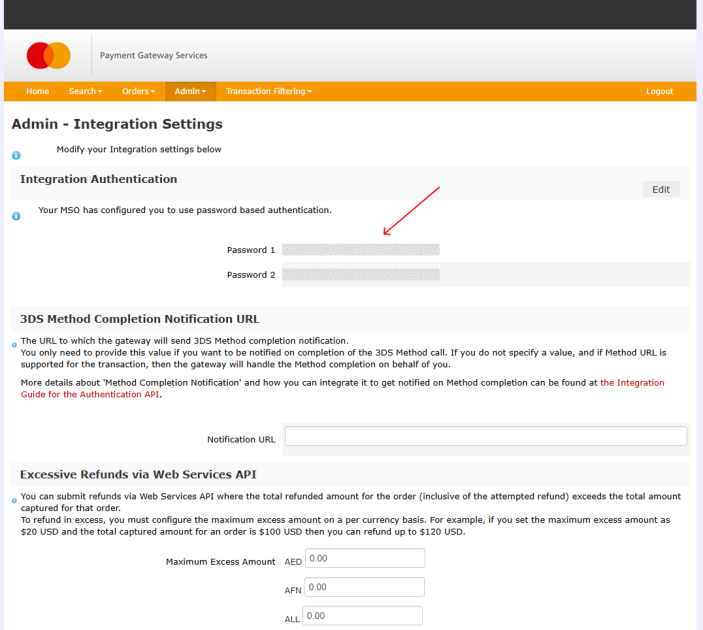
You can obtain your Integration Authentication Password by logging into your Merchant Portal → Admin → Integration Settings.
4. The plugin will validate your merchant credentials after clicking on Save Changes.
- If the connection is established, the rest of the plugin’s configuration settings will appear, as shown below.
Webhook notifications
↑ Back to topWebhook notifications allow your Woo store to receive real-time updates when a payment transaction is created or changes status (for example, when a payment is captured, voided, or refunded).
These notifications ensure that your store stays in sync with the payment gateway and that order statuses and payment information are updated correctly.
When are webhooks required?
Webhook notifications are strongly recommended for all production stores.
⚠️ While basic payments may function without webhooks, certain actions, such as delayed captures, refunds, and payment status updates, rely on webhook notifications to ensure your store reflects the correct transaction state.
Setting up webhook notifications
- Log in to your Merchant Portal.
- Navigate to Admin → Webhook Notifications.
- Leave the Notification URL field empty; it will be automatically generated and populated by the plugin.
- Generate a Notification Secret and Save.
- In your WooCommerce admin, go to WooCommerce → Settings → Payments → Mastercard Merchant Cloud.
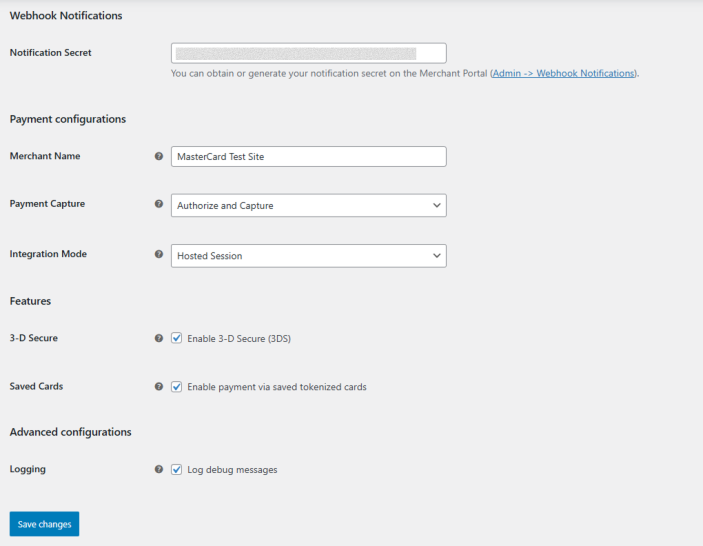
- Enter the Notification Secret in the corresponding field.
- Save your changes.
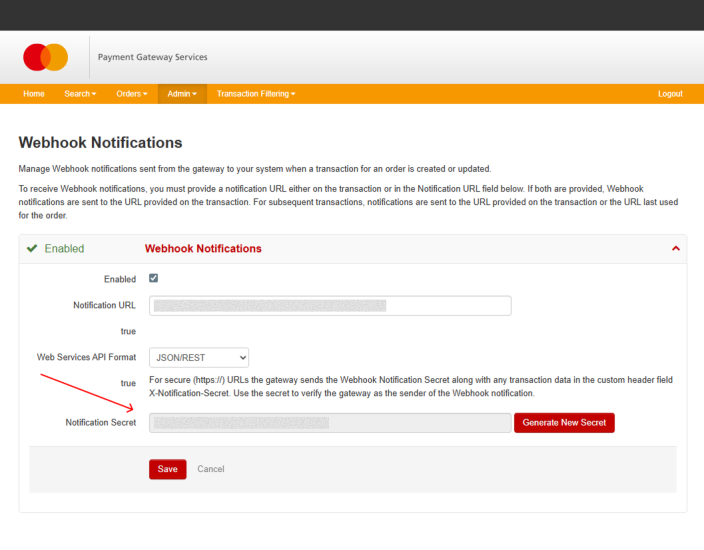
Security and validation
- The Notification Secret is used to verify that incoming webhook notifications are sent by the expected gateway.
- The gateway includes the secret in each notification request, allowing your store to validate the source before processing the update.
Payment configuration
↑ Back to topThis section defines how payments are authorized, captured, and presented to your customers during checkout. Choosing the correct configuration depends on your business model, fulfillment process, and compliance requirements.
- Merchant Name: The name of your business to the payer on the payment interaction.
- Payment Capture: Determines when funds are captured from the customer:
- Authorize and Capture: Funds are captured immediately at checkout.
- Authorize: Funds are authorized at checkout and captured later manually from the order admin screen.
Integration mode
The Integration Mode controls how the payment form is presented and how much control you have over the checkout experience. You can visualize how each mode looks in the Customer Experience section.
- Hosted Session: This method allows you to manage the layout and styling of your payment page while minimizing PCI compliance costs. The following extra settings will be available when using the Hosted Session method:
- 3D-Secure: Enable or disable additional cardholder authentication. Recommended for higher fraud protection and compliance in supported regions.
- Saved Cards: Allow customers to securely store their payment methods for future purchases.
- Hosted Checkout: This method allows you to gather payment details through a hosted interface. The following extra settings will be available when using the Hosted Checkout method:
- Embedded: The payment form is displayed inside an embedded iframe on your checkout page.
- Redirect to Payment Page: Customers are redirected to a secure external page to complete payment, then returned to your store.
- Display plugin’s logo: Toggle whether the plugin’s logo appears on the checkout interface.
- Merchant Name: The business name displayed to customers during payment. The website title will be used as the default.
Advanced configurations
↑ Back to top- Logging: Enable logging to record debug messages for troubleshooting and support purposes.
Recommended default configuration (for most merchants)
If you are unsure which settings to use, the following setup works well for most Woo stores:
- Payment Capture: Authorize and Capture
- Integration Mode: Hosted Session
- 3D Secure: Enabled
- Saved Cards: Enabled
- Logging: Disabled (enable only when needed)
Customer experience
↑ Back to topThis section describes what your customers will see during checkout when paying with Mastercard Merchant Cloud, depending on the integration mode you have selected.
Checkout flow
↑ Back to topRegardless of the integration mode, the checkout process follows the same general steps:
- The customer adds products to the cart and proceeds to checkout.
- Billing and shipping details are entered.
- Mastercard Merchant Cloud is selected as the payment method.
- The customer completes the payment using one of the supported checkout experiences.
- If enabled, 3D Secure authentication may be required to verify the payment.
- After payment is completed, the customer is redirected to the order confirmation page.
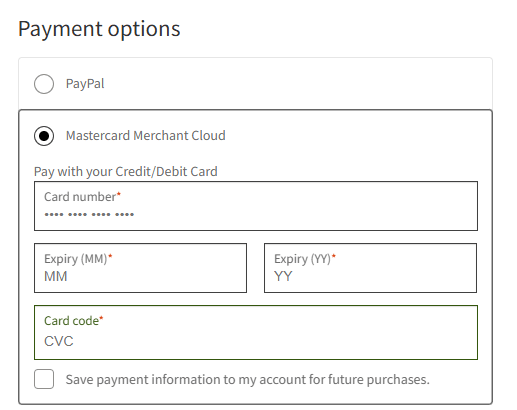
Hosted sessions
When using Hosted Session, customers enter their card details directly on your store’s checkout page.
Customer experience highlights:
- Payment fields are embedded directly into the Woo checkout
- Card details are securely processed by the gateway and never stored on your server
- Returning customers can select a previously saved card, if enabled
- The checkout experience remains visually consistent with your store’s theme
Customization notes:
- Payment fields inherit WooCommerce’s default CSS classes
- Most themes will style the fields automatically
- Additional visual customization can be applied through your theme’s stylesheets
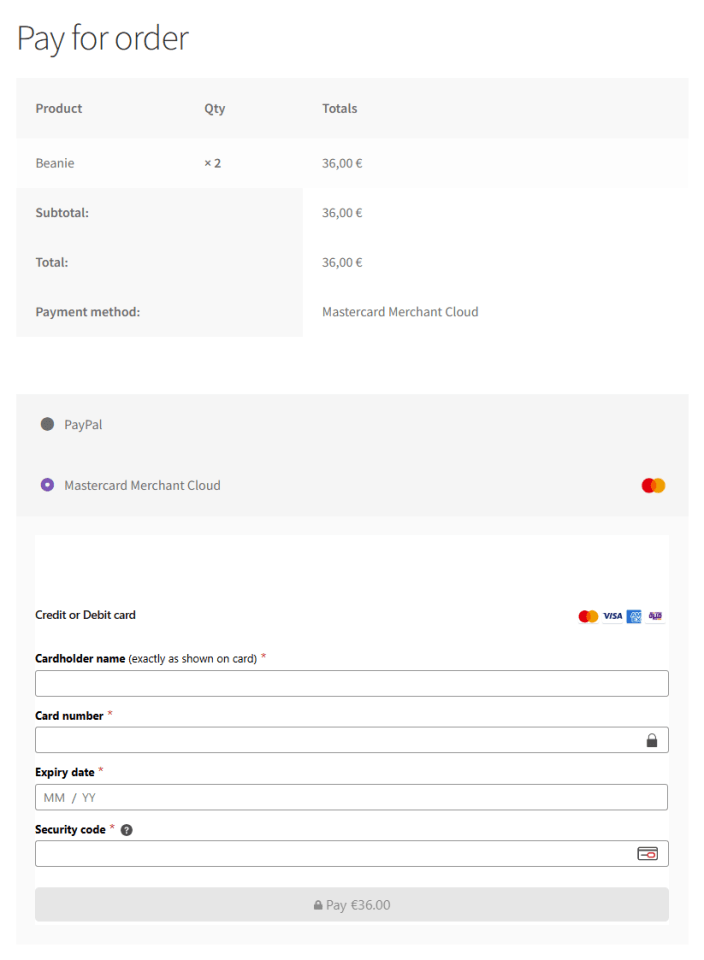
Hosted checkout
When using Hosted Checkout, the payment form is presented through a Mastercard-hosted interface.
Embedded mode:
- The payment form is displayed inside an embedded iframe on your checkout page
- Customers complete payment without leaving your store
- Customization options are limited to displaying the merchant name and plugin logo
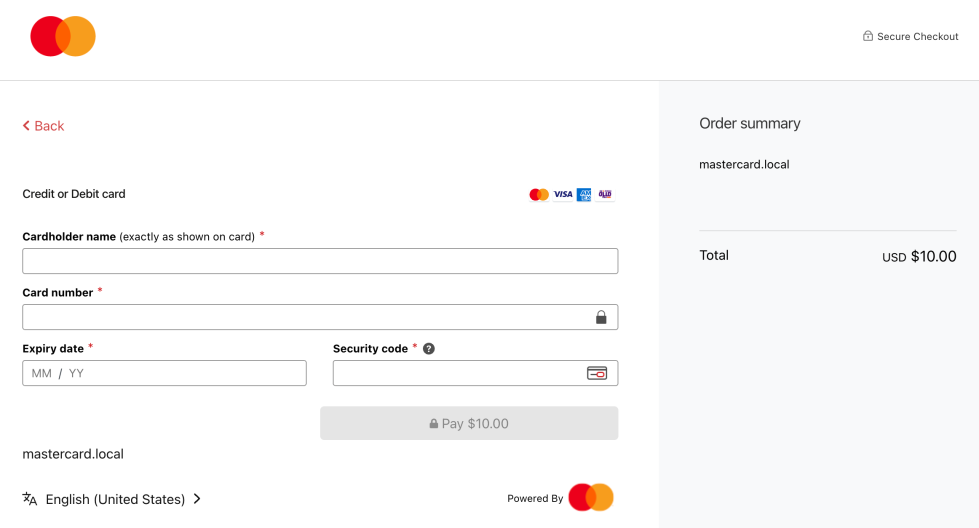
Redirect mode:
- Customers are redirected to a secure external payment page
- After completing payment, they are returned to your store automatically
- This mode offers the lowest PCI compliance requirements
Subsequent admin operations
↑ Back to topAfter an order is placed, the Mastercard Merchant Cloud plugin provides payment management actions directly within the Woo order admin screen. These actions allow you to capture authorized funds, void authorizations, and issue refunds without leaving your store’s dashboard.
Payment actions
↑ Back to topThe available actions depend on how the payment was configured and the current transaction state.
| Action | When it’s available | What it does |
|---|---|---|
| Capture | Payment was authorized but not yet captured | Collects funds from the customer |
| Void | Authorization exists and funds have not been captured | Cancels the authorization |
| Refund | Funds have already been captured | Returns funds to the customer |
Capture payments
If your store is configured to use Authorize (manual capture), authorized funds must be captured before the payment is finalized.
How it works:
- A payment widget appears on the order edit screen
- The widget displays the authorized amount available for capture
- You can capture the full amount or a partial amount (if supported by your merchant account)
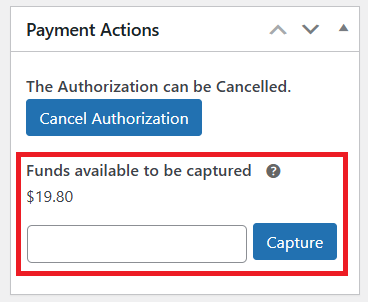
Important notes:
- Capturing funds is irreversible
- Once captured, the authorization can no longer be voided
- Captured funds become eligible for refund
Void authorizations
Voiding cancels an existing authorization before funds are captured.
Use cases:
- The order cannot be fulfilled
- Fraud or manual review failed
- The customer cancels before fulfillment
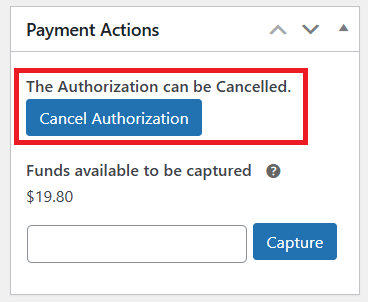
Important notes:
- Voids are only available for uncaptured authorizations
- Once an authorization is voided, it cannot be captured
- Voided authorizations release the reserved funds back to the customer
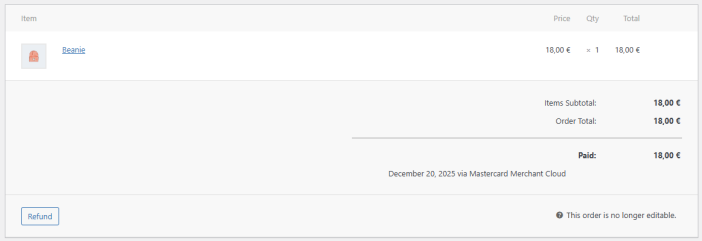
Refunds
Refunds allow you to return captured funds to the customer directly from WooCommerce.
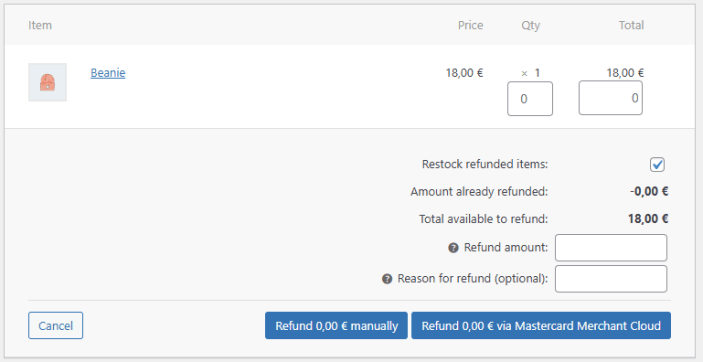
How refunds work:
- Open the order in the WooCommerce admin.
- Click Refund.
- Enter the amount to refund.
- Click Refund $XX.XX via Mastercard Merchant Cloud.
The refund will be registered in your Merchant Portal and reflected in WooCommerce once processed.
Important notes:
- Refunds are only available after funds have been captured
- Partial refunds are supported
- Refund processing times depend on the card issuer and bank
Order status and visibility
- Payment actions are displayed only when applicable to the order’s current state
- The payment widget is hidden once no outstanding amount remains
- Order notes record key payment actions for traceability
Go-live checklist
↑ Back to topBefore accepting live payments with Mastercard Merchant Cloud, complete the following checklist to ensure your store is correctly configured and ready for production use.
Plugin and environment
- [ ] Plugin is installed and activated
- [ ] WordPress, WooCommerce, and PHP versions meet requirements
- [ ] SSL certificate is active and the site loads over HTTPS
Merchant account and credentials
- [ ] Correct merchant region selected
- [ ] Production Merchant ID entered
- [ ] Production API password entered
- [ ] Credentials validated successfully (no error messages after saving)
Payment configuration
- [ ] Payment Capture mode selected (Authorize or Authorize and Capture)
- [ ] Integration Mode selected (Hosted Session or Hosted Checkout)
- [ ] 3D Secure configured according to business requirements
- [ ] Saved Cards enabled or disabled intentionally
- [ ] Merchant Name verified for customer display (Hosted Checkout)
Webhook notifications
- [ ] Webhook Notification Secret generated in the Merchant Portal
- [ ] Notification Secret entered in plugin settings
- [ ] Notification URL auto-populated by the plugin
- [ ] Webhooks tested with at least one transaction
End-to-end testing
- [ ] Successful test payment completed
- [ ] Order status updates correctly in WooCommerce
- [ ] Payment appears in the Merchant Portal
- [ ] Capture, Void, and Refund actions verified (where applicable)
⚠️ Ensure Sandbox mode is disabled before going live.
Customer experience
- [ ] Checkout page displays correctly on desktop and mobile
- [ ] Payment fields render correctly and match store styling
- [ ] 3D Secure flow works as expected (if enabled)
- [ ] Order confirmation page displays successfully
Final verification
- [ ] Real transaction completed with a live card
- [ ] Funds captured or authorized as expected
- [ ] No pending or stuck orders
✅ Once all checklist items are completed, your store is ready to accept live payments.
Translations
↑ Back to topThe plugin is currently available in English, however, it can be fully translated to any language following the WordPress Localization handbook.
Support
↑ Back to topIf you need assistance while installing, configuring, or using the Mastercard Merchant Cloud plugin, support is available to help you resolve issues efficiently.
How to get support
↑ Back to topFor any questions or issues related to:
- Plugin installation or activation
- Payment configuration and settings
- Checkout behavior or customer payment issues
- Captures, voids, or refunds
- Webhook notifications and order status updates
Please contact:
For any questions or issues related to:
- Merchant account
Please contact:
When contacting support
↑ Back to topTo help us assist you as quickly as possible, please include the following information in your message:
- Your store URL
- A brief description of the issue
- The affected order ID (if applicable)
- Whether the issue occurs in Sandbox or Production
- Any relevant error messages or screenshots
Providing this information upfront will help reduce resolution time.