
Odoo Integration for WooCommerce connects your WooCommerce store with Odoo so you can synchronize products, inventory, pricing, customers, orders, refunds, and related business data between the two platforms.
The integration can support Odoo-led, WooCommerce-led, or two-way workflows. Before enabling synchronization, decide which system should be the primary source for each type of data to reduce the risk of one system overwriting changes made in the other.
Installation
↑ Back to topAfter installing and activating Odoo for WooCommerce, go to WooCommerce > Settings > Integrations > Odoo Integration.
Before you begin
↑ Back to topOdoo Integration for WooCommerce supports Odoo versions 13 through 19.
Before connecting your store, make sure you have:
- An Odoo database with API access.
- The server URL and database name for your Odoo instance.
- An Odoo username and API key or password.
- The Odoo apps required for the workflows you plan to synchronize. Product, inventory, sales, invoicing, and accounting workflows require the corresponding functionality to be available in Odoo.
- Consistent product identifiers in WooCommerce and Odoo. Products can be matched using the Odoo Internal Reference or Barcode field.
The extension requires WordPress 5.8 or newer, WooCommerce 3.0 or newer, and PHP 7.4 or newer. It declares compatibility with WooCommerce High-Performance Order Storage (HPOS).
Integration screens
↑ Back to topThe integration is organized into the following screens:
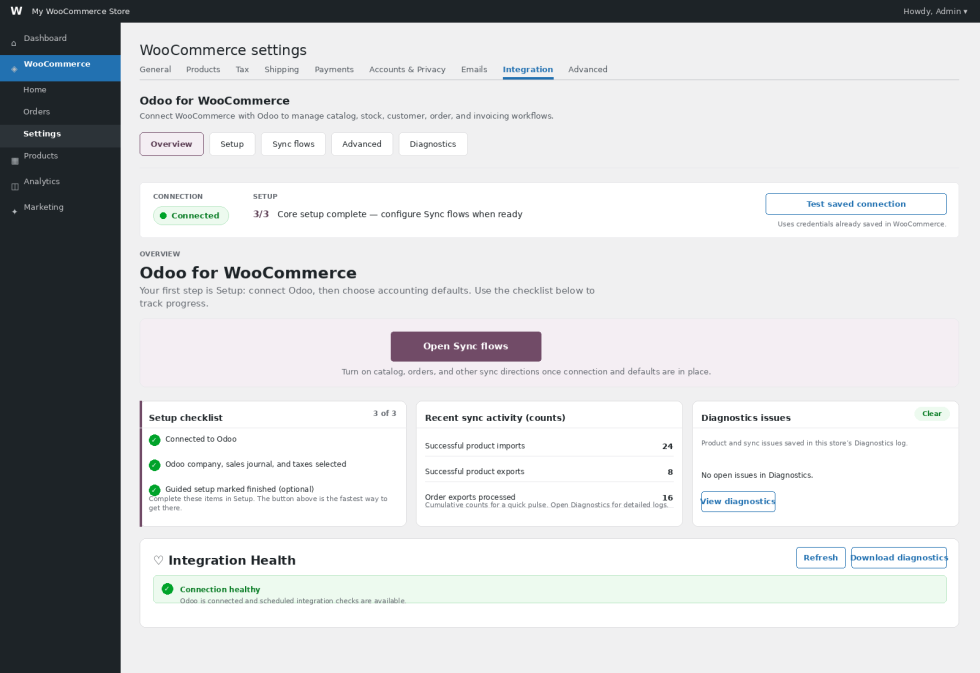
- Overview – View connection health, synchronization status, errors, cron status, and diagnostics.
- Setup – Connect to Odoo and configure the company, accounting, tax, and product-matching defaults.
- Sync flows – Choose what synchronizes between Odoo and WooCommerce and in which direction.
- Active Processes – Monitor running synchronization processes, review recent synchronization history, and stop processes when necessary.
- Advanced – Configure optional order-status and coupon synchronization.
- Diagnostics – Test the connection, review recorded issues, and access logging information.
Some synchronization and Active Processes controls remain unavailable until the Odoo connection and required Setup fields have been completed.
Overview
↑ Back to topThe Overview screen provides a high-level view of the integration’s current health.
Use it to check:
- Odoo connection status.
- Odoo host and authentication status.
- Synchronization activity.
- Errors recorded during recent operations.
- WordPress cron status.
- Last and next cron activity.
- Configuration or scheduling warnings.
Select Refresh to retrieve current health information.
You can also select Download diagnostics (ZIP) to create a diagnostic package that can be provided to WooCommerce Marketplace support when troubleshooting an issue.
Setup
↑ Back to topConnect WooCommerce to Odoo
↑ Back to topEnter the following connection information:
Odoo version
Select the version used by your Odoo database. Versions 13 through 19 are supported.
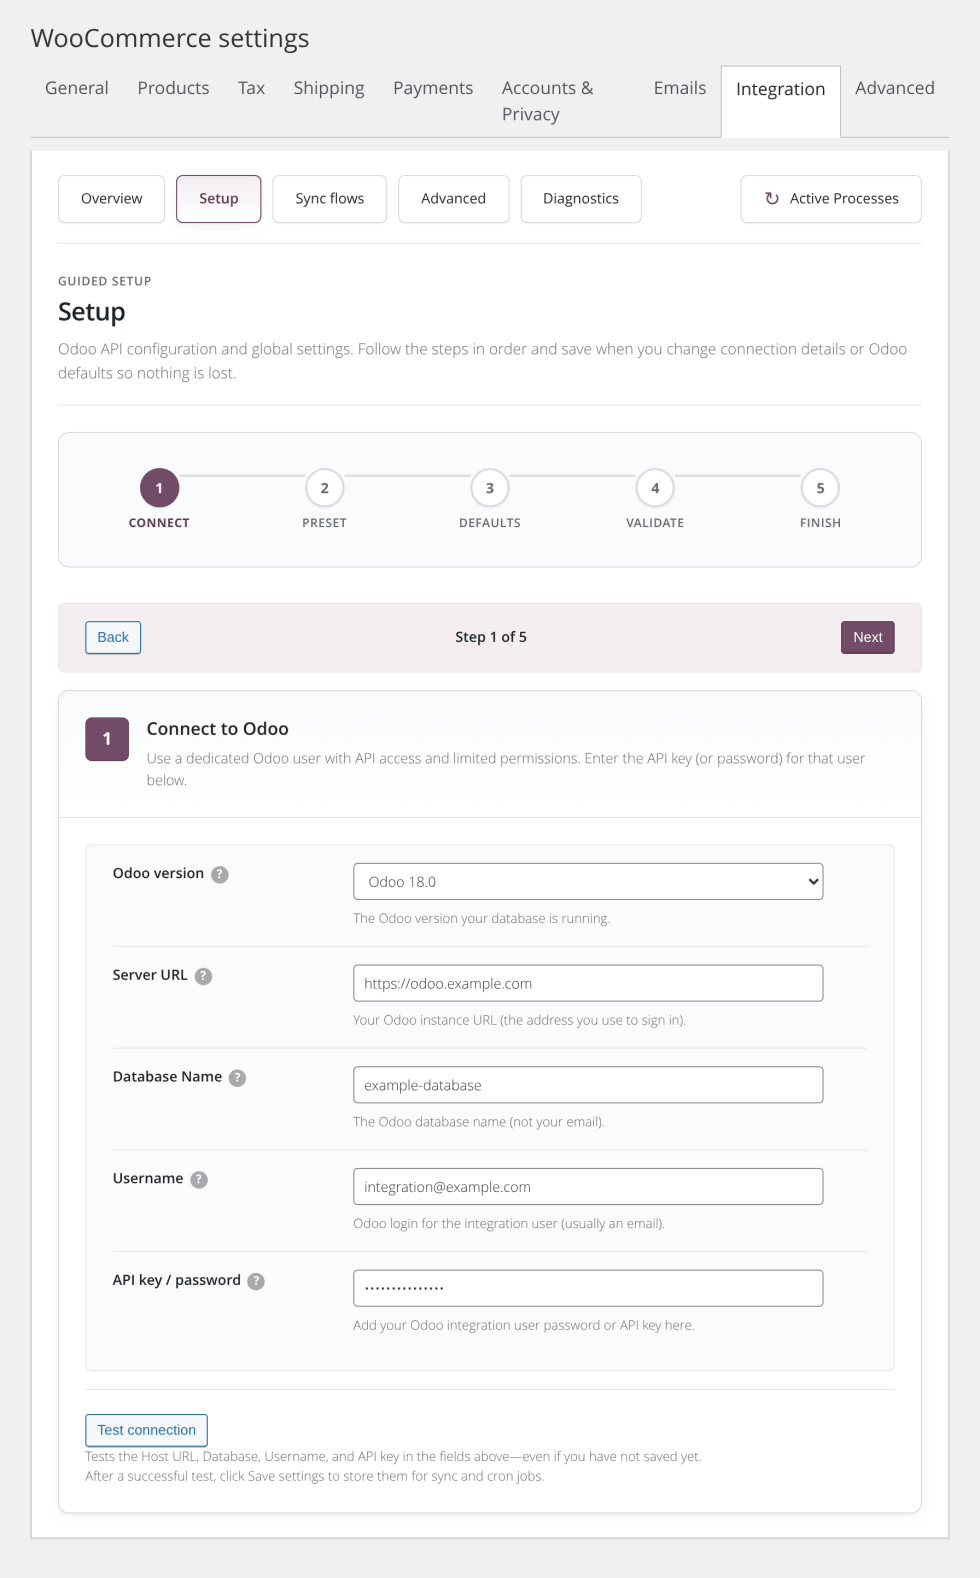
Server URL
Enter the base URL used to access your Odoo instance.
Database Name
Enter the Odoo database name.
Username
Enter the username for the Odoo integration user. This is commonly an email address.
API key / password
Enter an API key where supported by your Odoo configuration, or the password for the integration user.
After saving the connection details, confirm that the integration reports a successful connection before configuring synchronization.
Reset the Odoo connection
↑ Back to topUse Reset Odoo connection when you need to remove the stored connection and reconnect from the beginning.
Choose a starting scenario
↑ Back to topThe Starting scenario setting can enable a sensible starting configuration based on how you intend to use the integration.
Available presets are:
- Custom – Keep your existing synchronization choices and configure them manually.
- Odoo leads the catalog – Use Odoo as the primary source for products, inventory, and prices.
- WooCommerce leads orders – Send WooCommerce orders, invoices, and related data to Odoo.
- Two-way catalog and orders – Enable a broader two-way workflow.
The two-way option should be used carefully. If both platforms can update the same information, establish which platform is authoritative for each field or workflow.
Configure Odoo business defaults
↑ Back to topComplete the Odoo defaults used by synchronization.
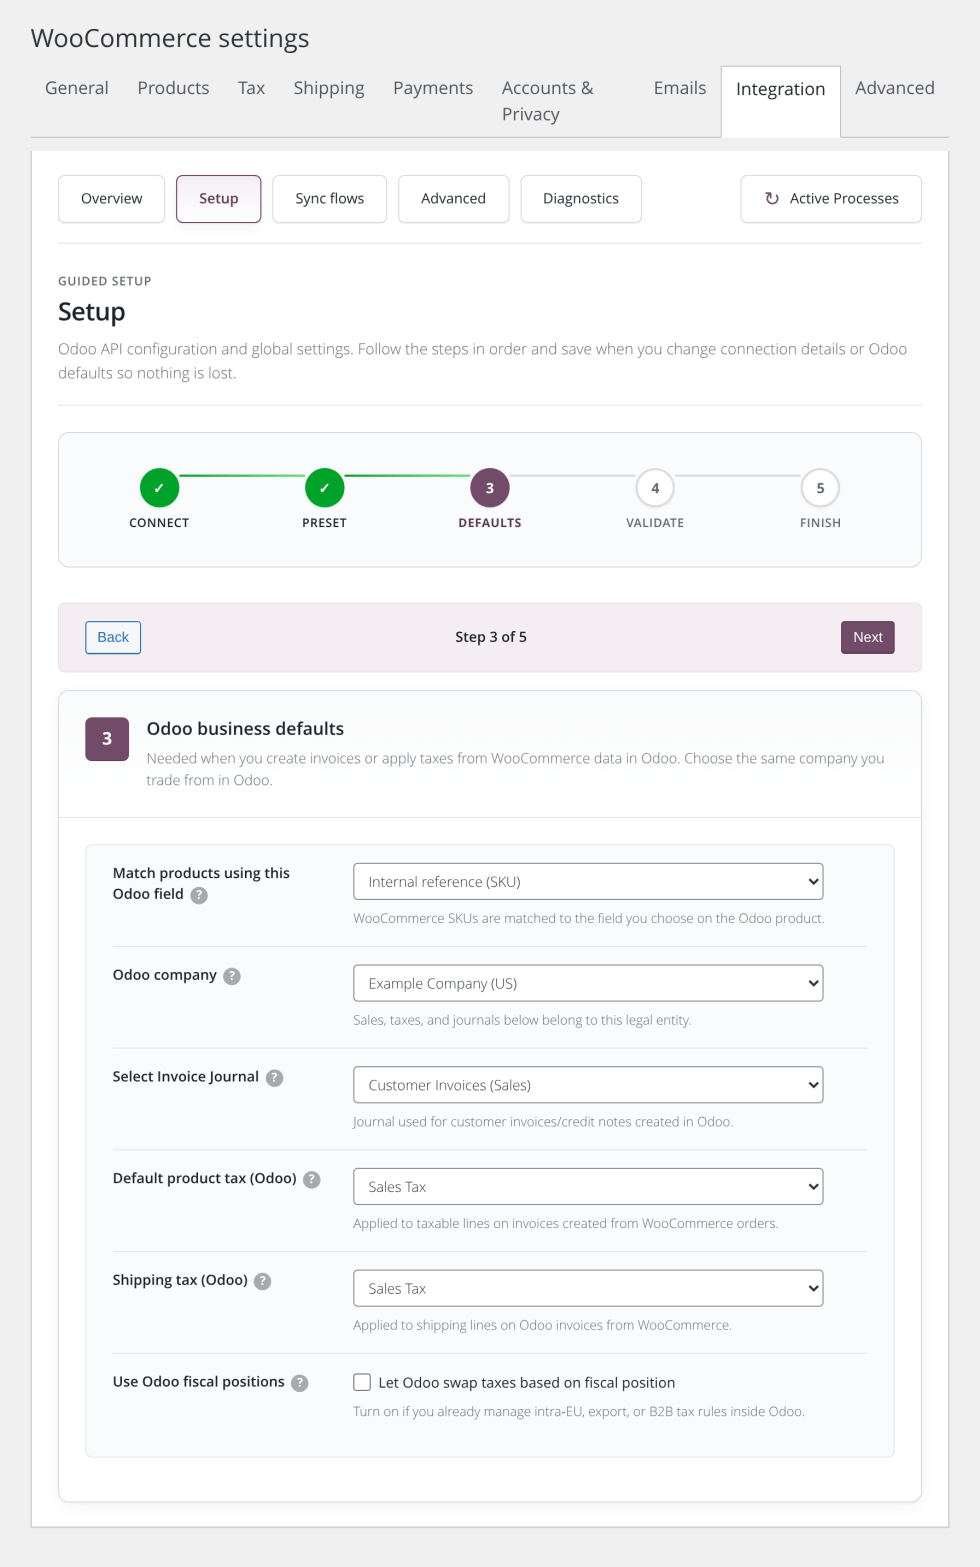
Product code source in Odoo
Choose whether WooCommerce SKUs should match the Odoo Internal Reference or Barcode field.
Odoo company
Select the Odoo company that should receive the WooCommerce data.
Invoice Journal
Choose the Odoo journal used when the integration creates customer invoices or credit notes. Customer invoices require a Sales-type journal.
Default product tax
Select the default Odoo tax for taxable product lines created from WooCommerce orders.
Shipping tax
Choose the Odoo tax applied to shipping lines.
Odoo fiscal positions
Enable fiscal positions if Odoo should apply its configured tax mappings for customers or regions.
Default fiscal position
Select the applicable Odoo fiscal position when fiscal-position handling is enabled.
For applicable Indian Odoo configurations, a GST treatment option may also be available.
Activity logging
↑ Back to topEnable Activity logging when you need a detailed record of synchronization activity.
When file logging is available, Odoo integration logs can be viewed under WooCommerce > Status > Logs.
Logging is especially useful when testing a new synchronization workflow or troubleshooting a failed record.
Sync flows
↑ Back to topThe Sync flows screen controls what information moves between WooCommerce and Odoo.
The available settings are grouped by business area so you can enable only the workflows your store requires.
Products and catalog: Odoo to WooCommerce
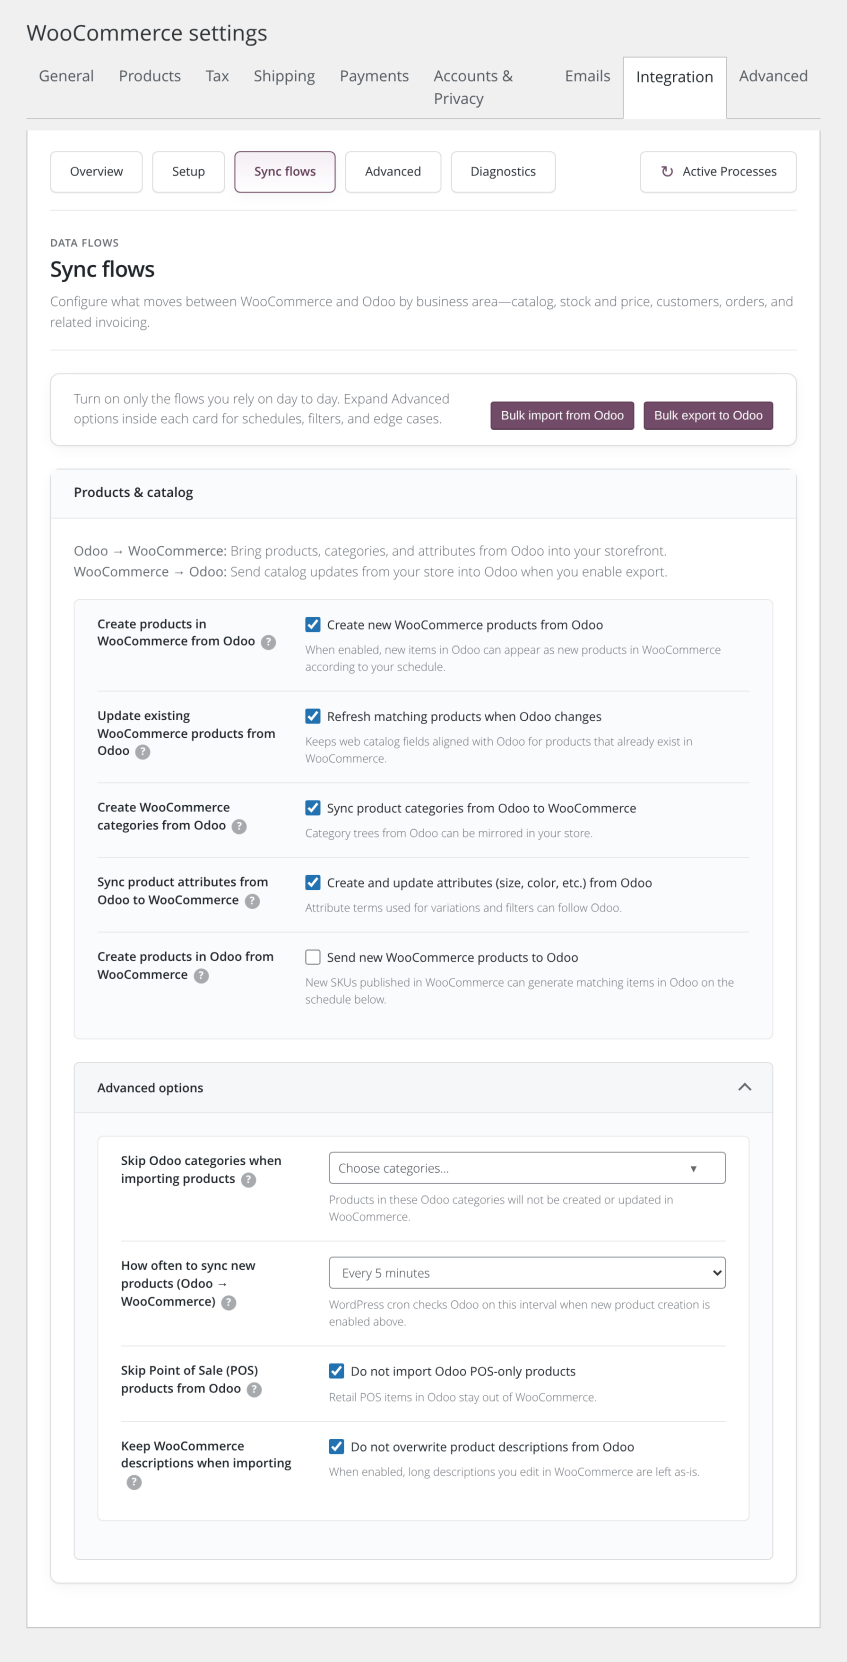
↑ Back to topYou can configure Odoo to create or update WooCommerce catalog data.
Available controls include:
- Exclude selected Odoo product categories.
- Create new WooCommerce products from Odoo.
- Update existing WooCommerce products from Odoo.
- Exclude Odoo POS-only products.
- Keep WooCommerce product descriptions instead of overwriting them from Odoo.
- Use an Odoo ID as an SKU fallback when a product or variation has no standard product code.
- Reuse a parent product image for variations that do not have their own image.
- Create and update WooCommerce product categories from Odoo.
- Create and update WooCommerce product attributes from Odoo.
- Synchronize product tags from Odoo.
When Odoo ID fallback is enabled, the integration can generate an identifier such as odoo-{id} for a simple product or odoo-var-{id} for a variation. Variable product parents do not require their own SKU.
Products and catalog: WooCommerce to Odoo
↑ Back to topWooCommerce can also be used as the catalog source.
Available controls include:
- Exclude selected WooCommerce product categories.
- Create new Odoo products from WooCommerce.
- Update existing Odoo products from WooCommerce.
- Keep Odoo descriptions unchanged instead of sending WooCommerce descriptions.
- Use the WooCommerce product ID as an SKU fallback.
- Create and update Odoo categories.
- Create and update Odoo product attributes.
- Synchronize WooCommerce product tags to Odoo.
- Optionally delete the linked Odoo product when a WooCommerce product is moved to Trash.
When WooCommerce ID fallback is enabled, the integration can generate identifiers such as wc-{id} and wc-var-{id}.
Product tag synchronization
↑ Back to topProduct tags are supported in both directions.
When products synchronize from Odoo to WooCommerce, matching Odoo product tags can be created or assigned as WooCommerce product tags.
When products synchronize from WooCommerce to Odoo, WooCommerce product tags can be matched or created in Odoo and assigned to the corresponding Odoo product.
There is no separate product-tag schedule. Tag synchronization is handled as part of the relevant product synchronization process.
Product synchronization schedule
↑ Back to topThe product synchronization process supports the following scheduled intervals:
| Schedule | Product synchronization |
|---|---|
| Every 5 minutes | Supported |
| Every hour | Supported |
| Twice per day | Supported |
| Once per day | Supported |
The selected product schedule applies to the enabled product synchronization workflow in that direction. This can include product creation or updates and, where enabled, stock and price synchronization.
The 5-minute interval does not apply to the separate category, attribute, customer, order, refund, or coupon schedules.
Inventory and pricing
↑ Back to topInventory and price synchronization can be enabled independently in either direction.
Odoo to WooCommerce
- Update WooCommerce stock from Odoo.
- Update WooCommerce prices from Odoo.
WooCommerce to Odoo
- Send WooCommerce stock to Odoo.
- Send WooCommerce prices to Odoo.
Avoid enabling conflicting two-way inventory or pricing workflows unless you have a clear source of truth for those values.
How Odoo stock is calculated
↑ Back to topFor standard Odoo to WooCommerce stock synchronization, the integration uses the Odoo product’s qty_available value.
The integration does not currently retrieve reserved inventory separately when calculating WooCommerce stock. It does not use stock.quant.reserved_quantity or Odoo’s free_qty field as the standard WooCommerce stock value.
This means the standard stock synchronization should not be described as “available after reservations.”
qty_available, the standard synchronization logic must be changed. Reserved quantities are accessible through Odoo’s data model, but they are not currently exposed as a standard stock synchronization option in the extension.Per-product Odoo controls
↑ Back to topIndividual WooCommerce products include an Odoo Sync panel on the product edit screen.
Select Odoo Tax
Use Select Odoo Tax to assign a specific Odoo tax to an individual WooCommerce product.
When a product-specific Odoo tax has been saved, it is used for that product during WooCommerce to Odoo synchronization instead of the global Default product tax configured under Setup.
This is useful when different products require different Odoo tax treatments.
Exclude an individual product from Odoo synchronization
Enable Exclude from Odoo when a WooCommerce product should not be exported or updated in Odoo.
This setting applies to the WooCommerce to Odoo product synchronization workflow. It does not act as a general exclusion from incoming Odoo to WooCommerce synchronization.
Odoo Last Sync column
↑ Back to topThe WooCommerce Products screen includes an Odoo Last Sync column.
For products with a recorded successful synchronization, the column displays Synced and the last synchronization date. Products without a recorded successful synchronization display Not Synced.
Use this column as a quick way to identify products that have or have not been processed by the Odoo integration.
Customer synchronization
↑ Back to topCustomer records can be synchronized in either direction.
Odoo to WooCommerce
↑ Back to topEnable customer import to create or update WooCommerce customer accounts from Odoo.
Available schedules are:
- Every hour.
- Twice per day.
- Once per day.
WooCommerce to Odoo
↑ Back to topEnable customer export to create or update Odoo contacts from WooCommerce customer records.
The same hourly, twice-daily, and daily schedule options are available.
Route orders to one Odoo customer
↑ Back to topFor workflows where individual WooCommerce customers should not create separate Odoo contacts, enable Route all orders to one Odoo customer.
Enter the numeric Odoo contact ID that should receive those orders.
This can be useful for guest-order or kiosk-style workflows, but it should not be enabled when individual customer history needs to be maintained in Odoo.
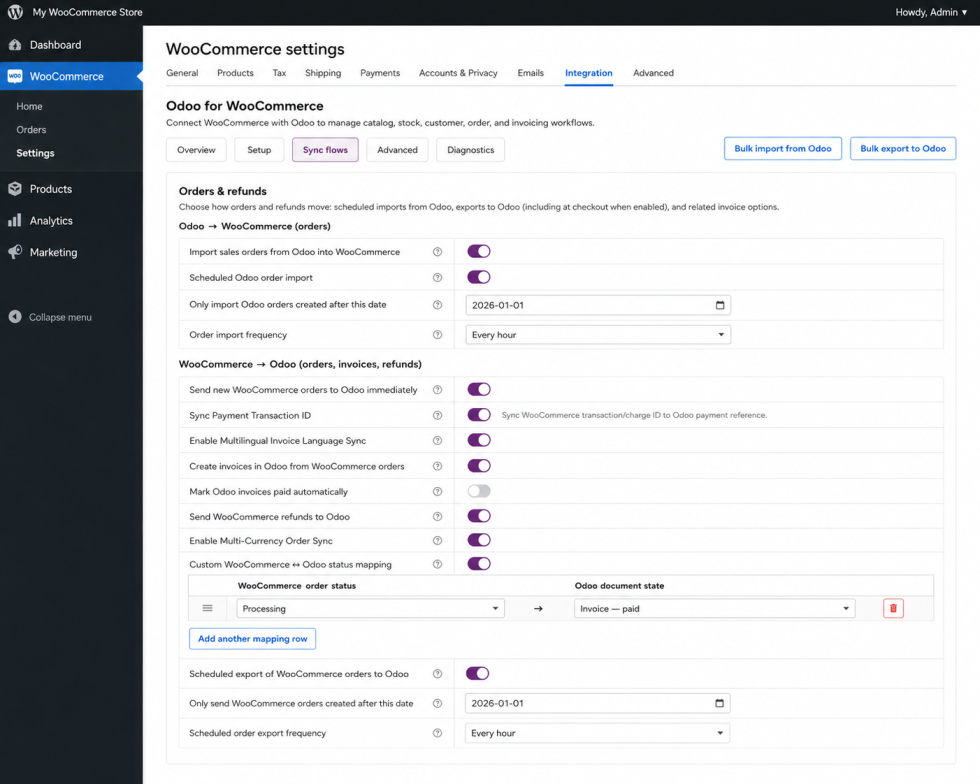
Orders, invoices, and refunds
↑ Back to topOdoo to WooCommerce
↑ Back to topThe integration can:
- Import Odoo sales orders into WooCommerce.
- Synchronize Odoo refund records to WooCommerce.
- Update related WooCommerce records according to the enabled workflow.
Order and refund synchronization can be scheduled hourly, twice per day, or once per day.
WooCommerce to Odoo
↑ Back to topWooCommerce orders can be sent to Odoo as soon as they are created.
Enable Send orders at checkout to queue new WooCommerce orders for Odoo immediately.
You can also enable a scheduled order export as a catch-up process. The scheduled export can be restricted to WooCommerce orders created after a specified date, which is useful when first enabling the integration on an established store.
Available scheduled order intervals are hourly, twice per day, and once per day.
Create invoices in Odoo
↑ Back to topEnable Create invoices in Odoo when WooCommerce orders should create corresponding Odoo invoices.
Make sure the Odoo company, Sales journal, and tax settings under Setup are correct before using this option in production.
Mark Odoo invoices as paid
↑ Back to topWhen Mark Odoo invoices as paid is enabled, newly created Odoo invoices can be marked as paid automatically.
Use this when payment is already considered complete in WooCommerce. If payment is collected or reconciled separately in Odoo, leave this option disabled.
WooCommerce refunds
↑ Back to topEnable Send WooCommerce refunds to Odoo to reflect WooCommerce refunds in Odoo.
Invoice creation must be enabled for the corresponding Odoo accounting workflow.
Payment Transaction ID
↑ Back to topEnable Sync Payment Transaction ID to send the WooCommerce payment gateway transaction ID to Odoo.
When available, the transaction ID is stored in the Odoo sales order Payment Ref. field and can also be added to the invoice Payment Reference field.
Orders without a transaction ID continue to synchronize normally.
Multilingual invoice language
↑ Back to topEnable Multilingual Invoice Language Sync when a supported multilingual WordPress configuration should pass the checkout language to Odoo.
The integration includes handling for WPML, Polylang, and Weglot. When enabled, the detected order language can update the Odoo customer language so Odoo can generate the related invoice in that language.
When disabled, Odoo continues to use the language already assigned to the customer.
Multi-currency order synchronization
↑ Back to topEnable Multi-Currency Order Sync when WooCommerce orders should be sent to Odoo using the order’s WooCommerce currency.
When that currency exists and is active in Odoo, the integration resolves or creates the corresponding Odoo pricelist and synchronizes the order using that currency.
If the WooCommerce order currency is missing or inactive in Odoo, the integration records an error and continues the order export without applying a currency-specific pricelist.
Multi-currency support applies to the WooCommerce to Odoo order workflow; it should not be interpreted as a general multi-currency catalog synchronization feature.
Custom order status mapping
↑ Back to topCustom order status mapping lets you associate WooCommerce statuses with Odoo document states.
Available Odoo outcomes include:
- Quote only.
- Quote and sales order.
- Invoice – payment pending.
- Invoice – paid.
- Cancelled.
Use custom mapping when the standard order workflow does not match your business process.
Bulk synchronization
↑ Back to topFor larger migrations, initial setup, or manual synchronization, use the buttons at the top of the Sync flows screen.
Bulk import from Odoo
↑ Back to topBulk import supports:
- Products.
- Orders.
- Customers.
You can optionally select Created after and Created before dates. Leave both dates empty to process all matching records.
Bulk export to Odoo
↑ Back to topBulk export supports:
- Products.
- Orders.
- Customers.
Date filters are also available for export. Leave both dates empty to process all matching records.
Progress is displayed while a bulk process runs.
Active Processes
↑ Back to topThe Active Processes screen provides centralized monitoring for background Odoo synchronization jobs.
Use this screen to view:
- Currently running synchronization processes.
- Progress for supported product, order, customer, and stock processes.
- Recent synchronization history.
- Completed, stopped, or failed processes.
Stop a running process
↑ Back to topSelect Stop when you need to end a long-running synchronization.
Stopping is graceful. The item or batch currently being processed may finish before the process stops, and records that have already synchronized are retained.
Stopping a process does not roll back records that were successfully synchronized earlier in the run.
Synchronization history
↑ Back to topThe Recent Sync History section lets you review recent processes and clean up old history.
Available cleanup actions include:
- Clear completed history.
- Clear stopped or failed history.
- Clear history older than 30 days.
Currently running and stop-requested processes are not removed. History older than 30 days is also cleaned automatically.
Advanced settings
↑ Back to topThe Advanced screen contains optional synchronization features that are not required by most stores.
Order status automation
↑ Back to topOrder statuses can be synchronized from Odoo to WooCommerce or from WooCommerce to Odoo when the corresponding workflow is enabled.
Use status synchronization only when you have decided which platform controls fulfillment and order progression. Updating the same order independently in both platforms can lead to conflicting changes.
Coupons and promotions
↑ Back to topCoupon synchronization is available in both directions.
You can configure the integration to:
- Create WooCommerce coupons from Odoo.
- Update existing WooCommerce coupons from Odoo.
- Send WooCommerce coupons to Odoo.
- Update existing Odoo coupon records from WooCommerce.
Coupon synchronization supports hourly, twice-daily, and daily schedules.
Enable coupon synchronization only if the same promotion data needs to exist in both platforms.
Diagnostics and troubleshooting
↑ Back to topUse the Diagnostics screen when the integration does not behave as expected.
Test the Odoo connection
↑ Back to topRun the connection test to confirm that the saved Odoo credentials can authenticate successfully.
If the connection fails, confirm:
- The selected Odoo version.
- The Odoo server URL.
- The database name.
- The username.
- The API key or password.
- The Odoo user’s permission
Product not syncing? Check these common causes first
↑ Back to topA product that does not synchronize is often caused by a product-matching or synchronization setting rather than a connection failure.
Check that:
- The product has a matching Internal Reference, Barcode, or enabled SKU fallback.
- The correct Create or Update synchronization option is enabled for the direction you are using.
- The product or its category has not been excluded from synchronization.
- Your Odoo connection is active.
- The product’s Odoo Last Sync status does not show an earlier failure or missing sync.
- Active Processes does not show a stopped or failed synchronization.
- The integration log does not contain an error for that product.
Still not syncing? Note the affected product SKU or ID and the approximate time you attempted the sync, then include those details when contacting support.
Each product needs a usable identifier so WooCommerce and Odoo can match the same item. Normally, the WooCommerce SKU is matched to the selected Odoo Internal Reference or Barcode.
If a product does not have a matching code, enable the SKU fallback option before syncing.
Scheduled synchronization does not run
↑ Back to topScheduled synchronization uses WordPress cron.
Check the integration health information on the Overview screen for:
- WP-Cron status.
- Last cron activity.
- Next scheduled activity.
- Missed or missing scheduled events.
- A disabled WordPress cron configuration.
Remember that standard WP-Cron execution depends on the site’s WordPress scheduling environment.
WooCommerce stock is higher than expected
↑ Back to topIf Odoo contains reserved inventory, remember that standard Odoo to WooCommerce stock synchronization uses qty_available.
Reserved quantity is not separately deducted by the standard synchronization process.
If your required WooCommerce stock value is inventory available after reservations, a different stock calculation is required.
A synchronization is taking too long
↑ Back to topOpen Active Processes to check the current process and its progress.
If necessary, select Stop. The current item or batch may complete first, and records already synchronized will remain.
Collect information for support
↑ Back to topWhen contacting support through the WooCommerce Marketplace, provide:
- The affected synchronization direction.
- The type of record involved, such as product, order, or customer.
- An example WooCommerce ID or Odoo record.
- The approximate time the problem occurred.
- Relevant WooCommerce logs.
- The diagnostics ZIP from the integration Overview screen where requested.
Do not include passwords, API keys, or other credentials in a support request.
Frequently asked questions
↑ Back to topWhich Odoo versions are supported?
↑ Back to topThe current integration supports Odoo versions 13, 14, 15, 16, 17, 18, and 19.
Can products synchronize every five minutes?
↑ Back to topYes. The product synchronization schedule supports a 5-minute interval in both directions.
The product synchronization job can process the enabled product creation, product update, stock, and price functions. Other scheduled workflows, including categories, attributes, customers, orders, refunds, and coupons, use their own available schedules.
Are product tags synchronized?
↑ Back to topYes. Product tags can synchronize between Odoo and WooCommerce as part of product synchronization in either direction.
There is no separate product-tag schedule or switch.
Can I assign a different Odoo tax to an individual product?
↑ Back to topYes. Edit the WooCommerce product and use Select Odoo Tax in the Odoo Sync panel.
A saved product-specific Odoo tax overrides the global default product tax for that product during WooCommerce to Odoo synchronization.
Can I prevent one WooCommerce product from being sent to Odoo?
↑ Back to topYes. Edit the product and enable Exclude from Odoo in the Odoo Sync panel.
This excludes that product from the WooCommerce to Odoo product synchronization workflow. It does not act as an exclusion from Odoo to WooCommerce imports.
How can I tell when a product last synchronized?
↑ Back to topGo to Products > All Products in WooCommerce and check the Odoo Last Sync column.
Successfully processed products display the recorded synchronization date. Products without a recorded successful synchronization display Not Synced.
Can I stop a synchronization after it starts?
↑ Back to topYes. Open Active Processes and select Stop for a supported running process.
The current item or batch may finish before the process stops. Items that already synchronized are not rolled back.
Does Odoo to WooCommerce stock account for reserved inventory?
↑ Back to topNot separately. Standard Odoo to WooCommerce stock synchronization uses Odoo’s qty_available value.
The extension does not currently use free_qty or stock.quant.reserved_quantity as the standard WooCommerce inventory value.
If WooCommerce must show stock available after reservations, the stock synchronization logic requires a different implementation.
Can I select an Odoo warehouse for stock synchronization?
↑ Back to topThere is no standard warehouse-selection setting in the current extension. Stock synchronization uses the quantity returned for the Odoo product by the configured integration.
Stores requiring warehouse-specific or reservation-adjusted inventory should confirm their required inventory model before enabling production stock synchronization.
Is multi-currency supported?
↑ Back to topYes, for WooCommerce to Odoo order synchronization.
When enabled, the WooCommerce order currency is used to resolve the appropriate Odoo currency and pricelist. The currency must exist and be active in Odoo for the currency-specific workflow to be applied.
Is the extension compatible with WooCommerce HPOS?
↑ Back to topYes. The extension declares compatibility with WooCommerce High-Performance Order Storage.
You need:
- An active WooCommerce store.
- An Odoo environment with external API access.
- An Odoo user that has permission to access the records used by the integration.
- Your Odoo server URL.
- Your Odoo database name.
- Your Odoo username.
- An Odoo API key or password.
- The Odoo applications required for the data you plan to synchronize, such as Sales, Inventory, and Invoicing/Accounting.
Odoo for WooCommerce currently provides configuration options for Odoo versions 13 through 19.
For automated integrations, use a dedicated Odoo user with only the permissions required by your synchronization workflow where possible.
Get started
↑ Back to topFor a new installation:
- Go to WooCommerce > Settings > Integrations > Odoo Integration.
- Open Setup.
- Enter your Odoo connection details.
- Use Test connection to verify them.
- Save the settings.
- Select the Odoo company, invoice journal, and tax defaults used by the store.
- Choose a starting scenario or leave it set to Custom.
- Open Sync flows.
- Enable only the data flows your store needs.
- Test with a small number of products or orders before starting a large synchronization.
- Review Overview and Diagnostics to confirm the integration is operating normally.
Do not enable every synchronization option simply because it is available. Configure each data type according to which system owns that information in your business.
Navigate the Odoo settings
↑ Back to topOdoo for WooCommerce organizes its settings into five main areas.
Overview
↑ Back to topOverview provides a high-level status of the integration.
Use it to review:
- Odoo connection status.
- Setup completion.
- Synchronization activity.
- Recorded integration issues.
- Integration health information.
Overview is the best place to start when checking whether the connector is operating normally.
Setup
↑ Back to topSetup contains the guided initial configuration.
Use it to:
- Connect WooCommerce to Odoo.
- Select an Odoo version.
- Enter connection credentials.
- Choose a starting synchronization scenario.
- Select the Odoo company.
- Configure the invoice journal.
- Configure product and shipping tax defaults.
- Configure fiscal-position settings where required.
Sync flows
↑ Back to topSync flows controls day-to-day movement of business data.
The settings are grouped into areas including:
- Catalog.
- Inventory and pricing.
- Customers.
- Orders and refunds.
- Invoicing.
Each group also contains advanced options for schedules, exclusions, and less common workflows.
Advanced
↑ Back to topAdvanced contains synchronization options that most stores do not need during initial setup.
These include:
- Order-status synchronization.
- Coupon and promotion synchronization.
- Additional scheduled automation.
Configure the main connection and Sync flows before enabling advanced options.
Diagnostics
↑ Back to topDiagnostics provides connection testing, activity logging, recorded integration issues, and WooCommerce log information.
Use this area when investigating failed or unexpected synchronization.
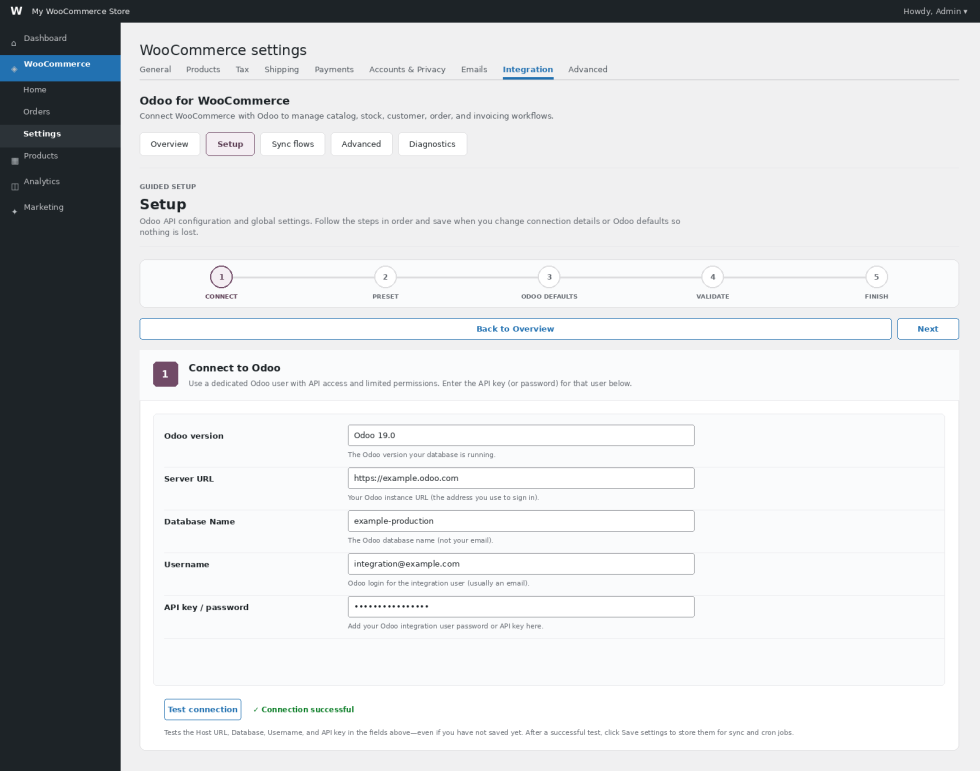
Connect WooCommerce to Odoo
↑ Back to topGo to Setup > Connect to Odoo.
Enter the following information.
Odoo version
↑ Back to topSelect the version used by the Odoo database.
The current integration provides options for Odoo 13 through Odoo 19.
Server URL
↑ Back to topEnter the base URL used to access the Odoo instance.
For example:
Do not add unnecessary paths to the end of the URL.
Database name
↑ Back to topEnter the Odoo database name.
This is the database identifier, not the user’s email address.
Username
↑ Back to topEnter the login used by the Odoo integration user.
This is commonly an email address.
API key or password
↑ Back to topEnter the credential used by the Odoo integration user.
Use an API key when supported by the Odoo environment.
Treat the API key with the same care as a password.
Test the connection
↑ Back to topUse Test connection before continuing.
A successful test verifies the values currently entered in the Setup screen.
Overview and Diagnostics also provide a Test saved connection option for credentials that have already been saved.
Choose a starting scenario
↑ Back to topOdoo for WooCommerce provides starting scenarios that enable a sensible group of synchronization settings.
Custom
↑ Back to topKeeps the current synchronization choices and allows you to configure individual settings manually.
Odoo leads the catalog
↑ Back to topUse this when products, stock, and prices are primarily maintained in Odoo and should flow into WooCommerce.
WooCommerce leads orders
↑ Back to topUse this when WooCommerce is the ecommerce order source and orders, invoices, and related data should be sent to Odoo.
Two-way catalog and orders
↑ Back to topEnables a broader set of synchronization directions.
After selecting a preset, save the settings and review the individual options under Sync flows.
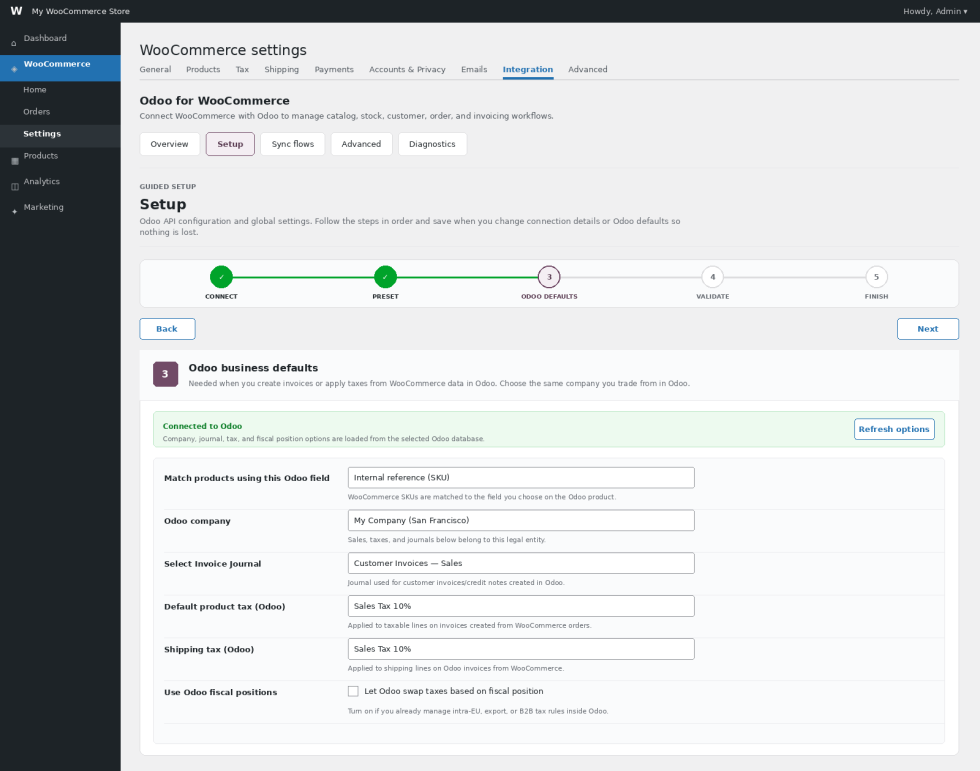
Configure Odoo business defaults
↑ Back to topAfter connecting successfully, configure the Odoo defaults used when WooCommerce data is sent to Odoo.
Product code source
↑ Back to topChoose how WooCommerce SKUs are matched with Odoo products:
- Internal reference (SKU)
- Barcode
Use the identifier your business already treats as the unique product reference.
Odoo company
↑ Back to topSelect the Odoo company that should receive WooCommerce sales and accounting data.
Only one company is selected for the integration at a time.
Invoice journal
↑ Back to topSelect the journal used when WooCommerce orders create customer invoices or credit notes in Odoo.
Odoo customer invoices require a Sales-type journal. If an incompatible journal is selected, Odoo may use its default Sales journal instead.
Refresh the available options after creating a new journal in Odoo.
Product tax
↑ Back to topSelect the default Odoo tax for taxable product lines created from WooCommerce orders.
Shipping tax
↑ Back to topSelect the tax used for shipping lines.
Fiscal positions
↑ Back to topEnable Odoo fiscal positions if your Odoo accounting configuration uses them to change taxes for specific customers, countries, regions, or transaction types.
GST treatment
↑ Back to topStores using applicable Indian Odoo accounting localization may also see a GST treatment setting.
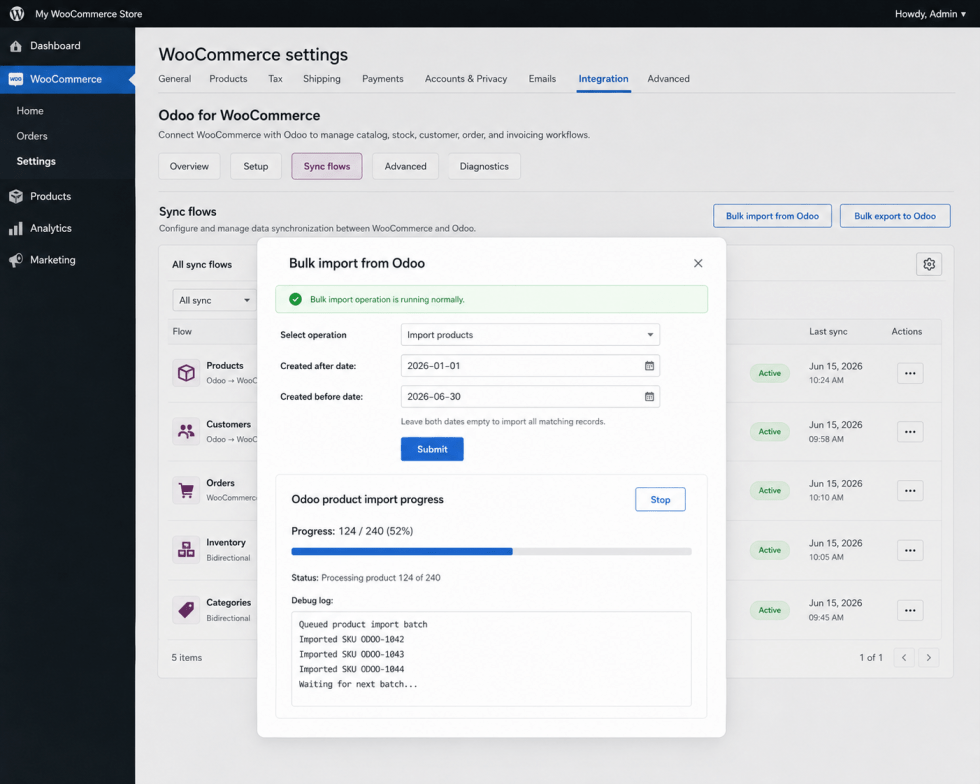
Plan your synchronization directions
↑ Back to topBefore enabling synchronization, determine which application owns each data type.
For example, a store might use:
- Odoo as the source of truth for products, stock, and prices.
- WooCommerce as the source of truth for ecommerce orders.
- Odoo as the accounting system for invoices and refunds.
This configuration minimizes overlapping updates.
If both Odoo-to-WooCommerce and WooCommerce-to-Odoo synchronization are enabled for the same data, avoid editing the same record in both applications at approximately the same time.
Sync products from Odoo to WooCommerce
↑ Back to topOpen Sync flows > Catalog.
Enable Create new WooCommerce products from Odoo to allow products created in Odoo to be added to WooCommerce.
Enable Update existing WooCommerce products from Odoo when changes made to matching Odoo products should also update WooCommerce.
Additional options include:
- Excluding selected Odoo product categories.
- Skipping Odoo Point of Sale-only products.
- Keeping the existing WooCommerce product description.
- Creating WooCommerce categories from Odoo.
- Creating product attributes from Odoo.
- Selecting synchronization schedules.
- Using an Odoo ID as an SKU fallback.
- Reusing a parent product image for variants that do not have their own image.
Products without an SKU
↑ Back to topNormally, product matching relies on the WooCommerce SKU and the configured Odoo Internal Reference or Barcode.
If Use Odoo ID as SKU Fallback is enabled, products without a suitable Odoo reference can still be imported using a generated SKU.
Simple products use a value based on:
odoo-{id}
Variants use:
odoo-var-{id}
Variable parent products do not require their own SKU.
This is useful when an Odoo variable product structure does not provide a reference for the parent product.
Product images and variants
↑ Back to topWhen Reuse parent product image on variants is enabled, an Odoo variant without its own image can use the parent product’s main image in WooCommerce.
The integration references the existing image rather than intentionally creating a duplicate Media Library item for each variant.
Sync products from WooCommerce to Odoo
↑ Back to topOpen Sync flows > Catalog and configure the WooCommerce-to-Odoo options.
You can:
- Create new Odoo products from WooCommerce.
- Update existing Odoo products.
- Exclude selected WooCommerce categories.
- Send categories to Odoo.
- Send attributes to Odoo.
- Keep existing Odoo product descriptions unchanged.
- Configure scheduled synchronization.
- Use a WooCommerce ID as an SKU fallback.
- Optionally delete the linked Odoo product when a WooCommerce product is moved to Trash.
Delete products in Odoo when trashed in WooCommerce
↑ Back to topEnable Delete Product in Odoo on Woo Trash only when removing the linked Odoo product is part of your intended business process.
WooCommerce products without an SKU
↑ Back to topWhen Use Woo ID as SKU Fallback is enabled, a generated SKU can be created for products that do not already have one.
Simple products use:
wc-{id}
Variations use:
wc-var-{id}
The generated value is saved to WooCommerce so subsequent synchronization continues using the same identifier.
Variable parent products do not require their own SKU.
Sync inventory and pricing
↑ Back to topUnder Sync flows > Inventory & pricing, choose the system that controls stock quantities and prices.
Odoo to WooCommerce
↑ Back to topEnable the relevant options to:
- Update WooCommerce stock from Odoo.
- Update WooCommerce prices from Odoo.
Use this configuration when Odoo is the main inventory or pricing system.
WooCommerce to Odoo
↑ Back to topEnable the relevant options to:
- Send WooCommerce stock levels to Odoo.
- Send WooCommerce prices to Odoo.
Use this configuration when inventory or pricing is maintained in WooCommerce.
Sync customers
↑ Back to topOdoo for WooCommerce can synchronize customer records in either direction.
Odoo to WooCommerce
↑ Back to topEnable Create and update WooCommerce customers from Odoo.
Choose the schedule used to refresh customer records.
WooCommerce to Odoo
↑ Back to topEnable Create and update Odoo contacts from WooCommerce customers.
Choose the required export schedule.
If both directions are enabled, define which system is authoritative for customer information before staff edit the same customer in both systems.
Route orders to one Odoo customer
↑ Back to topSome stores do not need an individual Odoo contact for every WooCommerce customer.
Enable Attach every WooCommerce order to a single Odoo contact and enter the required Odoo contact ID when all web orders should use one Odoo customer.
This can be useful for kiosk, point-of-sale-style, or other workflows where individual ecommerce customer records are not required in Odoo.
Send WooCommerce orders to Odoo
↑ Back to topOpen Sync flows > Orders & refunds.
Enable Send new WooCommerce orders to Odoo immediately to queue new orders when they are placed.
This is enabled by default in the current configuration.
Odoo for WooCommerce can also perform scheduled order export.
For scheduled exports, configure:
- Whether scheduled order export is enabled.
- The earliest WooCommerce order date that should be included.
- How often the export should run.
Create Odoo invoices
↑ Back to topEnable Create invoices in Odoo from WooCommerce orders when the integration should generate the accounting document for exported orders.
Before enabling invoice creation, verify:
- The correct Odoo company is selected.
- A suitable Sales journal is selected.
- Product taxes are configured.
- Shipping tax is configured.
- Fiscal-position behavior is correct for the business.
Test invoice creation before enabling it on a high-volume production store.
Mark invoices as paid
↑ Back to topEnable Mark new Odoo invoices paid automatically if a successfully paid WooCommerce order should result in the corresponding Odoo invoice being treated as paid.
Sync refunds
↑ Back to topEnable Record refunds in Odoo when issued in WooCommerce to synchronize WooCommerce refund activity to Odoo.
Invoice creation must be enabled for the related Odoo accounting workflow.
The integration can also import refund information from Odoo into WooCommerce when Odoo is the system where refunds are processed.
Sync payment transaction IDs
↑ Back to topEnable Sync Payment Transaction ID to send a WooCommerce payment gateway transaction ID to Odoo.
When available, the transaction ID is stored with the related Odoo sales and invoice information.
Orders without a payment transaction ID continue to synchronize without one.
This can make payment reconciliation and transaction lookup easier when WooCommerce is the payment source.
Sync invoice language
↑ Back to topEnable Sync order language to Odoo customer and invoice when the store uses a supported multilingual setup and invoices should follow the shopper’s checkout language.
When enabled, the integration can detect the order language and pass it to the corresponding Odoo customer so Odoo can create documents in that language.
The current integration includes support for multilingual environments using systems such as WPML, Polylang, or Weglot.
When this setting is disabled, Odoo continues to use the language already assigned to the customer.
Test this workflow with each storefront language before using it for production invoicing.
Sync multi-currency orders
↑ Back to topEnable Multi-Currency Order Sync when WooCommerce orders are placed in more than one currency and the WooCommerce order currency should be used when creating the corresponding Odoo order.
The matching currency must exist and be active in Odoo.
When possible, the integration resolves the appropriate Odoo pricelist for the order currency.
If the required currency is unavailable in Odoo, review the integration log before relying on the resulting Odoo order for accounting or fulfillment.
Import orders from Odoo
↑ Back to topEnable Import sales orders from Odoo into WooCommerce when orders created in Odoo also need to appear in WooCommerce.
This workflow is useful when Odoo receives orders from additional sales channels and WooCommerce should also contain those orders.
Select the synchronization frequency according to how frequently Odoo orders need to appear in WooCommerce.
Sync order statuses
↑ Back to topOrder-status synchronization is available under Advanced.
Odoo to WooCommerce
↑ Back to topEnable Pull order status updates from Odoo into WooCommerce when Odoo controls fulfillment status.
Use this when warehouse or fulfillment staff primarily update the order in Odoo.
WooCommerce to Odoo
↑ Back to topEnable Update Odoo documents when WooCommerce order status changes when WooCommerce controls the operational order lifecycle.
Custom status mapping
↑ Back to topCustom mapping can associate WooCommerce order statuses with the corresponding Odoo document states.
Sync coupons and promotions
↑ Back to topCoupon synchronization is available under Advanced > Coupons & promotions.
Odoo for WooCommerce can:
- Create WooCommerce coupons from Odoo.
- Update existing WooCommerce coupons from Odoo.
- Send WooCommerce coupons to Odoo.
- Update corresponding Odoo discount information.
- Run coupon synchronization on a schedule.
Enable these settings only if coupons or promotions genuinely need to be shared between the two systems.
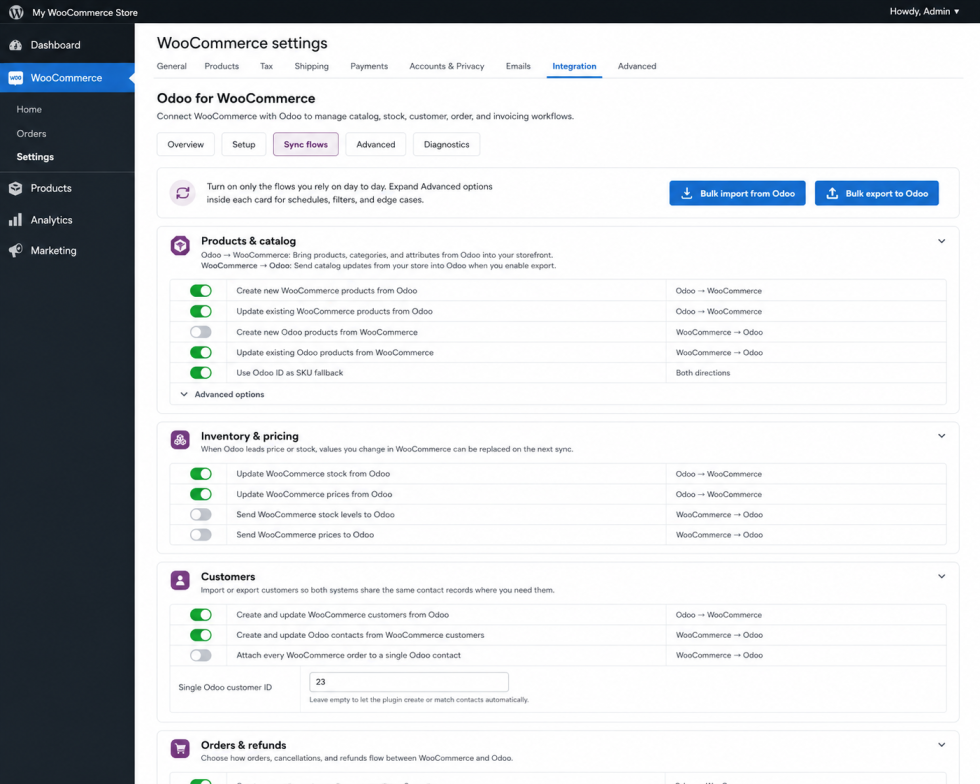
Run bulk synchronization
↑ Back to topOdoo for WooCommerce provides bulk operations for products, customers, and orders.
Bulk operations can be used for tasks such as:
- Initial product migration.
- Re-synchronizing a catalog.
- Importing or exporting customers.
- Importing or exporting historical orders.
Where available, select the operation and date range before starting the process.
A running bulk operation displays progress information.
The integration also provides a Stop control for supported background processes.
Do not start multiple conflicting bulk processes for the same data set at the same time.
If a product import is interrupted because the Odoo connection is lost, recent versions of the integration can resume the product import queue after connectivity is restored.
Monitor integration health
↑ Back to topThe Overview screen includes integration health information.
Use it to review whether the WooCommerce store and Odoo connector appear to be operating normally.
Health information can include:
- Connection state.
- Recent synchronization success or failure.
- Recent connector errors.
- WordPress cron status.
- Last scheduled run.
- Next scheduled run.
- Missing or overdue scheduled synchronization tasks.
If WordPress cron is disabled, make sure the server has an alternative system cron process calling WordPress cron correctly.
Low-traffic stores can also experience delayed WP-Cron processing.
Download diagnostics for support
↑ Back to topThe integration health area provides Download diagnostics (ZIP).
Use this when support requests diagnostic information about the integration.
The diagnostics package is designed to collect useful system and integration information in one support bundle.
Use Diagnostics and logs
↑ Back to topOpen Diagnostics when a synchronization does not behave as expected.
The screen provides:
- Test saved connection.
- Activity logging controls.
- Recorded product and synchronization issues.
- WooCommerce Odoo log files.
Enable activity logging before reproducing an issue so the relevant event is recorded.
WooCommerce file logs can also be reviewed under WooCommerce > Status > Logs.
Troubleshooting
↑ Back to topOdoo does not connect
↑ Back to topConfirm:
- The Odoo version is correct.
- The Server URL is correct.
- The Database Name is correct.
- The Username belongs to the intended Odoo user.
- The API key or password is correct.
- The Odoo user has the permissions required by the integration.
- External API access is available for the Odoo environment.
Use Test connection after making changes.
If testing succeeds, save the settings before starting synchronization.
Sync settings are unavailable
↑ Back to topComplete the Setup process first.
The integration requires a working Odoo connection and the required Odoo defaults before synchronization settings are fully available.
Confirm the company, invoice journal, and tax defaults under Setup.
A product does not synchronize
↑ Back to topCheck:
- The product identifier.
- The configured Internal Reference or Barcode mapping.
- Category exclusion settings.
- Whether product creation or updating is enabled.
- Whether the correct synchronization direction is enabled.
- The Diagnostics issues.
- The WooCommerce Odoo logs.
If products do not have normal SKUs, consider the appropriate SKU fallback setting.
A variable product parent has no SKU
↑ Back to topVariable parent products do not require their own SKU in the current integration.
If a product or variant lacks the identifier required by your workflow, use the appropriate Odoo ID or WooCommerce ID SKU fallback where suitable.
Product images are duplicated or repeatedly imported
↑ Back to topUpdate to the current release before troubleshooting historical image-import behavior.
Current product import handling is designed to preserve existing WordPress Media Library references rather than unnecessarily deleting and recreating existing attachments.
For variants without a separate image, consider enabling Reuse parent product image on variants.
An Odoo order is missing products or line items
↑ Back to topCheck that the products referenced by the WooCommerce order can be matched or created in Odoo.
Review the SKU/Internal Reference or Barcode mapping and inspect Diagnostics for the failed product operation.
Resolve product synchronization errors before retrying the affected order.
An invoice journal is missing
↑ Back to topReturn to Setup > Odoo business defaults and refresh the available Odoo options.
Confirm that the journal belongs to the selected company.
Customer invoices require a Sales-type journal.
Synchronization is delayed
↑ Back to topCheck the integration health information for:
- The last cron run.
- The next scheduled run.
- Overdue scheduled tasks.
- Missing scheduled events.
- Whether WordPress cron is disabled.
If the site has little traffic, WP-Cron may run less consistently. A server-level cron configuration can provide more predictable scheduled processing.
A bulk synchronization needs to be stopped
↑ Back to topUse the Stop control associated with the running bulk operation.
Wait for the interface to confirm that processing has stopped before beginning a conflicting operation.
The integration stopped after reconnecting Odoo
↑ Back to topTest the saved connection first.
Recent versions can resume an interrupted product import queue after the Odoo connection is restored.
Review the progress indicator and Diagnostics before manually starting the same import again.
The site URL changed
↑ Back to topIf the site was moved between domains or from staging to production and connector authentication fails, save and test the connection again.
Do not repeatedly reset a production connection without first recording the current configuration.
Best practices
↑ Back to top- Choose a source of truth for products, inventory, prices, customers, and order statuses before enabling synchronization.
- Enable only the data flows the business actually uses.
- Use a dedicated Odoo integration user where possible.
- Prefer API keys over a personal user’s normal login password where supported.
- Test a small catalog and a small number of orders before running a full synchronization.
- Verify product identifiers before a bulk migration.
- Confirm accounting settings with the person responsible for the Odoo configuration before enabling automatic invoices, paid status, refunds, or tax-related options.
- Use reasonable synchronization intervals. More frequent synchronization increases requests to WordPress, Odoo, and the connector.
- Review the Overview and integration health information regularly.
- Keep activity logging available while troubleshooting.
- Download the diagnostics package when support requests system information.
- Keep WordPress, WooCommerce, Odoo for WooCommerce, and the Odoo environment updated.
- Test significant configuration changes and upgrades in staging before applying them to a production integration.
Getting help
↑ Back to topIf the issue cannot be resolved using Diagnostics and the troubleshooting steps above, contact support through the WooCommerce.com support channel for Odoo for WooCommerce.
Include:
- A concise description of the problem.
- What you expected to happen.
- What happened instead.
- Example WooCommerce order or product IDs.
- The approximate time the issue occurred.
- The synchronization direction involved.
- Relevant WooCommerce Odoo logs.
- The diagnostics ZIP when requested.
Do not include passwords, API keys, payment credentials or other secrets in a support request.

