Open Box Deal allows you to resell products that can’t be sold as new in your WooCommerce store. It displays a link to the Open Box Deal directly on the original product page. The Open Box Deal page automatically reuses all content from the original product, while also allowing you to add a product condition description and upload specific photos of the returned item. By offering these products at a discounted price, you boost sales and recover value from your returned inventory.
In addition, Open Box Deal supports sustainability by reducing waste and giving products a second life.
Installation
↑ Back to topTo start using a product from WooCommerce.com, you can use the “Add to store” functionality on the order confirmation page or the My subscriptions section in your account.
- Navigate to My subscriptions.
- Find the Add to store button next to the product you’re planning to install.
- Follow the instructions on the screen, and the product will be automatically added to your store.
Alternative options and more information at:
Managing WooCommerce.com subscriptions.

Setup and configuration (Premium version)
↑ Back to topGetting started
↑ Back to topTo set up your store with Open Box Deal:
- Go to WooCommerce > Settings > Open Box Deal.
- Adjust the default settings. (Each setting is explained below the screenshot)
- Click Save changes when finished.
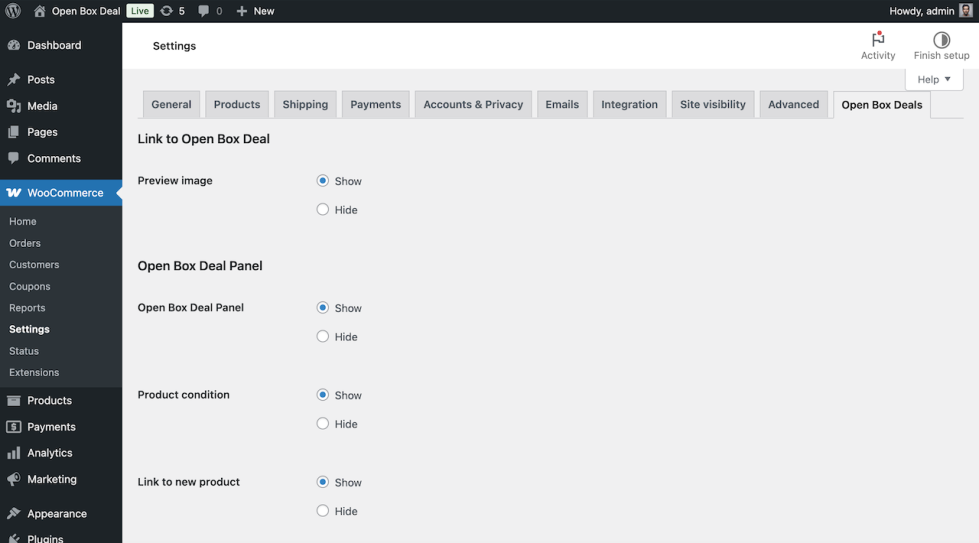
Link to Open Box Deal
↑ Back to topPreview Image: If enabled, the link will display the product thumbnail associated with the Open Box Deal product.
Open Box Deal panel
↑ Back to topOpen Box Deal Panel: If enabled, the Open Box Deal panel will appear on the Open Box Deal product page. It displays key information such as the product condition, a “Return Policy” link, a “What is Open Box Deal?” link, and a link to the original product with its regular price.
Product condition: Displays the condition specified for the Open Box Deal product.
Link to new product: Displays a link to the original (new) product associated with the Open Box Deal. The link also shows the original price of the product.
URL for “Return Policy”: Enter the URL of your “Return Policy” page. The link will be displayed on the Open Box Deal product page, but only if a URL is provided.
URL for “What is Open Box Deal?”: Enter the URL of your “What is Open Box Deal?” page. The link will be displayed on the Open Box Deal product page, but only if a URL is provided.
Open Box Deal (OBD) in the shop
↑ Back to topOBD links on shop page: Adds a link to the OBD on the shop page for each individual product, if an OBD is available.
OBD products between default products: If enabled, OBD products will be displayed alongside regular products in the shop and category listings.
Product conditions (Premium version)
↑ Back to topYou can assign a product condition to an Open Box Deal. To do this, you first need to create the product condition.
- In your WordPress Admin, go to Products > Product Conditions.
- Under Add New Product Condition, you can enter the name, slug, and a description for the condition.
- Click Add New Product Condition to save the condition
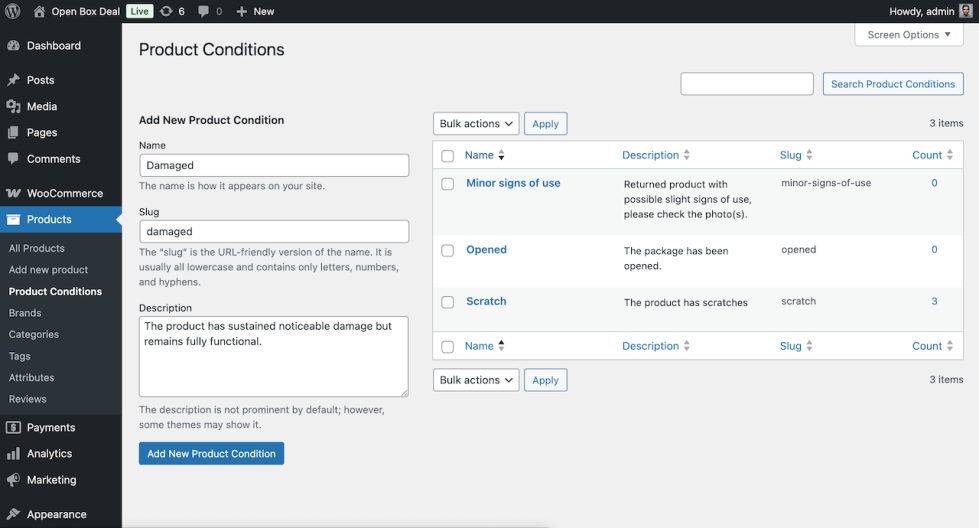
Now your product condition will be available for selection in the Open Box Deal product settings in WooCommerce. You can create and manage as many conditions as you need. In the next chapter, we’ll explain how to assign a product condition to an Open Box Deal product.
Open Box Deal products
↑ Back to topWhen creating an Open Box Deal, you can choose between a Simple Product or a Variable Product setup. The best choice depends on the number and type of returned items you want to sell.
When to use a simple Open Box Deal product
↑ Back to topUse a Simple Open Box Deal product if you only have one returned version of a product.
For example:
- You sell furniture and have one specific table with a scratch.
- You only need to show a single return item with its own condition and discount.
In this case, a Simple Product is easier and sufficient.
When to use a variable Open Box Deal product (Premium version)
↑ Back to topUse a Variable Open Box Deal product if you have multiple returned versions of the same item that differ in condition, size, or other attributes.
- For example:
- You sell shoes and have returned pairs in different sizes.
- You sell multiple returned tables, each with a different defect or condition.
By using a Variable Product, you can let customers choose between different Open Box Deal variations via a dropdown menu. Each variation can have:
- A unique product condition
- Its own photo
- A specific price
To create an Open Box Deal product, start by adding a new product and linking it to an existing main product in your store. This automatically creates the connection between the two products. By default, all content is inherited from the main product. If you add custom content, it will override the inherited version. Removing your custom content will restore the original content from the main product.
Create a simple Open Box Deal product
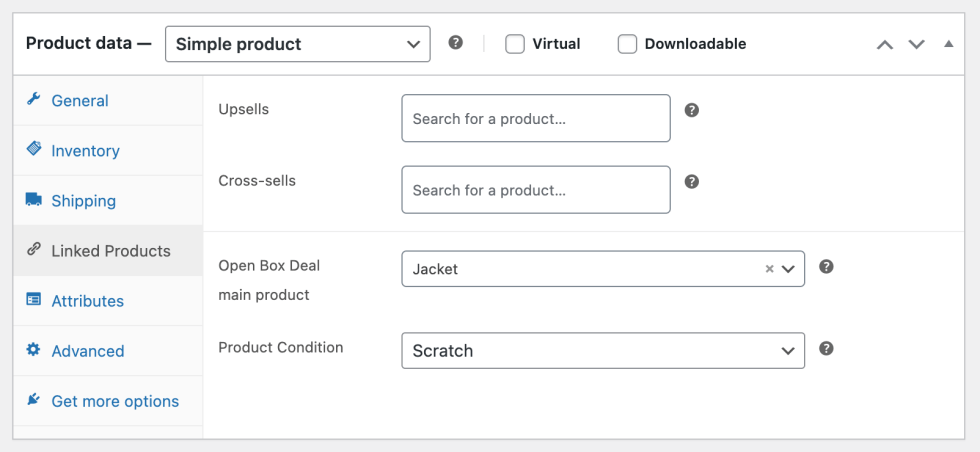
↑ Back to topA Simple Open Box Deal product is similar to a standard Simple Product in WooCommerce, so it does not have any variations. To set up a Simple Open Box Deal product, follow these steps:
- In your WordPress Admin, go to Products > Add New Product.
- Enter the Product name of your Open Box Deal product. This will be displayed on the product page and in the order summary.
- Scroll down to the Product data section and ensure that Simple product is selected from the dropdown menu.
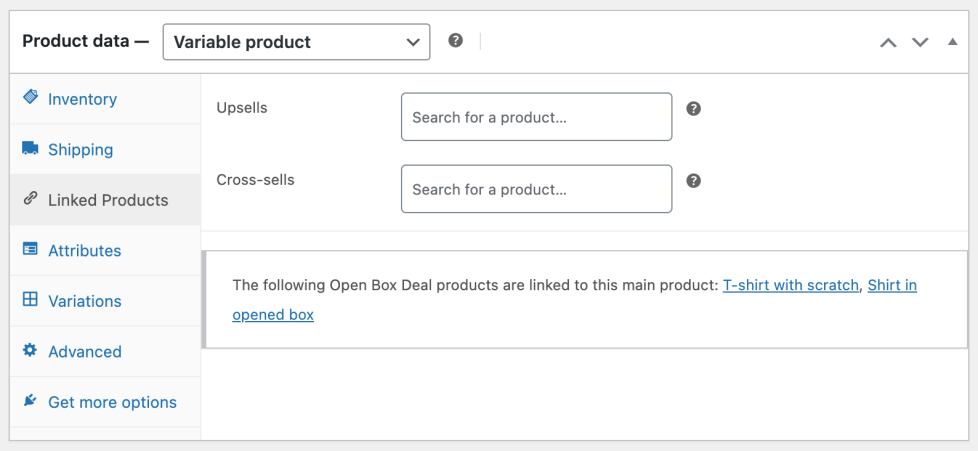
- Click on the Linked Products tab within the Product data section.
- Click on the dropdown under Open Box Deal Main Product and search for the product you want to link this Open Box Deal product to.
- Optionally, select the Product Condition you created, as explained in the Product Conditions chapter.
- Optionally, add a product image specifically for the Open Box Deal. If no image is selected, the default image from the main product will be used.
Create a variable Open Box Deal product (Premium version)
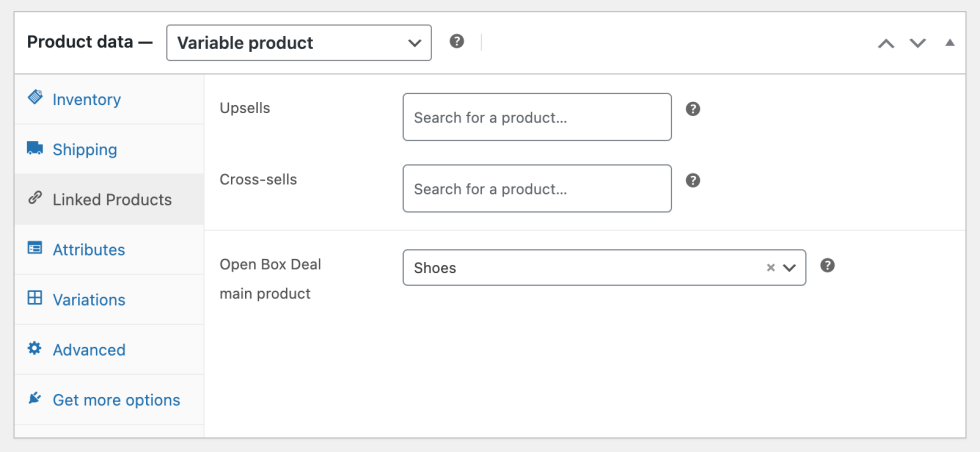
↑ Back to topA Variable Open Box Deal product is similar to a standard Variable Product in WooCommerce: it contains variations such as size and color. To set up a Variable Open Box Deal product, follow these steps:
- In your WordPress Admin, go to Products > Add New Product.
- Enter the Product name of your Open Box Deal product. This will be displayed on the product page and in the order summary.
- Scroll down to the Product data section and ensure that Variable product is selected from the dropdown menu.
- Click on the Linked Products tab within the Product data section.
- Click on the dropdown under Open Box Deal Main Product and search for the product you want to link this Open Box Deal product to.
- Next, click on the Variations tab. If you haven’t set up any attributes yet, you’ll need to do that first—just like you would for a regular variable product.
- Click either Generate variations or Add manually to create product variations. Once added, click on a variation to expand its settings. Make sure to set a price for the Open Box Deal variation. Without a price, the variation will not be displayed on the product page.
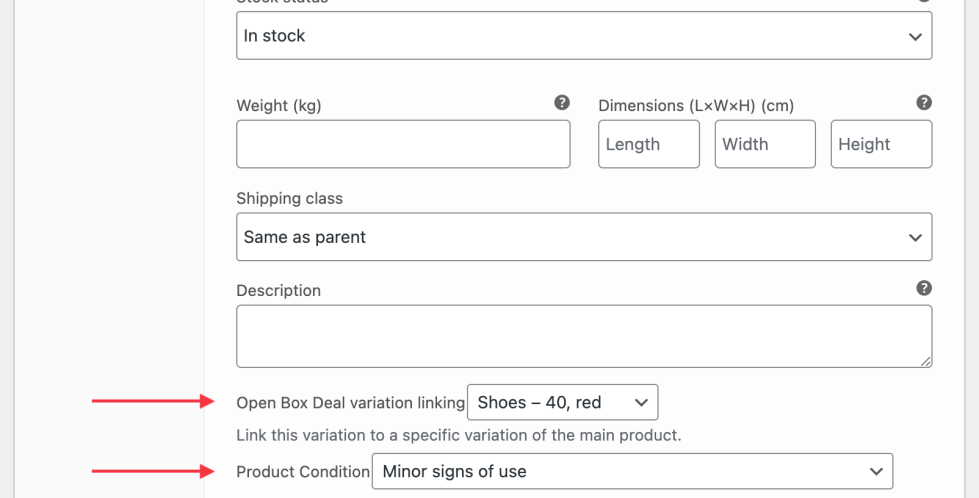
- Scroll down to the bottom of the variation settings and use the dropdown to select the corresponding Open Box Deal variation linking that links to the main product variation.
- Optionally, select the Product Condition you created, as explained in the Product Conditions chapter.
- Optionally, add a product image specifically for the Open Box Deal. If no image is selected, the default image from the main product will be used.
- Click Save changes and then Update the product. The Open Box Deal panel should now appear when selecting a variation that is linked to a main product variation.
Linked products
↑ Back to topWhen you link multiple Open Box Deal products to a main product, only the cheapest one will be displayed on the product page.
If you’ve lost track of which Open Box Deal products are linked to a main product, simply go to the edit page of that main product and click on the Linked Products tab. There, you’ll see a list of all associated Open Box Deal products.
Translations
↑ Back to topOpen Box Deal includes a .pot file to make the plugin translatable. You can use this file to modify language labels or to create multilingual versions of the plugin.
For detailed instructions on how to translate WooCommerce plugins, please refer to the official WooCommerce documentation: https://woocommerce.com/document/woocommerce-localization/