PH PostNord Shipping with Print Label helps you generate and print PostNord shipping labels, automate package and label creation, provide PostNord service-point options, generate customs documents for international shipments, and add tracking information to WooCommerce orders.
Now, let us take you through a step-by-step setup of the PH PostNord Shipping with Print Label plugin on your WooCommerce store.
Installation
↑ Back to topTo start using a product from WooCommerce.com, you can use the “Add to store” functionality on the order confirmation page or the My subscriptions section in your account.
- Navigate to My subscriptions.
- Find the Add to store button next to the product you’re planning to install.
- Follow the instructions on the screen, and the product will be automatically added to your store.
Alternative options and more information at:
Managing WooCommerce.com subscriptions.

Setup and Configuration
↑ Back to topGetting started
↑ Back to topThis guide walks you through the complete setup of the PH PostNord Shipping with Print Label for WooCommerce plugin, from connecting your PostNord account to printing shipping labels, setting up tracking, enabling service points, and configuring international shipments. You can follow the guide from start to finish or jump to any section you need.
Navigate to PostNord Plugin Settings
Access the plugin settings in either of these two ways:
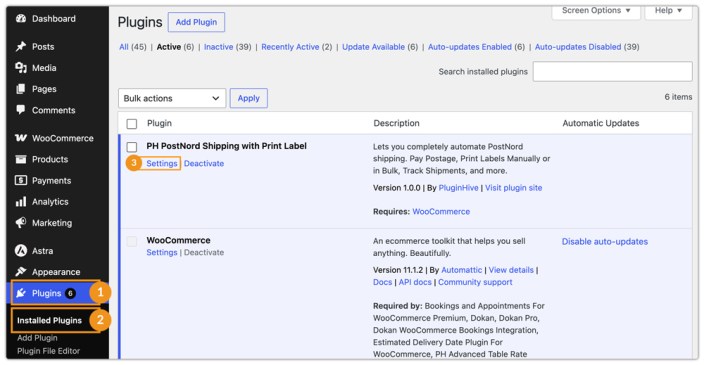
- Plugins > Installed Plugins > Settings under PH PostNord Shipping with Print Label
- WooCommerce > Settings > Shipping > PostNord
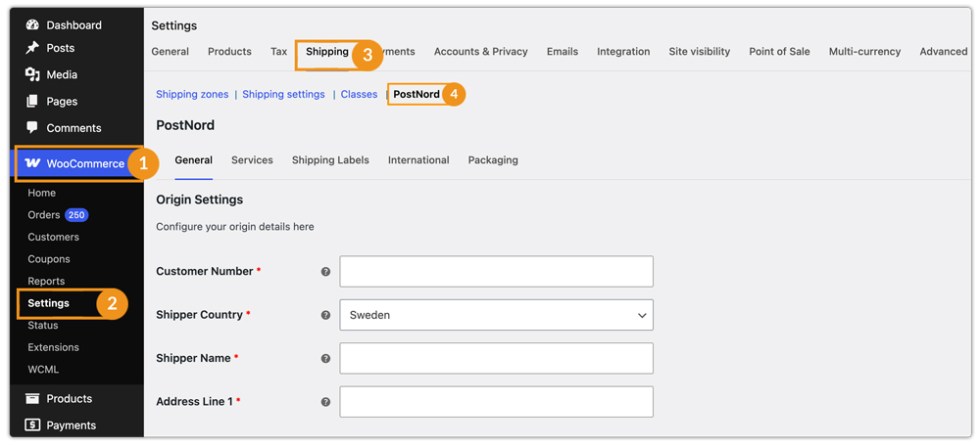
The settings are organized across the following tabs:
- General
- Services
- Shipping Labels
- International
- Packaging
Connect Your PostNord Account
Go to the plugin’s General tab and fill in your origin/shipper details to connect the plugin to your PostNord account.
Origin Settings
The following fields are required to establish the connection:
- Customer Number — Your PostNord customer number. Mandatory for API communication.
- Shipper Country — The country you are shipping from. Options: Denmark, Finland, Norway, Sweden. This determines which PostNord services are available.
- Shipper Name — The name that appears on shipping labels as the sender.
- Address Line 1 — Primary street address of the shipper.
- Address Line 2 — Optional second address line.
- Postal Code — Shipper’s postal/ZIP code.
- City — Shipper’s city.
- Company Name — Optional company name for label printing.
- Phone Number — Optional contact phone number.
- Email ID — Optional contact email. Also used as the default recipient for admin label notification emails.
- VAT Number — Optional VAT registration number for customs or invoicing purposes.
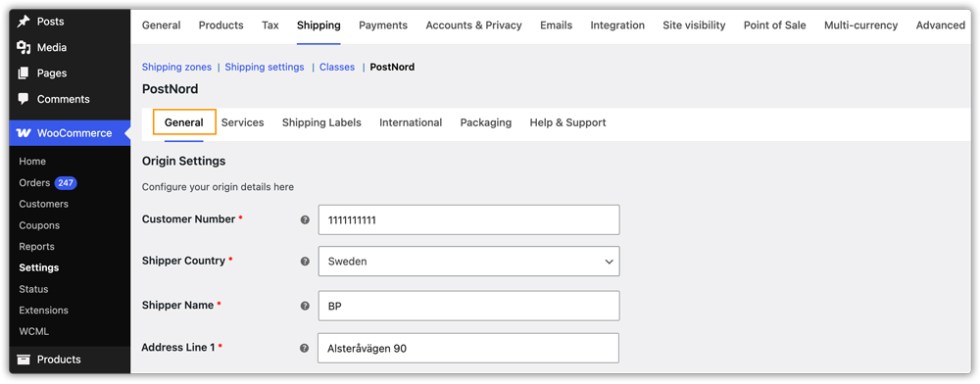
After filling in the Customer Number and shipper address, click Save Changes.
Configure Product Settings
Accurate product weight and dimensions are essential for correct package generation and label printing.
Set Product Weight and Dimensions
For each product you ship with PostNord:
- Go to WooCommerce > Products and open the product you want to edit.
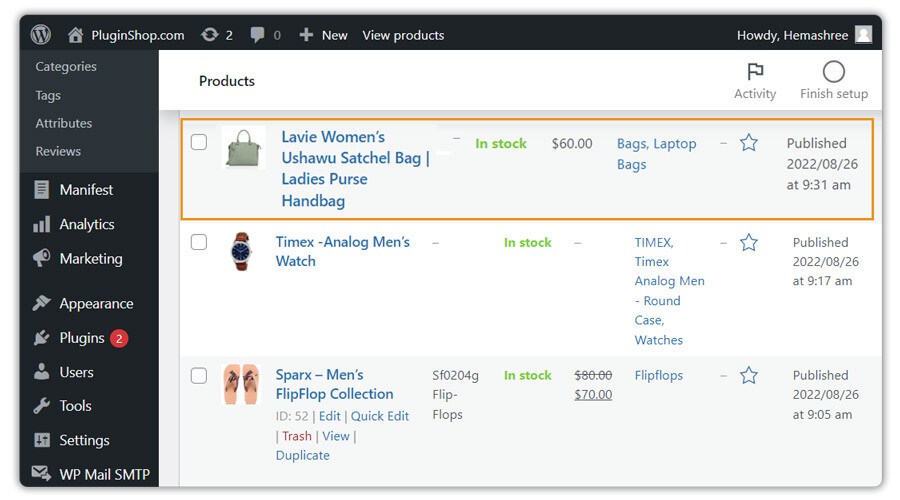
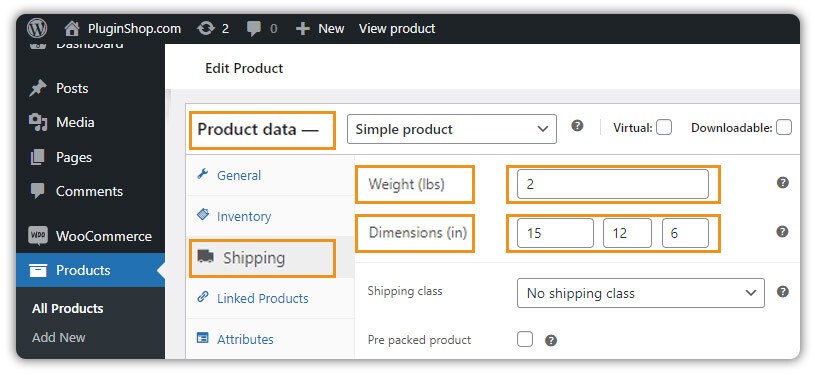
- Under Product Data, click the Shipping tab.
- Enter the product’s Weight and Dimensions (Length, Width, Height).
Set Weight and Dimensions Units
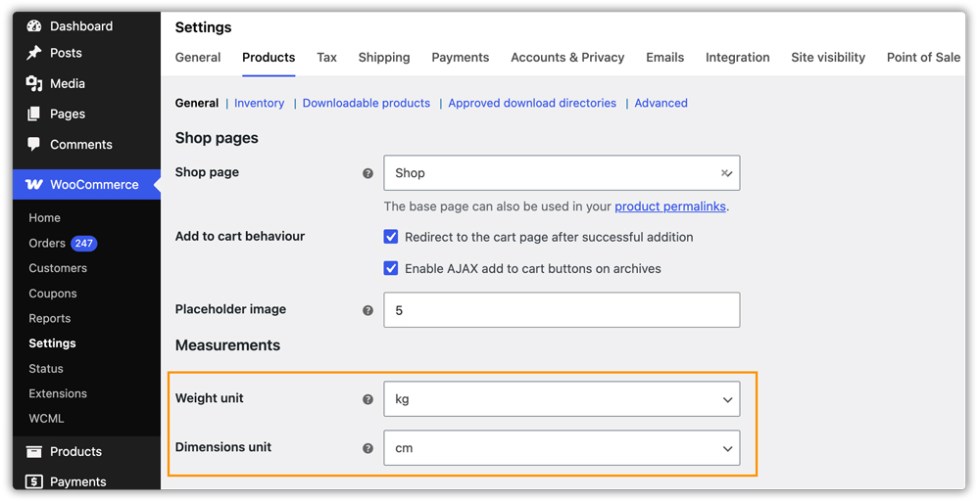
Make sure the units configured in WooCommerce match your shipping setup. Go to WooCommerce > Settings > Products and under the Measurements section, set the correct Weight Unit and Dimensions Unit:
- kg/cm — Kilograms and centimetres. Standard for Nordic PostNord shipments.
- lbs/in — Pounds and inches. Applicable for US-bound shipments or if your store operates in imperial units.
PostNord Shipping Rates
↑ Back to topThe PostNord API does not support live shipping rate calculation at checkout. To display shipping costs to customers, use one of the following WooCommerce-native approaches:
- WooCommerce Flat Rate Shipping — Set a fixed shipping cost per zone or per item.
- PH Advanced Table Rate Shipping for WooCommerce — Define rate rules based on weight, quantity, product type, or cart value for more granular control.
Configure PostNord Shipping Services
Go to the Services tab in the plugin settings and enable the shipping services you want to print labels with.
Available services are:
Parcel & Home Delivery Services
- PostNord Parcel
- PostNord MyPack Collect
- PostNord MyPack Home
- MyPack Home Small
- PostNord Home Small Prio
- Retail Delivery
- International Parcel
- Postpaket Utrikes
Express & Time-Critical Services
- Expresspaket
- Expressbrev
- PostNord InNight
- PostNord InNight Reverse
Freight & Pallet Services
- PostNord Pallet
- PostNord Groupage
- PostNord Part Loads
- PALL.ETT Special
- Road Freight Europe
- Tompallsdistribution
Letter & Mail Services
- Tracked Letter
- Export Letter Sweden
- Varubrev Ekonomi
- Värde
- Rek
- Rek Extra
Returns Services
- PostNord Return Drop Off
- Return Pickup
- Rek Retur
- Varubrev Retur
- Företagspaket Comeback
Other Supported Services
- DPD
- Brevpostförskott
- PostNord Parcel Special
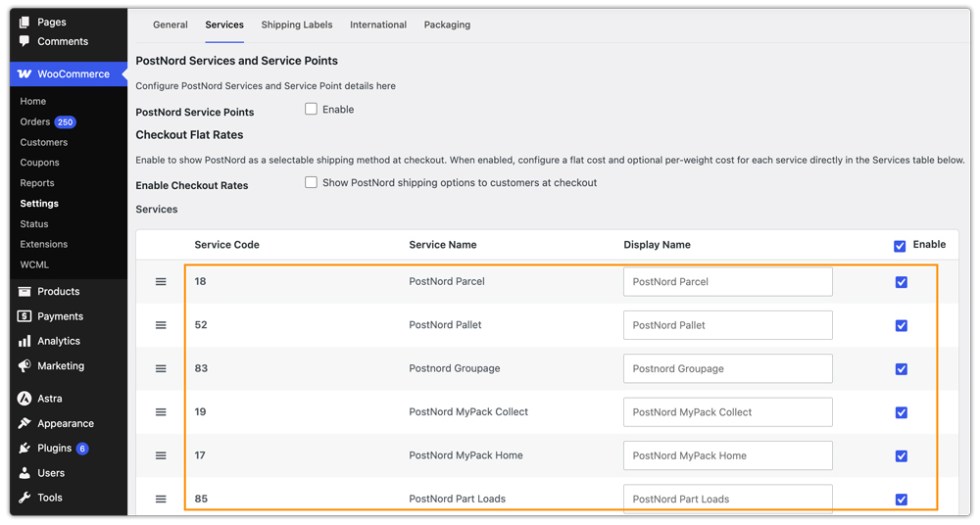
Enable Checkout Rates
Note: The plugin doesn’t use the PostNord API for live/real-time carrier rates. The plugin includes a built-in Checkout Rates feature so you can offer PostNord as a selectable shipping method at checkout, without needing a separate flat rate or table rate plugin.
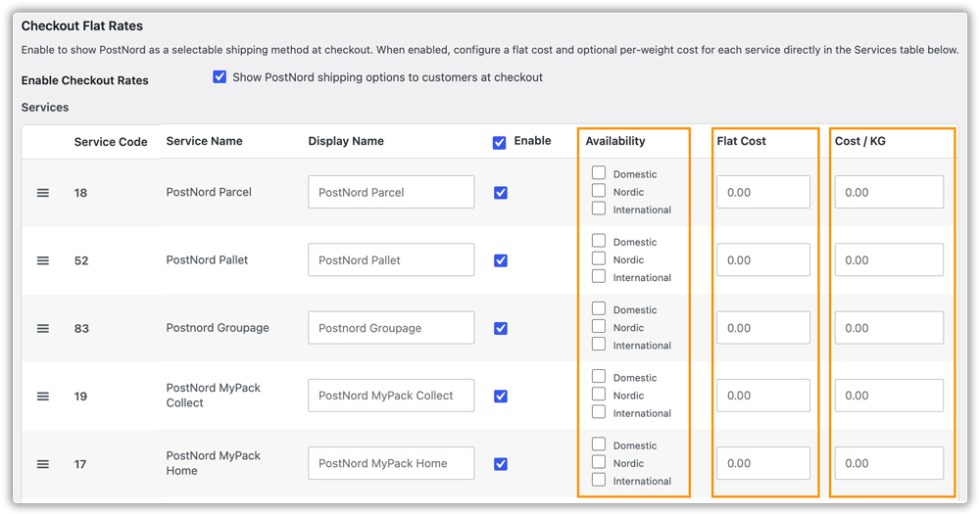
Turn on Enable Checkout Rates to show PostNord shipping options to customers at checkout. This reveals three additional columns in the Services table above:
- Availability: Choose whether the service applies to Domestic, Nordic, or International destinations. You can select more than one for the same service.
- Flat Cost: A fixed shipping cost for that service.
- Cost/kg (or your store’s weight unit): An optional extra cost applied per unit of total cart weight. The final checkout price is calculated as: Flat Cost + (Cost/kg × total cart weight).
The plugin automatically matches the customer’s shipping destination to a destination type, and only shows services whose Availability includes that type:
Example
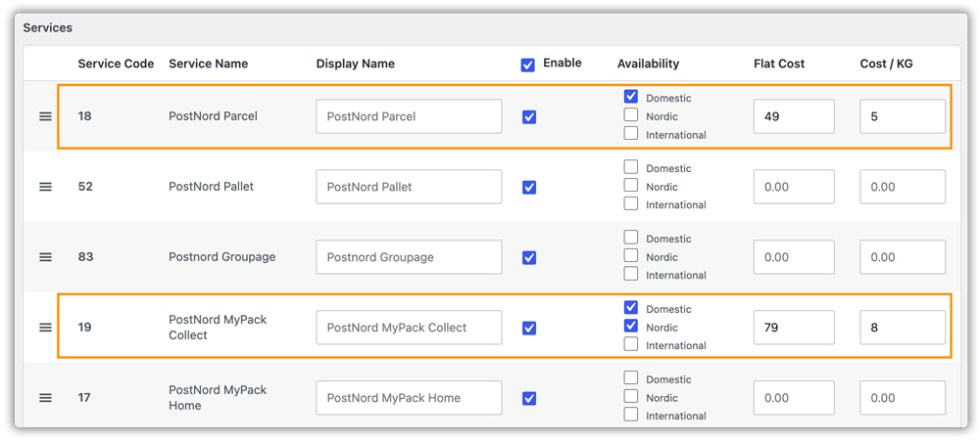
Say your Shipper Country is Sweden, and you configure:
- PostNord Parcel: Availability: Domestic — Flat Cost: 49 — Cost/kg: 5
- PostNord MyPack Collect: Availability: Domestic, Nordic — Flat Cost: 79 — Cost/kg: 8
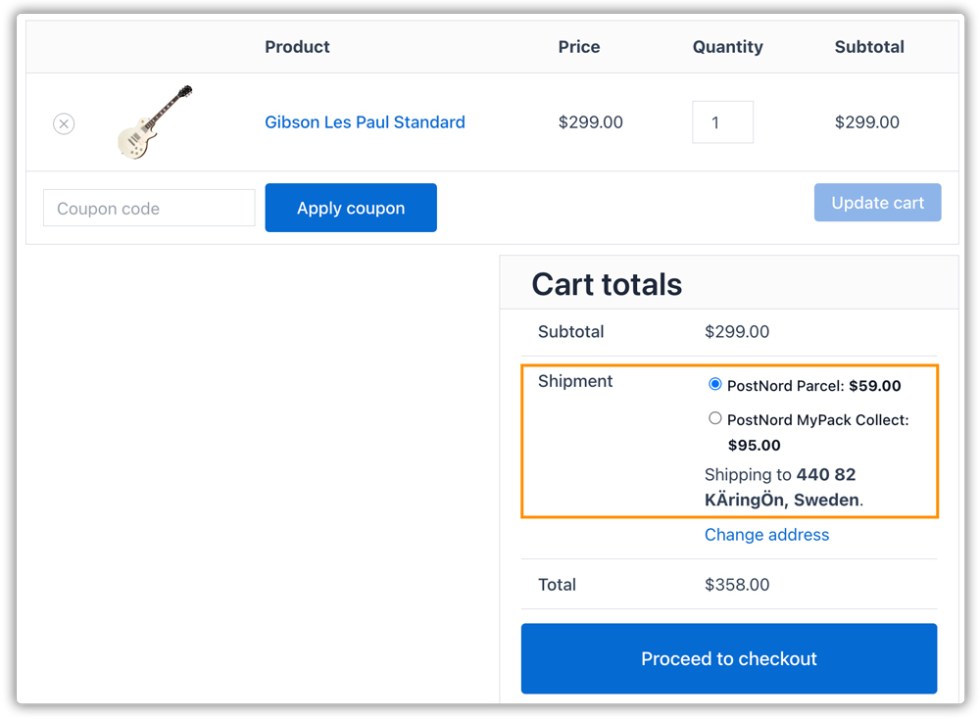
A customer in Sweden ordering a 2 kg parcel will see:
PostNord Parcel – 49 + (5 × 2) = 59
PostNord MyPack Collect – 79 + (8 × 2) = 95
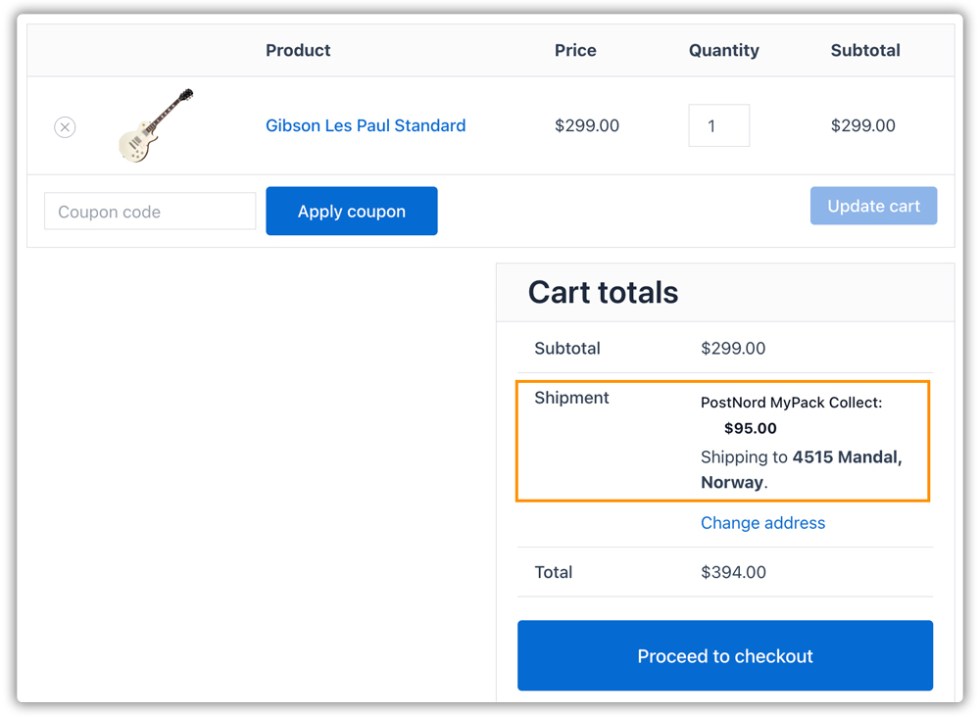
A customer in Norway (Nordic, not your Shipper Country) ordering the same 2 kg parcel will see:
PostNord MyPack Collect – 79 + (8 × 2) = 95
Note: If you need more advanced rate logic (based on cart value, product type, or shipping class), you can still use Flat Rate Shipping for a fixed cost per zone or item, or the PH Advanced Table Rate Shipping for WooCommerce plugin for rate rules based on weight, quantity, product type, or cart value.
Conversion Rate
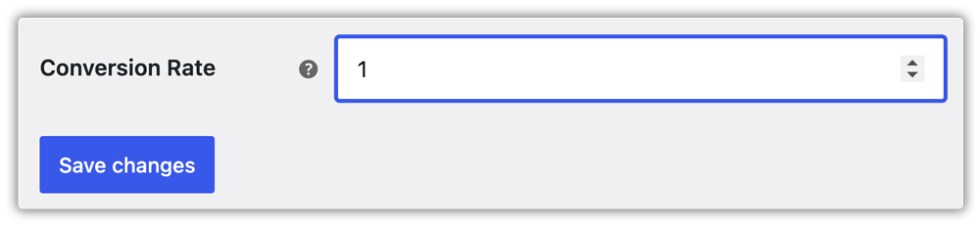
Enter a conversion rate if you need to convert your store currency to USD for US-bound shipments. Leave this at 1 if your store currency is already USD or if this does not apply to your setup.
Display PostNord Services and Rates Based on Shipping Zones
↑ Back to topTo offer different PostNord services and rates to customers in specific regions, use WooCommerce Shipping Zones instead of (or alongside) the global Checkout Rates settings.
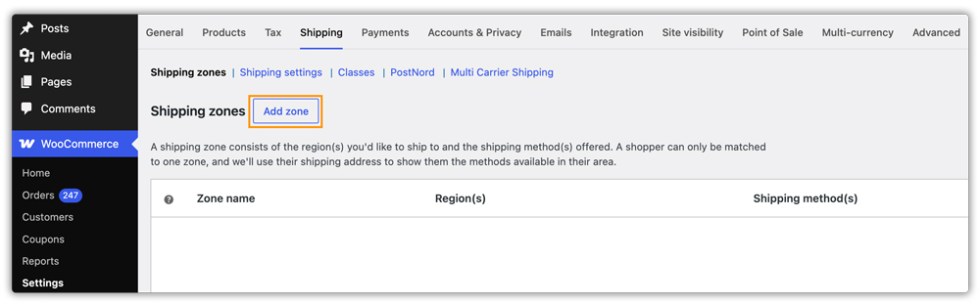
Go to WooCommerce > Settings > Shipping > Shipping Zones. Click on an existing zone to edit it, or click Add Zone to create a new one.
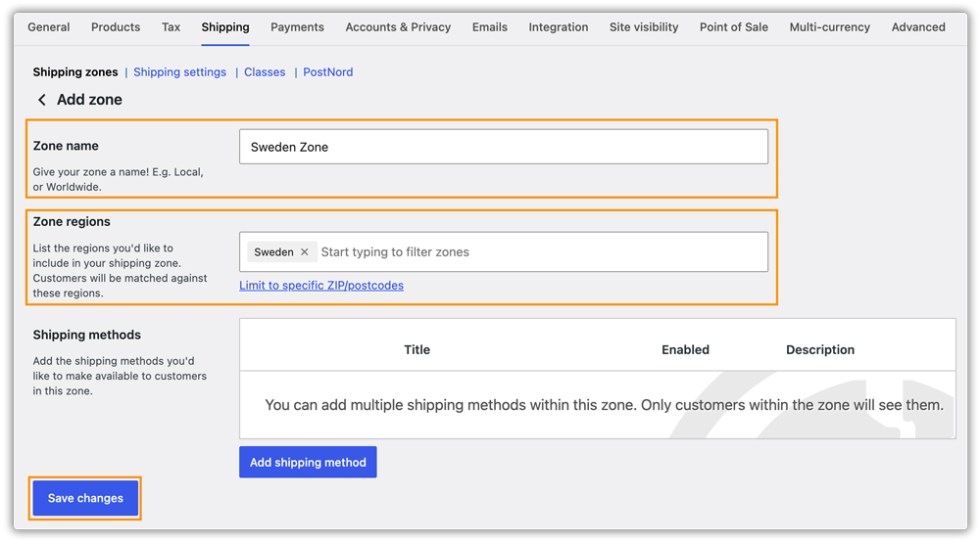
Give the zone a name, select the relevant region(s), and click Save Changes.
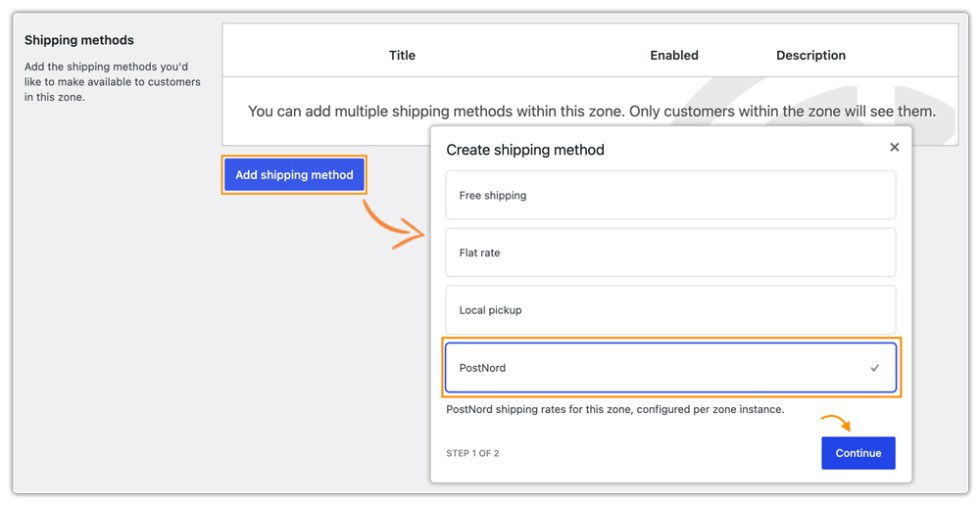
Click Add Shipping Method, select PostNord, and click Continue.
Click Edit next to the PostNord method in the zone.
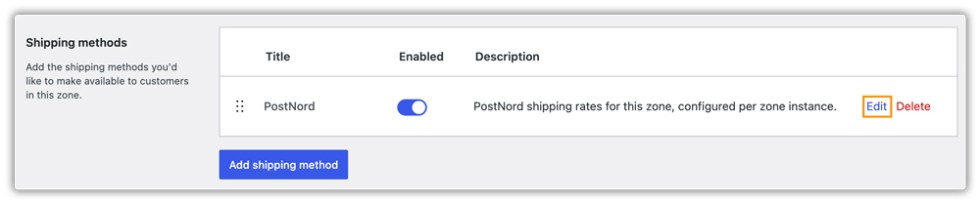
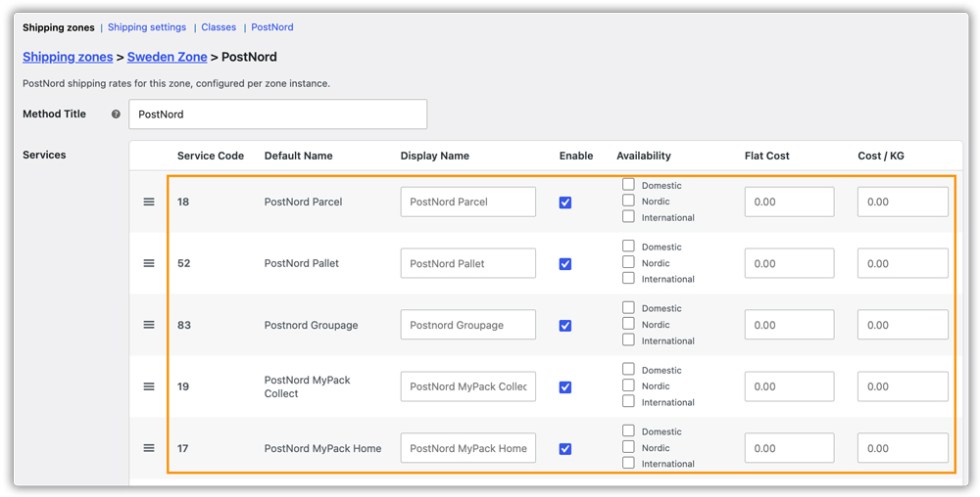
Set a Method Title for this zone. In the Services table shown, enable the services you want to offer, set a Flat Cost and Cost/kg for each. These settings are independent of the global Services tab; enabling a service globally does not affect a zone, and vice versa.
After you save the settings. At cart/checkout, customers shipping to that zone will see only the services and rates configured here.
Note: Avoid enabling the same service both globally (with Enable Checkout Rates on) and inside a zone, as this can cause duplicate rates to appear at checkout.
Display PostNord Service Points at Checkout
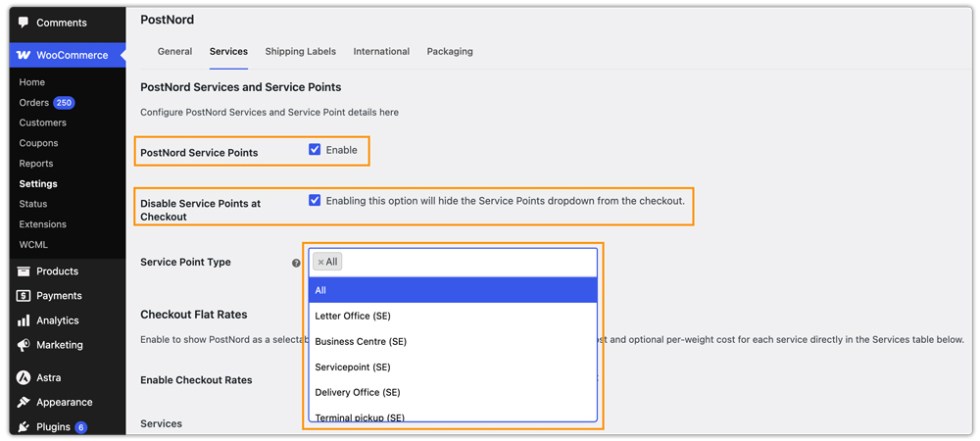
↑ Back to topThe Services tab also contains Service Point settings, which allow your customers to select a PostNord pickup point at checkout:
- PostNord Service Points — Enable the activation of service point selection at checkout.
- Disable Service Points at Checkout — When enabled, service points are still tracked internally, but the dropdown is hidden from the checkout page.
- Service Point Type — Select which types of service points to display. Options vary by shipper country and include Servicepoint, Business Centre, Parcel Box, Collect in Store, and others.
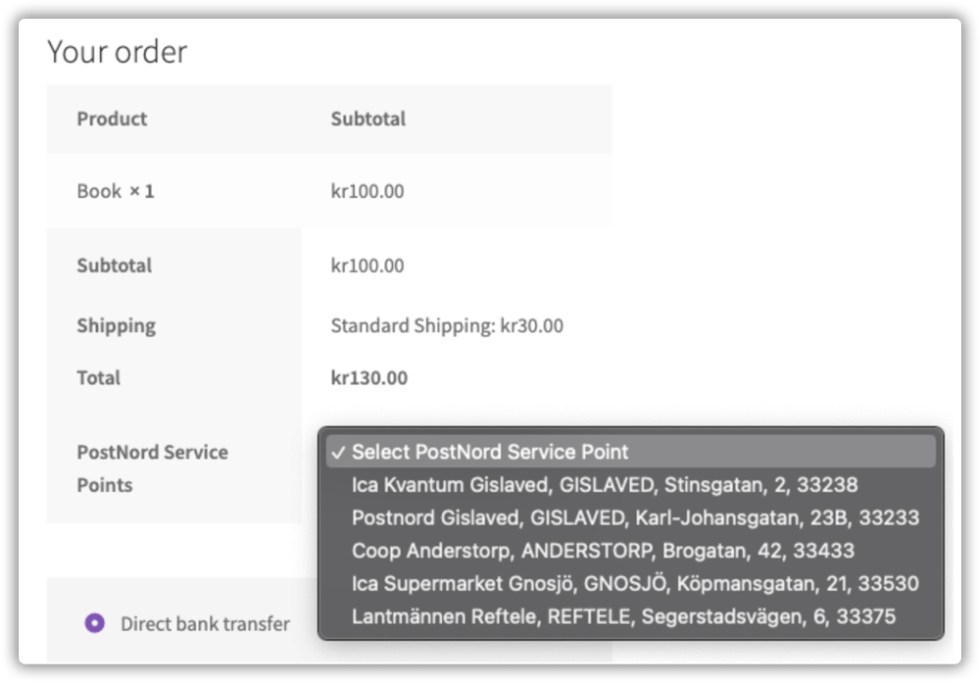
The plugin will display the PostNord service points on the WooCommerce checkout page based on the customer’s address, as shown below:
PostNord Shipping Label Settings
↑ Back to topThe Shipping Labels tab controls label generation defaults, automation, tracking, and return label behaviour.
Default Services
Set the default PostNord service to be used when labels are generated automatically:
- Default Domestic Service — The service used by default for domestic shipments when auto-generating labels.
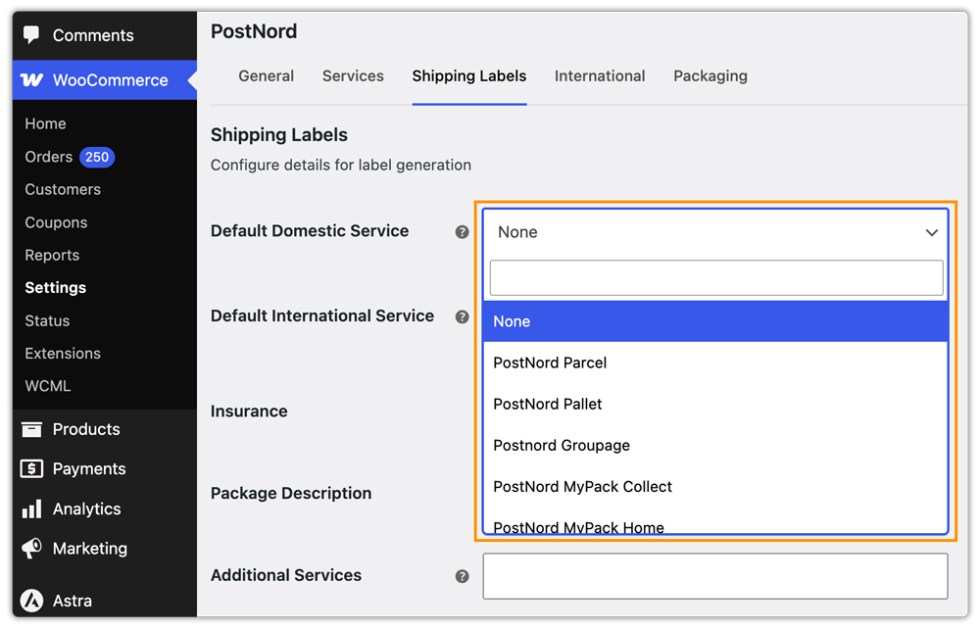
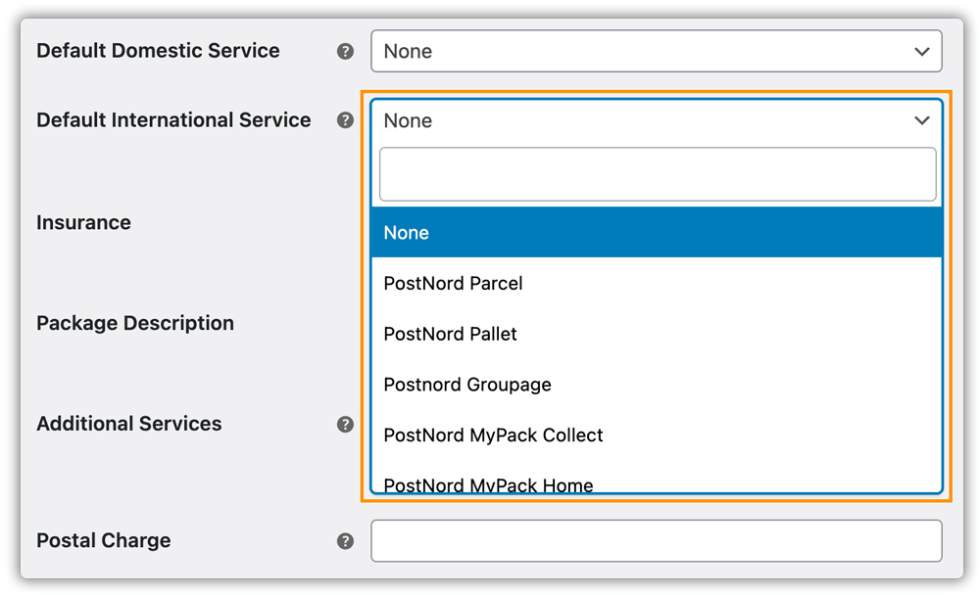
- Default International Service — The service used by default for international shipments when auto-generating labels.
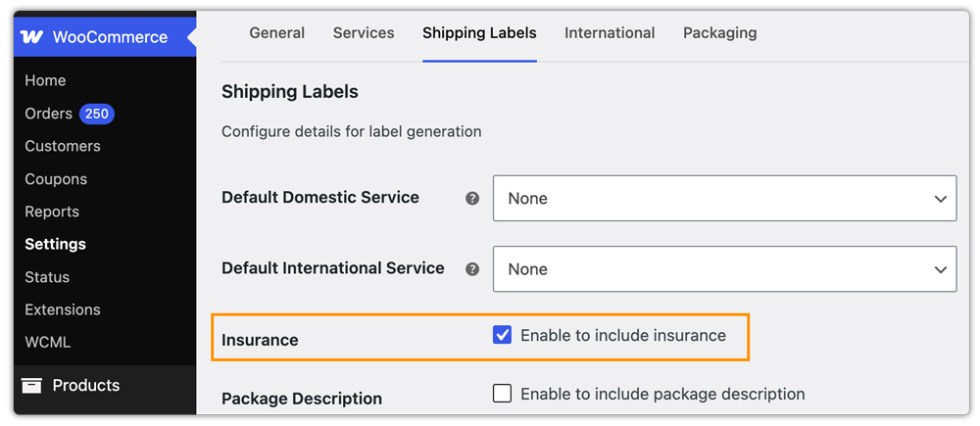
Insurance
Enable this option to include insurance on your shipments. When enabled, an Insurance Amount field also appears on each product’s Shipping tab so you can specify the insured value per product.
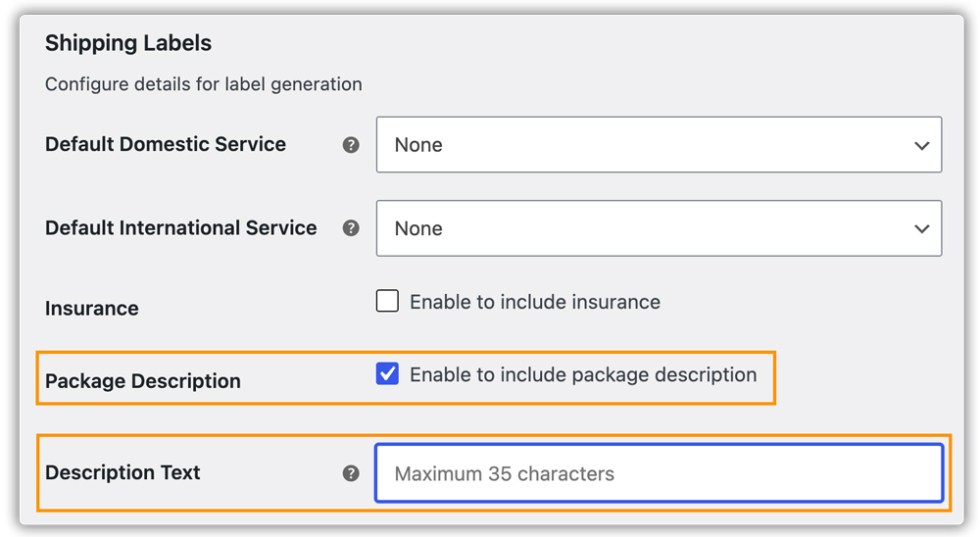
Package Description
Enable this option to include a package description on the shipping label. When enabled, a Description Text field appears where you can enter up to 35 characters of free text. This description is applied to all packages by default.
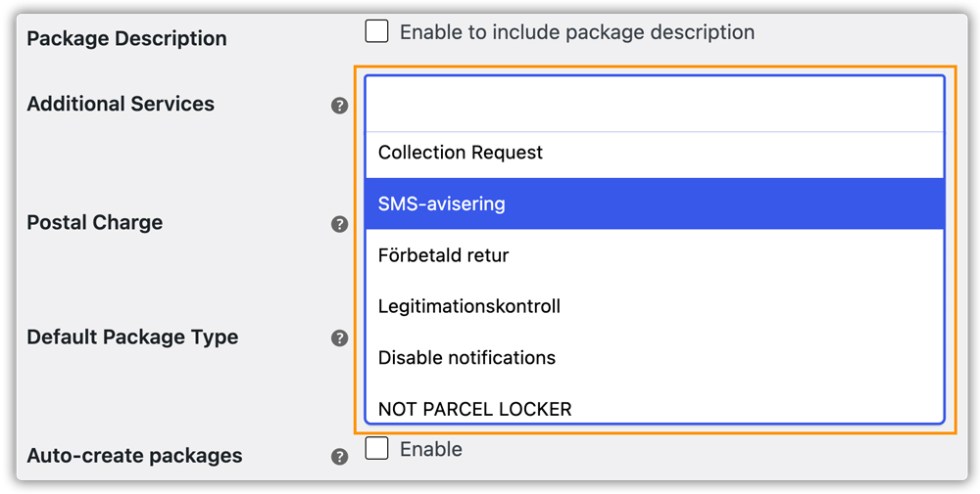
Additional Services
Select one or more additional services to include with your shipments. The options available depend on your shipper country. Examples for Sweden include: SMS Notification, Age Verification, Signature on Delivery, Return to Sender, Same-Day Delivery, and many others.
Postal Charge
Enter the total postal charge for the shipment, which covers the Customs Clearance Fee plus Freight Cost. This is included in customs documentation where applicable.

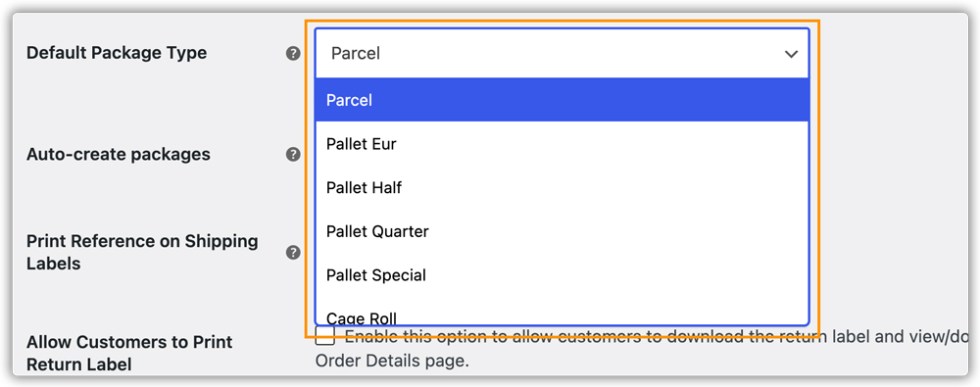
Default Package Type
Select the default package type to use when creating shipments. The available options are:
- Parcel (PC) — Standard parcel. The default.
- Pallet Eur (PE) — Euro pallet format.
- Pallet Half (AF) — Half pallet.
- Pallet Quarter (OA) — Quarter pallet.
- Pallet Special (OF) — Special pallet configuration.
- Cage Roll (CW) — Cage roll format.
- Box (BX) — Standard box.
- Envelope (EN) — Envelope format.
Print Reference on Shipping Labels
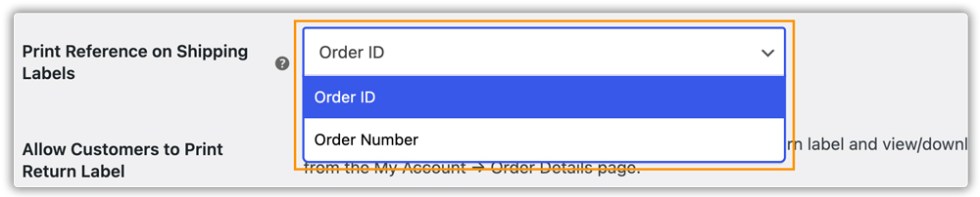
Choose what reference value is printed on the label. Options are Order ID or Order Number. This reference appears on the physical label and can be edited from the order page if needed.
Allow Customers to Print Return Label
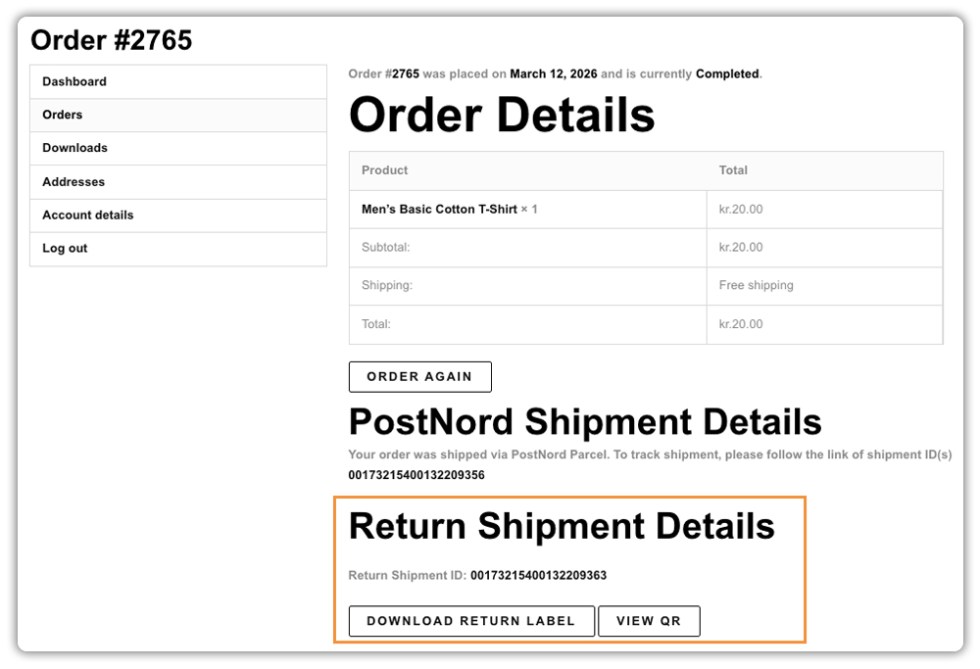
Enable this to let customers download their return label and view or download the return QR code from the My Account > Order Details page.

PostNord Shipment Tracking Details in Email
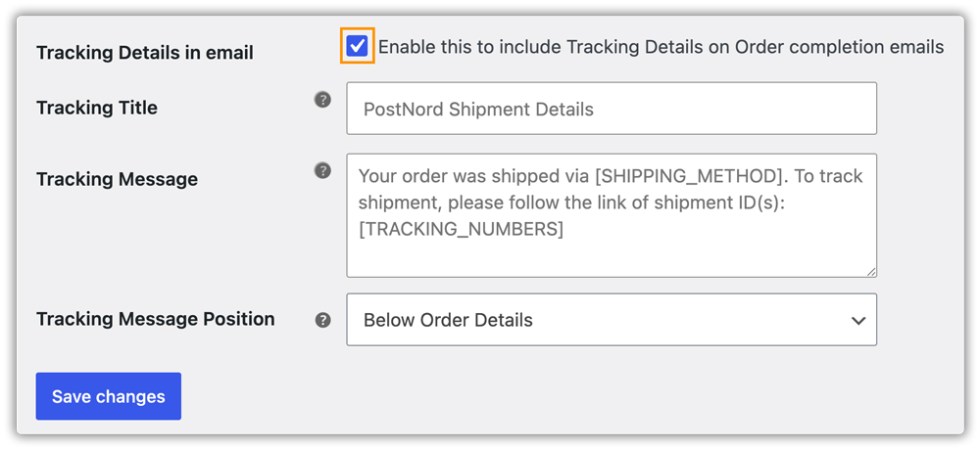
↑ Back to topEnable this in the Label tab to include shipment tracking information in the WooCommerce order completion email. When enabled, three additional settings appear:
- Tracking Title: The heading shown above the tracking details section in the customer email.
- Tracking Message: The message body shown to customers. You can include tracking links and shipment information here.
- Tracking Message Position: Choose whether the tracking section appears above or below the order details table in the email.
Print PostNord Shipping Labels
↑ Back to topPrinting Your First Label
To manually generate and print a PostNord shipping label:
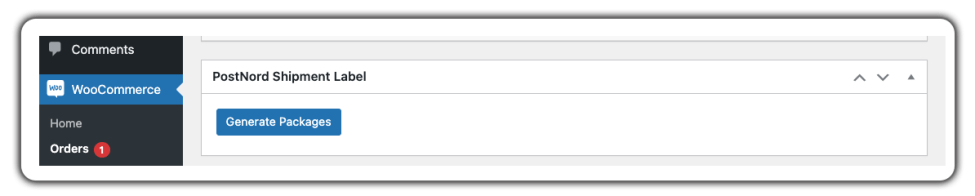
Go to WooCommerce > Orders, open the relevant order and click Generate Packages. The plugin will create the package(s) based on your Packaging settings.
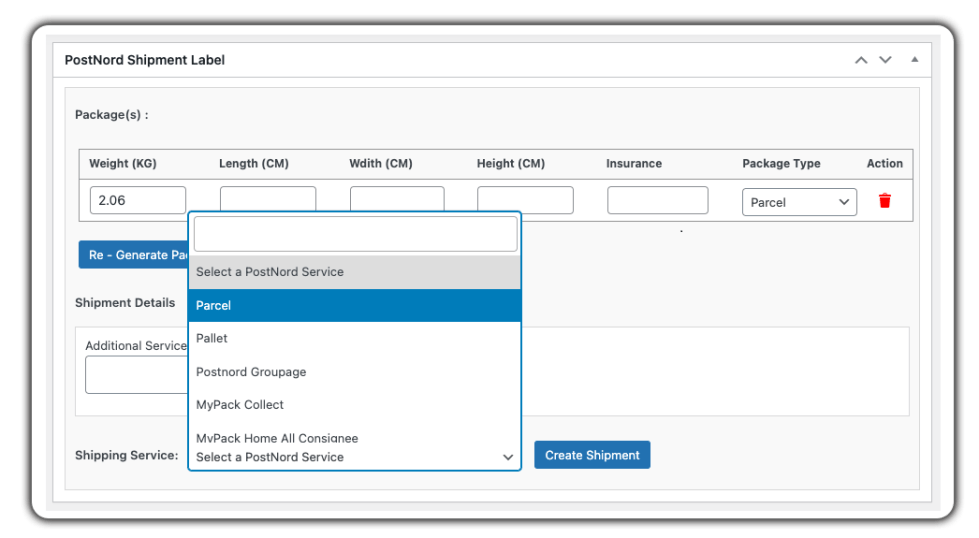
Once the package is created, click Select a PostNord Service and choose the desired service.
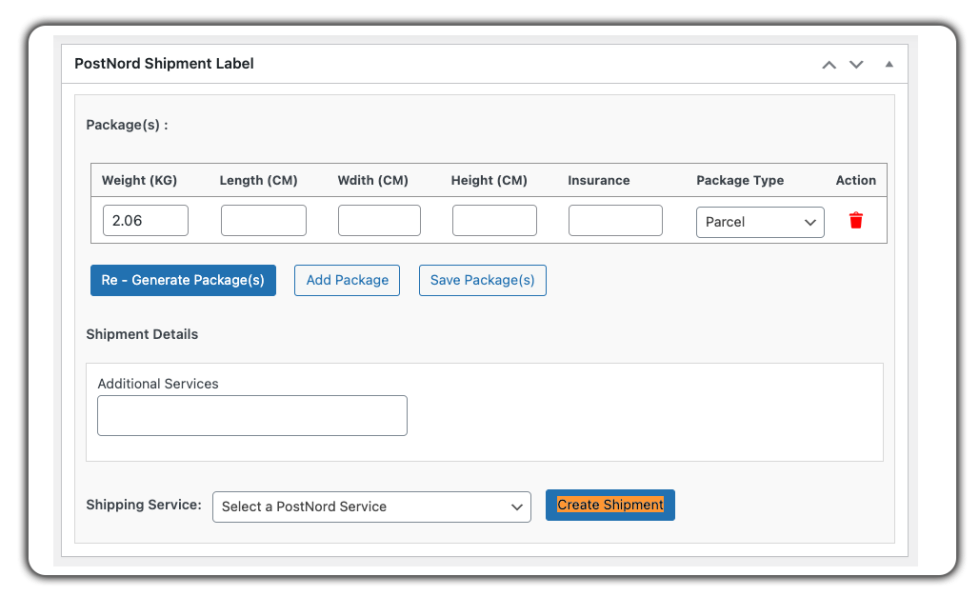
Click Create Shipment. The plugin will generate the shipping label and a shipment tracking ID.
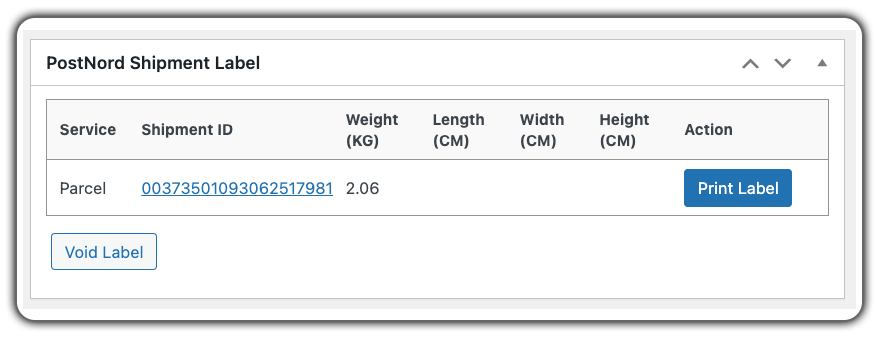
Click Print Label to download and print the label.
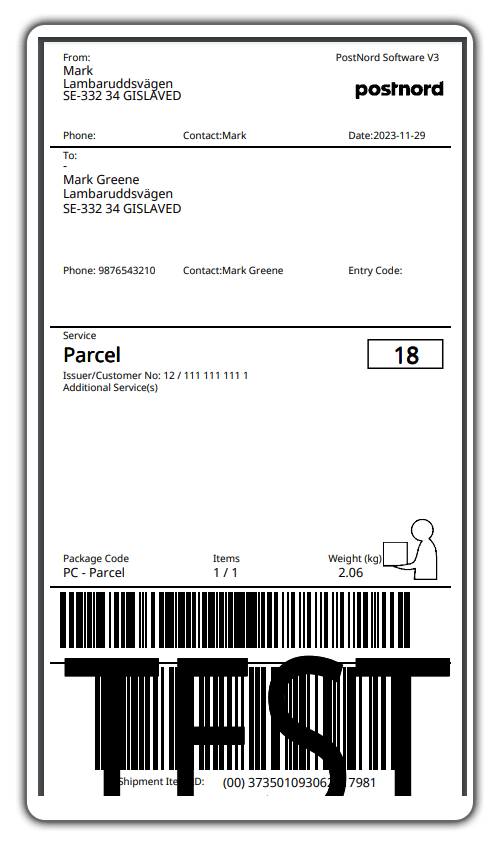
Printed Label:
Print Labels Automatically
To print PostNord shipping labels automatically, go to WooCommerce > Settings > Shipping > PostNord > Shipping Label and enable the following options:
- Auto-create packages
- Auto-generate shipping labels
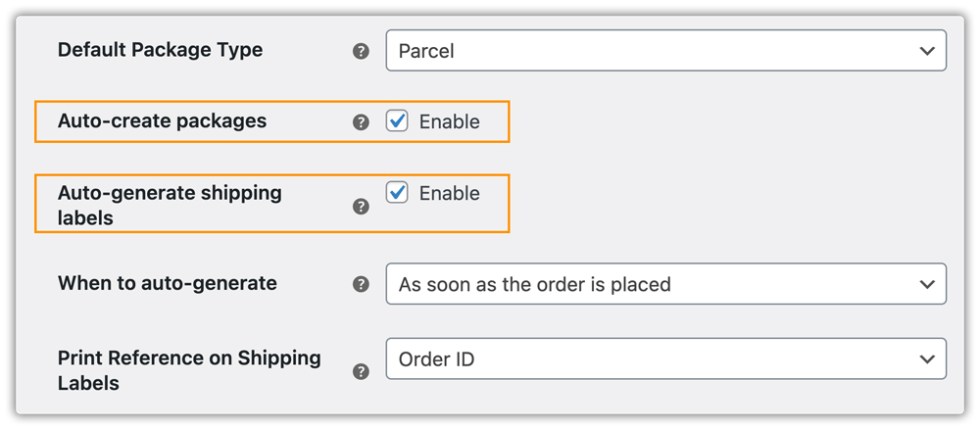
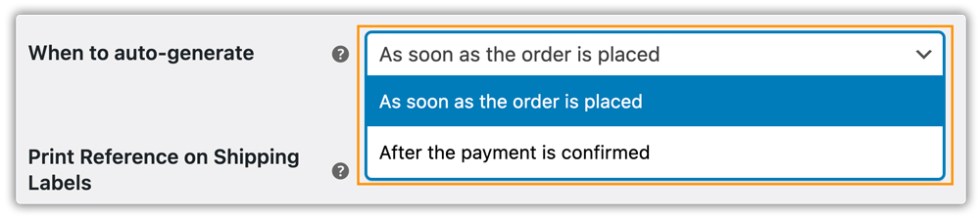
You also need to set when automatic label generation should be triggered. You can choose between:
- As soon as the order is placed (Default)
- After the payment is confirmed
You can assign the default PostNord services that the plugin should use while generating labels, as mentioned earlier.
Once an order is placed, the PostNord shipping label will be generated automatically. You can then print the label directly from the WooCommerce Orders page by selecting the order, as shown in the image below.
Print PostNord Shipping Labels for Multiple Orders in Bulk
The plugin supports bulk label printing, allowing you to generate and download PostNord labels for multiple orders at once as a single merged PDF. This saves time during high-volume fulfillment periods without switching between individual orders.
To print PostNord labels in bulk:
Navigate to Dashboard > WooCommerce > Orders and select all the orders for which you want to generate PostNord shipping labels.
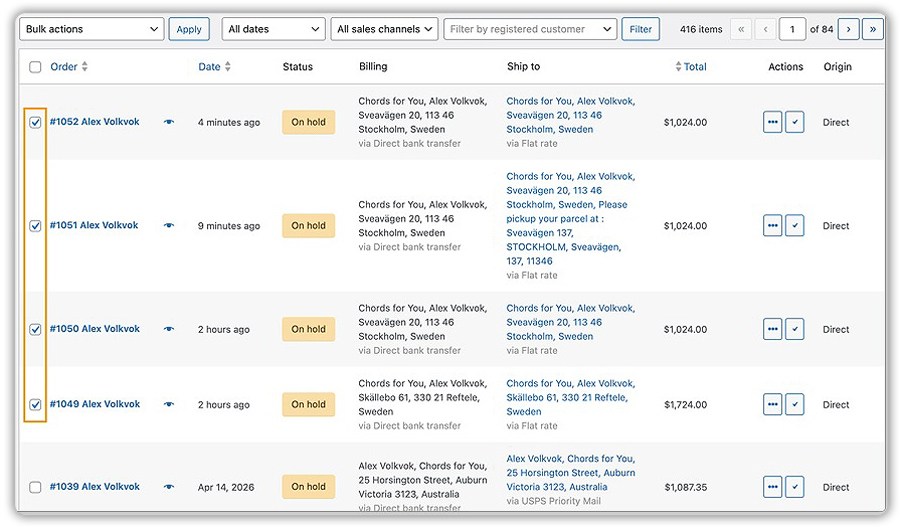
From the Bulk Actions dropdown, select the option to generate PostNord shipping labels and click Apply.
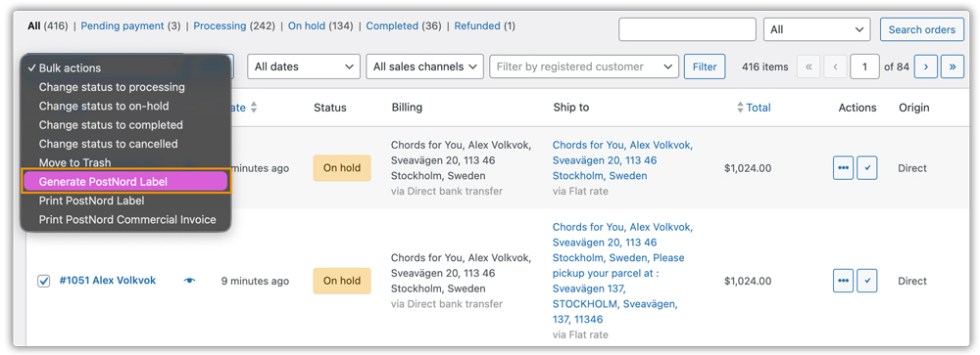
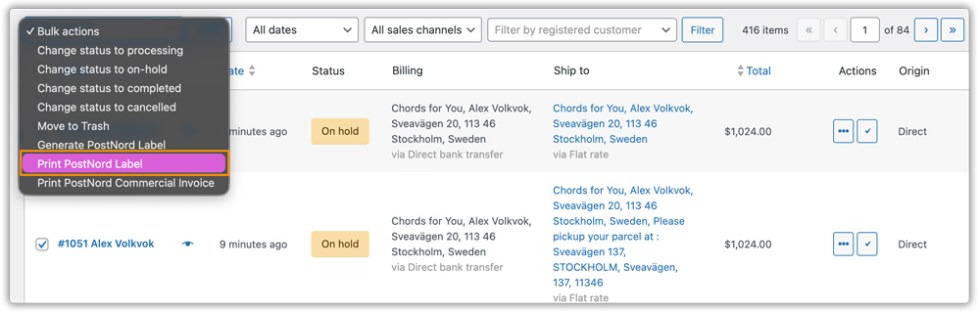
Then the plugin will generate PostNord shipping labels for all of the orders that you have selected and merge them into a single PDF for download. Once you have successfully generated the shipping label, you need to select the order you want to get the shipping label for and click on Print PostNord Label.
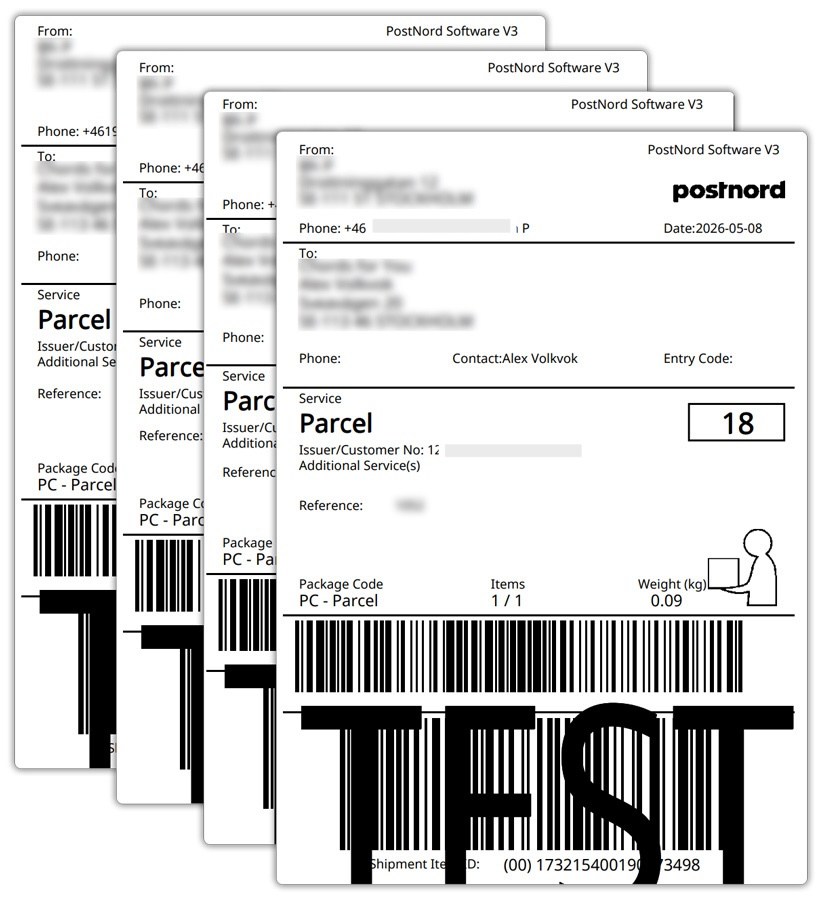
Here are the printed labels:
Note: You can also bulk print commercial invoices for selected orders using the same Bulk Actions workflow.
Generate Return Labels and QR Codes
Once the outbound shipping label has been generated, you can create a return label and access the return QR code directly from the WooCommerce order page.
- Navigate to WooCommerce > Orders.
- Open the order for which you want to generate a return label.
- Scroll down to the PostNord Shipment Label section, where you can view the selected shipping service and shipment ID.
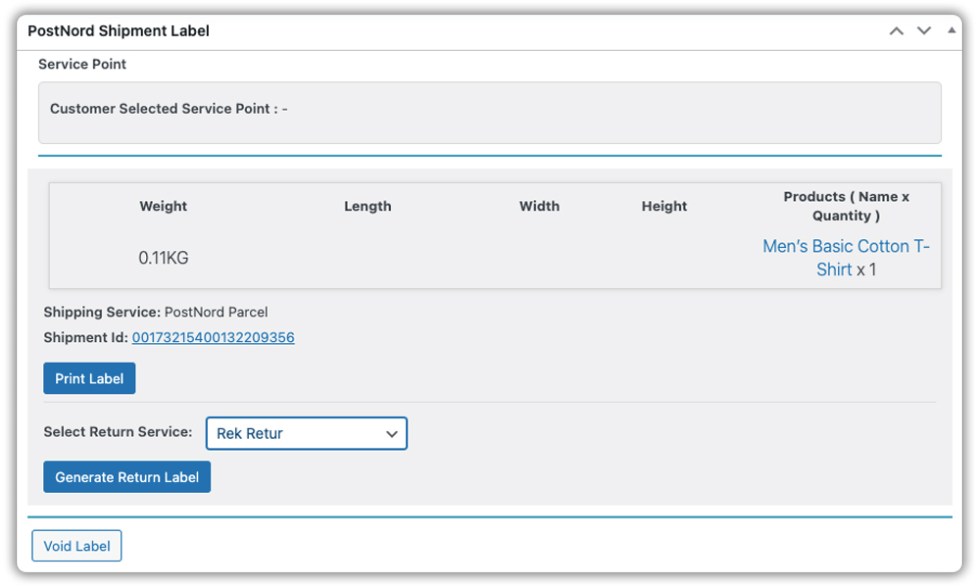
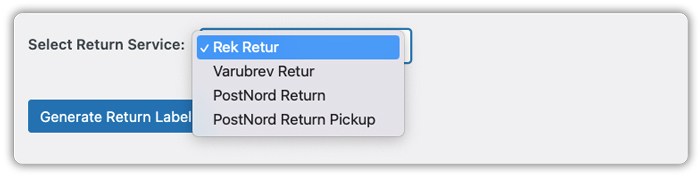
- Under Select Return Service, choose the required return service from the dropdown:
- Rek Retur
- Varubrev Retur
- PostNord Return
- PostNord Return Pickup
- Click Generate Return Label.
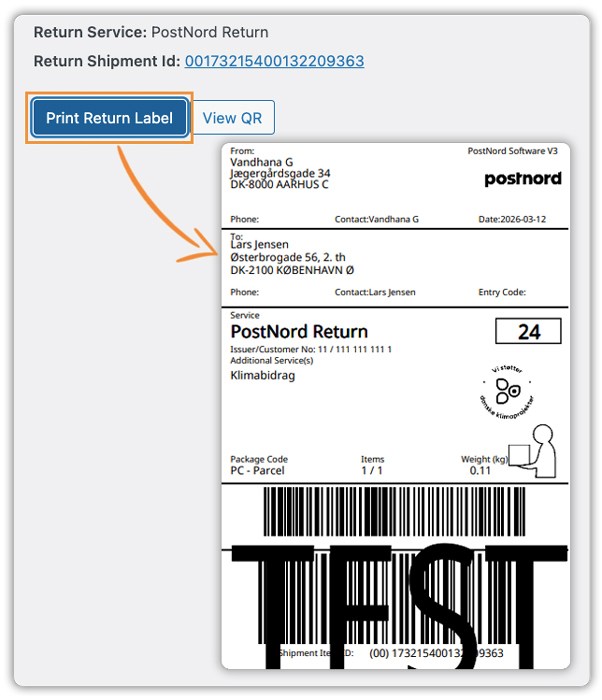
Once the return label is generated, the Return Service and Return Shipment ID will be displayed on the order page.
- Click Print Return Label to download and print the return shipping label.
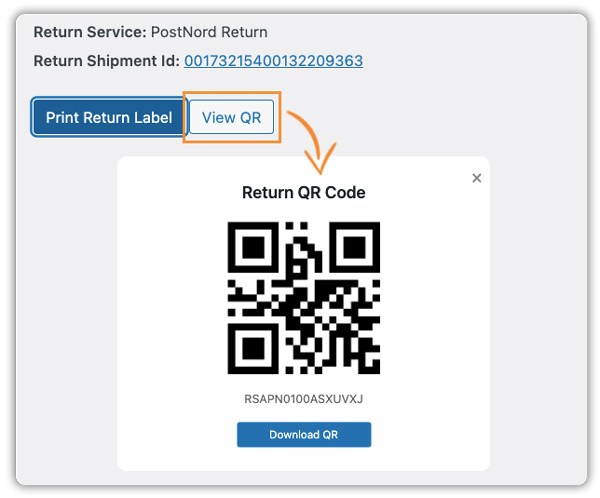
- Click View QR to access the return QR code. A popup window will display the QR code along with its reference code. Click Download QR to save the QR code image.
Customer Access to Return Label and QR Code
If you have enabled Allow Customers to Print Return Label in the Shipping Labels tab, customers can access their return label and QR code from My Account > Order Details. The Return Shipment Details section will appear with Download Return Label and View QR options.
Email Shipping Labels to Customer and Admin
The plugin can automatically email the PostNord shipping label PDF to the customer and your store admin as soon as a label is generated, including return labels.
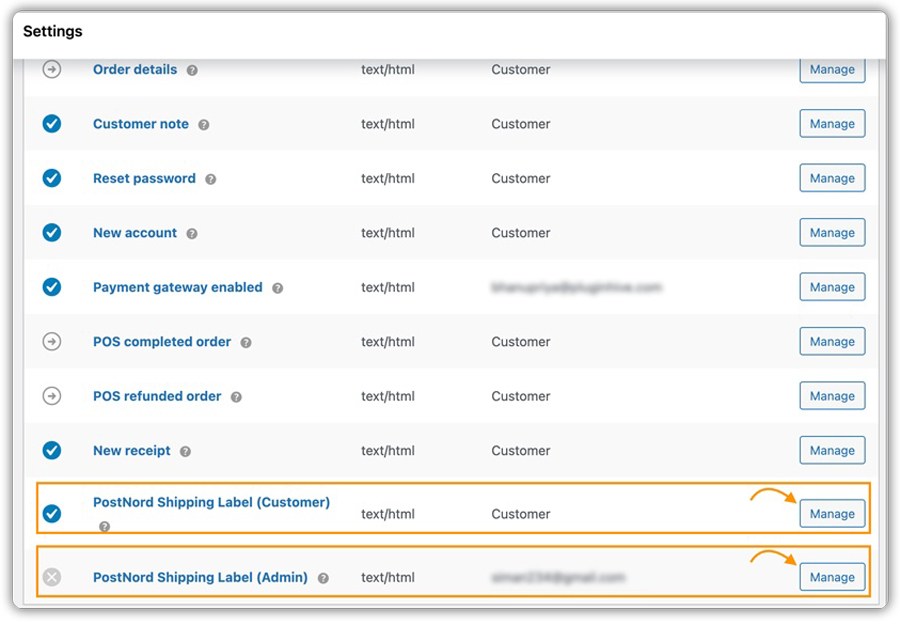
To configure this, go to WooCommerce > Settings > Emails. You will find two PostNord-specific email notifications listed:
- PostNord Shipping Label (Customer): Sends the customer a copy of the PostNord shipping label PDF as soon as it is generated. Also fires when a return label is generated, so the customer can print and use it.
- PostNord Shipping Label (Admin): Sends a copy of the PostNord shipping label PDF to your shop email so the team has a record. Useful if the team prints labels centrally rather than from the order page.
Click Manage next to either notification to configure it.
Customer Email Configuration
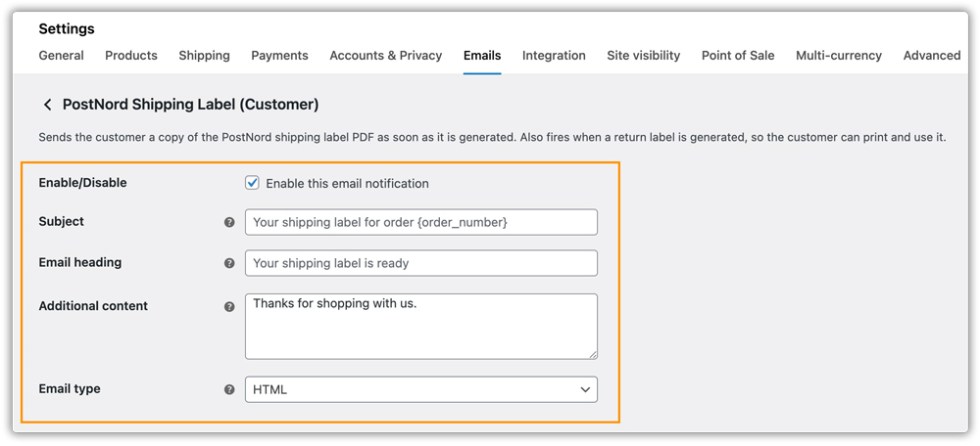
For the PostNord Shipping Label (Customer) email, you can configure the following options:
- Enable/Disable – Enable this email notification to automatically send labels to customers.
- Subject – Customize the subject line of the email. Example: Your shipping label for order #{order_number}
- Email Heading – Configure the heading displayed inside the email.
- Additional Content – Add extra instructions or messages such as return instructions, delivery notes, or thank-you text.
- Email Type – Choose the email format: Plain Text, HTML, or Multipart.
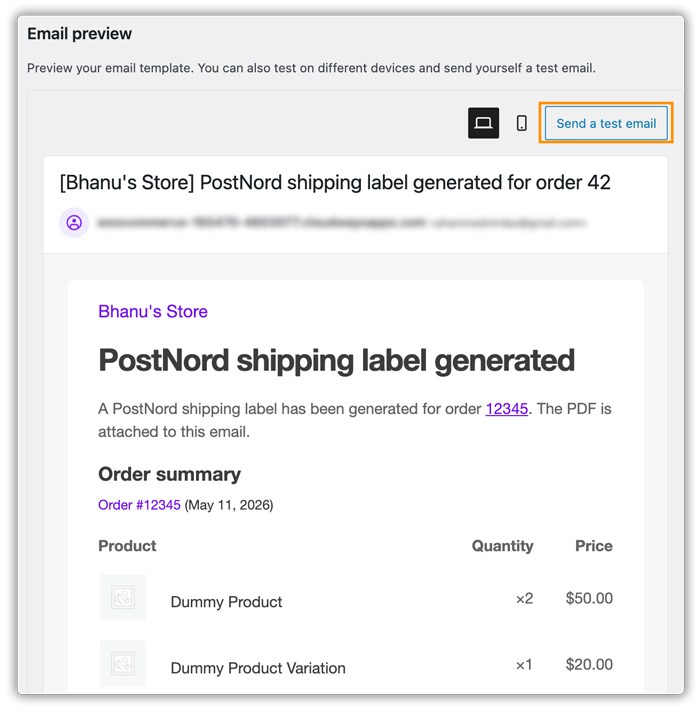
Use the Email Preview section at the bottom to preview how the email appears before saving. You can also click Send a test email to verify delivery and formatting.
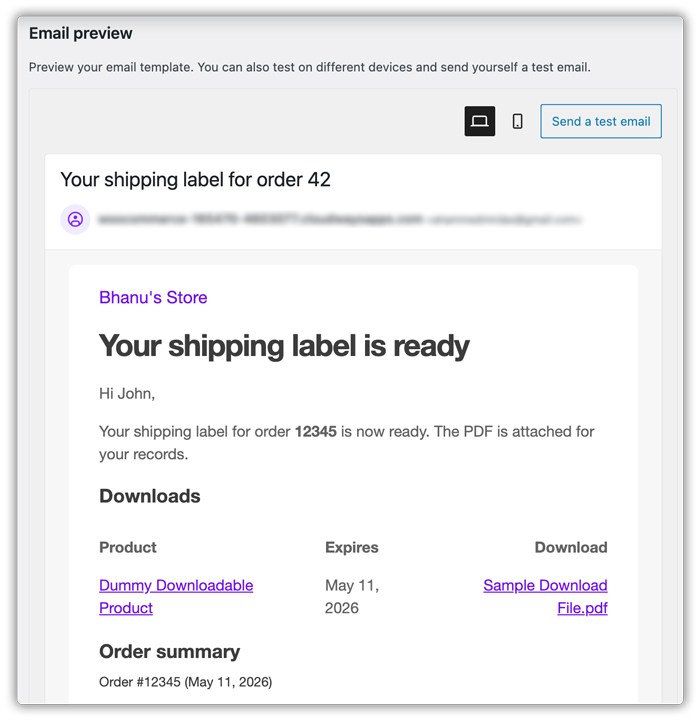
Once configured, the shipping label PDF will be automatically emailed whenever a PostNord shipping label or return label is generated.
Admin Email Configuration
For the PostNord Shipping Label (Admin) email, you can configure the following settings:
- Enable/Disable – Enable this notification to automatically send label PDFs to the admin or fulfillment team.
- Recipient(s) – Enter the primary email address that should receive the label notifications. By default, the plugin uses the shop email configured in the PostNord shipping settings.
- CC Recipients – Add additional email addresses separated by commas. This is useful for warehouse staff, logistics teams, or shared fulfillment inboxes.
- Subject – Customize the subject line used for admin label emails.
- Email Heading – Configure the heading displayed inside the email body.
- Additional Content – Add custom instructions or notes for the fulfillment team, such as printing instructions or packaging reminders.
- Email Type – Select the preferred email format: Plain Text, HTML, or Multipart
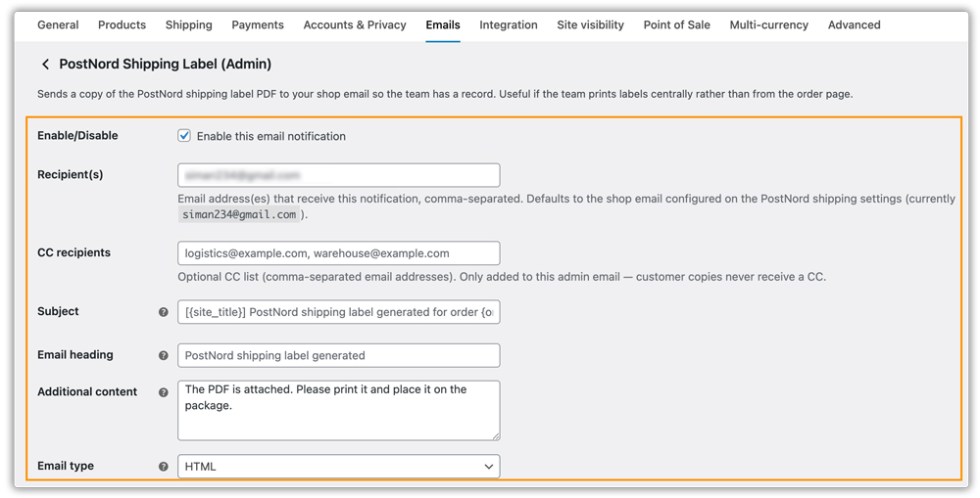
Here, you can also preview and send a test email to verify the format and text. Once saved, the plugin will automatically send a copy of every generated PostNord shipping label PDF to the configured admin email addresses.
Cancel (Void) a Shipping Label
To cancel a shipping label, use the Void Label button.
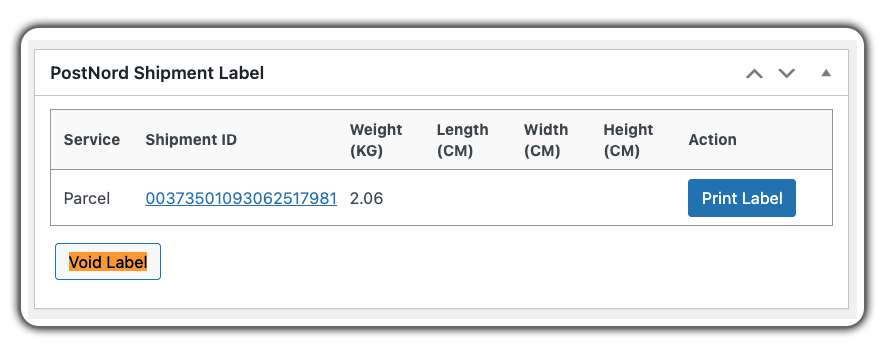
Please note that Void Label deletes the label for the order – it does not cancel the actual shipment with PostNord. The label remains valid until it is cancelled from your PostNord account dashboard or by contacting PostNord support.
We recommend following this order:
- Cancel the shipment from your PostNord account dashboard or contact PostNord support first.
- Before voiding, note the Shipment ID, as all shipment details will be removed from the order page once it is voided.
- Once the cancellation with PostNord is complete, click Void Label.
Configure Packaging Settings
↑ Back to topThe Packaging tab controls how cart items are grouped into packages before label generation. Go to WooCommerce > Settings > Shipping > PostNord > Packaging to configure.
Three packing methods are available:
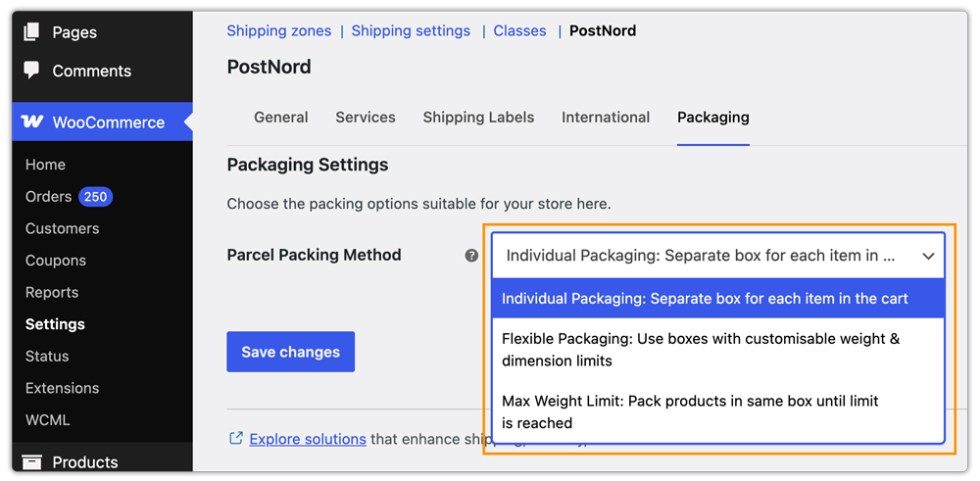
1. Individual Packaging
Each item in the cart is packed into its own separate box, and a separate label is printed for each. The total shipping cost is the sum of individual item shipping costs.
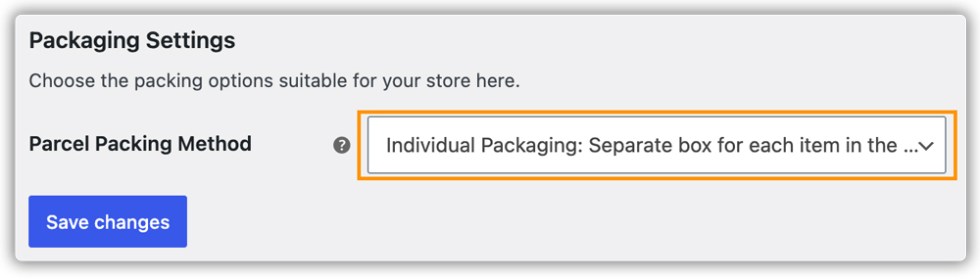
Example: If a service costs $10 per item and a customer orders 2 units, the total is $10 x 2 = $20, and two separate labels are printed.
2. Flexible Packaging (Boxes with Customisable Dimensions)
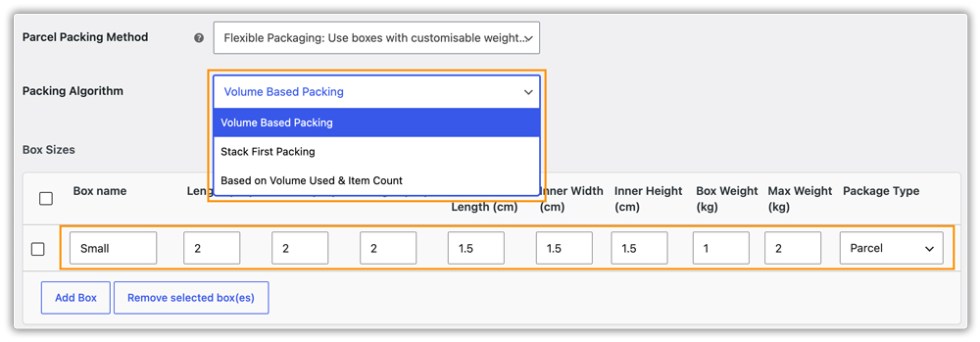
Define your own custom box sizes with specific weight and dimension limits. The plugin automatically selects the best-fitting box for each shipment and prints the label accordingly. Use this if you pack products in dedicated, fixed-size boxes.
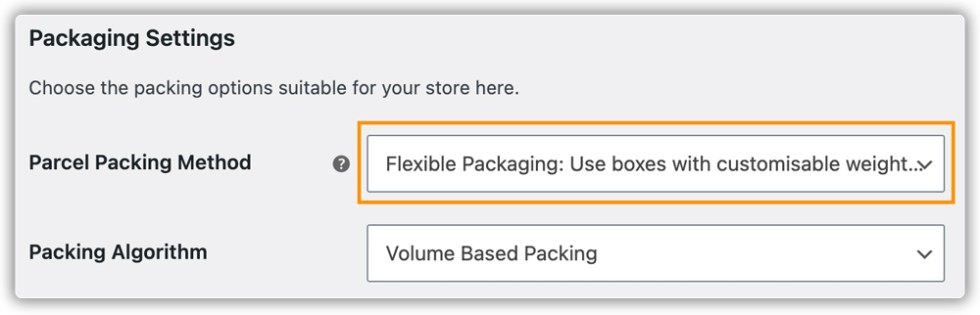
When this method is selected, a Box Details table appears where you can add custom boxes with their dimensions and weight limits. Flexible Packaging includes a Packing Algorithm option that controls how items are fitted into boxes:
- Volume-Based Packing: Items are packed based on total volume. Default setting.
- Stack First Packing: Items are stacked on top of each other before filling the remaining space.
- Based on Volume Used & Item Count: A combined algorithm that considers both volume utilization and number of items.
3. Max Weight Limit (Default)
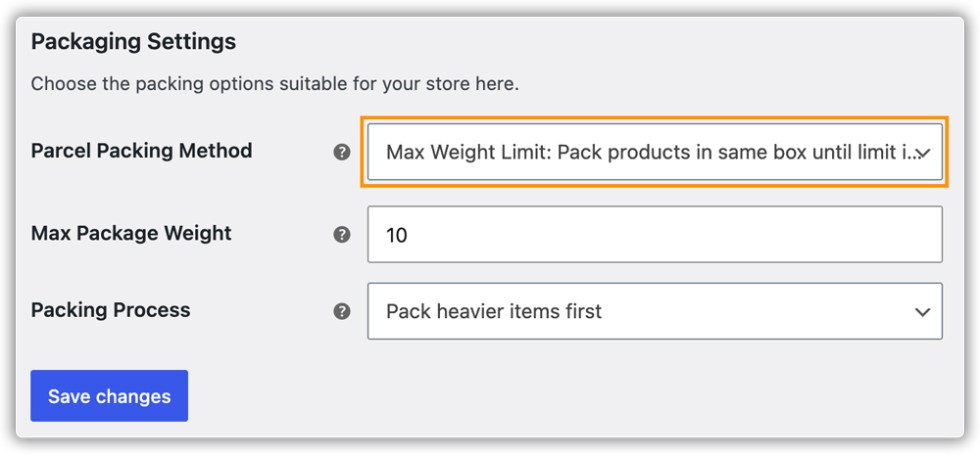
Items are packed into boxes up to a defined maximum weight. Once the limit is reached, a new box is started. This is the default packing method and works without requiring product dimensions, only product weights.
- Max Package Weight: The maximum weight (in your configured weight unit) allowed for a single package. Items are distributed across as many packages as needed.
- Packing Process: Controls the order in which items are packed: Pack heavier items first, or pack lighter items first.
Note: Ensure all products have accurate weights set on the product page. Incorrect or missing weights will cause inaccurate package generation.
Configure International Shipping with PostNord
↑ Back to topIf you plan to ship products internationally, the plugin allows you to use PostNord international shipping services directly within your WooCommerce store. For this, you must configure the required international shipment details in both the plugin settings and product settings.
International Shipping Settings
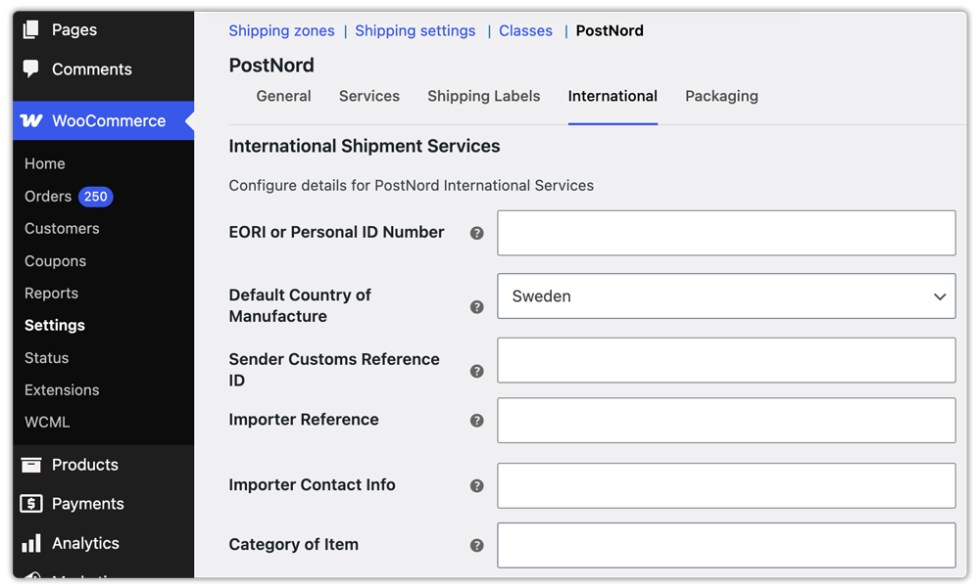
Go to WooCommerce > Settings > Shipping > PostNord > International tab and configure the required shipment details.
The following fields are commonly required for international shipments:
- EORI or Personal ID Number – Used for customs identification in many countries.
- Default Country of Manufacture – Select the default country where your products are manufactured. This value will be applied to all products that do not have a country of manufacture configured at the product level. If a different country is configured for an individual product, the product-level value will override the global setting.
- Sender Customs Reference ID – Customs reference number for the sender, if applicable.
- Importer Reference – Reference details for the importer or receiver.
- Importer Contact Info – Contact details of the importer.
- Category of Item – Define the shipment type, such as Sale of Goods.
- Terms of Sale – Select the applicable Incoterms or sales terms.
Product-Level International Shipping Details
Next, go to WooCommerce > Products, edit the required product, and open the Shipping tab under the Product data section.
Under PostNord Shipping Details, configure the following:
- HS Tariff Code – Enter the HS Tariff Code used for customs classification.
- Country of Manufacture – Select the country where the product was manufactured. This value overrides the global default country of manufacture configured in the plugin settings.
- Insurance Amount – Enter the insured value for the shipment, if required.
- Product Description – Enter a short and accurate product description used for CN22, CN23, and commercial invoices.
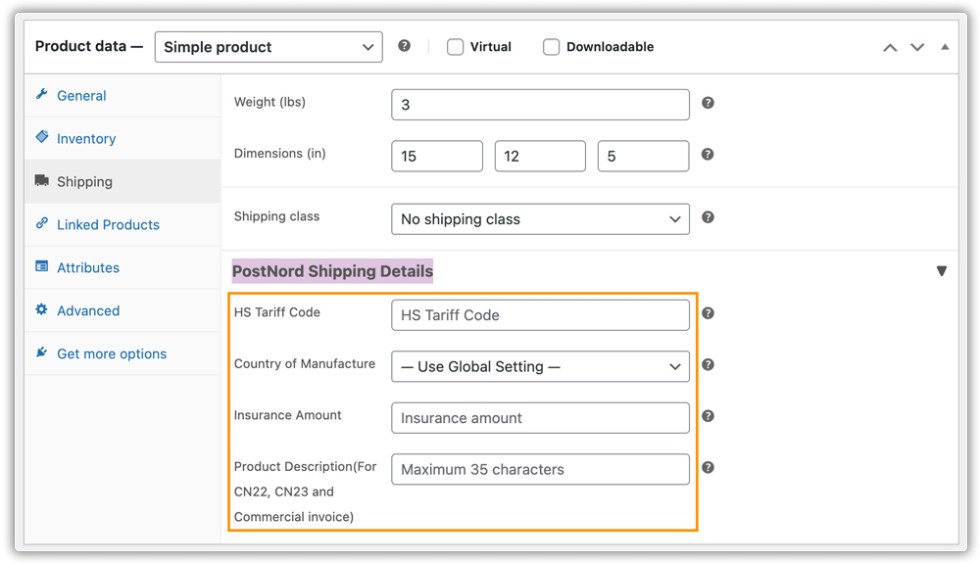
Make sure the product description is clear and concise to help avoid customs delays.
Printing PostNord Labels for International Shipments
- Visit the WooCommerce orders page and edit the international orders
- Click on Generate Packages
- Select the appropriate PostNord international service and then click on the Create Shipment option
- The plugin will generate the following documents for your international shipment
- PostNord Shipping Label
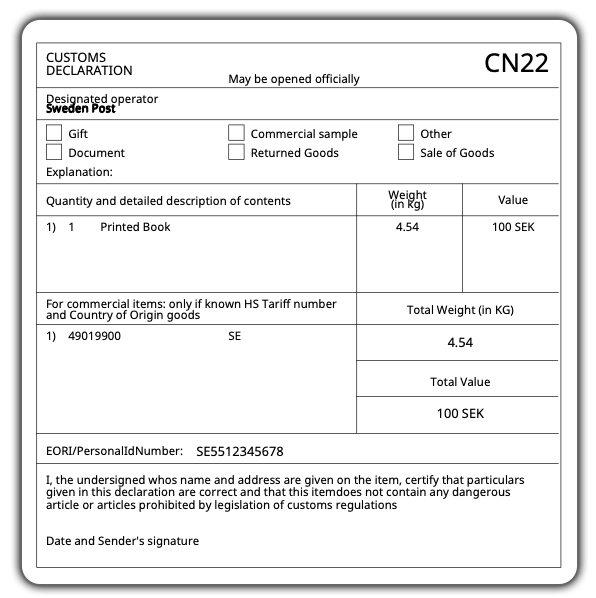
- CN22 or CN23 international form
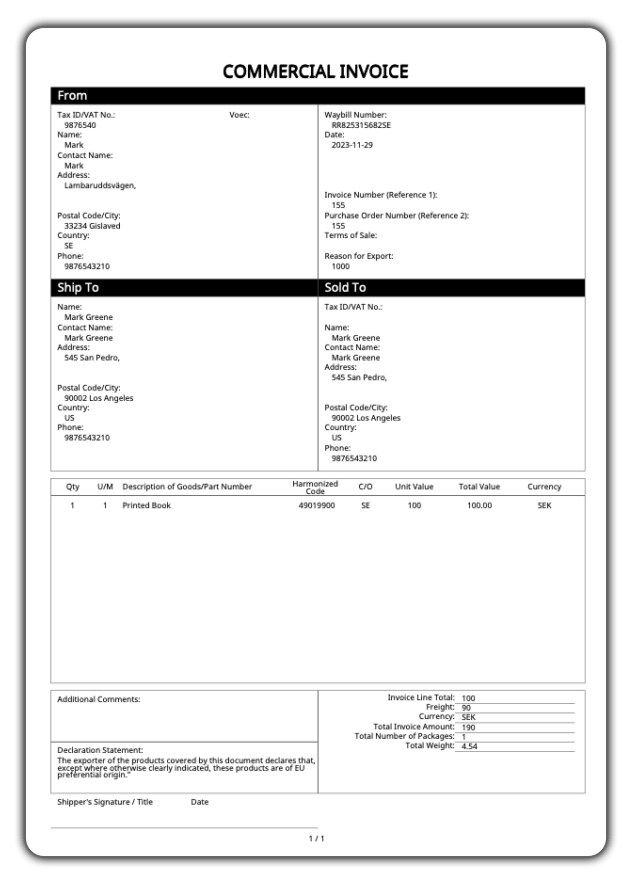
- Commercial Invoice
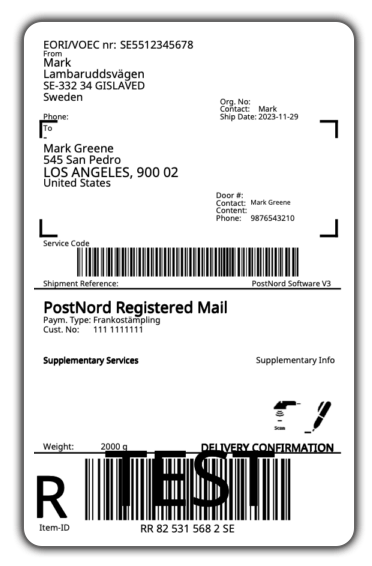
Here are the sample documents generated by the plugin for a shipment from Sweden to the US.
- PostNord International Shipping Label
- Commercial Invoice
- CN22 or CN23 international form
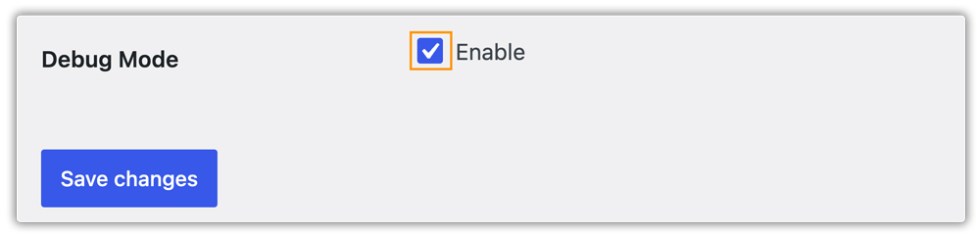
Debug Mode
↑ Back to topEnable Debug Mode under the General tab if you are experiencing issues such as missing services or label generation failures. When enabled, detailed diagnostic information is written to the WooCommerce logs, which you can review under WooCommerce > Status > Logs.