Overview
↑ Back to topPricePulse is a WooCommerce plugin that allows you to create and manage dynamic discount rules for products, categories, carts, and customer segments. Discounts can be applied conditionally based on cart contents, user roles, order count, and more.
Key Features
↑ Back to top- Product, variation, and category-level discounts
- Cart-based conditions (e.g., total amount, item count)
- Buy One Get One (BOGO) deals
- Tiered pricing (bulk discounts)
- Shipping and payment method-based discounts
- Scheduled discount rules with expiration
- Customer-specific promotions, including Nth order and next-order discounts
- Global discounts
Discount Types
↑ Back to topPricePulse supports the following discount types:
| Discount Type | Description |
|---|---|
| Product Discount | Applied to selected products, categories, or tags |
| Cart Discount | Based on cart conditions such as total amount or item count |
| BOGO Deals | Buy X get Y deals |
| Tiered Pricing | Quantity-based pricing levels for bulk purchases |
| Checkout Condition | Discount based on shipping or payment method |
| Customer-Based Rules | Offers for specific users or user roles |
| Nth Order Discount | Reward users on their 2nd, 5th, etc., purchase |
| Next Order Discount | Apply a discount on a user’s future purchase |
| Global Discount | A store-wide discount rule |
Installation
↑ Back to top- Purchase the product from WooCommerce.com
- Download the ZIP file from your WooCommerce.com dashboard
- Go to Plugins > Add New > Upload and select the ZIP file you just downloaded
- Click Install Now and then Activate.
Accessing the Plugin
↑ Back to topNavigate to WooCommerce → PricePulse in your WordPress dashboard.
Creating a Discount Rule
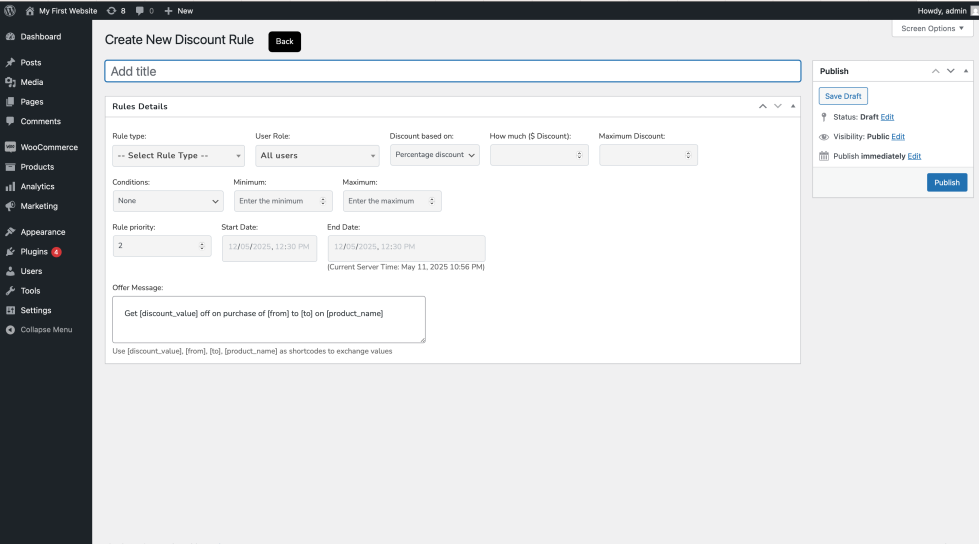
↑ Back to top- Click Add New Rule.
- Provide a rule name and select the discount type.
- Configure conditions (e.g., product selection, cart total, user role).
- Choose the discount method: fixed amount, percentage, or quantity.
- Set scheduling options (start and end date).
- Define display settings (e.g., show banners, tables, or timers).
- Click Publish.
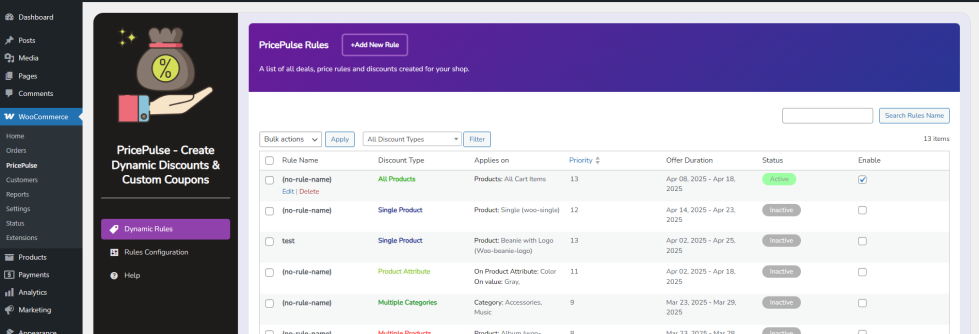
Managing Discount Rules
↑ Back to top- View all rules from the main dashboard.
- Enable/disable or delete rules using bulk actions.
- Use filters (e.g., by rule type, status) to find specific rules.
- Preview applied discounts before publishing.
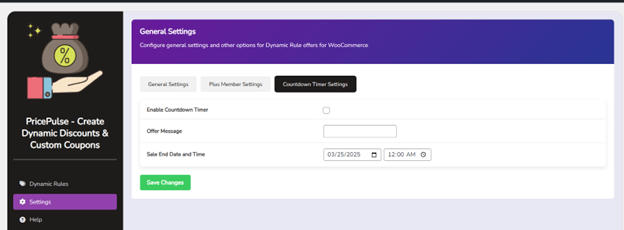
Display Options
↑ Back to top| Option | Description |
|---|---|
| Show Countdown Timer | Add urgency with a timer on eligible product pages |
| Display Offer Banner | Show a discount message near the product title or description |
| Offer Table Position | Choose position for tiered pricing table (before/after product description) |
| Shipping Discount Line | Display as a separate cart line or embedded in shipping cost |
Rule Application Modes
↑ Back to top- First Matched Rule: Only the first matched rule is applied.
- All Matched Rules: All applicable rules are applied (can be combined).
Customer Engagement Features
↑ Back to top- Tab Message Notification: Customize browser tab title when user navigates away (e.g., “Wait! Special Offers Inside”).
- Bring Back Lost Visitors: Automatically change the browser tab title to a custom attention-grabbing message when users switch away—like “Wait! You Forgot Something!”
- Tailor Messages by Page: Set unique browser tab messages for different pages (e.g., “Don’t Miss Our Best Deals!” on the shop page or “Limited-Time Offer!” on the cart page).
💡 Step-by-Step Walkthroughs for Discount Rule Types in PricePulse
↑ Back to top🔁 Buy One Get One (BOGO) Discount
↑ Back to topHow to Setup Bogo in WooCommerce
🛒 Single Product Rules
1. Specific Product Discount
- Navigate to PricePulse > Add New Rule.
- Choose “Specific Product” from the dropdown.
- Enter the Rule Name and Priority.
- Select the product(s) to apply the discount on.
- Set the discount type: Percentage, Fixed, or Price Override.
- Define quantity ranges (e.g., Buy 2–4 get 10% off).
- Save the rule.
2. Specific Category Discount
- Go to Add New Rule.
- Select “Specific Category”.
- Choose one or more product categories.
- Set quantity range and discount method.
- Save the rule.
3. Specific Product Variation Discount
- Create a new rule.
- Choose “Specific Product Variation”.
- Pick product variations (like Size M, Color Blue).
- Set up pricing tier or single discount.
- Save.
4. Specific Tag Discount
- Add a new rule.
- Select “Specific Tag”.
- Enter or select the desired product tags.
- Define the discount.
- Save rule.
5. Product Attribute Discount
- Choose “Product Attribute”.
- Select attributes like Color, Brand, etc.
- Apply discount configuration.
- Save the rule.
6. Tiered Rule on Product
- Select “Tiered rule on Product”.
- Choose target products.
- Create multiple tiers (e.g., 1–3: 5%, 4–6: 10%).
- Save.
7. Tiered Rule on Category
- Select “Tiered rule on Category”.
- Choose categories.
- Set up tier slabs.
- Save.
📦 Multiple Product Rules
8. All Products Discount
- Choose “All Products”.
- Define a global discount (e.g., 15% sitewide).
- Set optional usage limits.
- Save the rule.
9. Multiple Products Discount
- Choose “Multiple Products”.
- Pick specific products.
- Apply shared or individual discount values.
- Save.
10. Multiple Categories Discount
- Choose “Multiple Categories”.
- Select categories.
- Set up discount method.
- Save.
🧠 Advanced Rules
11. Cart Rule Discount
- Choose “Cart”.
- Set condition (e.g., subtotal > $100).
- Apply discount (fixed/percentage).
- Save.
12. Payment Discount
- Select “Payment Discount”.
- Choose payment gateways (e.g., PayPal).
- Assign discount.
- Save.
13. Shipping Discount
- Choose “Shipping Discount”.
- Pick shipping methods (e.g., Flat Rate).
- Set discount or free shipping.
- Save.
14. BOGO (Buy X Get Y)
- Choose “BOGO (Buy X Get Y)”.
- Select X and Y products or categories.
- Define quantity and limits.
- Save.
15. Next Purchase Discount
- Select “Next Purchase Discount”.
- Define rules (e.g., after 1st order, get 10% off next).
- Choose delivery method (email or auto-apply).
- Save.
16. Least Amount Product Discount
- Choose “Least Amount Product Discount”.
- System auto-picks lowest priced item.
- Define discount (e.g., 100% = free).
- Save.
17. Nth Order Discount
- Choose “Nth Order Discount”.
- Set the order number (e.g., 3rd order).
- Define discount.
- Save.
18. Specific Customer Discount
- Choose “Specific Customer”.
- Enter customer email/ID.
- Set discount amount.
- Save.
19. Plus Member Discount
- Choose “Plus Member”.
- Define membership roles or tags.
- Apply special pricing.
- Save.
Notes
↑ Back to top- Discount rules are applied on the frontend and reflected in the cart.
- Scheduled rules will only activate within the defined date/time range.
- Rules can be previewed using staging or preview tools in WooCommerce.
Troubleshooting
↑ Back to topIf discounts are not applying:
- Check that the rule is published and not expired.
- Ensure that product/category/tag matches the rule’s target.
- Review conditions such as cart total or user role.
- Verify no plugin conflicts with other discount systems.
FAQs
↑ Back to topHelp customers by answering commonly asked questions.
Can I create multiple discount types at the same time?
Yes! PricePulse supports creating and applying multiple discount rules simultaneously. You can stack rules or set priorities so certain discounts apply over others.
Can I schedule discounts for specific time periods?
Absolutely! Each rule in PricePulse can be scheduled using start and end dates, so you can prepare campaigns for flash sales, seasonal promotions, or weekly deals.
Does it work with variable and grouped products?
Yes. PricePulse fully supports simple, variable, grouped, and even virtual/downloadable products when applying rules.