WooCommerce Product Attachments allows you to add downloadable and viewable files & URLs to products, categories, and orders. Customize display settings, restrict access, set expiry dates, and track downloads.
Installation and Activation
↑ Back to top- Download the .zip file for Product Attachments Pro for WooCommerce.
- Go to: WordPress Admin > Plugins > Add New to upload the file you downloaded with Choose File
- Now, Install and Activate the extension.
More information at: Install and Activate Plugins/Extensions
Configurations
↑ Back to topGo to WooCommerce > Product Attachments. Here, you will find all the configuration settings for the Product Attachments Pro plugin.
Settings
↑ Back to topTo configure the general settings, go to WooCommerce > Product Attachment, then click on Settings tab. Here, you can adjust the following options:
- Attachment Title: Set Title for the product attachments section
- External URL Title: Specify Title for the External URLs section
- Custom Tab Title: Set Title for the product attachments tab
- Attachment Position: Select where to display attachments on the product page
- After Add to Cart
- Before Add to Cart
- Custom Tab
- Show URL: Display URL for external URL attachments
- Show File Size: Display file size for attachments
- Include in Emails: Include attachments in order emails

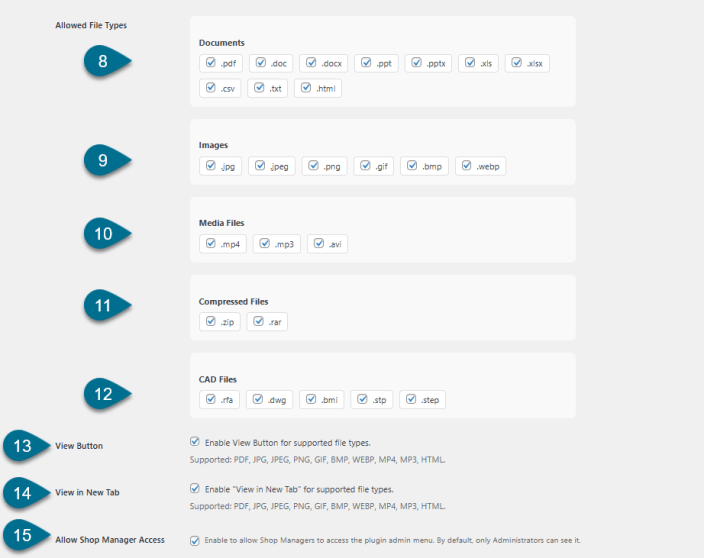
- Documents: Allow to upload multiple types of documents like
- pdf, doc, docx, ppt, pptx, xls, xlsx, csv, txt, html
- Images: Allow to upload multiple types of images
- jpg, jpeg, png, gif, bmp, webp
- Media Files: Allow multiple types of video files
- mp4, mp3, avi
- Compressed Files: Option to allow compressed files attachment
- zip, rar
- CAD & 3D Modeling Files: Option to allow CAD & 3D modelling files
- rfa, dwg, bmi, stp, step
- Enable View Button: Enable the view button to view the following file types:
- Supported Formats: PDF, JPG, JPEG, PNG, GIF, BMP, WEBP, MP4, MP3, HTML
- View in New Tab: Enable “View in New Tab” for supported file types to allow the users to view the files in new tab oof browser
- Supported Formats: PDF, JPG, JPEG, PNG, GIF, BMP, WEBP, MP4, MP3, HTML
- Allow Shop Managers Access: Enable to allow Shop Managers to access the plugin admin menu. By default, only Administrators can see it.
Note: If you need any additional file type that isn’t listed above, please feel free to reach out (support@extifyplugins.com). We’ll be happy to review it and add support for you.
Appearance – Button Customization
↑ Back to topGo to WooCommerce > Product Attachments > and then click on Appearance. Here, you will find all the customization and appearance settings for download button, view button, and titles.
- Download Button: Customize the Download button
- Text – Set button label
- Background Color – Select button background color
- Text Color – Set button text color
- View Button: Customize the View Button
- Text – Set button label
- Background Color – Set button background color
- Text Color – Set button text color

- Attachment Title: Customize Attachment section title
- Font Size – Set Attachment Title size
- Font Style – Set attachment title font like Bold or Normal
- External URL Title: Customize External URL section title
- Font Size – Set External URL size
- Font Style – Set External URL font like Bold or Normal
- File/URL Title: Customize attached file & URL
- Text Color – Set File/URL text color
- Font Size – Set External URL size
- Font Style – Set External URL font style like Bold or Normal

Icon Manager
↑ Back to topGo to WooCommerce > Product Attachments > and then click on Icon Manager. Here you can upload and manage the Icons for 20+ file types.
Assign New Icon
You can upload new icons here.
- Upload Icon: Upload a custom icon for a specific file type
- File Type: Set icon for 20+ file types
- Enable: Enable this icon for the selected file type
Existing File Type Icons
Here, you can View & manage all the file types icon in a grid. You can also enable/disable or remove the icon.

Bulk Assign Attachments
↑ Back to topTo assign attachments in bulk. Go to WooCommerce > Product Attachments > and then click on Bulk Assign.
- File Upload Options
- Upload Files: Upload attachments directly
- Enter URL: Provide an external URL for the attachment. You can enter the URL & URL Title.

2. Assign Attachments To
- Products
- Categories
3. Select Products/Categories
- Products: Assign attachments to specific products
- Categories: Assign attachments to product categories
4. Expiry Date (optional)
- Set an expiry date for the attachments
5. Order Status (optional)
Select applicable order statuses for attachments. The attachment will be shown in the Order detail page & Order email based on pre-configured order status.
- Pending Payment
- Processing
- On Hold
- Canceled
- Pending
- Completed
- Refunded
- Failed
- Draft
Note: If Order status is configured then attachment will not be shown on product page. The attachment can be shown in Order detail page in ‘My Account’ and order email as per pre-configured order status.
6. User Roles (optional)
Select which user roles can access this attachment:
- Not Logged-in Users
- Administrator
- Customers
- Subscribers
- Other custom roles
Note: Please leave it empty if you want to display the attachment to all customer roles.

Attachment List
↑ Back to topTo view and manage all the attachments in a dedicated dashboard. Go to WooCommerce > Product Attachments > and then click on Attachments List.
Add New Attachment:
Click the ‘Add New Attachment’ button and A popup will appear and upload an attachment or enter file URL. Attachments include a file, description, assigned products, and applicable order statuses. Access can be restricted based on user roles, and an optional expiry date can be set. Downloads are tracked for better management.

Attachment Grid
↑ Back to topView all attachments and their details in a grid, with options to unlink or remove them. You can also check the total downloads counter for each file.
Note: Download counter is shown only for files. For URL, their is no Download counter.

Translation Support (i18n)
↑ Back to topThe plugin fully supports translation of all frontend labels using standard WordPress language files (.po/.mo).