Slim SEO Pro allows your WooCommerce store to rank higher in search results with structured data, healthy links, and optimized content – all managed directly from your WordPress dashboard.
Installation
↑ Back to topTo start using a product from WooCommerce.com, you can use the “Add to store” functionality on the order confirmation page or the My subscriptions section in your account.
- Navigate to My subscriptions.
- Find the Add to store button next to the product you’re planning to install.
- Follow the instructions on the screen, and the product will be automatically added to your store.
Alternative options and more information at:
Managing WooCommerce.com subscriptions.

Schemas
↑ Back to topTo create a schema, click the + Add Schema button. A popup will appear where you can browse or search for a schema by name.

Click a schema to add it. Schemas are grouped similarly to the Google Search Gallery, making them easier to find.
Once added, you can:
- Click the title or arrow icon to expand/collapse the schema details
- Click the trash icon to remove the schema (with confirmation)
Properties
↑ Back to topEach schema includes a set of properties that define its details.
Slim SEO Pro follows standards from Google and schema.org to provide a comprehensive list of properties, helping you supply as much useful information as possible.
There’re two types of properties:
- Required: Must be filled in (marked with a red asterisk *)
- Optional: Recommended, but not required
To keep things simple, some optional properties are hidden by default. Click + Add property at the bottom to reveal more.

Most fields are pre-filled with sensible defaults to save you time, but you can customize them as needed.
Shortcodes
↑ Back to topYou can use shortcodes in property values. Slim SEO Pro will process them and use their output as the final value.
Dynamic variables
↑ Back to topMost properties are auto-filled with default values to save you time to enter or select values for them. You can manually enter data for them as well, but we recommend you use the Insert button to insert dynamic data for properties.
When clicking the Insert button, you’ll see a popup with a list of supported dynamic variables for properties. You can search for them (by title) or simply click any of them to insert them into the property value input box.

You can insert multiple dynamic variables and/or custom text in the text box for the property value.
Location
↑ Back to topSchemas can be applied conditionally, giving you full control over where they appear.
Open the Location tab in a schema panel:

Location types
- Singular: Applies to individual posts/pages
- Archive: Applies to archive pages (categories, tags, etc.)
- Code: Applies based on custom PHP logic (advanced)
Rule groups
For Singular and Archive, click Add Rule Group to define conditions.

Each group contains multiple rules. The logic works like this:
- If any rule in a group is true → the group is true
- If all groups are true → the schema is applied
Rules let you target:
- All posts of a post type
- Specific posts
- Specific terms (categories, tags, etc.)
Using code (advanced)
If you select Code, you can define custom logic using PHP:

Enter any PHP expression (without <?php ?>) that returns true or false.
We recommend using WordPress conditional tags for this.
Hooks
↑ Back to topDevelopers can programmatically register schemas using the slim_seo_schema_settings filter:
add_filter( 'slim_seo_schema_settings', function( array $schemas ): array {
	$schemas[ 'unique_schema_id' ] = [
		'type'   => 'Brand',
		'active' => true,
		'fields' => [
			'name' => '{{ site.title }}',
		],
		'location' => [
			'type'               => 'singular',
			'singular_locations' => [
				'unique_group_id' => [
					'unique_rule_id' => [
						'name'  => 'product:post',
						'value' => 'all',
						'label' => 'All',
					]
				],
			],
		],
	];

	return $schemas;
} );
The schema format is the same as the exported JSON. A good workflow is:
- Create a schema in the UI
- Export it to JSON
- Use that structure in your code
You can also use dynamic variables in schema properties.
Custom properties
↑ Back to topAlthough most important properties (which Google recommends) are implemented in Slim SEO Pro, there are some properties that are available in the schema.org specification, but are not required by Google. Adding these properties can help you add more details for a schema and thus, help search engines to understand and display the schema better.
To add custom properties, click the + Add Property link at the bottom of the schema panel.

After that, you’ll see a new property called Custom with a + Add New button. Clicking the button will show you a pair of key-value.

Each key-value pair represents a custom property, where key is the property name and value is the property value.
For example: if you enter property “street_address” with value “35 Nguyen Co Thach, Nam Tu Liem”, then in your schema JSON-LD (the output of the schema), you’ll see a pair like this:
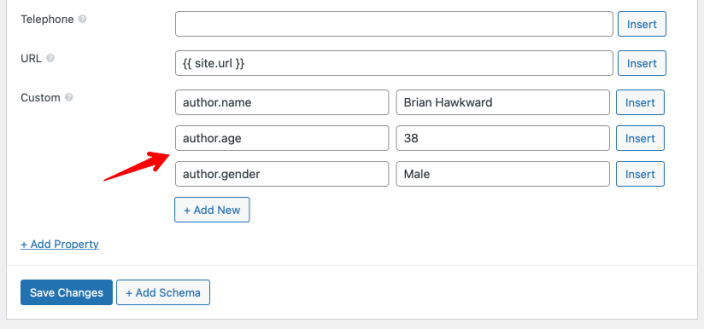
"street_address": "35 Nguyen Co Thach, Nam Tu Liem"Dot notation
By default, you can only enter “plain” pair of key-value for custom properties. If you want to enter a structural data for a property like:
"author": {
    "name"  : "Brian Hawkward",
    "age"   : "38",
    "gender": "Male"
}
Then you need to use the dot notation. Dot notation is a way that let you define structural data (hierarchical data) with dots (.). Each dot (.) defines a level in your data.
With the sample above, this can be understood like this:
"author.name"  : "Brian Hawkward",
"author.age"   : "38",
"author.gender": "Male",
Here the params name, age, gender are sub-params of the author and they’re defined with a dot prefixed.
Implementing that in Slim SEO Pro as follows:
Another case is when you want to add a set of data without keys (like list of images). The data in JSON-LD looks like this:
"images": [
    "https://domain.com/1.jpg",
    "https://domain.com/2.jpg",
    "https://domain.com/3.jpg"
]
Although keys are not implemented, we can understand that this list (array) uses numeric keys: 0, 1, 2. So we can rewrite it as:
"images": [
    0: "https://domain.com/1.jpg",
    1: "https://domain.com/2.jpg",
    2: "https://domain.com/3.jpg"
]
Similar to above, this can be understood as:
"images.0": "https://domain.com/1.jpg",
"images.1": "https://domain.com/2.jpg",
"images.2": "https://domain.com/3.jpg",
And can be implemented as follows in Slim SEO Pro:

Combining these, you can define a complex data structure as follows (this is a list of addresses, each address is an object):
"address": [
    {
        "street": "35 Nguyen Co Thach",
        "city"  : "Hanoi"
    },
    {
        "street": "12 Le Duc Tho",
        "city"  : "Hanoi"
    },
]
In Slim SEO Pro:

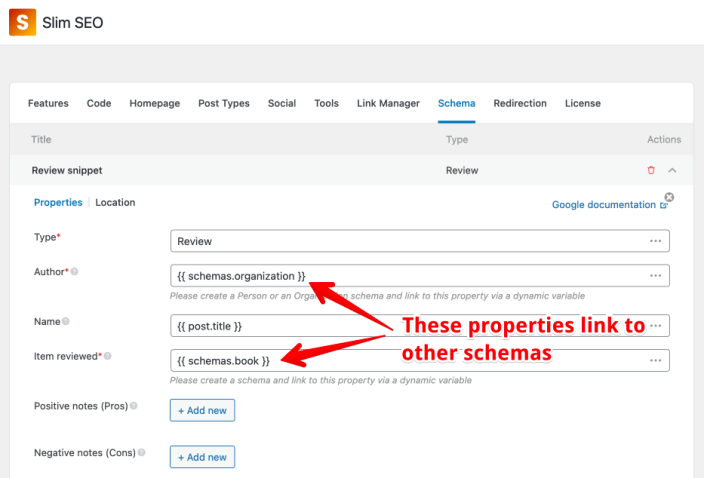
Connecting schemas
↑ Back to topConnecting schemas together via properties is a powerful feature of Slim SEO Link Manager. With this feature, you can build individual schemas, and then link from one schema to another one via a property (with the help of dynamic variables).
For example, if you want to add a schema for a review of a book, then you can build two separate schemas: Review and Book. Inside the Review schema, you can set its property “item reviewed” that links to the Book schema. This way, you connect the Book schema to the Review schema as a property.
Using individual schemas gives you more options to enter a lot of properties for each schema, which is quite hard to do if implementing them as nested schemas.
Another benefit of this method is that you can reuse schemas. For example, you can build an Organization schema that can be the author of the review for a Book schema, and also be the organization of the current WebSite.
Post schemas
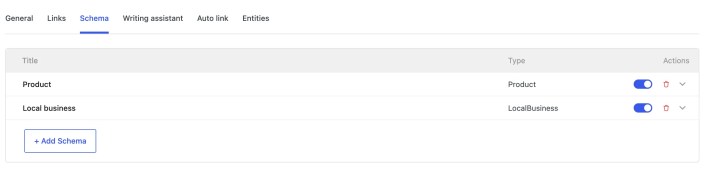
↑ Back to topIn addition to global schemas set in the settings page, you can also create custom schemas for individual posts and pages.
Schemas added directly to a post or page take priority over global schemas. If a post has its own schema, global schemas will not be applied.
To add a schema, open the post or page editor and look for the Schema tab inside the Search Engine Optimization meta box below the editor.
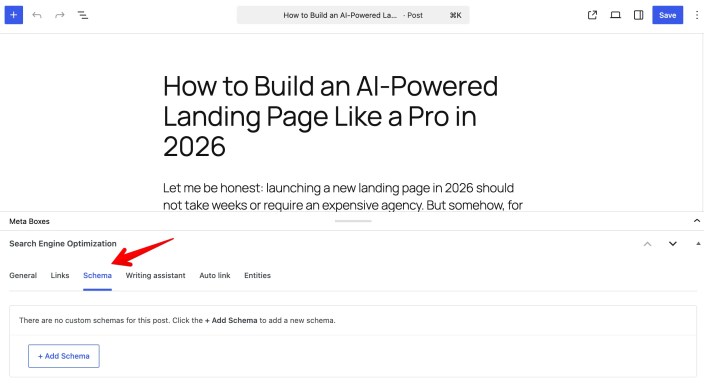
Click + Add schema, then choose a schema type from the list. After that, fill in the required properties – just like when creating a global schema.
All available properties are the same as in the global schema settings, including support for dynamic variables.
When you’re done, click Save or Update to apply the changes.
Custom JSON-LD
↑ Back to topIf you’re an advanced user and want to add and edit schemas with custom JSON-LD code, then Slim SEO Pro has that for you.
Select Custom JSON-LD from the list of available schemas:

Then in the schema panel, paste your JSON-LD code into the textarea box:

You can still insert the dynamic variables into your JSON-LD code as follows:

And the plugin will render the variables on the front end.
Although the plugin can process your custom JSON-LD code if it contains <script> tag, it’s recommended to enter only the JSON code. Some hostings has special security rules that block the plugin from saving the data if it contains <script> tag.
Link manager
↑ Back to topScanning links
↑ Back to topAfter installing the plugin, you need to scan all posts to find links and their details. It’s required to create reports in the plugin dashboard.
To scan links, clink the Scan links now button:

When the link scanning process finishes, the status (admin notice) will disappear and you’ll see reports in the plugin dashboard.

How it works
Slim SEO Pro scans links in the background to avoid any performance issues if you have a lot of posts. The plugin uses WordPress cron to process posts and parse links from the post content. So in each run, the plugin will process only a batch of posts and parse links for them. This will reduce the performance impact on your hosting/server as the number of posts for each run is relatively small and can be processed at once. Even if the plugin fails at processing some posts, it will try again in the next run.
Because the plugin depends on the WordPress cron, it requires the cron to work. If you disable WordPress cron and use an external cron (like a server cron or a remote system that sends requests to your site to trigger the cron), then the scanner runs only when the cron is called. If your cron setup is once per 15 minutes, then the plugin runs its background processing once every 15 minutes, which might take more time than usual to finish the process.
In that case, we’d recommend enable the WordPress cron to run the scanner once and then disable the WordPress cron when you finish.
Re-scan links
In case you already ran the link scanning, and you want to scan again, go to the Tools tab and you’ll find the Scan links button there:

The link scanning action will remove all existing link data and scans from the beginning.
Requests blocked
If you use a security plugin or a security rule in CloudFlare, there might be a chance that the requests made by the plugin are blocked. Technically, the plugin uses background processing to send requests to admin-ajax.php via the wp_remote_post function to perform the scan. If your security rules have a max request limit, then they might block the requests, even when the requests are made by the server itself.
In this case, you might want to increase the limit or exclude the server IP of the website to avoid blocking the plugin’s requests.
For the Shield Security plugin, please go to the plugin settings > Config tab > Traffic, and update the settings Max Request Limit and Request Limit Time Interval.
If you use CloudFlare WAF’s Rate Limiting Rules, then increase the limit in its settings.
Scanning process not finishing
If you see the scanning process isn’t finished, please follow these steps:
- Update Slim SEO Pro to the latest version.
- Deactivate the plugin and reactivate it.
- Re-scan links
When deactivating the plugin, your data remains. No links are lost or changed.
Why dynamically generated links cannot be detected?
Dynamic links are, by nature, always changing. For example, if you have a “Recent Posts” widget or a section that automatically lists your latest articles, every time you publish a new post:
- New links appear
- Older links disappear
- The order may change
Because these links update themselves over time, the list is never stable. That makes it extremely difficult (and often not very useful) to track them reliably. The report can quickly become noisy or misleading.
Besides, Slim SEO stores all detected links in a dedicated database table and regularly runs background checks to verify their status.
However, with dynamically generated links, this process becomes inefficient:
- The plugin would have to rescan your site constantly to catch every change.
- This would impact performance, especially on larger sites.
- The database could grow very large because these links change frequently and are not meant to be stored long-term.
To keep your website fast and your reports clean, Slim SEO avoids analyzing links that are generated dynamically. We only analyze static links – the links that appear directly in your post or page content and do not change unless you edit the content yourself. These are predictable, stable, and meaningful for SEO analysis.
Reports
↑ Back to topSlim SEO Pro provides several reports to help you understand links on your website. Based on the data here, you’ll have an overview of your links, see problems, and fix them.
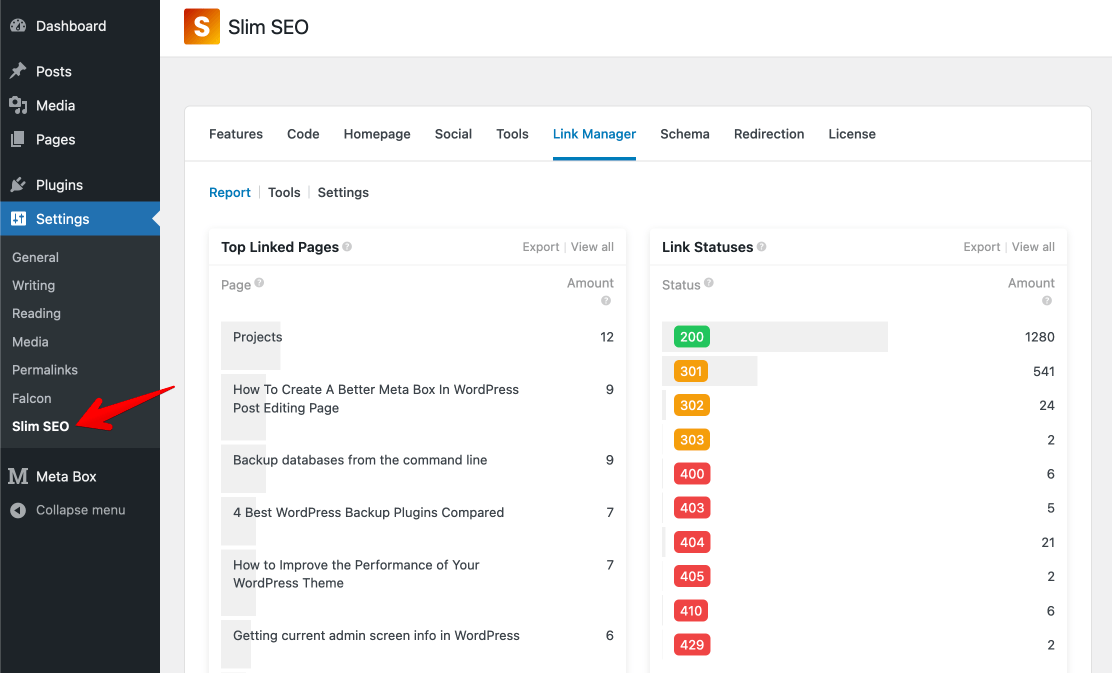
To see reports, go to Settings > Slim SEO and select tab Link Manager. There are several reports available:
- Top linked pages: this report shows you which pages are linked to the most. All links counted here are internal links.
- Link statuses: this report shows you the HTTP statuses of links, which tell you which link is working, broken, or redirected. This report includes both internal and external links.
- Top External Links: this report shows you the external URLs that are linked to the most.
- Top keywords: this report shows you the keywords that are used the most as anchor text. It counts keywords for both internal and external links.
Post link reports
↑ Back to topBesides the global reports, you can also see links from/to a specific post when editing it.
When editing a post, you’ll see a meta box Link Manager below the post content as follows:

Updating links
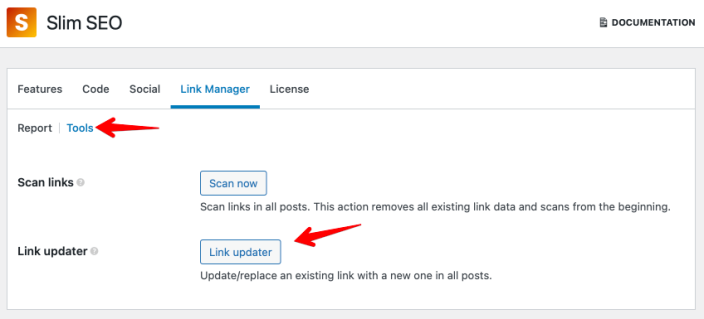
↑ Back to topAn important feature of Slim SEO Pro is the link updater tool. This tool helps you to update an URLs in all posts in your website. It’s very helpful when you want to fix a broken link, or update an old link.
To use the tool, go to Tools tab and click the Link updater button:
A new form will appear to allow you enter the old link and the new link:
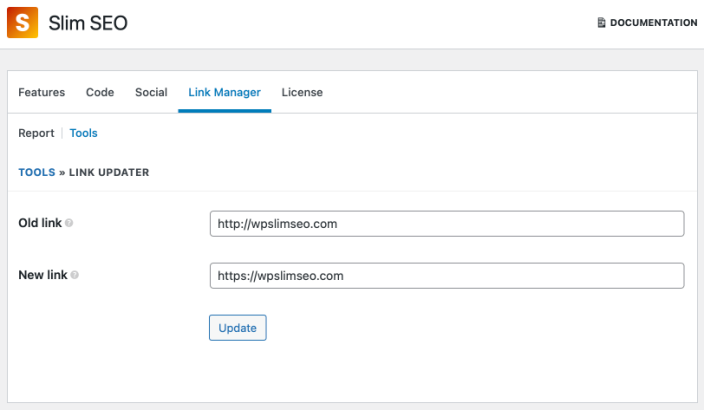
Click the Update button when you finish. The plugin will search through all posts for the old link and replace it with a new link.
Link suggestions
↑ Back to topThe plugin also suggests related posts for you to build links with. The plugin also allows you to connect different WordPress sites and suggest links between them. This feature is very useful to build internal links as well as build backlinks for your websites.
To get link suggestions when editing a post, click the Link Suggestions tab in the Link Manager meta box, below the post content. The plugin has 2 modes for link suggestions:
- Automatic: automatically suggests other posts to link to based on the keywords in the post content. The plugin will find all posts that have the keywords in the post content and show them to you so you can link to them.
- Manual: allows you to search for posts by keywords to link to. The plugin shows most used words from the post content that you can search faster by clicking on them.

Slim SEO Pro also allows you to find posts that in the same category or tag with the current post by enabling the Same taxonomies switch. In this case, you will get only related posts in the same category/tag.
For each found post, the plugin will suggest the sentence that has the related content to the post, where you should put the link. To save you time, a Copy link button is also available for you to copy the post URL.
With this feature, you can find related posts and link to them quickly. When you add a link to another post, the link will be updated in the reports immediately (see the Link reports section above). It’s a great way to build internal links and improve your website SEO!
How do link suggestions work?
To get related posts, the plugin will break the content of current post into sentences. For each sentence, it will find posts that their title has common words with the sentence.
If the duplication rate of the words is above 30%, then the plugin will suggest the post for you to link to from that sentence. Otherwise, the post will be ignore.
This way, the plugin ensures suggested posts are quite related to sentences and you can pick them to build links.
Create links from old posts to new posts
By default, Slim SEO Pro allows you to build links from the current post to exsiting posts. This way, the existing posts will have more internal links and will become stronger in term of SEO.
However, you can do backward with the plugin, e.g. build links from existing posts to the current post. So the new post will immediately have internal links and thus, will be indexed and ranked faster.
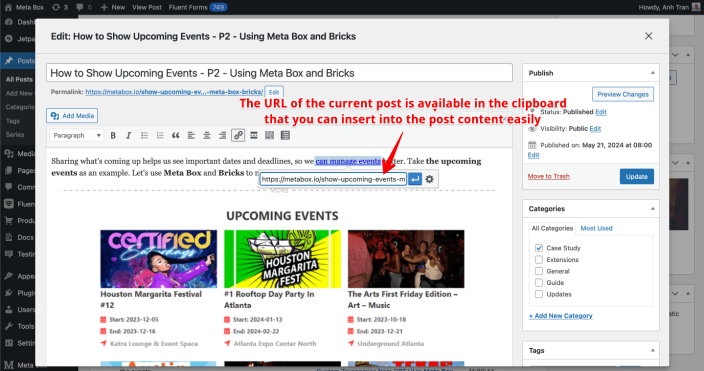
To do that, from the list of related (suggested) posts, click the edit icon to edit that post:
A popup will appear. In the popup, you’ll see the familiar edit screen of the selected old post, where you can edit its content and insert links. To make it more convenient, the plugin automatically copies the URL of the current post to the clipboard, so you can easily paste into the old post’s content easily and fast.
Interlinking external sites
↑ Back to topBesides suggesting internal links, Slim SEO Pro allows you to build backlinks with external sites of your network. So if you own a network of sites, then you can build backlinks from sites to sites. And plugin make this process easier by suggesting and maintaining links automatically for you.
Enable interlinking external sites option
To start using this feature, go to Slim SEO > Link Manager > Settings:
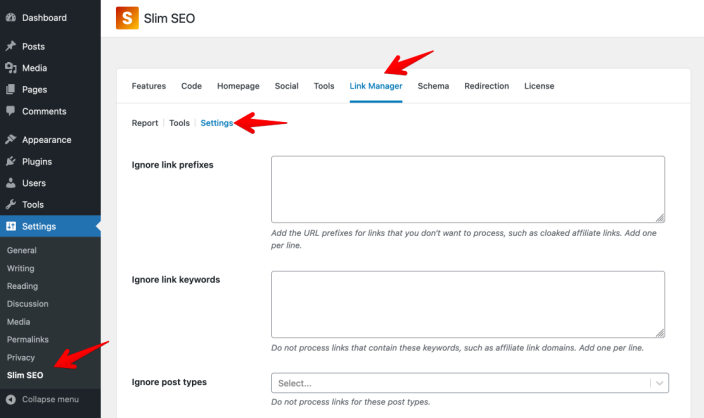
Scroll down and enable the Interlink external sites option:
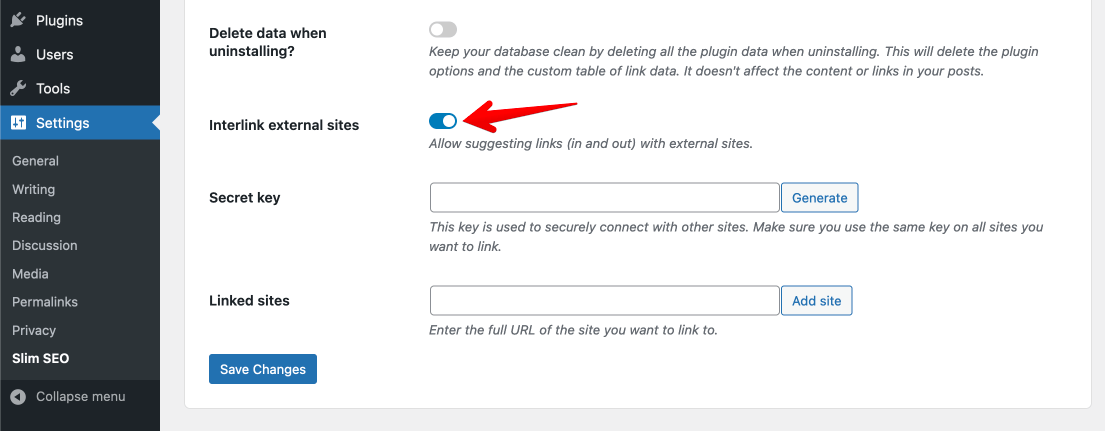
The plugin will reveal two more options:
- Secret key: this is the key used to connect with other sites securely. All the sites that are linked together must use the same key.
- Linked sites: this is the list of the sites that are linked to from the current site.
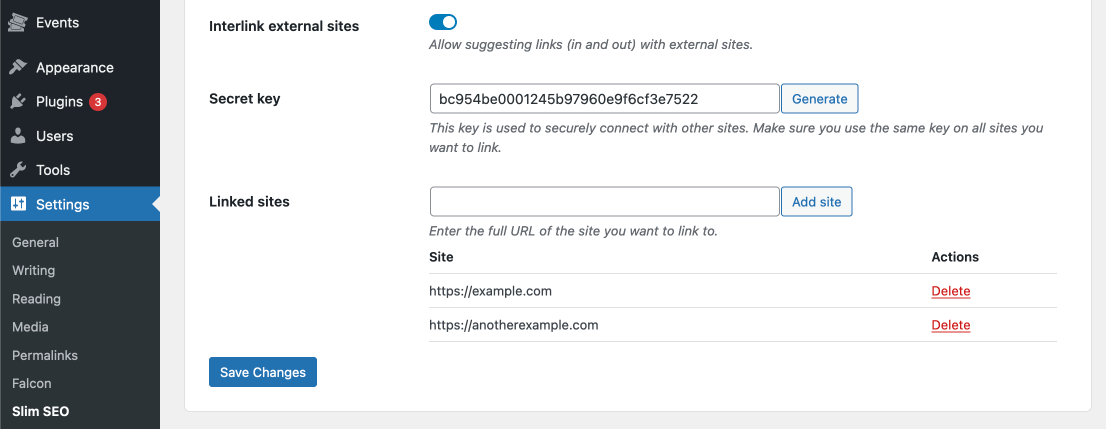
Generating secret key
The next step is generating a secret key. To do that, click the Generate button. The plugin will create a key for you and fill in the input.
Save the key before continuing
Make sure you save the plugin settings by clicking the Save Changes button. Otherwise, the secret key is not saved yet, and this feature won’t work.
This secret key is used to connect with your other sites securely, so keep it secret and don’t share it anywhere. Otherwise, if hackers know this key (and your license key), they can connect to your website and get data.
Also note that this key must be the same on the sites that you want to connect. So after generating a key on one site, go to other sites and enter it in this setting. Then save the changes.
Adding sites
After having a secret key for all sites, then you need to connect them together. In the next option Linked sites, you’ll see an input to enter the other sites’ URLs. Make sure you enter the full URL of the site, including https://. After that click the Add site button.
The plugin will connect to the newly added site, using the secret key to verify the connection. When everything is finished, the new site will be shown in the table below.
That’s done the setup part for interlinking external sites. To see it in action, let’s go to edit a post and see how the plugin suggests links from other sites.
Suggesting links from external sites
To build backlinks between sites, Slim SEO Pro will suggest links to other sites when you edit a post or a page. This way, you can link from your current post or page to a related or relevant post on other sites.
To do that, go to edit a post, and in the Link Manager meta box, below the post content, click Link Suggestions and you’ll see two new options: Internal and External tabs as follows:
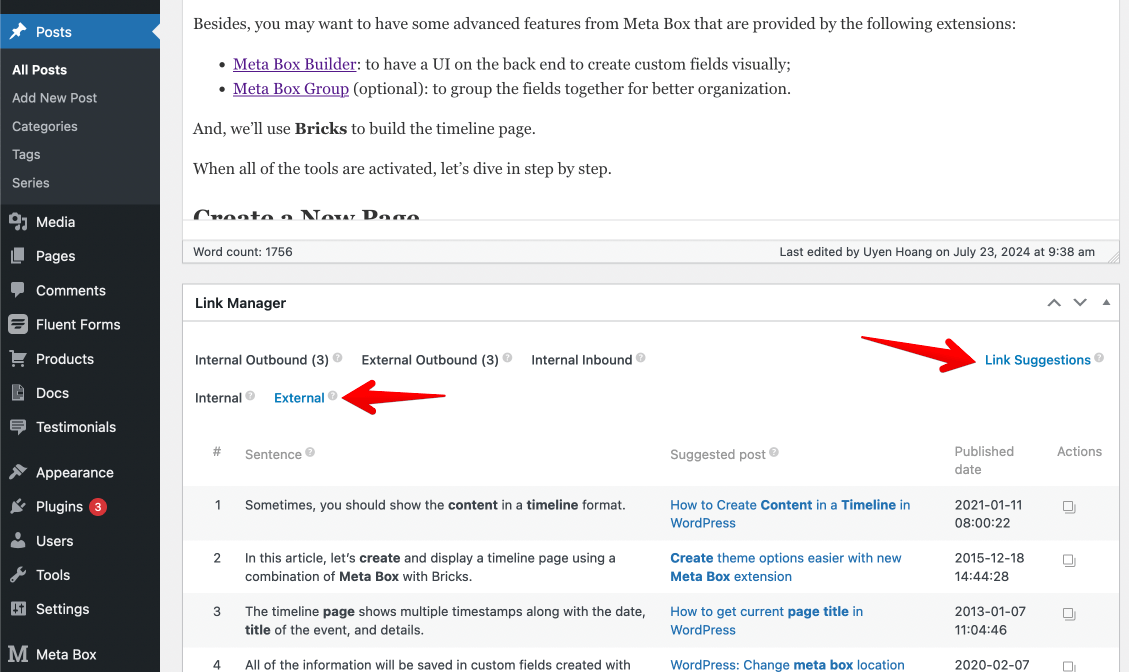
Where:
- Internal: it’s the link suggestions within your site, e.g. the suggestions to link to posts and pages on your site. It’s the functionality that has been in the plugin since the beginning.
- External: this is the new feature that suggests links from posts or pages on other websites.
When clicking the External tab, the plugin will show you a table of the related or relevant posts that it found on other websites. You can also see which sentence relates to the post, and if you feel okay, you can click the Copy button (in the Actions column) to copy the link to insert into your content.
After doing that, you’ll see the new links appear in the External Outbound report:
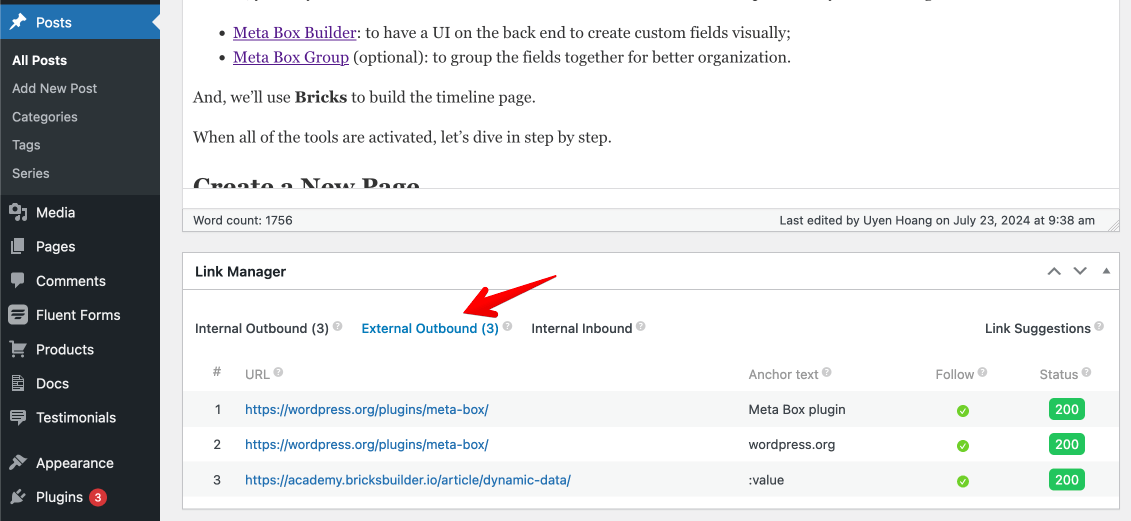
Of course, those links will be available in the plugin’s reports under Slim SEO > Link Manager, so you can see all the available details about them, like status, anchor text, etc.
Now you can monitor those links easily to see which links are redirected, which ones are broken, and can fix them.
Auto update links between sites
Besides suggesting and monitoring links to external sites, Slim SEO Pro also helps you to maintain those links, to keep them always active. That means when you edit and update a permalink of a post on one site, all the links to that post on other connected sites will be updated automatically. This keeps the URL always fresh, correct and avoids broken or redirected links across your sites, which is quite hard to track and fix.
Multisite network
If you use a multisite network, the plugin also optimizes the performance a lot to reduce the external connections. But in any case, performance is our top priority and this functionality doesn’t affect it. It’s just better in the case of multisite versus multiple external sites.
Google Search Console integration
↑ Back to topConnecting to Google Search Console
↑ Back to topSlim SEO Pro allows you to connect to Google Search Console (GSC) to bring the reports to WordPress. It helps you see how your pages perform on SERP, and give you more info about your impressions, positions, CTR, and keywords.
To connect your site with Google Search Console, the plugin uses the official Google OAuth2 SDK for authorization. This is the standard and recommended method provided by Google. With this setup, you’ll need a Google account and a project in Google Cloud Console. By creating your own app, you maintain full control and ownership of your data. Some third-party services let you connect through their Google app instead. However, this gives them access to your site’s data, which can pose security and privacy risks.
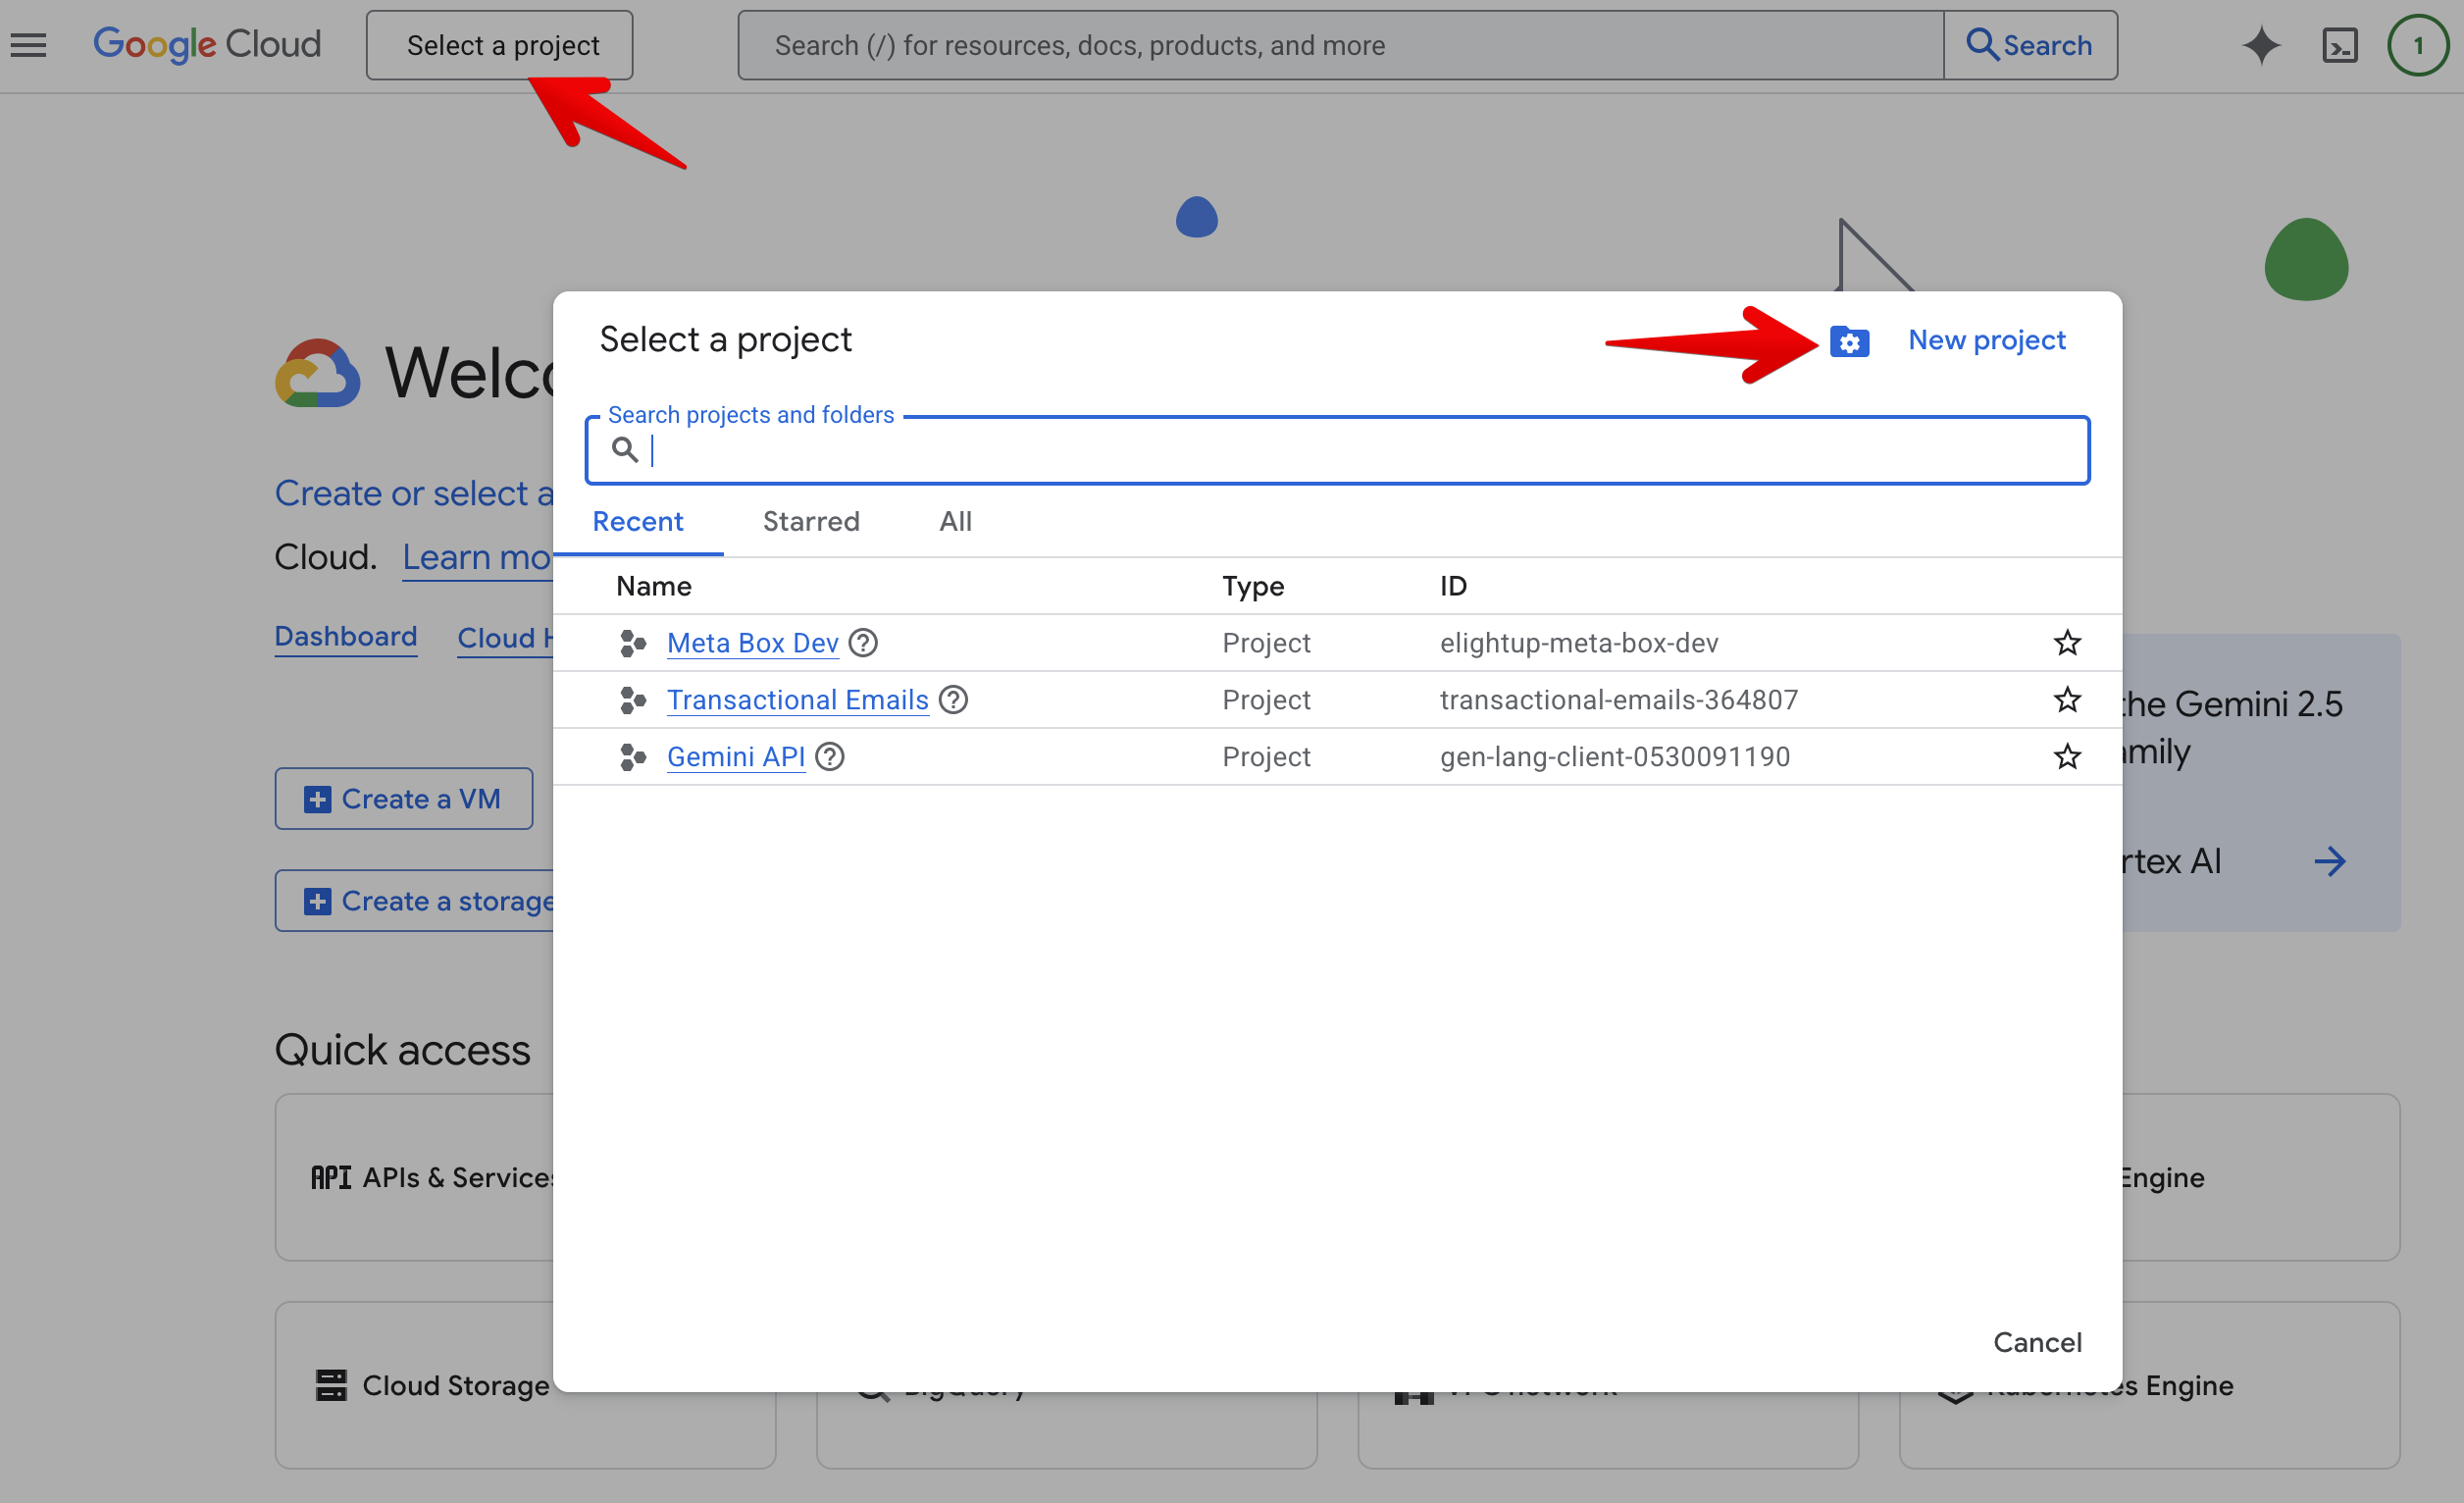
Creating a project
Go to Google Cloud Console and log in with your Google account. If you don’t already have a project to use for the integration with Slim SEO Pro, create a new one by selecting the project dropdown menu at the page’s top-left corner, near the Google Cloud logo, and in the popup, click the New Project button:
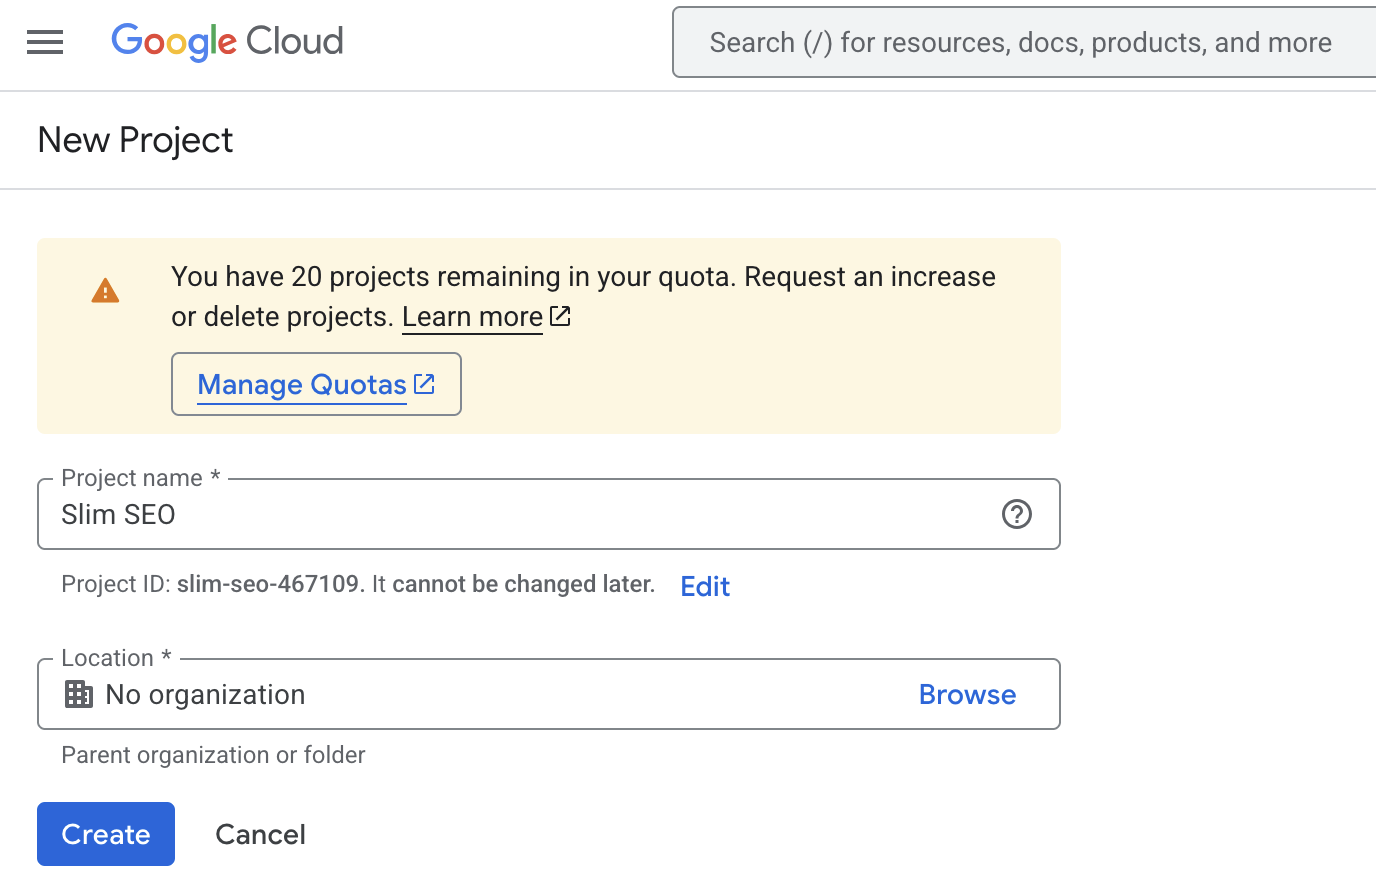
On the next screen, enter the project name. It can be anything:
Enabling API
After creating the project, select the project from the dropdown menu at the page’s top-left corner, near the Google Cloud logo.
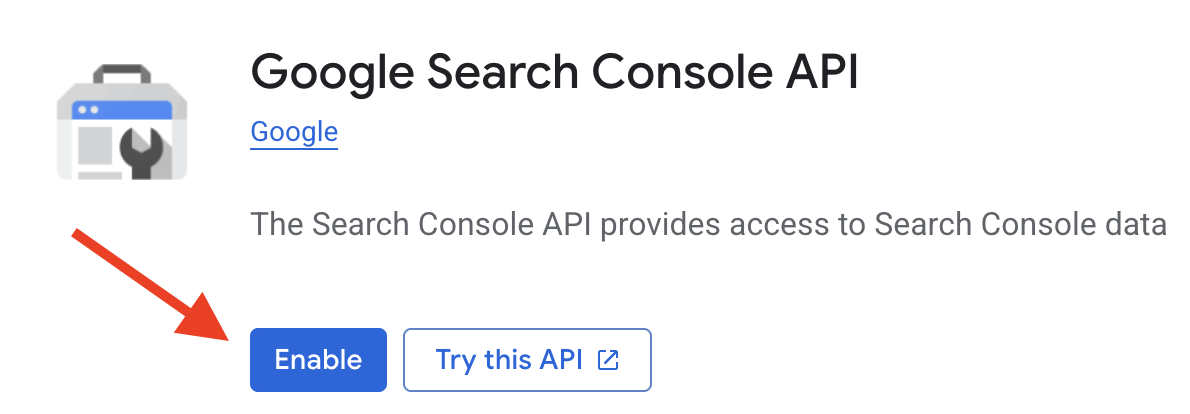
Then in the search box, enter “Google Search Console API” to search the API we need to enable, and select the first option:
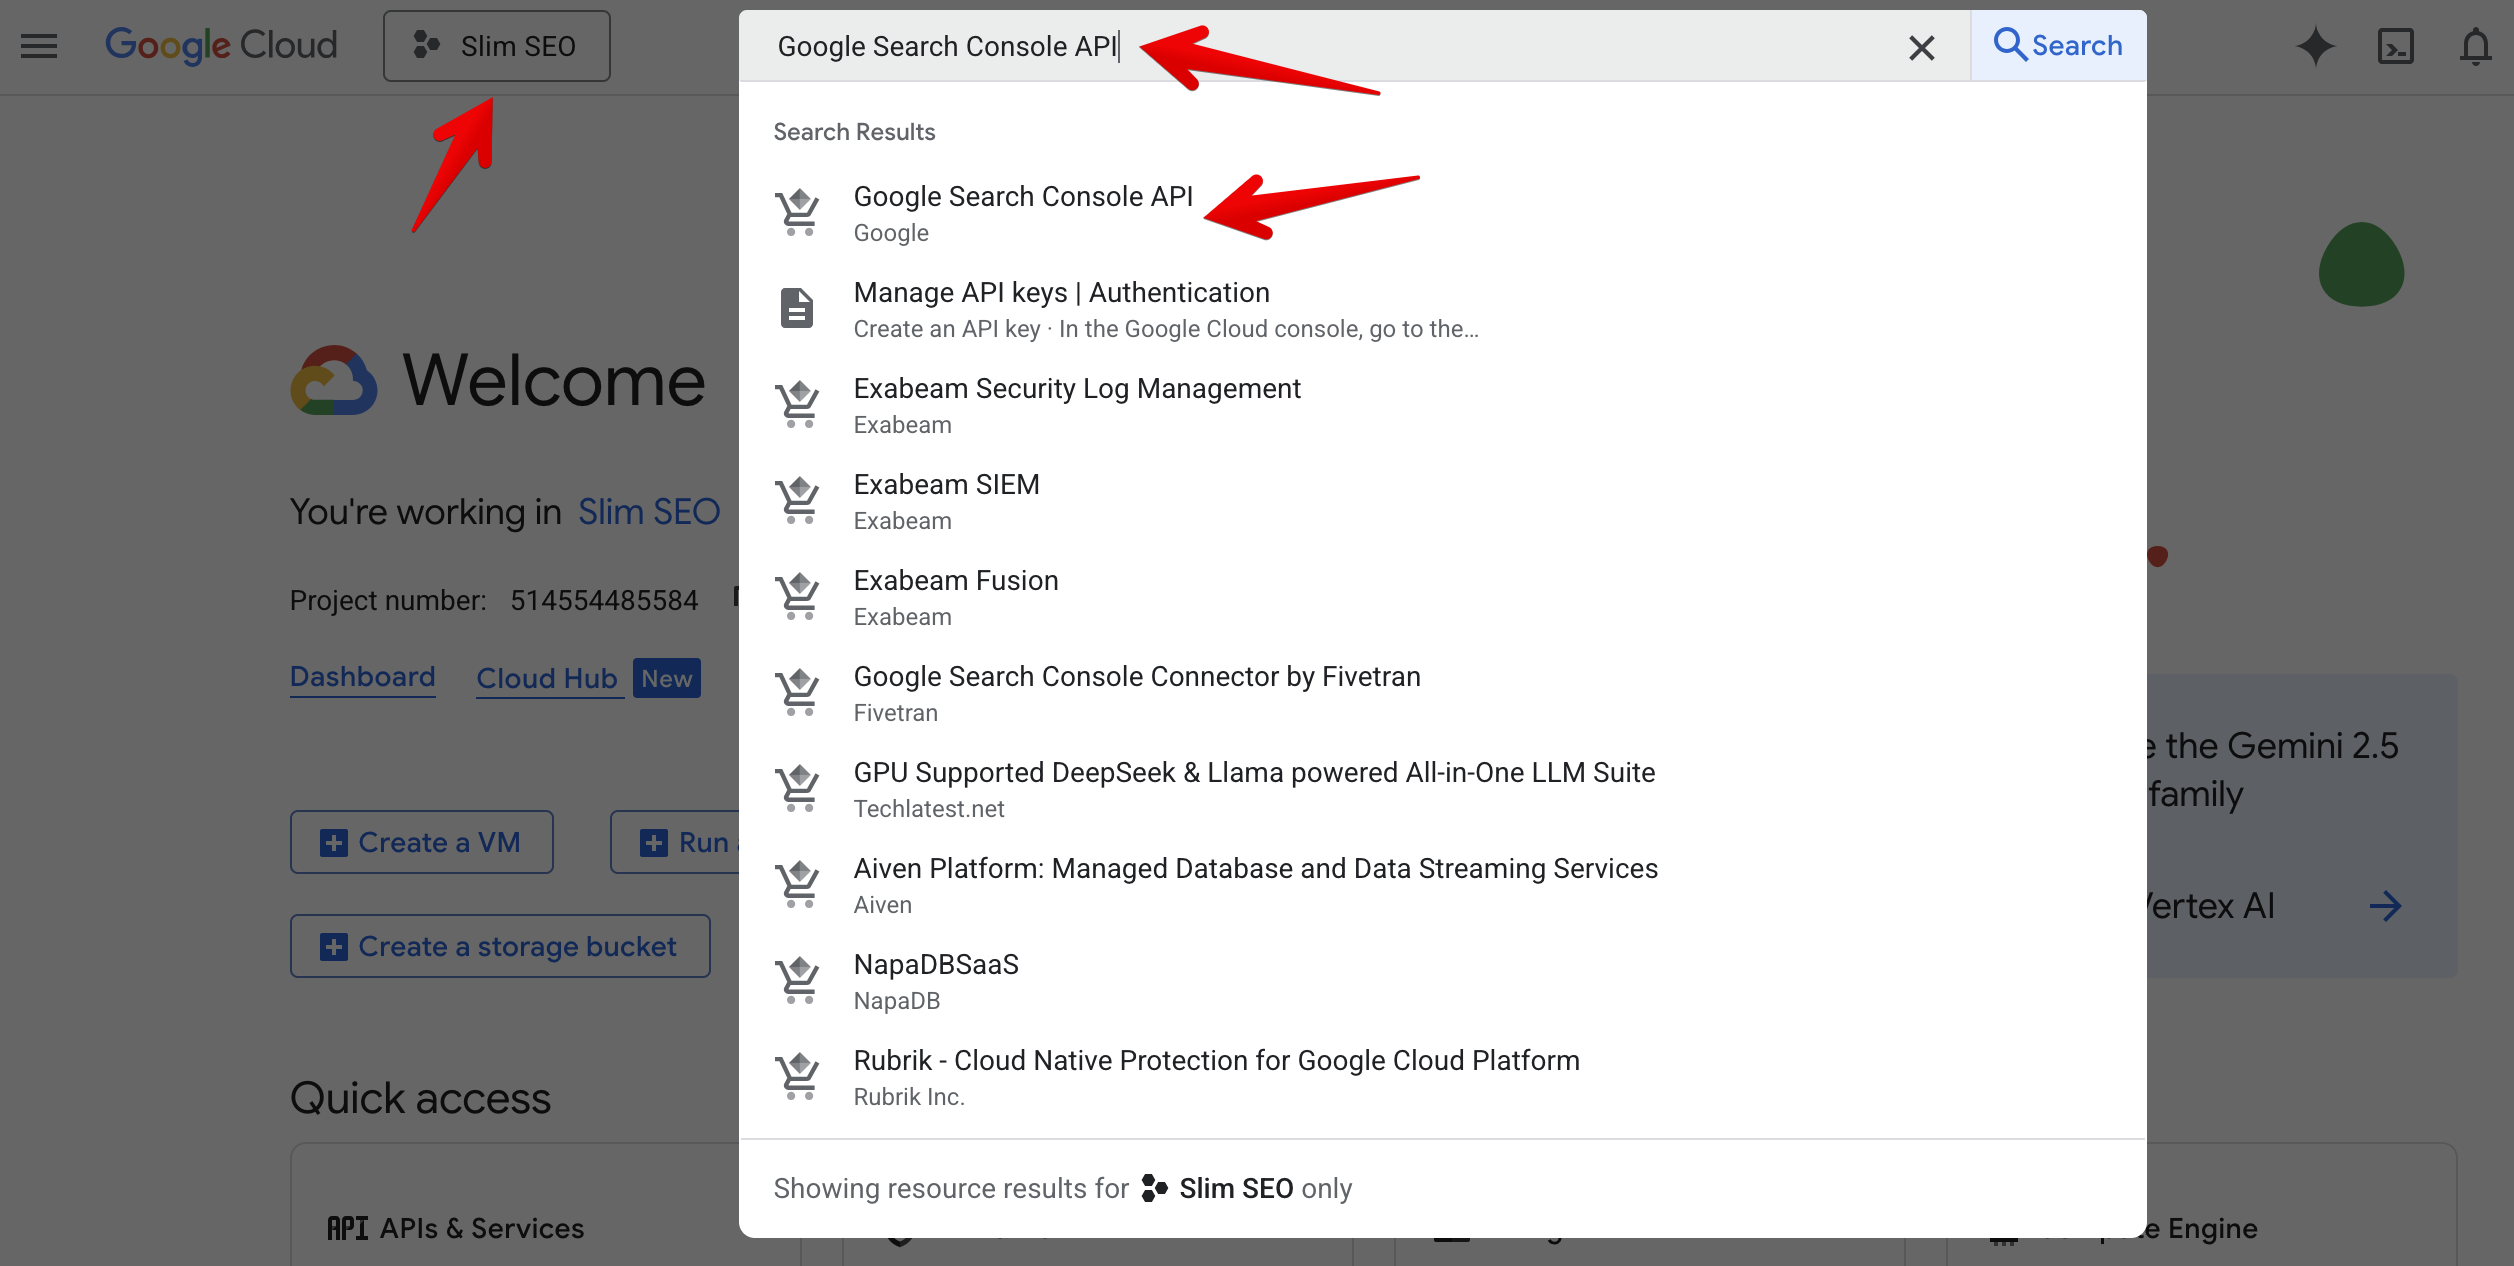
On the next screen, click Enable button to enable the API.
Configuring the consent screen
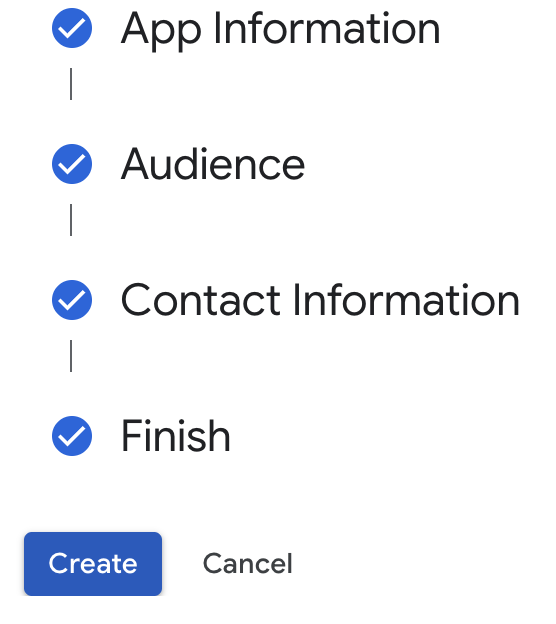
The app created in the previous step requires your permission to connect to your Google Search Console account. The steps below will let you know how to configure the screen for asking your permission (the consent screen).
Branding
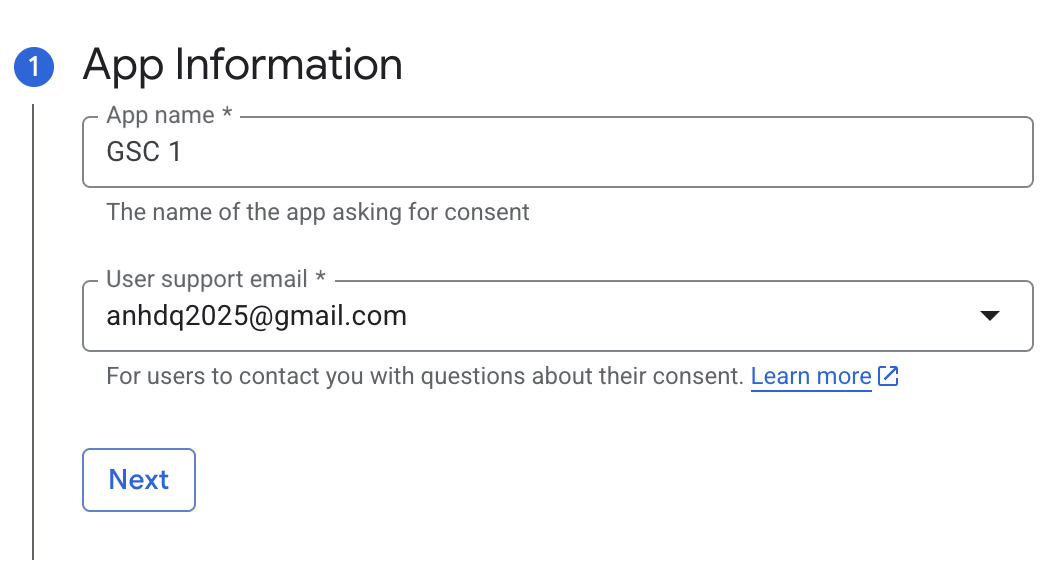
When connecting to Google Search Console, an authorization screen will appear and ask for your permission to access to GSC data. We need to configure the branding for that screen.
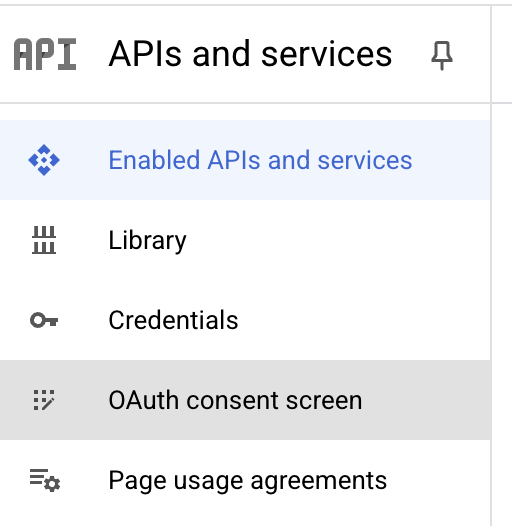
From the sidebar menu, select OAuth consent screen:
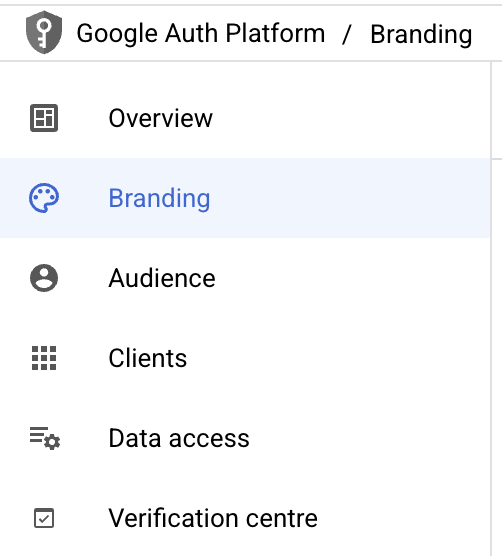
Then select the Branding menu:
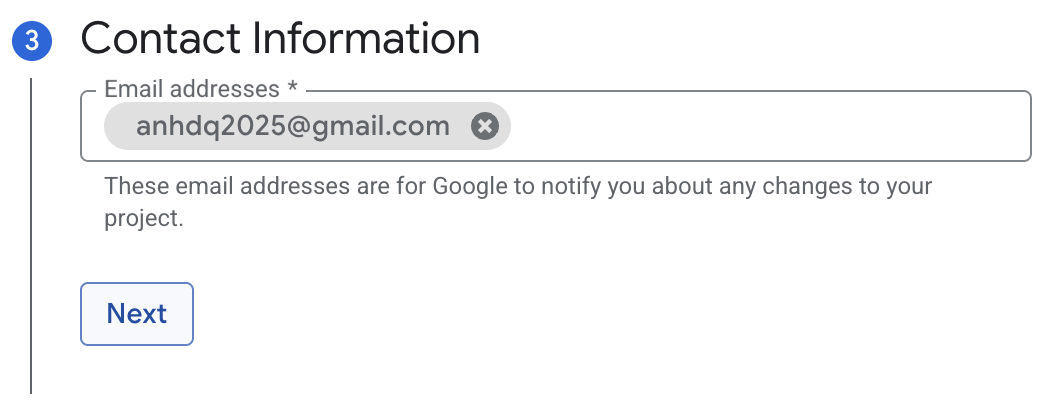
Enter your information by following their instruction:
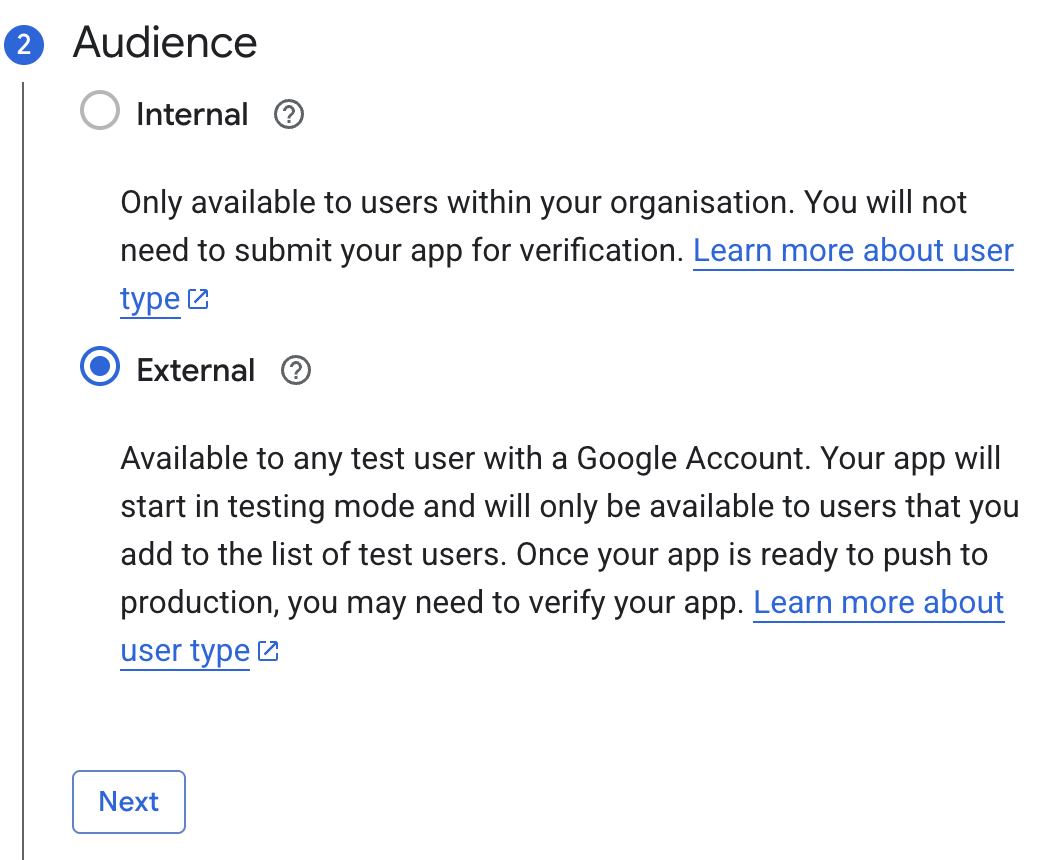

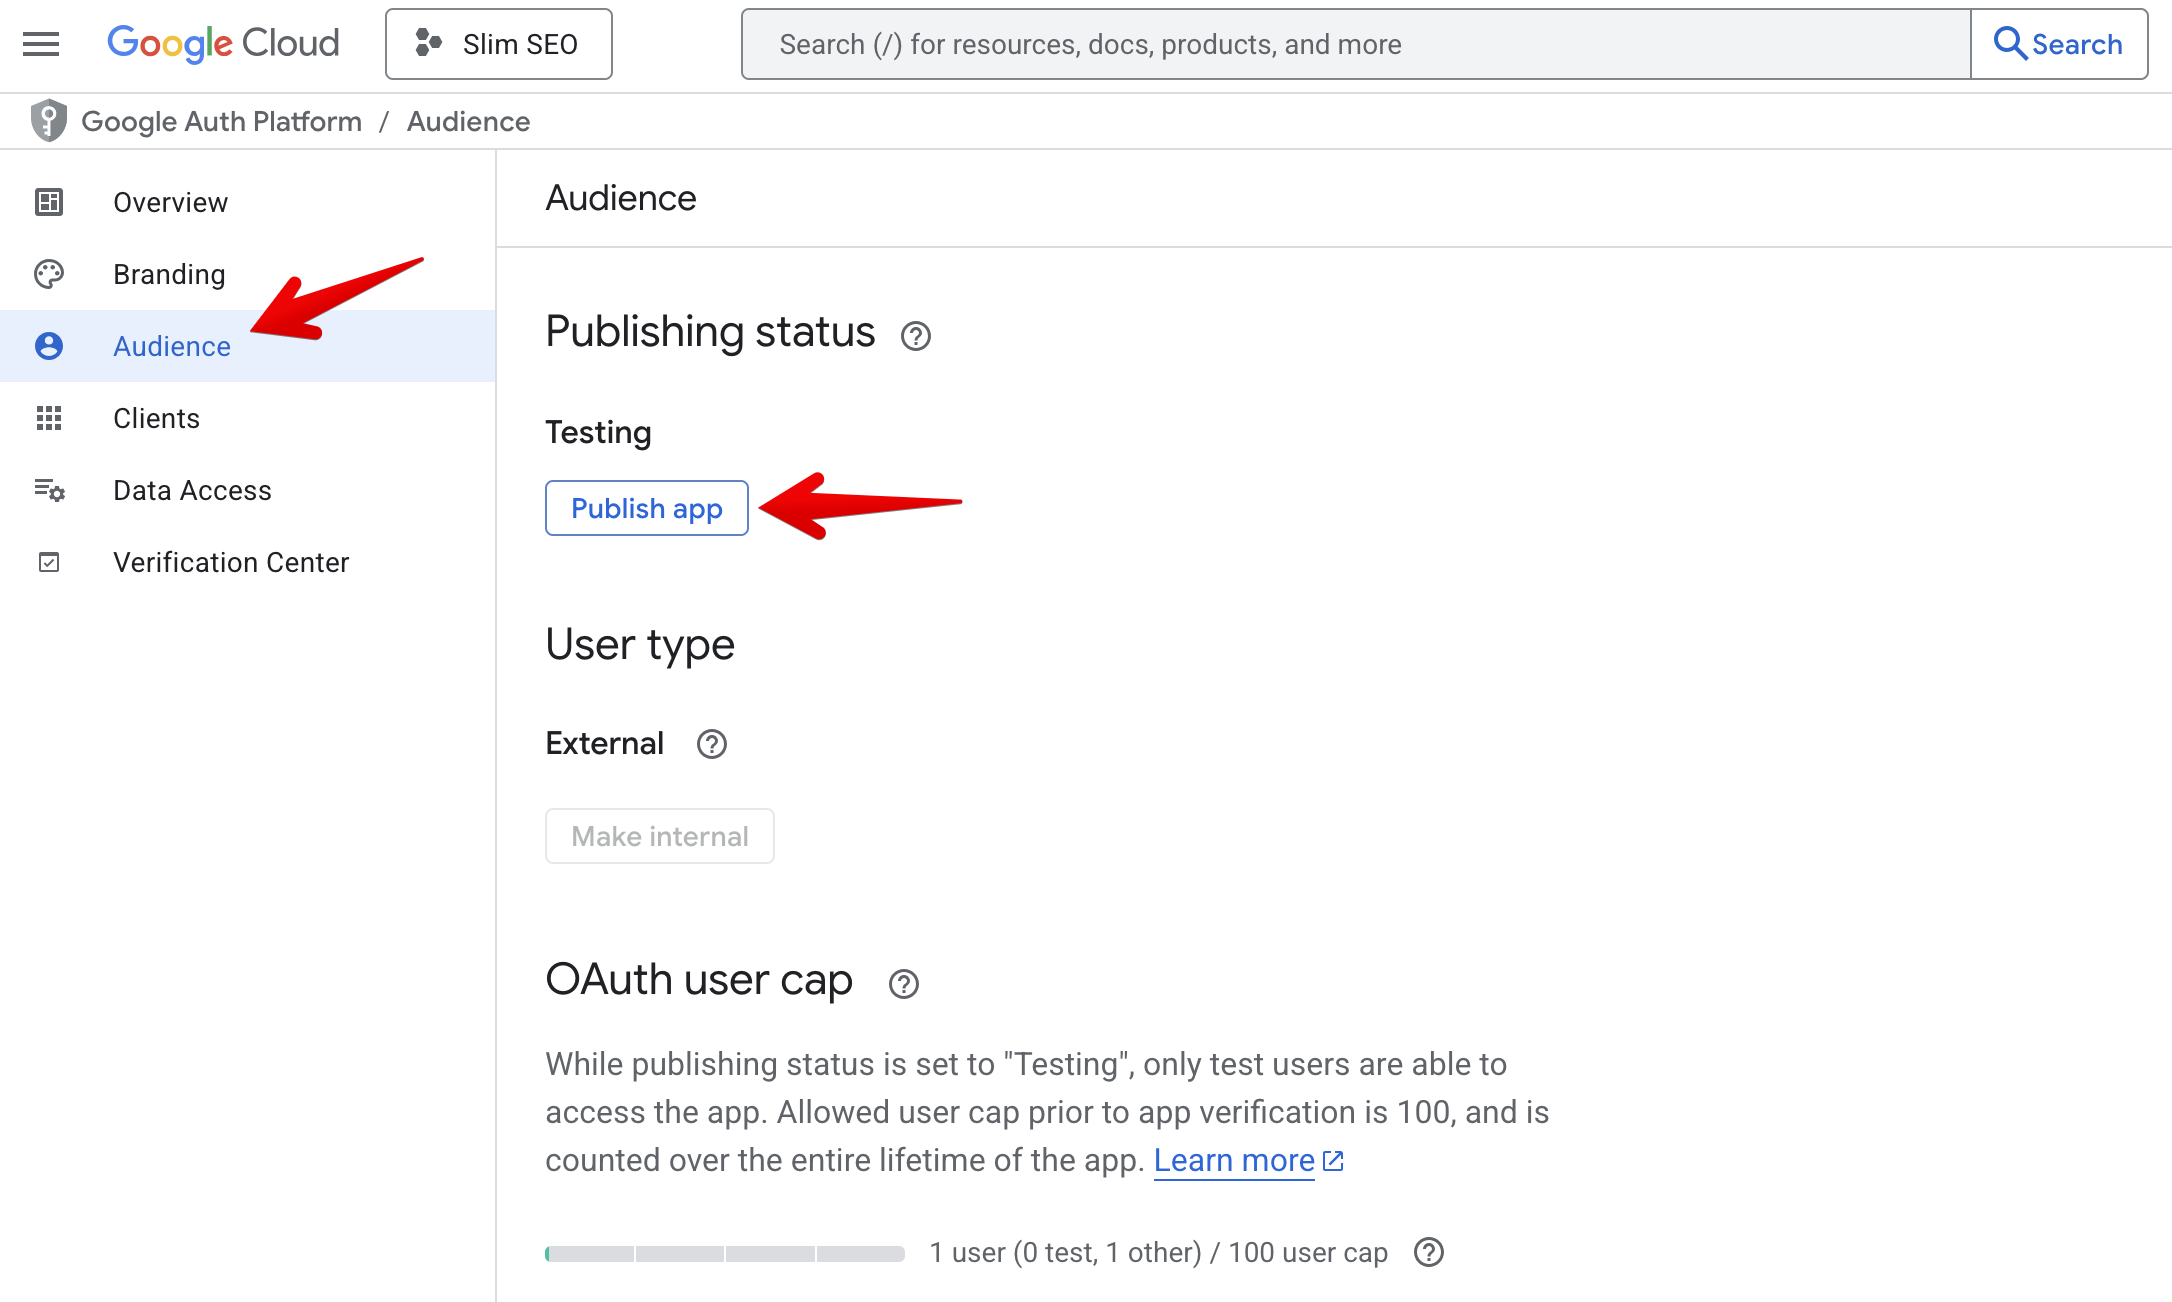
Audience
Now go to the Audience tab and click the Publish app button:
Creating credentials
Go to Credentials tab and click the + Create credentials button at the top, then select OAuth client ID:
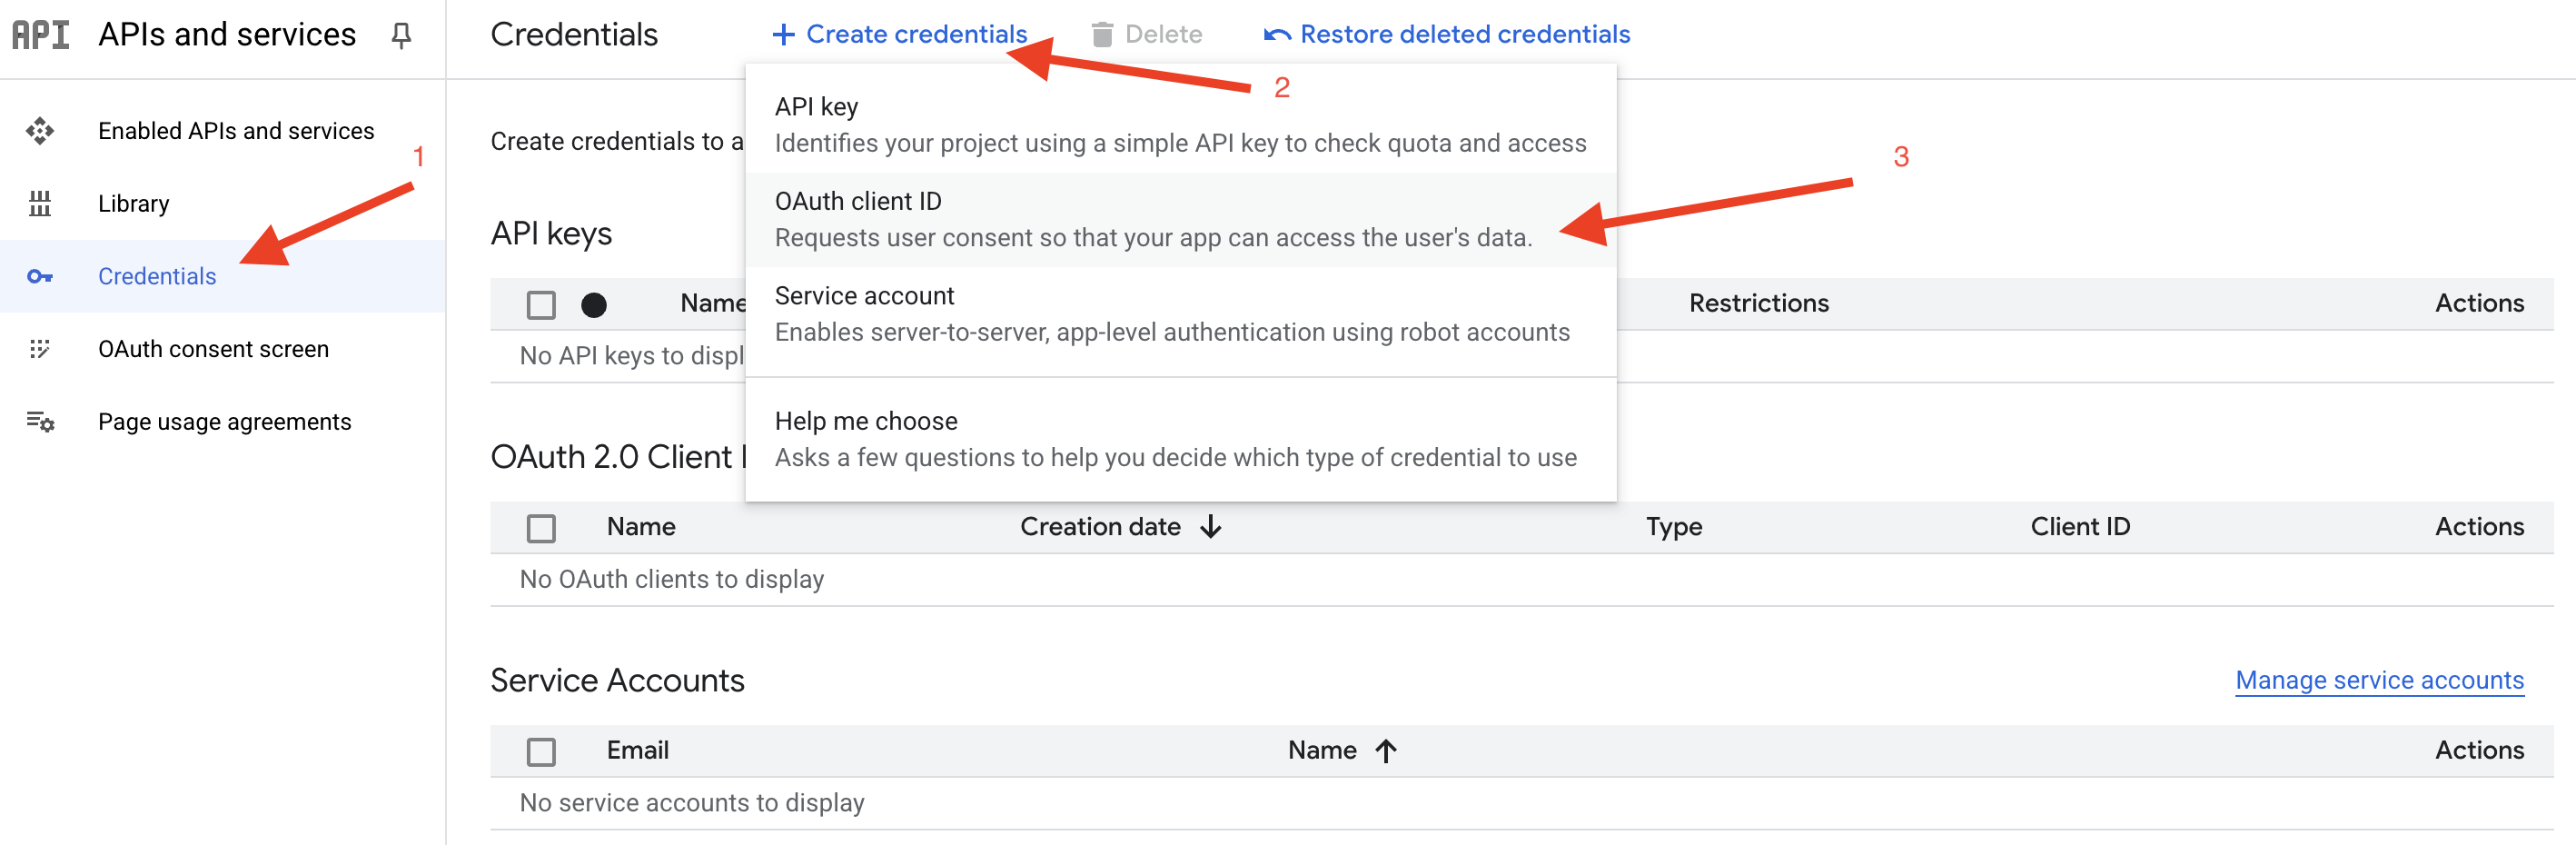
Select Web application in the Application type dropdown and enter https://yourdomain.com/?ssp_gsc_callback=1 (replace yourdomain.com with your actual domain) in the Authorised redirect URIs:

If you want to use Slim SEO Pro for multiple websites, you don’t need to create multiple projects and go throught these settings from the beginning. Instead of that, just add more authorised redirect URIs here.
Then click Create button to create the credentials. After finishing, you’ll see Client ID and Client Secret in the popup:
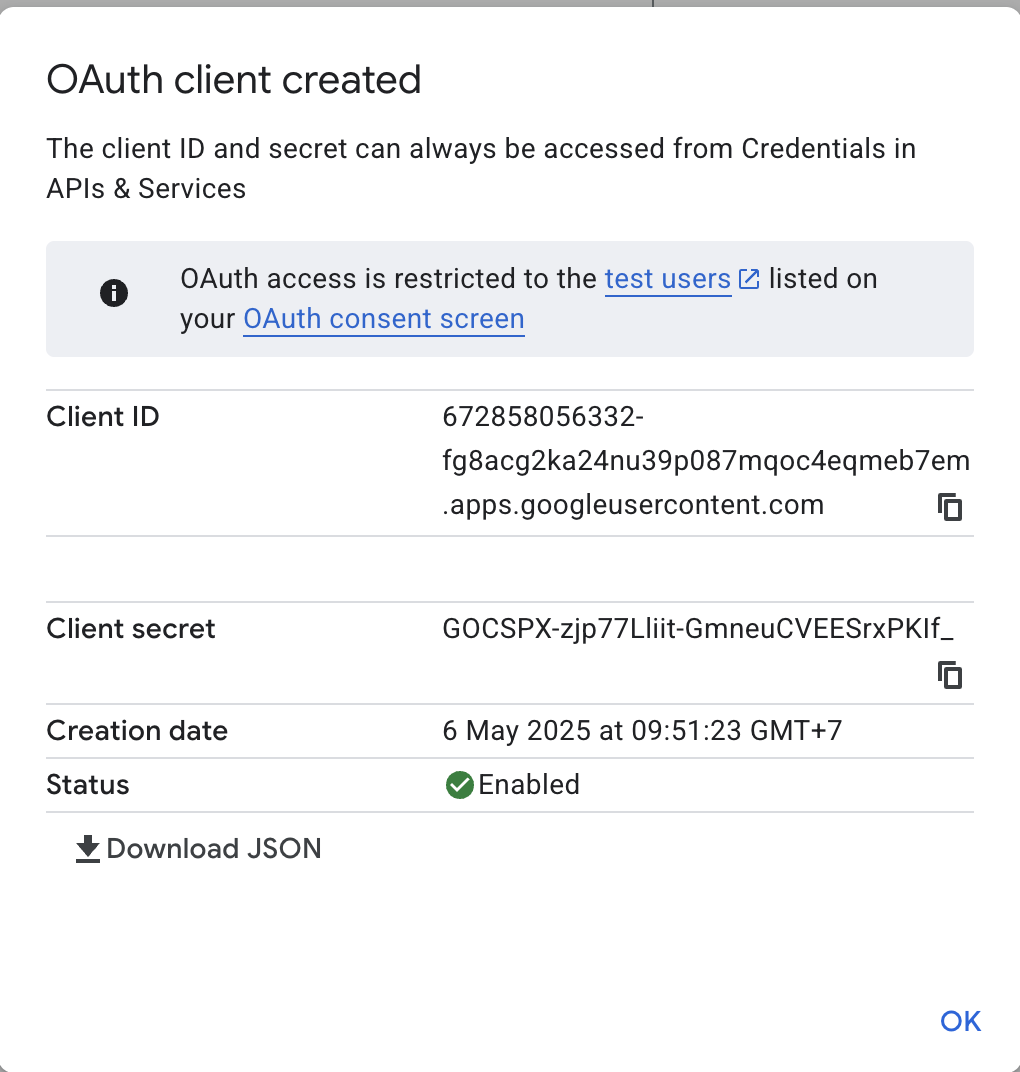
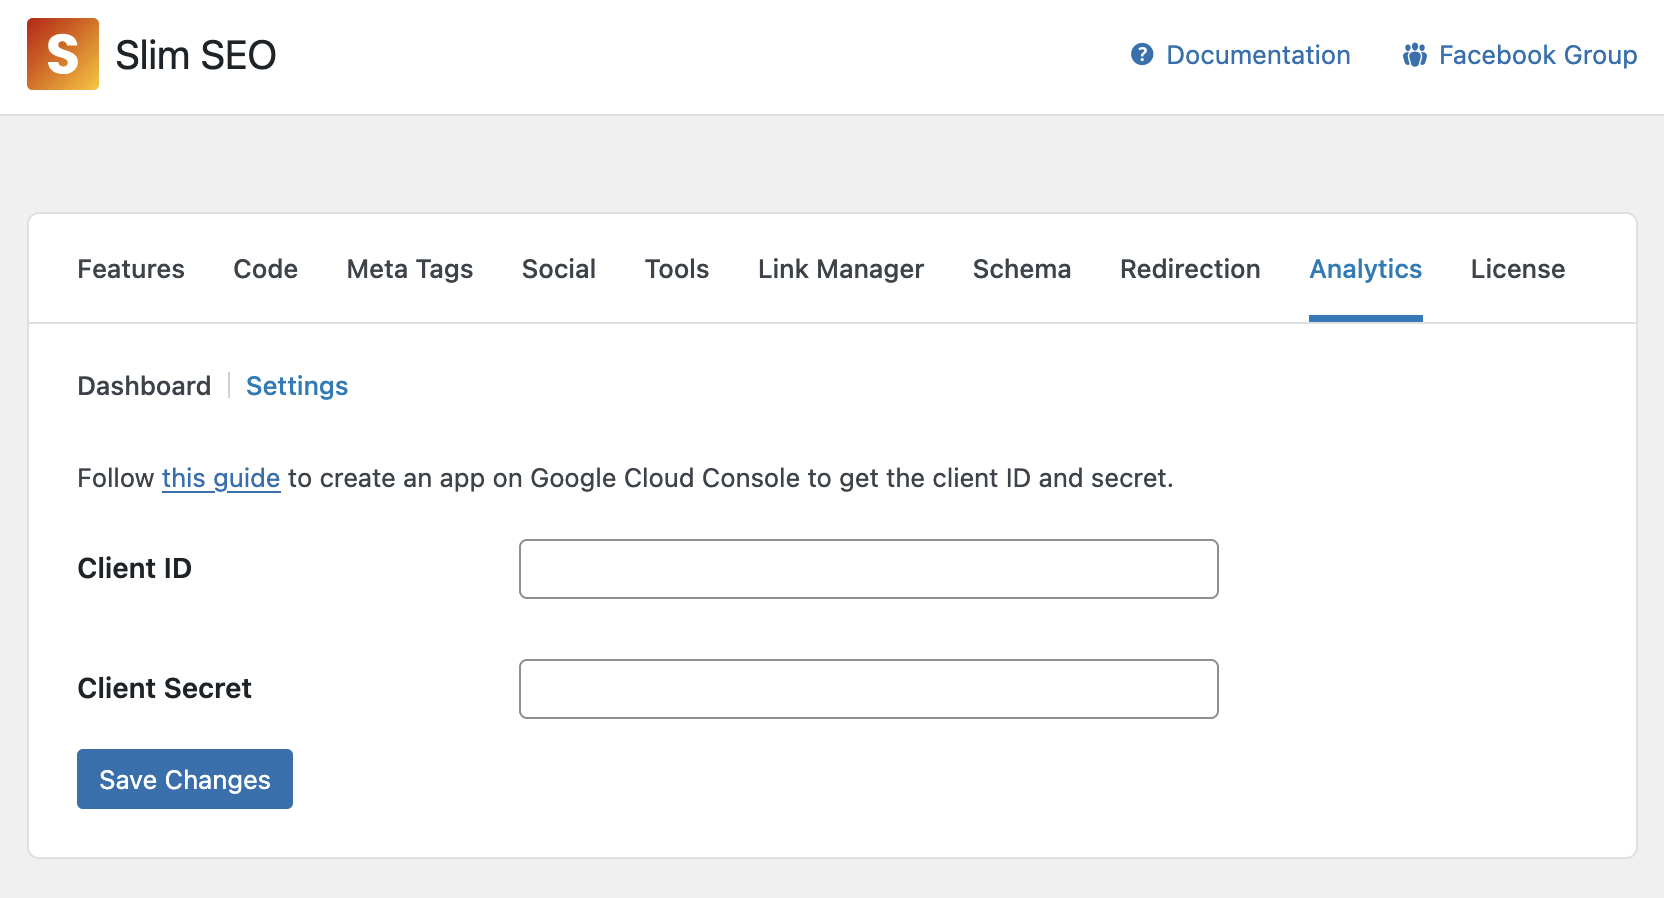
Copy these details and now go to your WordPress admin > Settings > Slim SEO > Search Console tab > Settings and enter the details:
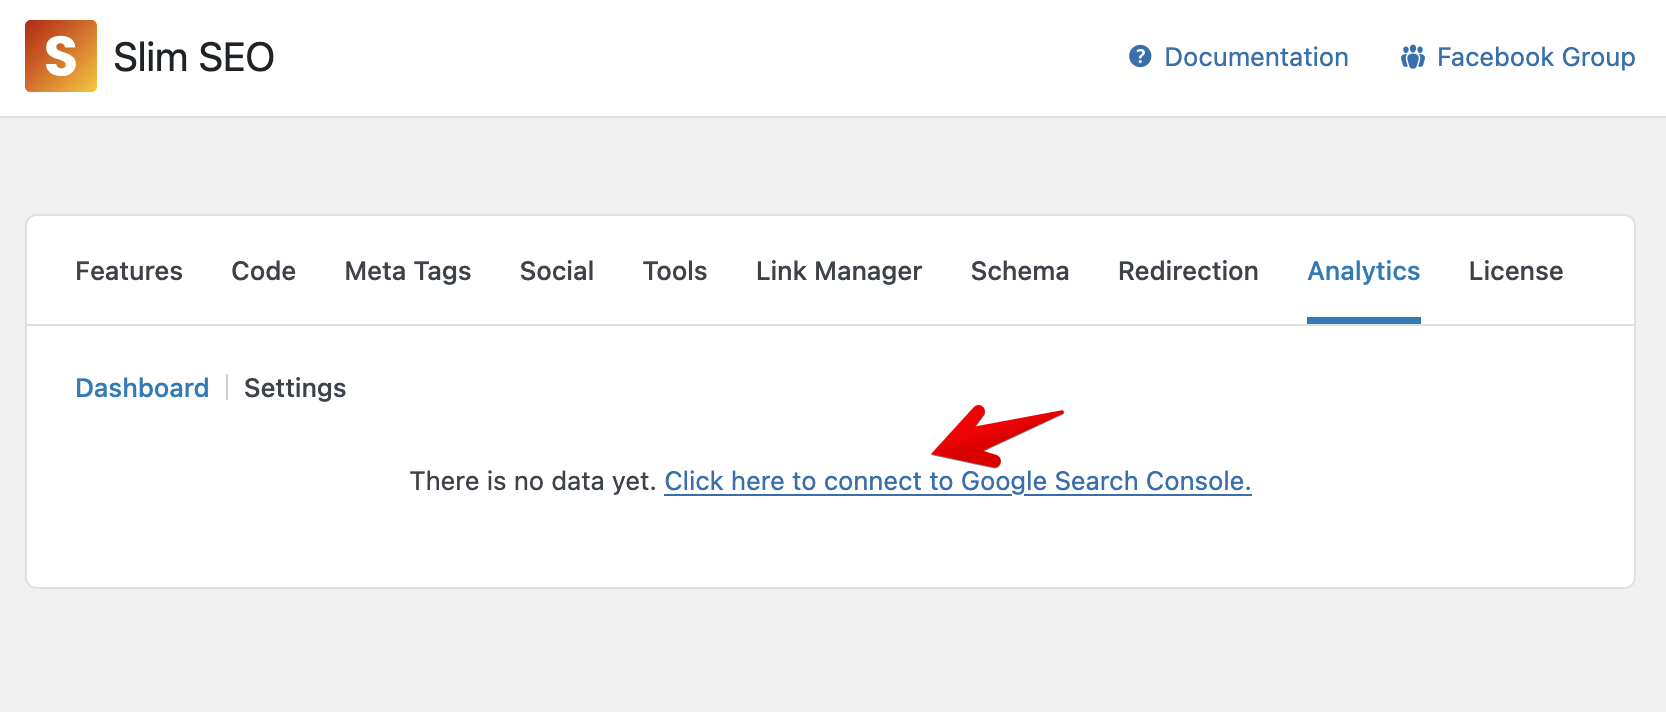
Authorizing with GSC
After entering the client ID and client secret for GSC, you can connect to GSC to get the reports. To connect to GSC, click the link in the dashboard:
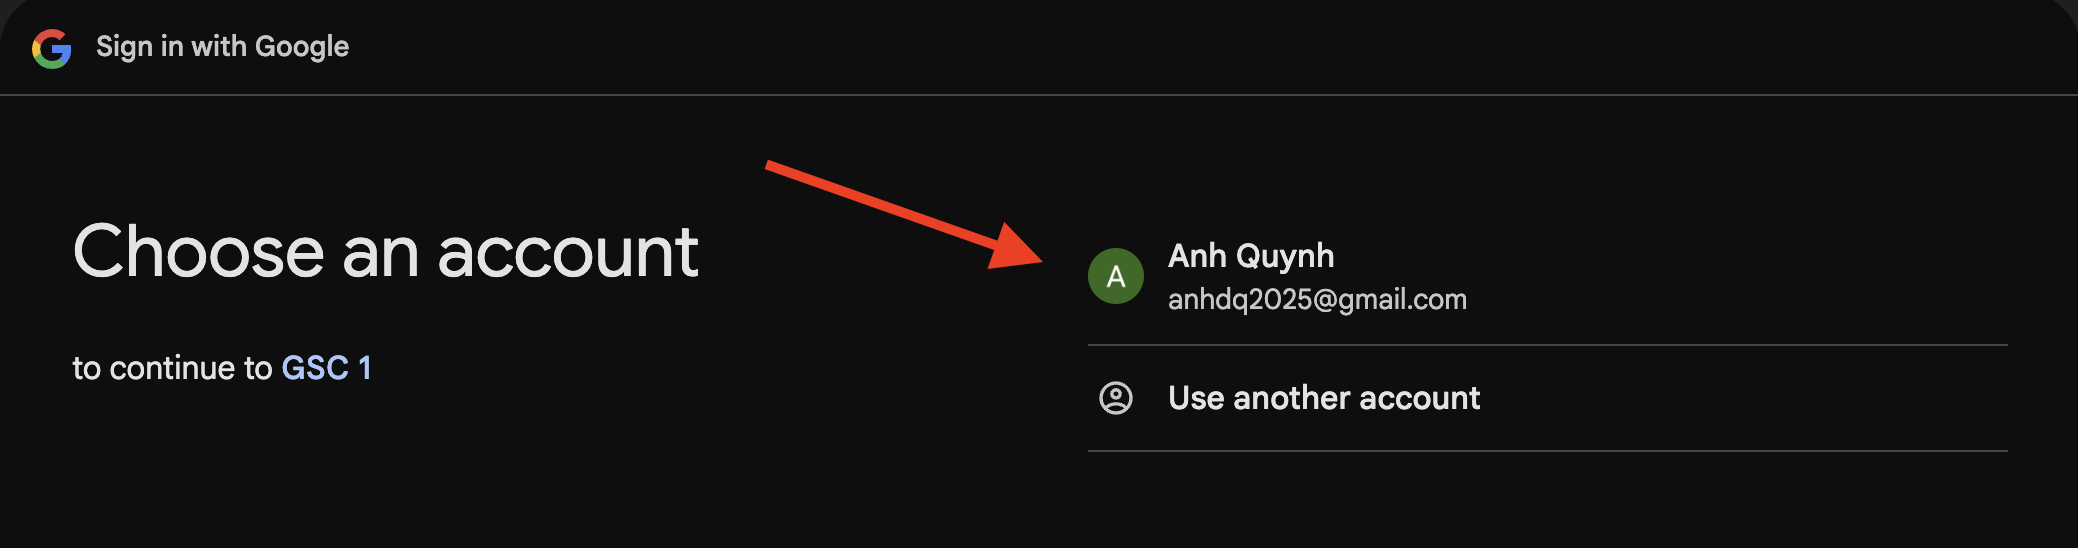
then login with the your Google account:
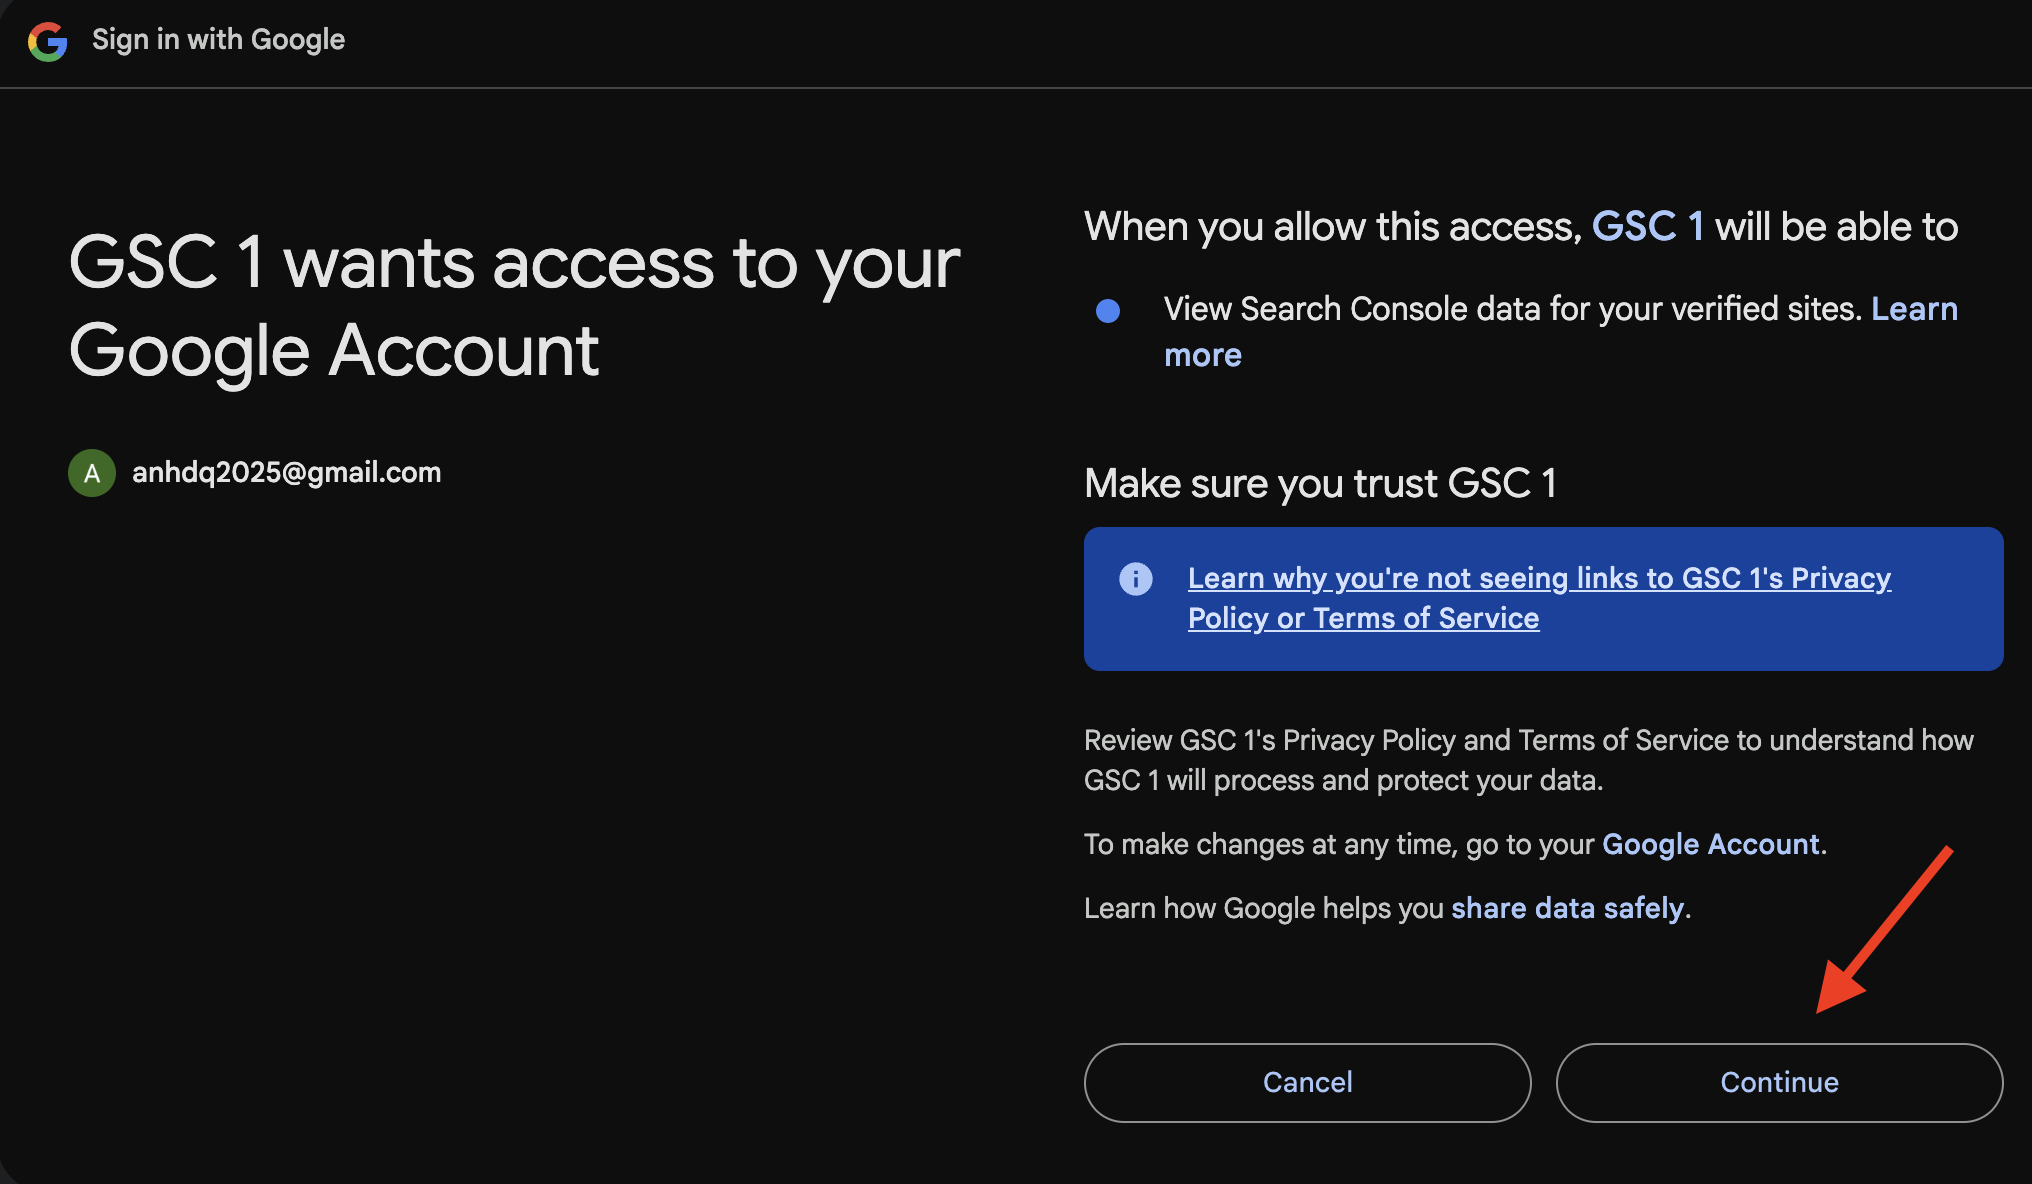
After all these steps, it will redirect you back to Search Console and ready for you to use:
Reports
↑ Back to topThe integration with Google Search Console (GSC) allows Slim SEO Pro to pull the reports from GSC into WordPress admin so you can see your search performance faster. The reports shown by Slim SEO Pro is a little bit different from the default GSC reports as we re-organize them so you can view import metrics faster.
Performance
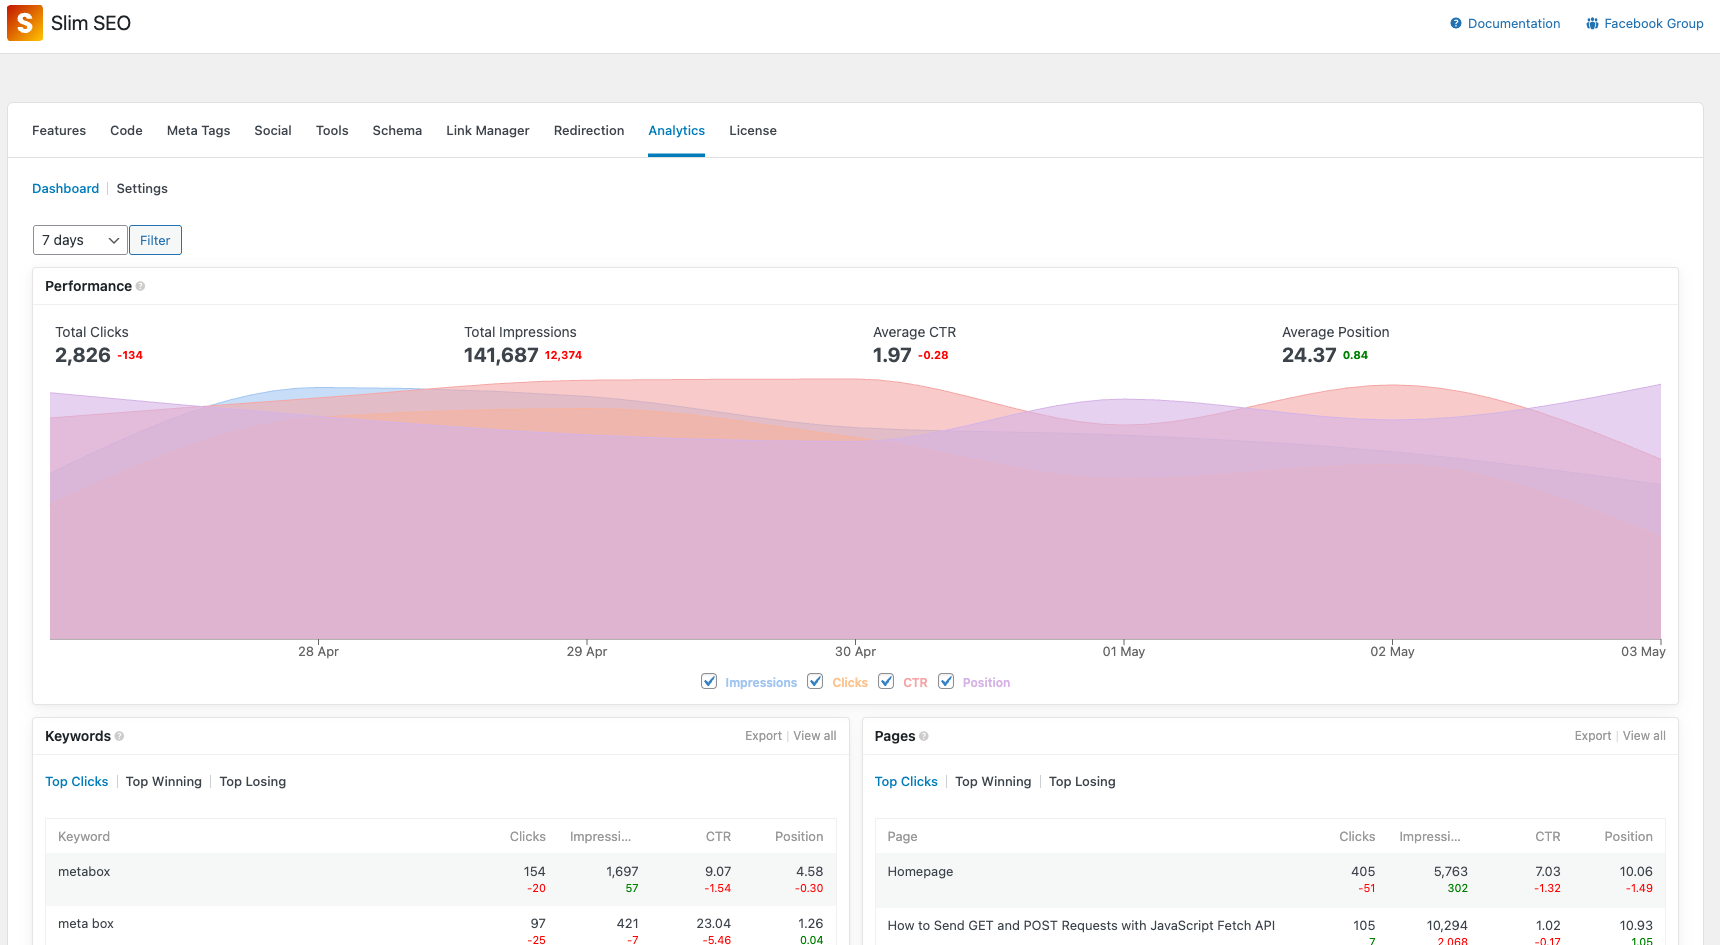
The 1st and the most important report is the Performance report. This report shows you how your pages perform on SERPs:

It has the following metrics:
- Total Impressions: how many times your pages appear on SERPs
- Total Clicks: how many times people click to go to your pages
- Average CTR: the average ratio between clicks and impressions
- Average Position: the avarage position of your pages on SERPs
You can toggle each metric by check/uncheck the checkbox below the graph, or filter the date from the dropdown at the top of the graph.
Basically, this report is the same as the original Performance report in GSC.
Keywords
The 2nd report is the Keywords report, which shows you the keywords that you rank for:
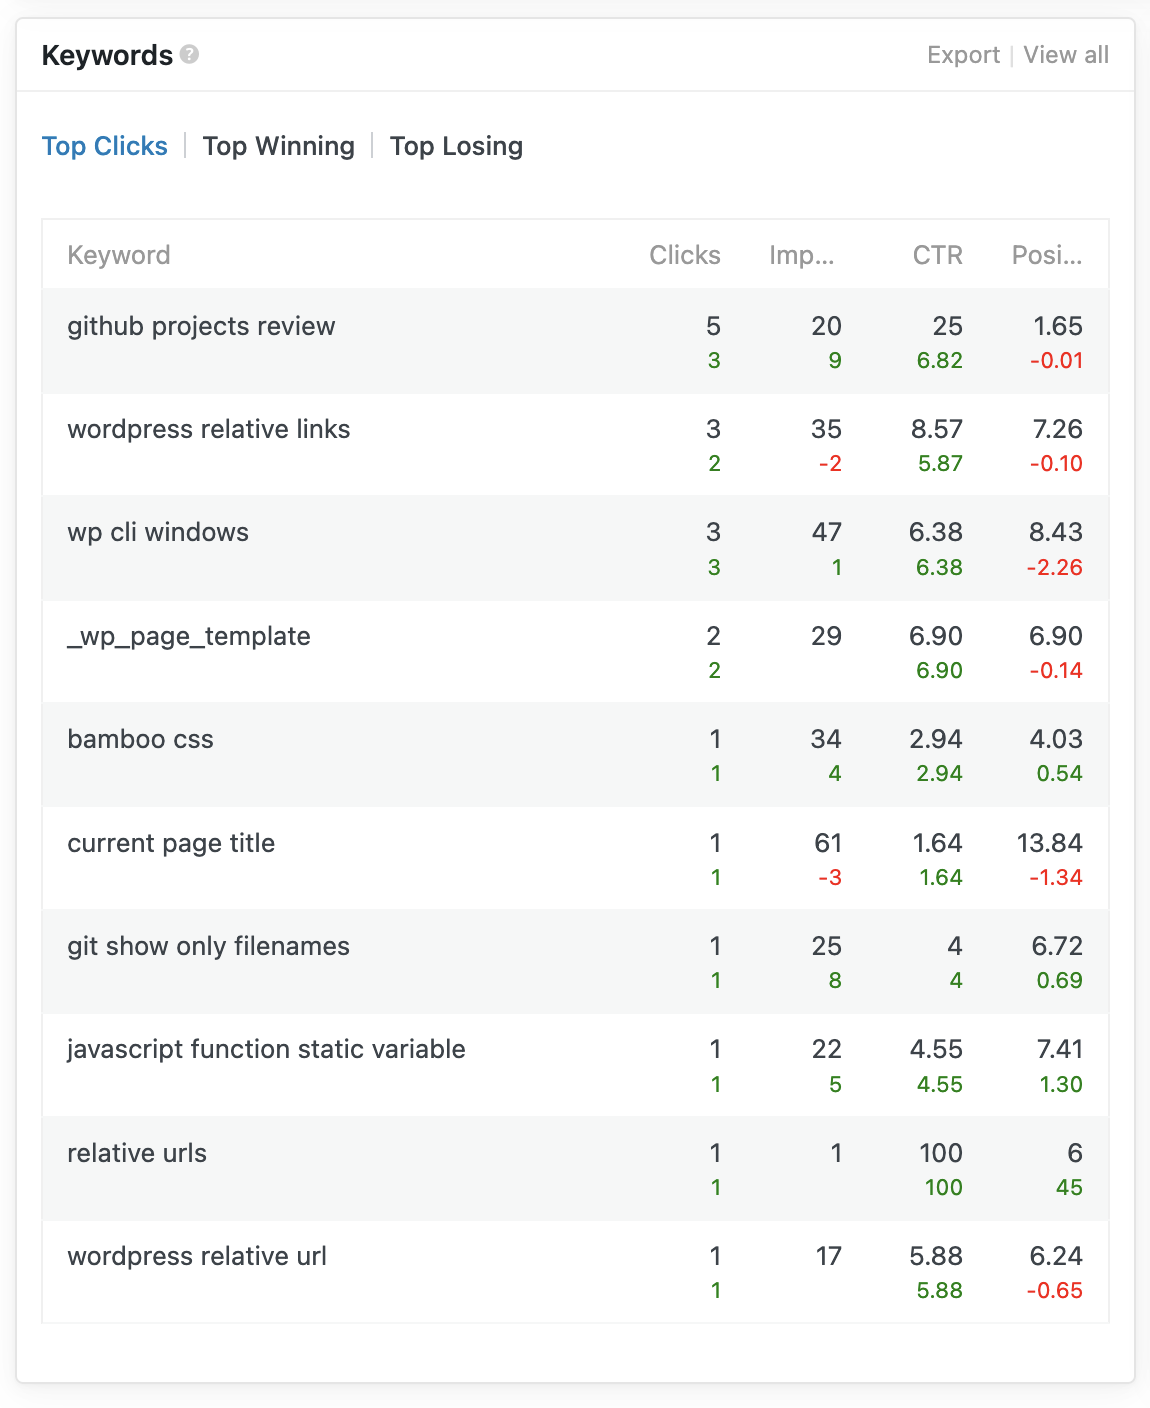
Slim SEO Pro groups keywords into 3 tabs and put them at the top of the table
- Top Clicks: keywords that get most total clicks
- Top Winning: keywords that get more clicks than the previous period
- Top Losing: keywords that lose more clicks than the previous period
In the table, you’ll see each keyword with the same metrics as in the Performance report. However, to let you know the changes/differences from the current period to the previous period, we added secondary numbers below the primary numbers, with color = green if increased and red if decreased.
To view more details about each keywords, click the View all link at the top right of the widget, and you’ll redirect to the detailed page:
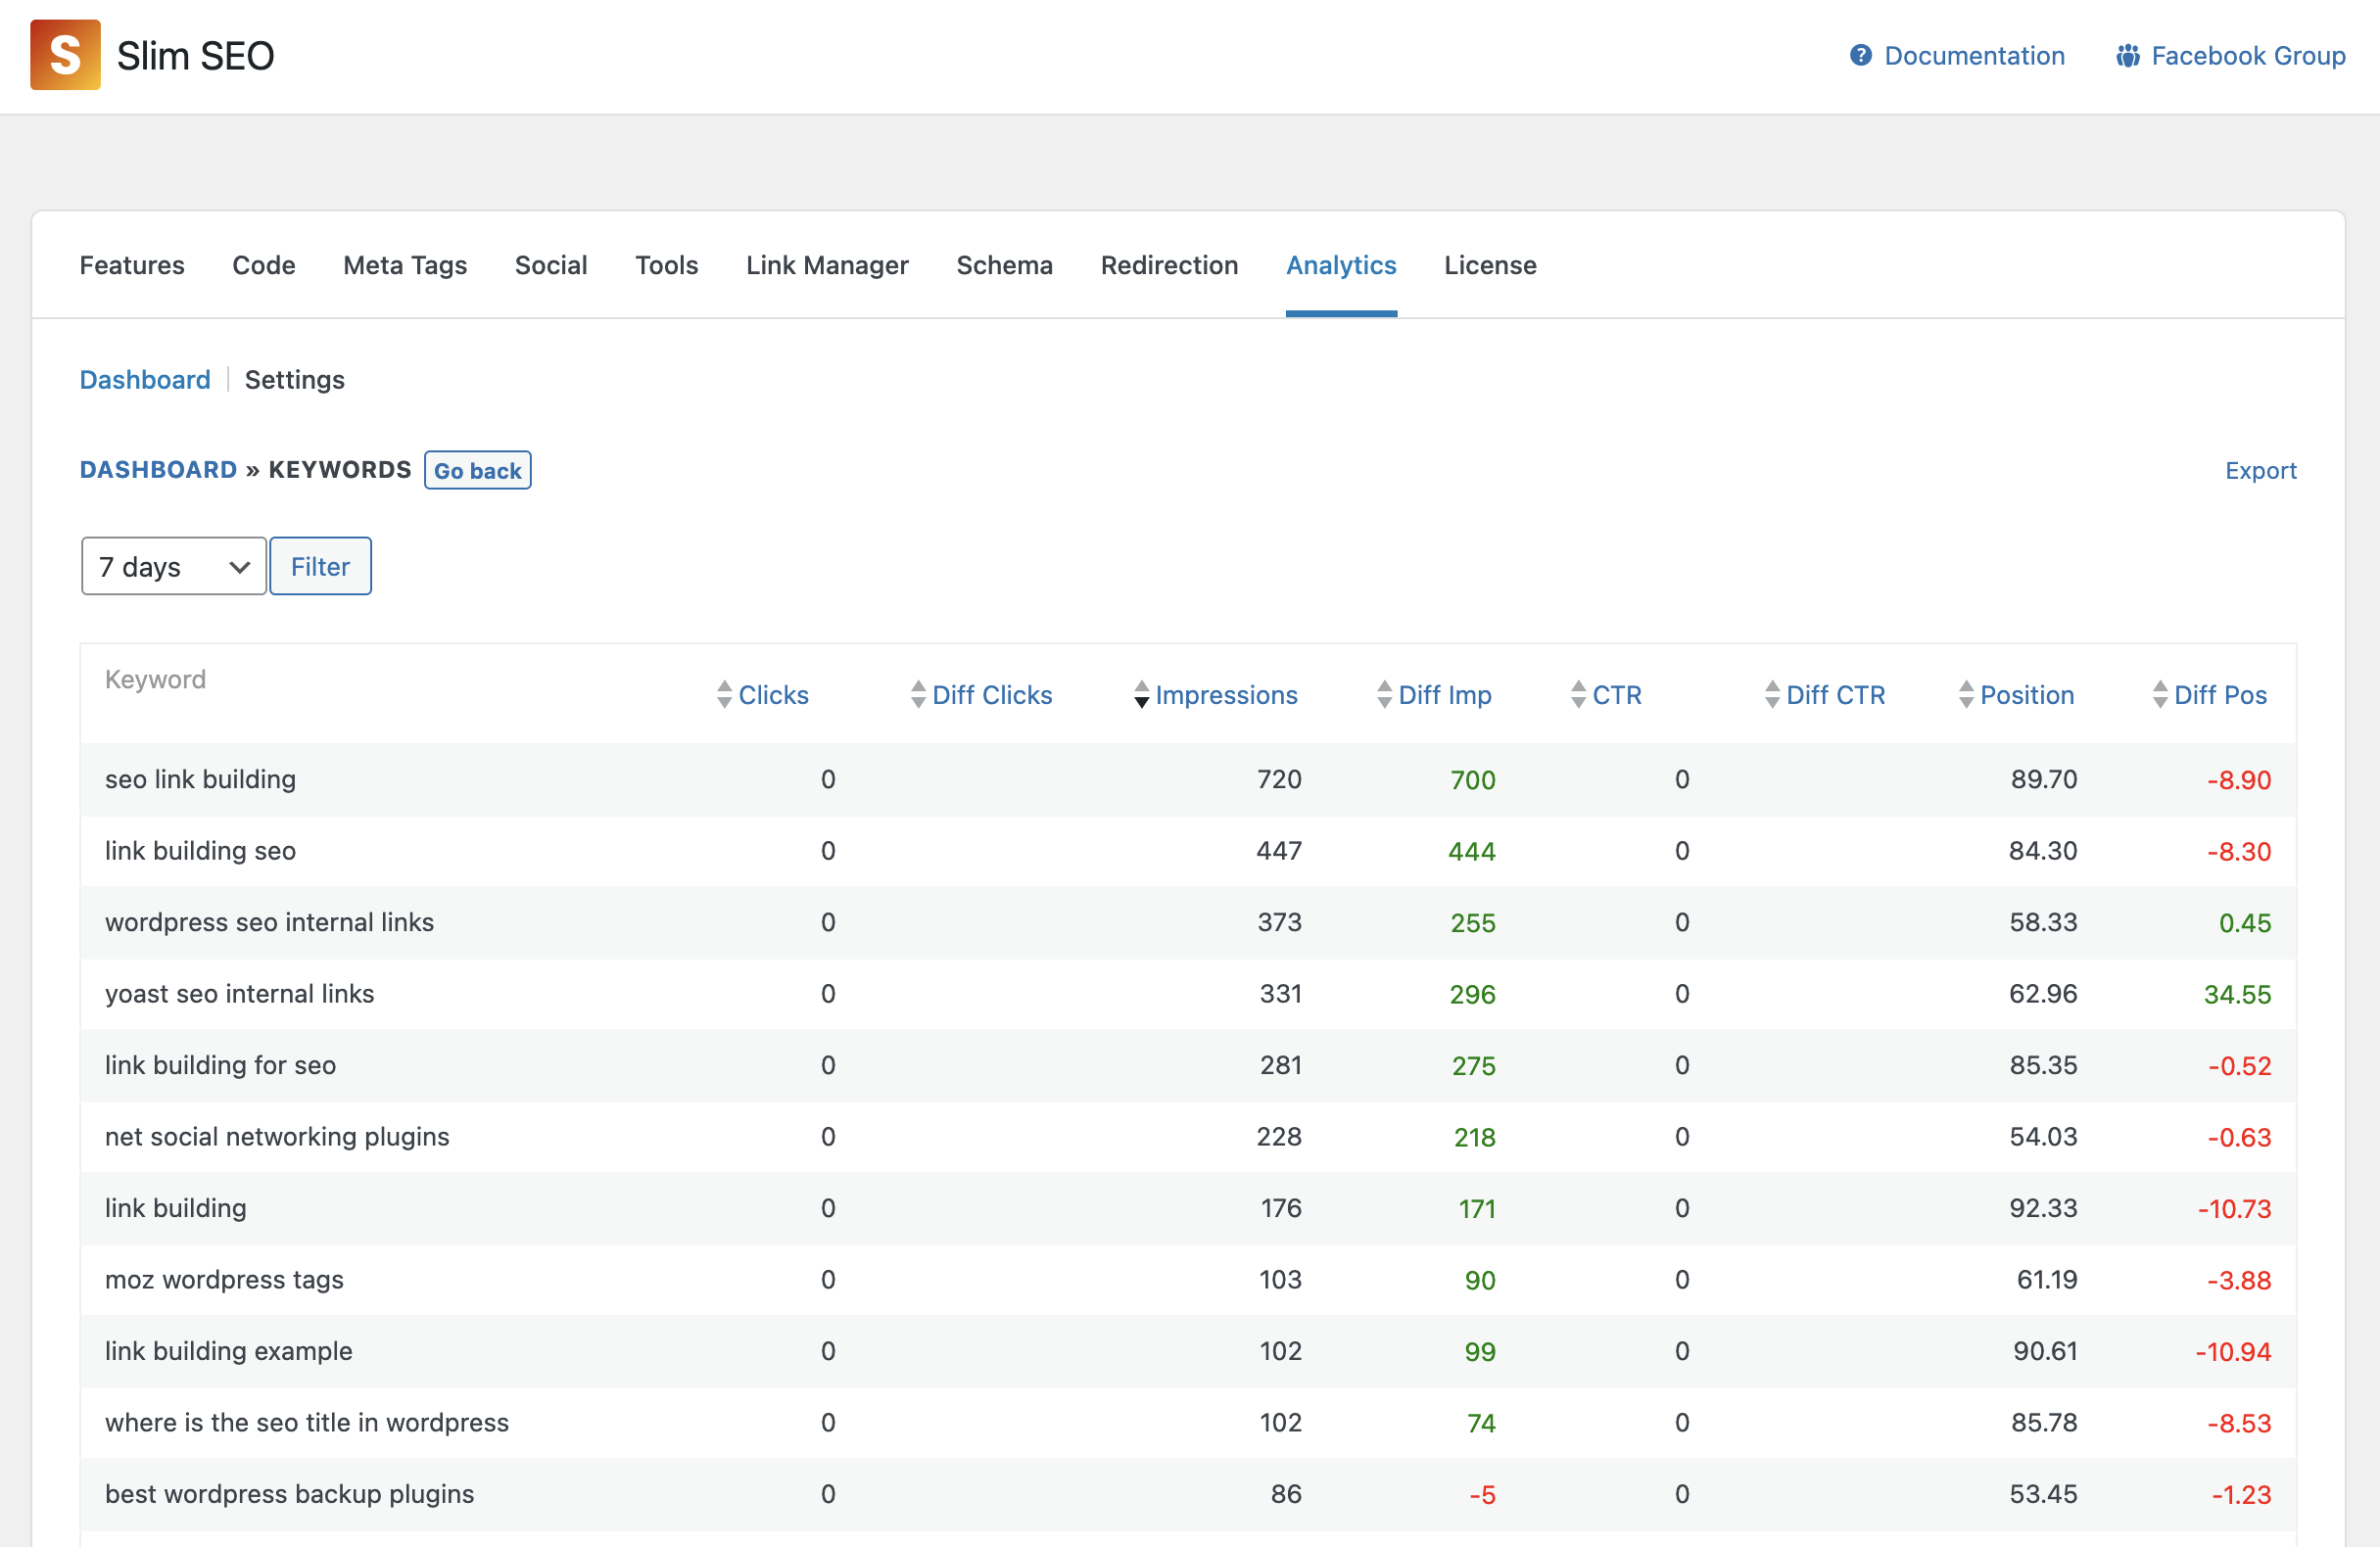
In this screen, you can see the metrics clearer, and sort keywords by them.
You can also export the keywords to CSV to do further analyzing if you want.
Pages
The 3rd report is the Pages report, which shows you how your pages perform on SERPs. It’s useful to know the performance of each individual page on your website.
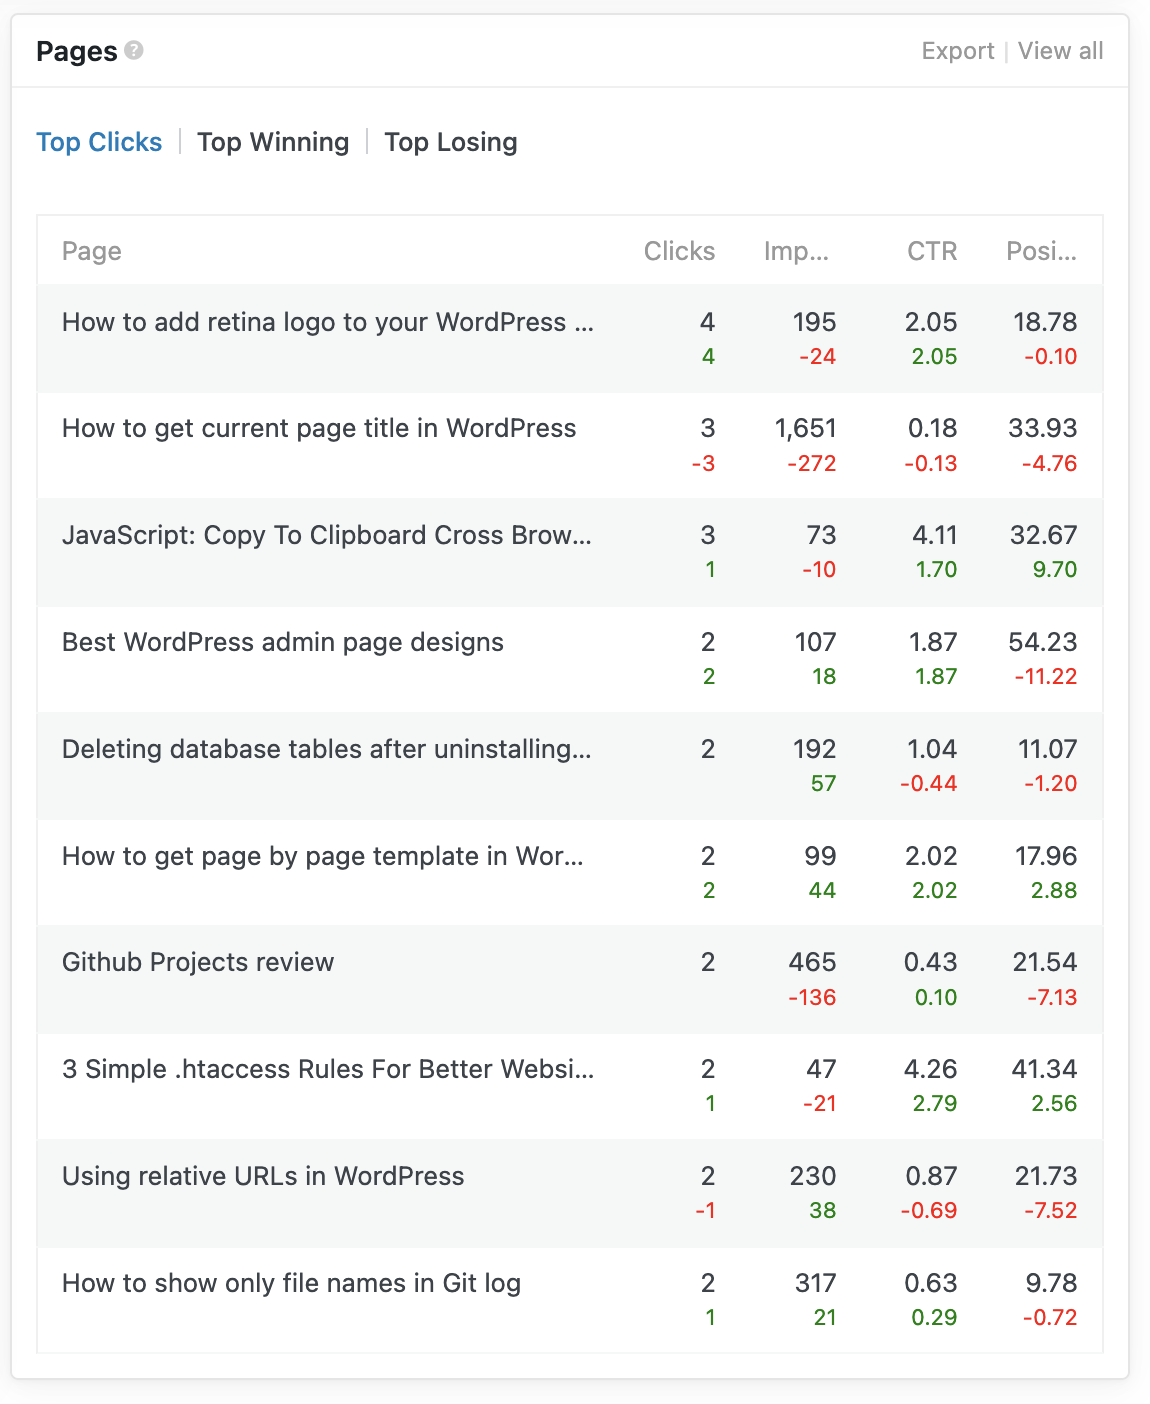
Similar to the Keywords report, we also group pages into 3 tabs:
- Top Clicks: pages that get most total clicks
- Top Winning: pages that get more clicks than the previous period
- Top Losing: pages that lose more clicks than the previous period
In the table, you’ll see each page with the same metrics as in the Performance report. However, to let you know the changes/differences from the current period to the previous period, we added secondary numbers below the primary numbers, with color = green if increased and red if decreased.
To view more details about each page, click the View all link at the top right of the widget, and you’ll redirect to the detailed page:
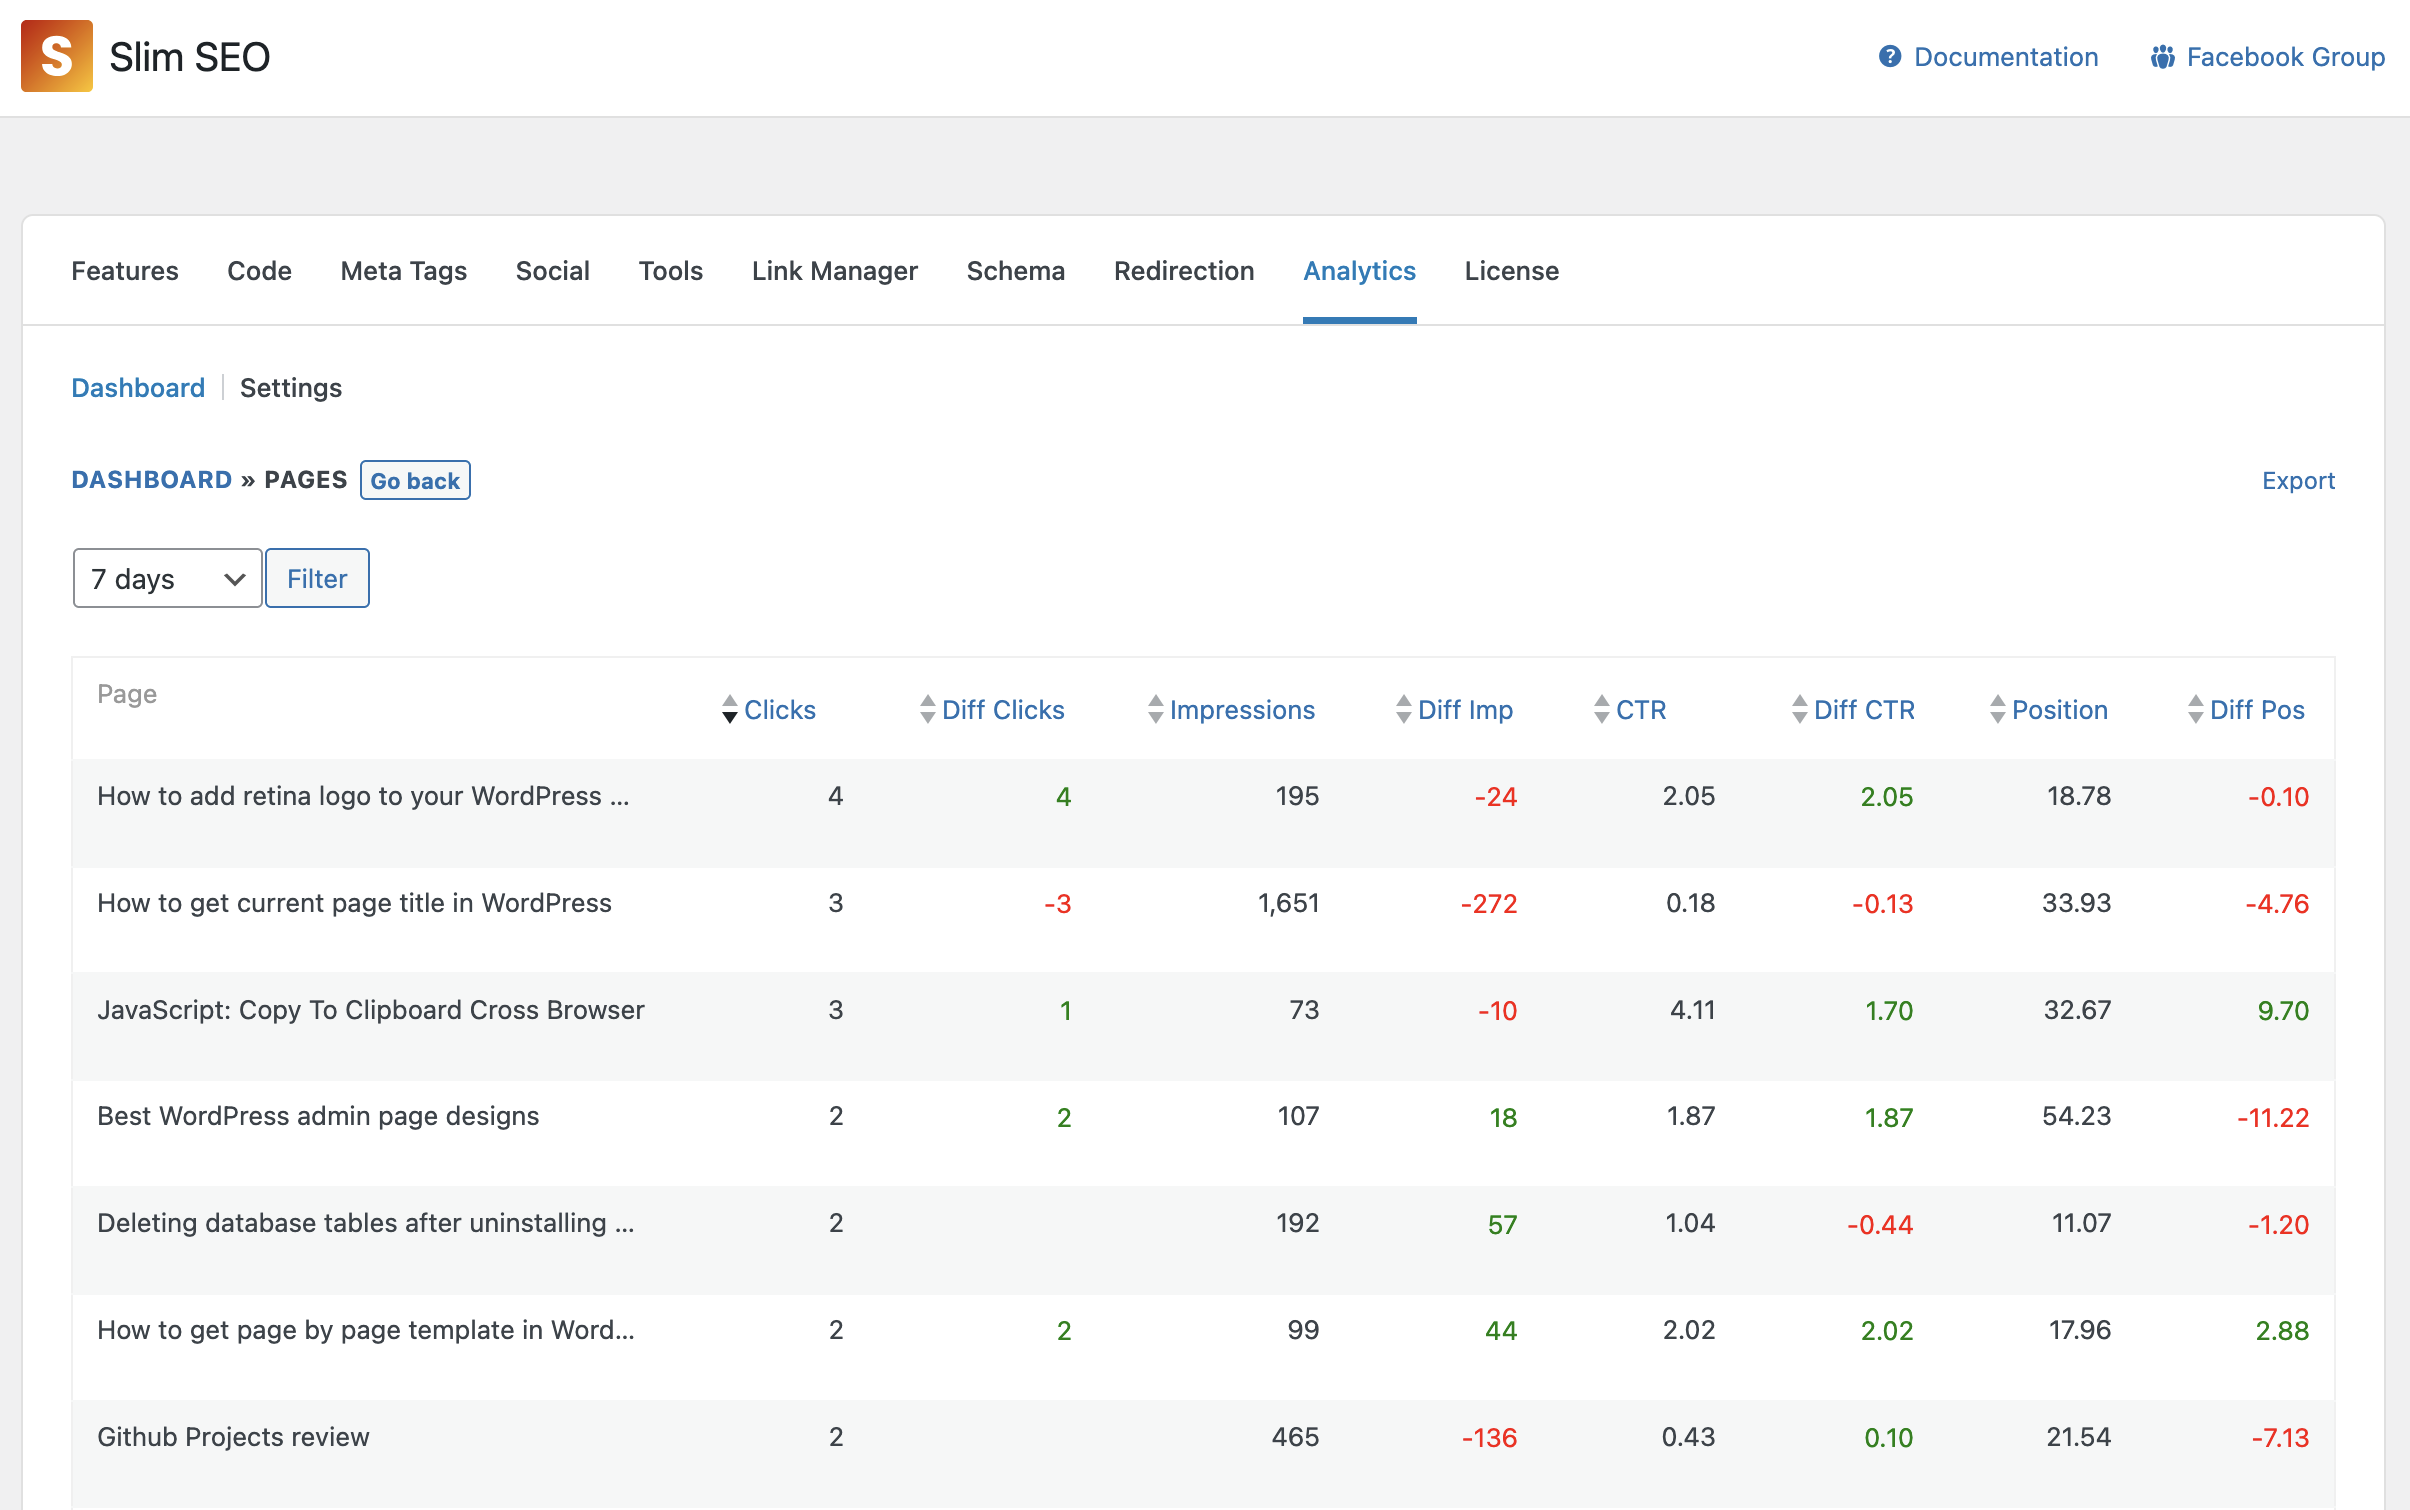
In this screen, you can see the metrics clearer, and sort pages by them.
You can also export the report to CSV to do further analyzing if you want.
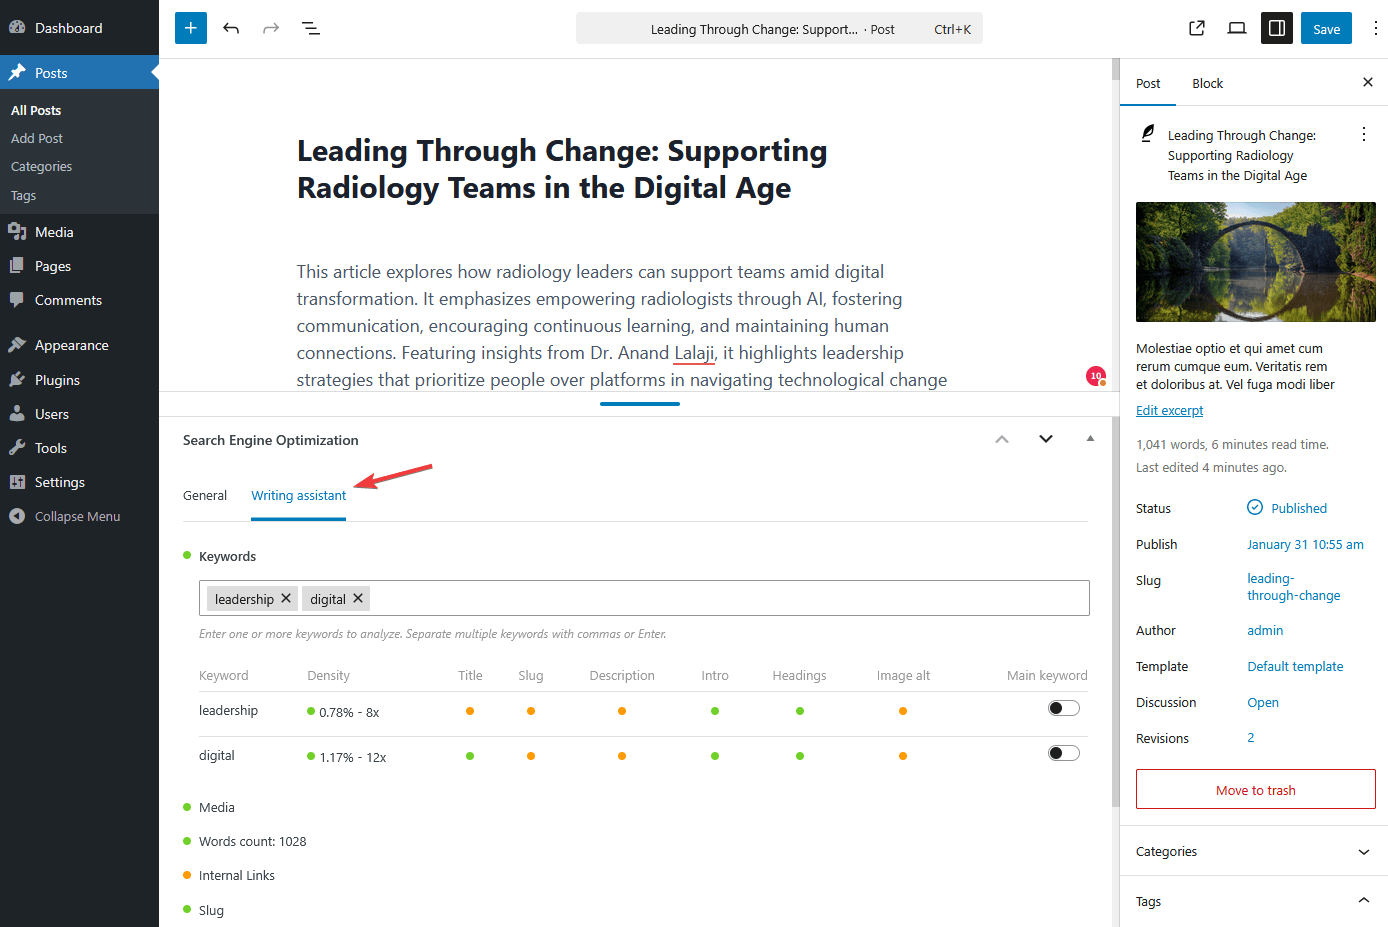
Writing assistant
↑ Back to topThe Writing Assistant feature analyzes your content in real time to help you create SEO-optimized posts and pages. It provides instant feedback on keywords, readability, content structure, and media optimization, helping you improve quality and search engine rankings.
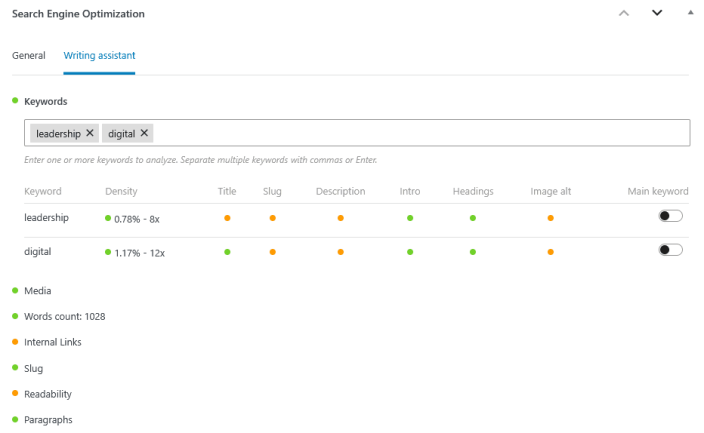
When edit a post, you’ll see the Writing Assistant tab in the Search Engine Optimization meta box below the content area:
The Writing Assistant offers suggestions to help you improve your content. These are opinionated recommendations, not strict rules you must follow. Think of it as an assistant providing feedback to enhance your writing.
Below is the full list of recommendations. Each has a colored indicator in its title:
- Orange: Needs improvement
- Green: No issues detected
Click a section title to expand details, including explanations and specific issues to address.
Keywords
↑ Back to topKeywords are the first element analyzed (see the screenshot above). Slim SEO Pro lets you enter multiple keywords and evaluate them against your content.
In the Keywords section:
- Enter your target keywords, separate multiple keywords with commas or press Enter.
- Mark one keyword as your Main keyword using the toggle switch.
For each keyword, the plugin checks:
- Keyword density: Counts how often and how many times a keyword appears. A density between 0.5% and 3% is recommended. Lower values mean the keyword may not be a topic of the article, while higher values may appear spammy.
- Keyword placement: Checks if the keyword appears in the title, slug, excerpt, intro paragraph, headings, and image alt text – important locations for signaling your topic to readers and search engines.
Media
↑ Back to top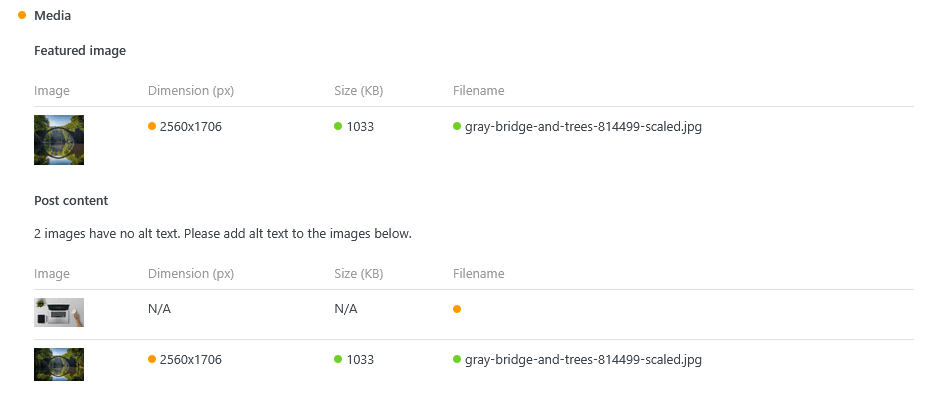
This section analyzes your featured image and any images within your content.
- Featured image: Warns if no featured image is set.
- Post images: Warns if images are missing alt text.
It also evaluates each image for:
- Dimensions: Warns if width exceeds 1920px (suitable for most screens).
- File size: Warns if the image is larger than 2MB, to ensure fast loading.
- Filename: Warns if filenames contain special characters. Use meaningful, descriptive names, and consider adding keywords. (This check is advisory and not enforced strictly.)
Word count
↑ Back to topTracks total word count, including image alt text. We recommend writing at least 500 words to avoid thin content, which can hurt SEO.
Internal links
↑ Back to top
Counts internal links to other posts or pages. Adding internal links can:
- Help readers find related and useful content
- Assist search engines in understanding your content’s context
- Help search engines discover new posts
- Pass link juice to other pages
- Demonstrate expertise, boosting your authority
This is a quick overview. For detailed link analysis, use the Link Manager module, which provides:
- Internal outbound links: From this post to other posts
- Internal inbound links: From other posts to this one
- External outbound links: From this post to other websites
- Link suggestions: Related content suggestions for internal linking
Slug
↑ Back to topThe slug is an important SEO element. We check slug length and recommend keeping it under 5 words for better readability.
Note that keyword inclusion in slugs is already checked in the Keywords section.
Readability (English only)
↑ Back to top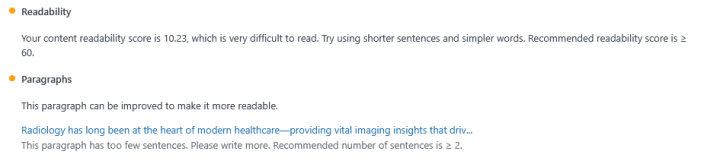
We assess content readability using the Flesch–Kincaid readability tests.
Score ranges:
- 90-100: Very easy to read
- 80-89: Easy to read
- 70-79: Fairly easy to read
- 60-69: Okay to read
- 50-59: Fairly difficult to read
- 30-49: Difficult to read
- 0-29: Very difficult to read
If your content scores low, try:
- Shortening sentences, especially for complex topics
- Breaking up long paragraphs
- Avoiding unnecessary jargon
Paragraphs
↑ Back to topChecks paragraph length for optimal readability.
Recommendations:
- Maximum: 10 sentences per paragraph (too long is harder to read)
- Maximum words: 200 words per paragraph
Now you’re ready to create content that’s both useful and optimized for SEO!
Auto link
↑ Back to topAuto Link is a feature that automatically scans your post/page content and turns matching keywords into links. This helps you add consistent links across your site without manually inserting links every time.
Global keywords
↑ Back to topGlobal keywords are keywords that are used across your entire site. To add a global keyword, follow these steps:
- Go to Settings → Slim SEO → Auto Link tab.
- Open the Keywords tab.
- Click Add Keyword.
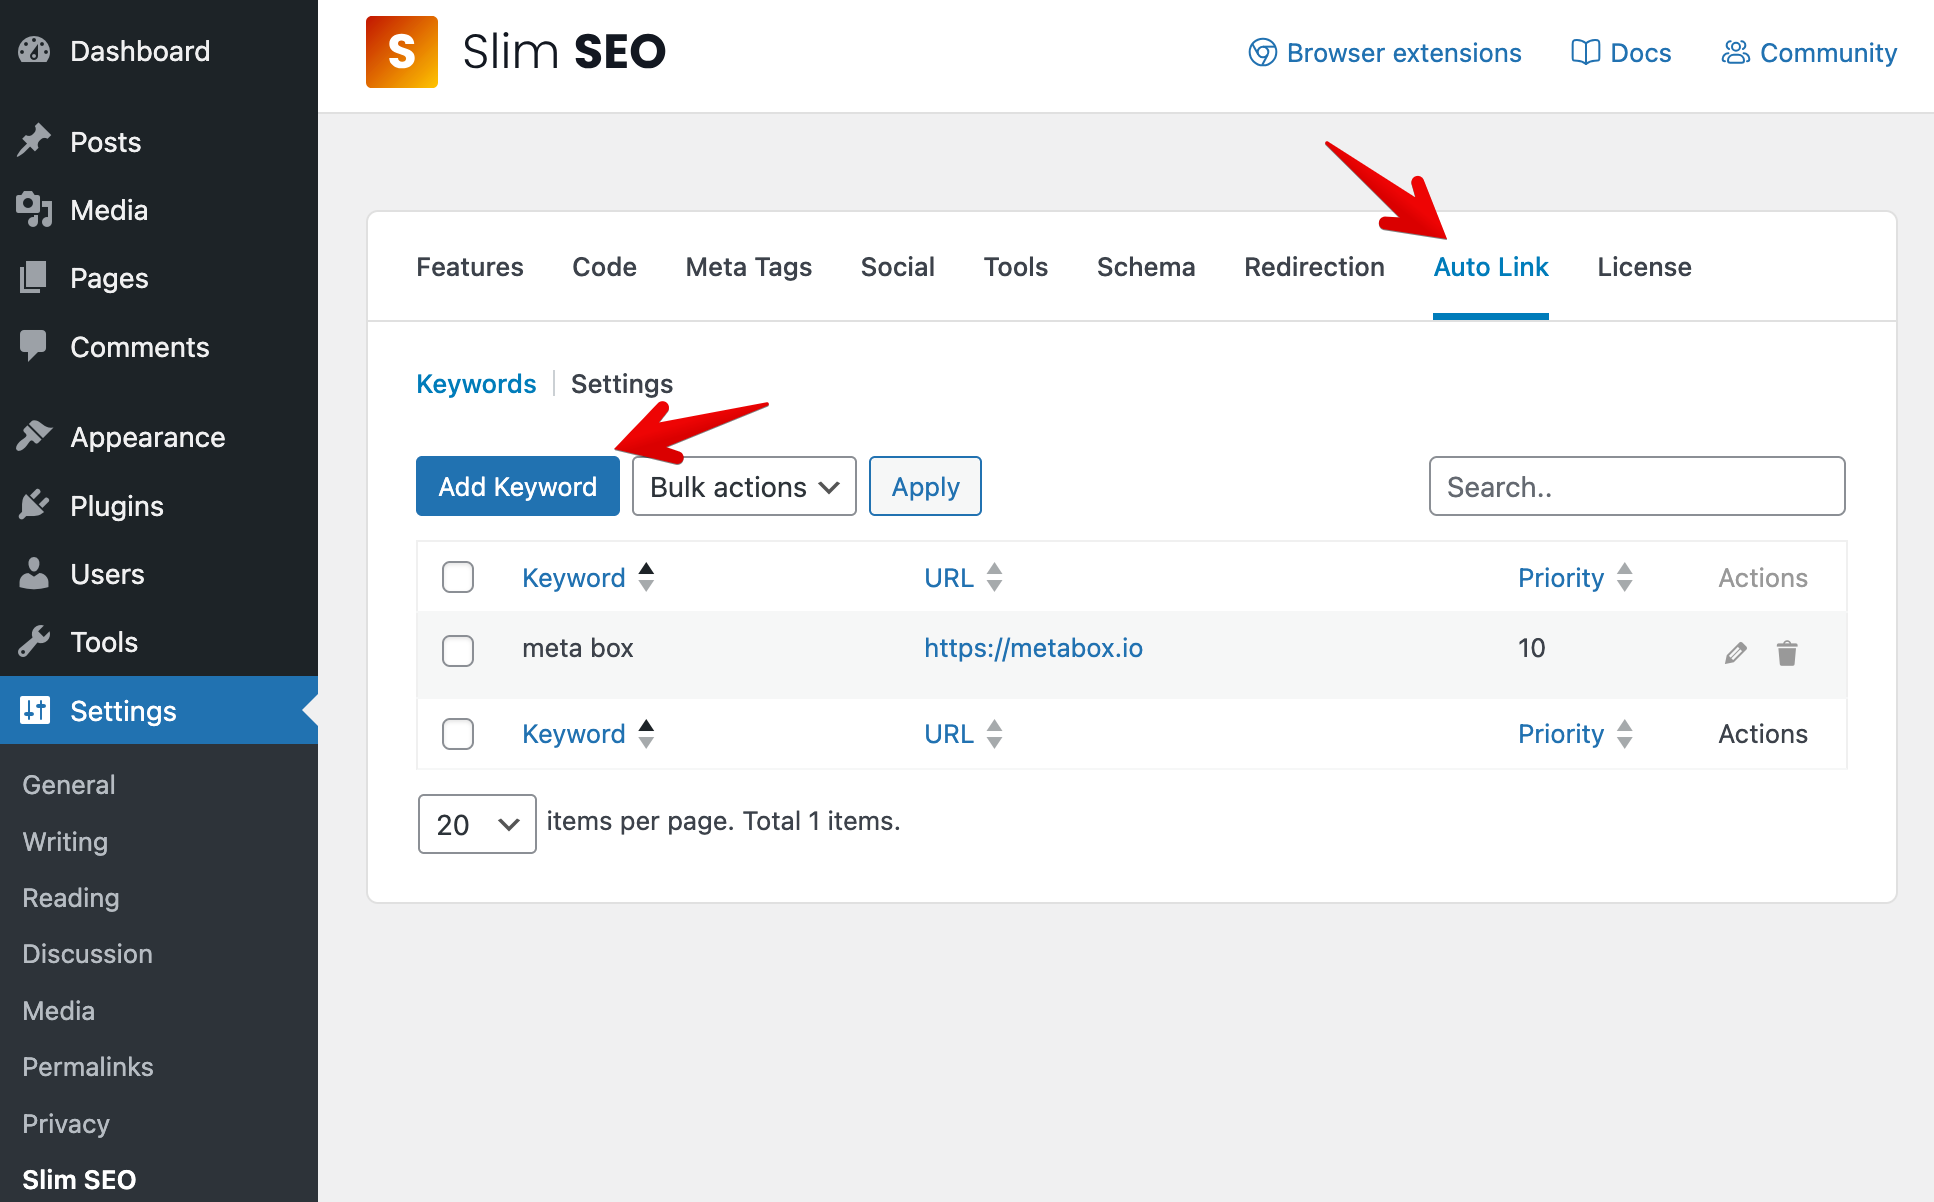
A popup will appear with the following options:
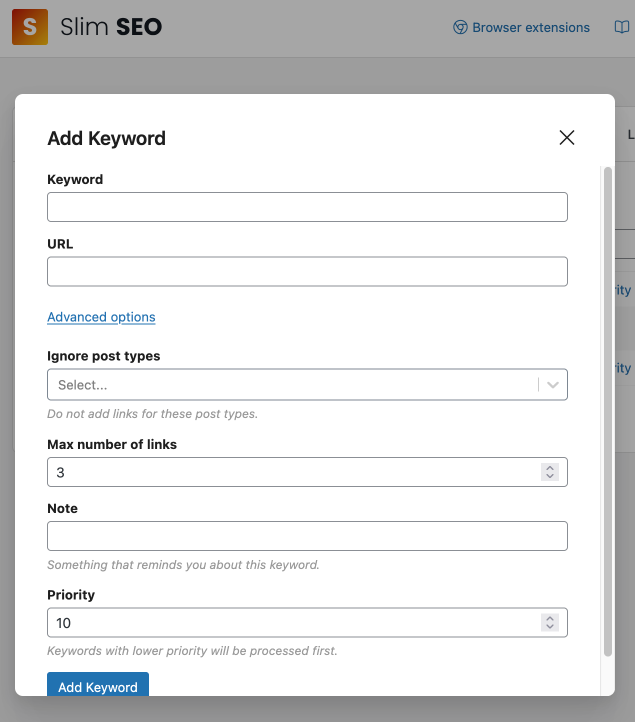
| Option | Description |
|---|---|
| Keyword | The word or phrase you want Auto Link to find in your content. |
| URL | The destination link for that keyword. |
| Ignore post types | Do not add links for this keyword when viewing these post types. |
| Max number of links | The maximum number of links Auto Link will create for this keyword in a single piece of content. |
| Note | A private note to help you remember what this keyword is for. |
| Priority | Controls the order keywords are processed. Keywords with higher priority are processed first. |
- Matching is case-insensitive. For example,
WordPressandwordpressare treated the same. - A keyword must be unique. You can’t register the same keyword twice with different URLs.
On this page, you can edit or delete keywords.
- To edit a keyword, click the Edit (pencil) icon.
- To delete a keyword, click the Trash icon.
- To delete multiple keywords at once:
- Select keywords using the checkboxes
- Choose Bulk actions → Delete
- Click Apply
Per-post keywords
↑ Back to topPer-post keywords are keywords that are used only for a specific post/page. It’s useful when you want a keyword to link to the current post/page’s permalink.
To add a per-post keyword, follow these steps:
- Go to Posts/Pages → Edit Post/Page.
- In the Search Engine Optimization meta box, open the Auto link tab.
- Click Add Keyword.
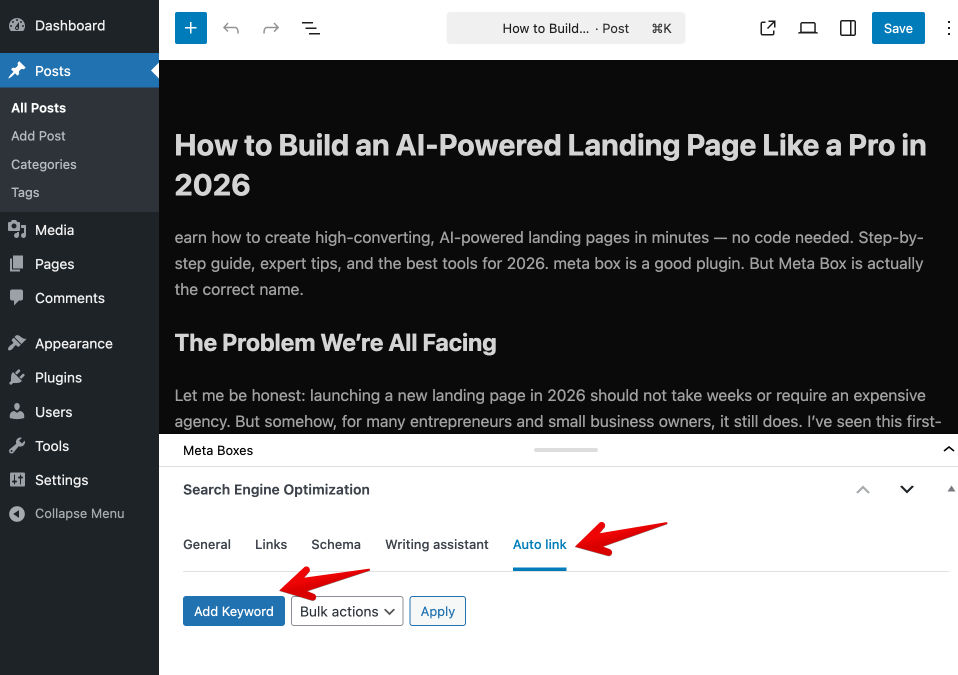
A popup will appear with similar options as the global keywords, except for the URL which will be the current post/page permalink.
Settings
↑ Back to topThese settings apply across your site. You can view them in the Settings → Slim SEO → Auto Link tab, and select the Settings sub-tab.
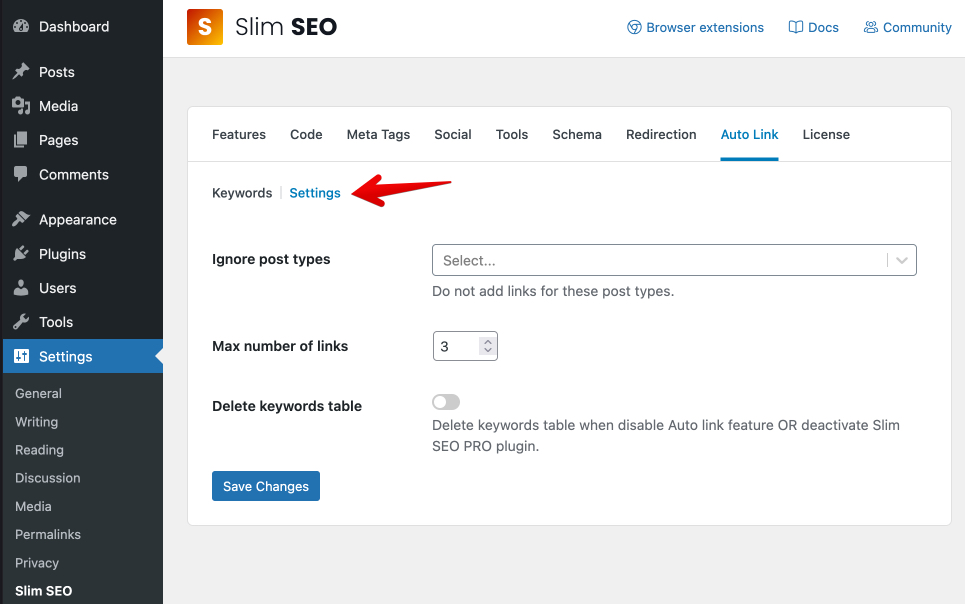
| Option | Description |
|---|---|
| Ignore post types | Do not add links for these post types. |
| Max number of links | The default maximum number of links for each keyword in a single post/page. |
| Delete keywords table | If enabled, Auto Link keyword data will be removed when the Auto Link feature is disabled or Slim SEO Pro is deactivated. |
How does it work?
↑ Back to top- Auto Link scans only your post/page content (the main content area).
- When it finds a matching keyword, it replaces that keyword with a link to the URL you set.
Notes:
- Content only: Auto Link runs only on the post/page content, not on other areas like excerpts or widget text.
- Unique keywords: Because each keyword can only be registered once, you can’t use the same keyword for multiple URLs.
Auto Link and Link Manager
↑ Back to topAuto Link and Link Manager are two different features:
- Auto Link is used to automatically add links to your content.
- Link Manager is used to manage and monitor your links, including internal links, external links, and broken links.
You can use both features together to get the best of both worlds. For example, you can use Auto Link to automatically add links to your content, and then use Link Manager to get (manual) link suggestions and monitor those links.
Because links added by Auto Link are dynamically generated, they are not visible in the Link Manager’s reports, you can’t use Link Manager to monitor them.