Manage suppliers, purchase orders, and stock notifications in WooCommerce. Assign suppliers, create POs, and update stock when goods are received.
Installation
↑ Back to top- Download the Supplier Management for WooCommerce .zip file from your WooCommerce account.
- Go to WordPress Admin > Plugins > Add New and Upload Plugin.
- Click on Choose File to upload the file you downloaded.
- Install Now and Activate the extension.
Configuration
↑ Back to topAfter you have installed and activated the Supplier Management for WooCommerce extension, go to WooCommerce > Settings > Supplier Management to configure suppliers, purchase orders, and stock notifications. The settings are organized into four tabs: Suppliers, Purchase Orders, Stock By Supplier, and Email Notifications.
Supplier
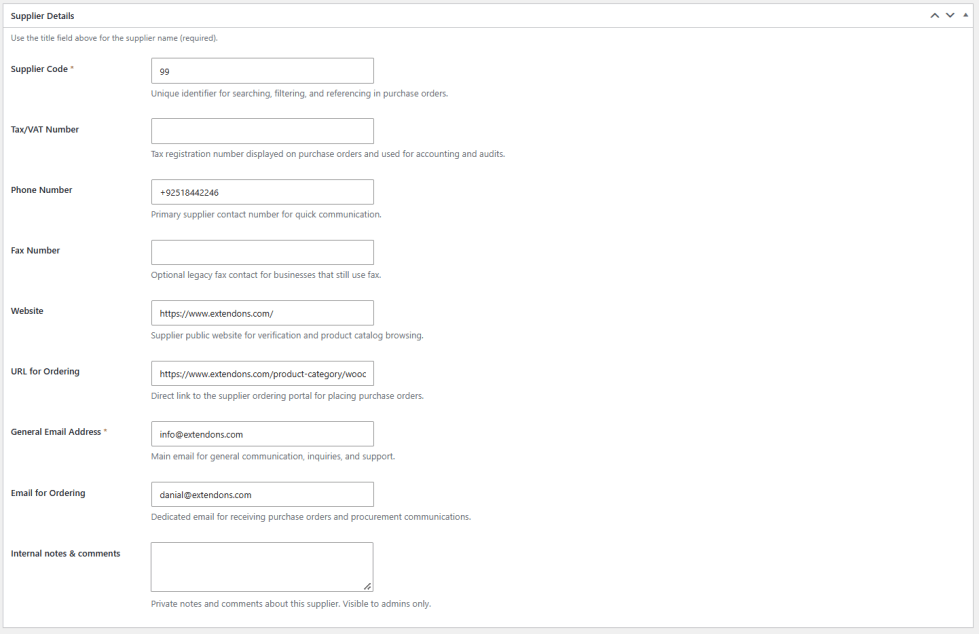
↑ Back to topGo to the Suppliers tab and click Add New Supplier. Use the title field to enter the supplier name, then configure the following.
- Supplier Code: A unique identifier used for searching, filtering, and referencing the supplier in purchase orders. Required.
- Tax/VAT Number: The tax registration number displayed on purchase orders and used for accounting and audits.
- Phone Number: The primary supplier contact number for quick communication.
- Fax Number: An optional legacy fax contact for businesses that still use fax.
- Website: The supplier’s public website, used for verification and product catalog browsing.
- URL for Ordering: A direct link to the supplier’s ordering portal for placing purchase orders.
- General Email Address: The main email for general communication, inquiries, and support. Required.
- Email for Ordering: A dedicated email for receiving purchase orders and procurement communications.
- Internal Notes & Comments: Private notes about the supplier, visible to admins only.
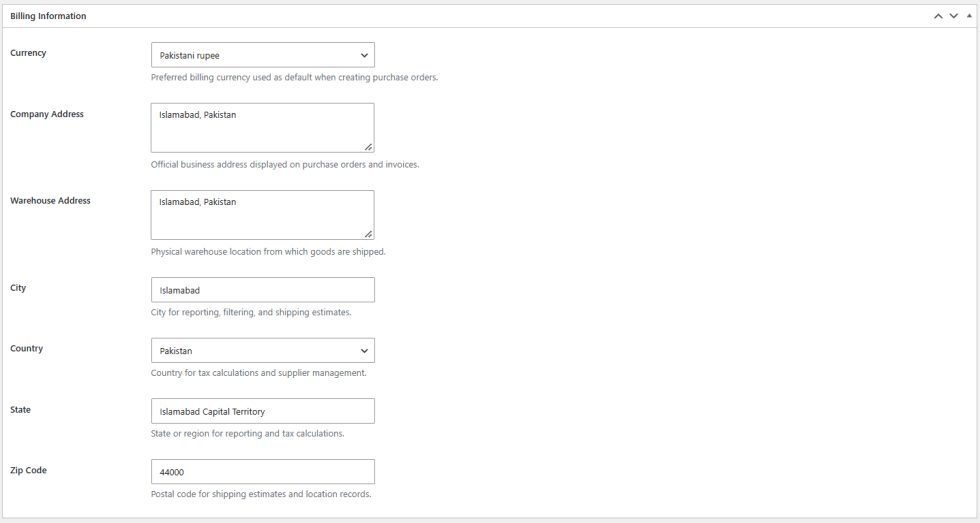
Under Billing Information, configure the following.
- Currency: The preferred billing currency, used as the default when creating purchase orders for this supplier.
- Company Address: The official business address displayed on purchase orders and invoices.
- Warehouse Address: The physical warehouse location from which goods are shipped.
- City: The city used for reporting, filtering, and shipping estimates.
- Country: The country used for tax calculations and supplier management.
- State: The state or region used for reporting and tax calculations.
- Zip Code: The postal code used for shipping estimates and location records.
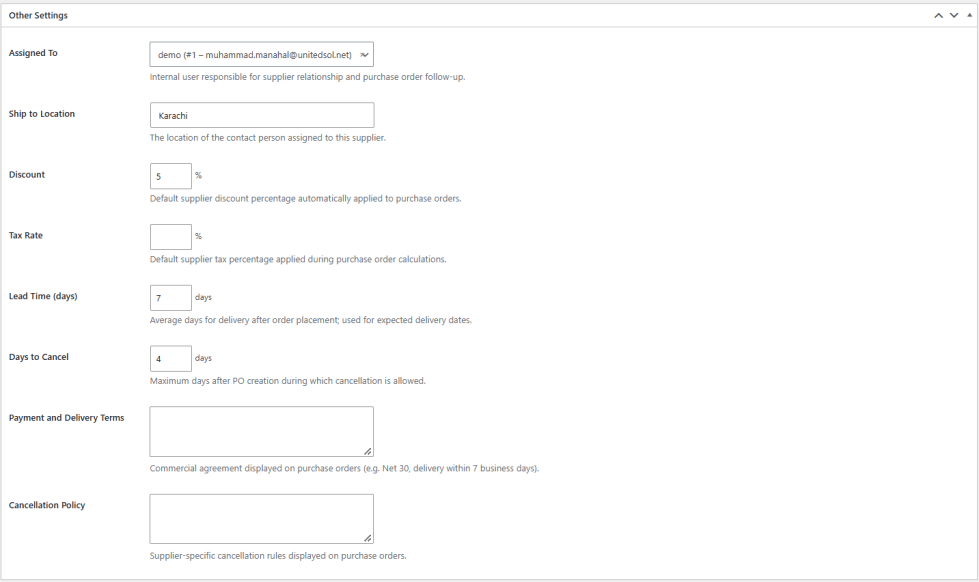
Under Other Settings, configure the following.
- Assigned To: The internal user responsible for the supplier relationship and purchase order follow up.
- Ship to Location: The location of the contact person assigned to this supplier.
- Discount: The default supplier discount percentage, applied automatically to purchase orders.
- Tax Rate: The default supplier tax percentage, applied during purchase order calculations.
- Lead Time (days): The average number of days for delivery after order placement, used to calculate expected delivery dates.
- Days to Cancel: The maximum number of days after purchase order creation during which cancellation is allowed.
- Payment and Delivery Terms: The commercial agreement displayed on purchase orders, for example Net 30, delivery within 7 business days.
- Cancellation Policy: The supplier specific cancellation rules displayed on purchase orders.
How to Assign Suppliers to a Product?
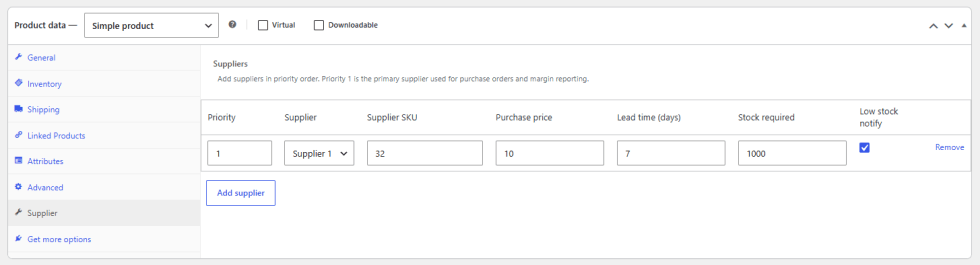
↑ Back to topGo to Products > All Products and open the product you want to configure. On the product edit page, click the Supplier tab under Product Data. Add one or more suppliers in priority order. Priority 1 is treated as the primary supplier and is used for purchase orders and margin reporting.
- Priority: The order in which suppliers are used. Priority 1 is the primary supplier.
- Supplier: The supplier to link to this product.
- Supplier SKU: The supplier’s own SKU or reference code for this product.
- Purchase Price: The price paid to this supplier for the product.
- Lead Time (days): The expected delivery time from this supplier for this product.
- Stock Required: The stock quantity at which this product is considered low stock for this supplier.
- Low Stock Notify: Enable to receive a low stock alert for this supplier and product once stock reaches the threshold.
Click Add Supplier to add an additional supplier row and assign a backup supplier to the same product.
Purchase Order
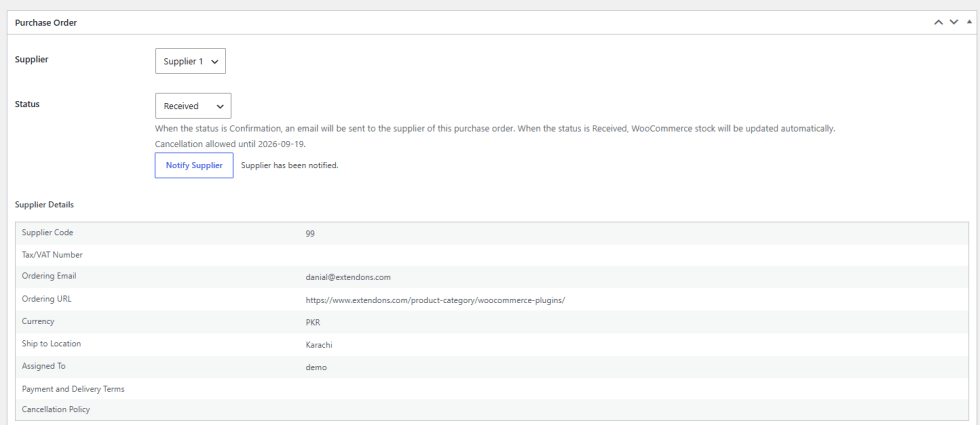
↑ Back to topGo to the Purchase Orders tab and click Add New Purchase Order. Use the title field to name the purchase order, then configure the following.
- Supplier: The supplier this purchase order is placed with.
- Status: The purchase order status. Setting it to Confirmation sends an email to the supplier. Setting it to Received updates WooCommerce stock automatically.
- Notify Supplier: Click to manually send the supplier notification email.
- Cancellation Window: The plugin displays the date until which cancellation is allowed, calculated automatically from the supplier’s Days to Cancel setting.
Once a supplier is selected, the plugin automatically displays the Supplier Code, Tax/VAT Number, Ordering Email, Ordering URL, Currency, Ship to Location, Assigned To, Payment and Delivery Terms, and Cancellation Policy as read only reference details on the purchase order.
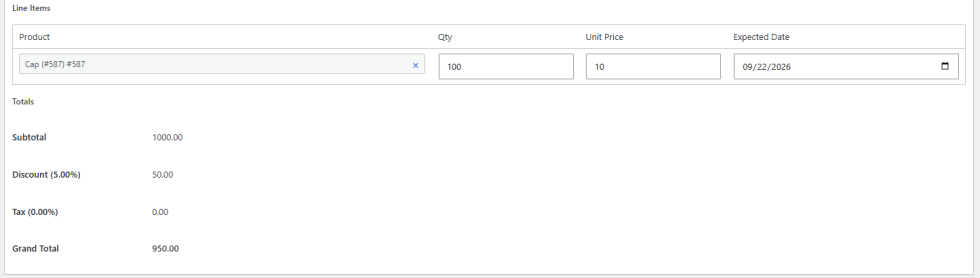
Under Line Items, add one or more products with the following.
- Product: Search and add a product to the purchase order.
- Qty: The quantity of the product being ordered.
- Unit Price: The price per unit for the product.
- Expected Date: The expected delivery date for this line item.
Subtotal, Discount, Tax, and Grand Total calculate automatically based on the line items and the supplier’s default discount and tax rate.
Stock by Supplier
↑ Back to topGo to the Stock By Supplier tab, choose a supplier from the dropdown, and click View Stock. The stock table displays Product, Supplier SKU, Stock, and Low Stock Threshold for every product linked to the selected supplier.

Email Notifications
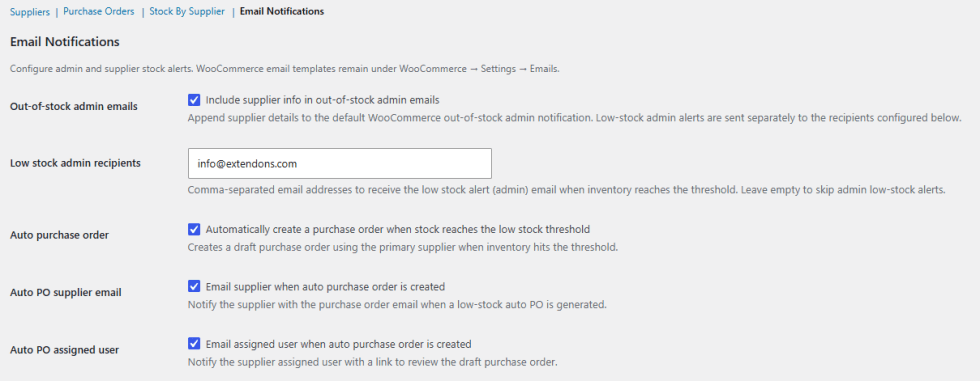
↑ Back to topGo to the Email Notifications tab to configure admin and supplier stock alerts. WooCommerce’s own email templates remain under WooCommerce > Settings > Emails.
- Out-of-Stock Admin Emails: Enable to include supplier information in the default WooCommerce out-of-stock admin notification.
- Low Stock Admin Recipients: Enter comma-separated email addresses to receive the low stock alert email when inventory reaches the threshold. Leave empty to skip admin low stock alerts.
- Auto Purchase Order: Enable to automatically create a draft purchase order using the product’s primary supplier when inventory hits the low stock threshold.
- Auto PO Supplier Email: Enable to notify the supplier with the purchase order email when a low stock auto purchase order is generated.
- Auto PO Assigned User: Enable to notify the supplier’s assigned user with a link to review the draft purchase order.