Telegram Mini Apps for WooCommerce lets your customers browse products, manage a cart, and complete checkout directly inside Telegram. This extension connects your WooCommerce store to a Telegram bot, giving your Telegram audience a native shopping experience powered by your existing product catalog.
Who should use this extension
↑ Back to top- WooCommerce merchants with a Telegram audience or community
- Merchants looking to sell products inside Telegram without building a separate app
- Merchants selling simple, variable, or subscription products
Requirements
↑ Back to top- A Telegram bot (free to create via BotFather).
- An SSL certificate (webhooks and Telegram Mini Apps require HTTPS).
- PHP 8.0 or later.
- WooCommerce 5.3 or later.
- WordPress 5.6 or later.
For additional information, read the WooCommerce requirements and server recommendations.
Optional dependencies
↑ Back to top- WooCommerce Subscriptions: Required only if you want to sell subscription products through Telegram.
- Telegram payment provider (e.g., Stripe): Required only if you want to accept payments through Telegram’s native payment form instead of redirecting to your site checkout.
Getting started
↑ Back to topInstall the extension
↑ Back to topBefore installing the extension, check whether it is already installed on your store.
1. Log in to your WooCommerce site’s administrator dashboard.
2. Navigate to Plugins > Installed Plugins.
3. Look for “Telegram Mini Apps for WooCommerce” in the list.
- If the extension is already installed, make sure it is activated, then proceed to the Connect your Telegram bot section.
- If the extension is not installed, follow one of the installation methods below.
Option 1: Install using the WooCommerce auto-installer (recommended)
1. Click the Add to Store button on the extension page.
2. If prompted, enter your store URL.
3. Connect your store to WooCommerce.com.
4. Once connected, the Telegram Mini Apps for WooCommerce extension is automatically installed on your site.
5. After installation completes, ensure the plugin is activated.
Option 2: Install the extension manually
1. Log in to your account on WooCommerce.com and go to My Subscriptions.
2. Click the three-dot menu next to “Telegram Mini Apps for WooCommerce” and select Download extension.
3. A .zip file will be downloaded to your computer.
4. Log in to your WordPress admin dashboard.
5. Navigate to Plugins > Add New.
6. Click Upload Plugin at the top of the page.
7. Select the downloaded .zip file and click Install Now.
8. Once installation completes, click Activate Plugin.
You can find more detailed information about managing installations and subscriptions in the Managing WooCommerce.com Subscriptions documentation.
Setup and configuration
↑ Back to topAfter activating the plugin, navigate to WooCommerce > Settings > Telegram Mini-Apps. The setup process has two main steps: connecting your Telegram bot and configuring your storefront.
Step 1: Connect your Telegram bot
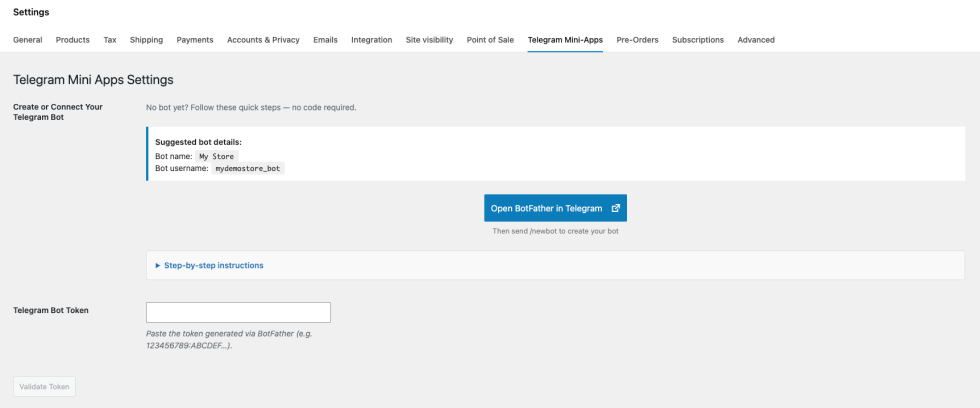
↑ Back to topThe first screen asks you to connect a Telegram bot. A bot is the entry point for your customers to access your store inside Telegram.
Create a Telegram bot
If you don’t have a bot yet, follow these steps:
- Open BotFather in Telegram.
- Tap Start and send
/newbotto create a new bot. - Choose a friendly display name for customers to see.
- Pick a unique username ending with “bot” (e.g.,
myshop_bot). - Copy the access token BotFather returns.
Enter your bot token
- Navigate to WooCommerce > Settings > Telegram Mini-Apps.
- Paste your bot token into the Telegram Bot Token field.
- Click Validate Token.
The plugin validates the token by contacting the Telegram API. If the token is valid, the plugin displays your bot’s information and opens the configuration panel.
Step 2: Configure your bot profile
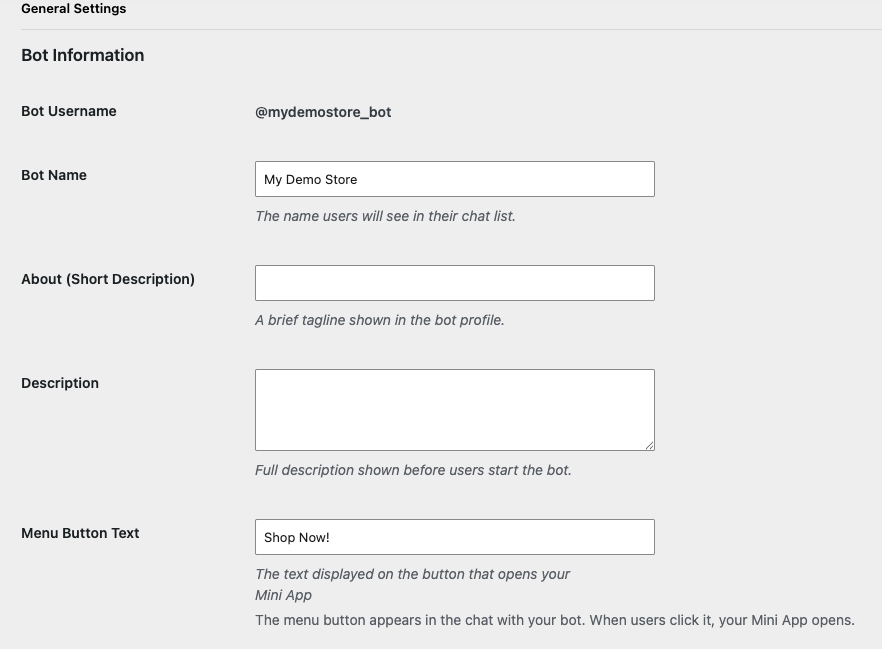
↑ Back to topAfter connecting your bot, the General Settings tab appears. This is where you configure how your bot presents itself to customers in Telegram.
Bot information
- Bot Name: The name users see in their Telegram chat list. Use your brand or store name.
- About (Short Description): A brief tagline shown in the bot’s profile. Keep it to one sentence.
- Description: The full description shown when a user opens the bot for the first time.
- Menu Button Text: The label on the button that opens your store inside Telegram. The default is “Shop”.
Step 3: Choose your integration mode
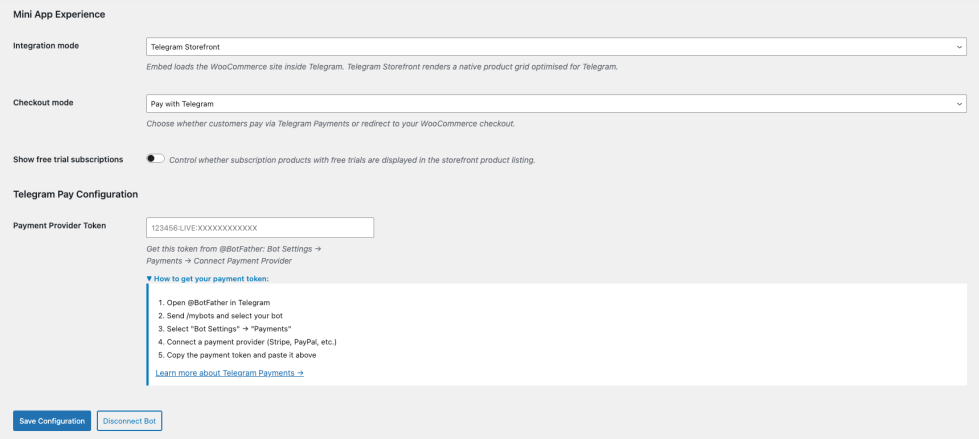
↑ Back to topThe Integration mode setting controls how your store is presented inside Telegram.
| Mode | Behavior | Best for |
|---|---|---|
| Telegram Storefront | Renders a dedicated product grid and cart optimized for Telegram. Customers browse, add to cart, and check out without leaving the app. | Merchants who want a native Telegram shopping experience with full customization |
| Embed existing store | Opens your WooCommerce shop page inside Telegram. Customers see your existing theme and layout. | Merchants who prefer to reuse their existing site design |

Step 4: Choose your checkout mode
↑ Back to topThe Checkout mode setting determines how customers pay. This setting is only available when using the Telegram Storefront integration mode.
| Mode | How it works | Requirements |
|---|---|---|
| Pay with Telegram | Customers complete their purchase using Telegram’s built-in payment form. Name, email, and shipping address are collected natively by Telegram. | A payment provider token from BotFather (see below) |
| Redirect to site checkout | Customers are redirected to your standard WooCommerce checkout page. Cart items transfer automatically. Any payment gateway you have configured in WooCommerce is available. | None — uses your existing WooCommerce payment gateways |
Set up Telegram payments
If you choose Pay with Telegram, you need a Payment Provider Token from BotFather. This connects Telegram’s payment system to a payment processor like Stripe.
- Open BotFather in Telegram.
- Send
/mybotsand select your bot. - Select Bot Settings > Payments.
- Connect a payment provider (e.g., Stripe, PayPal).
- Copy the payment token BotFather provides.
- In your WooCommerce settings, paste the token into the Payment Provider Token field.
- Click Save Configuration.
Step 5: Customize your storefront appearance
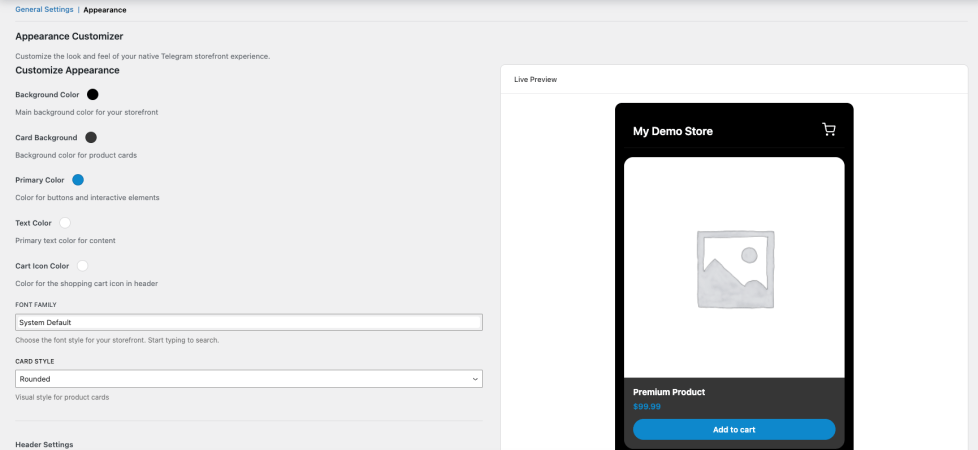
↑ Back to topWhen using the Telegram Storefront integration mode, an Appearance tab becomes available. This tab lets you customize the look and feel of your Telegram store to match your brand.
Colors
- Background Color: The main background color for your storefront.
- Card Background: The background color for product cards.
- Primary Color: The color for buttons and interactive elements.
- Text Color: The primary text color for content.
- Cart Icon Color: The color for the shopping cart icon in the header.
Typography
- Font Family: Choose from system fonts or Google Fonts. Start typing to search the font list.
Card style
- Rounded: Cards with rounded corners (default).
- Sharp: Cards with straight corners.
- Elevated: Cards with a shadow effect.
Header settings
- Header display: Choose to show your store title, logo, or both. The logo is pulled from your WordPress theme’s custom logo setting (Appearance > Customize > Site Identity).
- Logo size: Adjust the logo size between 24 and 80 pixels.
- Title font size: Adjust the header title size between 14 and 32 pixels.
The Live Preview panel on the right side of the screen updates as you change settings, so you can see how your storefront looks before saving.
Step 6: Save and activate
↑ Back to topAfter configuring your settings, click Save Configuration & Activate Bot (or Save Configuration if you have previously saved). The plugin performs the following actions automatically:
- Updates your bot’s profile in Telegram (name, description, about).
- Configures the menu button in the bot chat to open your store.
- Registers bot commands (
/start,/my_orders, and/my_subscriptionsif WooCommerce Subscriptions is active). - Sets up the webhook URL so your store receives order and payment updates from Telegram.
Webhooks require HTTPS. If your site is running on HTTP (e.g., a local development environment), the webhook is not registered. It is automatically configured when you deploy to a production environment with HTTPS.
Settings reference
↑ Back to topAll settings are available at WooCommerce > Settings > Telegram Mini-Apps.
General settings
↑ Back to top| Setting | Description | Default |
|---|---|---|
| Telegram Bot Token | The API token that authenticates your bot with Telegram. Obtained from BotFather. | Empty |
| Bot Name | The display name users see in their Telegram chat list. | From bot info |
| About (Short Description) | A brief tagline shown in the bot’s profile page. | Empty |
| Description | The full description shown when a user opens the bot for the first time. | Empty |
| Menu Button Text | The label on the button that opens your Mini App inside Telegram. | Shop |
| Integration mode | Controls how the store is presented: Telegram Storefront (native product grid) or Embed existing store (loads your WooCommerce shop page). | Embed existing store |
| Checkout mode | Controls how customers pay: Pay with Telegram (native payment form) or Redirect to site checkout (standard WooCommerce checkout). Only available in Storefront mode. | Redirect to site checkout |
| Payment Provider Token | The token from BotFather that connects Telegram to a payment processor. Only required when using Pay with Telegram. | Empty |
| Show free trial subscriptions | Controls whether subscription products with free trials are displayed in the storefront. Only visible when WooCommerce Subscriptions is active. | Off |
Appearance settings (Storefront mode only)
↑ Back to top| Setting | Description | Default |
|---|---|---|
| Background Color | Main background color for the storefront. | #18222d |
| Card Background | Background color for product cards. | rgba(255,255,255,0.04) |
| Primary Color | Color for buttons and interactive elements. | #0088cc |
| Text Color | Primary text color for content. | #ffffff |
| Cart Icon Color | Color for the shopping cart icon in the header. | [NEEDS INPUT: default cart icon color] |
| Font Family | The font used across the storefront. Choose from system fonts or Google Fonts. | System Default |
| Card Style | Visual style for product cards: Rounded, Sharp, or Elevated. | Rounded |
| Header display | Controls what is shown in the header: Title only, Logo only, or Logo and title. | Title only |
| Logo size | Size of the logo in the header (24–80 pixels). Only visible when header display includes a logo. | 40px |
| Title font size | Size of the title in the header (14–32 pixels). Only visible when header display includes a title. | 20px |
Customer experience
↑ Back to topThis section describes what your customers see when they interact with your store through Telegram.
Shopping flow
↑ Back to topRegardless of your integration or checkout mode, the shopping process follows these general steps:
- The customer opens your bot in Telegram and taps the Menu Button (e.g., “Shop”).
- Your Mini App storefront opens inside Telegram, displaying your product catalog.
- The customer browses products, selects variations (if applicable), and adds items to their cart.
- At checkout, the customer completes payment using the configured checkout mode.
- The order is created in WooCommerce and the customer receives a confirmation.
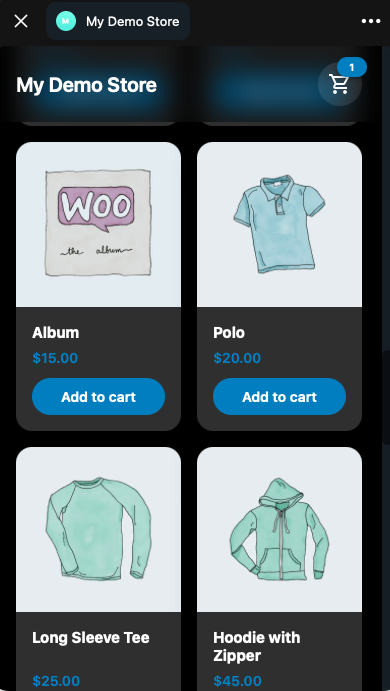
Telegram Storefront
When using the Telegram Storefront integration mode, customers see a dedicated product grid optimized for the Telegram interface.
- Products are displayed in a grid with images, names, and prices.
- Customers can add items to a persistent in-app cart.
- Variable products display variation selectors (size, color, etc.) with dynamic price updates.
- The cart persists across sessions for 24 hours.
Embed existing store
When using the Embed existing store integration mode, your WooCommerce shop page loads inside Telegram. Customers see your existing theme, layout, and product pages.
Checkout experience
↑ Back to topPay with Telegram
- A native Telegram payment form appears with the order summary.
- Telegram collects the customer’s name, email, and shipping address.
- The customer enters their payment details and completes the purchase.
- After successful payment, the order is confirmed and the customer receives a notification in the bot chat.
Redirect to site checkout
- The customer’s cart is transferred to WooCommerce.
- The customer is redirected to your standard WooCommerce checkout page.
- All payment gateways you have configured in WooCommerce are available.
- After completing payment, the customer can return to Telegram.
Bot commands
↑ Back to topYour customers can use the following commands in the bot chat:
| Command | What it does |
|---|---|
/start | Opens the Mini App storefront. |
/my_orders | Displays the customer’s order history. |
/my_subscriptions | Displays the customer’s active subscriptions (only available when WooCommerce Subscriptions is active). |
Order notifications
↑ Back to topWhen an order’s status changes (e.g., processing, completed, refunded), the plugin automatically sends a notification to the customer through the Telegram bot chat. No additional configuration is required.
Managing orders
↑ Back to topOrders placed through Telegram appear in your standard WooCommerce orders list at WooCommerce > Orders. You manage them the same way as any other WooCommerce order.
Identifying Telegram orders
↑ Back to topOrders placed through Telegram include additional metadata:
- A Telegram user ID is stored on the order.
- The payment method is recorded as Telegram payment (when using Pay with Telegram mode).
- A Telegram charge ID is recorded for payment reconciliation.
Refunds
↑ Back to topRefunds for orders paid through Telegram are processed through your WooCommerce dashboard using the standard refund process. Navigate to the order, click Refund, enter the amount, and confirm.
Go-live checklist
↑ Back to topBefore directing customers to your Telegram store, complete the following checklist.
Plugin and environment
- [ ] Plugin is installed and activated.
- [ ] WordPress, WooCommerce, and PHP versions meet the requirements.
- [ ] SSL certificate is active and the site loads over HTTPS.
Bot configuration
- [ ] Bot token validated successfully.
- [ ] Bot name, about, and description are filled in.
- [ ] Menu button text is configured.
- [ ] Configuration saved and bot activated (webhook registered).
Storefront and checkout
- [ ] Integration mode selected (Telegram Storefront or Embed).
- [ ] Checkout mode selected (if using Storefront).
- [ ] Payment provider token configured (if using Pay with Telegram).
- [ ] Storefront appearance customized (if using Storefront).
End-to-end testing
- [ ] Mini App opens correctly from the bot menu button.
- [ ] Products load and display with correct prices and images.
- [ ] Cart add, update, and remove work correctly.
- [ ] Checkout completes successfully and creates a WooCommerce order.
- [ ] Order notification is received in Telegram after purchase.
- [ ] Bot commands (
/start,/my_orders) work as expected.
Troubleshooting
↑ Back to topBot token validation fails
↑ Back to topCause: The token format is incorrect or the bot has been deleted.
Solution: Verify the token follows the BotFather format (e.g., 123456789:ABCDEF...). If the token was revoked, generate a new one from BotFather using /revoke and update the settings.
Webhook not registered
↑ Back to topCause: Your site is not running over HTTPS. Telegram requires HTTPS for webhooks.
Solution: Ensure your site has a valid SSL certificate and loads over HTTPS. Save the configuration again after enabling HTTPS.
Products don’t appear in the storefront
↑ Back to topCause: Products may not be published, may be out of stock, or the product cache may be stale.
Solution: Verify products are published and in stock in WooCommerce > Products. The product list is cached for 60 seconds — wait and refresh, or clear your site’s object cache.
Telegram payment fails
↑ Back to topCause: The payment provider token may be invalid, or the payment provider account may not be fully configured.
Solution: Verify your payment provider token in WooCommerce > Settings > Telegram Mini-Apps. Check that your payment provider account (e.g., Stripe) is fully activated and can process payments. Test with a small transaction.
Customer doesn’t receive order notifications
↑ Back to topCause: The webhook may not be properly registered, or the customer’s Telegram ID may not be linked to the order.
Solution: Re-save the bot configuration to re-register the webhook. Check that the order in WooCommerce has a Telegram user ID stored in the order metadata.
Appearance changes don’t take effect
↑ Back to topCause: The browser or Telegram app may be caching the old styles.
Solution: Close and reopen the Mini App in Telegram. If the issue persists, clear your site’s object cache and try again.
Still need help?
↑ Back to topIf the issue persists after following the steps above, contact support with the following information:
- Your store URL
- A brief description of the issue
- The affected order ID (if applicable)
- Screenshots or error messages
Frequently asked questions
↑ Back to topDo I need a Telegram bot?
↑ Back to topYes. You create a bot through Telegram’s BotFather — no coding is required. The setup wizard in the plugin guides you through connecting it.
Which payment methods are supported?
↑ Back to topIn Redirect to site checkout mode, any WooCommerce payment gateway works. In Pay with Telegram mode, you use a provider configured through BotFather — Stripe and other Telegram-approved payment providers are supported.
Does it work with variable products?
↑ Back to topYes. Customers can select product variations (size, color, etc.) directly inside the Telegram storefront. Prices and stock status update dynamically based on the selected options.
Can I sell subscriptions through Telegram?
↑ Back to topYes, with WooCommerce Subscriptions installed. Subscription products, free trials, and sign-up fees are supported. Customers can view their active subscriptions using the /my_subscriptions command.
How are orders managed?
↑ Back to topOrders placed through Telegram appear in your standard WooCommerce orders list at WooCommerce > Orders. You manage fulfillment, refunds, and status updates the same way as any other order.
Can I customize which products appear in the Telegram store?
↑ Back to topThe storefront displays all published, in-stock products from your WooCommerce catalog. You can use product and category exclusions to control which products appear.
Is it compatible with WooCommerce HPOS?
↑ Back to topYes. The extension is fully compatible with WooCommerce High-Performance Order Storage (HPOS).
Translations
↑ Back to topThe extension is currently available in English. It can be translated to any language following the WordPress Localization handbook.
Support
↑ Back to topIf you need assistance with installation, configuration, or usage of the Telegram Mini Apps for WooCommerce extension, support is available to help you resolve issues.
How to get support
↑ Back to topFor questions or issues related to:
- Plugin installation or activation
- Bot configuration and settings
- Checkout behavior or customer payment issues
- Storefront appearance and customization
- Order notifications and status updates
When contacting support
↑ Back to topTo help resolve your issue as quickly as possible, include the following information in your message:
- Your store URL
- A brief description of the issue
- The affected order ID (if applicable)
- Your integration mode and checkout mode settings
- Any relevant error messages or screenshots
Providing this information upfront reduces resolution time.