Ultimate Product Gallery for WooCommerce replaces the standard WooCommerce product gallery with a richer experience that lets customers browse images, watch videos, and open PDFs in one place. It is responsive, so you can optimize how your products are presented on desktop and mobile without compromising performance. It works with classic themes, block themes (Site Editor), and popular page builders (Divi, Elementor), while keeping your core WooCommerce product images in sync for compatibility.
If you run into a limitation, such as a theme-specific issue, a missing control, or a workflow you need to support, contact the developers. The team is responsive, and feature requests often turn into shipped improvements.
Installation
↑ Back to topTo start using a product from WooCommerce.com, you can use the “Add to store” functionality on the order confirmation page or the My subscriptions section in your account.
- Navigate to My subscriptions.
- Find the Add to store button next to the product you’re planning to install.
- Follow the instructions on the screen, and the product will be automatically added to your store.
Alternative options and more information at:
Managing WooCommerce.com subscriptions.

Requirements
↑ Back to top- WordPress 6.5+
- WooCommerce 8.0+
- PHP 8.1+
Set up and configure the gallery
↑ Back to topSet store-wide defaults
↑ Back to top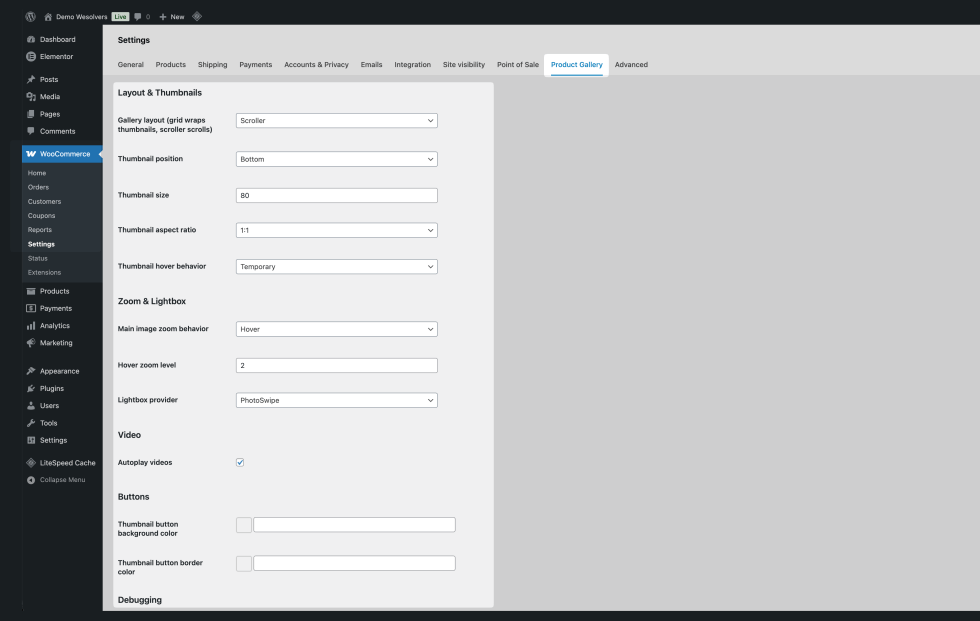
To set up Ultimate Product Gallery across your store:
- Go to: WooCommerce > Settings > Product Gallery.
- Configure your default gallery settings:
- Choose a gallery layout: Grid or Scroller
- Choose the thumbnail position: Top, Bottom, Left, or Right
- Set the thumbnail size and aspect ratio
- Fill aspect-ratio gaps with expanded image colors (off by default). When enabled, this adds a blurred background layer behind media when aspect ratios do not match.
- Choose thumbnail hover behavior: Preview, Commit, or None
- Set zoom and lightbox options
- Turn on SEO-optimized media captions (off by default)
- Set the main media fetch priority (
fetchpriority="high") - Set the default video autoplay behavior
- Set the hero autoplay trigger and fallback delay
- Turn on the advanced beta option for in-browser self-hosted video optimization tools
- Choose optional thumbnail button colors
- Save changes.
Notes:
- These settings define your store-wide defaults.
- Templates built with Elementor, Divi, or blocks can override these defaults. Product-level settings always take priority.
- Many gallery display settings are responsive. Use the
Mobile / Tablet / Desktopbuttons inside a setting to change the value for that device.- Mobile is the base value.
- Tablet inherits from Mobile unless you set a different value.
- Desktop inherits from Tablet unless you set a different value.
- In Elementor and Divi, responsive controls use the builder’s own device UI and follow the builder’s native responsive behavior.
- Captions are off by default. You can enable them globally, in a template, or on individual products through inheritance.
- Expanded image-color gap fill is off by default. You can enable it globally, in a template, or per product through inheritance.
- Available override controls vary depending on where you are editing (Block Editor, Elementor, or Divi).
- The
Enable gallery debug barandEnable "Optimize video for web streaming" (beta)settings save and reload consistently. - When you save settings, common toggle values are normalized so options like
Fill aspect-ratio gaps with expanded image colorskeep their state consistently across global defaults and inherited editor flows. - When you save, the plugin also clears legacy WooCommerce Product Gallery option values so refreshed fields show the latest saved defaults.
- Checkbox rows use the saved
yes/novalue, so an unchecked setting stays unchecked after refresh.
Add and manage gallery items per product
↑ Back to top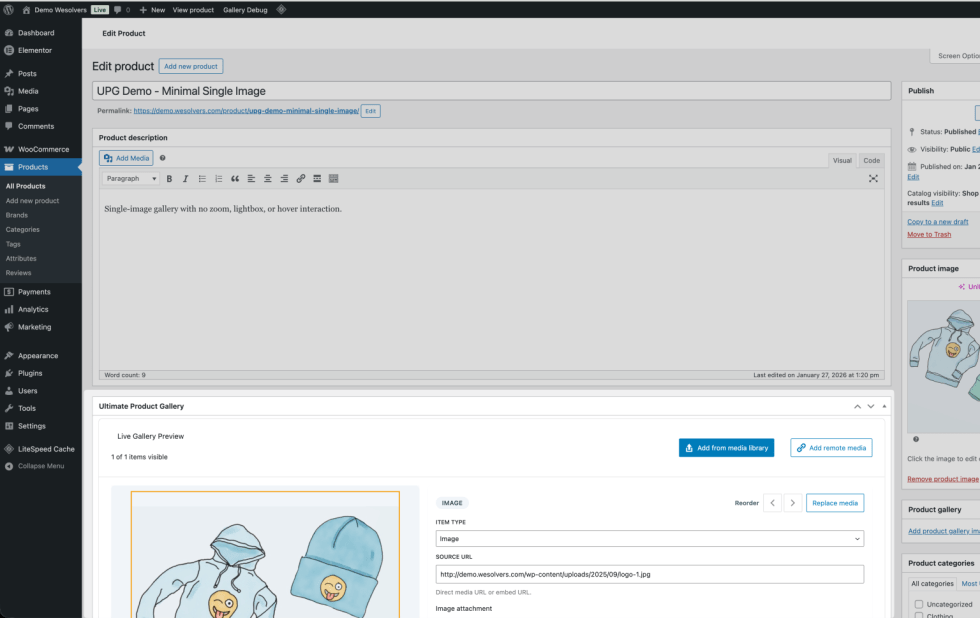
- Go to: Products > All Products.
- Edit a product.
- Find the “Ultimate Product Gallery” panel.
- Add gallery items:
- Add from the media library (images, videos, PDFs).
- Add remote media by pasting a trusted external
http/httpsURL for an image, video, YouTube or Vimeo link, or PDF. - Drag and drop files into the preview area for a faster upload workflow.
- Reorder items:
- Drag thumbnails in the preview strip.
- Use the left/right arrow controls directly under each preview thumbnail.
- Use the Move left/Move right buttons in the sidebar.
- Click Update to save the product.
Quick settings tips
- In the
Advanced gallery settingscard, you can expand or collapse the panel by clicking either the title area or theShow settings/Hide settingsbutton. - The larger click area makes it easier to open and close settings while editing products quickly.
- The advanced settings controls support per-device overrides (Mobile/Tablet/Desktop) using a compact device selector inside each setting. Leave Tablet and Desktop on inherit unless you need different behavior on larger screens.
- There is no separate
Reorder thumbnailspanel anymore. Use the reorder arrows directly below each thumbnail in the preview strip.
Fields you can edit for each item
- Media type: Image, Video, or PDF.
- Source URL: a direct media URL or embed URL. Saved gallery item URLs must be standard web or media URLs; inline
data:andblob:values are not accepted. - Alt text and caption.
- Visibility: hide an item without deleting it.
- Thumbnail: choose an image from the media library or paste a standard web or media URL. Inline
data:andblob:values are not accepted, and invalid thumbnail URLs are cleared during save and preview so the editor matches the storefront. - Video options:
- Self-hosted video poster: choose an image, paste a URL, or capture a frame.
- Playback controls, autoplay (muted), muted, and loop.
- YouTube player options (related videos, modest branding, start and end time, playlist, captions, and more).
- Vimeo player options (DNT, background mode, quality, color, text track, and more).
- For Vimeo items, the saved thumbnail is also used as the frontend poster fallback when no separate poster URL is stored.
- Optional
Optimize video for web streamingtools for self-hosted videos (you must enable the global Advanced beta setting first).
Use existing WooCommerce images automatically
↑ Back to top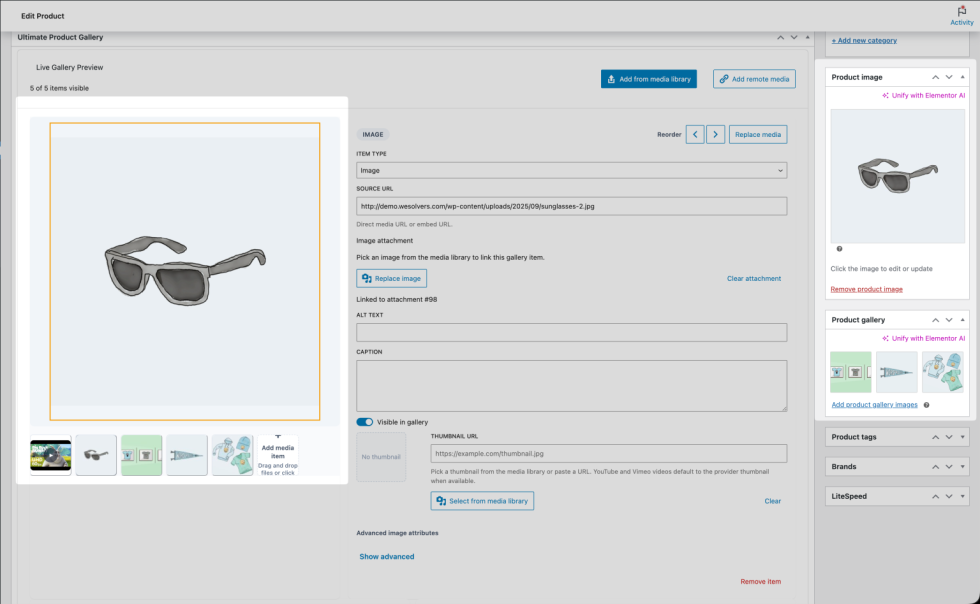
You do not need to rebuild your product galleries after installing the plugin.
- If a product already has a featured image and gallery images in WooCommerce, Ultimate Product Gallery will use them automatically.
- When you add or reorder images in Ultimate Product Gallery, the plugin keeps the WooCommerce featured image and product gallery images in sync for compatibility with themes and plugins that rely on WooCommerce image data.
- Videos and PDFs are stored only in Ultimate Product Gallery because WooCommerce core galleries support images only.
Common product gallery tasks
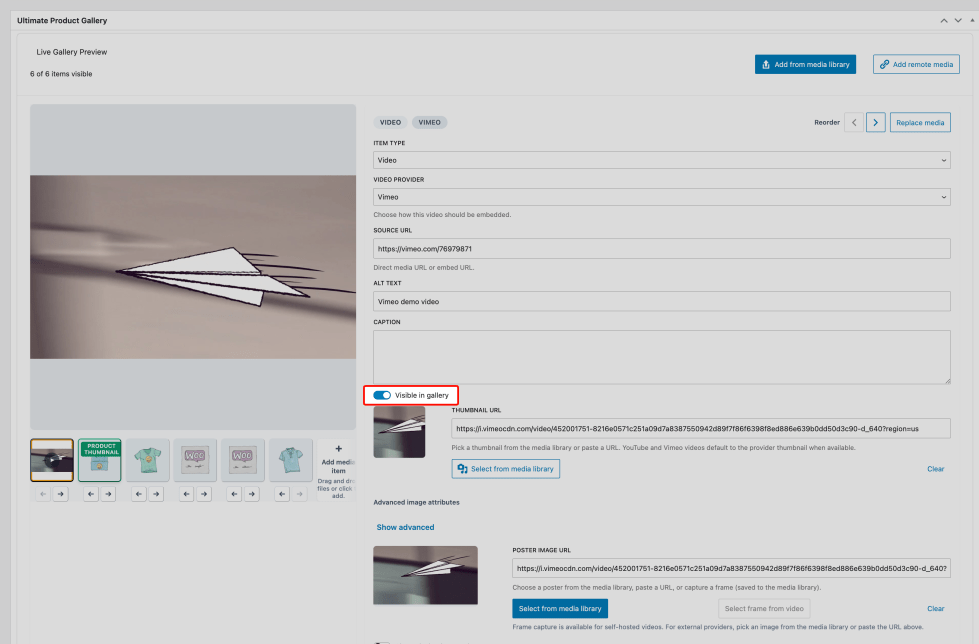
↑ Back to topAdd a YouTube or Vimeo product video
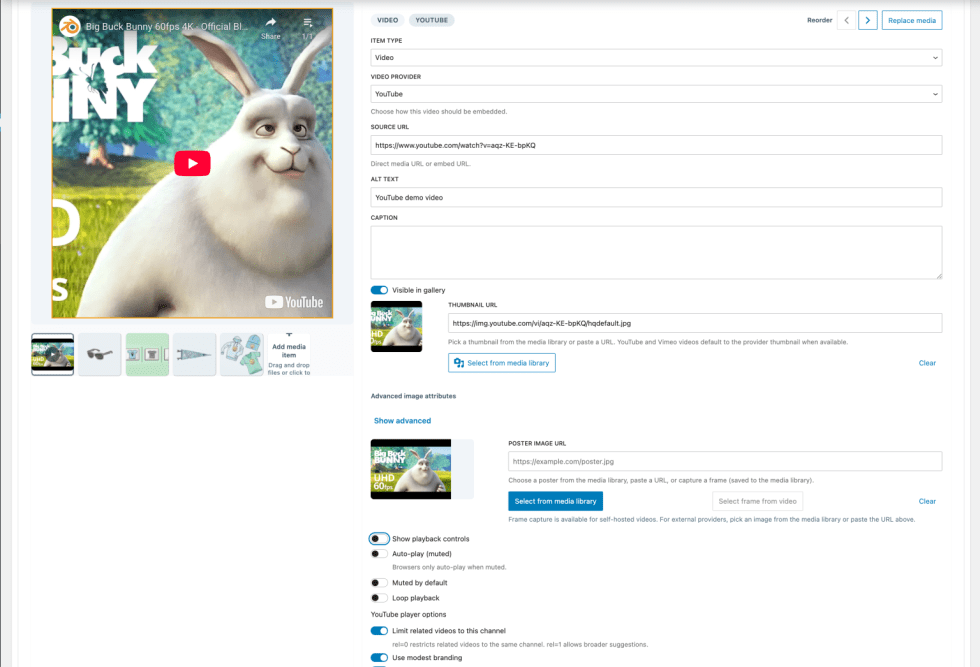
- Edit a product.
- In the Ultimate Product Gallery panel, click Add remote media.
- Set Media type to Video.
- Set Video provider to YouTube or Vimeo (or leave it on Auto detect).
- Paste a trusted external
http/httpsvideo URL and click Add media. Local or internal hostnames, private-network IPs, credentialed URLs, and other blocked targets are rejected even if you choose the media type manually. If you are unsure whether a domain should be allowed for your store or hosting setup, check with your developer before adding it. - Select the new item in the preview to adjust playback controls, autoplay, captions, or provider-specific options.
- Update the product.
Add a PDF, such as a size chart, manual, or spec sheet
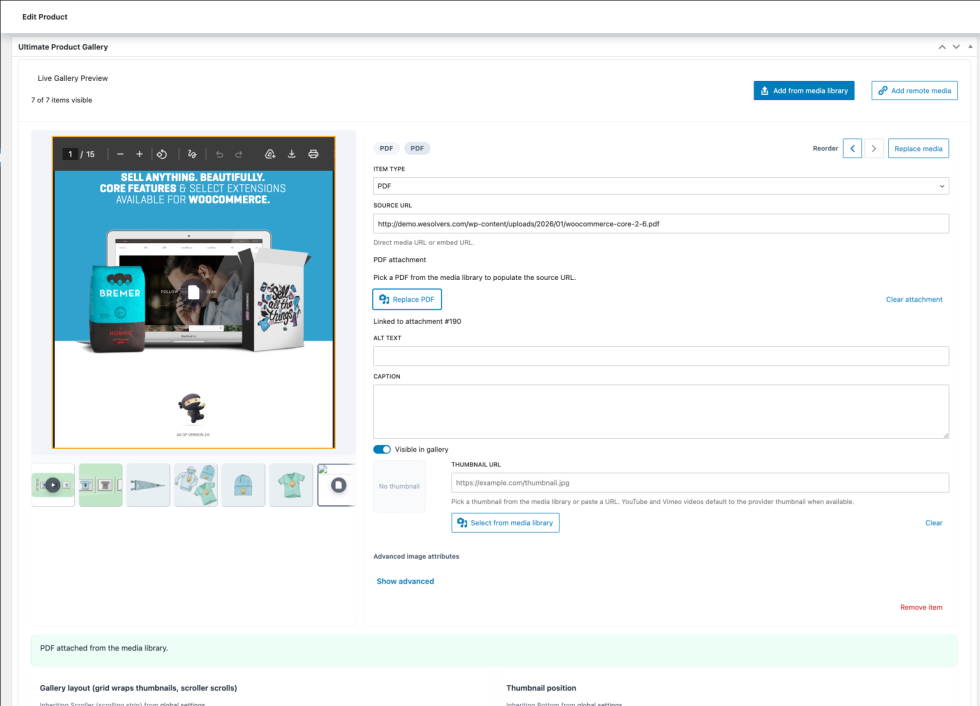
- Edit a product.
- In the Ultimate Product Gallery panel, click Add from media library.
- Select a PDF (or upload one).
- Set the item’s Alt text to something clear, for example: “Download size chart”.
- Update the product.
Hide an item without deleting it
- Select the item in the preview.
- Turn off
Visible in gallery. - Update the product.
How settings are applied
↑ Back to topUltimate Product Gallery applies settings in this order:
- Per-product settings in the product editor (highest priority).
- Page builder or template settings (Block Editor, Elementor, Divi), if present.
- Global defaults in WooCommerce > Settings > Product Gallery.
The product editor shows when a setting is inheriting and where that value comes from.
Responsive behavior notes
- Responsive display settings are resolved per device and still follow the same hierarchy shown above.
- If a Tablet or Desktop value is not set, it inherits from the smaller breakpoint (Mobile, then Tablet), similar to a mobile-first CSS approach.
- Elementor and Divi responsive controls follow the builder’s native breakpoint model, and Ultimate Product Gallery maps them into the same per-device behavior.
- In Elementor and Divi live previews, changing the builder device mode re-applies gallery responsive settings immediately, even if the browser viewport size does not change.
Theme and builder setup
↑ Back to topBlock themes (Site Editor)
↑ Back to top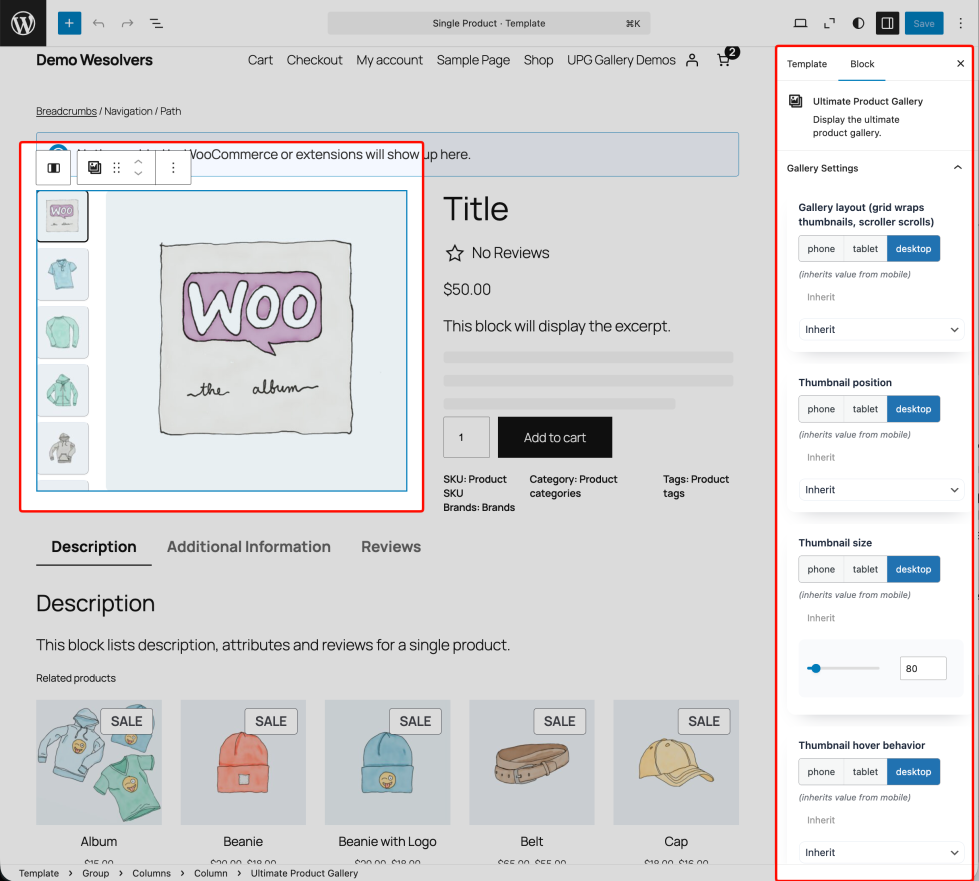
If you are using a block theme:
- If your product template already includes the WooCommerce “Product Image Gallery” block, Ultimate Product Gallery will replace the frontend output automatically.
- If you want template-level overrides, such as different layouts for different templates, insert the “Ultimate Product Gallery” block and configure its settings. Leave controls set to Inherit if you want to keep using your global defaults.
Tip: In the Site Editor, you can use the block’s “Product ID override” option, when available, to preview the gallery with a specific product while designing the template.
Elementor setup
↑ Back to top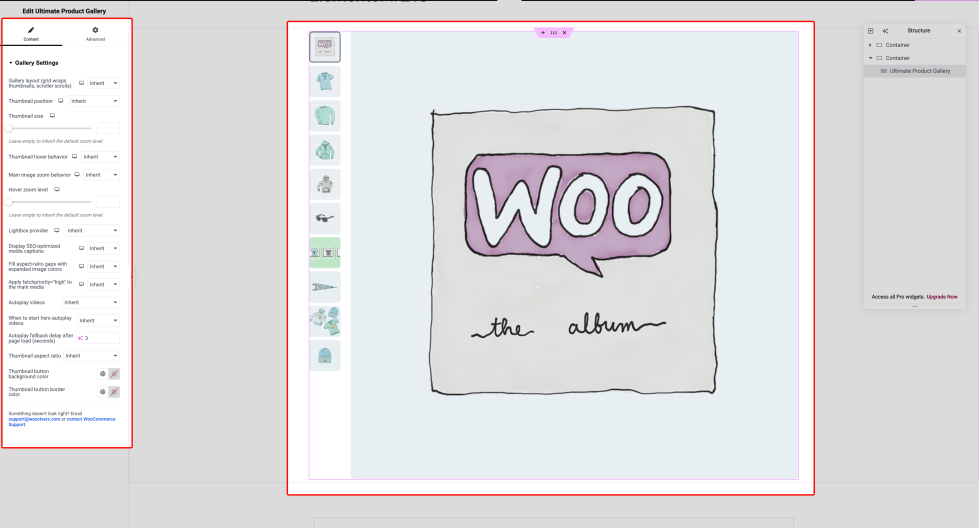
If you build product templates with Elementor:
- Open your Single Product template in Elementor Theme Builder.
- Insert the “Ultimate Product Gallery” widget.
- Adjust the widget settings, or leave them set to Inherit to use your global defaults.
- Update the template.
Elementor preview note
- The widget now loads its required frontend assets directly in Elementor preview, so
upg-stylesandupg-frontendload consistently. This helps prevent preview issues where all main images appear stacked instead of showing only the active image.
Divi setup
↑ Back to top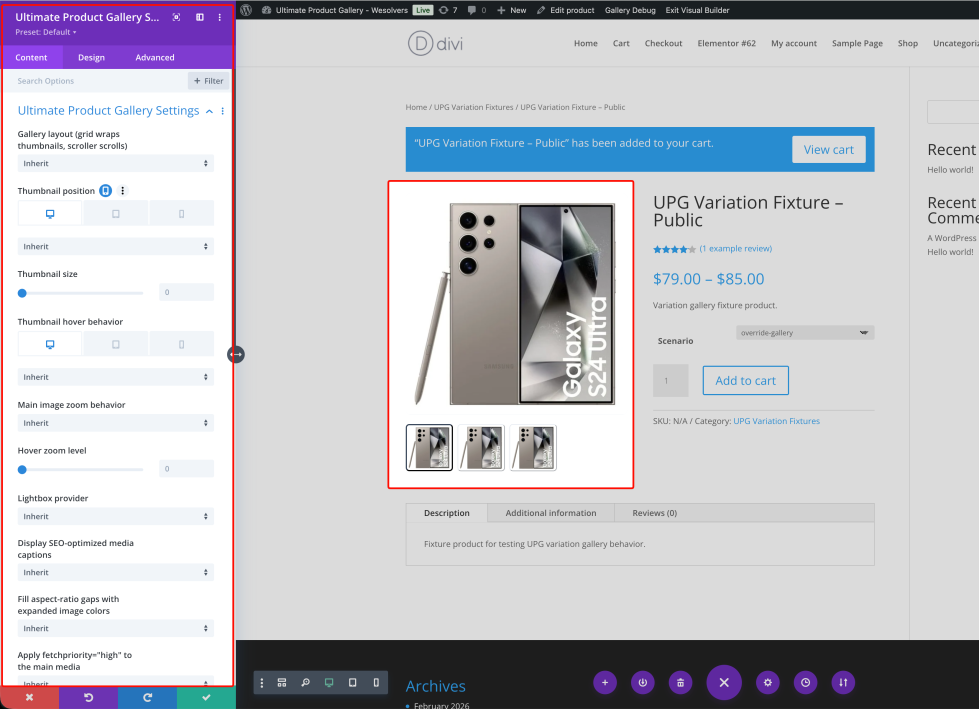
If you build product templates with Divi:
- Edit the product template with the Divi Builder.
- Insert the “Ultimate Product Gallery” module.
- Adjust the module settings, or leave them set to Inherit to use your global defaults.
- Optional: use Divi’s built-in module settings, such as Disable on or Sticky, if needed. These apply to the module wrapper like any other Divi module.
- Save.
Shortcode
↑ Back to topUse the shortcode to render a product gallery in any shortcode-enabled area:
Render the current product (when used on a product page):
[upg_gallery]
Render a specific product gallery:
[upg_gallery product_id="123"]
Optional tools
↑ Back to topAt the bottom of WooCommerce > Settings > Product Gallery, you’ll find an optional tool:
- Remove plugin data: deletes saved defaults, per-product overrides, and gallery data from the database. Media files are not removed. This action cannot be undone.
What customers see on the product page
↑ Back to topOn the product page, customers will see:
- A main media area with a thumbnail strip. The thumbnail position depends on your settings.
- Clicking a thumbnail switches the main media.
- Dragging or swiping the main media area left or right also switches to the previous or next item.
- Swipe tracking continues even if the pointer moves outside the media frame before release, so drag navigation stays reliable.
- Optional hover behaviors:
- Preview on hover: hovering previews an item without changing the selected item.
- If a video was already playing, returning to the selected video resumes playback automatically.
- Commit on hover: hovering changes the selected item.
- No hover: only clicking changes the selected item.
- Preview on hover: hovering previews an item without changing the selected item.
- For images:
- Optional hover zoom.
- Optional lightbox for full-screen viewing.
- Main images and thumbnails use responsive image variants automatically, so customers load image sizes that fit the current layout.
- Main media and thumbnails use
containfitting and reset inherited image spacing inside the gallery, so media fills its allotted space without extra padding or borders from the theme.
- Optional expanded-image color fill can blur and extend each image and self-hosted video behind the main media to cover letterbox or pillarbox gaps when aspect ratios do not match. This uses CSS background layers rather than extra visible image elements.
- To keep that fill lightweight,
expandImageColorsuses a small dedicated image variant for the background layer instead of the full display image. - For videos, the expanded-image background stays lightweight because decorative poster selection prefers a very small poster source before larger poster images.
- When
Display SEO-optimized media captionsis enabled, captions appear below the main media area, including in the lightbox, instead of covering the visible image or video. - In lightbox mode, zoom supports scroll or pinch, with pan support.
- In lightbox grid layouts with left or right thumbnails, the thumbnail rail stays constrained so the backdrop remains clickable for closing.
- In lightbox mode, clicking empty thumbnail-rail space, away from the actual thumbnails, also closes the overlay.
- When
- For videos:
- Self-hosted video uses the native HTML5 video player.
- YouTube and Vimeo embeds load their own players.
- Vimeo embeds keep the saved poster or thumbnail visible until the Vimeo player finishes loading, which helps reduce blank frames on slower connections.
- Self-hosted posters are selected by target width first, so compact video areas do not download disproportionately large poster files.
- When expanded fill mode is enabled, videos use the same gap-fill treatment, with a low-resolution poster background to avoid extra large downloads.
- Embedded YouTube videos use the compact
mqdefaultposter for gap fill, so the background effect stays lightweight while still matching the player thumbnail.
- For PDFs:
- An embedded PDF viewer, when supported by the browser.
- A fallback download link if embedding is not supported or blocked.
Troubleshooting
↑ Back to topThe gallery does not appear on the product page
↑ Back to top- Confirm WooCommerce is active and the plugin is activated.
- Confirm the product has at least one gallery item.
- Check your theme/builder setup:
- Classic theme: the gallery output is replaced automatically.
- Block theme: ensure the product template includes a product gallery block.
- Elementor/Divi: ensure you inserted the Ultimate Product Gallery widget/module in the template.
- Clear page cache and any asset optimization cache.
If it still does not render, enable the debug bar (see below) and contact support with a screenshot of the debug output.
YouTube/Vimeo poster image is missing
↑ Back to top- Some hosts or firewalls block the outbound requests needed to fetch thumbnails from video providers.
- New Vimeo items get one immediate retry if the first poster lookup comes back empty, but some hosts or firewalls still block all follow-up requests.
- Vimeo embeds reuse the saved thumbnail as a poster fallback when no separate poster URL is stored.
- Fix: set a thumbnail manually on the item in the Thumbnail field, or set a poster image in the Video poster section.
Autoplay does not work
↑ Back to top- Most browsers only allow autoplay when the video is muted.
- Fix: enable autoplay and keep muted enabled. Some mobile browsers still require user interaction.
PDF does not embed
↑ Back to top- Some browsers do not support embedded PDFs.
- Some remote hosts block embedding via security headers.
- Fix: upload the PDF to your media library, or rely on the built-in download fallback link.
Clicking thumbnails does nothing / zoom or lightbox is not working
↑ Back to topThis is usually caused by a JavaScript conflict or by an optimization plugin deferring or minifying scripts too aggressively.
- Temporarily disable your JS/CSS optimization plugin and re-test.
- If that fixes it, exclude Ultimate Product Gallery assets from optimization:
- Script handle:
upg-frontend - Style handle:
upg-styles
- Script handle:
- Check the browser console for errors and include them when contacting support.
Elementor preview shows all main images stacked
↑ Back to top- Confirm you are on plugin version 1.0.8 or newer.
- Regenerate or clear optimization and CDN caches so Elementor preview loads fresh widget assets.
- Exclude Ultimate Product Gallery assets from optimizer/defer rules:
- Script handle:
upg-frontend - Style handle:
upg-styles
- Script handle:
Main media is not draggable/swipeable
↑ Back to top- Confirm you are on plugin version 1.0.8 or newer.
- Clear page cache, asset/minification cache, and CDN cache.
- Re-test with JS optimization disabled temporarily to rule out deferred/combined script conflicts.
Lightbox zoom-out click does not toggle back
↑ Back to topThis behavior has been improved so a second click on the active image area or viewport can still return the lightbox to its default zoom level.
- Clear any page cache and minified asset cache.
- Confirm the plugin version is 1.0.3 or newer.
The lightbox appears behind a sticky header
↑ Back to topSome themes use extremely high z-index values on sticky headers. The lightbox already uses a very high stack level by default, but a custom theme can still override that behavior.
- Check whether your theme applies custom stacking contexts (for example with
transformorisolation) around the product area. - If needed, ask your developer to set
--upg-lightbox-z-indexglobally in CSS. - For advanced integrations, developers can also override lightbox z-index through the
ultimate_product_gallery/lightbox/z_indexfilter.
Debugging: see which settings are being applied
↑ Back to top
- Go to: WooCommerce > Settings > Product Gallery.
- Enable “Enable gallery debug bar” and save your changes.
- View a product page while logged in as an admin or shop manager.
- In the WordPress admin bar, open “Gallery Debug” to review:
- Global defaults
- Builder or template overrides (if any)
- Per-product overrides (if any)
- Final resolved settings
Frequently asked questions
↑ Back to topDoes it require WooCommerce?
↑ Back to topYes. Ultimate Product Gallery requires WooCommerce to be installed and active.
What media types can I add?
↑ Back to top- Images
- Videos (self-hosted, YouTube, Vimeo)
- PDFs
Does it connect to external services?
↑ Back to topOnly when you add trusted external http/https media URLs, such as YouTube or Vimeo videos. In that case, the plugin may contact the video provider to fetch thumbnails, and visitors may load the provider’s player when they view embedded videos. For safety, the plugin blocks local or internal hostnames, private or reserved IPs, loopback and link-local addresses, credentialed URLs, and non-http/https URLs. In the admin editor, automatic Vimeo poster lookups are limited to newly added or newly changed Vimeo items, and new Vimeo items get one immediate retry if the first poster lookup is empty.
Can I hide an item without deleting it?
↑ Back to topYes. Each gallery item includes a “Visible in gallery” toggle. Hidden items are not shown to customers, but they stay saved in the product gallery for later use.
How do I show the gallery somewhere else (like a page builder section or a custom page)?
↑ Back to topUse the Ultimate Product Gallery block/widget/module (builder context) or the [upg_gallery] shortcode.
Support and feature requests
↑ Back to topQuick support shortcuts
↑ Back to top- In
Plugins > Installed Plugins, the Ultimate Product Gallery row includes quick support shortcuts:Email supportandOpen Support Ticket. - In the deactivation confirmation modal, opened from
Deactivate, there are also quick support buttons with built-in WordPress icons forEmail supportandOpen Support Ticket, plus a message that invites you to ask questions before deactivating.
If you purchased through WooCommerce.com, open a support request from your WooCommerce.com account.
When contacting support, include:
- A link to a product page that shows the issue (or a staging URL).
- Your theme name, and any page builder in use (Block theme/Site Editor, Elementor, Divi, etc).
- The media types involved (images, YouTube, Vimeo, PDFs, self-hosted video).
- If possible, a screenshot of the “Gallery Debug” panel.
The developers are responsive. If you have a feature request or a workflow that is close but not fully supported, contact the team. They can often implement it or suggest a clean workaround.