
Download and Installation
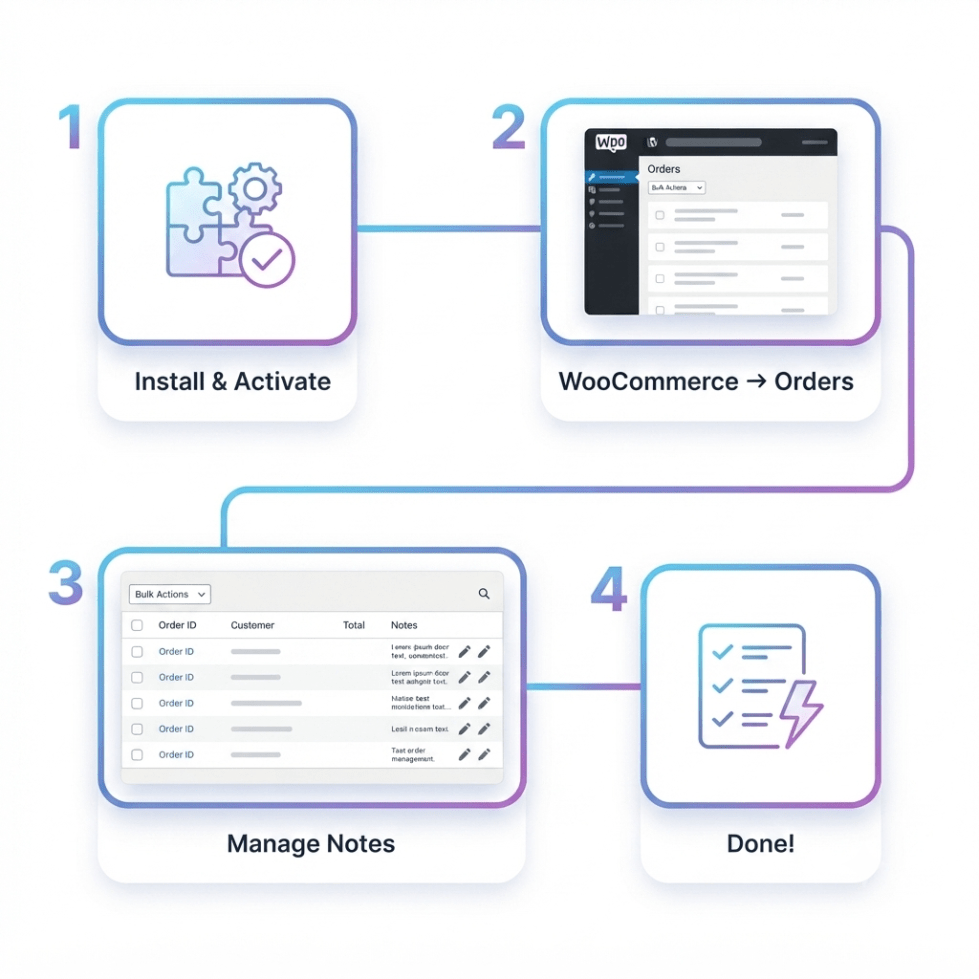
↑ Back to top- Download the .zip file from your WooCommerce account.
- Go to: WordPress Admin > Plugins > Add New and Upload Plugin the file you have just downloaded.
- Now, Install and Activate the extension.
More information at: Install and Activate Plugins/Extensions.
Initial Setup & Configurations
↑ Back to topAfter activation, navigate to WooCommerce → Orders :
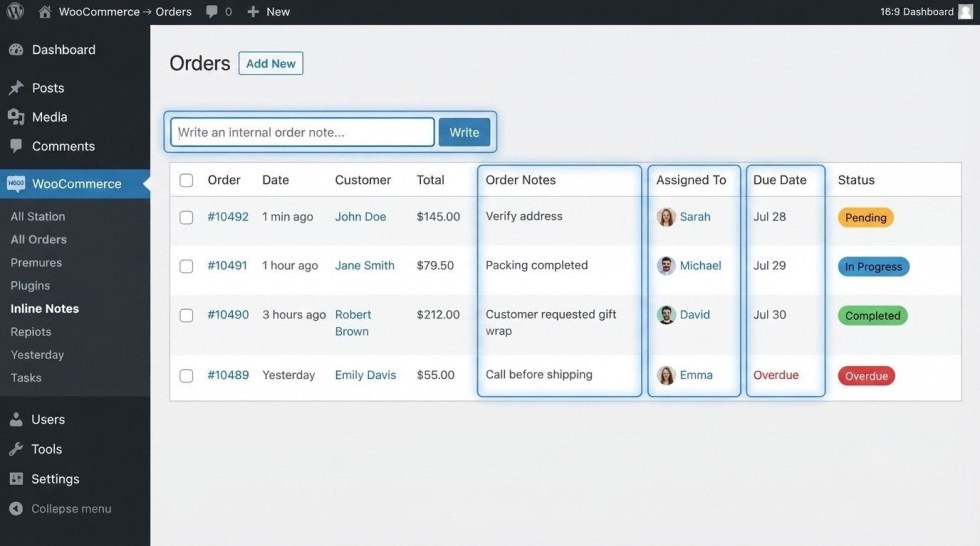
You’ll immediately see several new order management tools added to the WooCommerce Orders page, including:
- Inline order note editor
- Write button
- Order Notes column
- Write Order Note bulk action
- Inline Notes submenu under WooCommerce
- Staff assignment tools
- Due date management
- Status indicators
- Order templates
- Reminder controls
Adding Inline Order Notes
↑ Back to topInline Order Notes allow administrators and staff to record internal information for any WooCommerce order.
These notes are intended for internal communication and are not visible to customers.
To Add an Order Note
↑ Back to top- Go to WooCommerce → Orders.
- Locate the order you want to manage.
- Find the Order Notes column.
- Enter your note.
- Click the Write Note button.
The note is instantly attached to the selected order.
Example Notes
↑ Back to topWaiting for supplier confirmation.
Customer requested gift wrapping.
Verify shipping address before dispatch.
Payment confirmation received.
Fragile product please handle with care.
Bulk Order Notes
↑ Back to topStores processing many orders can save time by applying notes to multiple orders simultaneously.
Steps
↑ Back to top- Go to WooCommerce → Orders.
- Select multiple orders using the checkboxes.
- Choose Bulk Order Notes from the Bulk Actions menu.
- Enter your note.
- Click Apply.
The note will be added to every selected order.
Common Bulk Notes
↑ Back to top- Orders packed today
- Awaiting courier pickup
- Inventory verified
- Holiday shipping delay
- Customer contacted
Bulk notes significantly reduce repetitive administrative work.
Searching Order Notes
↑ Back to topFinding historical notes becomes effortless with the built-in search feature. Simply enter a keyword to search through saved notes.
Examples:
- refund
- replacement
- address
- payment
- delayed
- shipping
- warehouse
Search results help support teams quickly locate previous conversations and order actions.
Order Note History
↑ Back to topEvery note added to an order is stored in its history.
The history provides a complete timeline of activity, helping teams understand what actions have already been completed.
Benefits include:
- Better accountability
- Improved communication
- Easier troubleshooting
- Faster customer support
- Complete audit trail
Managing Inline Notes Operations Settings
↑ Back to topThe WooCommerce → Inline Notes menu provides a centralized control panel where store administrators can configure and manage the complete order workflow system.
From this section, administrators can create note categories, build reusable templates, assign order tasks to staff members, configure reminders, and monitor workflow activities.
To access these settings:
- Log in to your WordPress Dashboard.
- Navigate to WooCommerce → Inline Notes.
- Open the Operations tab.
The Operations tab contains the following management sections:
- Categories
- Templates
- Assignments
- Reminders
Each section helps organize and automate your WooCommerce order management workflow.
Operations Tab Overview
↑ Back to topThe Operations tab acts as the central workspace for managing internal order workflows.
Before using advanced workflow features such as assignments, reminders, and templates, it is recommended to configure categories first.
A typical setup workflow is:
- Create note categories.
- Create reusable templates.
- Create order assignments.
- Configure reminders.
- Monitor workflow progress from WooCommerce Orders.
This structure helps maintain consistency across your store operations.
Categories Management
↑ Back to topWhat Are Order Note Categories?
↑ Back to topCategories allow you to organize internal WooCommerce order notes into logical groups.
Instead of keeping all notes mixed together, categories help teams quickly identify the purpose and department responsible for an order activity.
Examples of categories:
- Shipping
- Warehouse
- Customer Support
- Returns
- Finance
- Billing
- Inventory
- Quality Control
- Production
Categories improve searching, filtering, and workflow organization.
Creating a New Category
↑ Back to topTo create a category:
- Go to WooCommerce → Inline Notes.
- Open the Operations tab.
- Locate the Categories section.
- Enter the required information.
Each category contains the following fields:
Category Name
↑ Back to topThe display name of the category.
Examples:
- Shipping
- Refunds
- Warehouse
- Customer Service
This name is visible when selecting categories throughout the plugin.
Category Slug
↑ Back to topThe slug is a unique identifier used internally by the system.
Example:
Category Name:
Customer Support
Slug:
customer-support
A slug should:
- Be unique
- Use lowercase characters
- Avoid spaces
- Use hyphens instead of spaces
Category Color
↑ Back to topAssign a custom color to each category.
Colors make categories easier to recognize visually when managing WooCommerce orders.
Example:
- Shipping → Blue
- Returns → Red
- Quality Control → Green
- Finance → Orange
Using colors allows teams to identify workflows faster.
Managing Existing Categories
↑ Back to topAfter creating categories, all existing categories appear below the creation form.
The category list displays:
- Category name
- Slug
- Assigned color
- Available actions
Available actions:
Edit Category
↑ Back to topUse the Edit action to update:
- Category name
- Category slug
- Category color
Changes are automatically applied throughout the plugin.
Delete Category
↑ Back to topUse the Delete action to remove categories that are no longer required.
Before deleting categories, ensure they are not actively used in your workflow.
Templates Management
↑ Back to topWhat Are Order Note Templates?
↑ Back to topTemplates allow you to create reusable internal notes for frequently repeated order activities.
Instead of manually writing the same message repeatedly, your team can insert predefined instructions instantly.
Templates improve:
- Processing speed
- Communication consistency
- Team productivity
- Workflow standardization
Creating an Order Note Template
↑ Back to topTo create a template:
- Go to WooCommerce → Inline Notes.
- Open the Operations tab.
- Navigate to the Templates section.
- Enter your template details.
A template includes:
Template Name
↑ Back to topThe title used to identify the template.
Examples:
- Address Verification Required
- Shipment Delayed
- Payment Pending
- Quality Check Required
Template Category
↑ Back to topAssign the template to an appropriate category.
Examples:
Shipping Templates:
- Courier Delay
- Shipment Ready
Support Templates:
- Customer Contact Required
- Refund Follow-up
Warehouse Templates:
- Packing Instructions
- Product Inspection
Assigning categories keeps templates organized.
Template Instructions
↑ Back to topAdd the reusable note content that should be inserted into orders.
Example:
Customer address requires verification before shipment. Contact customer and confirm delivery details.
Templates can contain detailed instructions for staff members.
Managing Existing Templates
↑ Back to topCreated templates are displayed below the template creation form.
The template listing provides quick access to manage existing templates.
Available actions:
Edit Template
↑ Back to topModify:
- Template name
- Category
- Instructions
Delete Template
↑ Back to topRemove templates that are no longer needed.
Assignments Management
↑ Back to topWhat Are Order Assignments?
↑ Back to topAssignments allow administrators to connect WooCommerce orders with specific staff members and workflow tasks.
Assignments ensure every order activity has a responsible person and clear completion timeline.
Assignments can include:
- Specific orders
- Assigned staff members
- Templates
- Due dates
- Reminders
- Workflow status
Creating an Order Assignment
↑ Back to topTo create an assignment:
- Open WooCommerce → Inline Notes.
- Go to the Operations tab.
- Locate the Assignments section.
The assignment form includes the following fields:
Search Order
↑ Back to topSelect the WooCommerce order that requires action.
You can search orders using available order information.
Examples:
- Order ID
- Customer details
- Order reference
Search Staff Users
↑ Back to topAssign the task to a specific WooCommerce user.
Common assigned users include:
- Warehouse employees
- Customer support agents
- Shop managers
- Fulfillment staff
Assigning users improves accountability and ensures tasks are handled by the correct team member.
Search Template
↑ Back to topSelect a predefined order note template.
Templates automatically add standardized instructions to the assignment.
This reduces manual entry and ensures consistent communication.
Enable Reminder
↑ Back to topEnable reminders when the assignment requires follow-up.
Reminders help teams avoid missing important deadlines.
Due Date
↑ Back to topSet a deadline for completing the assignment.
Examples:
- Contact customer within 24 hours
- Ship order before Friday
- Complete quality inspection today
Due dates help prioritize important tasks.
Status
↑ Back to topSelect the current assignment status.
Available statuses include:
- Pending
- Completed
- Overdue
Status tracking allows managers to monitor workflow progress.
Managing Existing Assignments
↑ Back to topAll created assignments are displayed below the assignment form.
The assignment list allows administrators to review:
- Assigned orders
- Assigned staff
- Templates used
- Due dates
- Reminder settings
- Current status
This provides a complete overview of active order tasks.
Reminders Management
↑ Back to topWhat Are Order Reminders?
↑ Back to topReminders help your team follow up on important WooCommerce order tasks automatically.
They ensure critical activities are not forgotten, such as:
- Customer follow-ups
- Shipping checks
- Payment verification
- Return processing
- Quality inspections
Creating a Reminder
↑ Back to topTo create a reminder:
- Navigate to WooCommerce → Inline Notes.
- Open the Operations tab.
- Go to the Reminders section.
- Create a new reminder.
Configure the reminder according to your workflow requirements.
Viewing Existing Reminders
↑ Back to topAll created reminders are displayed inside the Reminders section.
The reminder list allows administrators to monitor:
- Reminder details
- Related workflow actions
- Reminder status
- Available actions
Running a Reminder Manually
↑ Back to topThe plugin allows administrators to manually run reminders when required.
To run a reminder:
- Open the Reminders section.
- Locate the reminder.
- Click the Run Reminder action.
When executed, the reminder triggers the configured email notification.
This is useful for:
- Testing reminders
- Sending immediate follow-ups
- Processing urgent workflow actions
Email Notifications
↑ Back to topWhen a reminder runs, Inline Order Notes sends an email notification based on the configured reminder workflow.
Email reminders help keep staff members informed without requiring constant manual checking of WooCommerce orders.
Recommended Workflow Setup
↑ Back to topFor the best experience, configure Inline Order Notes in this order:
Step 1: Create Categories
↑ Back to topCreate categories that match your business departments.
Example:
- Warehouse
- Shipping
- Support
- Finance
Step 2: Create Templates
↑ Back to topCreate reusable instructions for common workflows.
Example:
- Address Verification
- Packing Complete
- Customer Contact Required
Step 3: Create Assignments
↑ Back to topConnect orders, staff members, templates, and deadlines.
Step 4: Configure Reminders
↑ Back to topEnable reminders for tasks that require follow-up.
Step 5: Manage Orders
↑ Back to topUse the WooCommerce Orders screen to monitor notes, assignments, due dates, and workflow status.
Summary
↑ Back to topThe WooCommerce → Inline Notes → Operations section provides complete workflow management capabilities for WooCommerce stores.
Using Categories, Templates, Assignments, and Reminders, store teams can:
- Organize order communication
- Standardize internal processes
- Assign responsibilities
- Track deadlines
- Automate follow-ups
- Improve fulfillment efficiency
By configuring these features correctly, businesses can transform basic WooCommerce order notes into a complete internal order management system.

