
The Anti-fraud shield protects your WooCommerce store from all sorts of fraudulent activities, such as carding attempts, fake orders, and rapid order generation.
Installation
↑ Back to top- Download the .zip file from your WooCommerce account.
- Go to: WordPress Admin > Plugins > Add New and Upload Plugin with the file you downloaded with Choose File.
- Install Now and Activate the extension.
More information at Install and Activate Plugins/Extensions.
Setup and Configuration
↑ Back to topAfter activating the Anti-Fraud Shield plugin extension, a Fraud Prevention option will be displayed in the WooCommerce dropdown menu and settings view. This advanced feature enables you to customize restrictions based on your specific requirements, which effectively prevents fraud activities.
With this extension, you can create global rules and set restrictions for multiple orders, specific IP addresses, proxy servers, and unsafe countries. You can also implement CAPTCHA to enhance the security of your platform.
AI Setup Guide – Anti-Fraud Shield for WooCommerce
↑ Back to topThe AI Assistant for Anti-Fraud Shield for WooCommerce makes store security easier with simple text commands inside your WordPress dashboard. Powered by OpenAI, Google Gemini, and Anthropic Claude, it helps you set fraud rules, protection settings, and other security options in seconds. Approval modes and permission controls give you full control over every change made by the AI.
NOTE: If you have already added AI API keys using the default WordPress Connector, Anti-Fraud Shield for WooCommerce will automatically use those AI models. You can then manage the extension with simple text prompts.
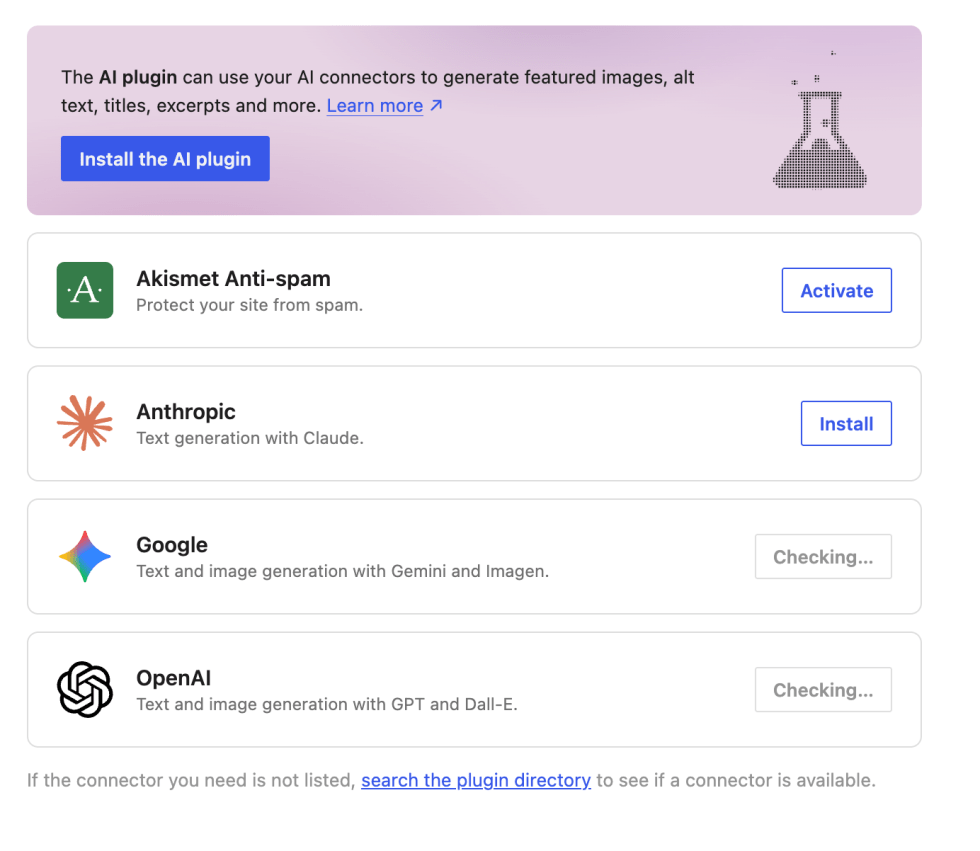
Accessing the AI assistant
↑ Back to topTo access and configure the AI integration, navigate to Anti-fraud shield > AI Assistant from your WordPress Admin side menu.
AI model & connection
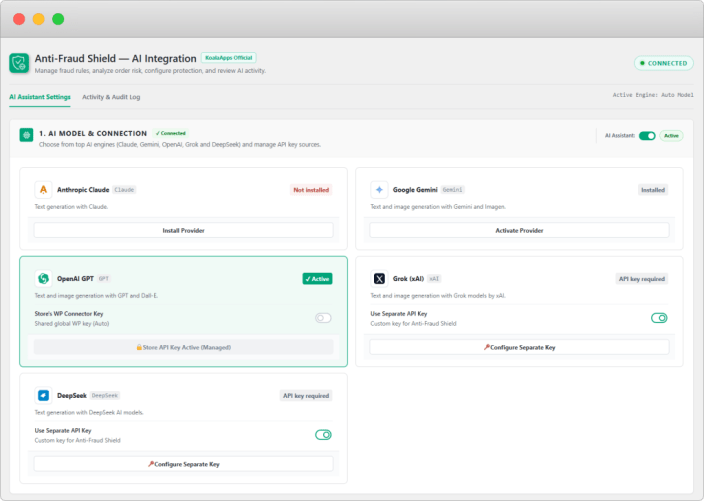
↑ Back to topThe AI Assistant supports current and future models from OpenAI, Google Gemini, and Anthropic Claude. You need to add a valid API key from your preferred AI provider.
Pause AI toggle: You can find the Pause AI toggle at the top-right of the settings page.
- Paused: Stops all AI activity and API usage until you turn it on again..
- Active: AI Assistant can work normally.
ChatGPT (OpenAI) key setup:
Log in to the OpenAI API Keys Dashboard and create an API key. Copy the key and add it to the OpenAI card. You can check the OpenAI Documentation.for API rates.
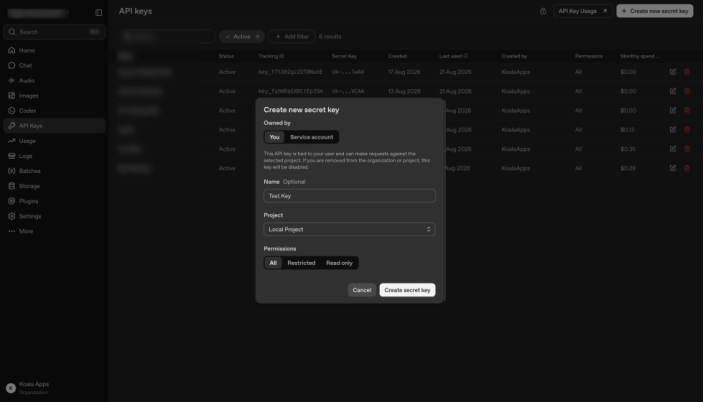
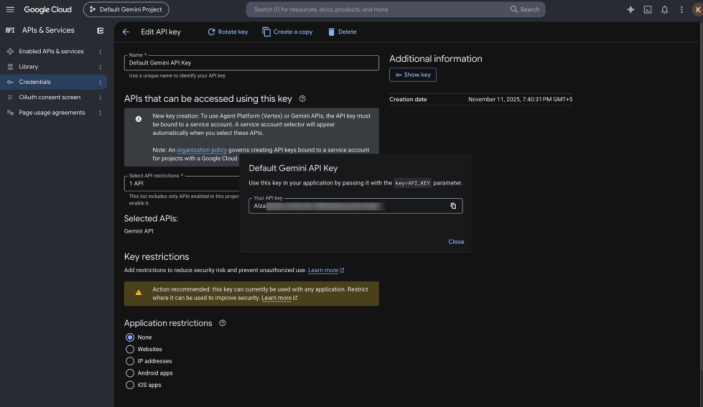
Google Gemini key setup:
Create an API key in Google AI Studio ait to the Gemini card. You can check the Gemini API Documentation documentation for usage limits.
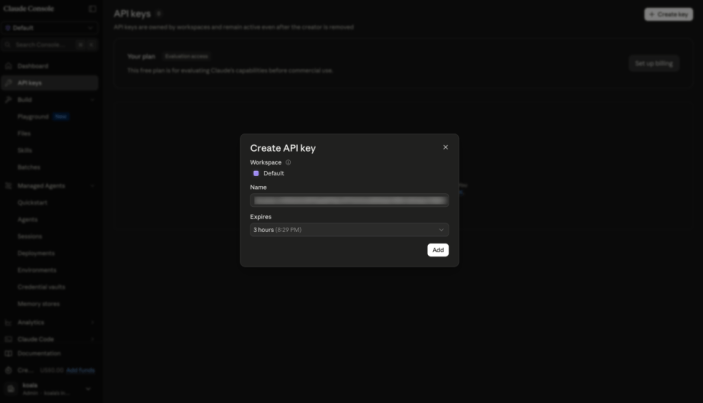
Anthropic claude key setup:
Create an API key from Claude Console Settings and add it to the Claude card. You can check the Claude Platform Documentation for more details.
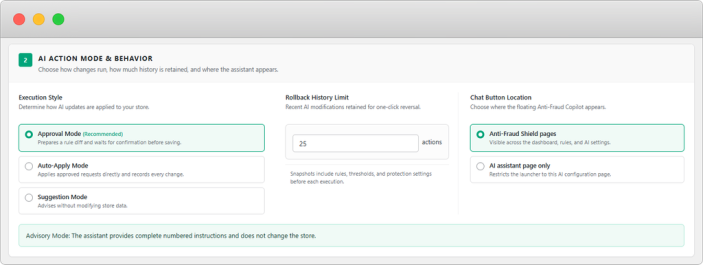
AI action modes & other settings
↑ Back to top| Mode | How It Works |
| Approval Mode (Recommended) | Shows the changes suggested by AI before applying them. You must approve the changes before they are made. |
| Suggestion Mode | Gives you step-by-step instructions. You can make the changes yourself. |
| Auto-Apply Mode | Makes the requested changes automatically based on your prompts. |
- Undo History (Rollback Depth): Enter a number to choose how many past AI actions you want to save for undo. For example, if you enter 25, you can undo any of the last 25 AI actions.
- Chat Button Location: CChoose where the AI Assistant button should appear:
- All Anti-Fraud Shield pages – Shows the AI Assistant button on all Anti-Fraud Shield pages in the WordPress Admin panel.
- AI Assistant Page Only – Shows the button only on the AI Assistant page
Multiple Models Support and Connectors
↑ Back to topAnti-Fraud Shield supports multiple AI models and connectors, allowing you to choose the AI service that works best for your store.
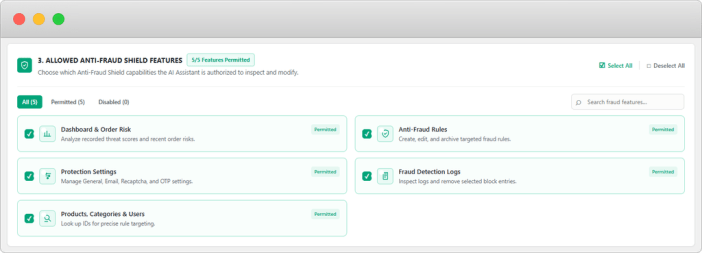
Allowed Anti Fraud Shield features (granular access)
↑ Back to topYou can choose which Anti-Fraud Shield features the AI Assistant can view and manage. Use the individual toggles to control access to each feature.
- Dashboard & Order Risk:
- Protection Settings
- Products, Categories & Users
- Anti-Fraud Rules
- Fraud Detection Logs
Note: If you turn off a feature toggle, the AI Assistant cannot view, change, or run actions for that feature.
MCP documentation:
↑ Back to topYou can view the separate guide to learn how to connect and use Anti-Fraud Shield for WooCommerce with Claude or Codex using the Model Context Protocol (MCP).
Apply Anti-Fraud Rules
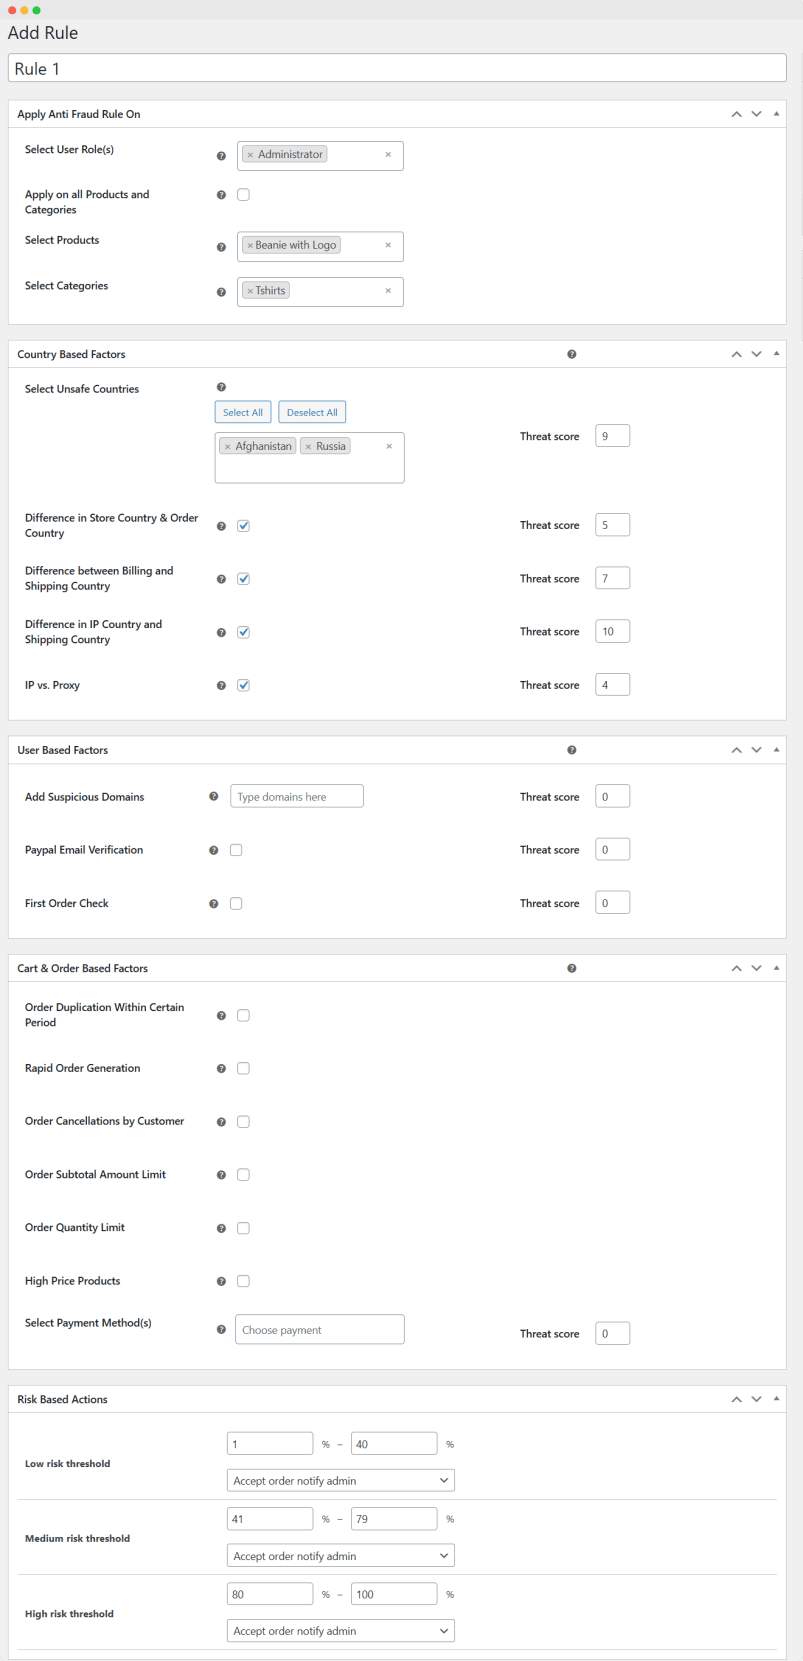
↑ Back to topApply anti-fraud restrictions based on user roles, specific products, and specific categories. To apply restrictions, follow these steps:
- Select User Roles: Apply restrictions based on user roles. You can select a user role from the dropdown (e.g., administrator, author, editor, etc.) and apply the restriction to it.
- Apply on All Products and Categories: Enable/disable this option to apply anti-fraud restrictions on all products and categories.
- Select Specific Products: Select the desired product from the list and apply restrictions on the selected product.
- Select Specific Categories: Choose the desired category and apply the restriction on the selected category.
Create a customized rule
↑ Back to topGo to the WooCommerce plugin and tap on the Fraud Prevention option. Then:
Add Rule Title: Add the title of the global rule according to your preference.
Apply restrictions based on user role
↑ Back to topYou can apply restrictions based on user roles. To restrict a user, follow the steps below:
- Add suspicious domain: You can add the domain (e.g., xyz.info or abc.net , etc.) in this required field.
- Paypal email verification: Turn the email verification enabled/disabled by using this checkbox.
- First Order Check: You can turn the first order check enabled or disabled by using the checkbox.
- Threat Score: You can set the threat score, and the maximum threat score will be 10.
Restriction on country base
↑ Back to topThis feature allows you to restrict the order based on the country. To apply restrictions to the country, follow the steps below:
- Select unsafe countries: You can select or deselect the unsafe countries. To restrict unsafe countries, tap on the select option, and the list of all countries will be added to the related field. You can also remove unrelated countries from the list after selection.
- Difference in store country & order country: You can enable or disable the store country and order country and set the threat score.
- Difference between billing and shipping country: You can enable or disable the billing & shipping country and set the threat score.
- Difference between IP and shipping country: Enable or disable the IP and shipping country and set the threat score.
- Ips vs. Proxy: You can enable or disable the Ips vs. proxy and set the threat score.
Restrict based on Order & Cart
↑ Back to topYou can apply the restriction based on the cart and order and restrict the duplicate order of the user. To apply this feature, follow the steps mentioned below:
- Order duplication within a certain period: Enable or disable the restriction of order duplication for a certain period.
- Rapid Order Generation: You can enable or disable to restrict the rapid order generation.
- Order cancellations by customer: Enable or disable the order cancellation option to restrict customers from canceling their orders.
- Order subtotal amount limit: Apply a restriction based on the subtotal of the order amount and also enable/disable this restriction.
- Order quantity limit: You can restrict the order limit and also enable/disable this restriction.
- High-price product: Restrict the high-price product and also enable/disable this restriction.
- Select Payment Method: You can set the payment method as per your preference in the required field and also set the limit of the threat score.
Risk-based actions
↑ Back to topManage risk levels based on the order. Risk threshold levels are categorized into low, medium, and high, with corresponding actions based on the percentage of risk. To apply restrictions based on risk, follow the steps below:
- Low-risk threshold: You can set the percentage of low-risk levels and define the corresponding actions (e.g., accept the order, notify admin, reject the order automatically, accept, and change the order status).
- Medium-risk threshold: Set the percentage of medium-risk levels and define the corresponding actions (e.g., accept order, notify admin, reject order automatically, accept and change the order status).
- High-risk threshold: Set the percentage of high-risk levels and define the corresponding actions (e.g., accept order, notify admin, reject order automatically, accept and change the order status).
General Setting
↑ Back to topGo to WooCommerce > Settings” option, where the “Fraud Prevention” option will be available. Click on “Fraud Prevention” to open the general settings. You can follow the steps below to configure the general settings:
- Email Blacklist: This feature allows you to block a specific email address to avoid threats.
- Block IPs By: You can block the IPs using multiple ways, such as range (like form and to fields), comma separation, and both.
- Block IP Ranges: Set the starting and ending IP addresses to block the IP ranges.
- Block Specific IPs: To block specific IPs, you can manually enter one or more IP addresses in the designated field.
- Address block words: You can block the addresses based on specific address words.
- Automatically Blacklist Restricted Address: You can easily enable/disable the list of restricted addresses.
- Address Block: You can block an entire list of addresses or a single address. You can also update the block list by adding a new address and removing the old one.

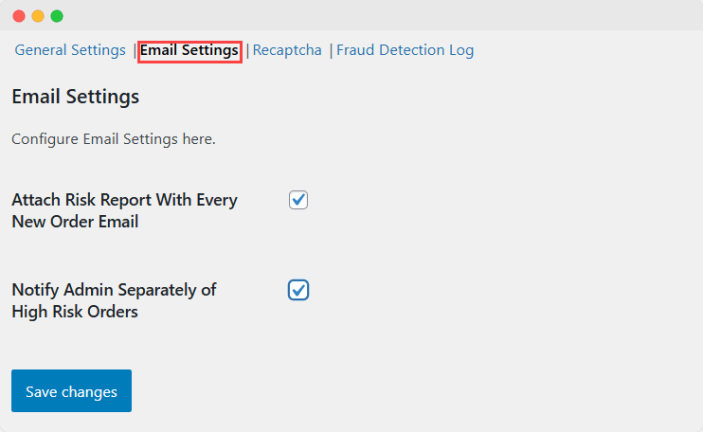
Email Setting
↑ Back to topTo configure the email setting, you can follow the steps mentioned below:
- Attached is a risk report with every new order email: A risk report helps assess the fraud potential of an order. You can enable or disable this option to restrict the user from attaching the risk report to the email.
- Notify Admin separately of high-risk orders: Enable or disable this option to ensure that a separate notification is sent to the admin via email for high-risk orders.
CAPTCHA Setting
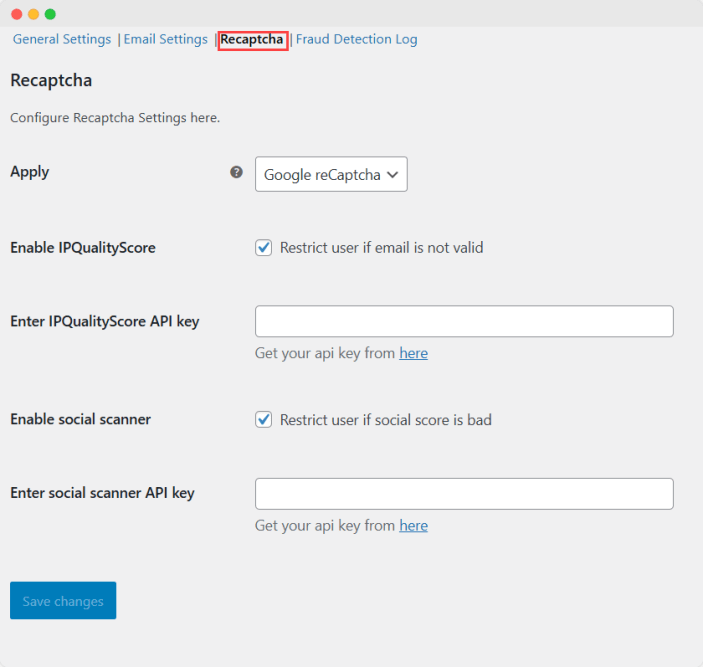
↑ Back to topSecure your website or platform by implementing a customized CAPTCHA. To enable this feature, follow the steps below:
- Apply: Select the Image CAPTCHA or Google reCAPTCHA option from the dropdown.
- Enable Image CAPTCHA: You can enable or disable the Image CAPTCHA option. If enabled, the following options will be available:
- Image captcha field title: you can set the title of the image CAPTCHA field as per your preference.
- Image captcha field icon: You can add or remove icons for the CAPTCHA field, including multiple icons if needed.
- Image captcha icon color: Add the customized color for the CAPTCHA icon.
- Captcha placement option on the checkout page: You can set the position of the captcha on the checkout page by selecting an option from the dropdown.
- Error message on no captcha selection: you can add the customized message if the user does not select the captcha.
- Error message on captcha failure: Add a customized message to display when the user fails the captcha.
- Enable IP Quality Score: Enable or turn off the IP Quantity Score to restrict invalid emails from accessing your system. If the email is valid and you want to enable this option, the field below will be enabled.
- Enter IP Quantity Score API key: You can enter the API key assigned to you via email, and this key will be confidential.
- Enable Social Scanner: Enable/disable the social scanner to restrict social media threats. If you can enable this option, the below-mentioned field will be enabled:
- Enter social scanner API key: You can enter the confidential API key, which helps to protect your platform from social threats.
Fraud Detection Log
↑ Back to topThis feature allows you to maintain all types of fraud detection logs. You can store logs for the occurrence date, user ID, order ID, user email, block score, block reason, and action taken. You can also remove these logs when needed.


