Enterprise-grade CAPTCHA & site protection for WooCommerce. Block bots, spam, and fraud using Cloudflare Turnstile, Google reCAPTCHA, hCaptcha, Geo-Blocking, IP rules, and intelligent rate limiting — without slowing down your store.
Installation
To start using a product from WooCommerce.com, you can use the “Add to store” functionality on the order confirmation page or the My subscriptions section in your account.
- Navigate to My subscriptions.
- Find the Add to store button next to the product you’re planning to install.
- Follow the instructions on the screen, and the product will be automatically added to your store.
Alternative options and more information at:
Managing WooCommerce.com subscriptions.

Setup and Configuration
↑ Back to topOnce installed, navigate to SecureGate in your WordPress admin menu to configure the plugin.
General Settings
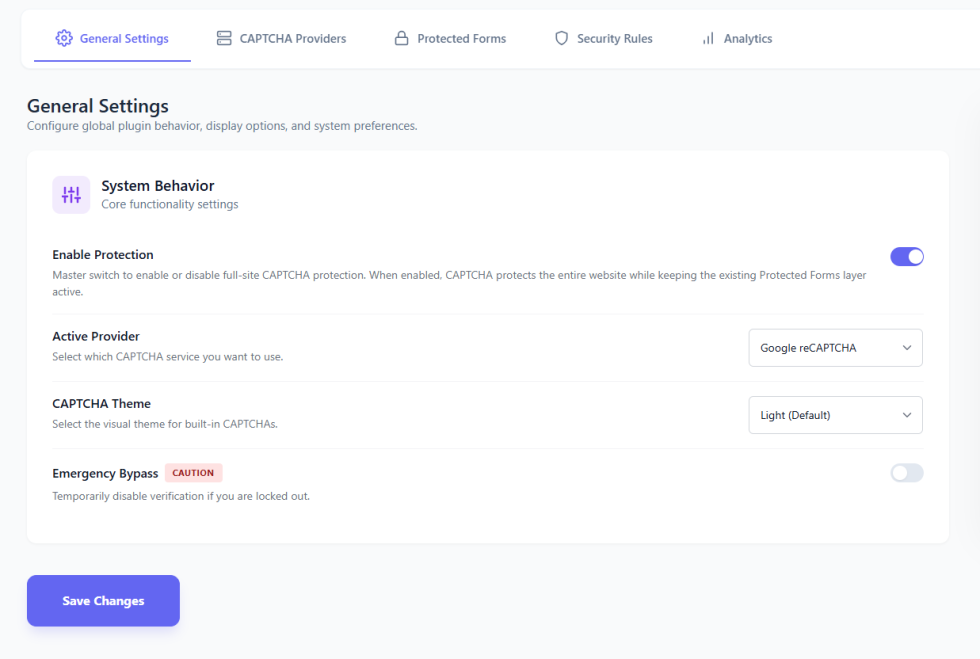
↑ Back to topThis is your command center for global security controls.
- Enable Protection: Toggle this ON to activate the plugin.
- Active Provider: Select your preferred CAPTCHA service (Turnstile, reCAPTCHA, hCaptcha, or Built-in).
- Emergency Bypass: Enable this if you accidentally lock yourself out. It disables CAPTCHA for administrators.
CAPTCHA Providers
↑ Back to topConfigure API keys for your selected provider here.
- Cloudflare Turnstile: Enter your Site Key and Secret Key.
- Google reCAPTCHA:
- Select Version: v2 Checkbox (classic user interaction) or v3 Invisible (score-based background check).
- Enter Site Key and Secret Key.
- hCaptcha: Enter your Site Key and Secret Key.
- Built-in Fallback: Choose between Math Challenge (e.g., 5 + 3 = ?) or Warped Text. No keys needed.

Protected Forms
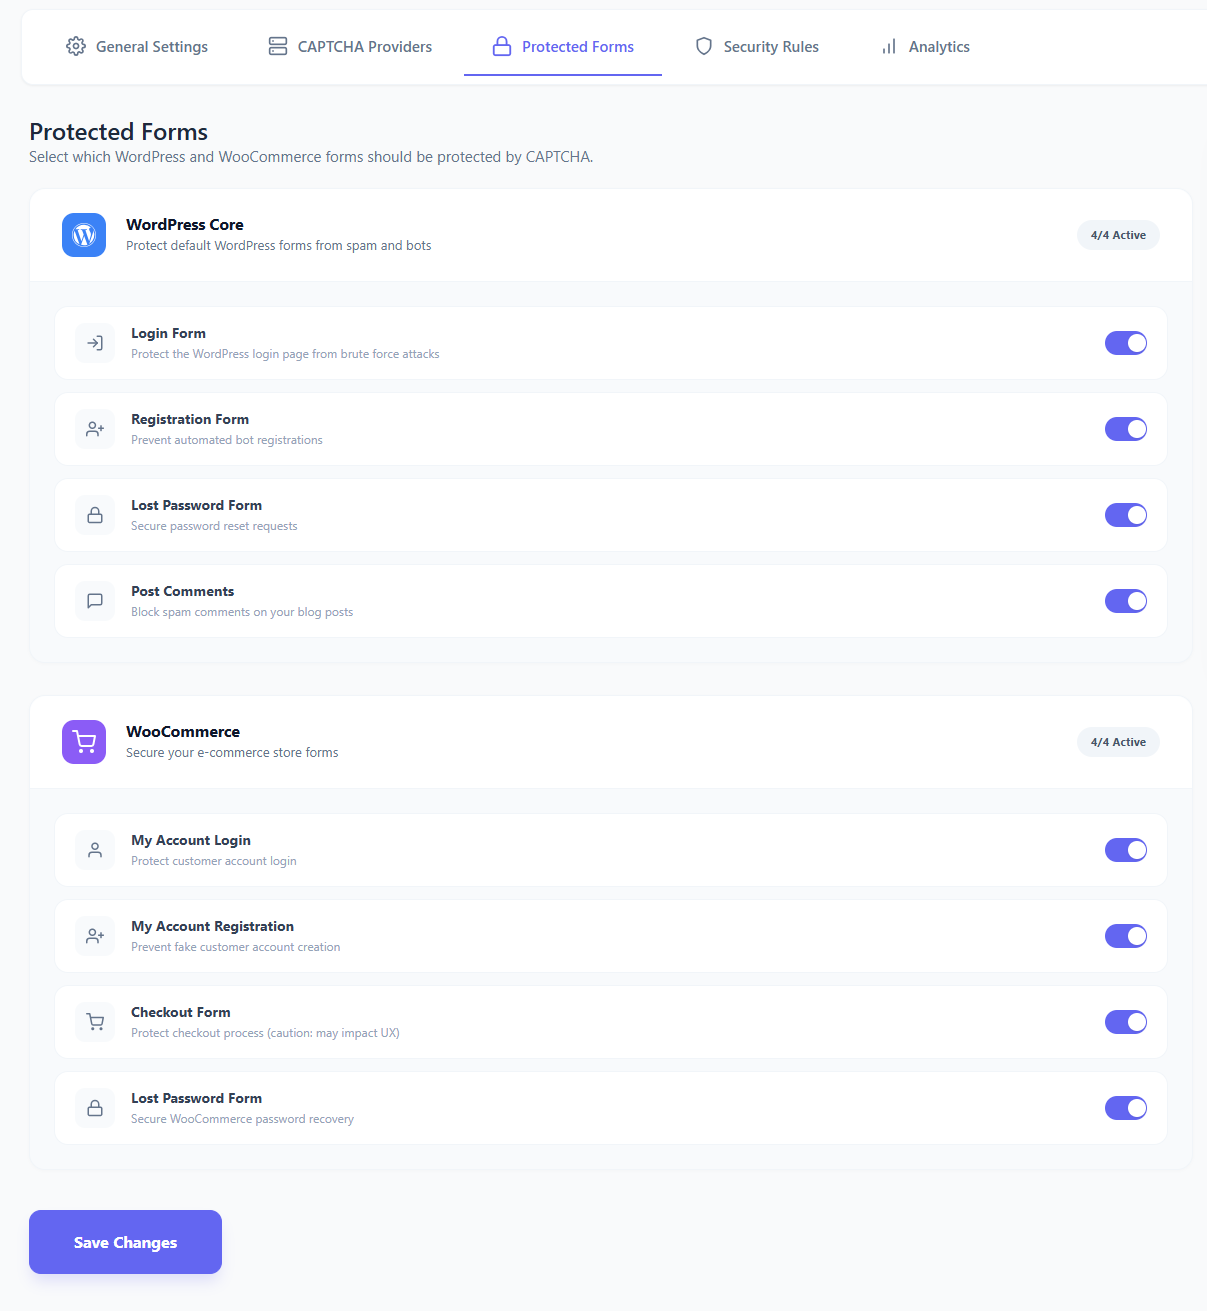
↑ Back to topControl exactly where CAPTCHA appears. You can toggle protection ON/OFF for individual forms.
- WordPress Core:
- Admin Login: Protects
wp-login.php. - Registration: Protects the core user registration form.
- Lost Password: Protects the password reset form.
- Comments: Protects the standard comment form to stop spam.
- Admin Login: Protects
- WooCommerce:
- Checkout: Protects the payment/order form.
- Login & Registration: Protects the “My Account” page forms.
- Guest Checkout: Adds verification for non-logged-in users.
Security Rules
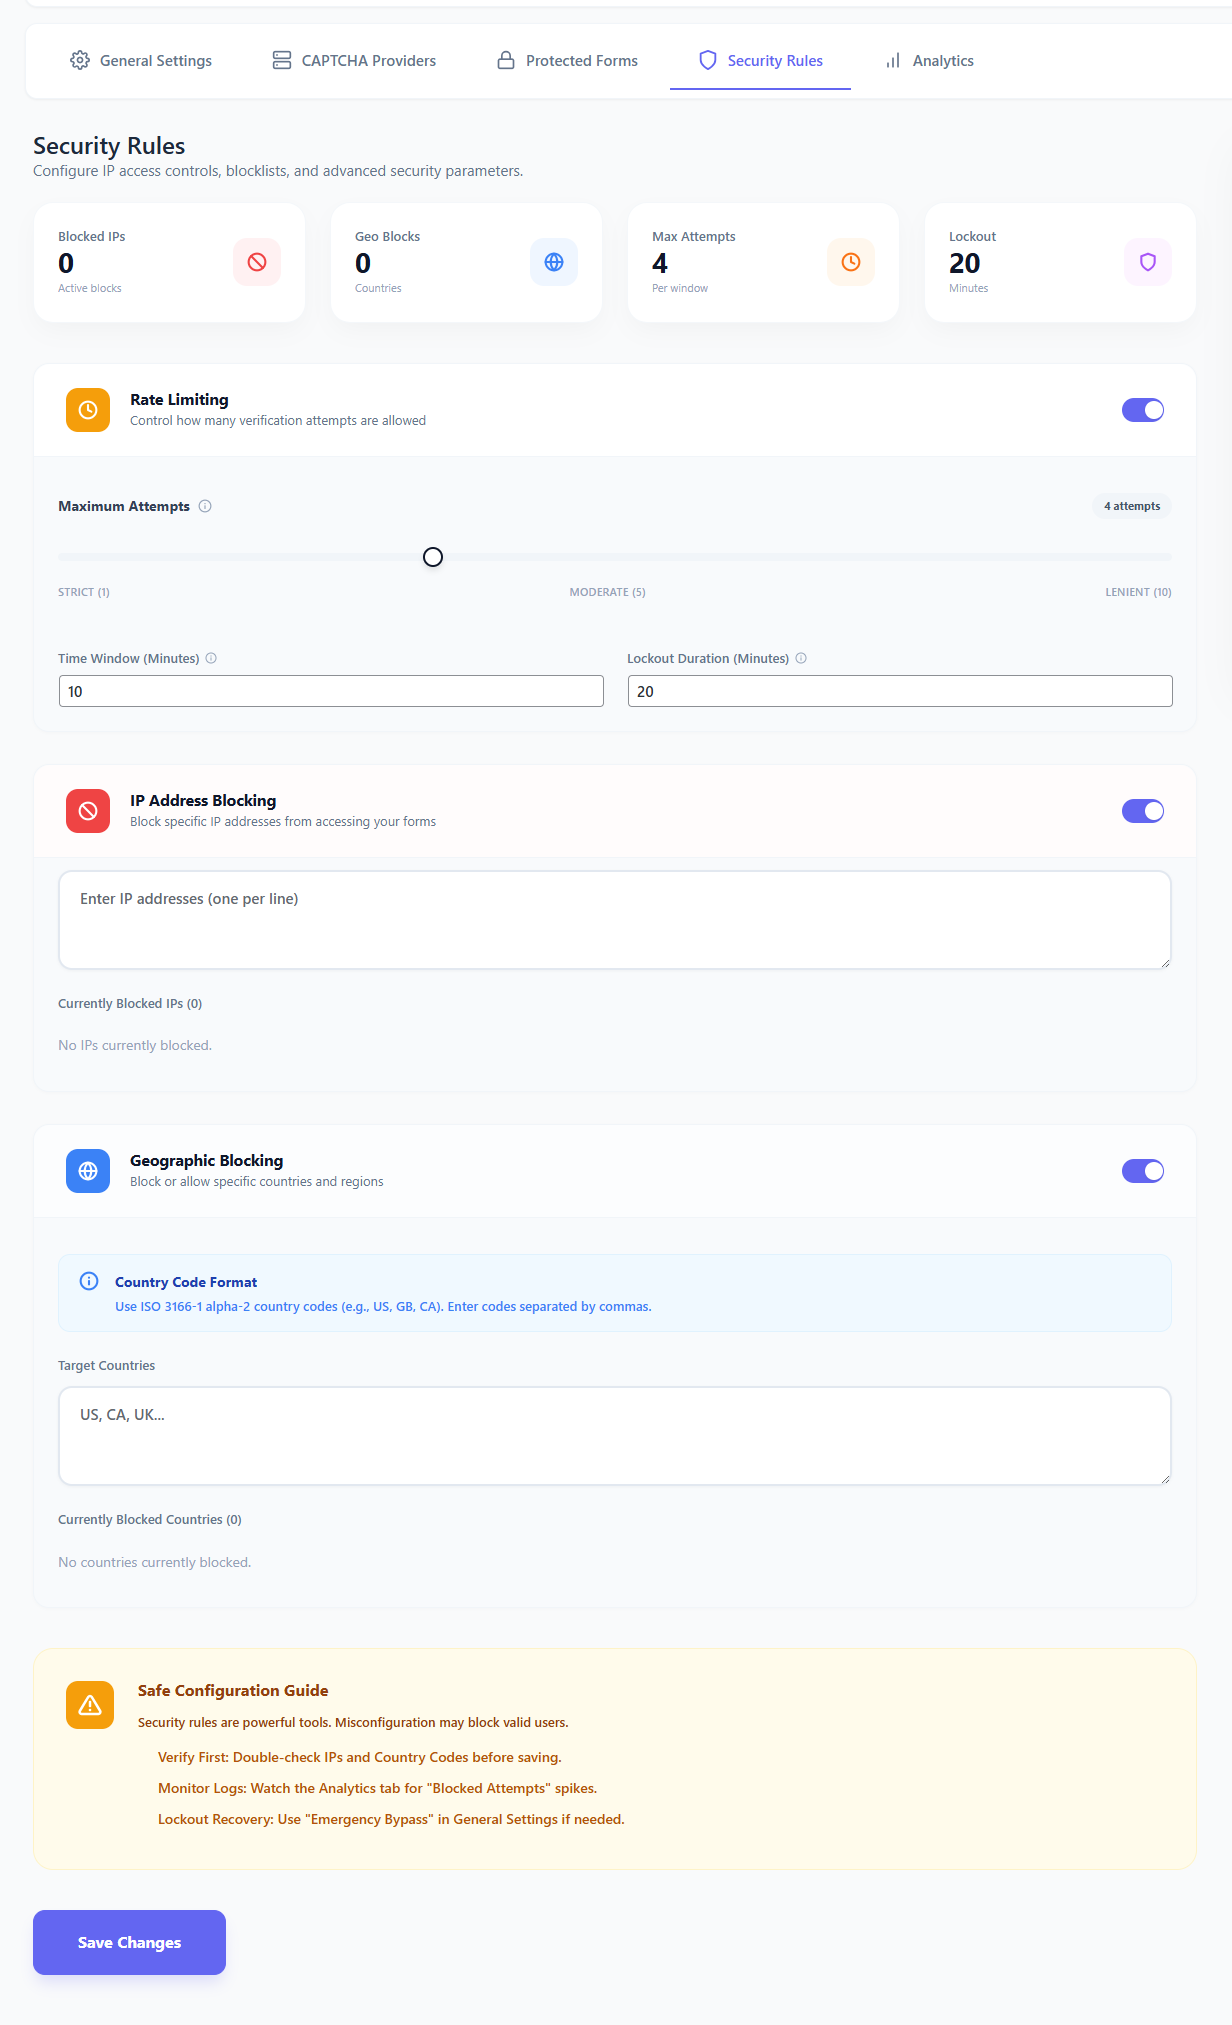
↑ Back to topThis section allows you to configure advanced firewall rules to block malicious traffic before it even reaches your forms.
Rate Limiting (Brute Force Protection)
Intelligent rate limiting monitors user behavior to prevent brute-force attacks.
- Max Attempts: The number of failed attempts allowed (e.g., 5) within a specific timeframe.
- Time Window: The duration (in minutes) during which failures are counted.
- Lockout Duration: If a user exceeds the Max Attempts, they will be temporarily banned for this many minutes.
IP Management
Control access based on IP address.
- Blocklist (Blacklist): IP addresses listed here are permanently blocked from accessing protected pages.
Geo-Blocking
Restrict access from entire countries to reduce attack surface.
- How it works: The plugin checks the visitor’s IP address against a local geolocation database to determine their country of origin.
- Configuration: Select specific countries from the dropdown list.
- Effect: Visitors from selected countries will be blocked from viewing or submitting protected forms. This is highly effective against bot farms operating from specific regions.
Analytics
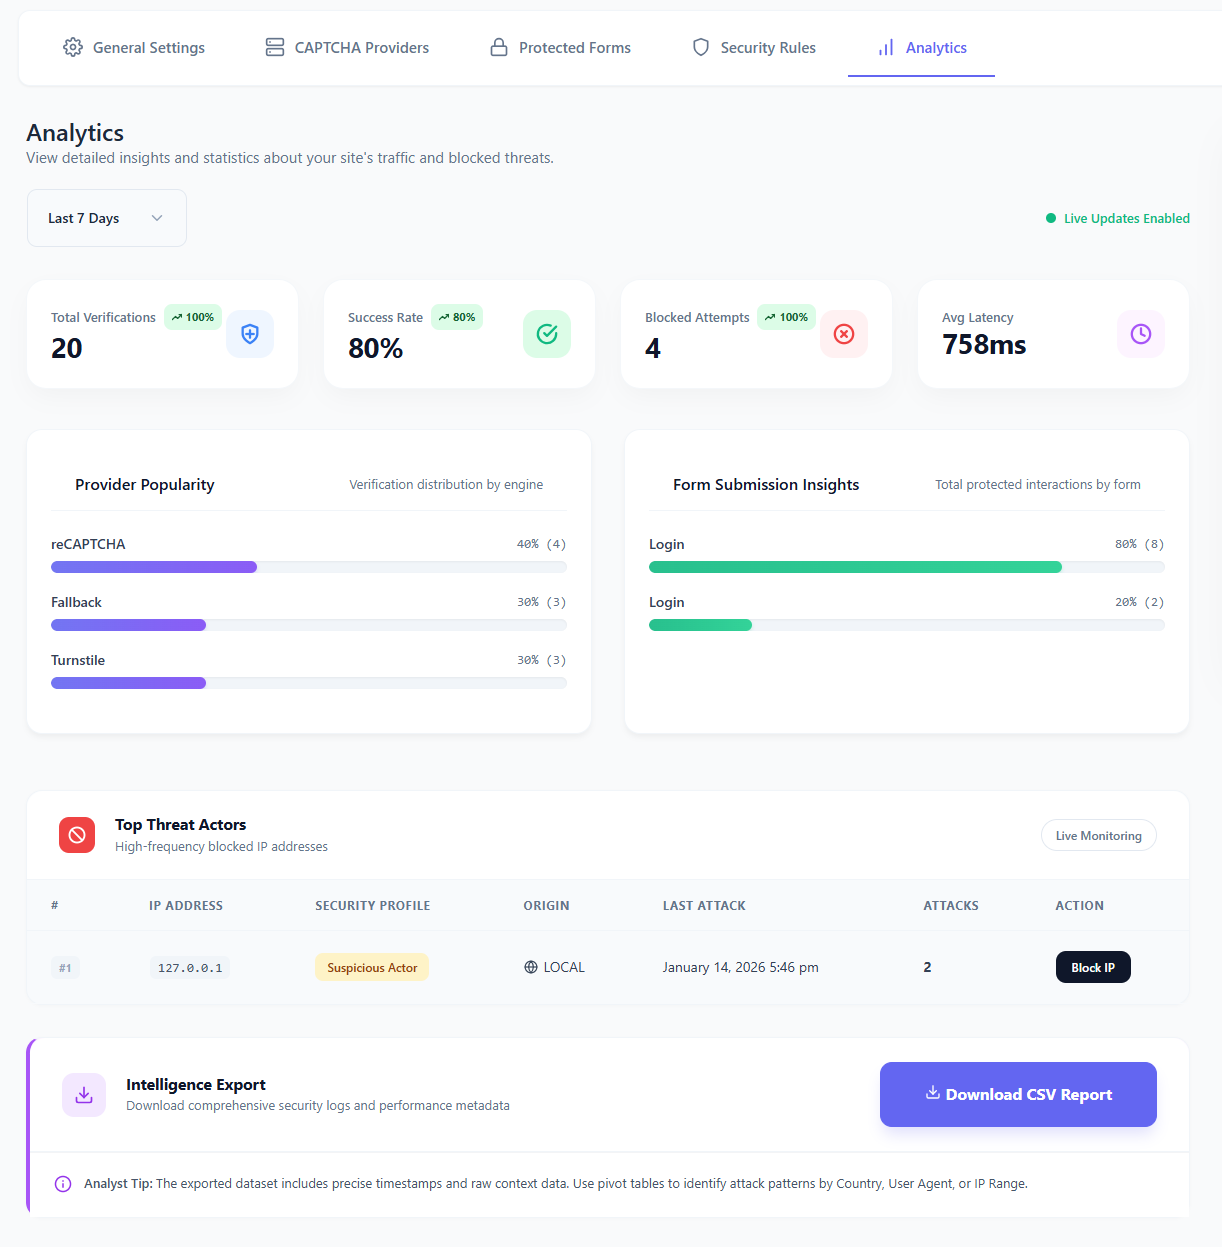
↑ Back to topMonitor your site’s security health in real-time.
- KPI Cards: Instant view of Total Verifications, Success Rate, Blocked Attempts, and Average Latency.
- Provider Popularity: See which CAPTCHA methods are being used most.
- Live Threat Monitoring: A real-time list of top offending IP addresses.
- Export: Download a CSV report of all security events for deeper analysis or offline reporting.
How to Get CAPTCHA Keys
↑ Back to topCloudflare Turnstile
↑ Back to top- Log in to the Cloudflare Dashboard.
- Go to Turnstile from the sidebar.
- Click Add Site and follow the prompts.
- Copy the Site Key and Secret Key.
Google reCAPTCHA
↑ Back to top- Visit the Google reCAPTCHA Admin Console.
- Click + (Create).
- Label your site and select reCAPTCHA v2 or v3.
- Add your domain (e.g.,
example.com). - Accept terms and click Submit.
- Copy the Site Key and Secret Key.
hCaptcha
↑ Back to top- Sign up or log in at hCaptcha.com.
- Click New Site.
- Enter your site name and domain.
- Click Save.
- Under Settings, find your Site Key.
- Go to your Account Settings (avatar icon) to find your Secret Key.
Frequently Asked Questions
↑ Back to topQ: Do I need to pay for API keys?
A: No. Cloudflare Turnstile, Google reCAPTCHA, and hCaptcha all offer generous free tiers that are sufficient for most stores. SecureGate also includes a Built-in Fallback provider that is completely free and requires no API keys.
Q: Will this slow down my site?
A: No. SecureGate is performance-optimized. Scripts are only loaded on the specific pages where protected forms exist (e.g., Login, Checkout), ensuring zero impact on your homepage or product pages.
Q: What happens if I get locked out?
A: If you accidentally block your own IP or forget your password, use FTP/SFTP to access your site files and rename the plugin folder (wp-content/plugins/securegate-captcha) to temporarily disable it. Alternatively, administrators are typically excluded from rate limiting rules.
Q: Does it work with Guest Checkout?
A: Yes. You can enable protection for Guest Checkout specifically in the Protected Forms tab, ensuring your sales funnel remains secure without adding friction for registered users.
Q: Is it GDPR compliant?
A: Yes. The plugin minimizes data collection. When using external providers (like Google), their respective privacy policies apply. The plugin’s internal logging anonymizes IP addresses and automatically purges old logs to respect user privacy.
Need More Help?
↑ Back to topIf you encounter any issues or have questions not covered here, please reach out to our support team.
We are committed to helping you keep your store secure and fraud-free.