PH Shipment Tracking & Notifications by PluginHive enables you to seamlessly track shipments, keep your customers informed at every stage of the delivery process, and provide a dedicated tracking lookup page for a better post-purchase experience.
This guide will walk you through installing and configuring the plugin to streamline order tracking and enhance customer communication for your store.
Installation
↑ Back to topRequirements
↑ Back to top- WordPress 6.0 or later
- WooCommerce 7.0 or later
- PHP version: 7.4 or higher
To start using a product from WooCommerce.com, you can use the “Add to store” functionality on the order confirmation page or the My subscriptions section in your account.
Alternative opion:
- Upload the plugin ZIP via Plugins → Add New → Upload Plugin
- Activate the plugin

Setup and Configuration
↑ Back to topHow to access the plugin settings
↑ Back to topAfter installing PH Order & Shipment Tracking with Notifications, you can access the plugin settings in either of the following ways:
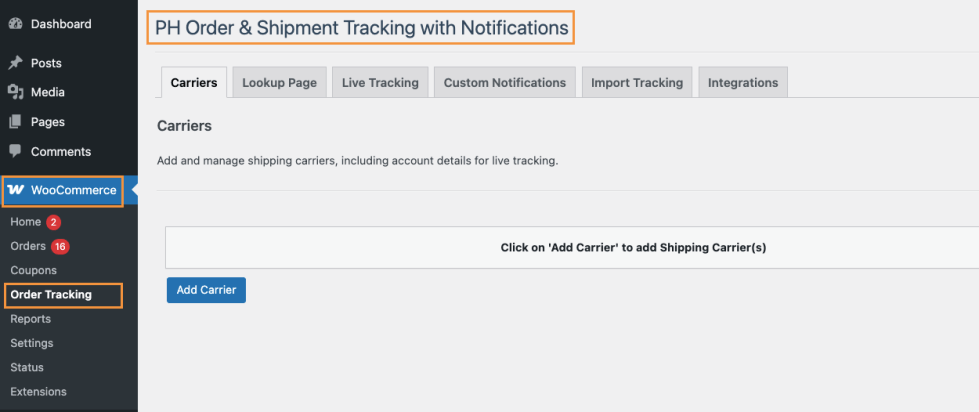
- Navigate to your WordPress Dashboard and go to: WooCommerce > Order Tracking
OR
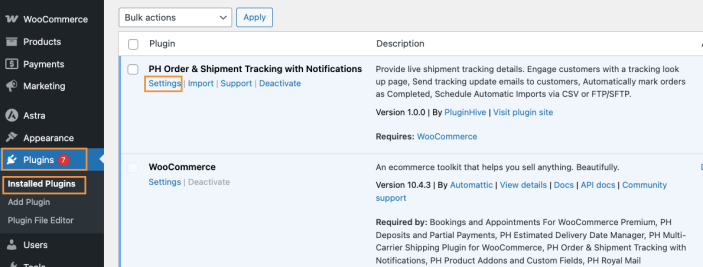
- Navigate to: Plugins > Installed Plugins, locate PH Order & Shipment Tracking with Notifications, and click on Settings
Configure Shipping Carriers Used For Order Fulfillment
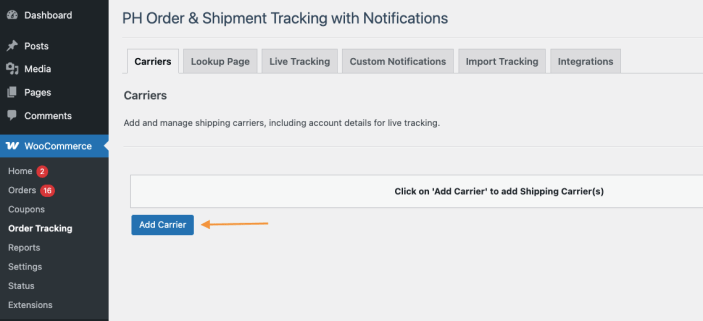
↑ Back to topAfter accessing the plugin settings, go to the Carriers section within PH Order & Shipment Tracking with Notifications.
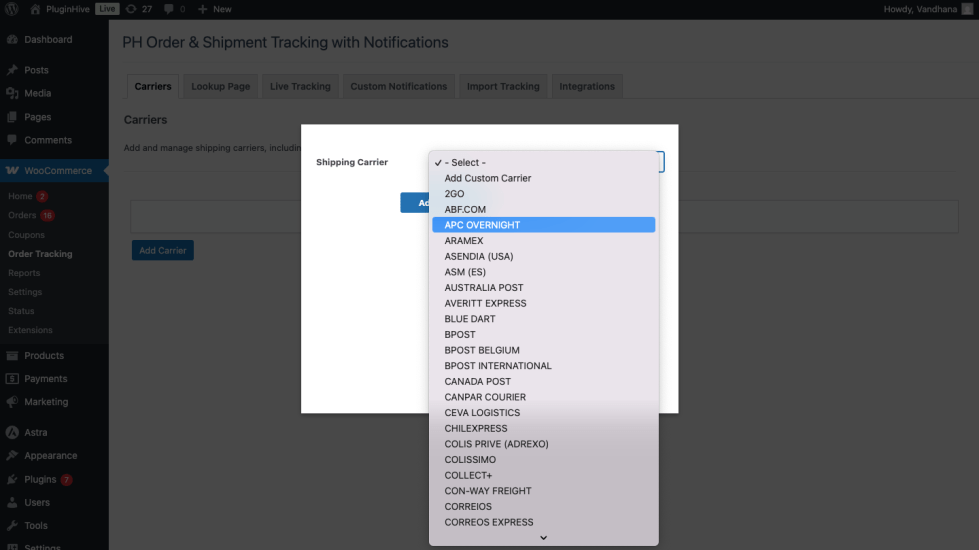
The plugin comes with 85+ built-in shipping carriers, making it easy to start tracking shipments right away. You can either select a carrier from the built-in list or add your own custom shipping carrier.
To add a shipping carrier, click on the Add Carrier button in the Carriers section, as shown below.
1. Select from built-in 85+ shipping carriers
From the list of available carriers, select your preferred shipping carrier. For example, you can choose FedEx from the built-in carrier list.
If needed, you can customize how the carrier name appears to customers by updating the Display Name field.
Once done, click on Add Carrier to add the selected shipping carrier successfully.
2. Add a shipping carrier that’s not in the built-in carrier list
If your preferred shipping carrier is not available in the built-in carrier list, you can add it manually using its shipment tracking URL.
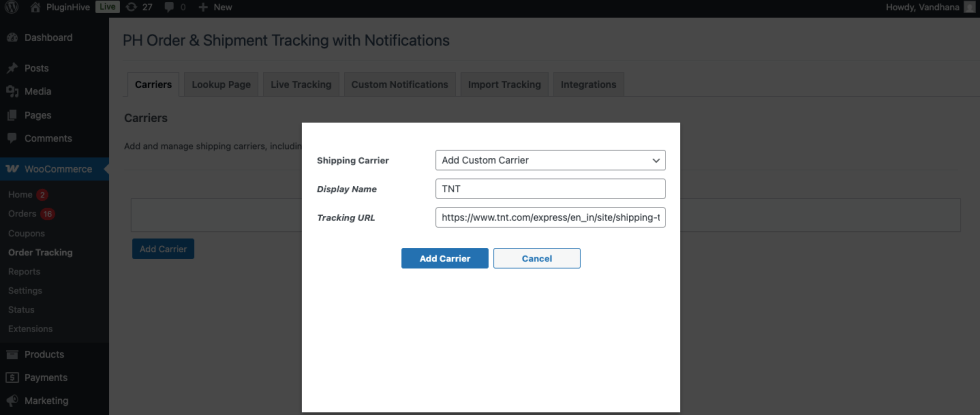
- From the carrier selection drop-down, choose the Add Custom Carrier option.
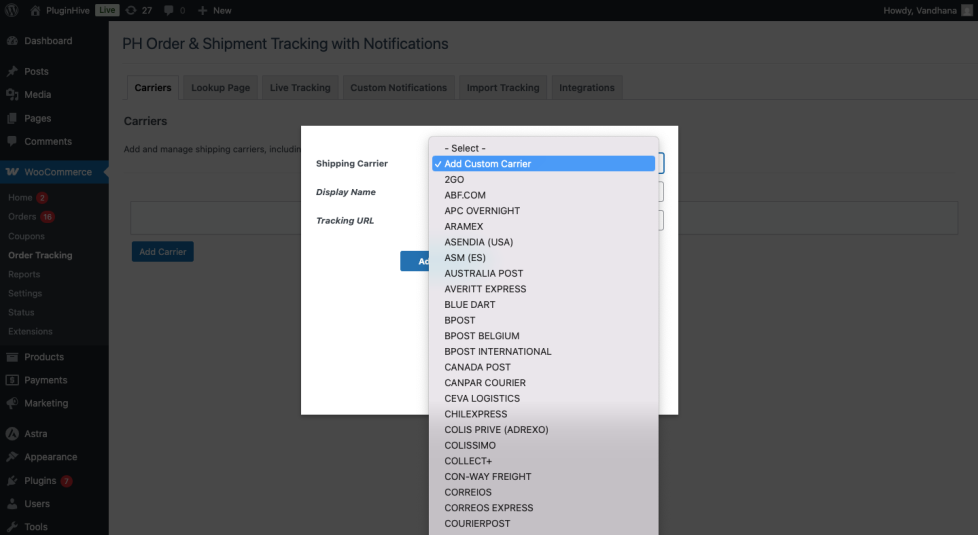
- Next, enter the carrier’s tracking URL in the Tracking URL field, as shown below, and click on Add Carrier to add the custom shipping carrier successfully.
Note:
When adding the tracking URL, make sure it is formatted correctly:
- Replace the tracking number in the URL with [ID]
- If the tracking URL requires a ZIP or postal code, replace it with [PIN]
For example: If the shipping carrier’s tracking URL is: https://www.tnt.com/express/en_in/site/shipping-tools/tracking.html?searchType=con&cons=152121130
Here, “152121130” is the tracking ID. When adding this URL to PH Order & Shipment Tracking with Notifications, update it as: https://www.tnt.com/express/en_in/site/shipping-tools/tracking.html?searchType=con&cons=[ID]
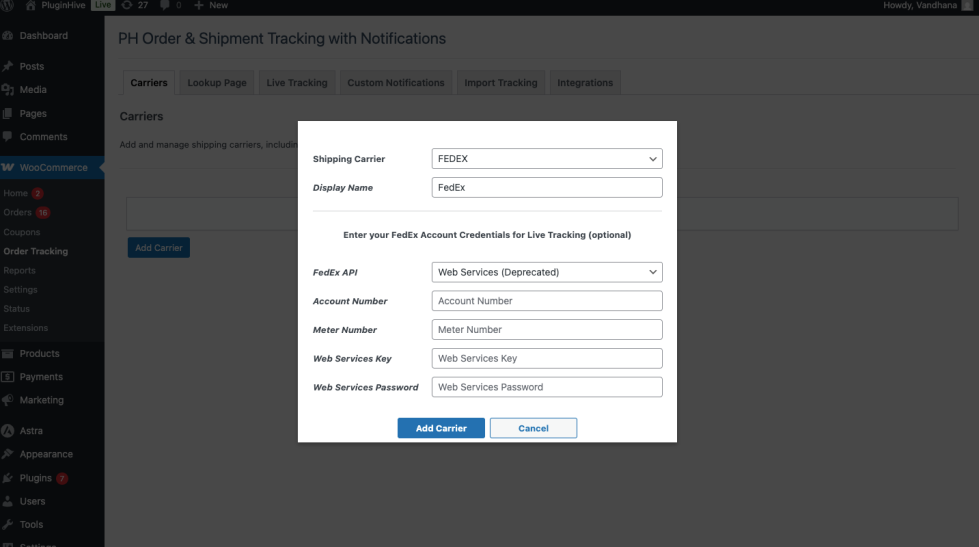
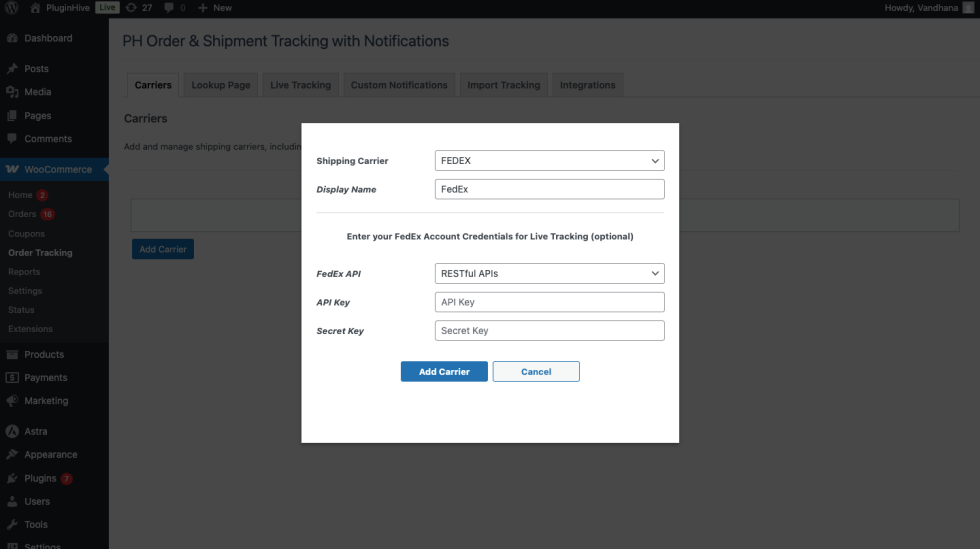
3. Add shipping carrier API credentials for live shipment tracking
Apart from the default shipment tracking functionality, PH Order & Shipment Tracking with Notifications also supports live shipment tracking. This feature fetches real-time shipment status updates directly from the shipping carrier.
Note:
By default, the plugin supports Live Shipment Tracking only for the following carriers:
- UPS
- FedEx
- USPS
- DHL Express
- Delhivery
- Canada Post
- Colissimo
- Australia Post
- Blue Dart
- Aramex
- Chilexpress
- Purolator
- Sendle
- TNT Consignment
- TPC
- Yanwen
If you want live shipment tracking for any other shipping carrier, feel free to contact PluginHive Support.
To use the live tracking feature on your WooCommerce store, make sure you have an active account with the shipping carrier and valid API credentials.
To configure live shipment tracking, add a supported shipping carrier by clicking on the Add Carrier button, enter the carrier’s API credentials in the respective fields as shown below, and then click on Add Carrier to add the shipping carrier successfully.
Create a tracking (lookup) page on your WooCommerce store
↑ Back to topWith PH Order & Shipment Tracking with Notifications, you can create a dedicated tracking page on your WooCommerce store where customers can easily check their shipment status using their order details. To configure this, go to WooCommerce > Order Tracking and open the Lookup Page tab.
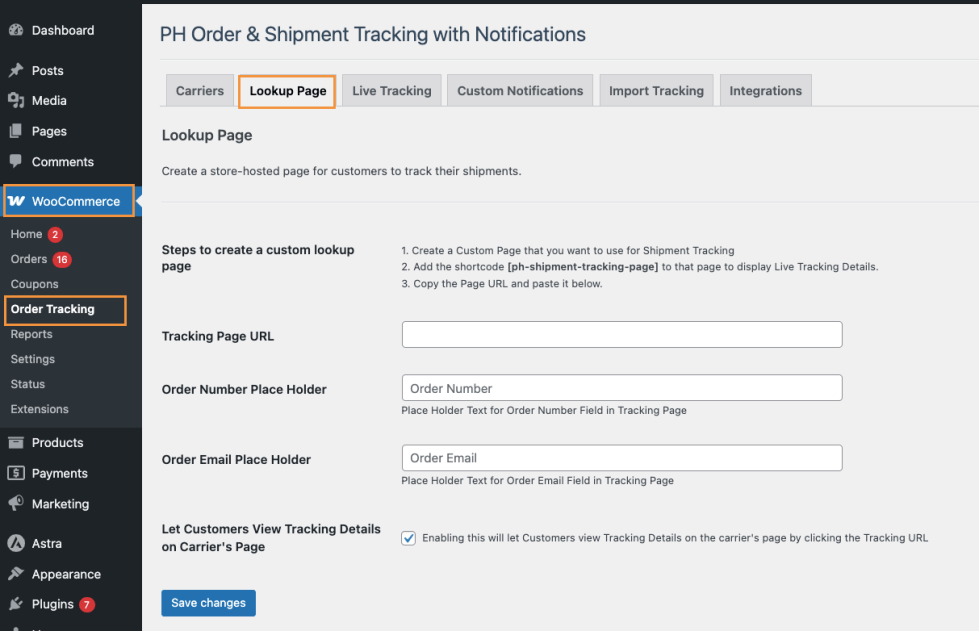
1. Tracking Page Configuration
Create a new page in WordPress by navigating to Pages > Add New. Create a page such as Track Your Shipments, add the shortcode [ph-shipment-tracking-page] to the page content, and publish the page. This shortcode displays the shipment tracking form and live tracking details for customers.
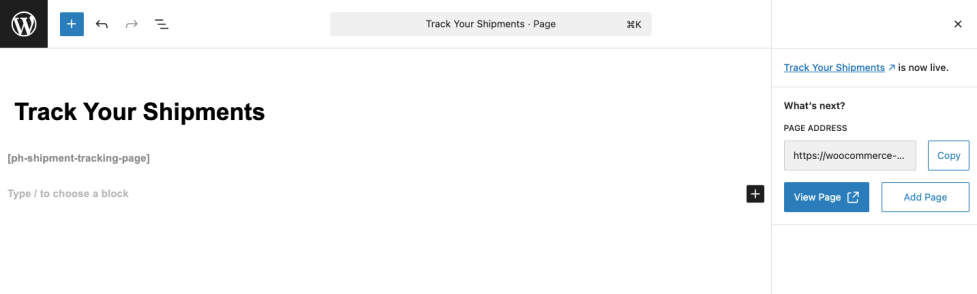
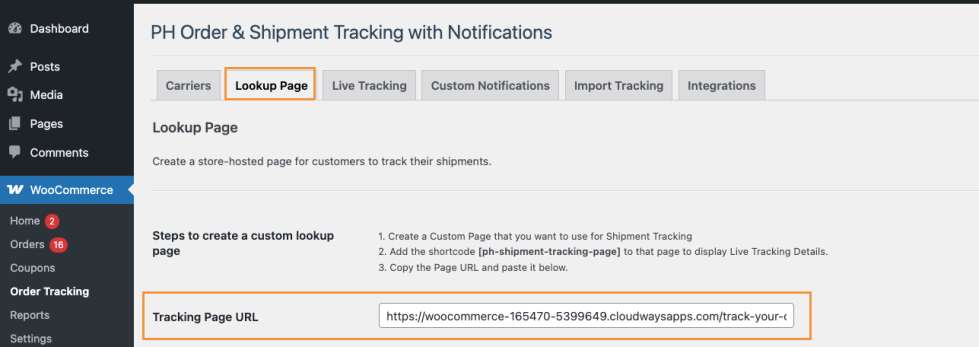
After publishing the page, return to the Lookup Page tab in the plugin settings, copy the URL of the tracking page, and paste it into the Tracking Page URL field.
You can then customize the placeholder text shown on the tracking page by updating the Order Number Place Holder and Order Email Place Holder fields, which help customers understand what information they need to enter.

If you want customers to view detailed tracking information directly on the shipping carrier’s website, enable the Let Customers View Tracking Details on Carrier’s Page option. Once all settings are configured, click Save changes to apply them.

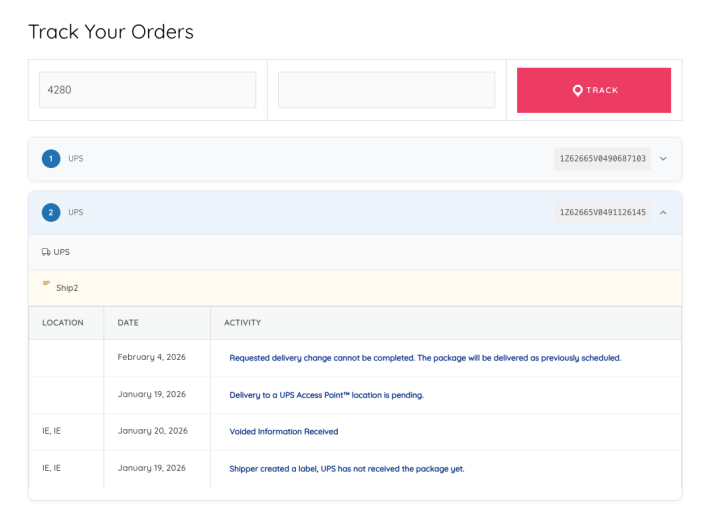
2. Customer Experience on the Tracking Page
↑ Back to topCustomers can now visit the tracking page on your store, enter their order number and email address, view real-time shipment tracking details, and, if enabled, click through to the carrier’s tracking page for more information.
Configure Live Tracking & Notifications
↑ Back to topThe Live Tracking feature in PH Order & Shipment Tracking with Notifications automatically fetches real-time shipment updates from supported shipping carriers, helping you keep track of your orders and keep your customers informed about delivery progress.
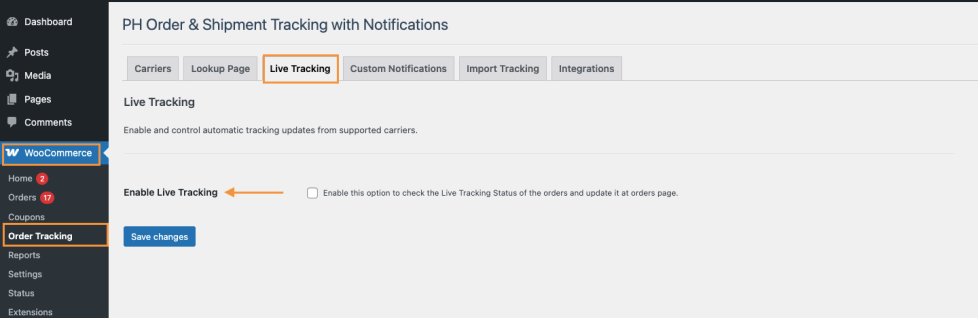
To configure live tracking, go to WooCommerce > Order Tracking and open the Live Tracking tab.
Start by enabling the Enable Live Tracking option. This allows the plugin to check the live tracking status of orders and automatically update the tracking information on the WooCommerce Orders page.
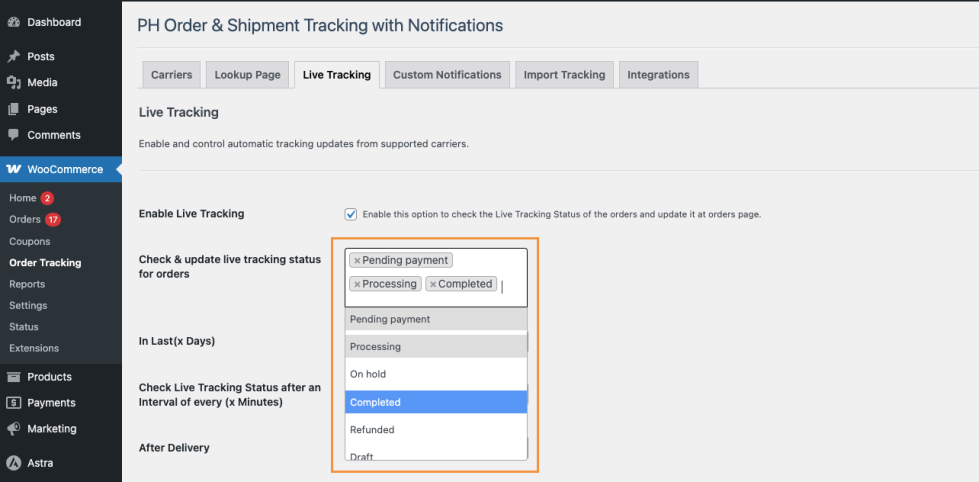
Next, choose which WooCommerce order statuses should be monitored for live tracking updates. Under Check & update live tracking status for orders, select the relevant order statuses such as Processing, Completed, or Pending Payment.
You can include or exclude additional statuses such as On Hold, Refunded, or Draft, depending on your business workflow.
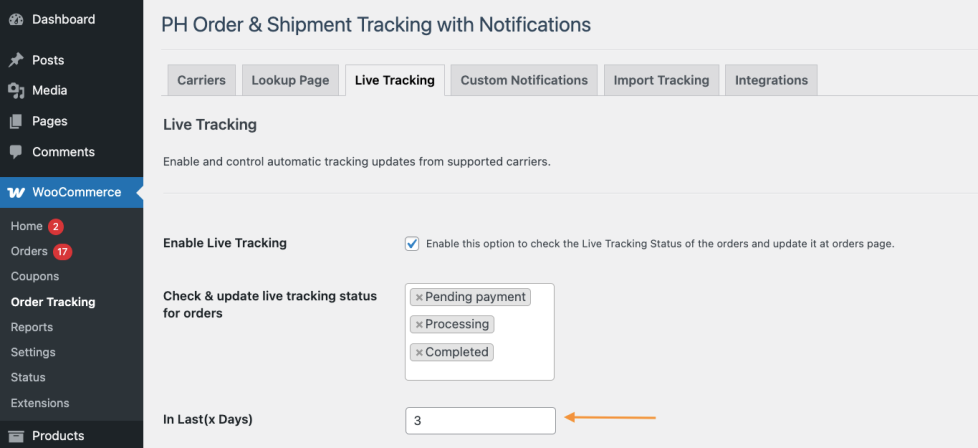
You can reduce server load by checking tracking updates only for recent orders. In the In Last (x Days) field, enter the number of days you want the plugin to check.
For example:
If most of your orders are delivered within 1 to 3 days, enter 3. The plugin will then check tracking updates only for orders created in the last 3 days that are marked as Processing, Completed, or Pending Payment. This helps improve performance by avoiding tracking checks for older orders.
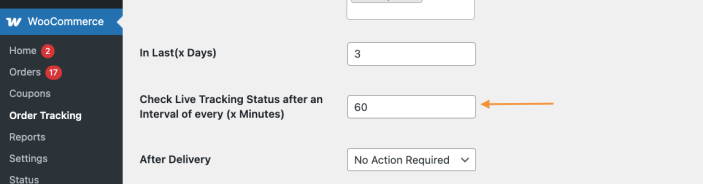
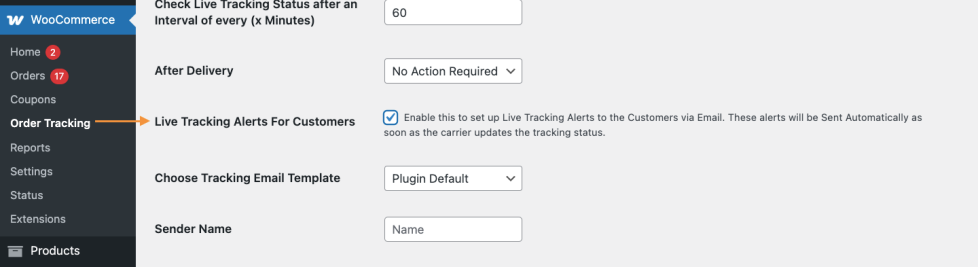
You can choose how often the plugin checks for tracking updates. In the Check Live Tracking Status after an Interval of every (x Minutes) field, enter the number of minutes between each check.
For example:
Entering 60 means the plugin will check the shipping carrier for updates every 60 minutes and update the tracking status whenever there is a change.
Under After Delivery, select what happens when a package is delivered:
- No Action Required: No automatic action taken
- Change order status to Delivered: Mark the order with a custom “Delivered” status
- Change order status to Completed: Marks the order as “Completed”
- Change order status to Draft: Changes to draft (rarely used)

Note: The “Delivered” status is a custom order status created by the plugin to distinguish delivered orders from completed orders.
Send Live Tracking Notifications via Email
↑ Back to topEnable the Live Tracking Alerts For Customers option to automatically send tracking update emails whenever the shipping carrier updates the shipment status.
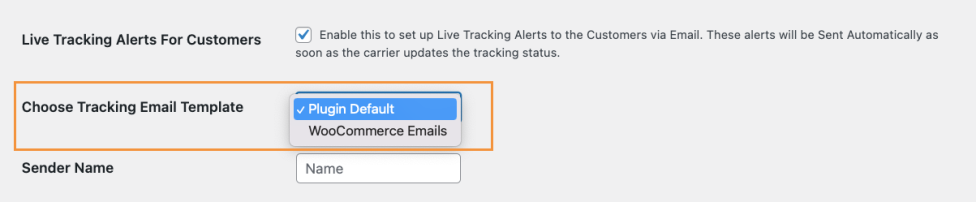
1. Choose the Tracking Email Template
Under Choose Tracking Email Template, select:
- Plugin Default: Uses the plugin’s built-in email template
- WooCommerce Emails: Uses your WooCommerce email styling for consistent branding
2. Customize Your Tracking Email Template
You can create a personalized email that will be sent to your customers whenever their shipment status updates. Follow these steps:
- Enter the Sender Name and Sender Email ID, which will appear as the sender of the email.
- Enter your preferred subject line in the Tracking Email Subject field.
- Write your custom message in the Email Content field.
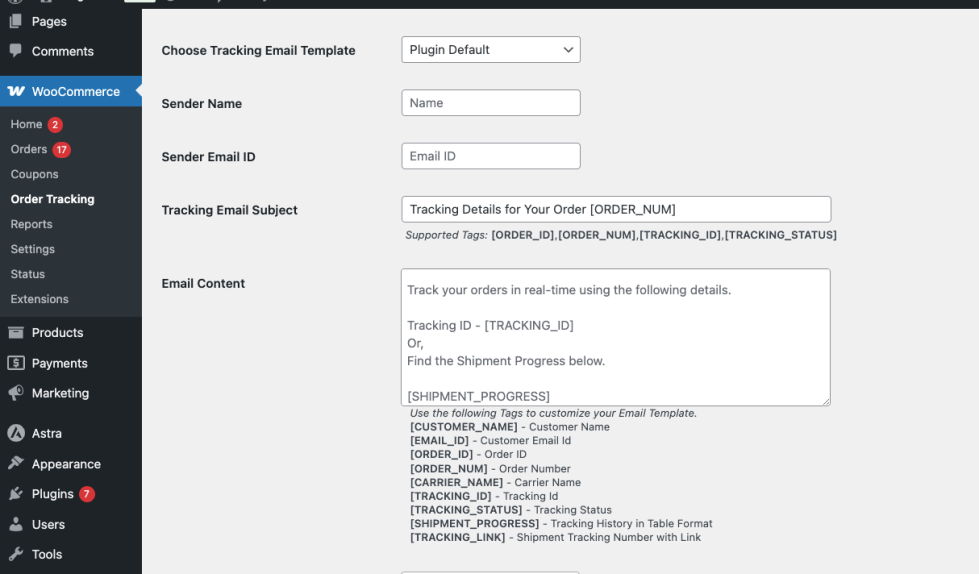
Note:
Use the following tags to automatically insert information into your email template:
- [CUSTOMER_NAME] – Customer Name
- [EMAIL_ID] – Customer Email Id
- [ORDER_ID] – Order ID
- [ORDER_NUM] – Order Number
- [CARRIER_NAME] – Carrier Name
- [TRACKING_ID] – Tracking Id
- [TRACKING_STATUS] – Tracking Status
- [SHIPMENT_PROGRESS] – Tracking History in Table Format
- [TRACKING_LINK] – Shipment Tracking Number with Link
3. Select Tracking Statuses for Email Notifications
Under Tracking status for, choose the shipment statuses that should trigger email notifications to customers.
You can select from the following tracking statuses:
- Initial
- In Transit
- Pickup
- Out for Delivery
- Delivered
- Failed
- Exception
- Returned
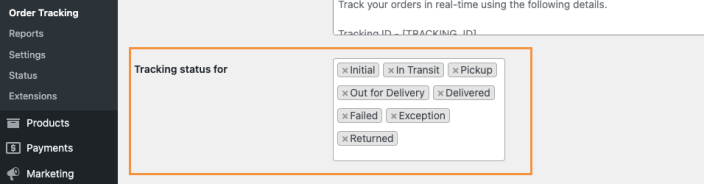
Each time the shipping carrier updates the tracking status to one of the selected options, the plugin will send an email notification to the customer.
Recommendation:
Enable all tracking statuses to keep customers informed at every stage of the delivery process.
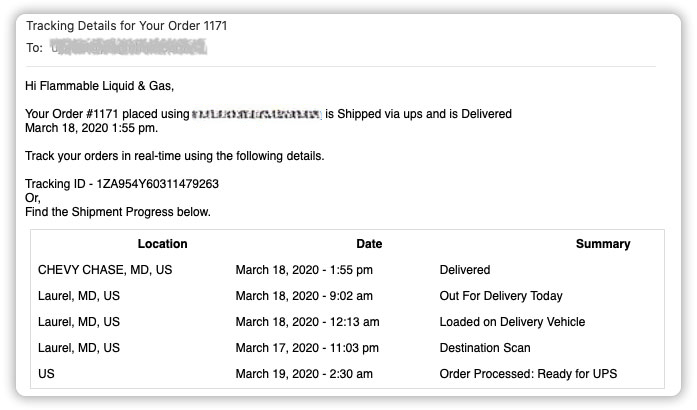
Here is the sample email sent to the customers on the tracking status update from the shipping carrier.
When Tracking Status Changes to “Delivered”
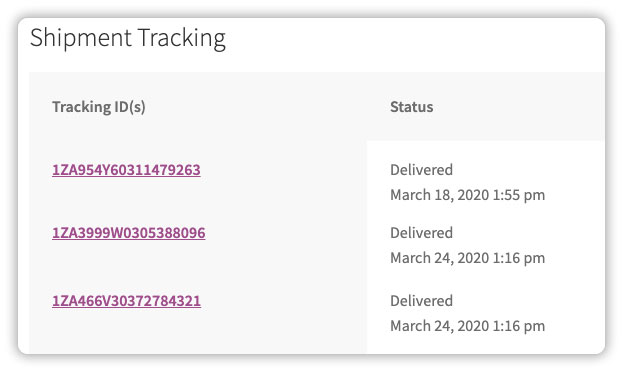
Display Live Tracking on the Customer’s My Account Page
↑ Back to topYou can allow customers to view real-time shipment tracking details directly from their account by enabling Display Live Tracking Status in My Account. Once enabled, live tracking information will be shown on the My Account > Orders page.
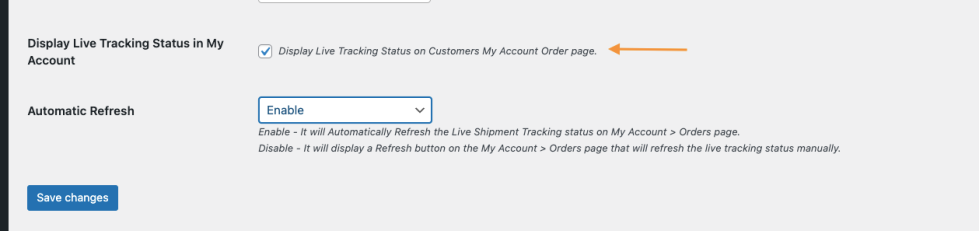
To control how tracking updates appear on the customer’s account page, use the Automatic Refresh option:
- When Automatic Refresh is enabled, the live tracking status updates automatically without any action from the customer.
- When Automatic Refresh is disabled, a Refresh button is displayed on the My Account > Orders page, allowing customers to manually update the tracking status.
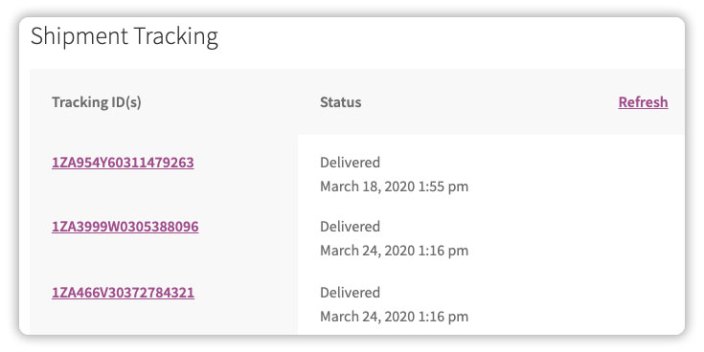
Automatic refresh provides a smoother customer experience, while manual refresh can help reduce server load and give customers control over when to check for updates.
After configuring these options, click Save changes to apply the settings.
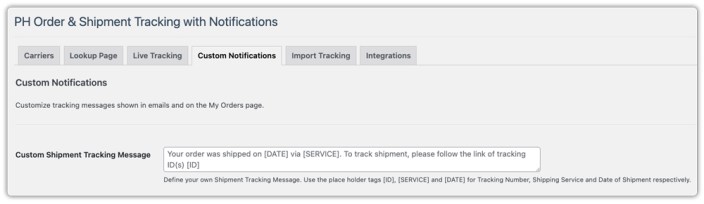
Customize Tracking Notifications
↑ Back to topThe Custom Notifications section lets you decide how shipment tracking details are shown to customers, both in emails and on their account page.
To access these settings, go to: WooCommerce > Order Tracking > Custom Notifications

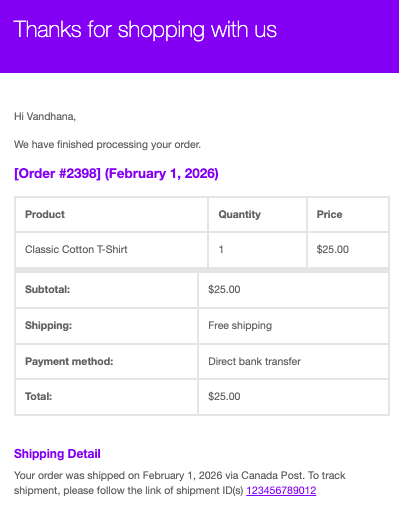
You can edit the message that customers see when their order is shipped. This message appears in:
- WooCommerce order completion emails
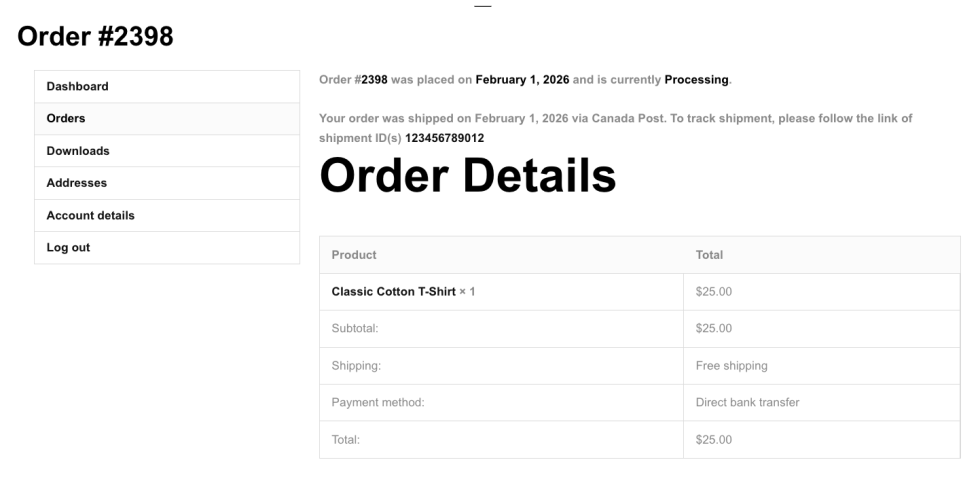
- The My Account > Orders page
In the Custom Shipment Tracking Message field, enter the message you want to show your customers. You can use the following tags to automatically add shipment details:
- [ID] – Tracking number
- [SERVICE] – Shipping carrier name
- [DATE] – Date of shipment
You can choose how customers receive their tracking details by enabling these options:
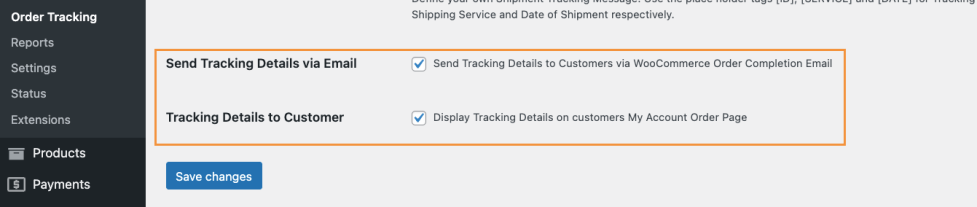
- Send Tracking Details via Email: Sends shipment tracking details in the WooCommerce order completion email when an order is marked as Completed. Customers receive the tracking ID, carrier name, shipment date, and tracking link by email.
- Tracking Details to Customer: Displays shipment tracking details on the My Account > Orders page, allowing customers to log in and view their tracking information anytime.
These options help keep customers informed and reduce the need for order-related support queries.
Add Shipment Tracking Details to WooCommerce Orders
↑ Back to topPH Order & Shipment Tracking with Notifications lets you add shipment tracking details to WooCommerce orders in multiple ways. You can choose the method that best fits your order volume and workflow.
1. Add Shipment Tracking Details Manually (Order by Order)
If you handle a small number of orders, you can add tracking details manually to individual orders. To do this, go to WooCommerce > Orders and open the order you want to update. On the Order Edit page, scroll to the Tracking Details section on the right-hand side and click on + Add Shipment.
Once you click Add Shipment, the tracking form will appear. Select the shipping carrier from the Carrier drop-down, enter the Tracking ID, add a Description (optional), and set the Date of Shipment. Once done, click Save Tracking to save the details.
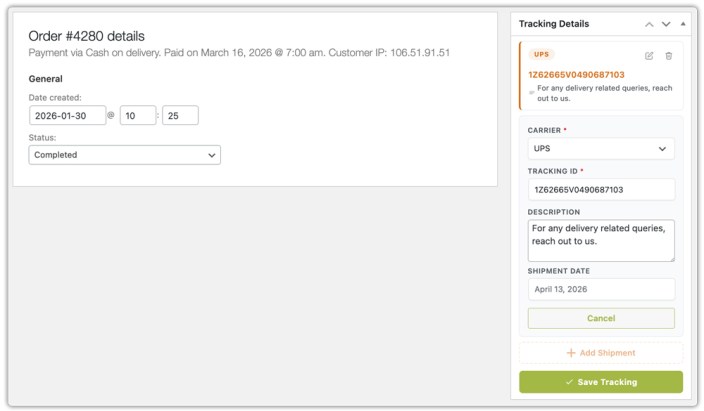
Save the order once the details are added. Customers will then be able to view the tracking information based on your notification settings.
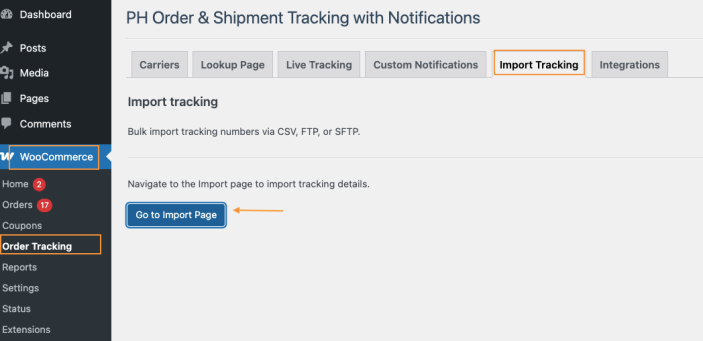
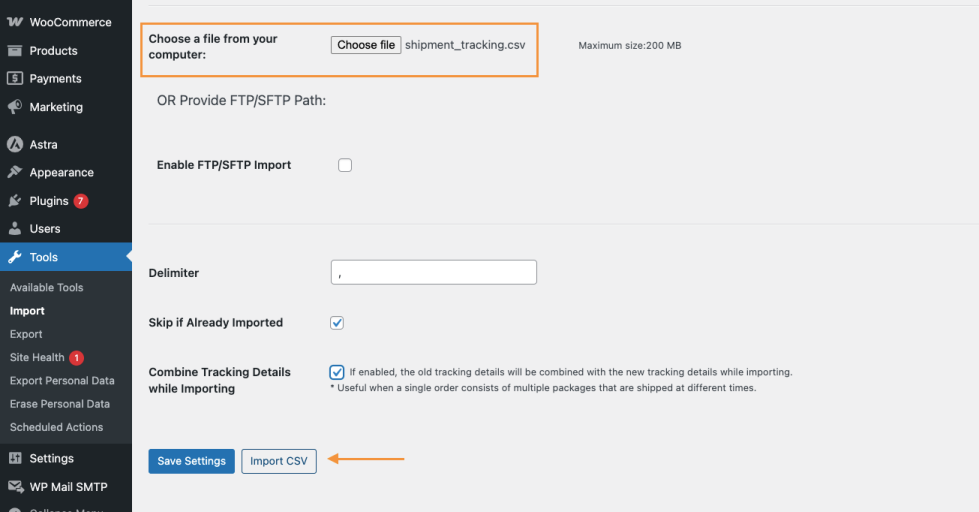
2. Import Shipment Tracking Details Using a CSV File
If you want to add shipment tracking details to multiple orders at once, you can use a CSV file. To get started, go to WooCommerce > Order Tracking > Import Tracking and click Go to Import Page.
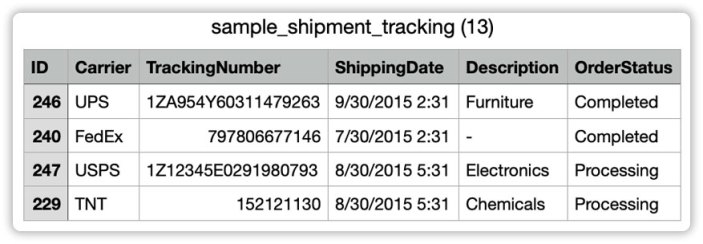
Download the sample CSV file available on the import page and update it with your tracking details.
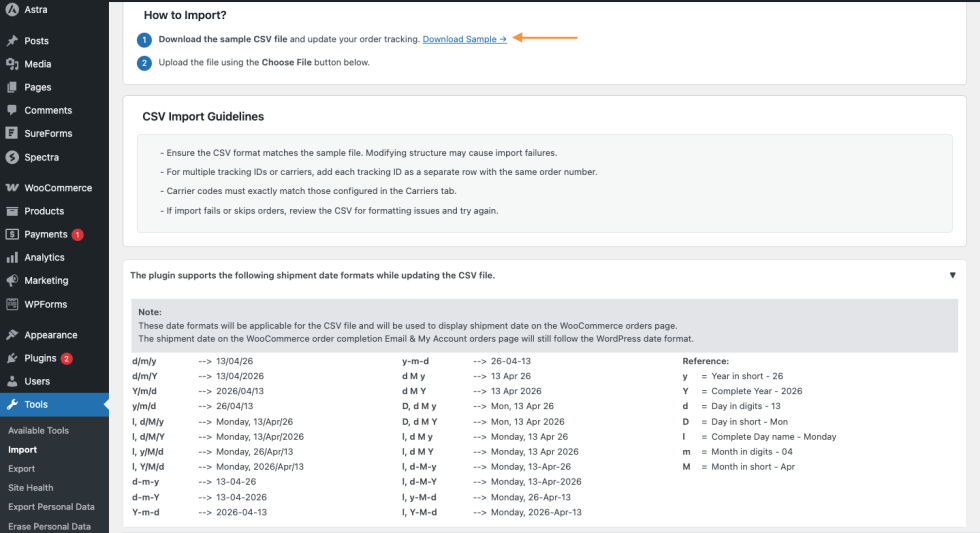
The CSV file must contain the following columns in the exact order listed below:
- Order ID
- Shipping Carrier Name
- Shipment Tracking Number
- Date of Shipment
- Custom Description (optional)
- Order Status after adding the Tracking Details
Important note:
- Do not change the column order, as this may cause the import to fail.
- Make sure the CSV file is saved in UTF-8 format.
Refer to the sample CSV file to ensure correct formatting
Once the CSV file is ready, click Choose File and select your CSV.
Import Options (Apply to All Imports)
Before importing, configure the following options to control how the tracking data is processed:
- Delimiter – Choose the separator used in your CSV file. This is usually a comma (,).
- Skip if Already Imported – Enable this option to avoid importing tracking details for orders that were already processed earlier.
- Combine Tracking Details while Importing – Enable this option if an order has more than one shipment. When enabled, new tracking details are added along with existing ones instead of replacing them. This is useful when an order is shipped in multiple packages at different times.
After configuring these options, click Import CSV to complete the import.
3. Import Tracking Details Using FTP or SFTP
One of the more secure methods to add tracking details to WooCommerce orders supported by the plugin is via FTP or SFTP.
On the Import page, enable FTP/SFTP Import and enter your server details, including:
- Server host or IP address
- Username and password
- Port number and timeout
- Path to the CSV file on the server
You can also enable Use FTPS or Use Passive Mode if required.
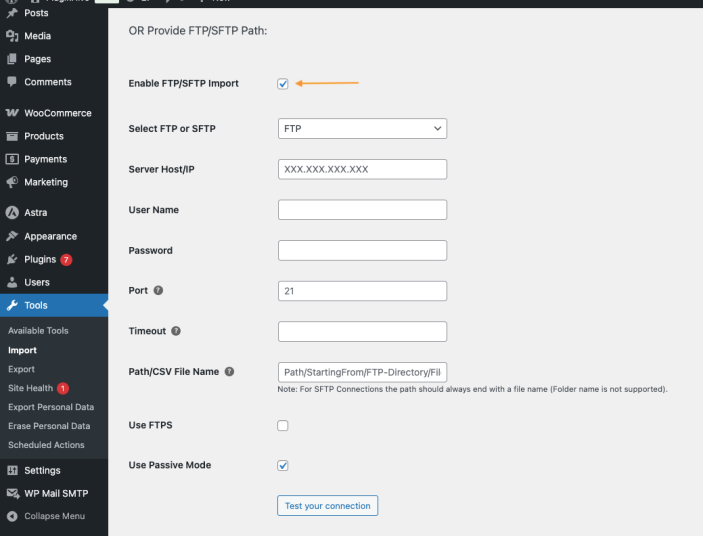
Once configured, the plugin will fetch the CSV file from your server and import the tracking details using the same CSV format and import options described above.
4. Automatically Import Tracking Details (Scheduled Import)
For stores with high order volumes, you can automate the import process using FTP or SFTP scheduling. Open WooCommerce > Order Tracking > Import Tracking, enter your FTP or SFTP details, then enable Automatically Import CSV to schedule automatic imports.
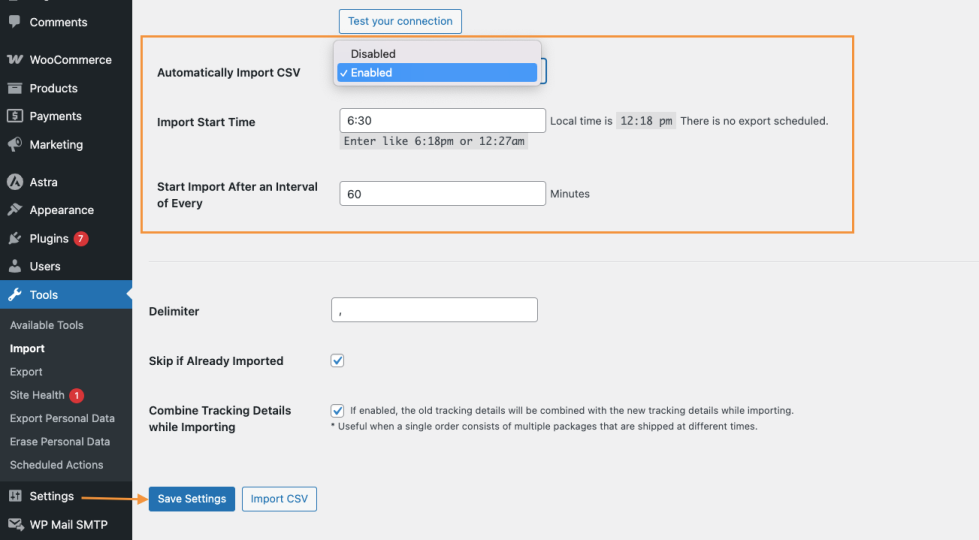
Configure the schedule by setting:
- Import Start Time: The time when the first import should run (based on the server time shown on the page).
- Start Import After an Interval of Every (Minutes): How often the plugin should check for and import new tracking files.
Note:
The time shown on the Import page is the server’s current time. Make sure you enter the Import Start Time based on this time.
For example, if the time displayed on the page is 8:21 pm and you want the import to start 30 minutes later, enter 8:51 pm as the start time.
After saving the settings, the plugin will automatically import tracking details at the defined intervals.
View Shipment Tracking Details in WooCommerce Admin
↑ Back to topPH Order & Shipment Tracking with Notifications also makes it easy for you, as a store owner, to view shipment tracking details directly from the WooCommerce admin.
Note: This feature works along with Live Tracking and is available only when live tracking is enabled for supported shipping carriers.
1. View Tracking Details from the Orders Page
You can quickly view shipment tracking information for each order from the WooCommerce > Orders page. For every order with tracking details added, you can see:
- Shipment tracking ID(s)
- The current live tracking status is updated by the shipping carrier
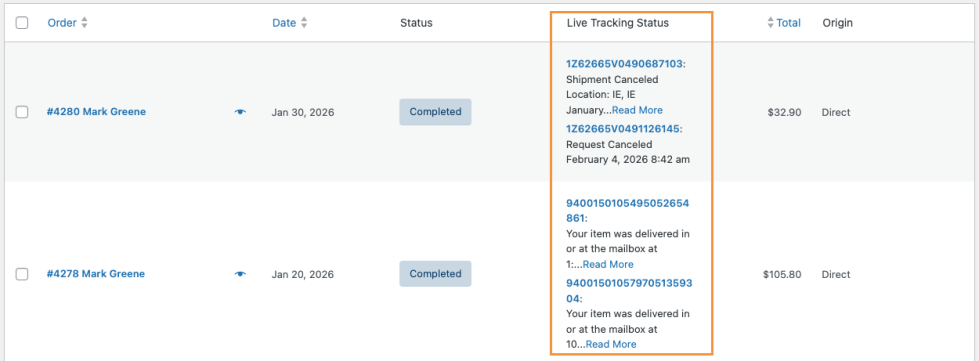
This allows you to check the delivery progress of orders at a glance without opening each order individually.
2. View Complete Tracking History for an Order
To view detailed tracking information, open the order from the WooCommerce > Orders page.
On the Order Edit page, go to the Tracking History section. Here, you can see the complete tracking history for the order, including updates for all packages if the order was shipped in multiple shipments.
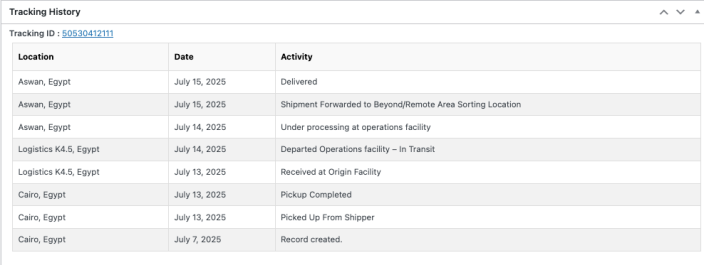
This helps you easily monitor shipment progress, verify delivery status, and respond to customer queries more efficiently.
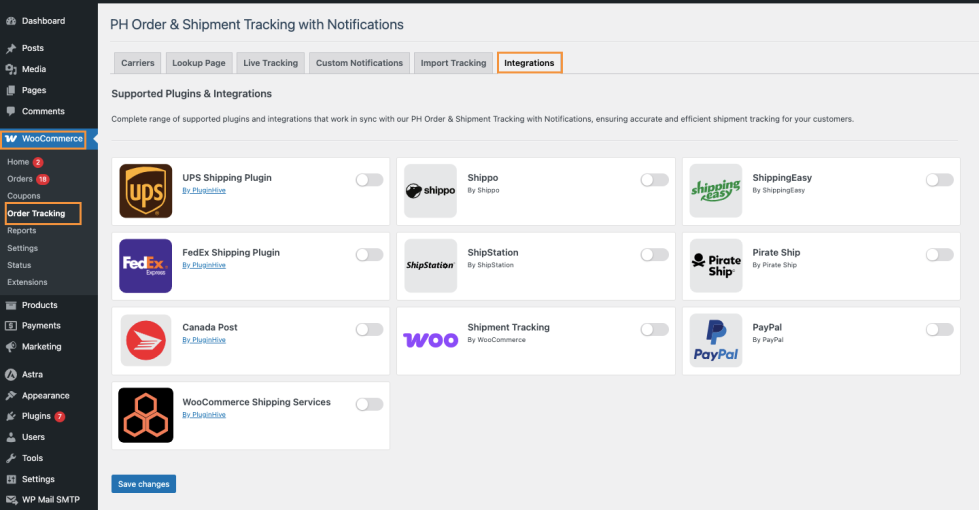
Supported Plugins & Integrations
↑ Back to topPH Order & Shipment Tracking with Notifications integrates seamlessly with popular shipping and fulfillment plugins to automatically sync tracking details to your WooCommerce orders. This helps reduce manual work and ensures customers receive accurate tracking updates.
To access these options, go to WooCommerce > Order Tracking > Integrations. Here, you’ll find a list of supported plugins and services that can be enabled with a simple toggle.
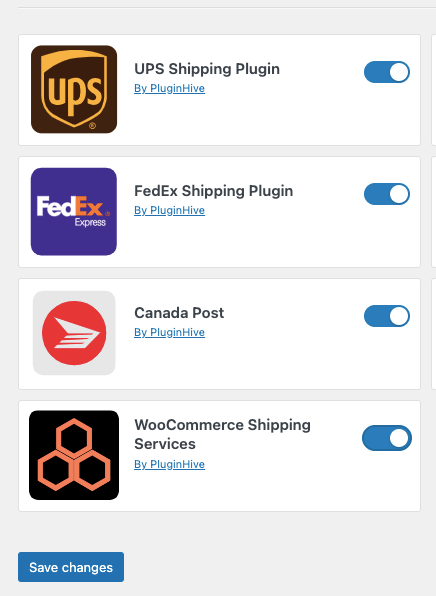
1. Shipping Plugins By PluginHive
PH Order & Shipment Tracking with Notifications works smoothly with PluginHive’s shipping plugins, such as:
- UPS Shipping Plugin for WooCommerce with Print Label
- FedEx Shipping Plugin for WooCommerce with Print Label
- Canada Post Shipping Plugin for WooCommerce with Print Label
- WooCommerce Shipping Services
When any of these plugins generate tracking numbers for an order, the tracking details are automatically synced to the WooCommerce order. Customers will then receive tracking updates through emails and their My Account page (based on your settings).
To enable an integration, turn on the toggle for the required PluginHive shipping plugin under the Integrations tab and click Save changes.
Note: To avoid duplicate tracking information, make sure tracking emails or customer-facing tracking options are not enabled in both plugins at the same time.
2. Integration with Shipping Platforms (Shippo, ShipStation, ShippingEasy, Pirate Ship)
The plugin also supports popular third-party shipping platforms, including:
- Shippo
- ShipStation
- ShippingEasy
- Pirate Ship
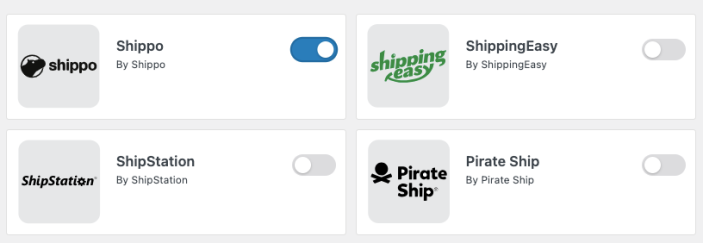
Once enabled, tracking details generated by these platforms are automatically imported into WooCommerce orders. This allows you to manage shipping externally while keeping order tracking centralized in WooCommerce.
Enable the required service using the toggle under the Integrations tab to start syncing tracking details.
3. WooCommerce Shipment Tracking Integration
PH Order & Shipment Tracking with Notifications can sync tracking details from the official WooCommerce Shipment Tracking plugin.
After enabling this integration, you can control how often tracking details are synced by configuring:
- Order statuses to sync
- Number of recent days to check
- Sync interval
- Start time
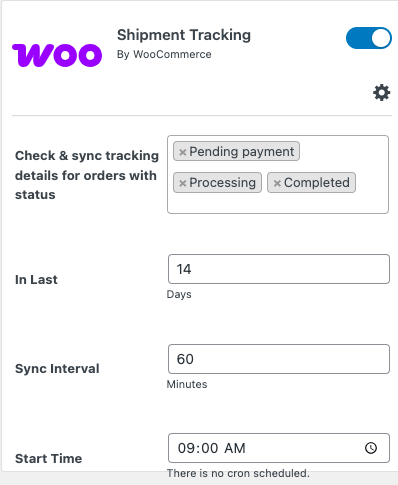
This ensures tracking information stays up to date without manual intervention.
4. PayPal Integration
The plugin also supports PayPal integration, allowing shipment tracking details to be shared with PayPal when orders are shipped.
To enable this, turn on the PayPal integration and enter your PayPal Client ID and Client Secret
Once configured, tracking details will be synced with PayPal, helping improve payment protection and order visibility.

You’re all set! If you have any questions or need assistance with PH Order & Shipment Tracking with Notifications, feel free to contact the PluginHive support team. We’re happy to help.