
Invoice Sync for Xero automatically creates Xero invoices whenever a customer places an order in your WooCommerce store — contacts, line items, taxes, shipping, fees, and payment records are all included with no manual data entry required.
Installation
↑ Back to topTo start using a product from WooCommerce.com, you can use the “Add to store” functionality on the order confirmation page or the My subscriptions section in your account.
- Navigate to My subscriptions.
- Find the Add to store button next to the product you’re planning to install.
- Follow the instructions on the screen, and the product will be automatically added to your store.
Alternative options and more information at:
Managing WooCommerce.com subscriptions.

Before You Begin
↑ Back to topBefore starting the setup, make sure you have the following ready:
- An active Xero subscription (or a free Xero developer account with a demo organisation for testing).
- Access to the Xero Developer Portal — you will need to log in with the same Xero account you use for your business organisation.
- Your WordPress site must be accessible over HTTPS. Xero requires a secure redirect URI when authorising third-party apps.
- You know your WordPress admin URL — typically
https://yourstore.com/wp-admin/. You will need to enter this as the redirect URI in both Xero and the plugin settings.
Step 1 — Create a Xero App
↑ Back to topThe plugin connects to Xero using OAuth 2.0. You need to register a Xero app to get a Client ID and Client Secret that the plugin will use to authenticate on your behalf. This is a one-time setup that takes around five minutes.
Register the app
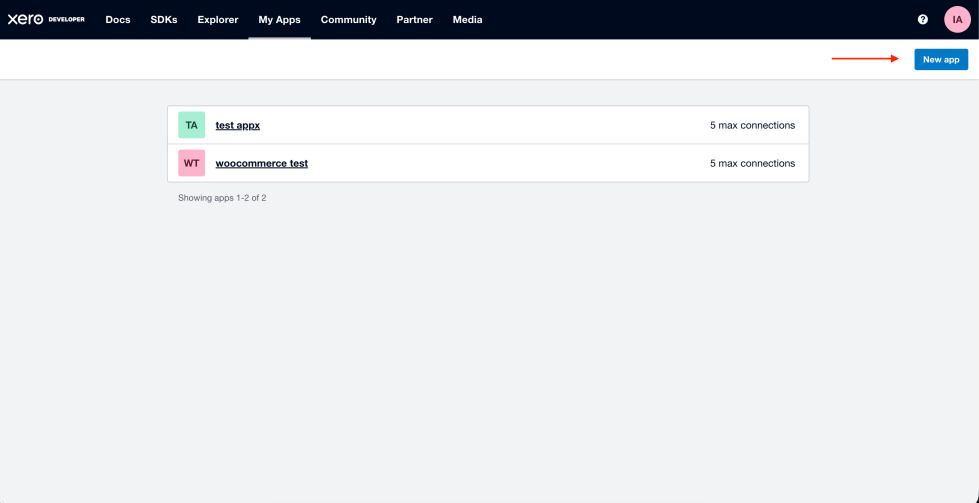
↑ Back to top- Go to https://developer.xero.com/app/manage and sign in with your Xero account.
- Click New app.
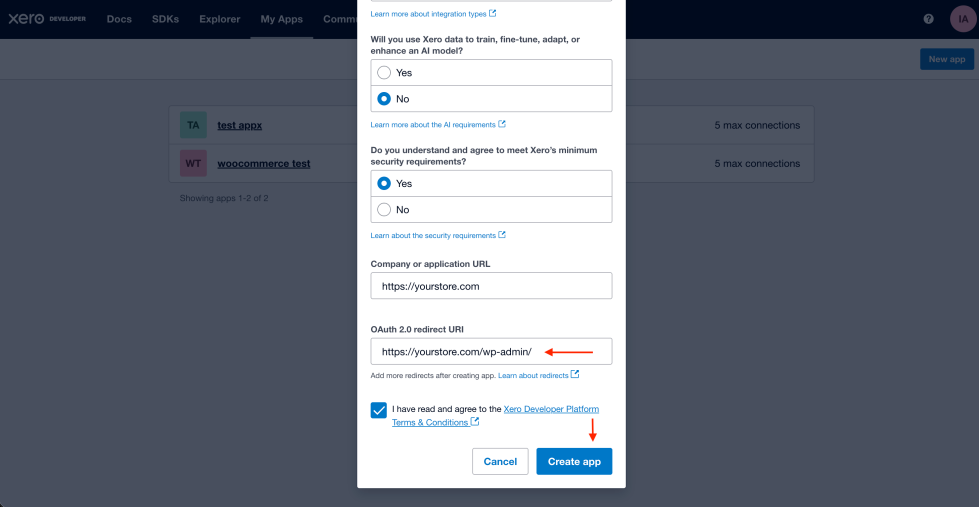
- Fill in the form as follows:
- App name — Enter any name that helps you identify this connection, for example My Store – WooCommerce.
- Integration type — Select Web app.
- Will you use Xero data to train, fine-tune, adapt, or enhance an AI model? — Select No.
- Do you understand and agree to meet Xero’s minimum security requirements? — Tick this checkbox.
- Company or application URL — Enter your store’s homepage URL, for example
https://yourstore.com. - OAuth 2.0 redirect URI — Enter your WordPress admin URL:
https://yourstore.com/wp-admin/. This must match exactly what you will enter in the plugin settings. Include the trailing slash. - I have read and agree to the Xero Developer Platform Terms & Conditions — Tick this checkbox.
- Click Create app.
Copy your credentials
↑ Back to top- After the app is created, you are taken to the app’s detail page. Click Configuration in the left sidebar.
- The redirect URI you entered is shown here — confirm it matches your WordPress admin URL.
- Copy the Client ID value shown on this page and keep it somewhere safe.
- Click Generate a secret. Xero will display the Client Secret once — copy it immediately and store it securely. If you navigate away without copying it, you will need to generate a new one.
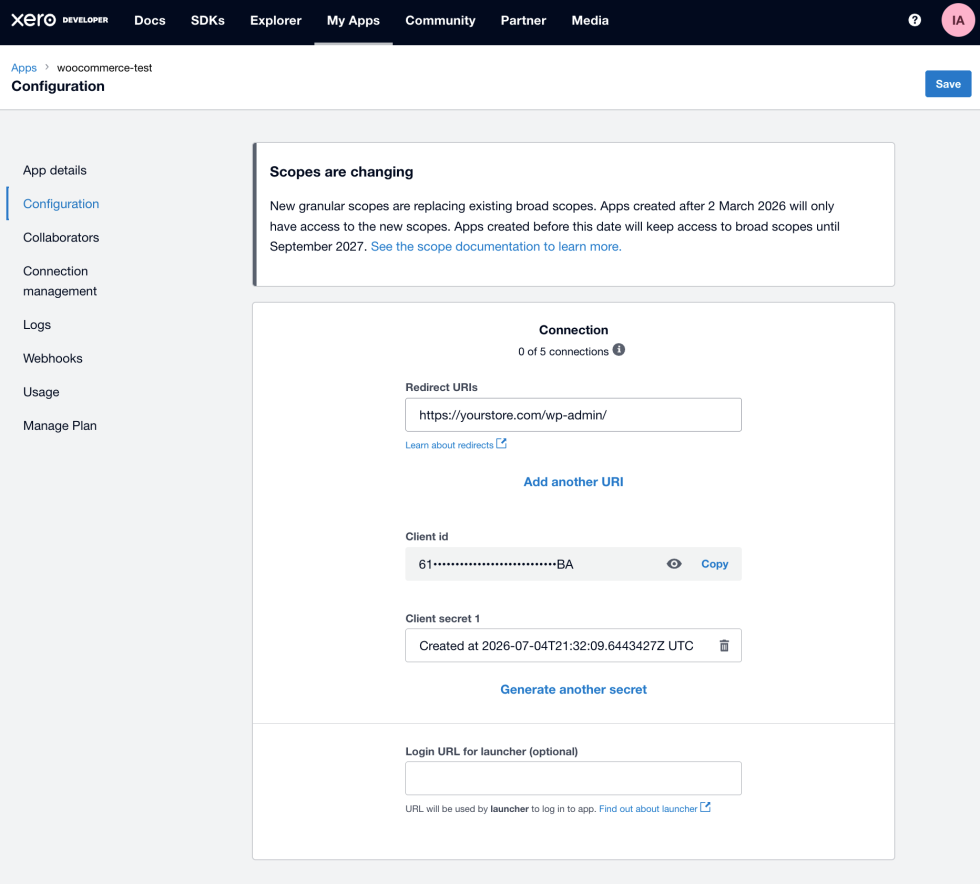
You now have a Client ID, a Client Secret, and a redirect URI. Keep these ready for the next step.
Step 2 — Connect the Plugin to Xero
↑ Back to top- In your WordPress dashboard, go to Plugins > Invoice Sync for Xero > Settings, or go to WooCommerce > Settings and click the Xero Invoice Sync tab.
- You will be on the API tab. Tick the Enable Automatic Sync checkbox.
- Paste your Client ID into the Client ID field.
- Paste your Client Secret into the Client Secret field.
- Enter your Redirect URI — this must be exactly the same URL you entered in the Xero Developer Portal (e.g.
https://yourstore.com/wp-admin/). - Click Save changes.
- Click the Connect to Xero button. You will be redirected to Xero to authorise the connection.
- On the Xero authorisation screen, click Allow access.
- You are redirected back to your WordPress admin. The settings page will show a Connected to Xero status indicator, and the Tenant ID field will be populated automatically.
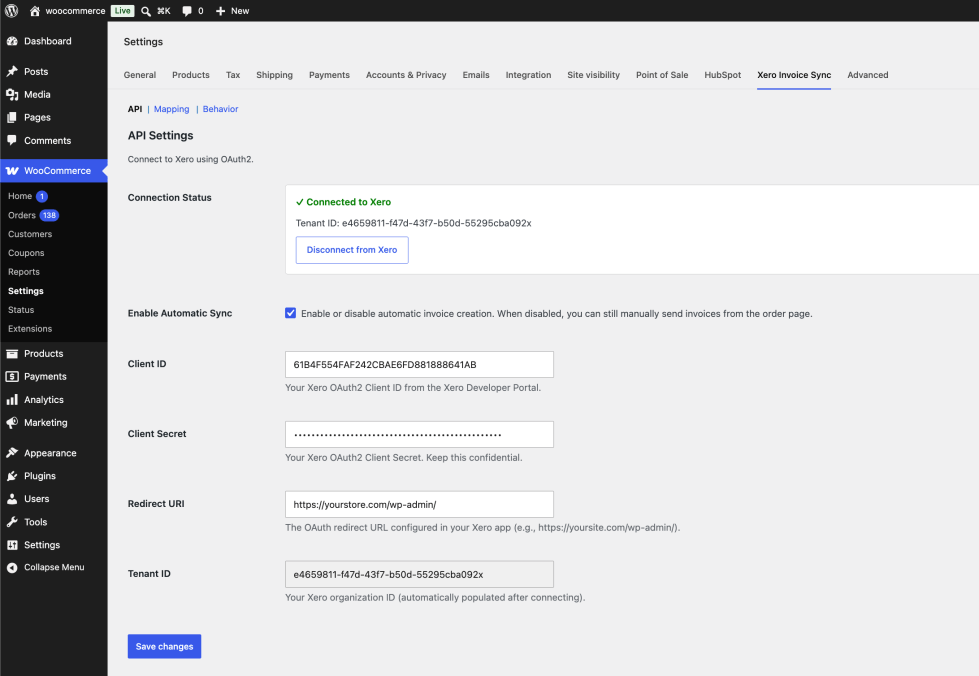
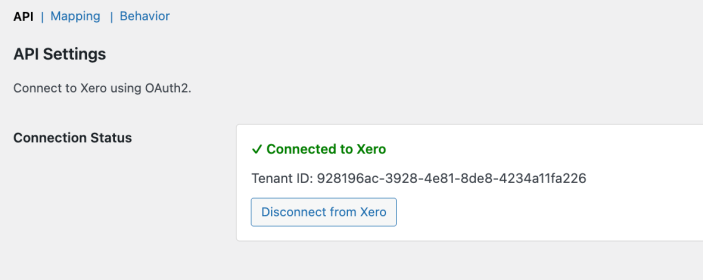
The connection is now active. Xero access tokens are refreshed automatically in the background — you should not need to reconnect unless you revoke access from within Xero.
Step 3 — Configure Tax Settings
↑ Back to topTax configuration is the most important part of the setup. Getting this wrong is the most common cause of invoices showing incorrect totals or a warning line in Xero. There are two places you need to configure tax: WooCommerce and the plugin’s Mapping tab.
Part A: Configure WooCommerce tax
↑ Back to topThe plugin takes tax amounts directly from WooCommerce and passes them to Xero. This means WooCommerce must have tax rates configured, otherwise the tax amount passed to Xero will be zero and your invoices will not reflect the correct GST or VAT.
- Go to WooCommerce > Settings > General and make sure Enable taxes is ticked. If it is not visible, enable it and save first.
- Go to WooCommerce > Settings > Tax.
- Under the Standard Rates tab, click Insert row and add your tax rate. For example:
- Australia (GST): Country AU, Rate 10.0000, Tax Name GST, tick Compound and Shipping
- UK (VAT): Country GB, Rate 20.0000, Tax Name VAT, tick Shipping
- New Zealand (GST): Country NZ, Rate 15.0000, Tax Name GST, tick Shipping
- Click Save changes.
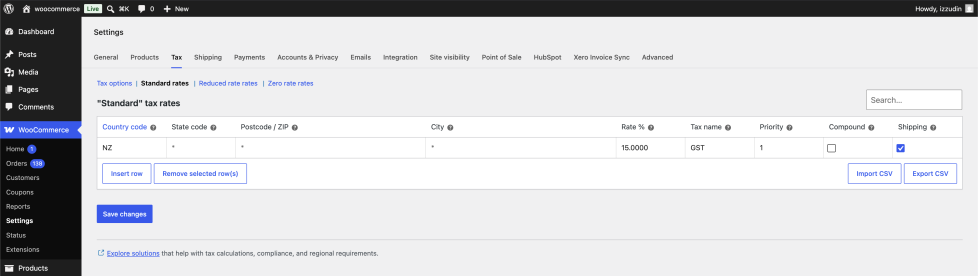
If your store sells tax-exempt products, or you operate in a region with no sales tax, you do not need to add a tax rate — but you must then set the plugin’s tax type to a zero-rated or exempt Xero tax type (see Part B below).
Part B: Set the Xero tax type
↑ Back to topThe Xero tax type tells Xero how to categorise the tax for your Profit & Loss and tax return (e.g. BAS in Australia, VAT Return in the UK). It does not affect the invoice total — the actual tax amount always comes from WooCommerce.
- Go to WooCommerce > Settings > Xero Invoice Sync > Mapping.
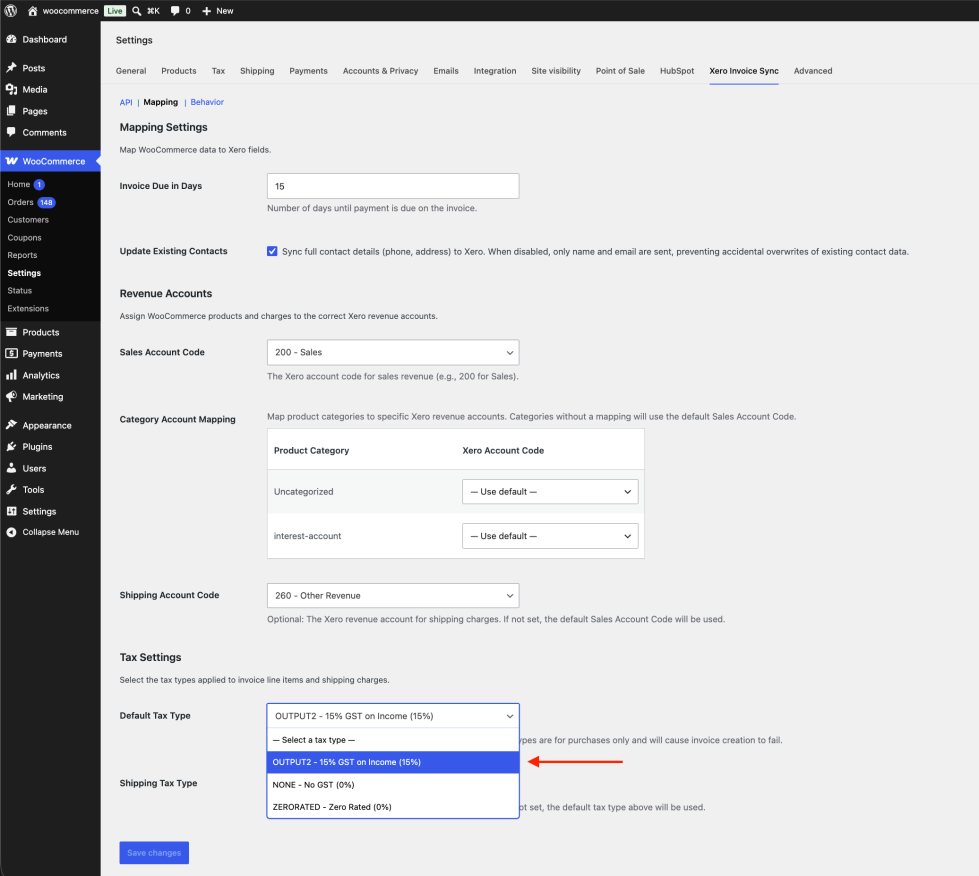
- Click the Default Tax Type dropdown. The list is populated with the tax types from your connected Xero organisation.
- Choose the tax type that matches how your sales are taxed. The table below shows common selections by region:
| Region | Recommended Tax Type | When to use |
|---|---|---|
| Australia | GST on Income (OUTPUT2 / GST) | Standard 10% GST on taxable sales |
| Australia | BAS Excluded | Sales outside the scope of GST (e.g. financial supplies) |
| Australia | GST Free Income | Products that are genuinely GST-exempt (fresh food, medical) |
| United Kingdom | Tax on Sales (OUTPUT) | Standard 20% VAT sales |
| United Kingdom | Lower Rate (OUTPUT2) | Reduced rate 5% VAT sales |
| United Kingdom | Zero Rated Income | 0% VAT sales (books, children’s clothing) |
| New Zealand | GST on Income (OUTPUT2) | Standard 15% GST on taxable sales |
| No tax / global | Tax Exempt / No GST | Stores with no sales tax or fully exempt sales |
Important: Always choose an OUTPUT type (for sales). Never select an INPUT type — INPUT types are for supplier invoices and purchases only. Selecting an INPUT type will cause Xero to reject the invoice with a validation error.
Shipping tax type (optional)
↑ Back to topIf your store charges tax on shipping at a different rate than your products — for example, if shipping is taxed at a reduced or zero rate — you can set a separate Shipping Tax Type on the Mapping tab. If you leave this blank, shipping will use the same tax type as your products.
Step 4 — Configure Mapping Settings
↑ Back to topStill on the Mapping tab, complete the remaining fields:
- Sales Account Code — Select the Xero account code that your product and fee revenue should be posted to. This is typically your main sales income account (e.g. 200 – Sales in a standard Xero chart of accounts). If you are unsure, check with your accountant.
- Category Account Mapping — Optionally map individual product categories to different Xero revenue accounts. For example, post clothing sales to 200 – Sales but accessories to 260 – Other Revenue. Categories without a mapping will use the default Sales Account Code above. The dropdown options are loaded from your connected Xero chart of accounts.
- Shipping Account Code — Select the Xero account code that your shipping charges should be posted to. If left blank, shipping charges will use the same Sales Account Code above. The dropdown options are loaded from your connected Xero chart of accounts.
- Invoice Due in Days — Sets the payment due date on invoices in Xero. For example, entering 14 means invoices will show a due date 14 days after the order date. The default is 14 days.
- Update Existing Contacts — When ticked, the plugin will update a customer’s phone number and address in Xero every time they place an order. This is useful for keeping contact records current. Untick this if you manage contact details manually in Xero and do not want them overwritten.
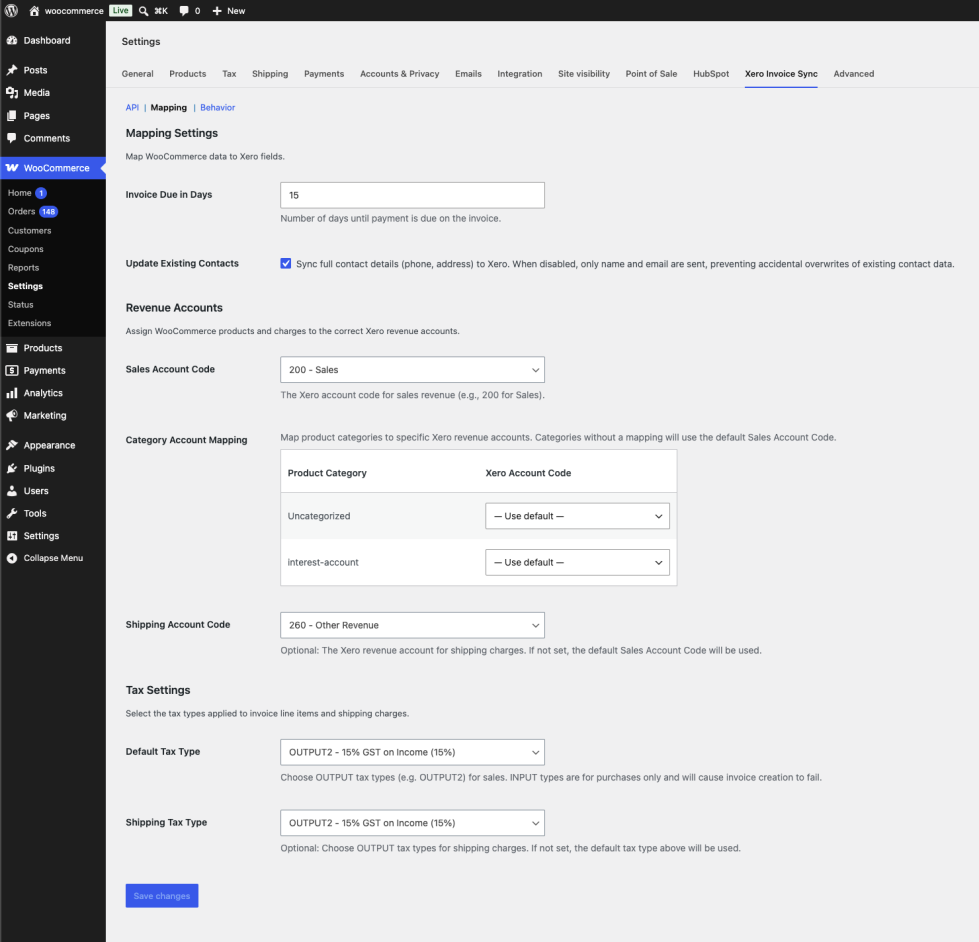
Click Save changes when done.
Step 5 — Configure Behavior Settings
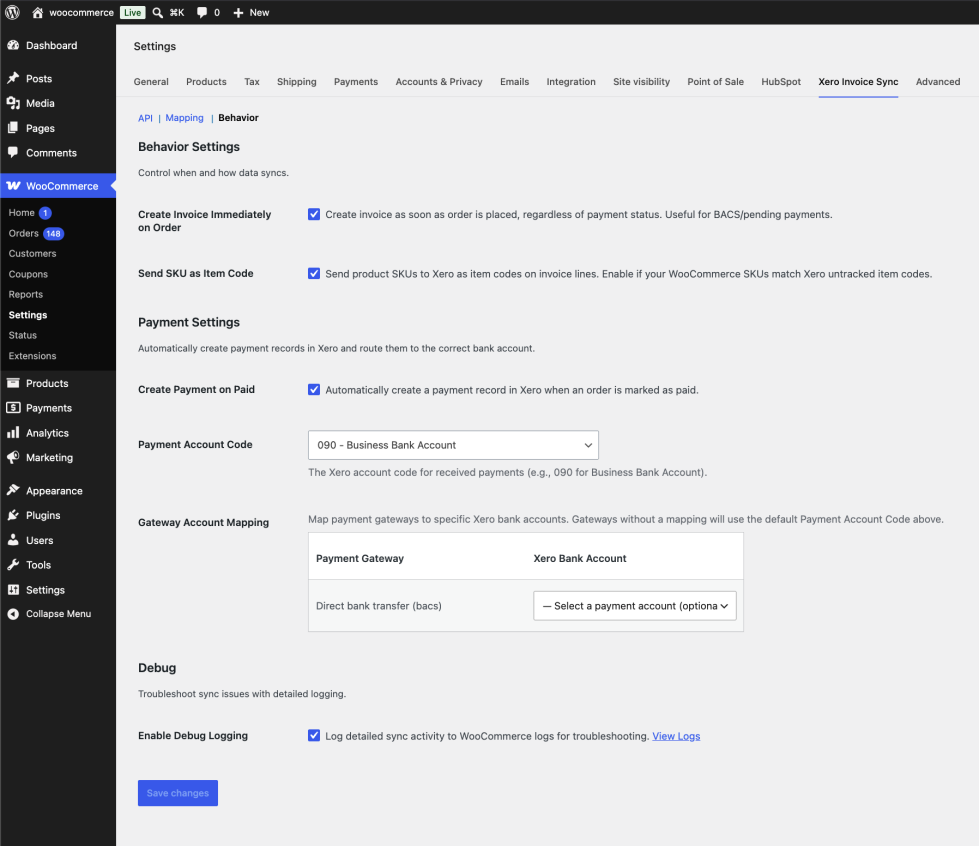
↑ Back to topClick the Behavior tab to control when the sync triggers and whether payments are recorded:
The Behavior tab is divided into three groups:
Behavior Settings
- Create Invoice Immediately on Order — When ticked, the Xero invoice is created as soon as the order is placed, regardless of payment status. This is useful if you accept bank transfers (BACS), cheques, or other offline payment methods where the order exists before payment is confirmed. If you only accept online payments (card, PayPal), you can leave this unticked — invoices will be created when the order reaches Processing status.
- Send SKU as Item Code — When ticked, product SKUs from WooCommerce are sent to Xero as item codes on invoice line items. If your WooCommerce SKUs match Xero item codes, Xero will automatically link the line item to the corresponding Xero item and populate its description and default account code.
Payment Settings
- Create Payment on Paid — When ticked, the plugin will automatically record a payment against the Xero invoice when the WooCommerce order is marked as paid. This keeps your Xero accounts receivable up to date without any manual input.
- Payment Account Code — If Create Payment on Paid is ticked, select the Xero bank or clearing account where payments should be recorded (e.g. 090 – Business Bank Account). Only active bank accounts that can accept payments are shown. Ask your accountant which account to use if you are unsure.
- Gateway Account Mapping — Map each payment gateway to a specific Xero bank account. For example, you could route Stripe payments to account 092 – Stripe Clearing and BACS payments to 090 – Business Bank Account. Gateways without a mapping will use the default Payment Account Code above. Click Save changes to store the mappings.
Debug
- Enable Debug Logging — Tick this only when troubleshooting. It writes detailed information about every sync attempt to a log file you can view at WooCommerce > Status > Logs (look for a log named wc-xero). Leave it unticked in normal operation to keep your logs clean.
Click Save changes.
Usage
↑ Back to topAutomatic sync
↑ Back to topOnce setup is complete, the plugin works automatically in the background. Every time an order reaches the trigger status (Processing or Completed), a Xero invoice is created with:
- The customer matched or created as a Xero contact, looked up by email address to help reduce duplicate contacts.
- All product line items, with quantities, prices, and your mapped account code and tax type. If per-category account mapping is configured, each line item uses the account code for its product category.
- Shipping charges as a separate line item, using the configured shipping tax type.
- Any order fees (payment surcharges, handling fees) as individual line items.
- Tax amounts taken directly from WooCommerce to keep Xero invoice totals aligned with WooCommerce order totals.
- The invoice date set to the WooCommerce order date, not the sync date.
- The invoice currency set to the WooCommerce order currency.
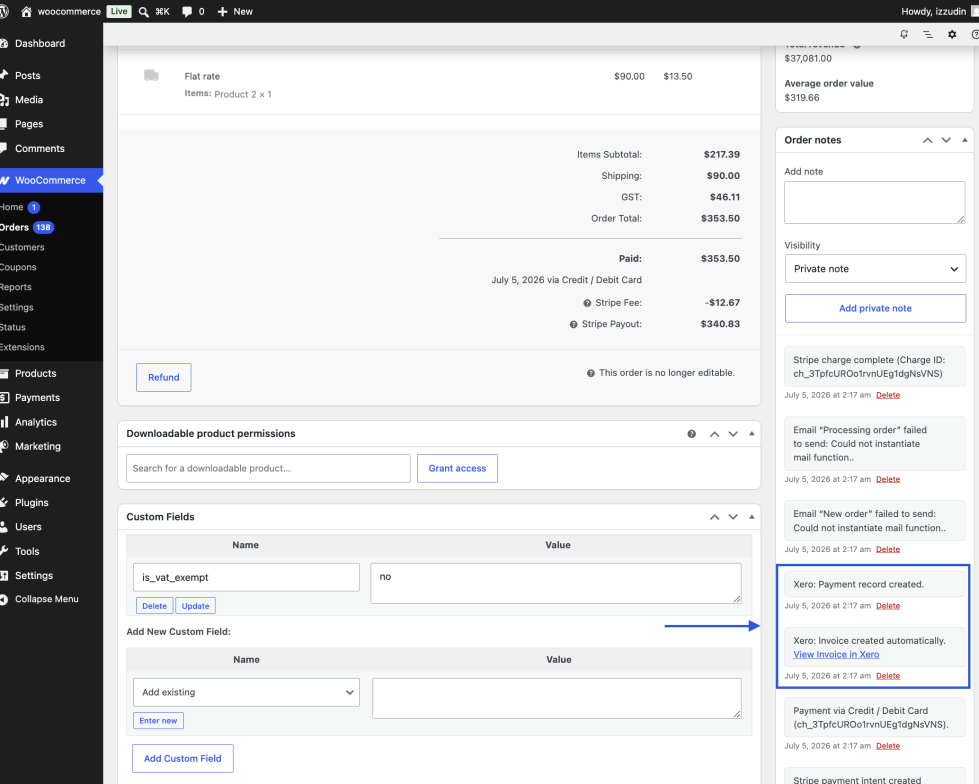
After a successful sync, an order note is added to the WooCommerce order with a direct link to the created Xero invoice. If the sync fails, the error is recorded as an order note and the customer’s checkout experience is not affected.
Manual sync
↑ Back to topYou can send any individual order to Xero at any time, even if automatic sync is disabled:
- Open the order in WooCommerce > Orders.
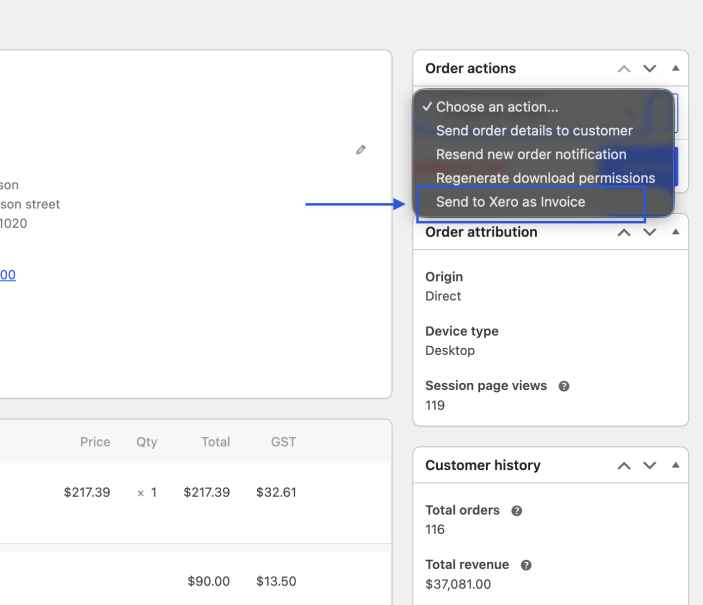
- Find the Order Actions panel on the right side of the screen.
- Select Send to Xero as Invoice from the dropdown.
- Click Update.
The result — success or error — will appear as an order note immediately.
Developer: exclude orders from syncing
↑ Back to topIf you need to keep certain orders out of Xero entirely — for example, orders that contain a payment-plan, deposit, or course-booking product that you invoice elsewhere — you can do this in code with the wc_xero_should_sync_order filter. It applies to automatic sync and to the manual Send to Xero as Invoice action, so excluded orders never reach Xero.
Return false to skip an order. The filter receives the order being synced, so you can decide based on products, customer, order total, or any other order data. This example keeps every order that contains one of your payment-plan products out of Xero:
add_filter( 'wc_xero_should_sync_order', function ( $should_sync, $order ) {
    $excluded_product_ids = array( 123, 124, 125, 126, 127, 128, 129 );

    foreach ( $order->get_items() as $item ) {
        if ( in_array( $item->get_product_id(), $excluded_product_ids, true ) ) {
            return false;
        }
    }

    return $should_sync;
}, 10, 2 );
There is also a wc_xero_should_sync_payment filter, which controls payment creation only. Return false to record the invoice in Xero but skip the payment.
Troubleshooting
↑ Back to topInvoice not created after an order is placed
Check that Enable Automatic Sync is ticked under WooCommerce > Settings > Xero Invoice Sync > API. Also check the connection status indicator on that same page — if the token has expired or the connection was revoked, click Connect to Xero to reconnect. Finally, check the order’s notes section for any error message recorded at the time of the order.
Xero invoice shows an “Includes adjustments to tax” line
This message appears in Xero when the tax amount on the invoice does not match what Xero expects based on its own tax rate calculations. The most common cause is that WooCommerce has no tax rates configured, so the tax amount passed to Xero is zero. To fix this: go to WooCommerce > Settings > General and enable Enable taxes, then go to WooCommerce > Settings > Tax > Standard Rates and add your local tax rate. If your products are genuinely tax-free, set the plugin’s Default Tax Type to a zero-rated or exempt type such as GST Free Income or No GST so that Xero does not expect any tax at all.
Invoice created but the tax amount is wrong
The tax amount on the Xero invoice is sourced directly from WooCommerce. If the amount looks wrong, the issue is almost always in WooCommerce’s tax configuration — check that the correct tax rate is applied to your products and shipping under WooCommerce > Settings > Tax. Also confirm that the products in your store have the correct tax class assigned (on each product’s edit page).
Error: “The tax type code is invalid” or invoice rejected by Xero
You have selected an INPUT tax type (used for supplier purchases) instead of an OUTPUT type (used for sales). Go to the Mapping tab and change the Default Tax Type to an OUTPUT type. Refer to the tax type table in Step 3 above for guidance.
Error: “The contact name must be unique”
Xero requires every contact to have a unique name. The plugin handles this automatically by appending a unique identifier when a duplicate name is detected. If the error persists, it is likely there are multiple contacts in Xero with the exact same name — open Xero, search for the contact name, and merge or rename the duplicates.
Invoice created but shows the wrong currency
Xero must have multi-currency enabled, and the currency used in WooCommerce must already be added to your Xero organisation before orders are synced. Go to your Xero organisation settings and add the required currency under Currencies.
Connect to Xero button redirects but returns an error
Double-check that the Redirect URI in the plugin settings exactly matches the OAuth 2.0 redirect URI entered in your Xero app’s Configuration page — including the trailing slash. Even a single character difference will cause the authorisation to fail.
Connect to Xero redirects back with no error or success message
This can happen when the PHP session data is lost between the redirect to Xero and the redirect back. The plugin now shows a specific error in this case. If you see a “Connection failed” message mentioning session configuration, try connecting again. If the issue persists, ask your hosting provider to check that PHP sessions are configured correctly and that the session save path is writable.
Where do I find sync error details?
Enable Debug Logging in WooCommerce > Settings > Xero Invoice Sync > Behavior, then place a test order (or manually trigger a sync) and view the log at WooCommerce > Status > Logs. Look for a log file named wc-xero. Individual order errors are always recorded as order notes regardless of whether debug logging is enabled.
FAQs
↑ Back to top
Do I need a paid Xero account?
Yes, you need an active Xero subscription to use this plugin with a live organisation. If you want to test the integration first, you can create a free Xero developer account at developer.xero.com and connect it to a demo company — this gives you a fully functional Xero environment at no cost.
Does this sync from Xero back to WooCommerce?
No. This is a one-way sync from WooCommerce to Xero only. The plugin creates invoices and records payments in Xero based on WooCommerce orders. Nothing is ever written back to WooCommerce from Xero.
Will it create duplicate customers in Xero?
It helps reduce duplicates by searching your Xero contacts by email address before creating a new one. If a match is found, that existing contact is used. If two customers happen to share the same name (but have different email addresses), a unique name is generated automatically to satisfy Xero’s requirement that all contact names be unique.
Can I manually sync a specific order?
Yes. Open the order in WooCommerce admin, select Send to Xero as Invoice from the Order Actions dropdown, and click Update. This works even if automatic sync is disabled and can be used at any time to resend a failed order.
Can I exclude certain products or orders from syncing?
There is no exclusion setting in the admin UI, but developers can use the wc_xero_should_sync_order filter to keep specific orders out of Xero entirely — for example, orders that contain a payment-plan, deposit, or course-booking product that is invoiced elsewhere. Return false from the filter and the order is skipped by both automatic sync and the manual Send to Xero as Invoice action. A separate wc_xero_should_sync_payment filter can skip payment creation only. See the “Developer: exclude orders from syncing” section above for a code example.
Can I use different Xero accounts for different product categories?
Yes. The Category Account Mapping setting on the Mapping tab lets you assign each WooCommerce product category to a specific Xero revenue account. For example, you could post clothing sales to one account and accessories to another. Unmapped categories fall back to your default Sales Account Code.
Can I route payments from different gateways to different bank accounts?
Yes. The Gateway Account Mapping table in Behavior > Payment Settings lets you map each payment gateway (e.g. Stripe, PayPal, BACS) to a specific Xero bank account. If Stripe pays into one bank account and BACS into another, you can configure that routing once — every payment from that gateway will automatically use the correct account in Xero. Gateways without a mapping fall back to the default Payment Account Code.
What does "Send SKU as Item Code" do?
When enabled on the Behavior tab, WooCommerce product SKUs are sent as item codes on Xero invoice lines. If your SKUs match Xero untracked inventory item codes, Xero will automatically link the line item to the corresponding Xero item and populate its description. This setting is off by default.
Which Xero tax type should I use?
Always use an OUTPUT tax type for sales — OUTPUT types cover income and sales invoices. INPUT types are for supplier invoices (purchases) and will cause Xero to reject your invoice. The specific OUTPUT type depends on your region and tax status: in Australia use GST on Income; in the UK use Tax on Sales (20%) or Lower Rate (5%); in New Zealand use GST on Income. If your products are tax-exempt, use GST Free Income, Zero Rated Income, or an equivalent exempt OUTPUT type. Your accountant can confirm the correct code for your situation.
Why does my Xero invoice show 'Includes adjustments to tax'?
This warning appears when the tax amount on the invoice does not match what Xero calculates based on its own rates. It almost always means WooCommerce has no tax rates configured, so the tax amount passed to Xero is zero. Fix it by enabling taxes in WooCommerce and adding your local tax rate under WooCommerce > Settings > Tax > Standard Rates. If your products are genuinely tax-free, set the plugin’s Default Tax Type to a zero-rated or exempt type (such as GST Free Income or No GST) so Xero does not expect any tax.
Does it work with WooCommerce Subscriptions?
Yes. Each subscription renewal order is treated like a regular order. When a renewal is processed, the sync triggers automatically and creates a new Xero invoice for that renewal period.
Is HPOS (High Performance Order Storage) supported?
Yes. The plugin is fully compatible with WooCommerce High Performance Order Storage (HPOS), also known as Custom Order Tables.
Do I need to reconnect after my Xero token expires?
Usually no. The plugin automatically refreshes your access token in the background. You may need to reconnect if you manually revoke access in Xero, or after prolonged inactivity depending on Xero’s current token policies. If the connection status on the API tab shows as disconnected, simply click Connect to Xero and authorise again.

