
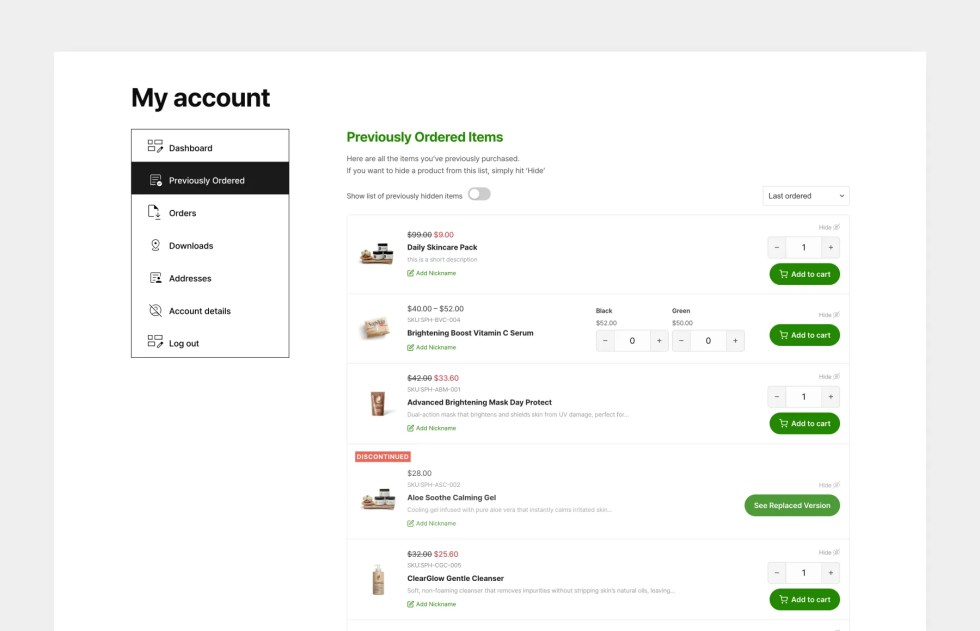
Previously Ordered Items for WooCommerce adds a “Previously Ordered” tab to your customers’ My Account page, so they can see everything they’ve bought before and add it back to the cart in one click. Customers can give items nicknames and hide the ones they don’t need. You can mark products as discontinued, link them to a replacement product, and match the tab’s colors and wording to your store. This guide covers installation and setup so your customers can start reordering quickly.
- One-click reorder from My Account, including individual variations of variable products, with no page reload
- Customer nicknames and hide/unhide controls. Hidden items come back automatically if the customer buys them again
- Discontinued product status, with an optional switch to discontinued when stock hits zero, a replacement product button and custom messages
- Works with High-Performance Order Storage (HPOS) and both the classic and block-based cart and checkout
Getting Support
↑ Back to topNeed help? Our support team is available through the support portal with responses typically within 24 hours on business days. On weekends or holidays, responses may take longer, but we will assist you as soon as possible. Feel free to reach out with any questions or issues, we’re always ready to help!
Installation
↑ Back to topTo start using a product from WooCommerce.com, you can use the “Add to store” functionality on the order confirmation page or the My subscriptions section in your account.
- Navigate to My subscriptions.
- Find the Add to store button next to the product you’re planning to install.
- Follow the instructions on the screen, and the product will be automatically added to your store.
Alternative options and more information at:
Managing WooCommerce.com subscriptions.

After Installation: Important Step
↑ Back to topAfter activating the plugin, visit Settings → Permalinks in your WordPress dashboard and click Save Changes. This flushes the rewrite rules and ensures the Previously Ordered Items page resolves correctly. Without this step, the tab may return a 404 error.
How It Works
↑ Back to topOnce installed and activated, a new Previously Ordered tab appears in the WooCommerce My Account page for all logged-in customers. The tab shows every product a customer has ever purchased, and lets them reorder in a single click.
Customer Features
↑ Back to topOne-Click Reorder
↑ Back to topCustomers can add any previously purchased item back to their cart directly from the Previously Ordered tab, with no need to browse the shop or search. Simple products and variable products are both supported.
Variable Product Support
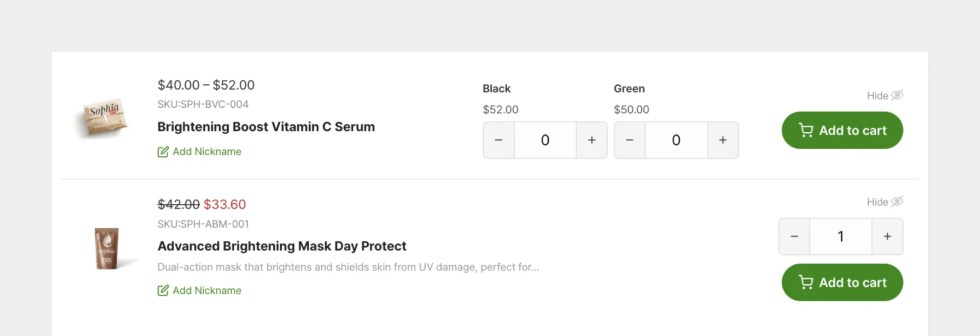
↑ Back to topVariable products (such as a t-shirt available in multiple sizes and colours) display each previously ordered variation as a separate line item. Each variation has its own quantity selector, so customers can adjust quantities independently and add them all to the cart in one go.
Custom Nicknames
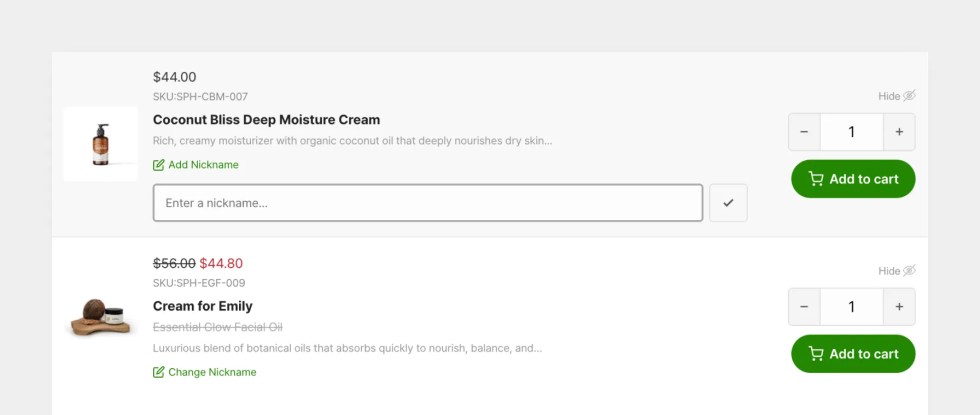
↑ Back to topCustomers can assign a personal nickname to any product in their list, for example, “John’s coffee” or “weekly order”. Nicknames help them find their regulars quickly on repeat visits.
To add or edit a nickname, customers click the nickname field next to the product and type their preferred label.
Hide and Unhide Products
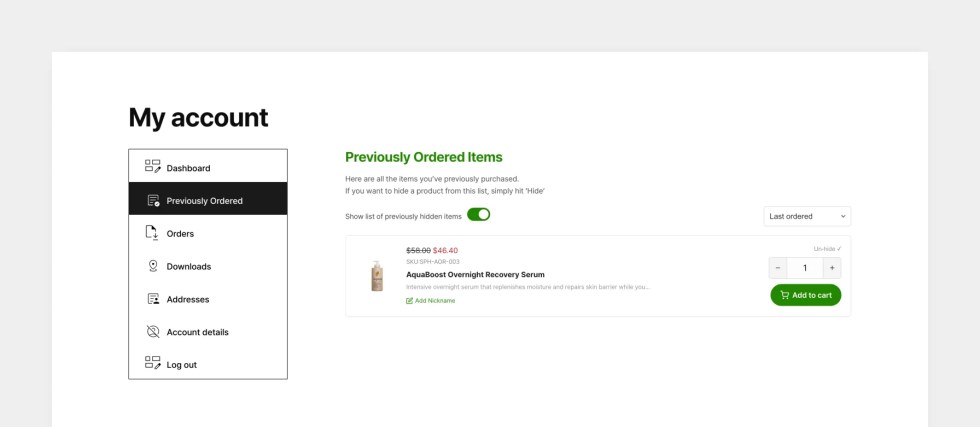
↑ Back to topIf a customer no longer wants to see a particular item in their list, they can hide it. Hidden products are removed from view but not deleted; they can be restored at any time using the Show Hidden Items toggle.
If a customer places a new order for a hidden product, it is automatically restored to their list without any manual action needed.
Last Ordered Date
↑ Back to topEach product in the list displays the date it was last purchased, making it easy for customers to track recurring orders and know when they last bought something.
Store Owner Features
↑ Back to topDiscontinued Product Status
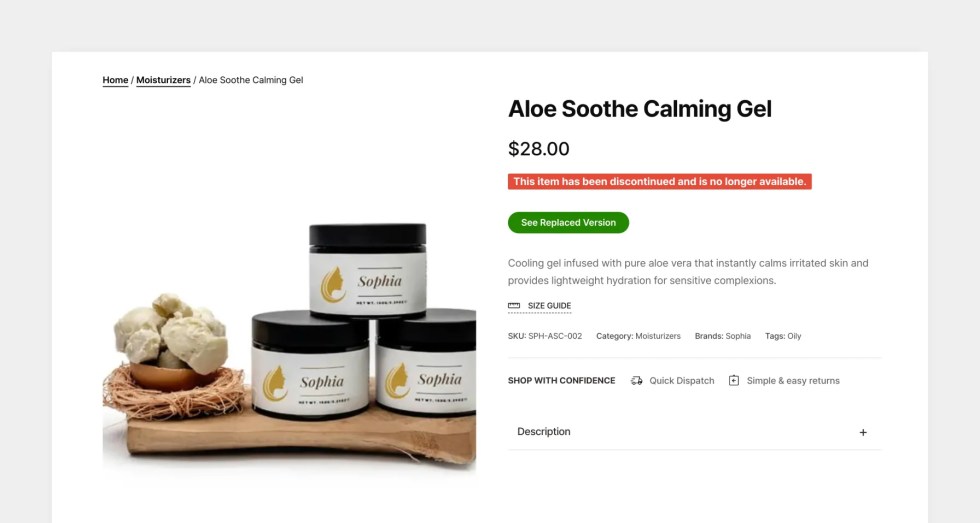
↑ Back to topYou can mark any product as Discontinued from the product edit screen. Discontinued products:
- Cannot be added to the cart (the add-to-cart button is replaced).
- Display a customizable banner on the product page.
- Remain published and visible in the catalogue, preserving any backlinks or search engine rankings.
To mark a product as discontinued:
- Open the product in the WordPress editor.
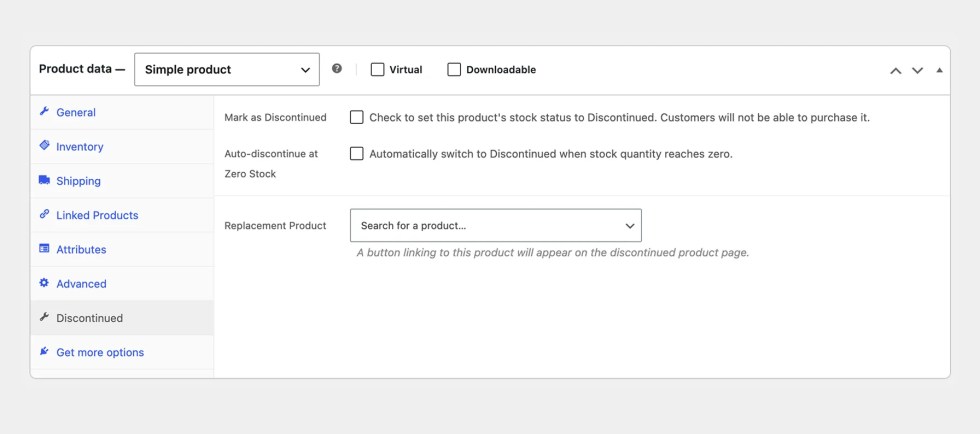
- Scroll down to the Product data section and click the Discontinued tab.
- Check the Mark as Discontinued checkbox.
- Optionally set a custom message (see below) and a replacement product.
- Click Update to save.
Auto-Discontinue at Zero Stock
↑ Back to topIf you manage stock on a product, you can enable the Auto-discontinue at Zero Stock option on the Discontinued tab. When the product’s stock quantity reaches zero, it will be automatically switched to Discontinued status, with no manual action required.
Replacement Product Linking
↑ Back to topOn the Discontinued tab, you can set a replacement product. When a replacement is set, a button linking to that product appears on the discontinued product’s page, making it easy to guide customers to the right alternative.
You can customize the button text (for example, “See the new version” or “Shop the replacement”) directly from the product edit screen.
Discontinued Messages
↑ Back to topThere are two ways to control the message shown on discontinued product pages:
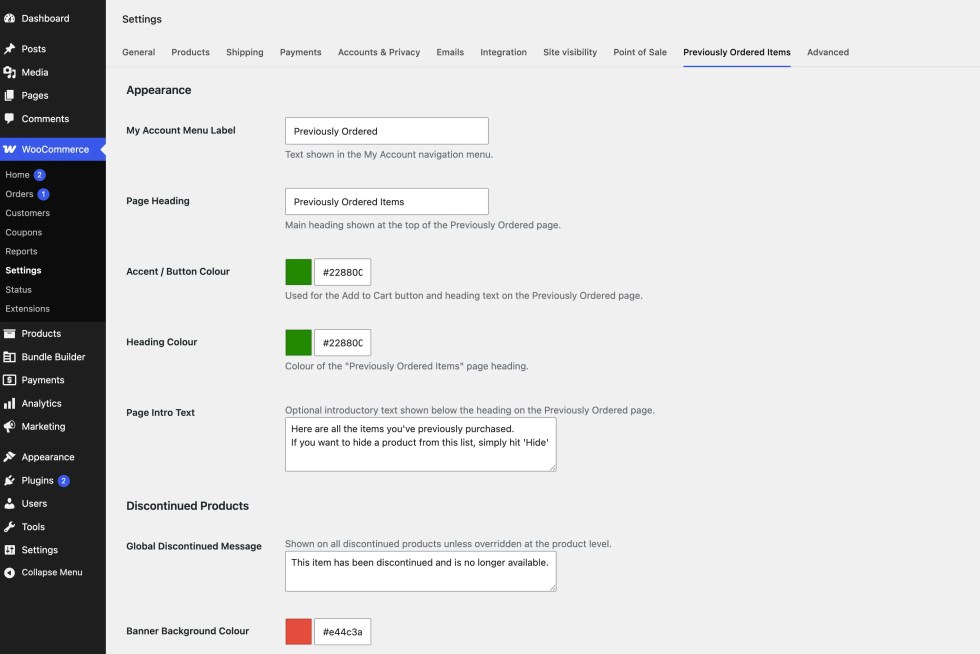
- Global message: Set a store-wide default message in WooCommerce → Settings → Previously Ordered Items, under the Discontinued Products section. This message appears on all discontinued products unless overridden.
- Per-product message: On the Discontinued tab of any individual product, you can write a custom message specific to that product. This overrides the global message for that item only.
Quick Edit Support
↑ Back to topYou can mark products as Discontinued and update the replacement button text directly from the Products list screen using WordPress Quick Edit, with no need to open the full product editor.
Settings
↑ Back to topGo to WooCommerce → Settings → Previously Ordered Items to customise the plugin’s appearance and behaviour.
Appearance
↑ Back to top| Setting | Description |
|---|---|
| My Account Menu Label | The text shown in the My Account navigation menu. Default: Previously Ordered. |
| Page Heading | The main heading displayed at the top of the Previously Ordered page. Default: Previously Ordered Items. |
| Page Intro Text | An optional introductory paragraph shown below the heading. Leave blank to show nothing. |
| Accent / Button Color | The color used for buttons and interactive elements. Default: #228800. |
| Heading Color | The color of the page heading. Default: #228800. |
Click Reset Colors to Defaults at the bottom of the settings page to restore all colour settings to their original values.
Discontinued Products
↑ Back to top| Setting | Description |
|---|---|
| Global Discontinued Message | The message shown on all discontinued product pages (unless overridden per product). |
| Banner Background Color | The background color of the discontinued product banner. Default: #E44C3A. |
| Banner Text Color | The text color of the discontinued product banner. Default: #ffffff. |
Frequently Asked Questions
↑ Back to top
Does this work with variable products?
Yes. Each previously ordered variation is displayed as its own line item with its own quantity selector. Customers can update quantities across multiple variations and add them all to the cart at once.
What happens if a customer hides a product and then orders it again?
The plugin automatically restores it to the visible list. No action is needed from the customer or store owner.
Does the Discontinued status remove the product from the shop?
No. Discontinued products stay published and visible in the catalogue. Only purchasing is disabled. This is intentional, as it preserves backlinks and SEO value.
Is this plugin compatible with WooCommerce High-Performance Order Storage (HPOS)?
Yes. The plugin is fully HPOS-compatible and uses
wc_get_orders()throughout, without ever querying order posts directly.
Does it work with the WooCommerce block-based cart and checkout?
Yes. The plugin is compatible with both the classic shortcode checkout and the WooCommerce block-based checkout.
Will this slow down my site?
No. Order data is cached using WordPress transients for 5 minutes per customer, and the cache is automatically cleared whenever a new order is placed or an order is marked as paid. Plugin assets are only loaded on the Previously Ordered page and on single product pages.
Where are customer nicknames stored?
Nicknames are stored in a dedicated database table (
{prefix}_poi_nickname) created when the plugin is first activated. Each nickname is stored per customer per product, so two customers can give the same product completely different nicknames.

