
LWN Multi-Step Checkout is a WooCommerce multistep checkout plugin. It splits a long checkout into a guided sequence of steps, so customers fill in one thing at a time instead of facing a single long form.
It works as a multi step checkout for WooCommerce on the classic shortcode checkout, and as a checkout steps block for the WooCommerce Checkout Block.
Every step is optional. You choose which steps appear, what they’re called, how the step indicator looks, and whether customers can skip ahead.
Configure it from a settings screen on the classic checkout, or from the block itself in the editor. No code required, no template overrides.
Installation
↑ Back to topTo start using a product from WooCommerce.com, you can use the “Add to store” functionality on the order confirmation page or the My subscriptions section in your account.
- Navigate to My subscriptions.
- Find the Add to store button next to the product you’re planning to install.
- Follow the instructions on the screen, and the product will be automatically added to your store.
Alternative options and more information at:
Managing WooCommerce.com subscriptions.

Manual installation
↑ Back to topDownloading
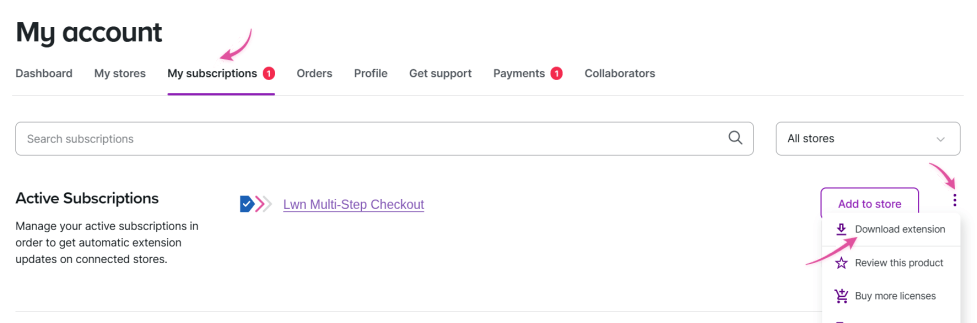
↑ Back to top- Go to My Account > My Subscriptions on WooCommerce.com.
- Find LWN Multi-Step Checkout in the list.
- Click the menu next to it and select Download.
Installation
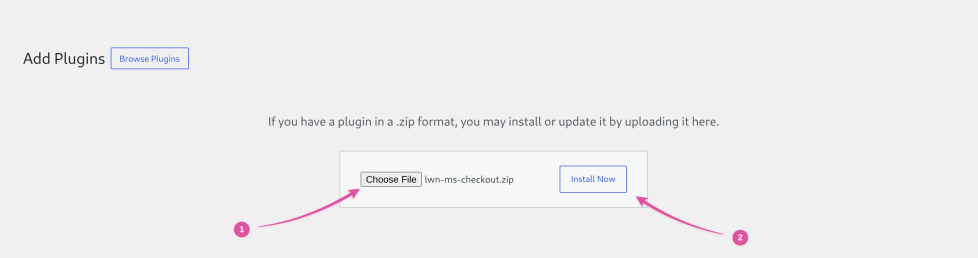
↑ Back to top- Log in to your WordPress admin dashboard.
- Go to Plugins > Add Plugin.
- Select Upload Plugin.
- Choose the ZIP file you downloaded, then select Install Now.
- Once installation finishes, select Activate Plugin.



Getting started
↑ Back to topNot sure which one your store is using, or how to switch between them? WooCommerce’s own guide covers both: Customizing the Cart and Checkout Pages.
After activation the extension detects which checkout your store uses. If the steps are not showing, it tells you why in your WordPress admin and links you to the setting that fixes it.
Classic checkout
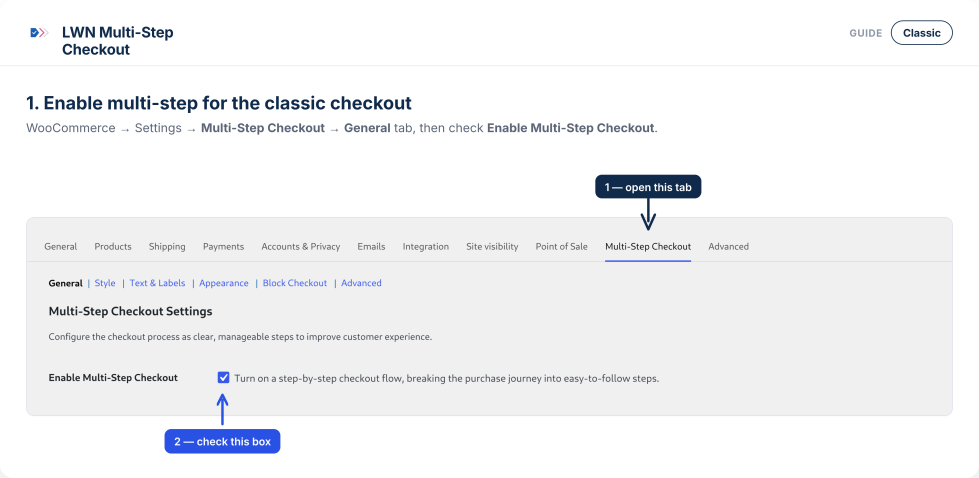
↑ Back to top- Go to WooCommerce → Settings → Multi-Step Checkout.
- Enable Multi-Step Checkout is already ticked — your checkout is split into steps as soon as the extension is active.
- Tick the steps you want — Shipping, Login, Coupon and so on — in the same General tab.
- Save changes.
Block checkout
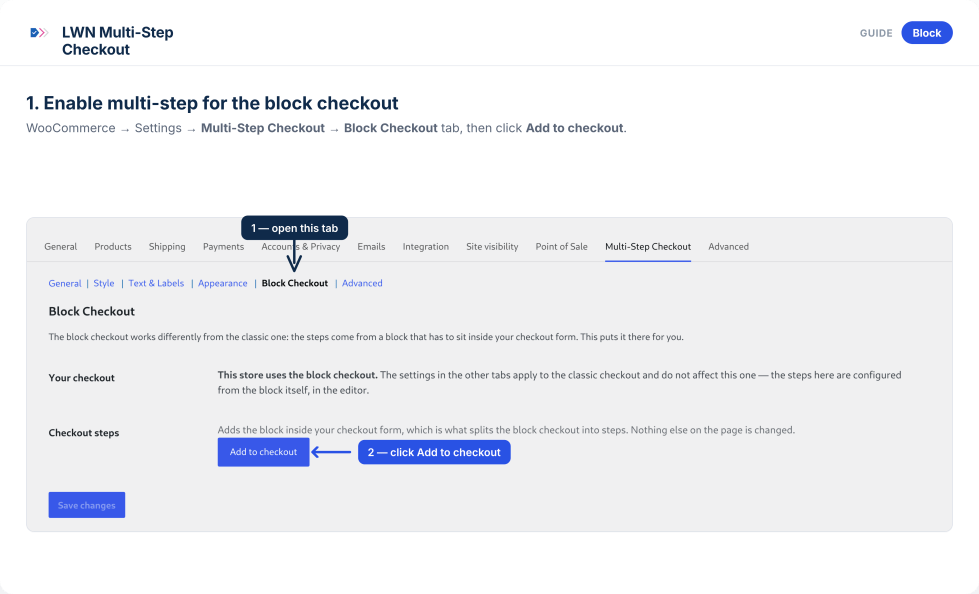
↑ Back to top- Go to WooCommerce → Settings → Multi-Step Checkout → Block Checkout.
- Select Add to checkout. This places the LWN Checkout Steps block inside your checkout form. Nothing else on the page changes.
- Edit your Checkout page, select the LWN Checkout Steps block, and set the steps, labels, style and color in the sidebar.
- To undo it, return to the same tab and select Remove from checkout. Your settings are kept.
Block checkout
↑ Back to topOn the block checkout, the steps are controlled by a block inside the Checkout template in the Site Editor, rather than by the plugin settings tabs. Add the block once, then configure its settings directly in the editor.
This means you see your real checkout while you configure it. Change a label, a style or the color and the preview updates as you type.
Placing the block is covered in Getting started. Everything below is what you can change once it is there.
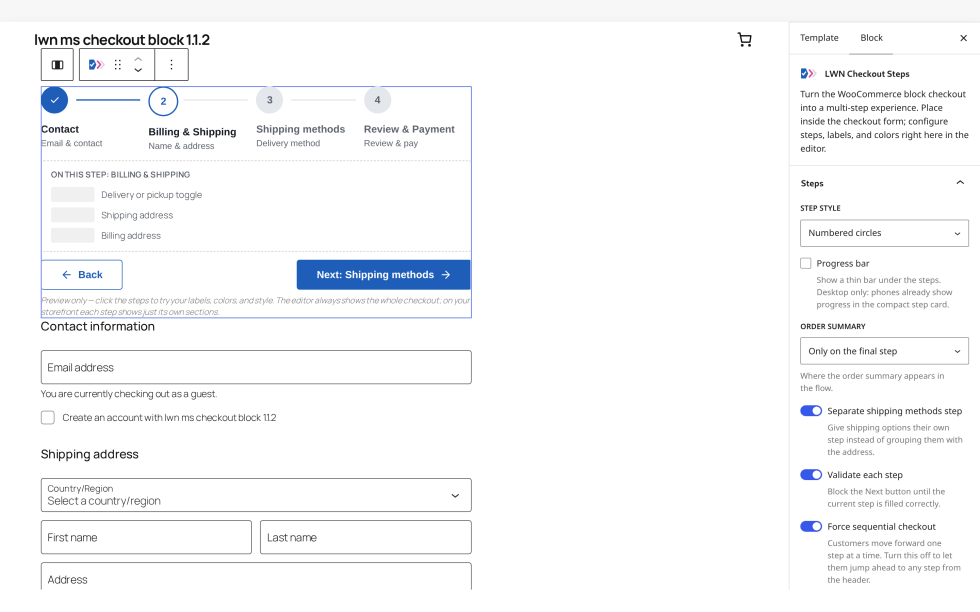
Steps
↑ Back to topSelect the LWN Checkout Steps block in the editor, then open the Steps panel in the sidebar.
The editor shows the whole checkout at once so you can click between steps and try your settings. On your storefront each step shows only its own sections.
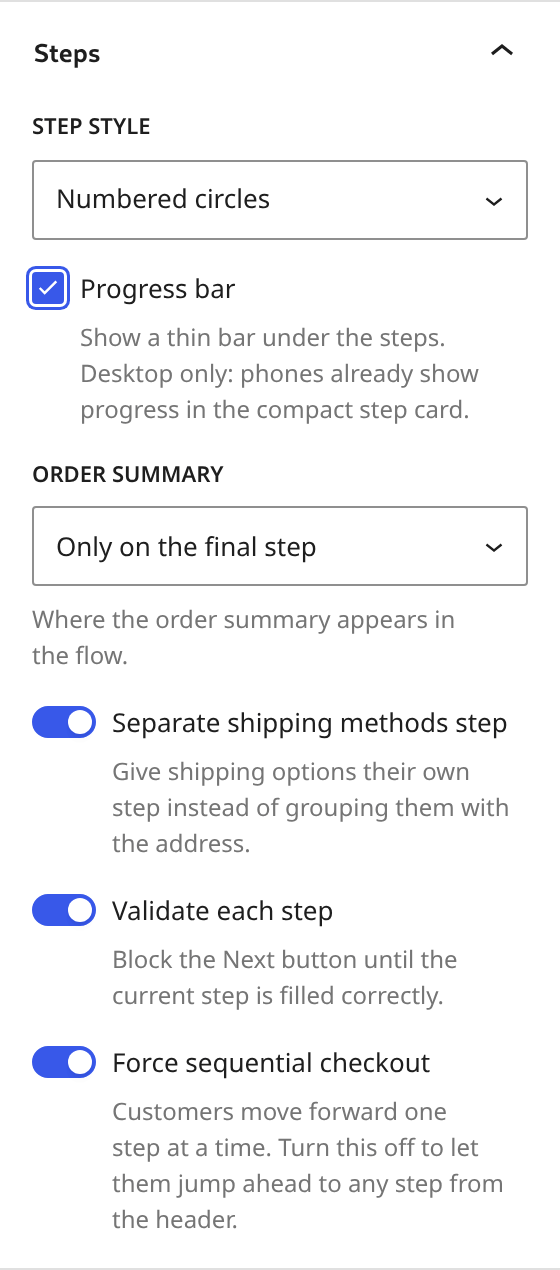
Step style
Default: Numbered circles.
Choose how the step indicator looks: Numbered circles, Breadcrumb arrows, or Icons. The preview updates as you switch.
Progress bar
Default: Enabled.
Shows a thin bar under the step indicator, filling as the customer moves through the steps. Desktop only — on phones, the compact step card already shows progress, so the bar is hidden there.
Order summary
Default: Only on the final step.
Where the order summary appears in the flow.
- Visible on all steps — the summary stays on screen throughout.
- Only on the final step — the summary appears once, at payment.
- Its own review step — the summary becomes a separate step of its own before payment.
Separate shipping methods step
Default: Enabled.
Gives shipping options their own step instead of grouping them with the address. Turn it off and the two are combined.
Validate each step
Default: Enabled.
Blocks the Next button until the current step is filled in correctly, so mistakes surface on the step that caused them rather than at payment.
Force sequential checkout
Default: Enabled.
Customers move forward one step at a time. Turn it off to let them jump ahead to any step from the step indicator.
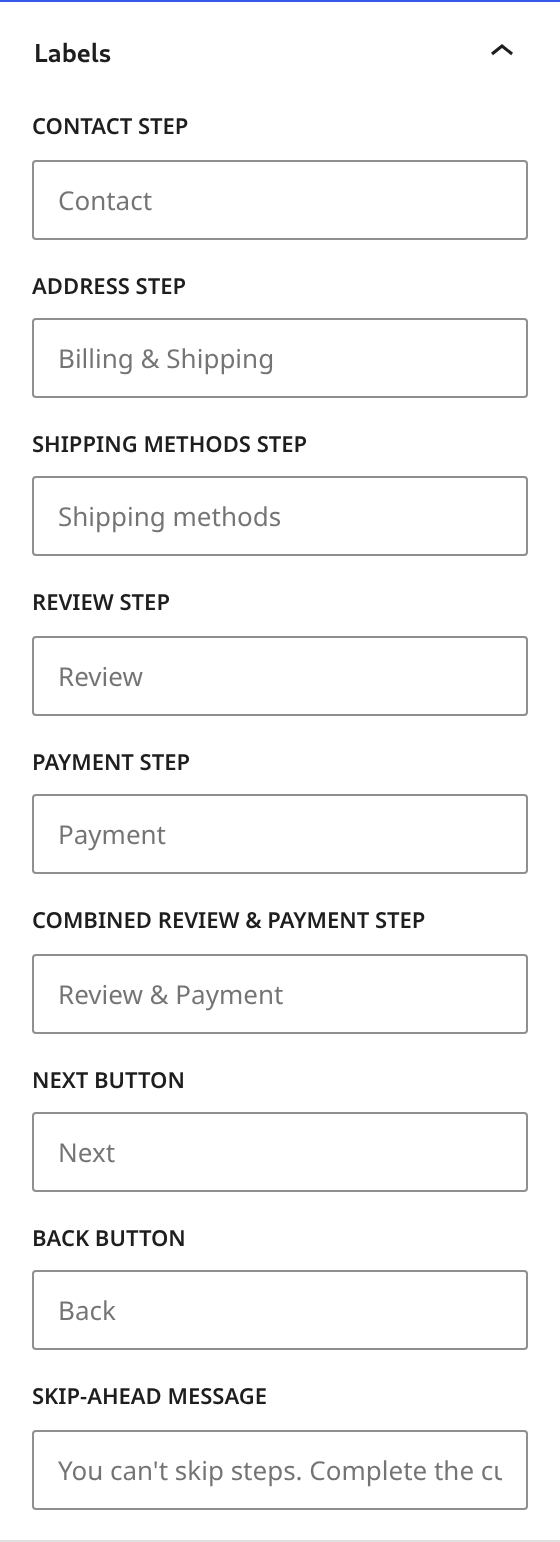
Labels
↑ Back to topOpen the Labels panel to rename any step or navigation button. Leave a field empty and the built-in wording is used.
| Field | Default wording |
|---|---|
| Contact step | Contact |
| Address step | Billing & Shipping |
| Shipping step | Shipping methods |
| Review step | Review |
| Payment step | Payment |
| Combined review & payment step | Review & Payment |
| Next button | Next |
| Back button | Back |
| Skip-ahead message | You can’t skip steps. Complete the current step first |
Two of these depend on your other settings. Shipping step is only used when Separate shipping methods step is on; when it is off, the address and shipping fields share the Address step label. Combined review & payment step is used in place of the separate Review and Payment labels when the order summary is not on its own step.
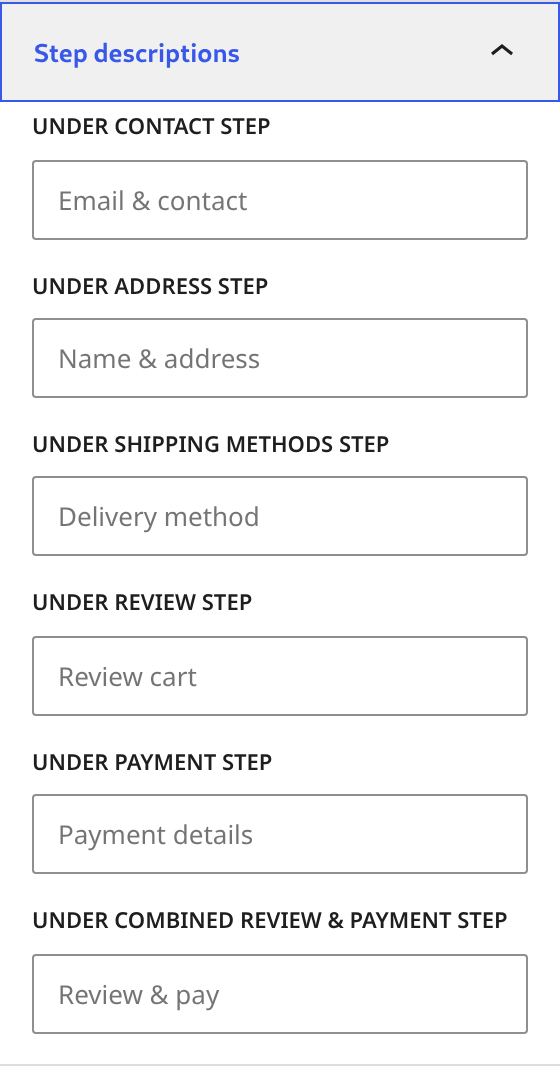
Step description
↑ Back to topEach step name has a smaller line underneath it. Open the Step descriptions panel to change them. Leave a field empty and the built-in wording is used.
| Field | Default wording |
|---|---|
| Under contact step | Email & contact |
| Under address step | Name & address |
| Under shipping step | Delivery method |
| Under review step | Review cart |
| Under payment step | Payment details |
| Under combined review & payment step | Review & pay |
These follow the same rules as the labels above: the shipping line only appears when Separate shipping step is on, and the combined line replaces the separate review and payment lines when the order summary is not on its own step.
If you translate your store, translate these too — they are ordinary text on the page, not automatic descriptions.
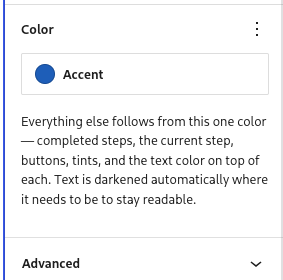
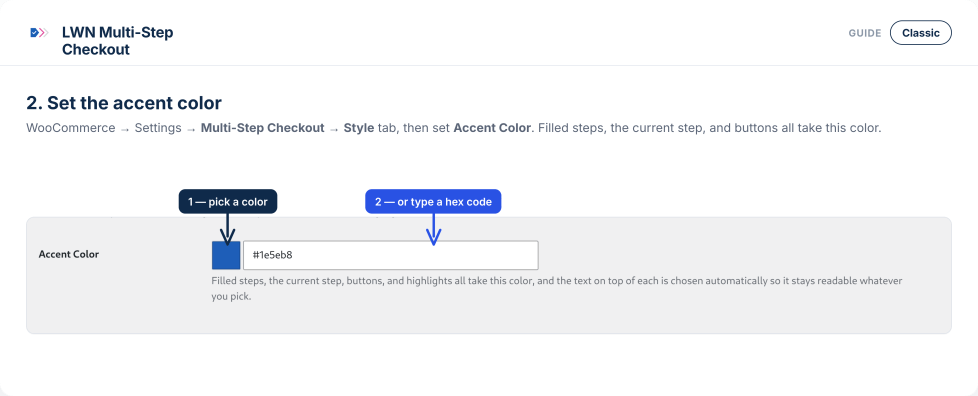
Color
↑ Back to topOpen the Color panel to set the accent.
Accent color
Default: #1e5eb8.
Everything the stepper draws comes from this one color. Completed steps, the current step, the navigation buttons and the highlights all follow it, in every step style.
The text on top of each of those is chosen automatically so it stays readable whatever you pick. There is nothing else to set — no separate colors per step style, and no CSS required.
Classic checkout steps
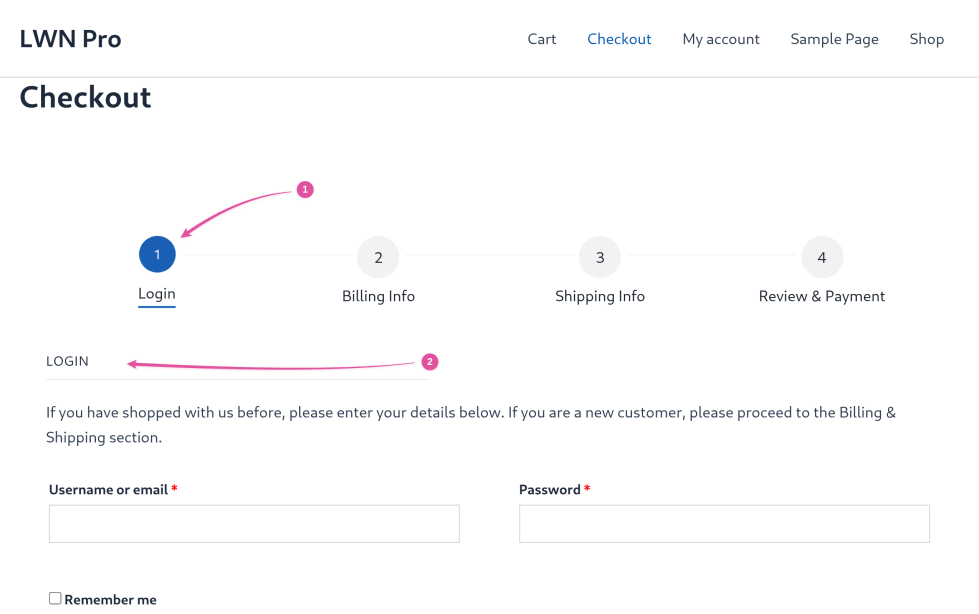
↑ Back to topLogin
↑ Back to topDefault: Disabled.
When enabled, checkout begins with a dedicated Login step for returning customers before they continue to checkout.
If Show Registration Form is also enabled, the login and registration forms are displayed together on this step.
Requirements:
- WooCommerce Enable log-in during checkout must be enabled.
- To display the registration form, WooCommerce Allow customers to create an account on the “My account” page must also be enabled.

Billing and shipping
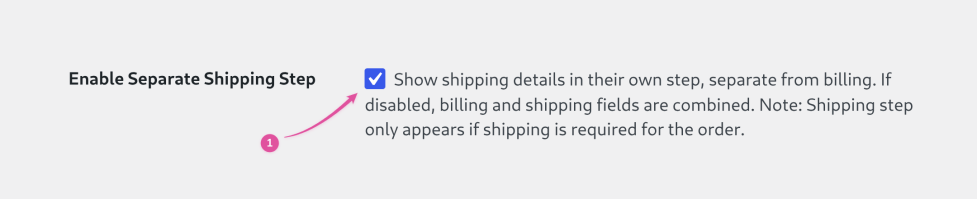
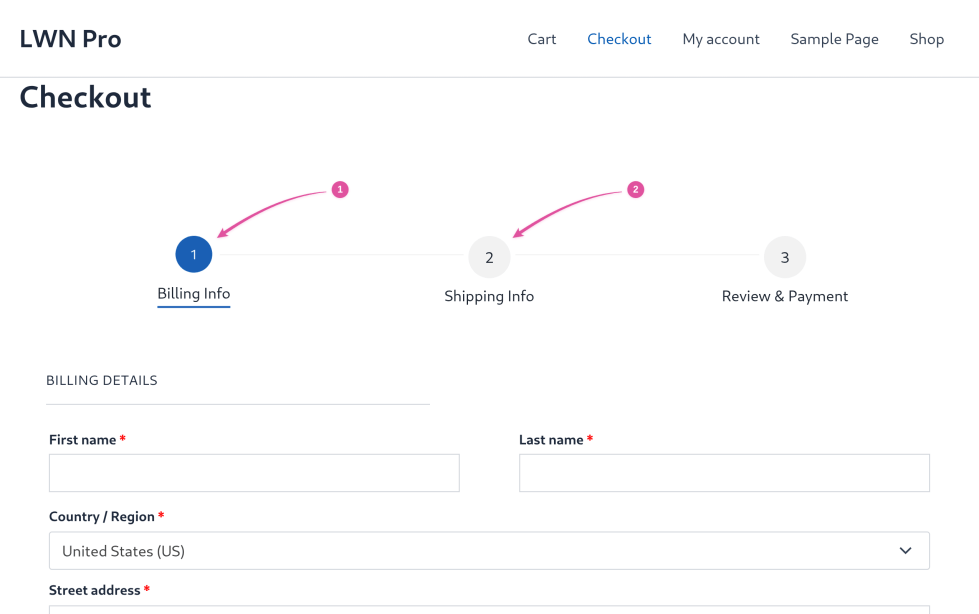
↑ Back to topDefault: Billing and shipping are displayed as separate steps.
Turn off Enable Separate Shipping Step to combine both sections into a single checkout step.
If the cart contains only virtual or downloadable products, the Shipping step is automatically skipped regardless of this setting.
Shipping methods placement
With Include Shipping Methods enabled, the available shipping methods appear inside the Shipping step — below the shipping address and above the order notes.
Default: Enabled.
Turn it off to keep WooCommerce’s standard behavior, where shipping methods appear in the order review step instead.

Coupon
↑ Back to topDefault: A coupon field is displayed at the top of the Review step.
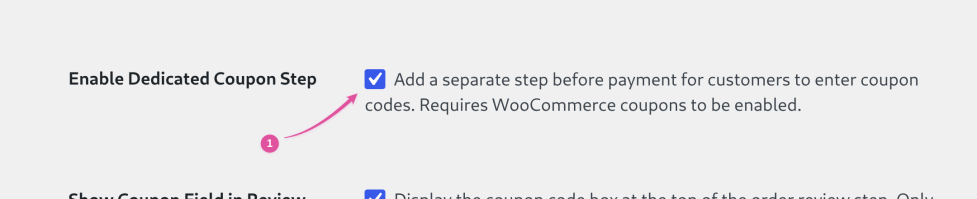
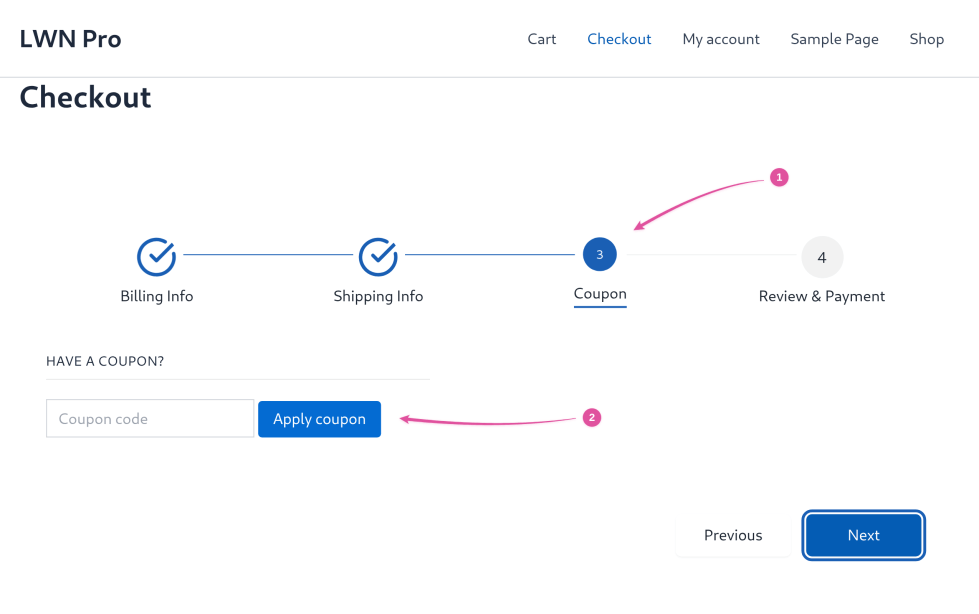
Enable Dedicated Coupon Step to move coupon entry into its own checkout step. This replaces the coupon field in the Review step.
Requirement:
- WooCommerce coupons must be enabled.
Coupon field in the review step
Default: Enabled.
While the dedicated coupon step is off, Show Coupon Field in Review Step controls whether the coupon box appears at the top of the review step. Turn it off to hide the coupon box from that step.
This setting has no effect when Enable Dedicated Coupon Step is enabled — the dedicated step replaces it.

Review and payment
↑ Back to topDefault: Order review and payment are combined into a single step.
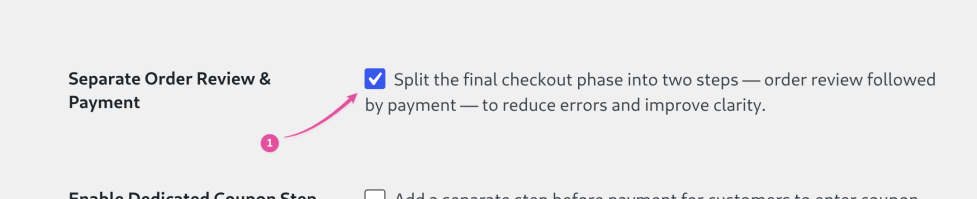
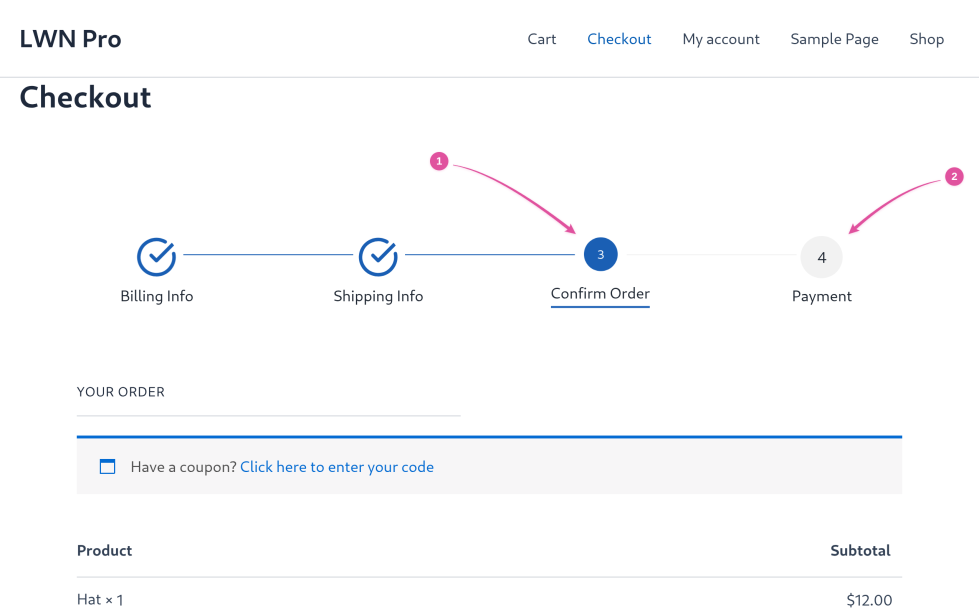
Enable Separate Order Review & Payment to split them into two steps:
- Confirm Order
- Payment
Navigation and validation
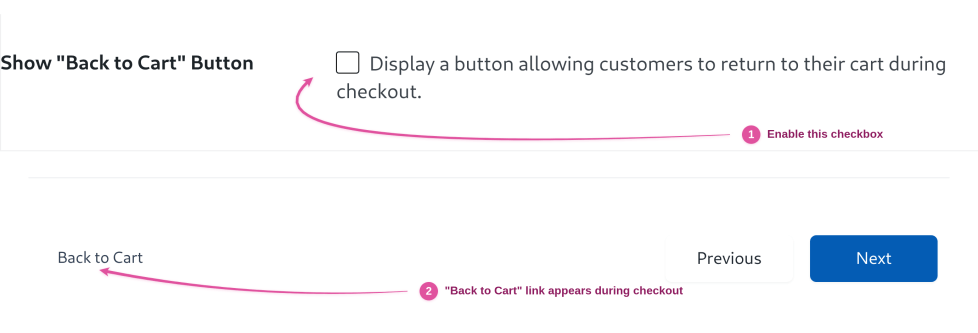
↑ Back to topShow “Back to Cart” button
↑ Back to topDefault: Disabled.
When enabled, a Back to Cart link appears alongside the step navigation, letting customers return to their cart at any point during checkout.
The link text can be changed with Back to Cart Text on the Text & Labels tab.
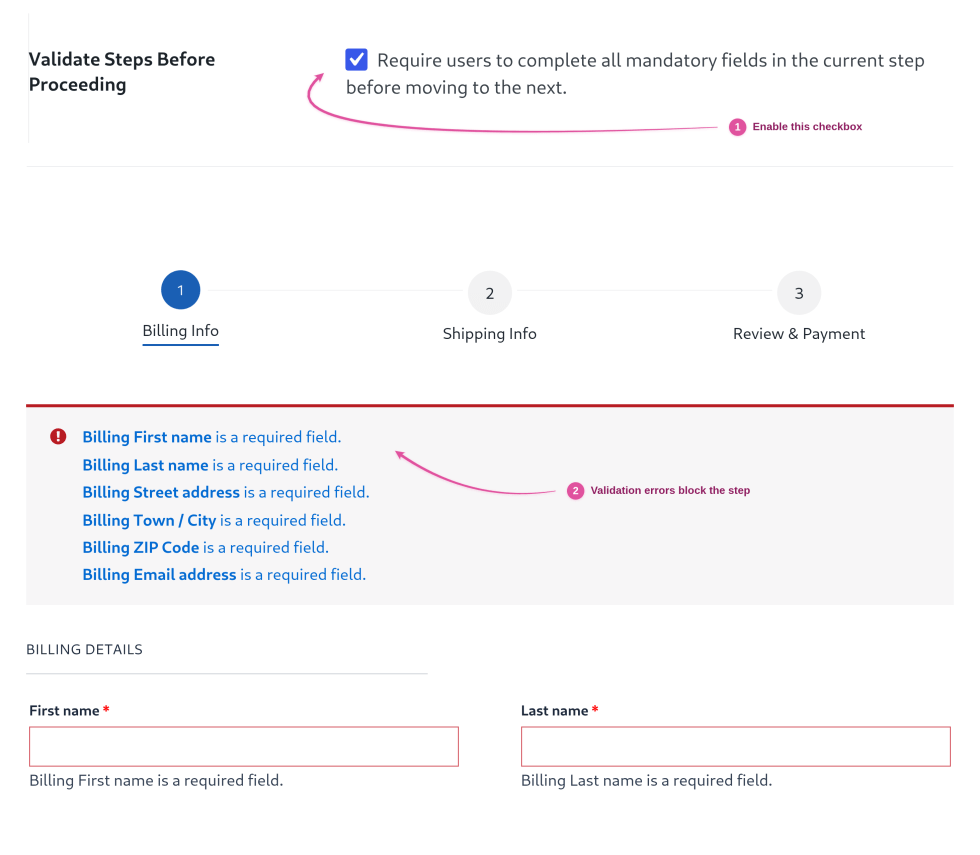
Validate steps before proceeding
↑ Back to topDefault: Enabled.
Each step is checked before the customer can continue — required fields must be completed correctly before Next moves them forward. Validation uses WooCommerce’s own checkout rules, so fields added by your theme or another extension are checked too.
Turn it off to let customers move through every step unchecked. Errors then surface only when they try to place the order.
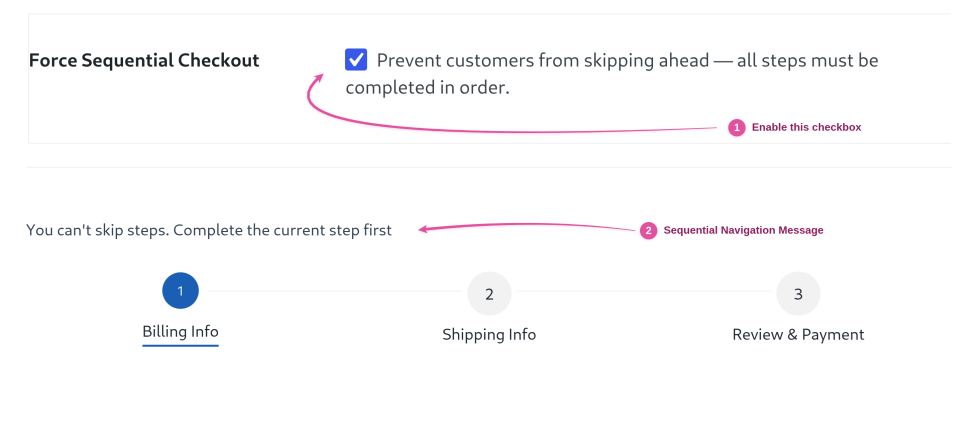
Force sequential checkout
↑ Back to topDefault: Enabled.
Customers move through the steps in order — they can return to any earlier step, but cannot jump more than one step ahead.
When a customer tries to skip ahead, the Sequential Navigation Message appears. Edit its wording on the Text & Labels tab.
Turn it off to let customers move freely between all steps.
Progress bar
↑ Back to topDefault: Enabled.
Shows a thin bar under the step indicator, filling as the customer moves through the steps.
Turn it off to show only the step indicator, with no bar underneath.


Style
↑ Back to topThe Style tab lets you customize both the appearance of the checkout step indicator and the loading animation shown when customers move between steps.
Step indicator
↑ Back to topDefault: Default — numbered circles.
Choose how the checkout steps are displayed:
- Default — numbered circles connected by lines.
- Breadcrumb Style — connected arrow-shaped breadcrumbs.
- Icon-Based Style — an icon above each step label.
A live preview is shown as you switch between styles, allowing you to see the changes before saving.



Loading animation
↑ Back to topDefault: Default — a spinning circular loader.
Choose the animation displayed while the next checkout step loads:
- Default — a spinning circular loader.
- Pulse Bars — animated vertical bars.
- Grid — an animated grid loader.
A live preview updates instantly as you select each animation.

Appearance
↑ Back to topThe checkout steps are built from a single color. Step indicators, buttons and highlights all follow it.
Accent color
Default: the plugin’s own blue.
Filled steps, the current step, buttons and highlights all take this color. The text on top of each is chosen automatically so it stays readable whatever you pick.
This one setting covers all three step indicator styles — there are no per-style colors to set.
Text and labels
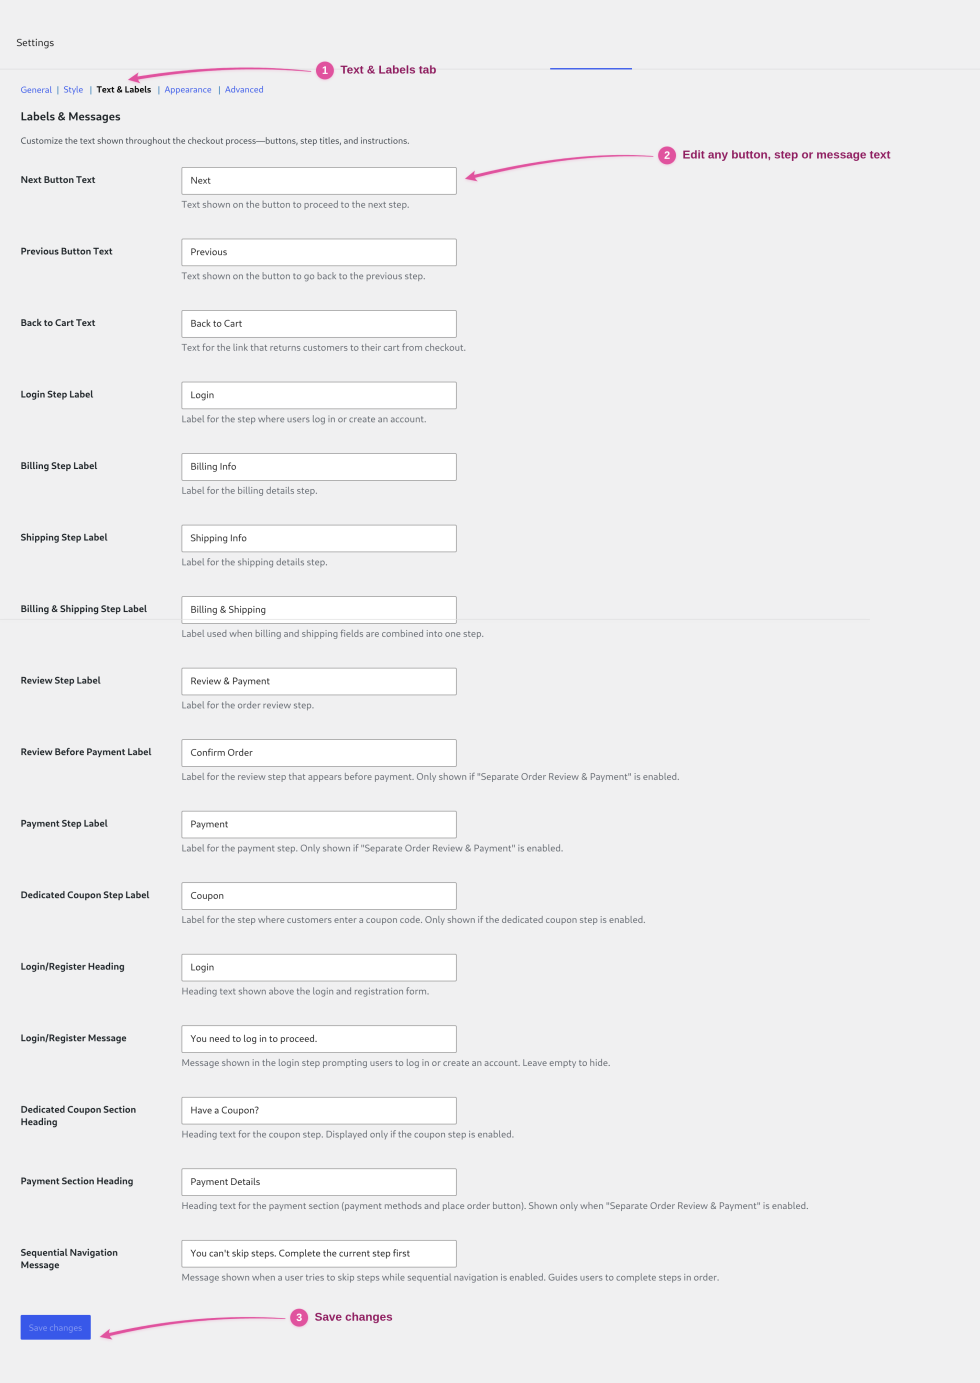
↑ Back to topThe Text & Labels tab lets you customize the wording used throughout your checkout experience without editing any code.
Update a field, save your changes, and the new text appears immediately on the checkout page.
Some settings only take effect when related features are enabled on the General tab. Where applicable, these dependencies are listed below.
Navigation labels
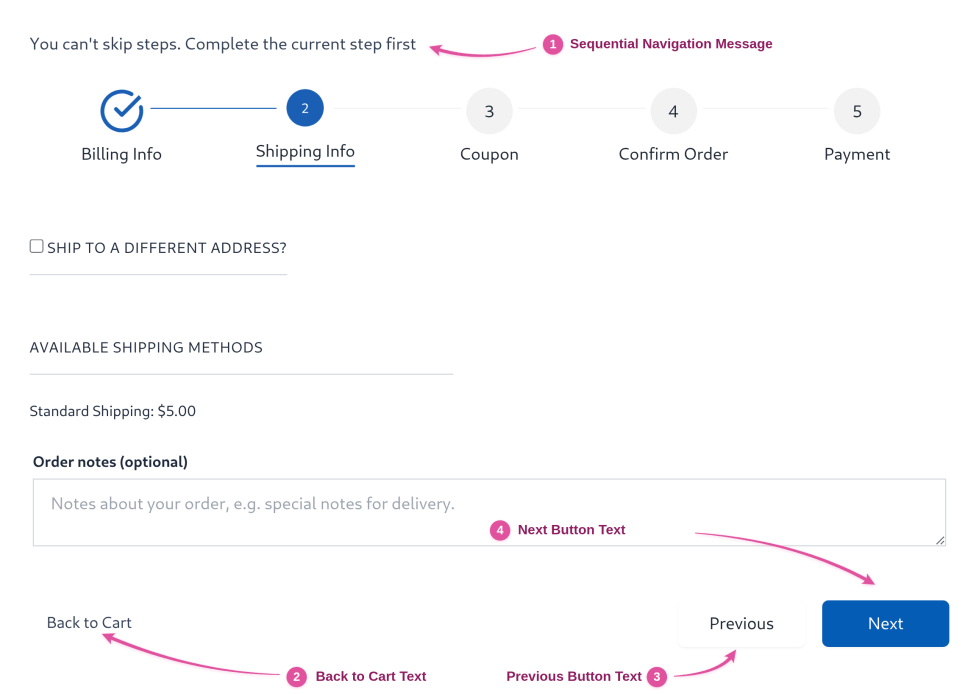
↑ Back to topThese labels control the navigation buttons and messages displayed during checkout.
| Setting | Default | Description |
|---|---|---|
| Next Button Text | Next | Text displayed on the button that moves customers to the next checkout step. Shown on every step except the final one. |
| Previous Button Text | Previous | Text displayed on the button that returns customers to the previous step. Shown on every step except the first. |
| Back to Cart Text | Back to Cart | Text for the link that returns customers to the cart page. Displayed only when Show “Back to Cart” Button is enabled on the General tab. |
| Sequential Navigation Message | You can't skip steps. Complete the current step first | Message shown when a customer attempts to jump ahead to a step that has not yet been completed. This is only used when Force Sequential Checkout is enabled. If sequential checkout is disabled, customers can move freely between available steps and this message is never shown. |
Step labels
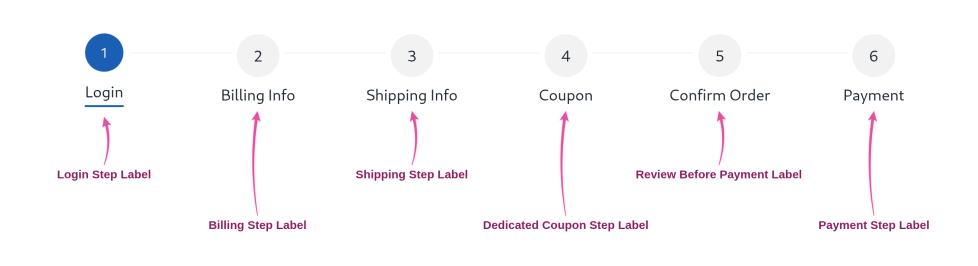
↑ Back to topThese settings control the names displayed in the checkout step indicator.
The steps customers see—and the order they appear in—depend on which checkout features are enabled. If all optional steps are disabled, only Billing & Shipping and Review & Payment are shown.
| Setting | Default | Description |
|---|---|---|
| Login Step Label | Login | Label for the login/register step. Displayed only when Enable Login Step is enabled. |
| Billing Step Label | Billing Info | Label for the billing step. Displayed only when Enable Separate Shipping Step is enabled. |
| Shipping Step Label | Shipping Info | Label for the shipping step. Displayed only when billing and shipping are separated, and shipping is required for the order. |
| Billing & Shipping Step Label | Billing & Shipping | Label for the combined billing and shipping step when separate shipping is disabled. |
| Dedicated Coupon Step Label | Coupon | Label for the coupon step. Displayed only when Enable Dedicated Coupon Step is enabled. |
| Review Step Label | Review & Payment | Label for the final combined review and payment step. Used when Separate Order Review & Payment is disabled (default). |
| Review Before Payment Label | Confirm Order | Label for the review step when order review and payment are separated. Displayed only when Separate Order Review & Payment is enabled. |
| Payment Step Label | Payment | Label for the payment step that follows the review step. Displayed only when Separate Order Review & Payment is enabled. |
Login step content
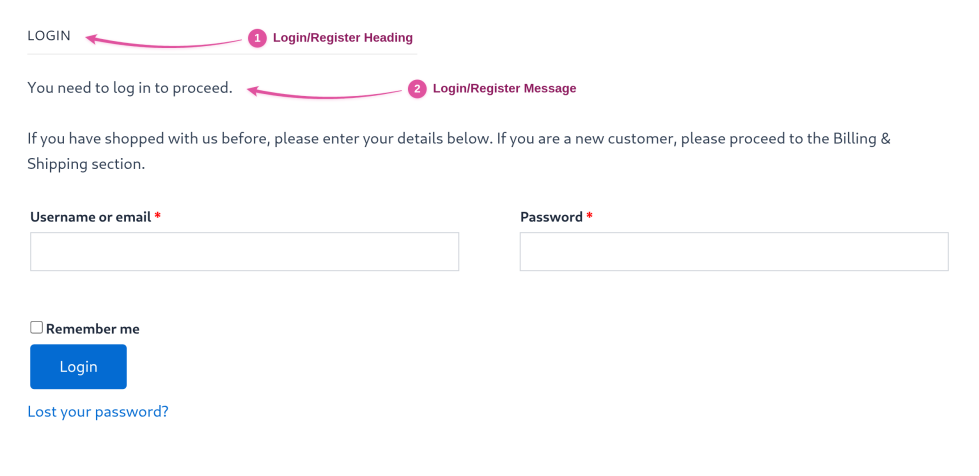
↑ Back to topThese settings apply only when Enable Login Step is enabled.
| Setting | Default | Description |
|---|---|---|
| Login/Register Heading | Login | Heading displayed above the login and registration form. |
| Login/Register Message | You need to log in to proceed. | Message shown when a customer tries to continue without logging in. It stays hidden until then. Leave the field empty to disable the message. |
Coupon step content
↑ Back to topThese settings apply only when Enable Dedicated Coupon Step is enabled.
| Setting | Default | Description |
|---|---|---|
| Dedicated Coupon Section Heading | Have a Coupon? | Heading displayed above the coupon code field. |

Payment step content
↑ Back to topThese settings apply only when Separate Order Review & Payment is enabled.
| Setting | Default | Description |
|---|---|---|
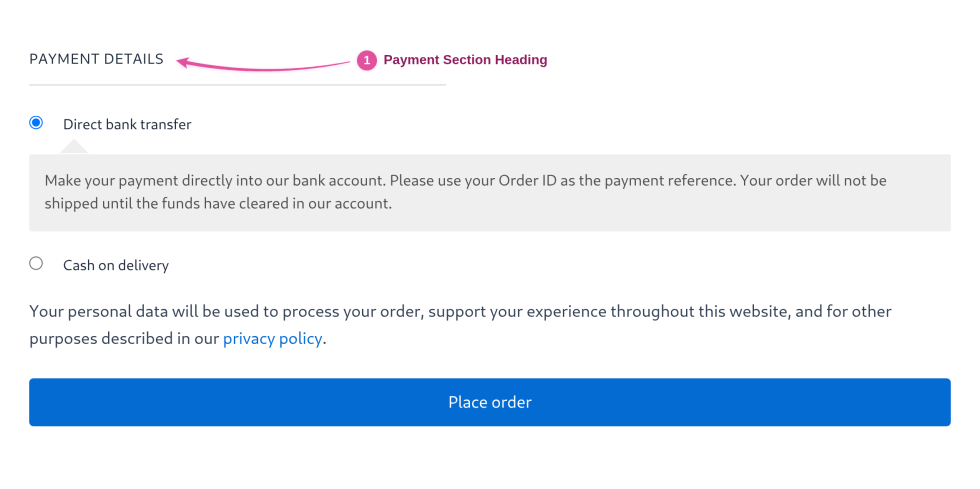
| Payment Section Heading | Payment Details | Heading displayed above the available payment methods and the Place Order button. |
Advanced settings
↑ Back to topThe Advanced tab contains tools for backing up, restoring, and resetting your checkout configuration. These tools affect only the extension’s settings—they do not modify orders or customer data.
Reset settings
↑ Back to topRestores all Multi-Step Checkout settings to their default values.

Export settings
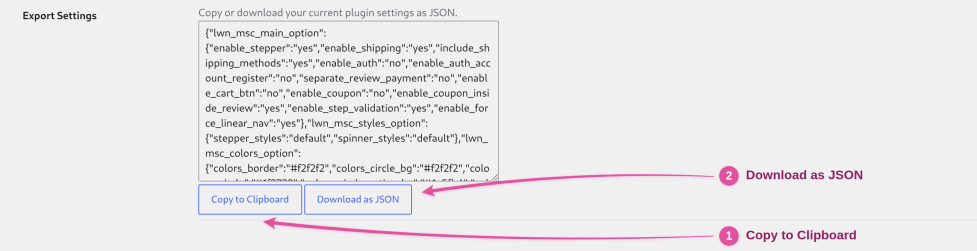
↑ Back to topExports your current configuration as a JSON file.
You can copy the generated JSON or download it as a file, then import it into another site to duplicate your checkout configuration.
Import settings
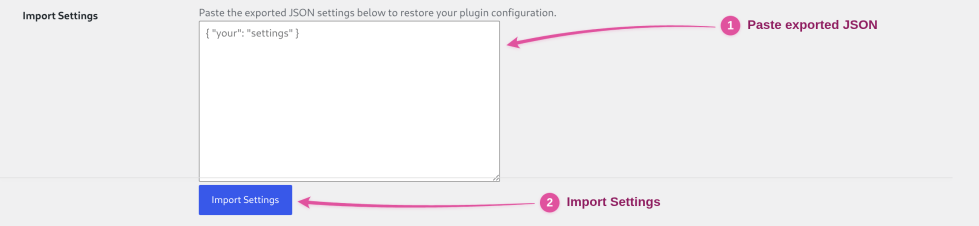
↑ Back to topImports settings from a previously exported JSON configuration.
Paste the exported JSON into the field and click Import Settings.
Only the settings included in the imported JSON are updated. Any settings not present in the file remain unchanged.
Troubleshooting
↑ Back to topThe checkout looks unchanged
↑ Back to topThe extension is installed and the stepper is enabled, but the checkout looks unchanged.
If your checkout page uses the Checkout block, the steps come from a block that has to sit inside your checkout form. Go to WooCommerce → Settings → Multi-Step Checkout → Block Checkout and select Add to checkout.
If your checkout page uses the [woocommerce_checkout] shortcode, check that Enable Multi-Step Checkout is ticked on the General tab.
Steps misaligned
↑ Back to topThe steps look broken or misaligned.
Your theme customizes the checkout markup in a way the stepper doesn’t recognize. The extension includes dedicated compatibility for 12 themes. If yours isn’t one of them, contact support with your theme name and we’ll look at adding it.
Errors only show at the end
↑ Back to topCustomers reach the last step and get a pile of errors at once.
Validate Steps Before Proceeding is turned off, so nothing is checked until the end. Turn it on (General tab) and each step is validated before the customer can continue.

Customers can’t jump back
↑ Back to topCustomers can’t jump back to an earlier step.
Force Sequential Checkout is on. Turn it off (General tab) to let customers move freely between steps they’ve already reached.

Login step missing
↑ Back to topThe Login step doesn’t appear on the checkout.
Three things must all be true:
- Enable Login Step is on.
- WooCommerce’s Enable log-in during checkout is on (WooCommerce → Settings → Accounts & Privacy)
- The visitor is logged out. Logged-in customers never see this step — test in a private window.
No registration form
↑ Back to topThe registration form doesn’t appear inside the Login step.
Turn on Allow customers to create an account on the “My account” page in WooCommerce → Settings → Accounts & Privacy, then check the step again.
Coupon step missing
↑ Back to topThe dedicated Coupon step doesn’t appear, even though it’s enabled.
Coupons also have to be enabled in WooCommerce itself. Turn on Enable coupons in WooCommerce → Settings → General.
Shipping step missing
↑ Back to topThe Shipping step appears on some orders but not others.
The Shipping step only appears when the order needs shipping — carts containing only virtual or downloadable products skip it. Also check Enable Separate Shipping Step; with it off, billing and shipping share a single step.
Payment step empty
↑ Back to topThe Payment step shows no payment methods.
No payment gateway is enabled. Enable at least one in WooCommerce → Settings → Payments.
Color won’t change
↑ Back to topA color was changed and saved, but the checkout looks the same.
There is a single Accent color on the Appearance tab, and everything follows from it. If a change does not appear, clear any page or CDN cache and reload the checkout.
On the block checkout the color is set on the block itself in the editor, not on this tab.
Import did nothing
↑ Back to topImporting settings showed a success message, but nothing changed.
Import only updates the setting groups present in the file — anything absent is left as it was. If the JSON came from somewhere other than this extension’s Export Settings, it can be valid JSON and still contain nothing importable.
FAQs
↑ Back to top
How do I know which checkout my store is using?
Open your Checkout page in the editor — a single Checkout block means block checkout, the
[woocommerce_checkout]shortcode means classic — or check the plugin’s own settings: WooCommerce → Settings → Multi-Step Checkout → Block Checkout, where the “Your checkout” row tells you directly. Both are supported — see Block checkout and Classic checkout steps for where to configure each.
Which steps can I turn on or off?
On the classic checkout: login, registration during checkout, a separate Shipping step, a dedicated Coupon step, a separate Review/Payment split, and the Back to Cart button — each a single checkbox on the General tab.
On the block checkout: a separate Shipping step, and where the order summary appears. There is no Login or Coupon step there.
Can I reorder the steps?
No. The order is fixed on both checkouts. On the classic checkout it runs login, billing, shipping, coupon, then review and payment. On the block checkout it runs contact, billing and shipping, shipping, then review and payment. Steps can be turned off or renamed, but not rearranged.
Can I stop customers from skipping ahead?
Yes. Require each step to validate before continuing, and optionally enforce strict step order. Both are optional.
What happens if a customer refreshes mid-checkout?
They return to the step they were on. On the classic checkout the current step is stored in the WooCommerce session, so it survives beyond the tab. On the block checkout it is stored in the browser for that tab only, so closing the tab starts the steps again.
Can I move my settings between staging and live sites?
Yes, for the classic checkout settings. Export your configuration as JSON on the Advanced tab and import it on the other site. Only the settings present in the file are updated.
The block checkout’s steps, labels and colors are stored in the block itself, so they travel with the checkout page rather than with this file.
Does it modify my checkout template files?
No. It works entirely through standard WooCommerce hooks, so nothing is copied into your theme and updates won’t break it.
Can I extend it with code?
On the classic checkout there are filters for the next and previous button markup and for the stepper colors, plus actions around the navigation buttons and the shipping methods wrapper. Adding or reordering steps in code isn’t supported yet.
The block checkout has no equivalent hooks — it is configured from the block’s settings in the editor.

