
Points Made Simple is a WooCommerce extension that lets you award, redeem, and manage customer points based on purchase amounts.
This documentation explains how to configure point earning and redemption, expiration dates, email notifications, customer point management, and other features.
Installation
↑ Back to topTo start using a product from WooCommerce.com, you can use the “Add to store” functionality on the order confirmation page or the My subscriptions section in your account.
- Navigate to My subscriptions.
- Find the Add to store button next to the product you’re planning to install.
- Follow the instructions on the screen, and the product will be automatically added to your store.
Alternative options and more information at:
Managing WooCommerce.com subscriptions.
WooCommerce must be installed and activated before using Points Made Simple.
After activating Points Made Simple, the Points Settings and Customer Points menus become available under WooCommerce.
Points Settings
↑ Back to topNavigate to WooCommerce → Points Settings.
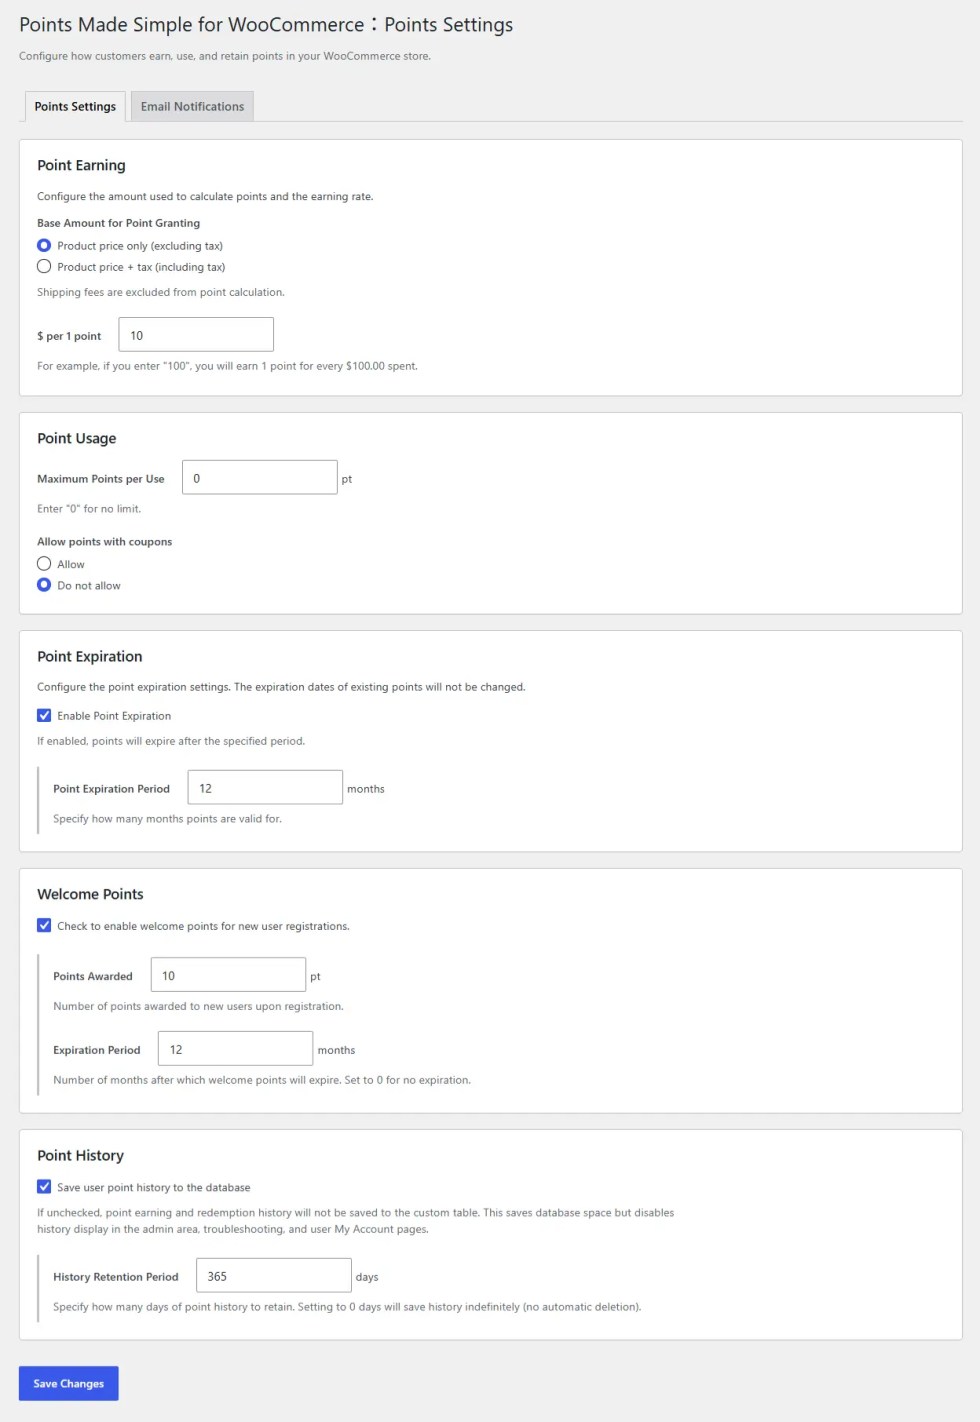
This screen lets you configure point earning, redemption, expiration, welcome points, and point history.
Point Earning
↑ Back to topPoint earning calculation basis
Choose which amount is used to calculate earned points:
- Product price only (excluding tax): Calculate points using product amounts excluding tax.
- Product price + tax (including tax): Calculate points using product amounts including tax.
Shipping charges and shipping taxes are excluded from point earning calculations.
Points are calculated based on the final eligible product amount after discounts and point redemption have been applied.
Amount required to earn one point
Specify how much a customer must spend in your store currency to earn one point.
For example, if your store currency is USD and you set the amount to 100, customers earn one point for every $100 of eligible purchases.
Fractional points are rounded down.
Point Redemption
↑ Back to topMaximum points per use
Set the maximum number of points a customer can redeem in a single order.
Enter 0 to allow unlimited redemption, up to the customer’s available balance and the eligible order amount.
Using points with coupons
Choose whether customers can redeem points on orders where coupons have been applied.
Point Expiration
↑ Back to topEnable point expiration to assign an expiration date to newly earned points.
Specify the expiration period in months.
For example, entering 3 sets an expiration period of three months for newly awarded points.
Changing the expiration settings does not modify the expiration dates of points that have already been awarded.
Welcome Points
↑ Back to topWelcome Points lets you automatically award points when a new customer registers an account.
Enable the feature and configure the number of points to award and their expiration period.
You can also award welcome points without an expiration date.
Point History
↑ Back to topChoose whether to save point earning, redemption, and adjustment history.
When history is enabled, administrators can review point transactions in the customer management screen. Customers can also view their point history from My Account.
You can specify how long point history should be retained.
Set the retention period to 0 to keep history indefinitely.
Deleting old history records does not affect current point balances.
Managing Points in Orders
↑ Back to topPoints Made Simple displays point information in the WooCommerce order details screen.
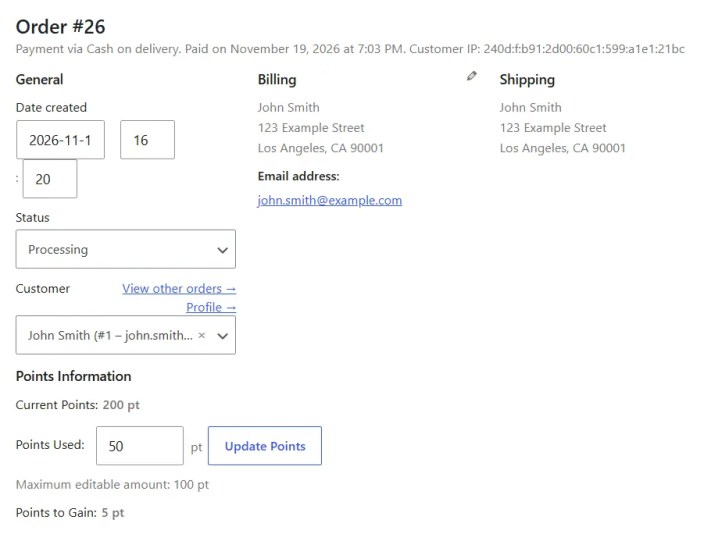
For orders using offline payment methods, administrators can change the number of points applied to an order before it is completed.
When the number of redeemed points changes, the order amount and points scheduled to be earned are updated automatically.
For online payments such as credit cards, changing redeemed points after order creation is not supported. This prevents discrepancies between the amount charged and the order total.
Using Points for In-Person Payments
↑ Back to topFor orders paid through an offline payment method, administrators can check the customer’s available points and apply points to the order.
The payable amount and points scheduled to be earned are automatically updated after the adjustment.
Email Notifications
↑ Back to topNavigate to WooCommerce → Points Settings → Email Notifications.
This tab provides expiration reminders and periodic point balance notifications.
Expiration Reminders
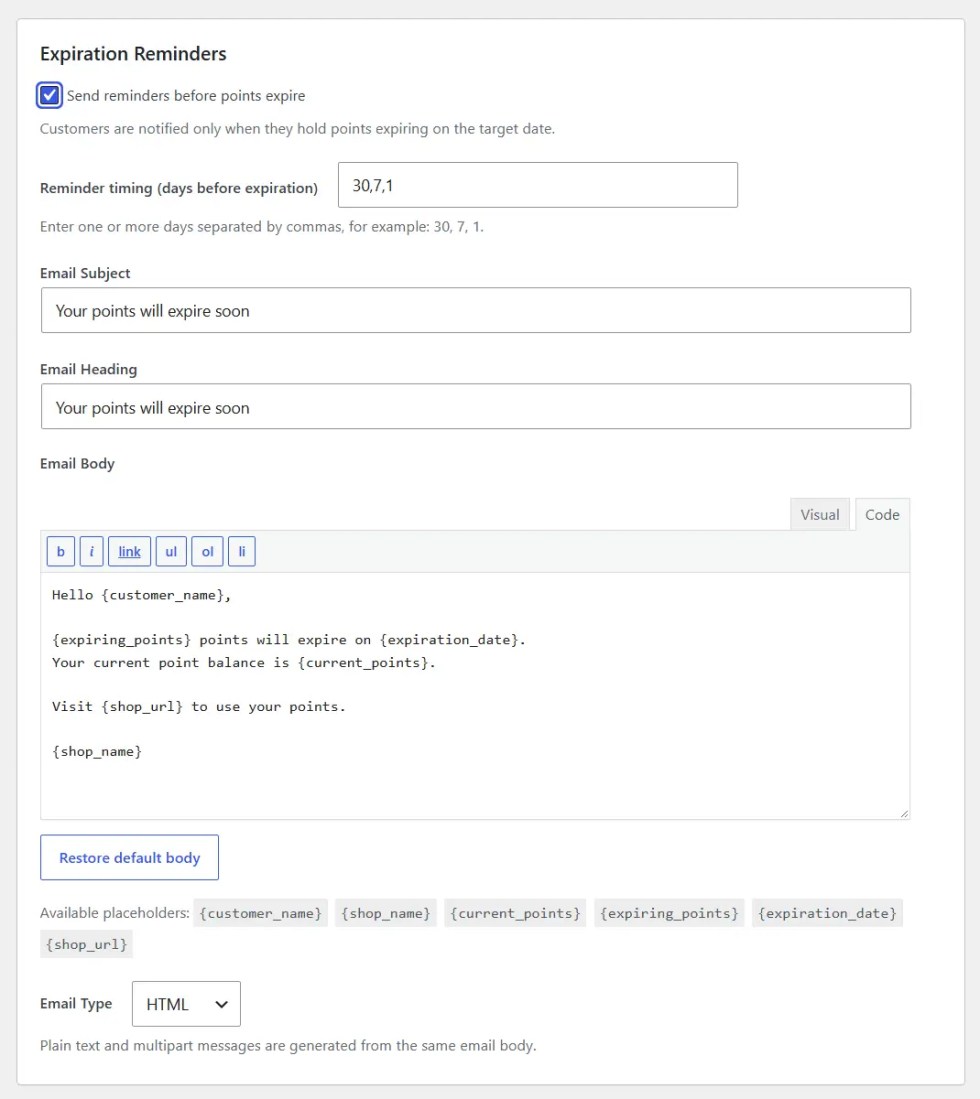
↑ Back to topEnable expiration reminders to automatically email customers who have points approaching their expiration dates.
Reminder timing
Enter the number of days before expiration when reminders should be sent, separated by commas.
For example:
30,7,1
This sends reminders 30 days, 7 days, and 1 day before expiration.
Email subject and content
You can customize the email subject, heading, and body, as well as the email format.
The following placeholders can be used in the email content:
| Placeholder | Description |
|---|---|
{customer_name} | Customer name |
{shop_name} | Store name |
{current_points} | Current point balance |
{expiring_points} | Points approaching expiration |
{expiration_date} | Expiration date |
{shop_url} | Store URL |
These placeholders are replaced with the corresponding information when an email is sent.
Periodic Balance Notifications
↑ Back to topYou can periodically notify customers of their current point balances when they hold points without an expiration date.
Available notification intervals are:
- 1 month
- 3 months
- 6 months
- 12 months
As with expiration reminders, you can customize the email subject, heading, and body.
Sending Test Emails
↑ Back to topYou can send test emails to the email address of the currently logged-in administrator to check the email content and formatting.
Separate test email options are available for expiration reminders and periodic balance notifications.
Before enabling notifications for customers, verify that the test emails are received and displayed correctly.
Customer Points Management
↑ Back to topNavigate to WooCommerce → Customer Points.
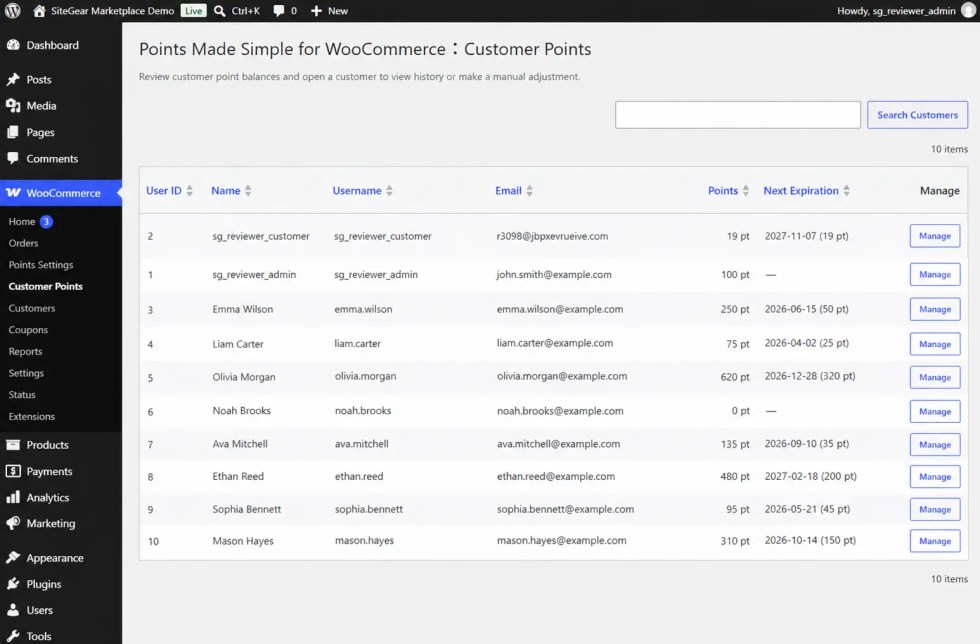
This screen displays the following customer information:
- User ID: Customer user ID
- Name: Customer name
- Username: Account username
- Email: Email address
- Points: Current valid point balance
- Next Expiration: Next expiration date and the number of points expiring
Use Search Customers to find a specific customer.
You can also sort the list by point balance or next expiration date.
Click Manage next to a customer to open their point details.
Customer Point Details
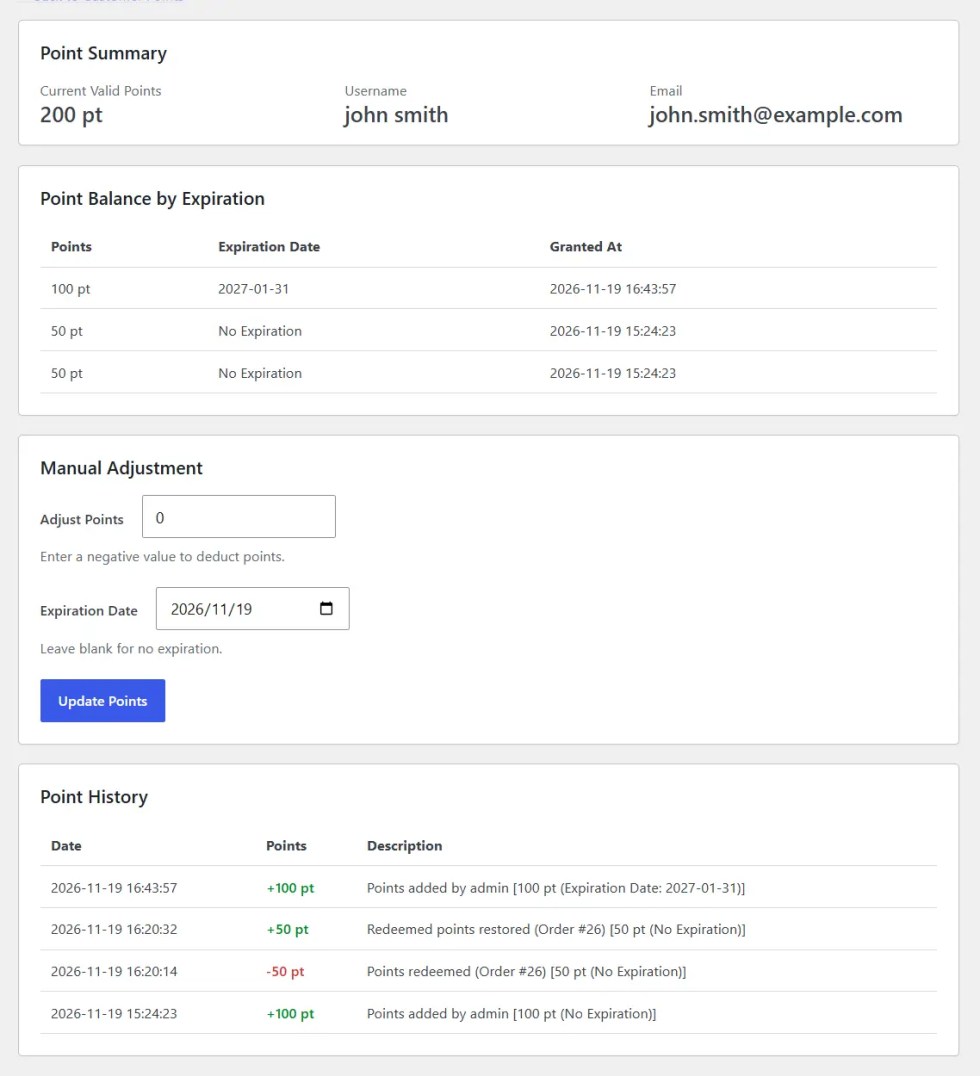
↑ Back to topThe customer details screen displays the current point balance, points grouped by expiration, manual adjustment controls, and point history.
Point Summary
The Point Summary section shows:
- Current valid points
- Username
- Email address
Point Balance by Expiration
This section shows the customer’s available points in individual batches.
Each entry includes:
- Points: Number of points
- Expiration Date: Expiration date, if applicable
- Granted At: Date and time the points were awarded
Points with different expiration dates, as well as points without an expiration date, are displayed separately.
When customers redeem points, the points with the nearest expiration date are used first.
If multiple point batches have the same expiration date, the oldest batch is used first.
Points without an expiration date are used after points with expiration dates.
Manual Adjustment
Administrators can manually add or deduct points from a customer’s balance.
- Enter the number of points to adjust in Adjust Points.
- Enter a positive number to add points or a negative number to deduct points.
- Specify an Expiration Date if you want the added points to expire.
- Click Update Points to apply the adjustment.
When adding points without specifying an expiration date, the points are treated as non-expiring points.
Manual adjustments can be used for individual customer support, promotional campaigns, event rewards, and other store-specific incentives.
Point History
Point History displays records of point earning, redemption, restoration, and manual adjustments.
The history includes:
- Date and time
- Number of points added or deducted
- Transaction description
Order-related transactions may also include the associated order number.
Redeeming Points at Checkout
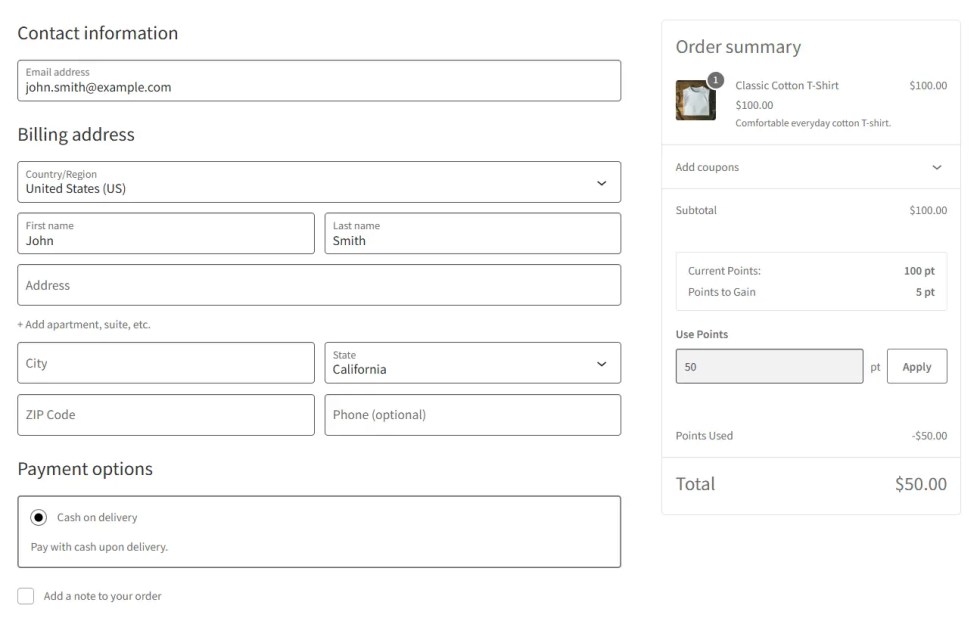
↑ Back to topCustomers can redeem their available points during WooCommerce checkout.
Points Made Simple automatically adds the point redemption interface to both Checkout Block and Classic Checkout.
No additional shortcode or custom block is required.
The checkout interface displays:
- Available point balance
- Points expected to be earned from the order
- Point redemption input field
- Result of the applied point redemption
Customers enter the number of points they want to redeem and click Apply.
The corresponding amount is deducted from the payable order total.
Points Made Simple applies point redemption after WooCommerce calculates taxes. Redeeming points therefore does not cause the calculated tax amount to be recalculated.
When Points Are Earned and Redeemed
↑ Back to topWhen an order is created, the points selected for redemption are recorded as planned usage for that order.
When the order status changes to Completed, Points Made Simple:
- Deducts the redeemed points from the customer’s point balance.
- Awards new points based on the eligible purchase amount after discounts and point redemption.
If an order is cancelled or fully refunded, redeemed points are restored with their original expiration information.
Points that were awarded upon completion of that order are also reversed.
Viewing Points in My Account
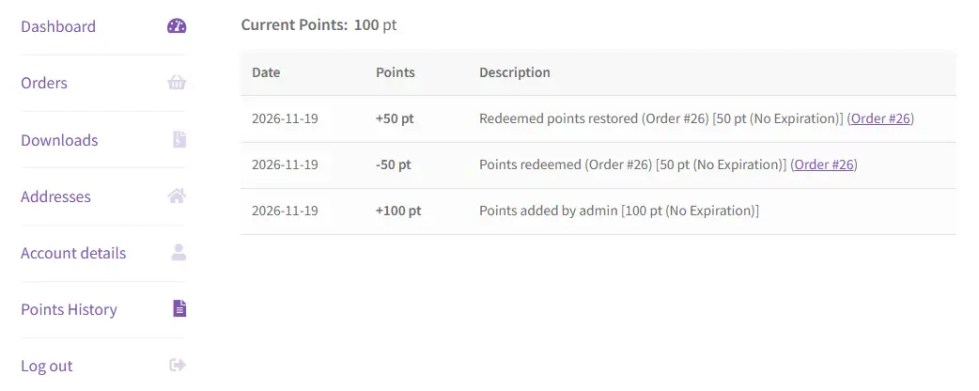
↑ Back to topCustomers can view their current point balance and point history from WooCommerce My Account.
The history shows point increases and decreases associated with earning, redemption, restoration, and other transactions.
Checkout Block and Classic Checkout
↑ Back to topPoints Made Simple supports both WooCommerce Checkout Block and Classic Checkout.
Both checkout methods provide the point balance, expected earning amount, redemption field, and applied redemption information.
Creating a Classic Checkout Page
↑ Back to topIf you want to use Classic Checkout, follow these steps:
- In WordPress administration, navigate to Pages → Add New Page.
- Create a page with a title such as “Checkout”.
- Add a Shortcode block containing
[woocommerce_checkout]and publish the page. - Navigate to WooCommerce → Settings → Advanced.
- Select the newly created page as the Checkout page and save your changes.
- Open the checkout page and confirm that the Classic Checkout form and point redemption interface are displayed.
You can also use an existing checkout page instead of creating a new one.
Point Data and History
↑ Back to topPoint balances are managed separately for each customer, together with information such as expiration dates and related orders.
Point earning, redemption, and manual adjustments are recorded as point transactions.
If a history retention period is configured, records older than that period are automatically deleted.
Deleting history records does not change the customer’s current point balance.
Frequently Asked Questions
↑ Back to topCan customers redeem points with Checkout Block?
↑ Back to topYes. Points Made Simple supports both Checkout Block and Classic Checkout.
Checkout Block uses WooCommerce Store API and block functionality. Changes to WordPress or WooCommerce may occasionally require compatibility updates.
Can I award points when a customer registers?
↑ Back to topYes. Enable Welcome Points to automatically award a specified number of points when a new customer account is registered.
You can also configure an expiration period for these points.
Can I award points for activities other than purchases?
↑ Back to topYes. Administrators can manually award points through WooCommerce → Customer Points.
This can be used for promotions, events, review incentives, and other store-specific activities.
Points Made Simple does not automatically detect these activities or award points for them.
What happens to existing points if I change the expiration settings?
↑ Back to topThe new expiration settings apply to points awarded after the change.
Expiration dates of previously awarded points remain unchanged.
Which points are redeemed first when a customer has different expiration dates?
↑ Back to topPoints with the nearest expiration date are redeemed first.
If multiple batches have the same expiration date, the oldest batch is used first.
Points without expiration dates are redeemed after all eligible expiring points have been used.
What happens to points when an order is cancelled?
↑ Back to topIf an order is cancelled or fully refunded, redeemed points are restored with their original expiration information.
Points awarded when the order was completed are also reversed.
How are points handled for partial refunds?
↑ Back to topPartial refunds may involve different combinations of products, shipping charges, taxes, coupons, and redeemed points.
Points Made Simple therefore does not automatically prorate point adjustments based only on the refunded amount.
Administrators can make manual adjustments through Customer Points when necessary.
Troubleshooting
↑ Back to topThe point redemption field does not appear at checkout
↑ Back to topConfirm that WooCommerce and Points Made Simple are both installed and activated.
Point redemption is available to logged-in customers. Confirm that the customer is logged in.
Also verify that your store uses either WooCommerce Checkout Block or Classic Checkout.
Points are not awarded after a purchase
↑ Back to topPoints are awarded when the order status changes to Completed.
Check the order status in WooCommerce order administration.
Guest orders are not eligible for point earning.
The point balance and transaction history appear inconsistent
↑ Back to topCheck whether point history is enabled and whether a history retention period has been configured.
Old history records may be automatically deleted without affecting the actual point balance.
Use WooCommerce → Customer Points to check the customer’s current balance.
Notification emails are not being received
↑ Back to topOpen WooCommerce → Points Settings → Email Notifications and confirm that the relevant notification is enabled.
Send a test email to verify the email content and delivery.
Email delivery also depends on your WordPress email configuration and the mail server used by your store.

