Installation
↑ Back to topTo start using a product from WooCommerce.com, you can use the “Add to store” functionality on the order confirmation page or the My subscriptions section in your account.
- Navigate to My subscriptions.
- Find the Add to store button next to the product you’re planning to install.
- Follow the instructions on the screen, and the product will be automatically added to your store.
Alternative options and more information at:
Managing WooCommerce.com subscriptions.

Configuration
↑ Back to topAt the WooCommerce admin panel go to WooCommerce > Settings > Custom Tabs, Here you will find the following Three tabs General Settings, Custom Product Tabs, and Account Tabs.
General Settings
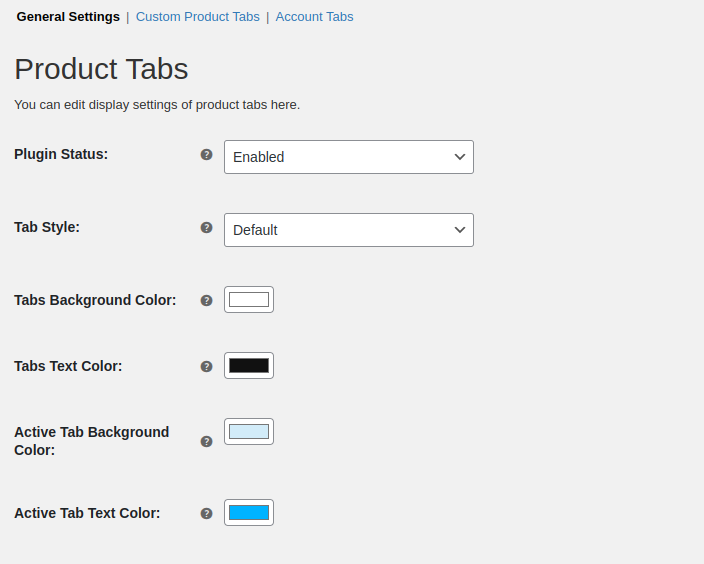
↑ Back to topProduct Tabs
↑ Back to topYou can edit the display settings of product tabs here.
- Plugin Status: Enable or disable plugin functionality.
- Tab Style: Choose from default, horizontal, or vertical layouts.
- Tabs Background Color: Set a background color for the tabs.
- Tabs Text Color: Define the text color for all tabs.
- Active Tab Background Color: Highlight the active tab with a unique background color.
- Active Tab Text Color: Specify a distinct text color for the active tab.
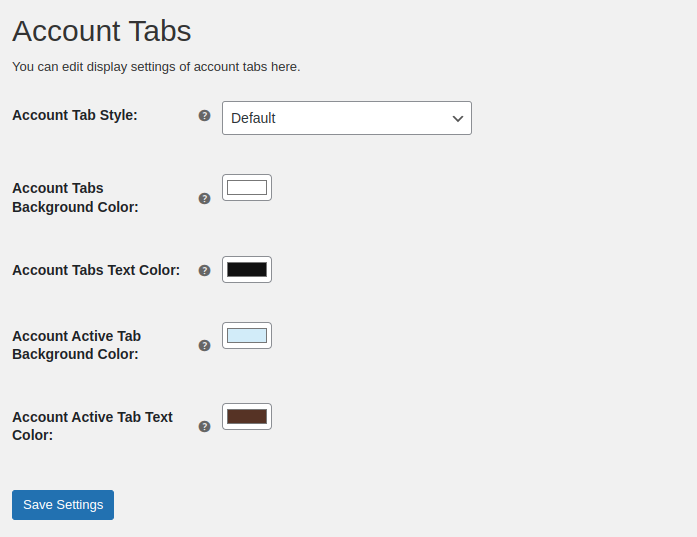
Account Tabs
↑ Back to topYou can edit the display settings of account tabs here.
- Account Tab Style: Select the Style of the tab from the given three styles, Default, Horizontal or Vertical.
- Account Tabs Background Color: Set the background color of the tabs
- Account Tab Text Color: Set the text color of the tabs
- Account Active Tab Background Color: Select the active tab background color.
- Account Active Tab Text Color: Set the color of the active tab text.
Custom Product Tabs
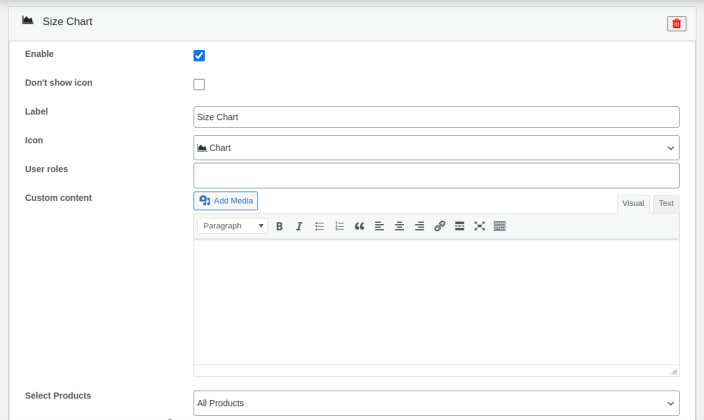
↑ Back to topYou can Enable or disable the default tab and add new custom tabs, for custom tabs, Click on the Add New Tab button to create a new custom tab, In which you can choose tab icon and tab title and click on the Add button. After that click on a tab to configure further settings which include:
- Enable: Enable this option to display the tab
- Dont Show icon: Checkbox option to hide tab icon
- Label: Set the label of the custom product tab
- Icon: Choose an icon according to the tab
- User roles: Select user roles for which you want to display these tabs
- Custom content: Write custom Content for the tab
- Select product: Include / Exclude products on which you want to display custom product tab
Show Advance Tab Options:
Select tab: (You can also select tabs in advanced tab option)
- Product Attributes Tab
- Location Tab
- Related Products Tab
- Best Selling Products Tab
- Size Chart Tab
- Product Compare Tab

Account Tabs Settings
↑ Back to topYou can Enable or disable the default tab and add new custom account tabs, for custom tabs, Click on the Add New Tab button to create a new custom account tab, In which you can choose tab icon, Tab Type (End Point, Page or Link), Tab title and click on Add button, After this click on a tab and configure the following:
- Enable: Enable this option to display the tab
- Dont Show icon: Checkbox option to hide tab icon
- Label: Set the label of the custom account tab
- Icon: Choose an icon according to the tab
- User roles: Select user roles for which you want to display these tabs
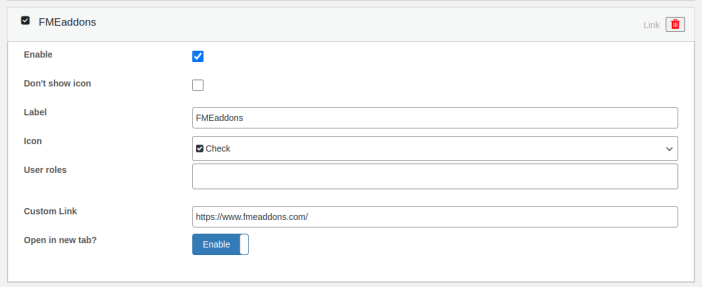
If the Admin Select End Point, He / She can add any type of custom content to it, for the Page Type Tab, the Admin can select Page which will open on a click and If the Admin selects the Link Type tab then a custom link will be added which will also open on a click.
