Installation
↑ Back to top- Download the .zip file from your WooCommerce account.
- Go to: WordPress Admin > Plugins > Add New > Upload Plugin > Choose File (for the file you downloaded in step 1).
- Install Now and Activate Plugin.
More information at Install and Activate Plugins/Extensions.
Accessing the Customer Info Dashboard
↑ Back to topAfter activation, Customer Info can be accessed from the WooCommerce menu in the WordPress Admin Navigation.
- Navigate to WooCommerce → Customer Info to open the Customer Info Dashboard.
Exploring the Customer Info Dashboard
↑ Back to topCustomer List
↑ Back to topThe Customer Info plugin includes a Customer List — a full overview of all registered customers in your store, displayed directly on the Customer Info page.
Viewing the Customer List
↑ Back to top- Navigate to WooCommerce → Customer Info to open the Customer List.
- The table shows all customers with their key details at a glance.
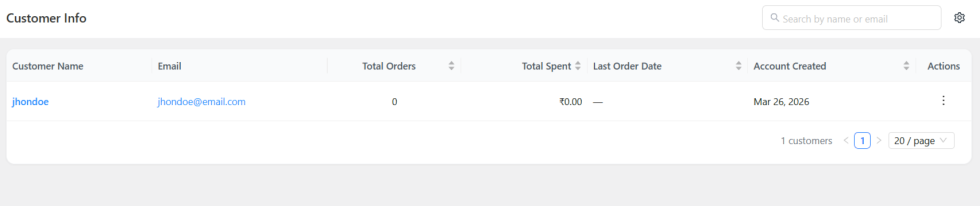
Customer List Columns
↑ Back to topThe customer table includes the following information for each customer:
- Customer Name: The customer’s full name. Clicking the name opens their individual Customer Info dashboard.
- Email: The customer’s registered email address.
- Total Orders: The total number of orders placed by the customer.
- Total Spent: The total amount spent by the customer across all orders.
- Last Order Date: The date of the customer’s most recent order.
- Account Created: The date the customer’s account was created.
- Actions: A menu with quick actions for that customer (see below).
Customer Actions Menu
↑ Back to topEach customer row has a three-dot menu (⋮) in the Actions column. Clicking it reveals the following options:
- Customer Info – Opens the full Customer Info dashboard for that customer.
- Switch to Customer – Lets you log in and browse the store as that customer. See the Switch to Customer section below for details.
- View Orders – Takes you to the WooCommerce Orders list filtered to show only that customer’s orders.
- Edit Customer – Opens the WordPress user edit screen for that customer.
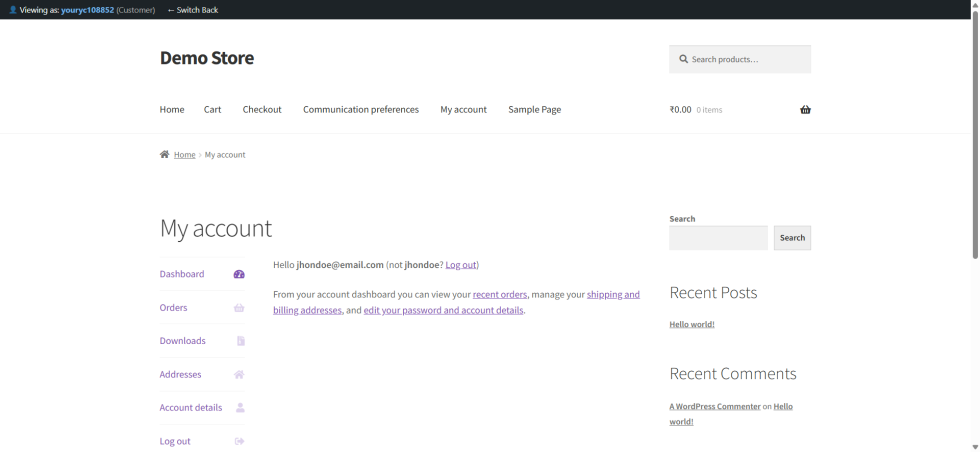
Switch to Customer
↑ Back to topThe Switch to Customer feature lets store admins temporarily view the storefront as a specific customer — without needing their password. This is useful for checking what a customer sees, troubleshooting account issues, or verifying order details from their perspective.
How to Switch to a Customer
↑ Back to top- Navigate to WooCommerce → Customer Info.
- Find the customer you want to view as.
- Click the three-dot menu (⋮) in the Actions column for that customer’s row.
- Select Switch to Customer.
- You will be redirected to the store’s My Account page, now viewed as that customer.
Switching Back to Your Admin Account
↑ Back to top- Click ← Switch Back in the admin bar at the top of the page.
- You will be logged out of the customer session and returned to your admin account automatically.
- The browser will redirect you back to the Customer Info page.
Note: Only store administrators can use Switch to Customer. It is not available for Shop Managers or other roles. Switching to another administrator account is not permitted.
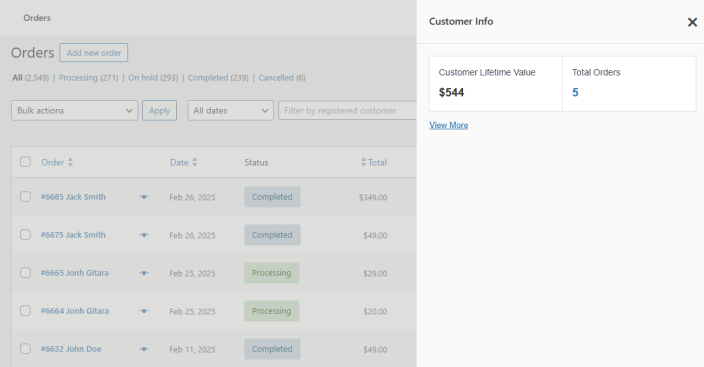
Customer Summary
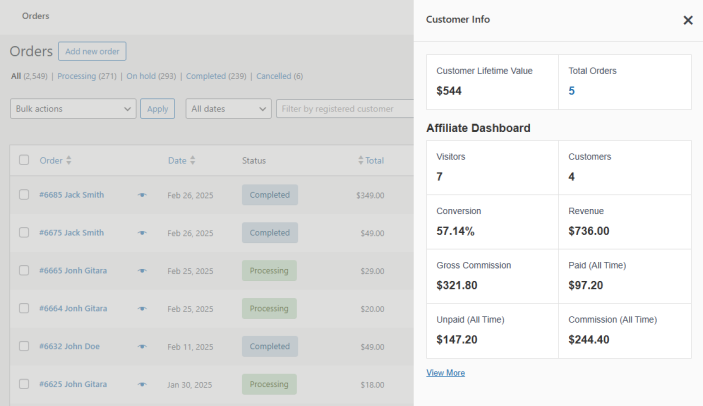
↑ Back to topThe Customer Info Dashboard provides a summary of key customer data:
- Customer Lifetime Value (CLV): Displays the total revenue generated by the customer.
- Total Orders: Shows the number of completed purchases made by the customer.
- Active Subscriptions: (Visible only if WooCommerce Subscriptions is installed) Displays the total number of active subscriptions for the customer.
- Connected Stores: (Visible only if WooCommerce API Manager is installed) Displays the number of stores where the customer has activated their licenses.
- Total Support: (Visible only if HelpScout or Intercom is enabled) Displays the total number of customer support interactions.

Order Details Table
↑ Back to topThe order history table provides details about past and ongoing orders, including:
- Order Number: Clickable order ID that redirects to the order details page.
- Items: Number of items in the order.
- Date: Order placement date.
- Status: Current order status (Completed, Delivered, Pending Payment, etc.).
- Subscription Relationship: (Visible only if WooCommerce Subscriptions is installed) Indicates whether the order is a new subscription or a renewal.
- Total: Total order value.
- Preview: A quick preview icon to view order details without leaving the page.

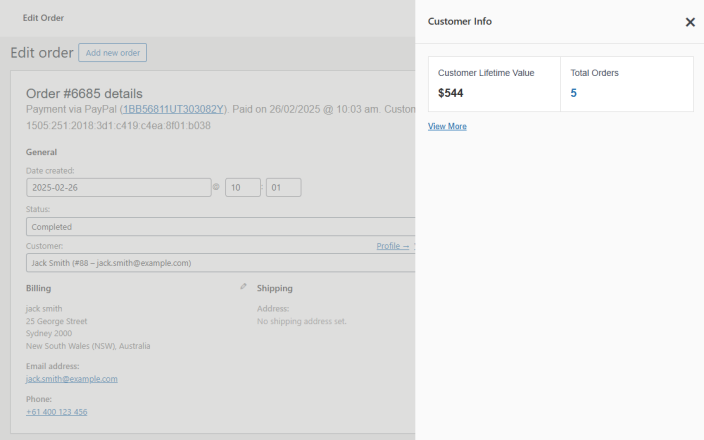
Customer Info in WooCommerce Orders
↑ Back to topThe Customer Info Dashboard is now accessible from two additional locations in the WooCommerce Orders section:
- Orders List Page – A Customer Info icon is added to the Actions column for each order.
- Order Details Page – A Customer Info button is available in the order details sidebar.
Customer Info in Orders List Page
↑ Back to top- In WooCommerce → Orders, the Customer Info icon is added in the Actions column next to each order.
- Clicking this icon opens the Customer Info Dashboard in a sidebar, displaying customer details without leaving the page.
Customer Info in Order Details Page
↑ Back to top- On the Order Details Page, a Customer Info button is available in the sidebar.
- Clicking this button opens the Customer Info Dashboard in a sidebar, displaying customer details without leaving the page.

WooCommerce Subscriptions Compatibility
↑ Back to topIf the WooCommerce Subscriptions plugin is installed, the Customer Info Dashboard will include an additional “Active Subscriptions” widget and a Subscription Details Table.
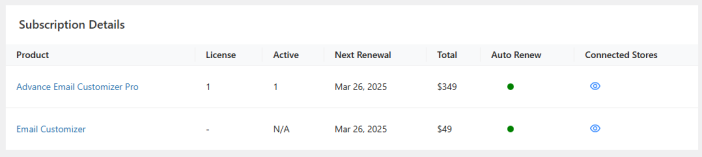
Subscription Details Table
↑ Back to top- Product: The name of the subscription product purchased by the customer.
- Next Renewal: The next billing date for the subscription.
- Total: The total amount billed for the subscription.
- Auto Renew: Indicates whether auto-renew is enabled (✅ Yes / ❌ No).

WooCommerce API Manager Compatibility
↑ Back to topIf WooCommerce API Manager is installed, the Subscription Details Table includes three additional columns:
Subscription Details Table (with API Manager Active)
↑ Back to top- License: Displays the total number of licenses assigned to the subscription.
- Active: Shows how many of the available licenses are currently in use.
- Connected Stores: Clicking the 🔗 View icon opens a popup listing all stores where the license is activated.
Connected Stores Popup
↑ Back to topIf a customer has activated licenses across multiple stores, clicking the Connected Stores icon will open a popup displaying the list of connected stores.
This section allows admins to monitor license activations and track connected stores, ensuring better control over customer subscriptions.

Affiliate for WooCommerce Compatibility
↑ Back to topIf the Affiliate for WooCommerce plugin is installed, a separate Affiliate Widget is added to the Customer Info Dashboard.
| Metric | Description |
| Visitors | The total number of visitors referred by the affiliate. |
| Customers | The total number of customers acquired through the affiliate. |
| Conversion Rate | The percentage of visitors converted into customers. |
| Revenue | The total revenue generated from the affiliate’s referrals. |
| Gross Commission | The total commission earned by the affiliate. |
| Commission (All Time) | The total commission accumulated over time. |
| Paid (All Time) | The total commission amount paid to the affiliate. |
| Unpaid (All Time) | The outstanding commission amount yet to be paid. |

HelpScout Integration (Customer Support Compatibility)
↑ Back to topThe Customer Info for WooCommerce plugin integrates with HelpScout, allowing store admins to access customer support history directly from the WooCommerce dashboard.
Enabling HelpScout Integration
↑ Back to top- Click on the Settings Icon ⚙️ in the Customer Info Dashboard (top-right corner).
- Navigate to the Integrations Settings Page.
- Click on the HelpScout integration card.
- Toggle Enable to activate the integration.
- Enter your Client ID and Client Secret, then click Save.

How to Get HelpScout Client ID and Client Secret
↑ Back to topTo integrate HelpScout, you need to generate Client ID and Client Secret from your HelpScout developer account.
Follow the official HelpScout guide here: 🔗 HelpScout Authentication Documentation
HelpScout Data in Customer Info Dashboard
↑ Back to topOnce enabled, the dashboard will display customer support interactions, including:
- Total Support Tickets – The number of tickets the customer has opened.
- Resolved Tickets – The number of tickets that have been closed.
- Pending Tickets – The number of unresolved support requests.

This integration allows store admins and support teams to access customer support history directly from the WooCommerce dashboard, ensuring quick and efficient customer assistance.
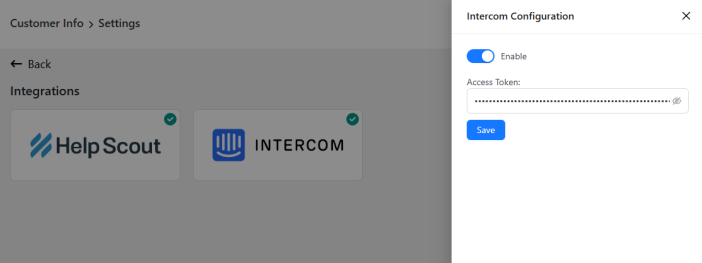
Intercom Integration (Customer Support Compatibility)
↑ Back to topThe Customer Info for WooCommerce plugin also integrates with Intercom, enabling direct access to customer conversations and support interactions.
Enabling Intercom Integration
↑ Back to top- Click on the Settings Icon ⚙️ in the Customer Info Dashboard (top-right corner).
- Navigate to the Integrations Settings Page.
- Click on the Intercom integration card.
- Toggle Enable to activate the integration.
- Enter your Access Token, then click Save.
How to Get Intercom Access Token
↑ Back to topTo integrate Intercom, you need to generate an Access Token from your Intercom developer account.
Follow the official Intercom guide here: 🔗 Intercom Authentication Documentation
Intercom Data in Customer Info Dashboard
↑ Back to topOnce enabled, the dashboard will display customer support interactions, including:
- Total Conversations – The number of conversations the customer has opened.
- Resolved Conversations – The number of conversations marked as closed.
- Pending Conversations – The number of ongoing customer support interactions.

This integration provides quick access to customer interactions within Intercom, allowing store admins to manage support inquiries more efficiently.
Email Verification
↑ Back to topCustomer Info includes a built-in Email Verification feature that asks new customers to confirm their email address with a one-time passcode (OTP) during registration. This reduces fake sign-ups and ensures you have a valid, reachable email on file.
🚀 How It Works
↑ Back to top- A customer enters their email on the WooCommerce registration form.
- A verification popup asks for the code sent to that email.
- They enter the OTP; on success, registration completes and they’re logged in.
- Registration is blocked until the email is verified.
⚙️ Settings
↑ Back to top| Setting | Description | Default |
|---|---|---|
| Enable | Turns email verification on or off. | Off |
| OTP Length | Number of digits in the code (4–8). | 6 |
| OTP Lifetime | How long a code stays valid, in seconds (60–3600). | 600 (10 min) |
| Resend Limit | Maximum resend attempts before the user is rate-limited (1–20). | 3 |
| Resend Limit Message | Message shown when the resend limit is reached. | Customizable |
🎨 Design Customization
↑ Back to topTwo design customizers let you match the experience to your brand:
| Customizer | What you can change |
|---|---|
| Verification Email | Logo, width, padding, background & text colors, button color, alignment, subject, heading, body and footer text. |
| Verification Popup | Logo, width, padding, colors, button color, alignment, overlay color & opacity, heading and body text. |
You can also send a test email from the settings to preview your design.
🛠️ Managing Verified Status
↑ Back to top- An Email Verified column is added to the WordPress Users list.
- Use the Mark verified / Mark unverified row actions to override a user’s status manually.
- Verified status is also shown throughout the Customer Info dashboard.
🔗 Works With CEV
↑ Back to topIf the dedicated Customer Email Verification (CEV) plugin — free or Pro — is active, Customer Info automatically steps aside and lets CEV handle verification, so the two never conflict.