Batch Inventory Manager for WooCommerce helps store owners manage product inventory at the batch level. Track quantities, monitor expiry dates, automate stock synchronization, receive expiry notifications, and manage all inventory from a centralized dashboard.
Installation
↑ Back to topTo start using a product from WooCommerce.com, you can use the “Add to store” functionality on the order confirmation page or the My subscriptions section in your account.
- Navigate to My subscriptions.
- Find the Add to store button next to the product you’re planning to install.
- Follow the instructions on the screen, and the product will be automatically added to your store.
Alternative options and more information at:
Managing WooCommerce.com subscriptions.

Setup and Configuration
↑ Back to topAfter activating the plugin, navigate to Products → Batch Manager from your WordPress admin dashboard. Here, you can access the Dashboard, Batch Inventory, Settings, and Import/Export tabs to manage all batch inventory features and configurations.
Getting started
↑ Back to topWhen you open Batch Manager for the first time, the inventory tables will be empty because no batches have been created yet. The plugin is divided into four main sections:
The plugin is divided into four main sections:
- Dashboard.
- Batch Inventory.
- Settings.
- Import / Export.
Dashboard
↑ Back to topThe Dashboard provides a quick overview of your inventory status. It helps store managers identify inventory trends and take action before stock shortages or expiry issues occur.
You can monitor:
- Total batches.
- Available batches.
- Expired batches.
- Vendor stock distribution.
- High stock products.
- Low stock products.
- Overall inventory statistics.

Batch Inventory
↑ Back to topThe Batch Inventory section is where all batch-related inventory management takes place.
From this screen you can:
- Add new product batches.
- Edit existing batches.
- Delete batches.
- Search inventory records.
- Filter inventory records.
- Track expiry dates.
- View vendor information.
- Manage batch quantities.
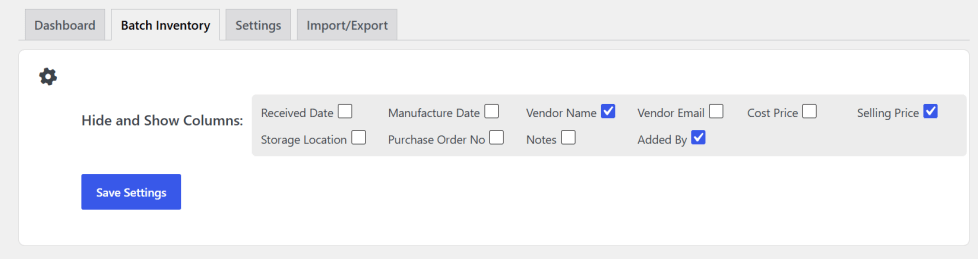
Customizing Table Columns
↑ Back to topClick the Settings icon located above the inventory table.
From here you can:
- Show columns.
- Hide columns.
- Customize your workspace.
- Save preferred column layouts.
Click Save Settings after making changes.
Using Inventory Filters
↑ Back to topFilters help locate inventory records quickly.
Available filters include:
- Date Filters.
- Product.
- Category.
- Product Type.
- Batch Status.
Use filters to find specific inventory records without manually searching through large inventories.

Adding a Product Batch
↑ Back to topTo create a new batch:
- Click Add Product Batch.
- Select the desired product.
- Click Add Batch.
- Enter batch information.
- Click Update to save.
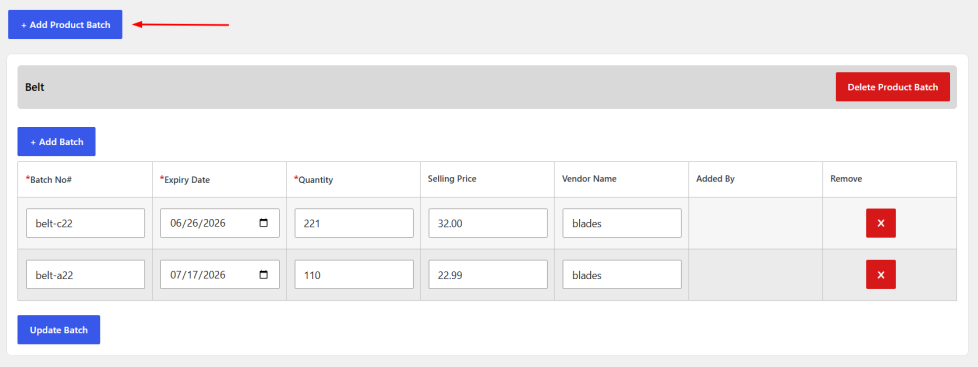
Note: A product can only have one batch inventory record group. If a batch group already exists for a product, a new batch group cannot be created.
Editing Batch Information
↑ Back to topTo update an existing batch:
- Click on the batch record.
- Modify the required information.
- Click Update.
Note: While editing a batch, other batch groups cannot be modified until the current changes are saved.
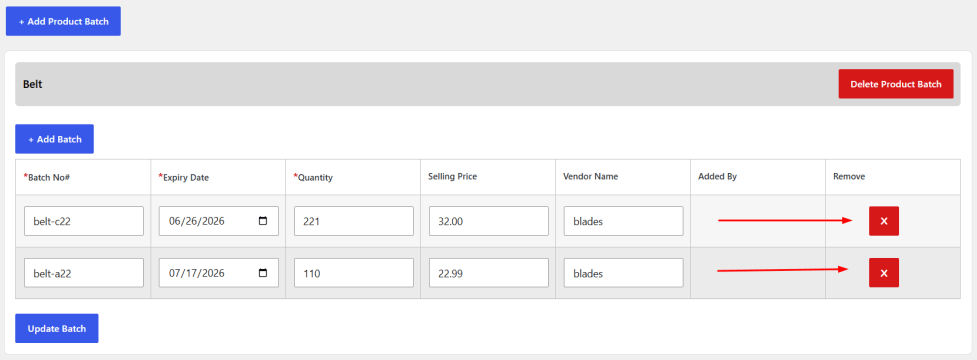
Deleting Product Batches
↑ Back to topDelete Entire Product Batch.
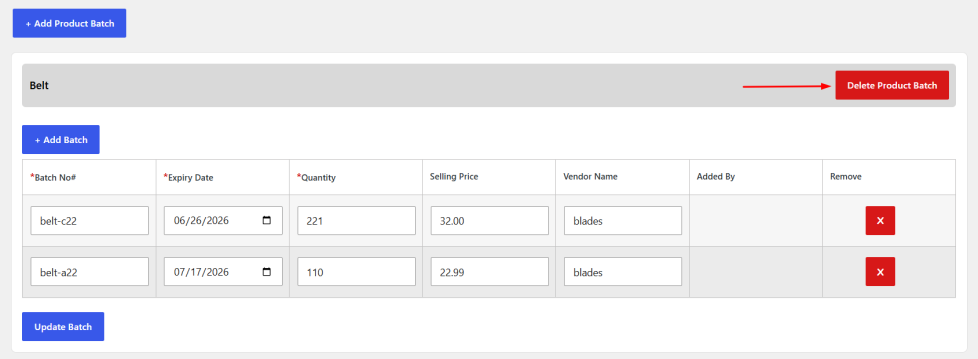
Delete Individual Batch Row.
Settings
↑ Back to topGeneral Settings
↑ Back to topThe Settings section allows you to configure inventory automation and expiry management.
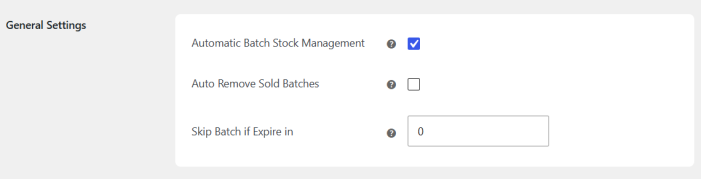
Automatic Batch Stock Management
When enabled, WooCommerce stock quantities are automatically calculated from active batch quantities.
Benefits:
- Accurate stock levels.
- Reduced manual updates.
- Improved inventory synchronization.
Auto Remove Sold Batches
Automatically removes fully sold batches after 30 days from their expiry date.
This helps keep inventory records clean and organized.
Skip Batch If Expire In X Days
Prevent batches that are close to expiry from being allocated to new orders.
Example:
If set to 30 days, any batch expiring within the next 30 days will be excluded from future orders.
Email Settings
↑ Back to topThe Email Settings section manages automated notifications.

Batch Expiry Email (Admin Notification)
Send automated alerts to store administrators before batches expire.
Benefits:
- Plan inventory clearance.
- Create promotions.
- Reduce stock loss.
Expired Batch Email (Vendor Notification)
Automatically notify vendors when their assigned batches expire.
The plugin uses the vendor email stored within batch records. If no vendor email exists, the notification will not be sent.
Expiring Product Category Management
↑ Back to topAutomatically move products with soon-to-expire batches into selected categories.
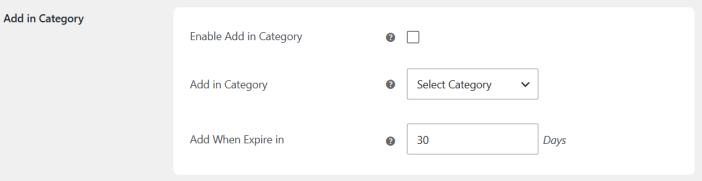
Enable Category Automation
Automatically move products with soon-to-expire batches into selected categories.
Enable category management for expiring inventory.
Select Target Category
Choose a category such as:
- Clearance.
- Expiring Soon.
- Promotional Stock.
Configure Expiry Threshold
Set the number of days before expiry that should trigger category assignment.
Example: If set to 30 days, products with batches expiring within 30 days will automatically be assigned to the selected category.
Enable Product Expiry Display
↑ Back to topTurn expiry date visibility on or off.
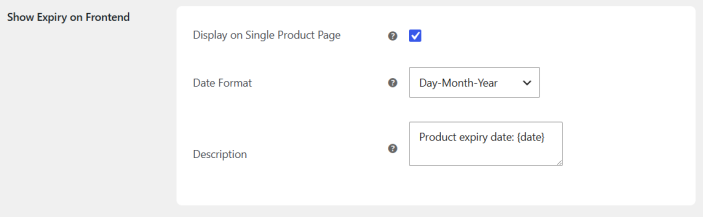
Select Date Format
Choose how expiry dates are displayed.
Examples:
- MM/DD/YYYY
- DD/MM/YYYY
- YYYY-MM-DD
Custom Expiry Message
Add a custom message alongside the expiry date.
Example:
“Best Before:”
“Expiry Date:”
“Fresh Stock Available Until:”
Front-End Expiry Display
↑ Back to topDisplay expiry information directly on product pages.

Import & Export
↑ Back to topThe Import & Export section simplifies bulk inventory management.
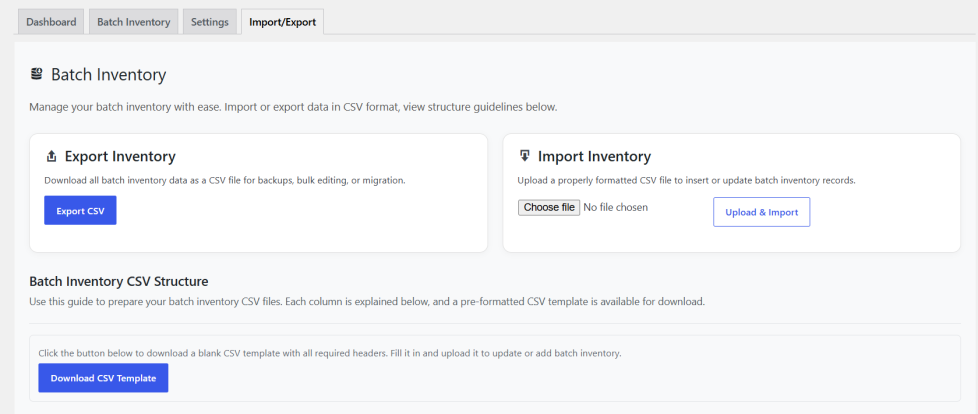
Export Batch Data
Export all inventory records to CSV format.
- Open Import & Export.
- Click Export CSV.
- Download the generated file.
Use exported files for:
- Reporting
- Backup purposes
- Inventory auditing
- Bulk editing
Import Batch Data
Import inventory records using CSV files.
- Click Choose File.
- Select your CSV file.
- Click Upload & Import.
The plugin will process the file and add or update inventory records automatically.
FAQs
↑ Back to top
Can I manage product variations?
Yes. The plugin supports both simple products and product variations.
Does WooCommerce stock update automatically?
Yes. When Automatic Batch Stock Management is enabled, WooCommerce stock is calculated from active batch quantities.
Can I prevent near-expiry inventory from being sold?
Yes. Use the “Skip Batch If Expire In X Days” setting.
Can I notify vendors when inventory expires?
Yes. Vendor notifications can be sent automatically using the vendor email stored in each batch record.
Can I import inventory using CSV files?
Yes. Batch inventory data can be imported using CSV files, making bulk updates and inventory migration quick and efficient.