Upload File for WooCommerce allows your customers to upload files with their orders directly on product, cart, order, and checkout pages. Control what they upload, set limits, and manage everything in one place.
Installation
↑ Back to topTo start using a product from WooCommerce.com, you can use the “Add to store” functionality on the order confirmation page or the My subscriptions section in your account.
- Navigate to My subscriptions.
- Find the Add to store button next to the product you’re planning to install.
- Follow the instructions on the screen, and the product will be automatically added to your store.
Alternative options and more information at:
Managing WooCommerce.com subscriptions.

Configurations
↑ Back to topGeneral Settings
↑ Back to topGo to WooCommerce > File Upload and Click General Settings Tab.
- Upload Locations – Choose where customers can upload files:
- Product page
- Cart page
- Checkout page
- Order pages
- Upload Interface Mode – Set the upload interface to appear in:
- Inline element
- Popup modal
- Enable Multi-File Upload – Allow customers to upload multiple files simultaneously.
- Max Files Per Order – Limit the total number of files a customer can upload per order.
- Max Files Per Product – Set a maximum number of files that can be uploaded per individual product.
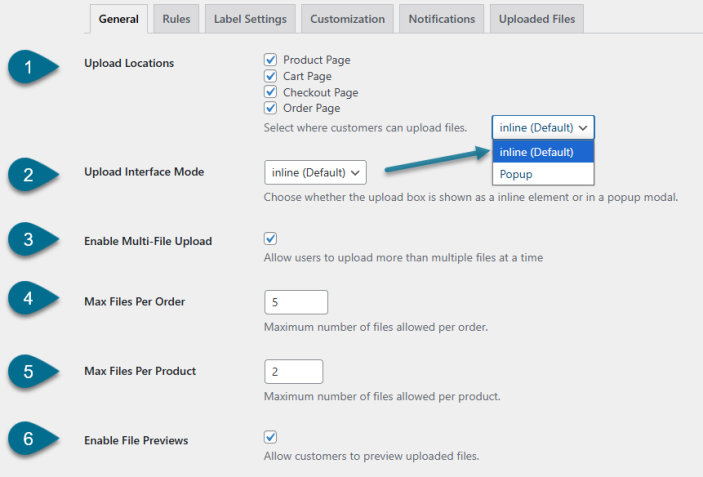
6. Enable File Previews – Let customers preview files the uploaded files.
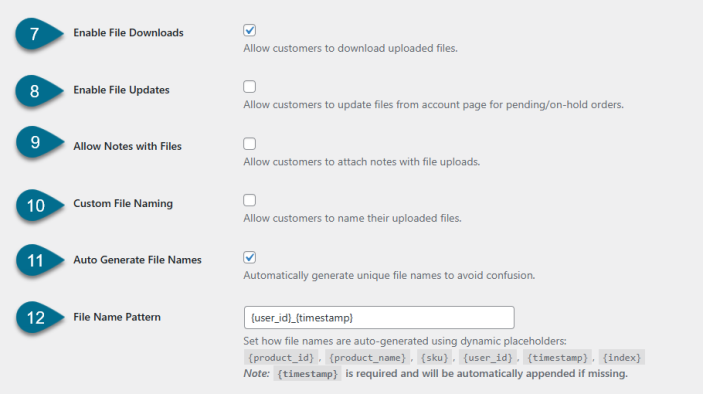
7. Enable File Downloads – Allow customers to download their uploaded files.
8. Enable File Updates – Enable customers to update files for pending or on-hold orders via their account page (order status depends upon backend configurations).
9. Allow Notes with Files – Allow customers to add text notes along with their file uploads.
10. Custom File Naming – Let customers assign custom names to their uploaded files.
11. Auto Generate File Names – Automatically generate unique file names to avoid duplication or confusion.
12. File Name Pattern – Define a dynamic naming pattern using placeholders like {user_id}, {timestamp}, etc for uploaded files.
Creating a New Rule
↑ Back to topHead to WooCommerce > File Upload > Click Rules Tab
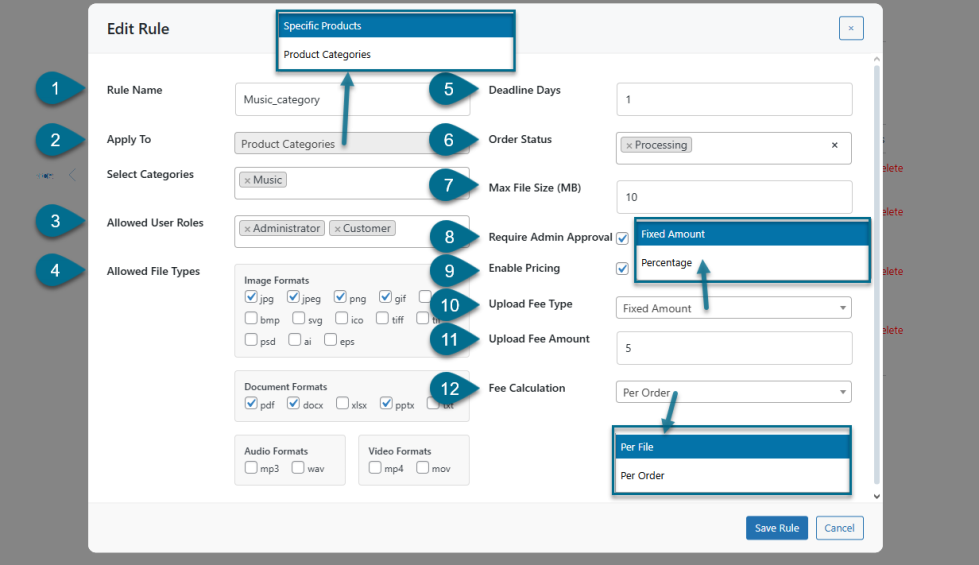
This section allows you to create conditional file upload rules based on product categories, user roles, file types, deadlines, order statuses, and optional upload fees.
- Rule Name – Assign a custom name to identify the upload rule.
- Apply To – Choose where the rule should apply:
- Products – Select one or more specific products.
- Categories – Select one or more specific categories.
- Allowed User Roles – Limit file uploads to selected user roles (eg, Guest, Customer, Admin).
- Allowed File Types – Define which file formats can be uploaded:
- Images – Supported formats include JPG, PNG, BMP, WEBP, and others.
- Documents – Includes DOCX, XLSX, PDF, TXT, and more.
- Audio – Supports MP3, WAV formats.
- Video – Accepts MP4, MOV formats.
- Deadline Days – Set the number of days after purchase during which files can be uploaded.
- Order Status – Choose which order statuses allow file uploads/replace (eg, Processing, On hold).
- Max File Size (MB) – Specify the maximum allowed file size per upload in megabytes
- Require Admin Approval – Require admin review and approval before files are accepted.
- Enable Pricing – Enable a fee for uploading files.
- Upload Fee Type – Select the type of upload fee to charge:
- Fixed amount – Charge a fixed fee (e.g., $5).
- Percentage – Charge a percentage fee(e.g., 5%).
- Upload Fee Amount (Upload file charges) – Set the upload fee amount to be charged.
- Fee Calculation – Determine how the upload fee is applied:
- Per product – Charged for each file uploaded per product.
- Per order – Charged once per order, regardless of the number of files.
Rules Grid:
↑ Back to topThe Rules Grid displays all existing file upload rules in a tabular format, providing a clear overview of each rule’s
- Name – The custom name assigned to the rule.
- Type – Indicates whether the rule applies to specific products or categories.
- Items – Lists the products or categories the rule is applied to.
- Settings – Shows key settings such as maximum file size and allowed file types.
- Actions – Options to edit or delete each rule for easy management.

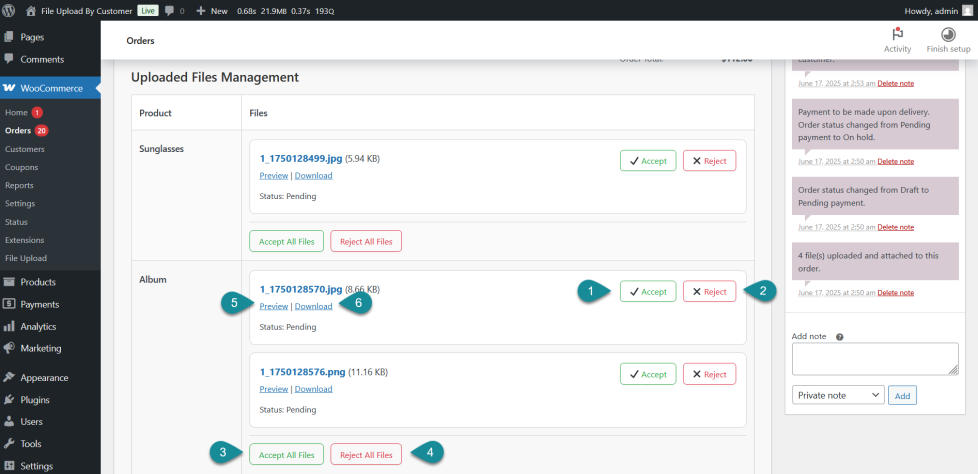
Accept or Reject Files
↑ Back to topIn the grid (check above screenshot), click Edit on the order with the uploaded file. You’ll be taken to that order, where you’ll see a section showing all uploaded files to specific order . Here, Admin can:
- Accept individual files.
- Reject individual files.
- Approve all files for specific products in that order.
- Reject all files for specific products in that order.
- Preview uploaded file.
- Download uploaded file.
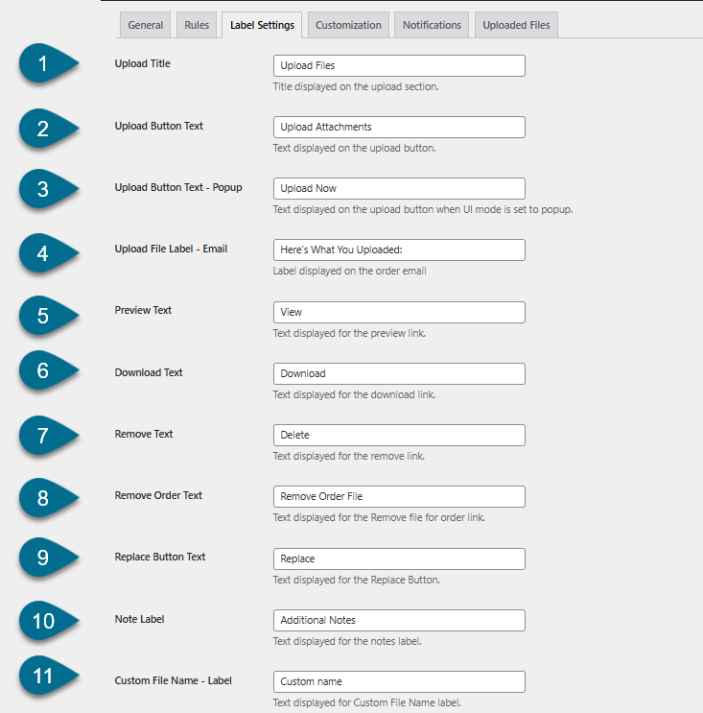
Labels Settings:
↑ Back to topNavigate to WooCommerce > File Upload and Click Labels Tab
Here, you can customize the text labels and button titles displayed throughout the file upload interface for a personalized user experience.
- Upload Title – The heading shown above the file upload section
- Upload Button Text – Text displayed on the upload button in inline mode
- Upload Button Text – Popup – Text shown on the upload button when the interface is in popup mode
- Upload File Label – Email – Label shown in order confirmation emails indicating uploaded files
- Preview Text – Text for the link allowing customers to preview uploaded files
- Download Text – Text for the download link on uploaded files
- Remove Text – Text for the link to delete an uploaded file
- Remove Order Text – Text for removing files attached to an order
- Replace Button Text – Label for the button that lets customers replace an uploaded file
- Note Label – Text displayed for the additional notes section accompanying file uploads
- Custom File Name – Label – Label shown for the custom file naming input
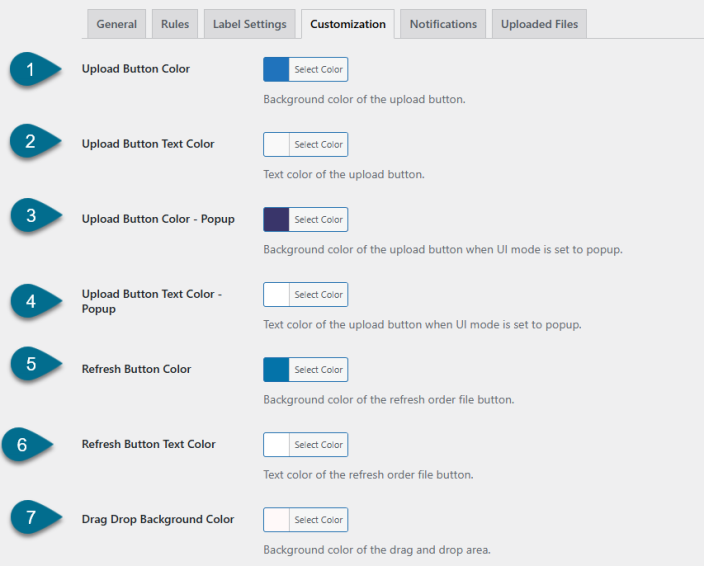
Customization
↑ Back to topGo to WooCommerce > File Upload > Click Customization Tab.
Here, you can adjust the visual appearance and positioning of the file upload interface to match your store’s branding and layout preferences like
- Upload Button Color – Set the background color of the upload button (inline mode)
- Upload Button Text Color – Set the text color of the upload button (inline mode)
- Upload Button Color – Popup – Define the background color of the upload button when using popup mode
- Upload Button Text Color – Popup – Define the text color of the upload button in popup mode
- Refresh Button Color – Set the background color for the “Refresh Order File” button
- Refresh Button Text Color – Set the text color for the “Refresh Order File” button
- Drag Drop Background Color – Choose the background color for the drag-and-drop upload area.
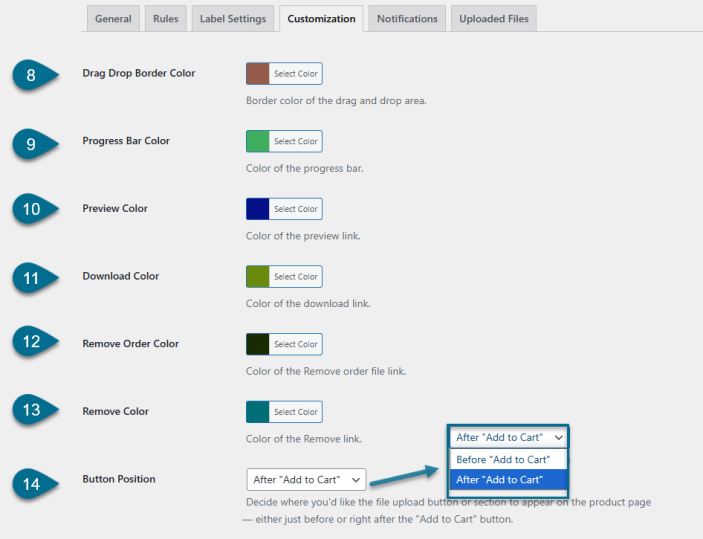
8. Drag Drop Border Color – Choose the border color of the drag-and-drop area
9. Progress Bar Color – Set the color of the file upload progress bar
10. Preview Color – Set the color of the preview file link
11. Download Color – Set the color of the download file link
12. Remove Order Color – Set the color for the “Remove Order File” link
13. Remove Color – Set the color for the standard remove file link
14. Button Position – Choose the position of the upload button on the product page:
- Before Add to Cart button
- After Add to Cart button
Email Notifications
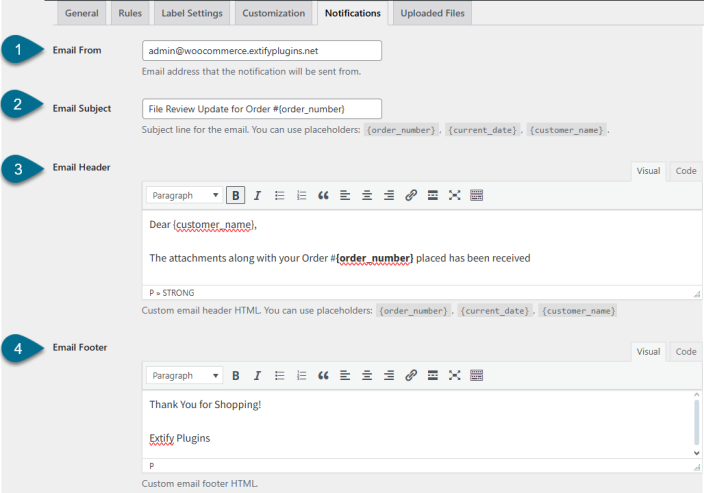
↑ Back to topNavigate to WooCommerce > File Upload > Click Notifications Tab.
Configure email notification settings to keep customers and store admins informed about file upload activity, rejections, approvals, and order-related updates.
- Email From – The email address from which notification emails will be sent.
- Email Subject – Customize the subject line for notification emails. Supports dynamic placeholders like {order_number},{current_date},{customer_name}.
- Email Header – Here you can add the text for the Email body. Placeholders {order_number}, {current_date}, {customer_name} are supported.
- Email Footer – Here you can add content for the bottom section of the email to match your branding or include additional info.
Uploaded Files
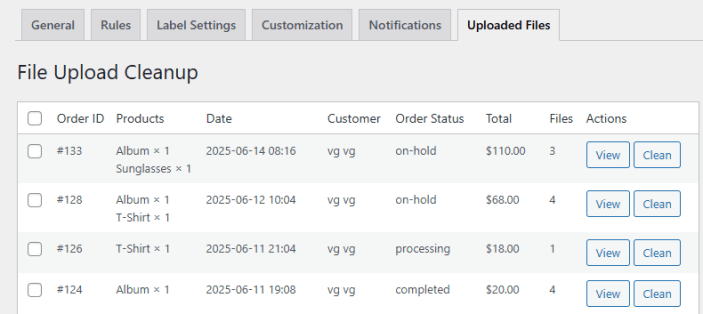
↑ Back to topBrowse to WooCommerce > File Upload > Click Uploaded Files Tab.
This section displays all uploaded files in a centralized grid, helping store admins monitor and manage file submissions linked to orders.
The grid includes the following columns:
- Order ID – The WooCommerce order number placed by customer.
- Products – Lists the products in the order that triggered the file upload.
- Date – The date and time when the order was placed.
- Customer – Name of the customer who placed the order.
- Order Status – Current WooCommerce status of the order (e.g., On-hold, Processing).
- Total – The total value of the order.
- Files – Number of files uploaded for that order.
- Actions – Here you can view the order and delete the uploaded files.
- View – View the order detail page.
- Clean – Permanently remove uploaded files from both the order and the storage directory.