The First Purchase Reward for WooCommerce plugin is a powerful tool that helps store owners boost sales and attract new customers by offering exclusive first purchase discounts. This WooCommerce first order coupon solution provides flexible reward options, including percentage-based discounts, fixed price reductions, free shipping, or even free gift products—all tailored to first-time buyers. Prices update dynamically in real time based on selected product variations, creating a smooth and transparent shopping experience. With flash notifications and customizable banners, this plugin builds urgency and encourages immediate action, helping to maximize conversions and improve customer loyalty.
Installation
- Download the First Purchase Reward Plugin for WooCommerce
.zipfile from your WooCommerce account. - In your WordPress dashboard, go to Plugins > Add New, then click Upload Plugin.
- Upload the file you downloaded and click Install Now.
- After installation, click Activate to enable the plugin.
More information at: Install and Activate Plugins/Extensions.
Configuration
- Navigate to WooCommerce > Settings > First Purchase Reward in your WordPress admin panel.
- Check the Enable Plugin option to activate the reward system.
- Enable notification messages for the Shop and Product pages by selecting their respective checkboxes.

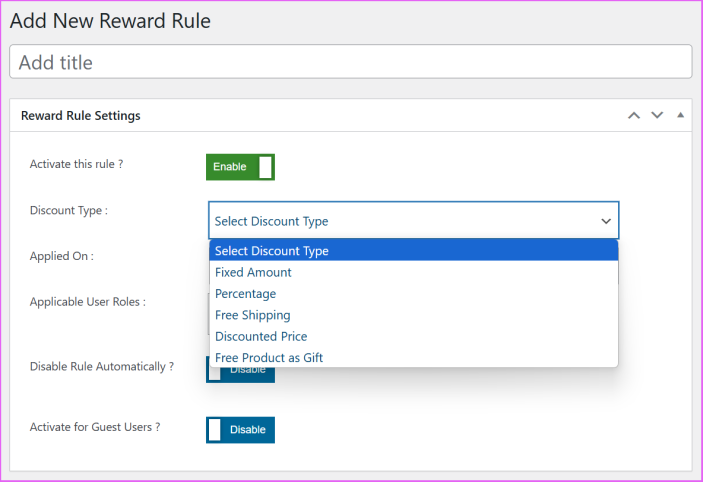
Adding Reward Rules
- Go to WooCommerce > All Reward Rules and click Add New Reward Rule.
- Enter a Rule Name and check the Activate Rule checkbox.
- Select a Discount Type from the dropdown:
- Fixed Amount
- Percentage
- Free Shipping
- Discounted Price
- Free Product (as a gift)
This setup allows you to define flexible reward options tailored to your store’s marketing strategy and first-time buyer incentives.
Set Rule Application Scope
Next, choose where the reward rule should apply:
- Entire Shop – Apply the rule to all products store-wide.
- Specific Categories – Select one or more product categories.
- Selected Products – Choose individual products manually.
This flexibility allows you to target rewards precisely, based on your promotional goals


Select Applicable User Roles
After defining where the rule applies (Entire Shop, Specific Categories, or Selected Products), choose the user roles eligible for the reward. You can select one, multiple, or all user roles, providing full flexibility to control who receives the offer—such as Customers, Subscribers, or custom roles added to your site.
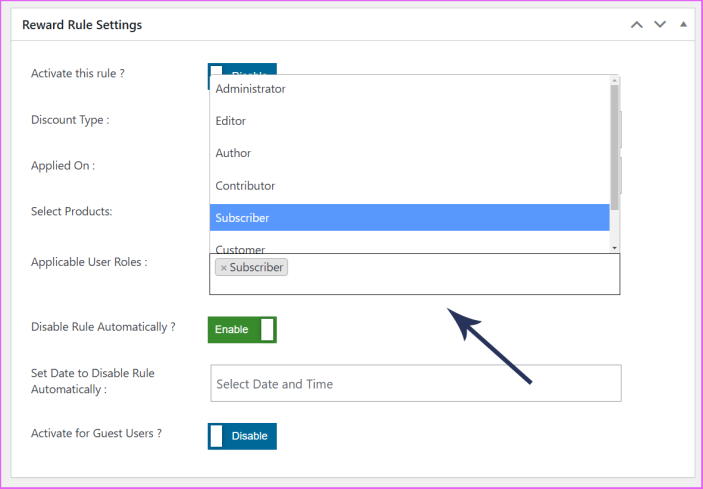
Automatic Rule Deactivation & Guest User Option
After selecting the applicable user roles, configure the Disable Rule Automatically option. Simply check the checkbox to enable it. Once active, you can specify a date and time for the rule to be automatically deactivated—ideal for managing limited-time promotions.
You can also enable rewards for guest users by checking the Enable for Guest Users option. This allows first-time visitors without accounts to receive the reward, increasing your chances of converting new customers.

Frontend Overview of Rules and Notifications
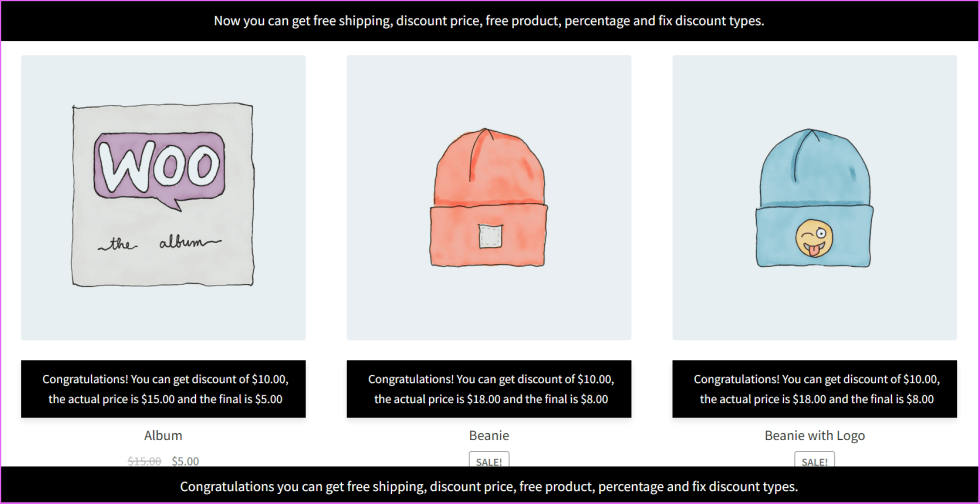
Shop Page Notifications
Based on the configured reward rules, notifications appear under each product on the shop page, provided the admin has enabled them. These messages inform customers about available rewards and discounts.
Admins can customize:
- Notification content
- Text and background colors
- Display position
This ensures a visually consistent and branded shopping experience.
Top & Bottom Bar Notifications
The plugin also offers top and bottom notification bars, perfect for announcing storewide promotions or first-time buyer rewards.
Key features:
- Fully customizable content and design
- Enable/disable control via settings
- Strategically positioned to boost engagement and drive conversions
These dynamic bars enhance visibility and create urgency, encouraging users to explore offers and complete their purchases.
Single Product Page Notifications
If notifications are enabled, they will be displayed in various locations on the product detail page to highlight first-purchase rewards:
✅ Top & Bottom Notification Bars
Promotional banners appear at the top and bottom of the product page, displaying custom messages set by the admin to draw attention.
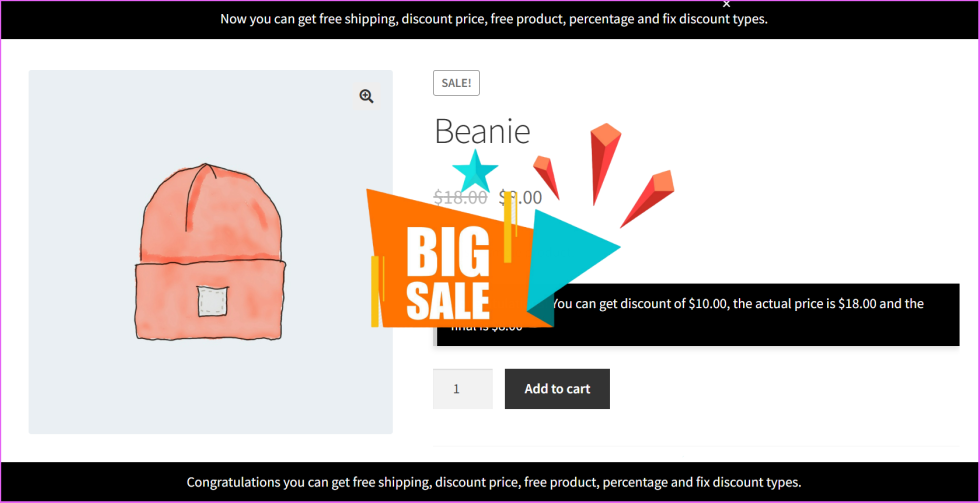
🎯 Product Price Notification
A notification box appears near the product price, showing the applicable reward—whether it’s a percentage discount, fixed discount, or a free product offer.
🎨 Customizable Content & Styles
Admins can fully customize the notification text, background and text colors, and positioning directly from the plugin settings to match their branding.
⚡ Flash Sale Banner
When enabled, a flash banner briefly displays over the product to create urgency. The admin can set the duration (in seconds) or choose to display it permanently.
These notifications ensure that first-time visitors clearly see the available rewards—driving more engagement and increasing conversions.
Single Product Page for Variable Product
For variable products, the notification initially displays the lowest available price before the user selects any variation. Once a variation is chosen, the notification instantly updates to show the selected variation’s actual price, the applied discount, and the final price.
This real-time update ensures that customers can easily see their savings and understand how the rewards and discounts are applied to different product variations, providing a transparent and engaging shopping experience.

General Setting Options
1. Enable Plugin
- A checkbox to activate the plugin and ensure that reward rules and notifications work.
2. Enable Notification (Product Pages & Shop Pages)
- Two checkboxes to enable discount notifications on:
- Product Pages (individual product details pages).
- Shop Pages (category and shop listing pages).
3. Notification Position
- Shop Page Position: Dropdown to select where the notification appears on the shop and category pages (e.g., above the product title).
- Product Page Position: Dropdown to set where notifications appear on individual product pages (e.g., below title and price).
4. Discount Type Notifications
These settings allow the admin to customize the notification messages for different types of discounts. The messages use placeholders to dynamically insert discount values.
- Fixed Discount Type Notification:
- Message format: “Congratulations! You can get a discount of {fixed_discount}.”
- Uses
{fixed_discount}for the fixed discount value,{final_price}for the discounted price, and{actual_product_price}for the original price.
- Percentage Discount Type Notification:
- Message format: “Congratulations! You can get a discount of {percentage_discount}.”
- Uses
{percentage_discount}for the discount percentage.
- Discounted Price Type Notification:
- Message format: “Congratulations! You can get a discount and the price is {discount_price}.”
- Uses
{discount_price}for the final price after discount.
- Free Product Type Notification:
- Message format: “You can get {free_product_name} as a free product if you buy this.”
- Uses
{free_product_name}to display the name of the free product.
- Free Shipping Type Notification:
- Message format: “You can get this product with no shipping charges.”
- Used for free shipping offers.

Styles and Layout Settings
Customization Options:
- Text Color
- Allows admins to set the text color for notifications.
- Example: White (
#ffffff).
- Background Color
- Defines the background color of the notification box.
- Example: Black (
#000000).
- Font Size
- Sets the font size of the notification text.
- Example:
14px.
- Border Color
- Determines the border color for the notification box.
- Example: Black (
#000000).
- Border Radius
- Sets the rounded corners of the notification box.
- Example:
0px 0px 0px 0px(no rounded corners).
- Left Border Width
- Specifies the width of the left border for the notification.
- Example:
5px.
- Left Border Color
- Allows customization of the left border color.
- Example: Black (
#000000)

Top & Bottom Bar Notification Settings
Customization Options:
- Text Color
- Sets the text color for both top and bottom bar notifications.
- Example: White (
#ffffff).
- Background Color
- Defines the background color of the notification bars.
- Example: Black (
#000000).
- Font Size
- Specifies the font size for the notification text.
- Border Color
- Sets the border color for both the top and bottom notification bars.
- Example: Black (
#000000).
- Adjust Top Bar Notification Position
- Allows setting the distance of the top notification bar from the top of the page.
- Example:
0px(default position).
- Adjust Bottom Bar Notification Position
- Allows setting the distance of the bottom notification bar from the bottom of the page.
- Example:
0px(default position).
- Enable Notification Top Bar
- A checkbox to enable or disable the top bar notification.
- Top Notification Message
- Customizable message displayed at the top of the website.
- Example:”Now you can get free shipping, discount price, free product, percentage, and fixed discount types.”
- Enable Notification Bottom Bar
- A checkbox to enable or disable the bottom bar notification.
- Bottom Notification Message
- Customizable message displayed at the bottom of the website.
- Example:”Congratulations! You can get free shipping, discount price, free product, percentage, and fixed discount types.”

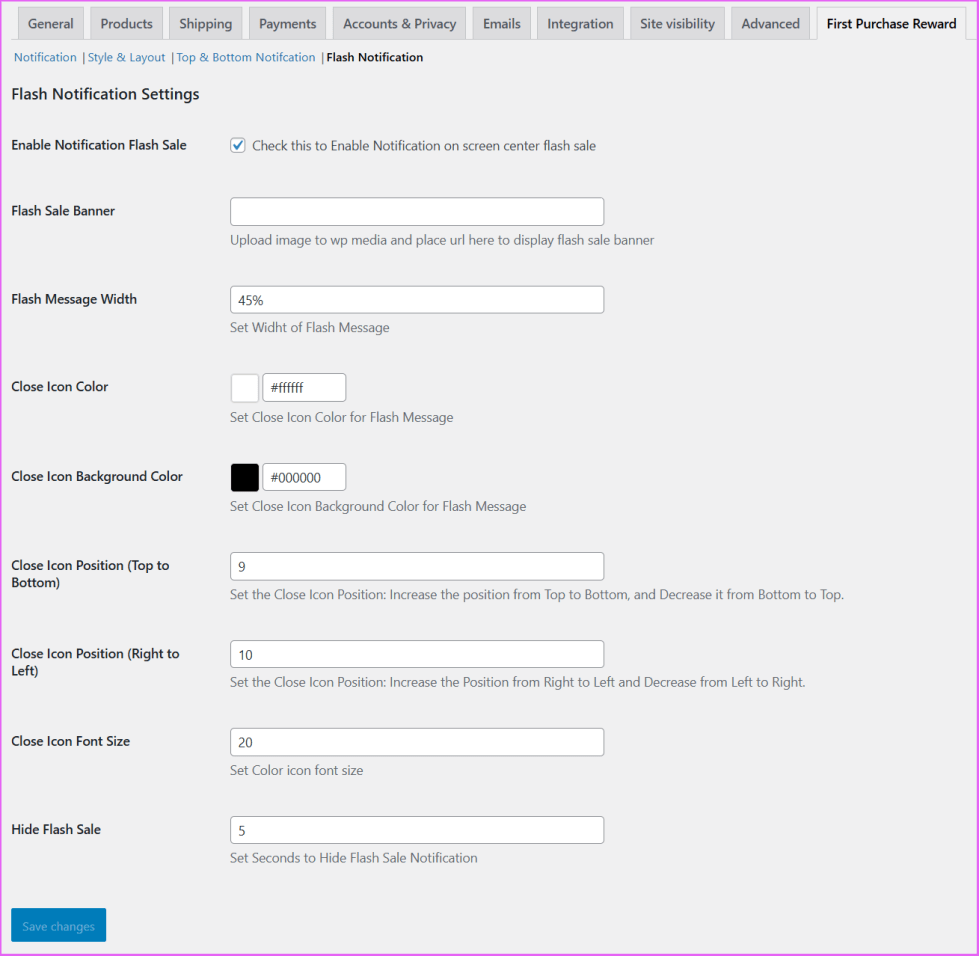
Flash Sale Banner Settings
Customization Options:
- Enable Notification Flash Sale
- Checkbox to enable or disable the flash sale notification.
- Flash Sale Banner
- Field to enter the URL of an image to be used as the flash sale banner.
- Flash Message Width
- Defines the width of the flash message.
- Example:
45%.
- Close Icon Color
- Sets the color of the close (X) icon.
- Example: White (
#ffffff).
- Close Icon Background Color
- Sets the background color of the close icon.
- Example: Black (
#000000).
- Close Icon Position (Top to Bottom)
- Adjusts the vertical position of the close icon.
- Example:
9.
- Close Icon Position (Right to Left)
- Adjusts the horizontal position of the close icon.
- Example:
10.
- Close Icon Font Size
- Defines the font size of the close icon.
- Example:
20px.
- Hide Flash Sale
- Sets the number of seconds before the flash sale notification automatically disappears.
- Example:
5seconds.