
The Multicurrency Switcher and Converter plugin lets your WooCommerce store display and accept payments in multiple currencies, with automatic exchange rates and geolocation-based switching.
Installation
↑ Back to top- Download the “Multicurrency Switcher and Converter” plugin.
- Go to WordPress > Plugins and click on “Add New” to upload the .zip file that you downloaded.
- Install and Activate the plugin.
Configuration
↑ Back to topSet up multiple currencies and switch currencies based on location. To configure the plugin, go to WooCommerce > Settings > Multicurrency Switcher and Converter, and here you will find the following settings:
General Settings
↑ Back to topIn this section, you can configure the general settings for the Multicurrency Switcher and Converter plugin. Go to WooCommerce > Settings > Multicurrency Switcher and Converter > General Settings and configure the following settings.
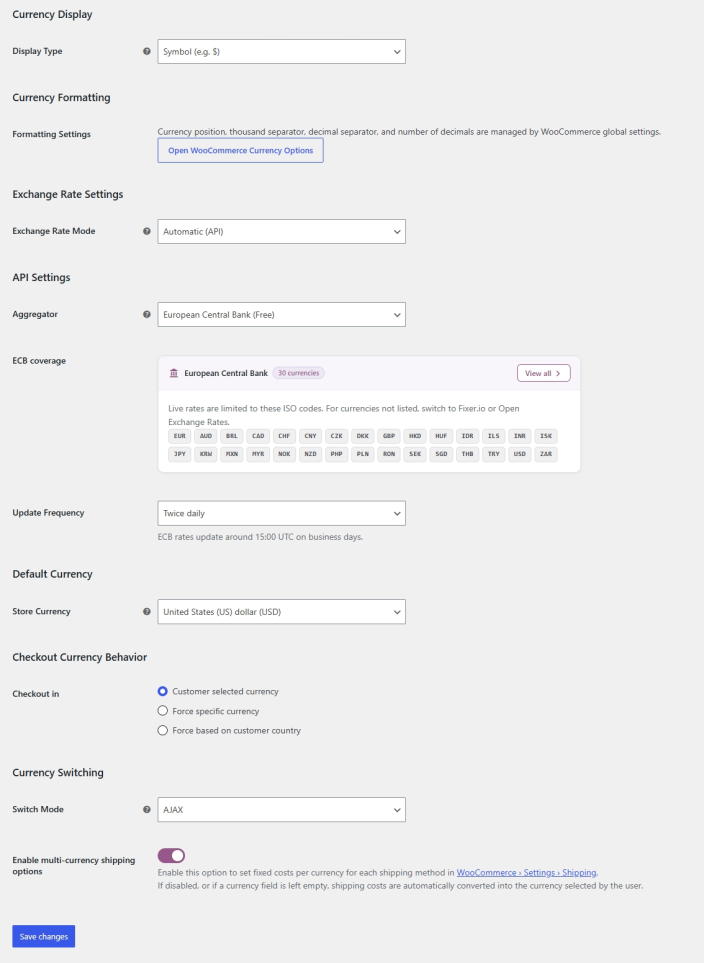
Currency Display
↑ Back to top- Display Type: Choose how currencies will be displayed across switcher UIs. You can select the following options from the dropdown:
- Symbol (e.g., $)
- Code (e.g., USD)
- Name (e.g., US Dollar)
Currency Formatting
↑ Back to top- Formatting Settings: Configure the formatting for currency. Currency position, thousand separator, decimal separator, and number of decimals can be managed in WooCommerce global settings
Exchange Rate Settings
↑ Back to top- Exchange Rate Mode: Select the exchange rate mode. You can select the following:
- Automatic (API): Automatic rates will be fetched from an external API on a scheduled basis.
- Manual: You can set each exchange rate manually.
API Settings (If Exchange Rate is Selected as Automatic (API))
↑ Back to top- Aggregator: Select your preferred exchange rate data provider. You can select the following from the dropdown:
- European Central Bank (Free)
- Flixer.io
- Open Exchange Rates
- ECB coverage: Explore the complete list of 30 currencies supported by the European Central Bank (ECB). Click on “View All” to check the full list. Rates are published against the EUR daily at ~15:00 UTC. Your store currency and display currencies must be in this list for automatic updates. For currencies not listed, switch to Fixer.io or Open Exchange Rates.
- API Key: Enter the API key in case of flixer.io or Open Exchange Rates.
- Update Frequency: Select the frequency at which the rates will be updated. You can select the following from the dropdown:
- Hourly
- Twice Daily
- Daily (Default)
- Weekly
Default Currency
↑ Back to top- Store Currency: Select the default currency for your store. All exchange rates will be determined relative to the default currency.
Checkout Currency Behavior
↑ Back to top- Checkout In: Select which currency to use on the checkout. You will have the following options:
- Customer selected currency
- Force specific currency
- Force Currency: Select the force currency
- Force based on the customer’s country
Currency Switching
↑ Back to top- Switch Mode: Select how currency switching will be implemented storewide. You choose between the following options:
- AJAX: Your choice will be saved in a background request, and then the page will be reloaded with a clear URL.
- Query String: Reloads the page with fmecs_currency in the URL.
- Enable Multi-currency Shipping Options: Enable this option to set fixed costs per currency for each shipping method. If disabled, or if a currency field is left empty, shipping costs are automatically converted into the currency selected by the user.
Currencies Setting
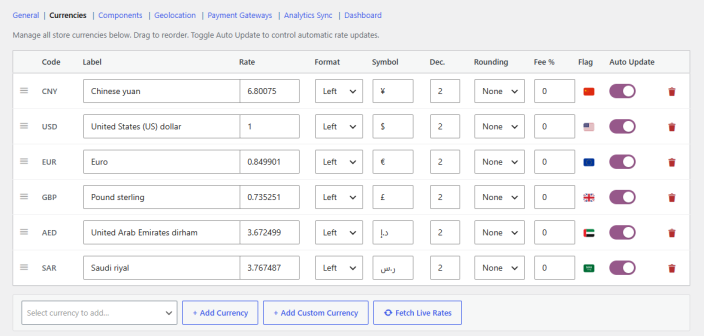
↑ Back to topHere you can manage all store currencies. Go to WooCommerce > Settings > Multicurrency Switcher and Converter > Currencies and configure the following:
Manage all store currencies. Add multiple store currencies or add a custom currency as well. For each currency, you can configure the following:
- Rate
- Format: Left or Right
- Symbol
- Dec
- Rounding: Options are None. 99, or Whole
- Fee %
- Flag
- Auto Update
To add a custom currency, click on “Add Custom Currency” and configure the following:
- Name
- Code
- Rate
Components Settings
↑ Back to topEnable and configure each frontend display component in this section. Go to WooCommerce > Settings > Multicurrency Switcher and Converter > Components and configure the following:
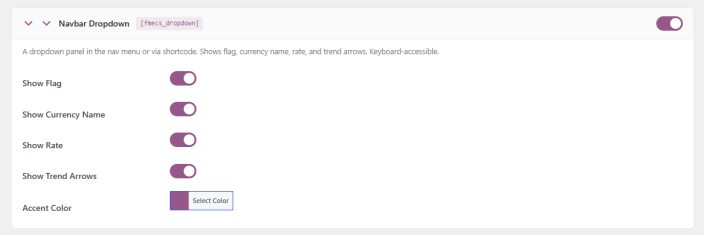
Navbar Dropdown – [fmecs_dropdown]
↑ Back to topA dropdown panel in the nav menu or via shortcode. Shows flag, currency name, rate, and trend arrows. You can enable the following:
- Show Flag
- Show Currency Name
- Show Rate
- Show Trend Arrows
- Accent Color
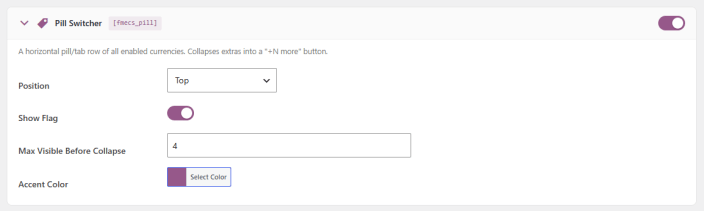
Pill Switcher – [fmecs_pill]
↑ Back to topA horizontal pill/tab row of all enabled currencies. Collapses extras into a “+N more” button. You can configure the following:
- Position: Select the component’s position. You can select the following:
- Top
- Left
- Right
- Show Flag: Enable the toggle switch to show the flag.
- Max Visible Before Collapse: Set the maximum number that will be visible before the component collapses.
- Accent Color: Select the accent color.
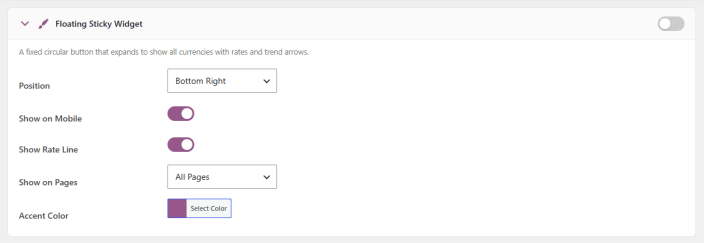
Floating Sticky Widget
↑ Back to topA fixed circular button that expands to show all currencies with rates and trend arrows.
- Position – Bottom Left or Bottom Right
- Show on Mobile
- Show Rate Line:
- Show on Pages – All Pages, Shop, Product, and Cart & Checkout
- Accent Color
Shop Page Toolbar
↑ Back to topA toolbar that will be injected above the WooCommerce product grid.

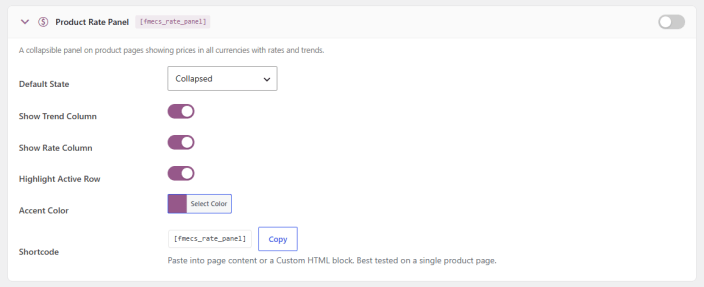
Product Rate Panel – [fmecs_rate_panel]
↑ Back to topA collapsible panel on product pages showing prices in all currencies with rates and trends.
- Default State – Collapsed or Extended
- Show Trend Column
- Show Rate Column
- Highlight Active Row
- Accent Color
- Shortcode – [fmecs_rate_panel] – Paste into page content or a Custom HTML block.
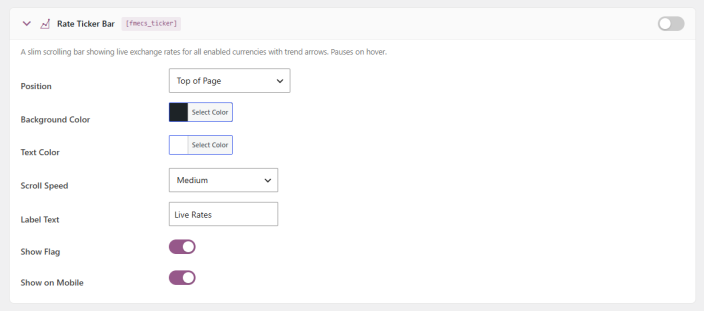
Rate Ticker Bar – [fmecs_ticker]
↑ Back to topA slim scrolling bar showing live exchange rates for all enabled currencies with trend arrows. Pauses on hover.
- Position – Top of Page, Below Header, or Above Footer
- Background Color
- Text Color
- Scroll Speed – Slow, Medium, or Fast
- Label Text
- Show Flag
- Show on Mobile
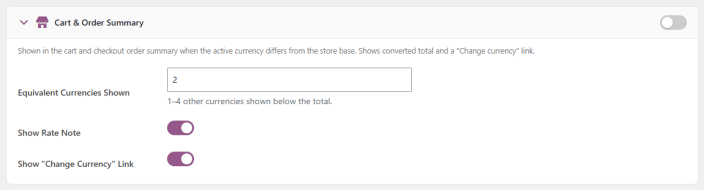
Cart & Order Summary
↑ Back to topShown in the cart and checkout order summary when the active currency differs from the store base. Shows converted total and a “Change currency” link.
- Equivalent Currencies Shown
- Show Rate Note
- Show “Change Currency” Link
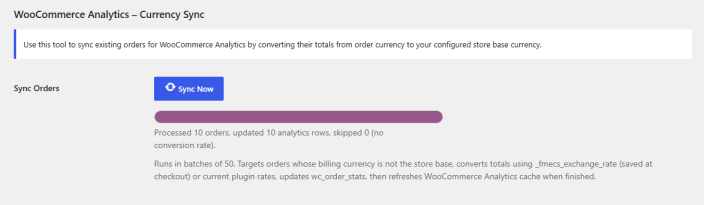
Sidebar Widget – [fmecs_sidebar_widget]
↑ Back to topA card-style currency list for sidebar areas. Add via Appearance → Widgets or as a Gutenberg block.
- Show Currency Name
- Show Rate
- Show Trend Arrows
- Display Style – Expanded or Compact
- Accent Color
- Shortcode – [fmecs_sidebar_widget]
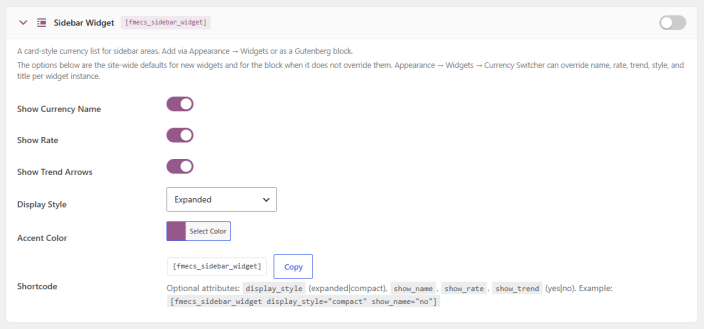
Geolocation Settings
↑ Back to topAutomatically detects the visitor’s country and switches to the matching currency from your Geolocation Rules. Go to WooCommerce > Settings > Multicurrency Switcher and Converter > Geolocation and configure the following;
- Enable Geolocation: Enable geolocation detection to show each visitor their local currency automatically.
IP Detection Method
↑ Back to top- Detection Method: Choose how you want to detect the IP address. You have the following two options:
- WooCommerce Default: Uses WooCommerce’s built-in detection – no API key needed.
- ipapi.co / ipapi.com: Supports both providers. Add an API key for higher limits and provider-specific plans. Use a key from ipapi.co or ipapi.com. ipapi.co offers a free tier without a key; ipapi.com plans are provider-specific.
- Test: Detects your country using the selected method and shows the result.
Geolocation Tester
↑ Back to topSimulate a visitor from any country to see which rule matches and which currency would be applied – without affecting live visitors. Select a country from the dropdown and click “Simulate Visit.” You can check the Country, Matched rule, and Currency applied for the selected country.
Geolocation Rules
↑ Back to topThe first matching rule applies. If no rule matches, the Store currency from General settings is used. Priority note: Geolocation rules have higher priority than “Checkout -> Force based on customer country”. If geolocation is disabled or no geo rule matches, checkout force-country uses country-to-currency mapping instead.
- Click on “Add Rule”
- Enter Rule Name
- Select Countries
- Select Currency
Payment Gateway Settings
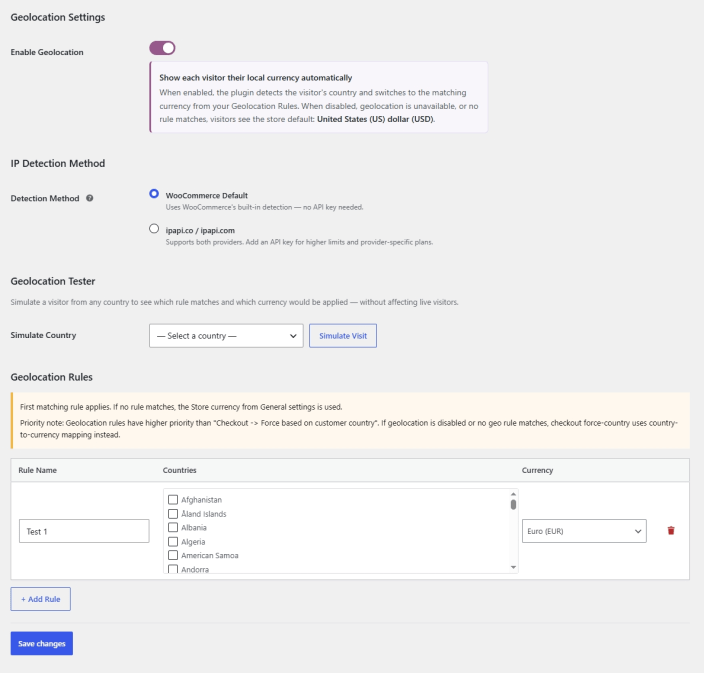
↑ Back to topManage the restriction of payment gateways based on currency. Go to WooCommerce > Settings > Multicurrency Switcher and Converter > Payment Gateway and configure:
- Enable restriction of payment gateway based on currency.
- Add rule(s) to manage the restriction
- Choose the currency and payment gateway for each rule
Analytics Sync
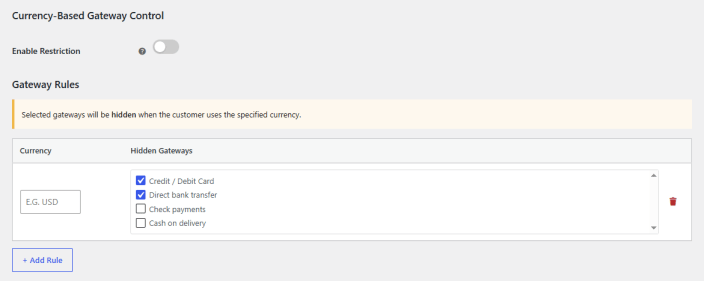
↑ Back to topGo to WooCommerce > Settings > Multicurrency Switcher and Converter > Analytics Sync. Use this tool to sync existing orders for WooCommerce Analytics by converting their totals from order currency to your configured store base currency.
Click on “Sync Now” to sync existing orders. Runs in batches of 50. Targets orders whose billing currency is not the store base, converts totals using _fmecs_exchange_rate (saved at checkout) or current plugin rates, updates wc_order_stats, then refreshes WooCommerce Analytics cache when finished.
Currency Analytics Dashboard
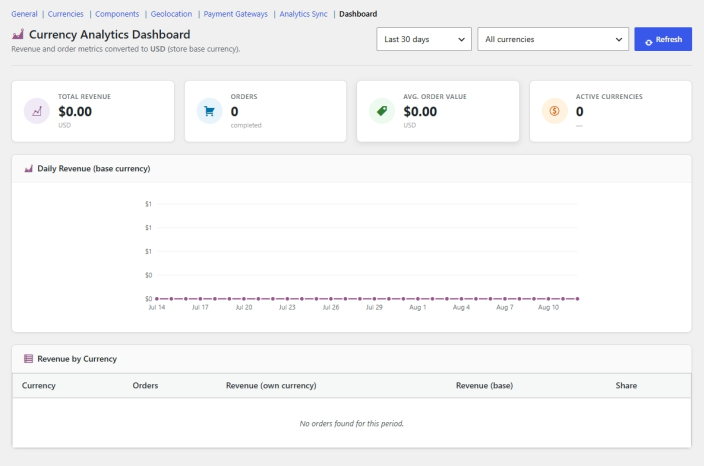
↑ Back to topA complete dashboard to monitor revenue and order metrics converted to the store’s base currency. Check data for the last 7 days, 30 days, 90 days, last month, or this month. Go to WooCommerce > Settings > Multicurrency Switcher and Converter > Dashboard. Here you can see analytics for the following:
- Total Revenue
- Orders
- Avg. Order Value
- Active Currencies
- Daily Revenue (base currency)
- Revenue by Currency
- Currency
- Orders
- Revenue (own currency)
- Revenue (base)
- Share
Multi-Currency Shipping Costs
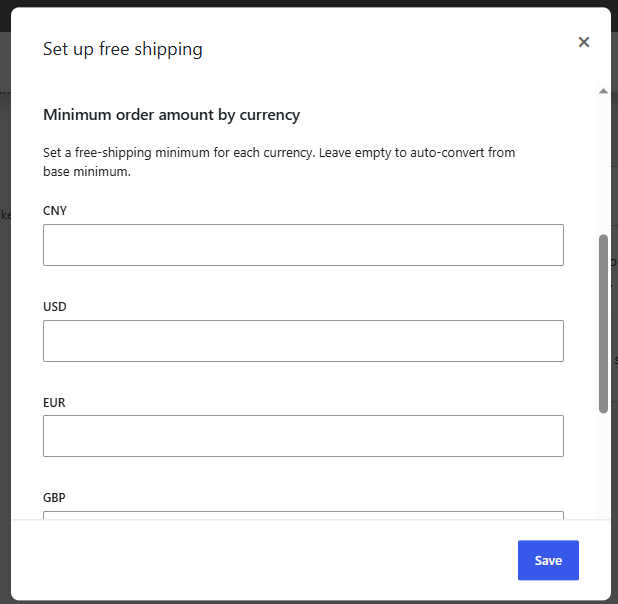
Go to WooCommerce > Settings > Shipping and edit any shipping zone. Within the zone, edit a shipping method (such as Flat Rate) to access multi-currency cost configuration. Set a fixed cost for each enabled store currency. Leave any field empty to auto-convert the cost from the base currency.
- Currency cost fields: Enter the fixed cost for each enabled store currency. Each currency is displayed by its code (such as USD, GBP) with its own input field. Leave a field empty to automatically convert the shipping cost from the base currency using the active exchange rate.
- Add shipping class costs: Click this link to configure shipping class-specific costs per currency, allowing different shipping classes to have unique fixed costs for each currency.
- Save: Click this button to save the multi-currency shipping cost configuration.

Per-Currency Coupon Settings
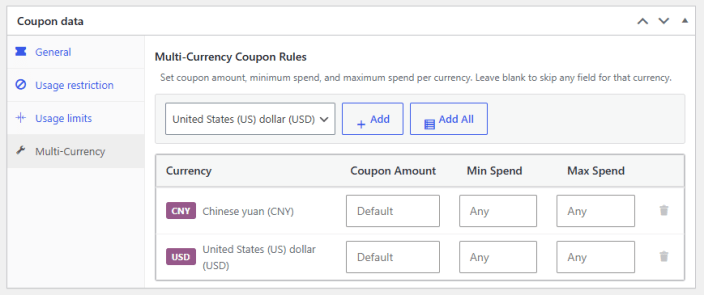
Go to WooCommerce > Coupons and create or edit a coupon. In the Coupon data panel, click the Multi-Currency tab to customize the coupon for each enabled store currency. Set coupon amount, minimum spend, and maximum spend per currency. Leave any field blank to skip it for that currency.
- Currency selector: Use the dropdown to select a currency to add to the configuration table.
- + Add: Click this button to add the selected currency to the configuration table.
- Add All: Click this button to add every enabled store currency to the configuration table at once.
- Configuration table: Displays the added currencies with the following columns:
- Currency: Displays the currency name and flag.
- Coupon Amount: Enter the coupon discount value for this currency. Leave blank to use the default coupon amount.
- Min Spend: Enter the minimum cart total required for the coupon to apply in this currency. Leave blank to skip the minimum spend check.
- Max Spend: Enter the maximum cart total allowed for the coupon to apply in this currency. Leave blank to skip the maximum spend check.
Frequently Asked Questions
↑ Back to topWhich exchange rate provider should I use if my currency isn’t covered by the European Central Bank?
↑ Back to topThe ECB only covers 30 currencies, updated daily against EUR. If your store or display currency isn’t on that list, switch the Aggregator to Fixer.io or Open Exchange Rates and enter an API key.
Do I need an API key to use geolocation-based currency switching?
↑ Back to topNo. The WooCommerce Default detection method requires no API key. You only need one if you choose ipapi.co or ipapi.com for higher detection limits or provider-specific features.
What happens if a visitor’s country doesn’t match any of my geolocation rules?
↑ Back to topThe plugin falls back to the Store Currency set under General Settings.
Which takes priority: geolocation rules or “Force checkout based on customer’s country”?
↑ Back to topGeolocation rules take priority. If geolocation is disabled, or no rule matches the visitor, checkout force-by-country uses its own separate country-to-currency mapping instead.
How do I test my geolocation setup before it goes live?
↑ Back to topUse the Geolocation Tester under Geolocation Settings. Select a country and click Simulate Visit to see the matched rule and currency that would apply, without affecting real visitors.
How often does Analytics Sync run, and will it slow down my store?
↑ Back to topSync only runs when you manually click Sync Now; it isn’t automatic or scheduled. It processes orders in batches of 50, targeting only orders whose billing currency isn’t your base currency, so it shouldn’t create a heavy load on your store.

