Allow your customers to choose the delivery date and time most suited to them with the Order Delivery Date and Time for WooCommerce plugin. Show multiple time slots, specify fees, and show error messages to ensure accurate delivery information is received.
Installation
↑ Back to top- Download the plugin .zip file from your Woo account
- Go to WordPress Admin > Plugins > Add New
- Click Upload Plugin and select Choose File
- Choose Install Now and Activate the plugin
You can explore more information about Installing and Activating Plugins/Extensions here.
Setup and Configuration
↑ Back to topGo to WooCommerce > Delivery Date and Time to create multiple delivery slots and holidays. From WooCommerce > Settings > Order Delivery, you can customize the style, and labels and configure other general settings.
To specify delivery details for specific products, you can go to Products, choose a desired Item, and click Edit. From there, go to Product Data > Delivery Date and Time Scheduler to add custom time slots and dates for that product.
Create Multiple Delivery Date & Time Rules
↑ Back to topCreate multiple rules based on different order delivery dates and time conditions.

Create Time & Delivery Slots for Multiple Products – Rule Based Settings
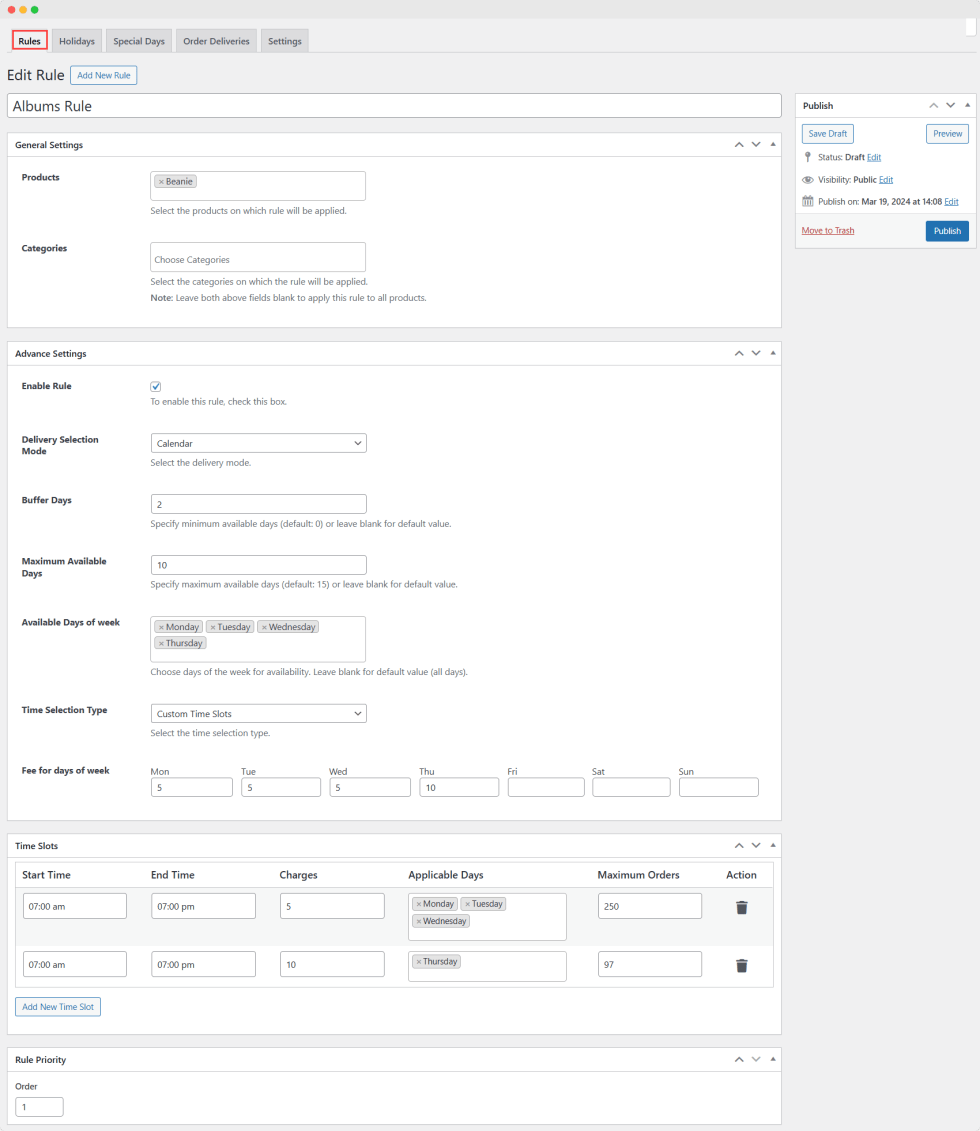
↑ Back to topGo to WooCommerce > Delivery Date and Time > Rules > Add New Rule to create new time slots for products of your choice. You can manage rules in an intuitive log. To create a new time slot, you can make use of the following settings:
- Title: Add a unique title for the rule
- Rule Priority: Set priority order for each rule
- Enable Rule: Choose to enable or disable the rule anytime
- Products: Select the products on which the rule will be applied.
- Categories: Select the categories on which the rule will be applied.
- Delivery Selection Mode: Select from the following delivery modes:
- Calendar
- Expected Delivery Information
- For the Calander Selection Mode, specify the following:
- Buffer Days: Specify minimum available days (default: 0) or leave blank for default value.
- Maximum Available Days: Specify maximum available days (default: 15) or leave blank for default value.
- Available Days of Week: Choose days of the week for availability. Leave blank for default value (all days).
- Time Selection Type: Select the time selection type: Custom Time Slots, Automatic Time Slots, or None.
- Fee for days of the week: Add a fee for each day of the week
- Time Slots: Specify multiple time slot duration by specifying the following:
- Start time
- End time
- Charges
- Applicable days
- Maximum orders
- Action
- For Expected Delivery Dates Mode, you can adjust the following:
- Minimum Delivery Days: Add the minimum days for expected delivery.
- Maximum Delivery Days: Add the maximum days for expected delivery.
- Expected Date Message Text: Add expected delivery date message text.
Add Holidays & Special Days
Go to WooCommerce > Delivery Date and Time > Holidays to add new holidays and manage all from a log. You can customize the following settings:
- Title: Add new holiday title
- Start Date: Add the start date of the holiday
- End Date: Add the end date of the holiday
- Repeat Holiday: Set a holiday to repeat on a regular schedule
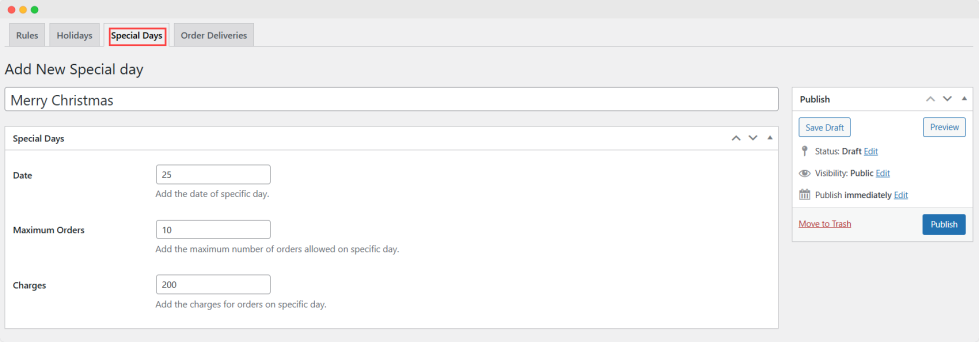
Now go to WooCommerce > Delivery Date and Time > Special Days to add new special days and manage all from a log. You can customize the following settings:
- Date: Add the date of a specific day
- Maximum Orders: Add the maximum number of orders allowed on a specific day.
- Charges: Add the charges for orders on a specific day.

Manage All Deliveries in One Place
From WooCommerce > Delivery Date and Time > Order Deliveries, you can view all orders with their IDs and easily track progress. Perform bulk actions on deliveries to save time.

Add Time Slots For Individual Products – Product Level Settings
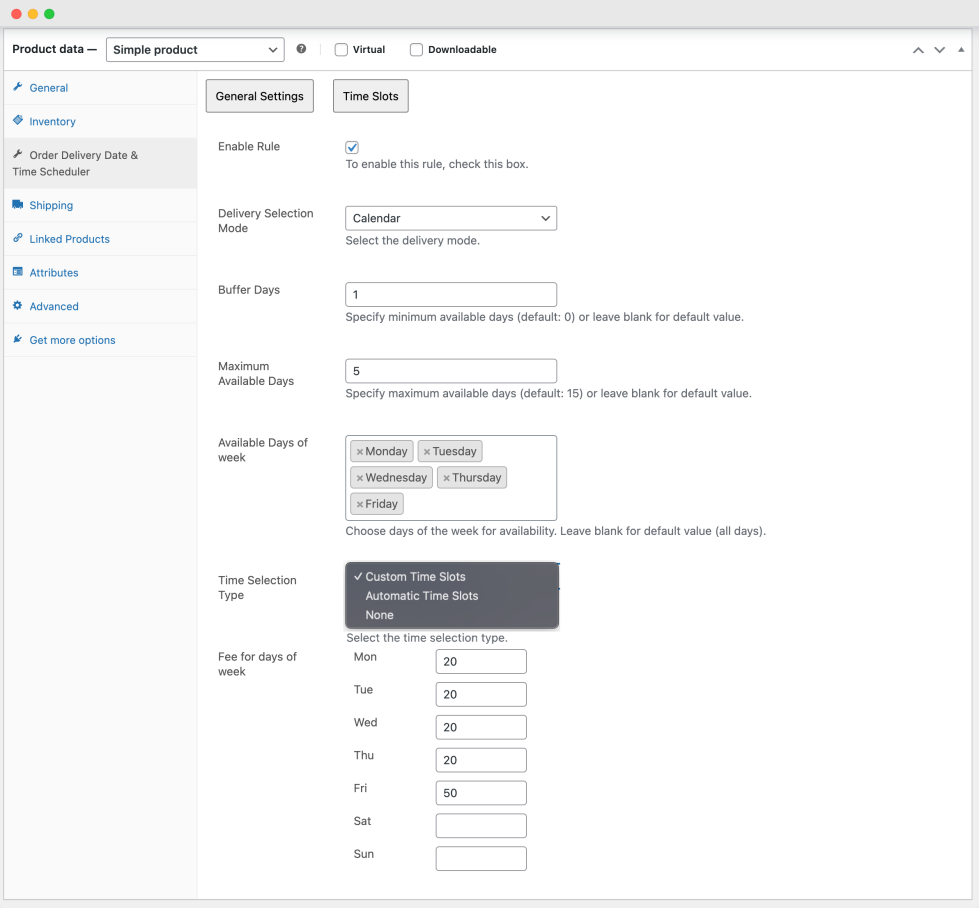
↑ Back to topYou can easily specify delivery details for specific products by going to Products and choosing a desired Item. After selecting the product, click Edit and go to Product Data > Delivery Date and Time Scheduler to add custom time slots and dates.
From here, you can customize the settings as we did at the global level but these changes apply at the product level.
- Enable Rule: Choose to enable the rule for the particular product
- Delivery Selection Mode: Select the delivery mode.
- Calendar
- Expected Delivery Information
- For the Calander Selection Mode, specify the following:
- Buffer Days: Specify minimum available days (default: 0) or leave blank for default value.
- Maximum Available Days: Specify maximum available days (default: 15) or leave blank for default value.
- Available Days of Week: Choose days of the week for availability. Leave blank for default value (all days).
- Time Selection Type: Select the time selection type: Custom Time Slots, Automatic Time Slots, or None.
- Fee for days of the week: Add a fee for each day of the week
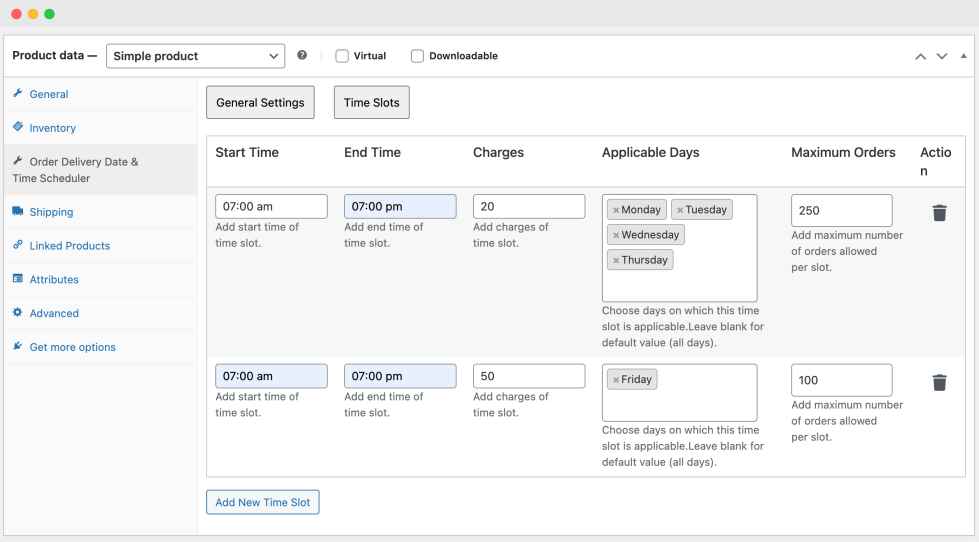
- Time Slots: Specify multiple time slot duration by specifying the following:
- Start time
- End time
- Charges
- Applicable days
- Maximum orders
- Action
- For Expected Delivery Dates Mode, you can adjust the following:
- Minimum Delivery Days: Add the minimum days for expected delivery.
- Maximum Delivery Days: Add the maximum days for expected delivery.
- Expected Date Message Text: Add expected delivery date message text.
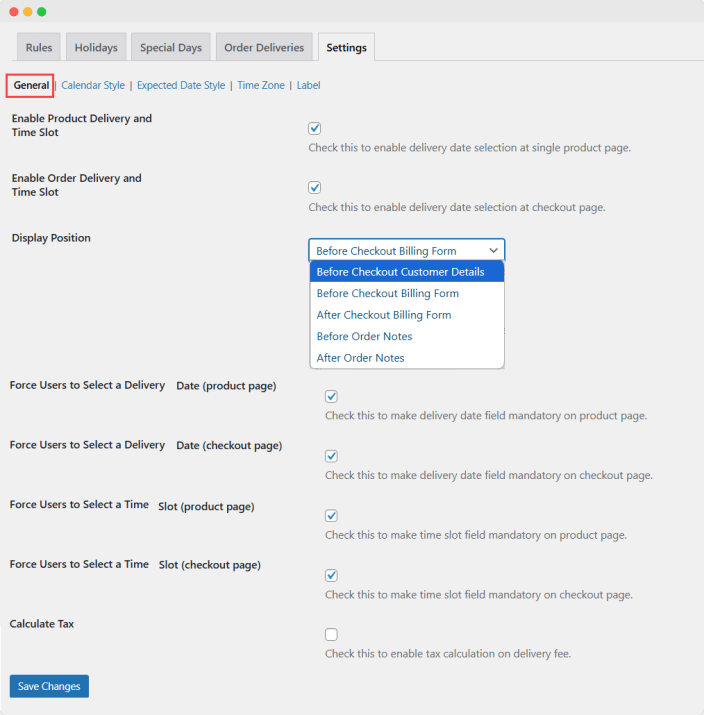
Choose Delivery Option Position & Force Selection – General Settings
Go to WooCommerce > Settings > Order Delivery > General option and adjust the following:
- Enable Product Delivery and Time Slot: Check this to enable delivery date selection on single product pages
- Enable Order Delivery and Time Slot: Check this to enable delivery date selection at the checkout page.
- Display Position: Choose the position of delivery info fields/expected date text on the checkout page:
- Before Checkout Customer Details
- Before/After Checkout Billing Form
- Before/After Order Notes
- Force Users to Select a Delivery Date (product page): Check this to make the delivery date field mandatory on the product page.
- Force Users to Select a Delivery Date (checkout page): Check this to make the delivery date field mandatory on the checkout page.
- Force Users to Select a Time Slot (product page): Check this to make the time slot field mandatory on the product page.
- Force Users to Select a Time Slot (checkout page): Check this to make the time slot field mandatory on the checkout page.
- Calculate Tax: Check this to enable tax calculation on delivery fees.
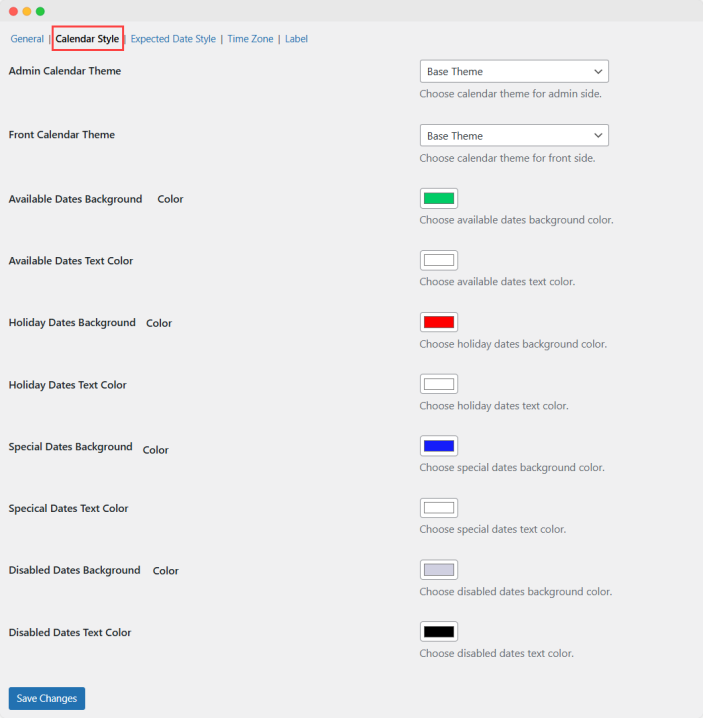
Customize Calendar Style
Go to WooCommerce > Settings > Order Delivery > Calendar Style and adjust the following options:
- Admin Calendar Theme: Choose from 25 calendar themes for the admin side.
- Front Calendar Theme: Choose from 25 calendar themes for the front side.
- Available Dates Background Color: Choose available dates background color.
- Available Dates Text Color: Choose available dates text color.
- Holiday Dates Background Color: Choose holiday dates background color.
- Holiday Dates Text Color: Choose holiday dates text color.
- Special Dates Background Color: Choose special dates background color.
- Special Dates Text Color: Choose a special date text color.
- Disabled Dates Background Color: Choose disabled dates background color.
- Disabled Dates Text Color: Choose disabled dates text color.
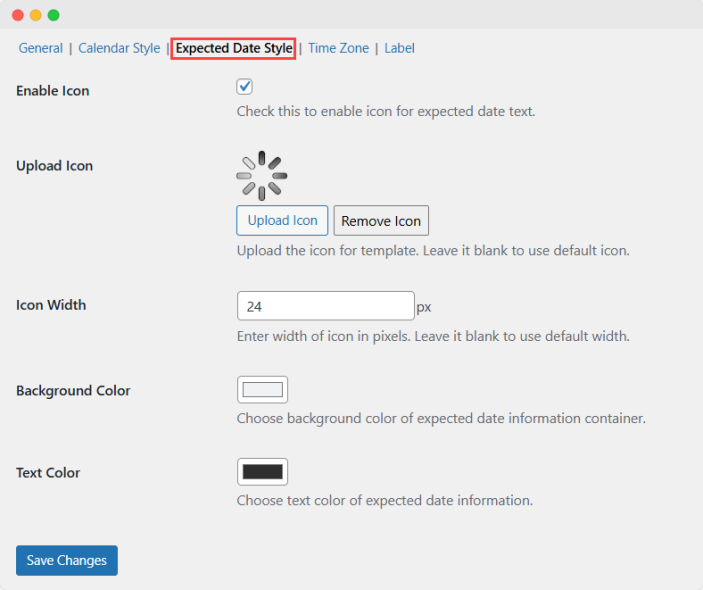
Customize the Expected Date Style
↑ Back to topGo to WooCommerce > Settings > Order Delivery > Expected Date Style and adjust the following options:
- Enable Icon: Check this to enable icon for expected date text.
- Upload Icon: Upload the icon for template. Leave it blank to use the default icon.
- Upload Icon
- Remove Icon
- Icon Width: Enter width of the icon in pixels. Leave it blank to use default width.
- Background Color: Choose the background color of expected date information container.
- Text Color: Choose the text color of expected date information.
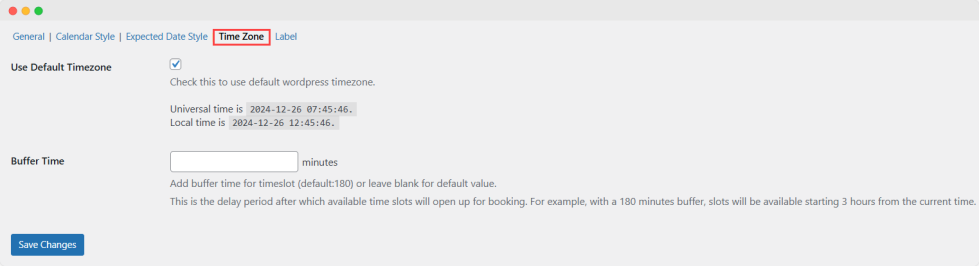
Enable Preferred Timezones and Specify Buffer Time
Go to WooCommerce > Settings > Order Delivery > Time Zone and adjust the following options:
- Use Default Timezone: Check this to use the Universal timezone. Uncheck to enable the timezone for a preferred location:
- Time Zone: Choose a city and apply the time zone from that region.
- Buffer Time: Add buffer time for the timeslot (default:180) or leave blank for default value.
Customize Labels and Show Personalized Error Messages
↑ Back to topGo to WooCommerce > Settings > Order Delivery > Label and adjust the following options:
- Mandatory Time Slot Message (checkout page): Customize error message for a mandatory time slot on the checkout page.
- Enable Delivery Date: Customize the label to enable the delivery date field. If left blank default label “Enable Delivery Date Selection” will be used.
- Delivery Date: Customize the label for the delivery date field. If left blank default label “Delivery Date” will be used.
- Time Slot: Customize the label for the time slot field. If left blank default label “Time Slot” will be used.
- Delivery Fee: Customize label for delivery fee. If left blank default label “Special Delivery Charges” will be used.
- Available Date Text: Customize the label for available date text. If left blank, default text “Available Date” shall apply.
- Special Date Text: Customize the label for special date text. If left blank, default text “Special Date” will apply.
- Mandatory Delivery Date Message (product page): Customize error message for a mandatory delivery date on the product page.
- Mandatory Time Slot Message (product page): Customize error message for a mandatory time slot on the product page.
- Mandatory Delivery Date Message (checkout page): Customize error message for a mandatory delivery date on the checkout page.
