PayPal Standard takes customers from your site to PayPal’s secure site to finish paying for their order.
Requirements
↑ Back to top- A PayPal Business account
Go to paypal.com, and sign up for a PayPal Business account or convert an existing Personal account to Business. It’s free.
Setup and Configuration
↑ Back to topTo set up PayPal Standard:
1/ Go to: WooCommerce > Settings > Payments.
2/ Use the toggle under Enabled to select PayPal.
3/ Select Set up. You are taken to the PayPal Standard settings.
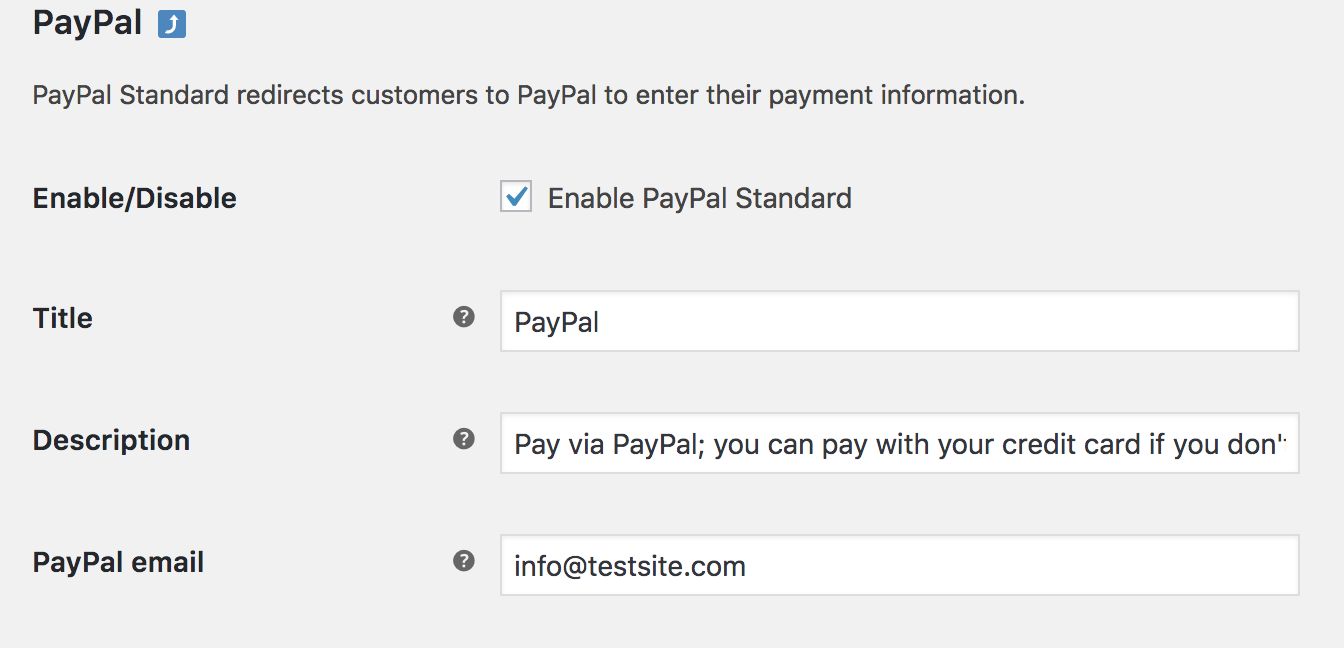
4/ Enter your email address in the PayPal Email field, which is the most important thing to configure before taking payments. Must match the same email address on your PayPal Business account.
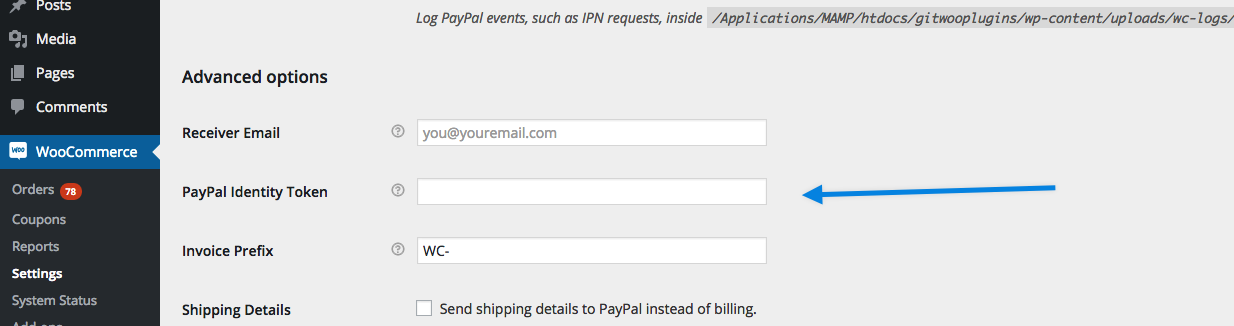
Advanced Options
↑ Back to top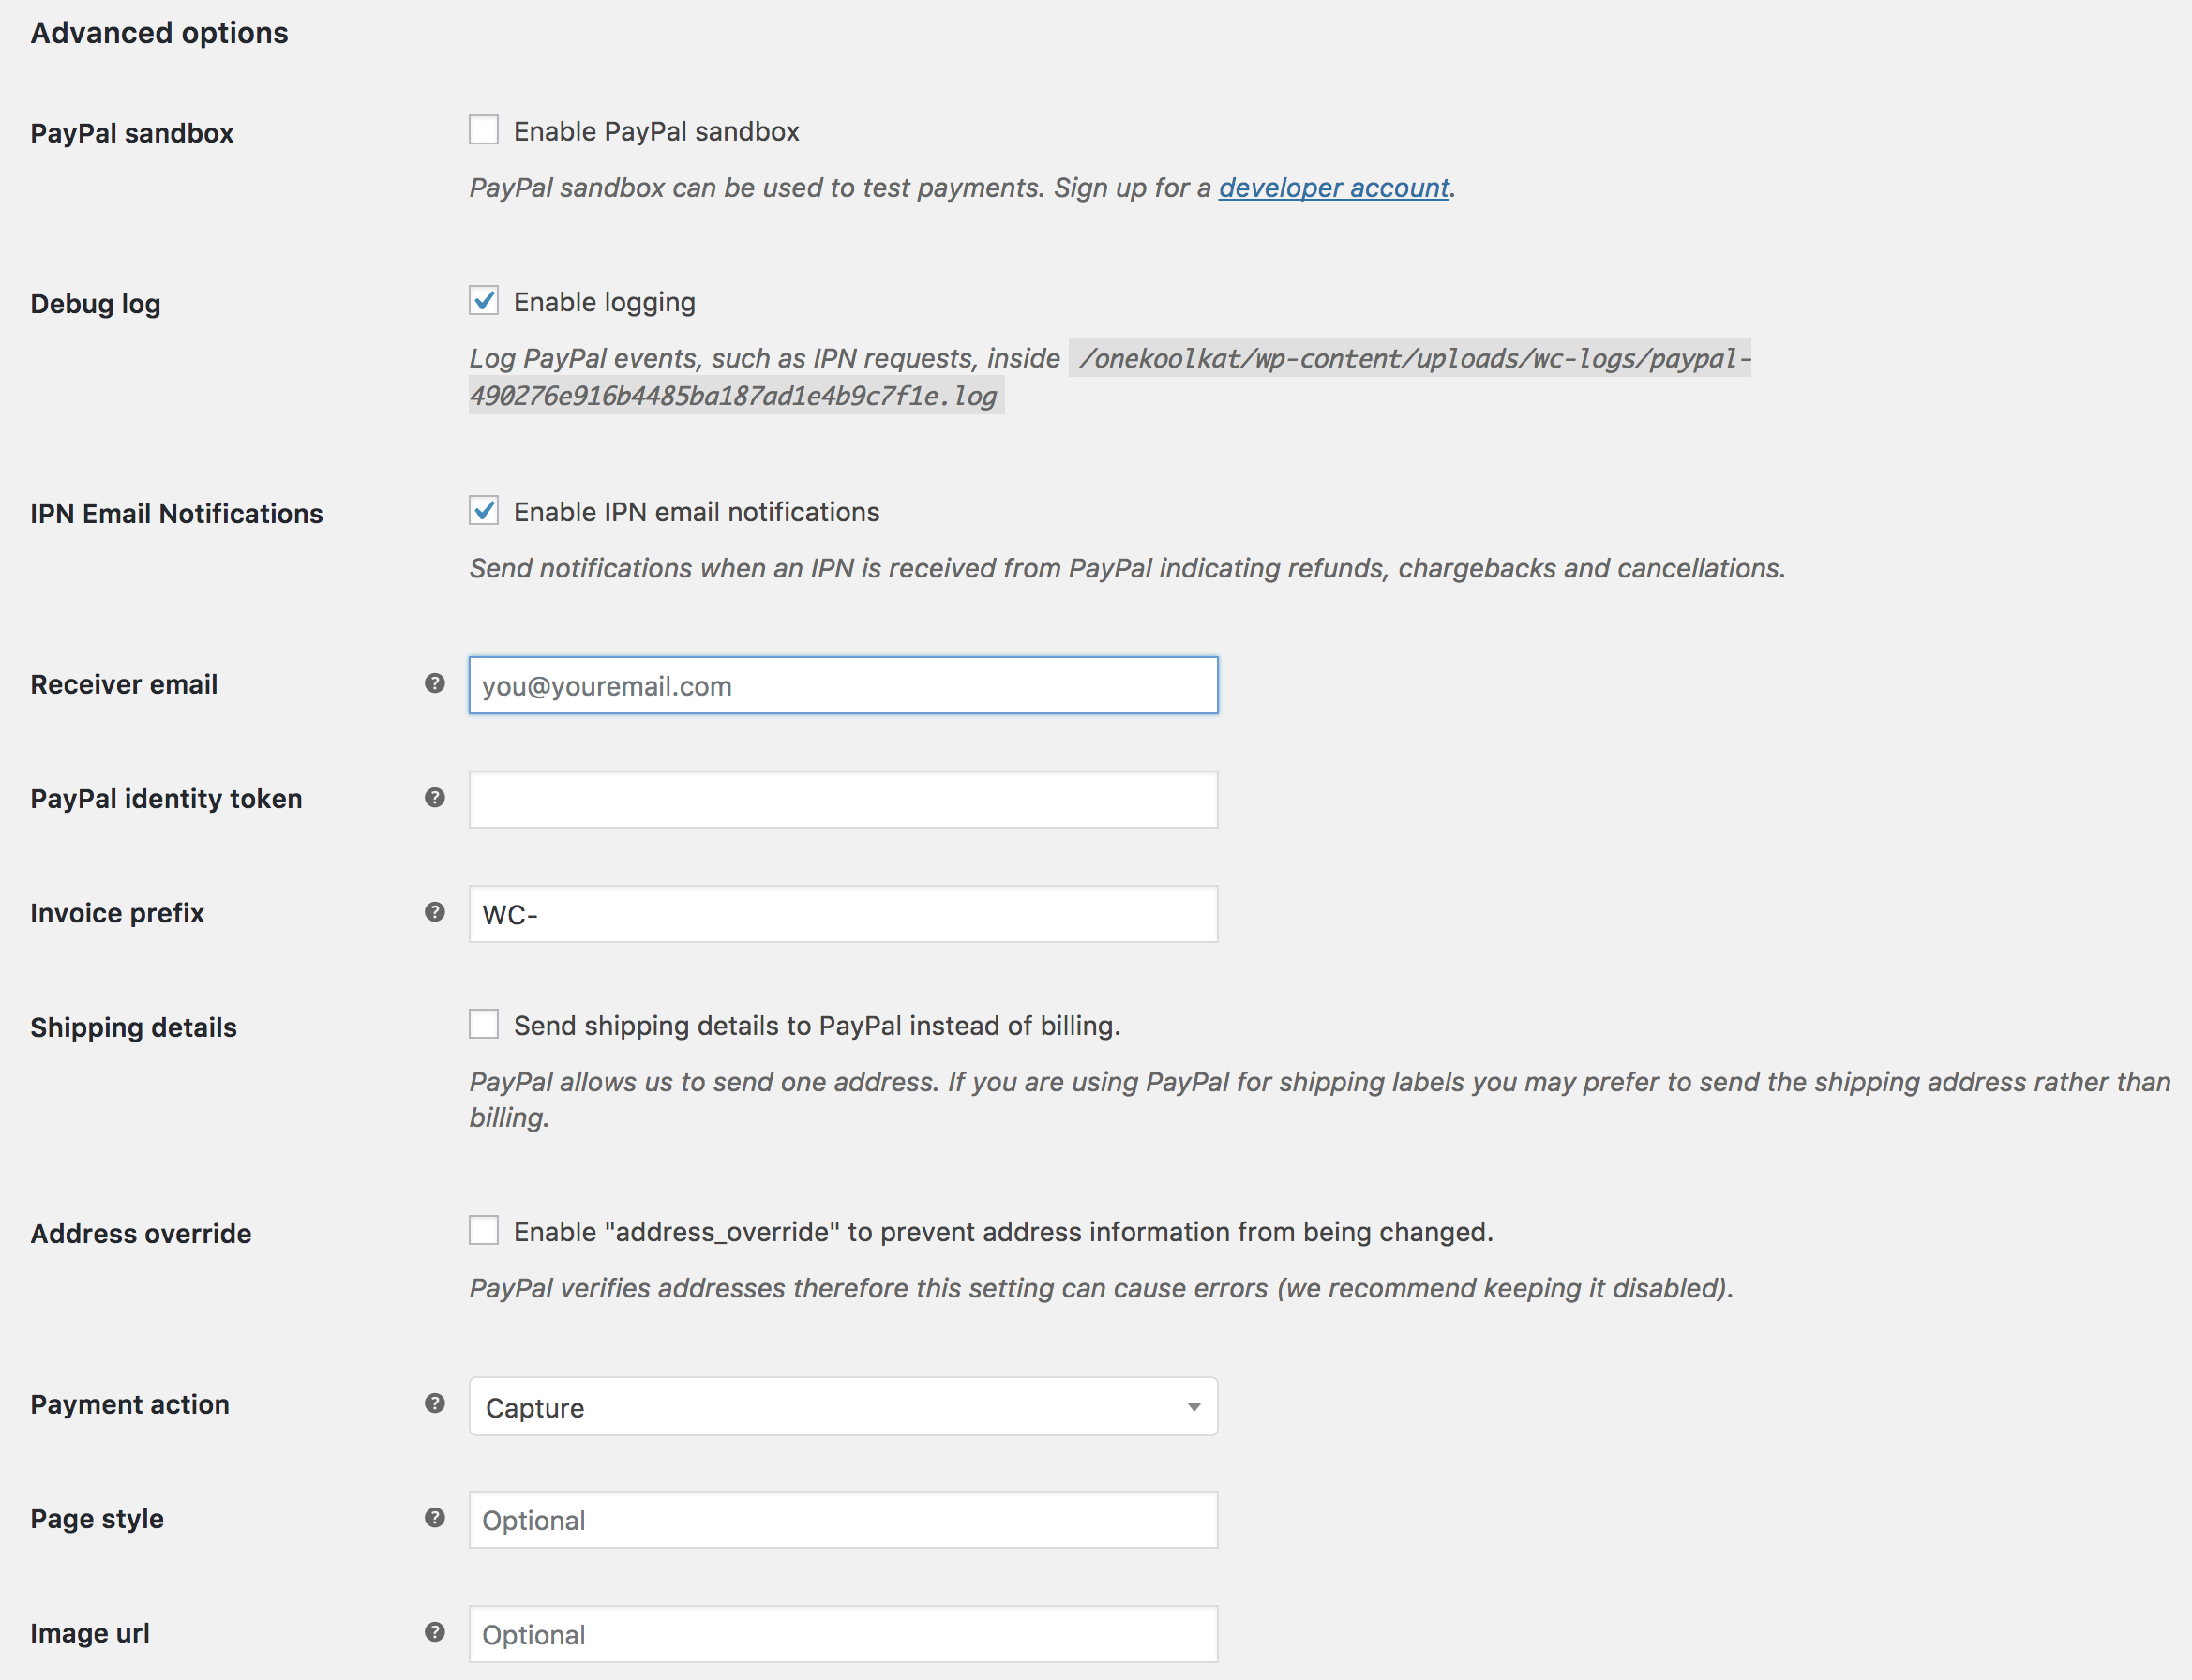
Under Advanced Options, complete fields as needed.
5/ Tick the box for Enable PayPal Sandbox if you wish to test the checkout process during your store’s development. With sandbox enabled, no payment/money is taken. To use Sandbox mode, you need a separate sandbox account via PayPal Sandbox.
6/ Debug log may also be turned on, which can be useful during development. You may need to first create a wc-logs folder and set permissions to make it writable. These logs are available at WooCommerce > System Status > Logs and then select the PayPal log from the dropdown.
7/ Tick the box for Enable IPN Email Notifications (optional). Instant Payment Notifications (IPN) are sent from PayPal when you receive a payment, issue a refund, or a chargeback or cancellation.
8/ The Receiver email in that field needs to be the Primary email address listed in the PayPal.com setting page – https://www.paypal.com/businessprofile/settings
9/ PayPal Identity Token (optional). Only required if you signed up for the Data Transfer option on your PayPal account; can be used to verify payments if you have IPN issues.
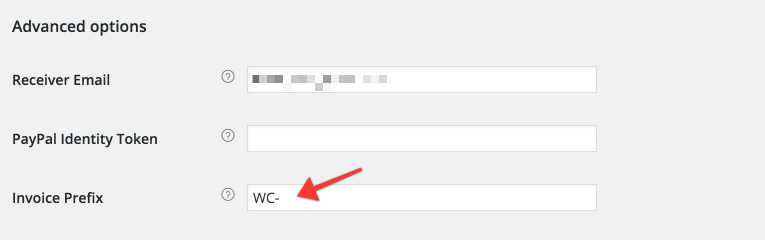
10/ Enter an Invoice Prefix (useful if you have multiple stores). WC is default to denote WooCommerce transactions.
11/ There are two shipping options:
- Send shipping details to PayPal. You can opt to have WooCommerce send shipping details to PayPal to create shipping labels instead of billing.
- Address override option. PayPal verifies addresses therefore this setting can cause errors. We recommend keeping it disabled, but it can be useful in preventing address information from being changed.
12/ Payment Action lets you choose to Capture funds immediately or only Authorize*.
*Once an ‘authorize only’ order has been changed to Processing or Completed, funds are automatically captured as long as you have entered your PayPal API Credentials (as below) under WooCommerce > Settings > Payments > PayPal. It is no longer a manual process as of WooCommerce 3.0.
13/ Page Style (optional) allows you to select the name of a custom page from your PayPal account.
14/ Image URL (optional) gives the option to specify a 150×50 image to display on PayPal checkout pages.
API Credentials
↑ Back to top
There are three fields to paste API information into:
- API Username
- API Password
- API Signature
How to get Live API Information
- Log in to your PayPal account at PayPal.com.
- Go to Settings (Gear Icon) > Account Settings > API Access.
- Select NVP/SOAP API integration (Classic) > Manage API Credentials > Request API Signature.
- View and copy API Username, API Password, and API Signature.
Configuring the PayPal dashboard
↑ Back to topMost of the configuration is handled from WooCommerce, but there are a few items to set up at PayPal.
PayPal IPN URL
It’s necessary for WooCommerce to set up your PayPal IPN URL.
PayPal Instant Payment Notifications (PayPal IPN) tells your store that payment has been successful (or not). To learn more about how to set this up on PayPal, see: How to Activate IPN in your PayPal Account.
How to setup PayPal IPN
- Log in to your PayPal account at PayPal.com.
- Go to Settings (Gear Icon) > Account Settings > Notifications > Instant Payment Notifications (Update).
- Click the Choose IPN Settings button, then use this URL, replacing
example.comwith your own URL:https://example.com/?wc-api=WC_Gateway_Paypal
- Make sure the Receive IPN messages option is selected, then save.
Multiple IPN URLs
It is possible to have multiple stores using the same PayPal.com account and IPN. There’s one default Notification URL, but if you send an IPN listener URL with the transaction, it overrides the default. As long as each transaction is passed to PayPal.com with the notify_url parameter set as the second URL then this will work.
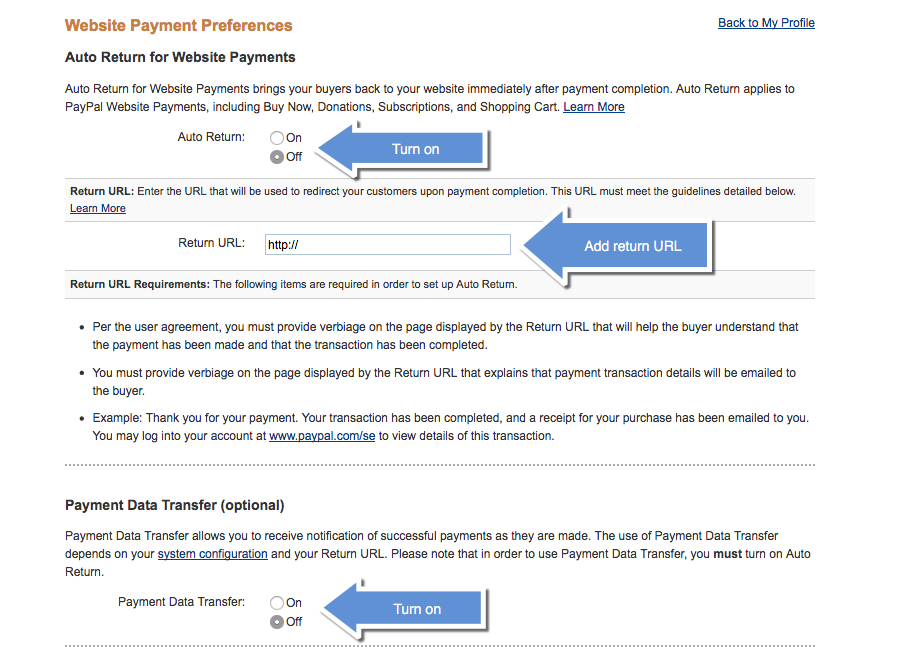
Auto-Return
↑ Back to topYou can set up auto-return in your PayPal account, which will take customers to a receipt page.
How to setup Auto-Return
- Log in to your PayPal account at PayPal.com.
- Go to Settings (Gear Icon) > Account Settings > Website payments > Website preferences.
- In the Auto return section, select On, then use this URL, replacing
example.comwith your own URL:https://example.com/checkout/order-received/
Regardless of this setting, it redirects dynamically to the correct receipt page.
- Optional: Add
?utm_nooverride=1to the end of your URL to ensure that transactions (i.e., conversions) are credited to the original traffic source, rather than PayPal.
Testing with PayPal Sandbox
↑ Back to topWhile configuring and ironing out your site’s checkout and payment workflows, you might choose to use PayPal sandbox details instead, so you can transact to your heart’s content.
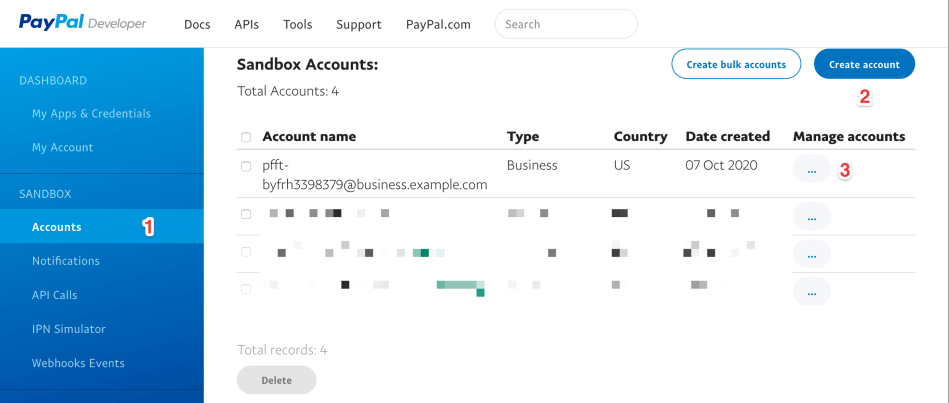
For this purpose, you can sign up for a PayPal developer account. Once signed up, select Sandbox » Accounts (1) from the menu, and click Create Account (2). Specify the Account type and Country/Region to match your requirements.
Note: The Country/Region will determine the currency of your sandbox account, which should match your site’s currency to avoid orders being set to Pending payment.
Next, click the dots menu next to the newly added account in the Manage accounts column, and select View/Edit Account (3) to reveal the sandbox account’s details.
Under the Profile tab of the modal that opens, you’ll notice your sandbox account has a PayPal provided Email ID. Use this email address while your site is in sandbox mode.
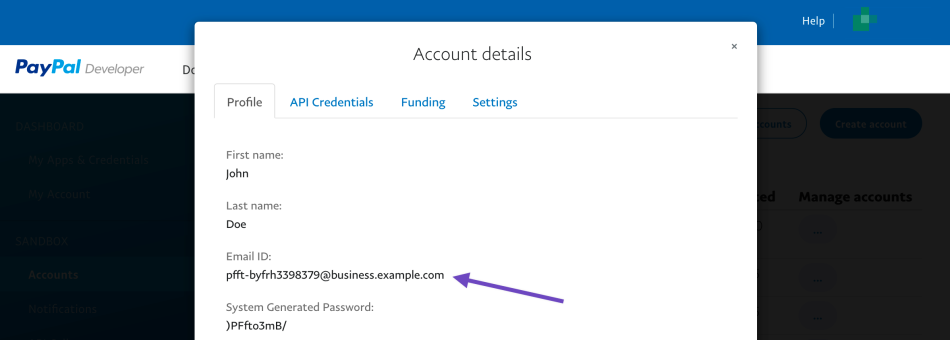
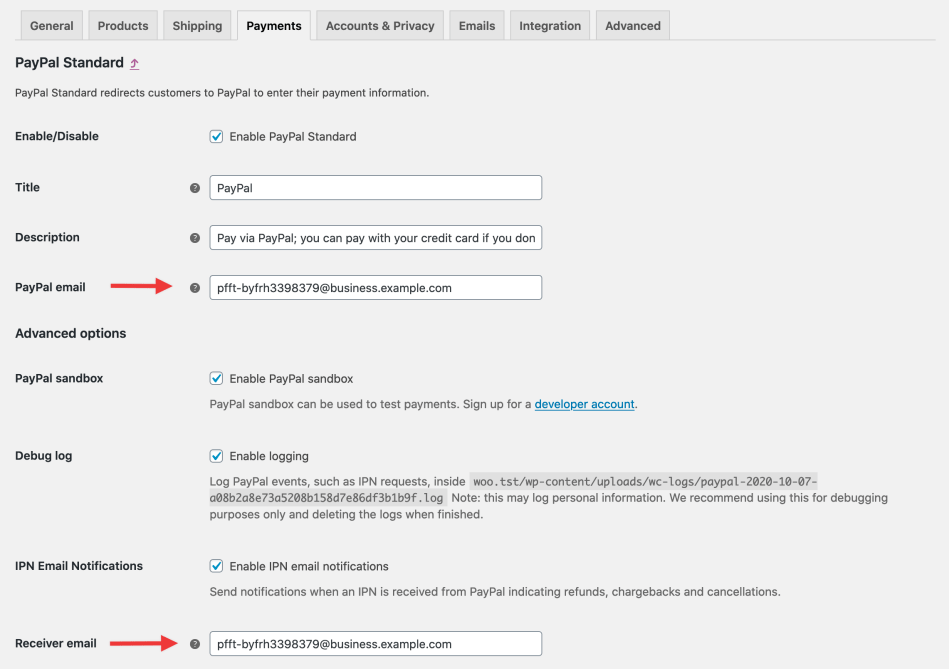
Note: The sandbox Email ID should be used for both the PayPal email and Receiver email fields on your site, which can be found under WooCommerce > Settings > Payments > PayPal .
If the live PayPal email address is used instead, order statuses will show On Hold and the order notes will read “Payment pending (unilateral). Order status changed from Pending payment to On hold”.
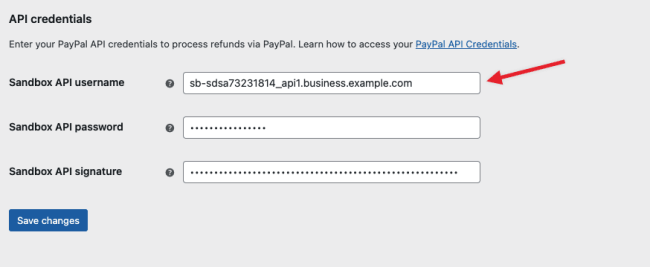
Under the API Credentials, copy the API credentials information (Username, Password, and Signature).
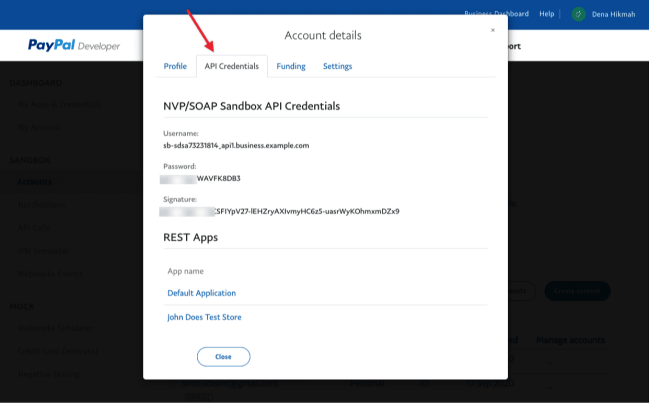
You need to paste them in the corresponding field on your PayPal Standard setting on WooCommerce.
Viewing test transactions on PayPal Sandbox
↑ Back to topTo view transactions received from your WooCommerce store with PayPal in Sandbox mode enabled, you need to login to the PayPal Sandbox website: https://www.sandbox.paypal.com/
Once logged in, you can click on the Activity tab to view all transactions from your WooCommerce store:
Frequently Asked Questions
↑ Back to topDo I need an SSL certificate?
↑ Back to topPayment is made offsite on the PayPal website and not your checkout. Adding an SSL certificate is optional but definitely recommended. SSL is a ranking factor in search results; it also keeps any information transmitted to and from your site secure, and customers expect it. For free and low-cost options, see: SSL and HTTPS.
How much does it cost to use PayPal with WooCommerce?
↑ Back to topPrior to version WooCommerce version 5.5.0, PayPal Standard is included with the core of WooCommerce, which is free to download. For version 5.5.0 and above, PayPal Standard is hidden for new installs.
PayPal charges you transaction fees depending on the account you qualify for and the number/volume of sales you make. Find out more at: Which Payment Option is Right for Me?
WooCommerce does not charge you a fee.
I have pending orders, but no payment was received.
↑ Back to topIf the customer abandons the order in PayPal (and not your WooCommerce store), the order shows as Pending (unpaid). No action is necessary.
When the hold stock time is reached, the order will be automatically canceled.
What data is sent to PayPal when a customer is checking out?
↑ Back to topThe PayPal gateway passes individual line items to PayPal (product name, price and quantity) unless:
- Your prices are defined as including tax
- You have more than nine line items, including shipping – PayPal only supports nine items.
This is to prevent rounding errors and to ensure correct totals are charged. When line items are not sent, the items are grouped and named ‘Order #x’.
My shipping costs are not transferring to PayPal
↑ Back to topWooCommerce 2.6+ sends shipping costs as a ‘real’ shipping line item via PayPals API. If your PayPal account has shipping rules setup within it, these will take over and remove the cost WooCommerce sends across.
To resolve, you must remove all shipping rules that are set up in the PayPal account or disable them using the method outlined here.
Why am I getting payments, but orders are still pending? *OR* Why is my cart not clearing after making payment?
↑ Back to topIn this case, the PayPal IPN is failing. Check your server and see the Debugging IPN issues section below.
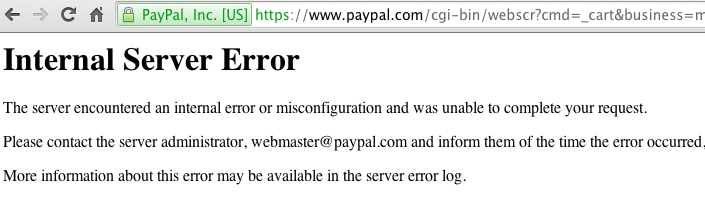
Why do I get an Internal Server Error?
↑ Back to topIf you see the following error message after hitting the purchase button, the email address you entered in PayPal settings is incorrect:
Using the same PayPal account with more than one website
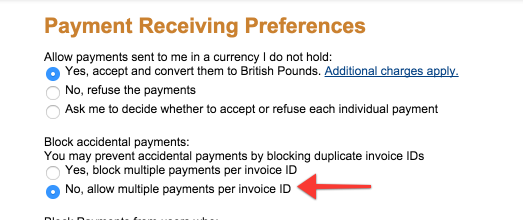
↑ Back to topWooCommerce uses an “invoice” system. There is a setting that “blocks duplicate invoices.” With two websites using invoices, it is inevitable that there will be duplicate invoice numbers. By de-selecting that setting in PayPal, the invoices have no issue. Please check that the Invoice Prefix in your WooCommerce PayPal settings is different for each site.
Alternatively, to disable duplicate invoice checking, log into your PayPal account and go to Profile > Profile and Settings > My Selling Preferences > Block Payments (or) Payment Receiving Preferences and set Block accidental payments to “No.“
Do customers need a PayPal account?
↑ Back to topThere is an option that allows customers to check out without creating an account, but it does first need enabled in your PayPal account.
Once logged in select the gear icon in the top right to get to the My Profile page. Then head to the Products & Services section and select Website Preferences. Once there toggle on the PayPal Account Optional option. To learn more, see: PayPal’s Website.

Is PayPal Seller Protection in effect?
↑ Back to topYes, if you use the Shipping address. No, if you use your Billing address (default). The PayPal API does not recognize more than one address.
Message: Seller only accepts payments from unencrypted payments
↑ Back to topThe “Seller only accepts payments from unencrypted payments” message is from PayPal.
This error displays when your PayPal Account Profile is set to only accept payments from “encrypted” buttons but your item button code is “not” encrypted. This interrupts the payment process and displays the error message.
To turn off this option:
- Log into your PayPal Account.
- Select the Profile tab or Edit Profile link.
- Under Selling Preferences, select Website Payment Preferences.
- In the “Encrypted Website Payments” section, select Off.
- Save changes.
Message: This invoice has already been paid
↑ Back to topWooCommerce order numbers may not be unique if you’re running multiple stores or use your PayPal account for other things.
To avoid this issue, go to WooCommerce > Settings > Checkout > PayPal and set a unique ‘prefix’ for your store, e.g., MYSTORE-
Message: Sorry, it seems there are no available payment methods which support subscriptions
↑ Back to topTo use PayPal Standard with WooCommerce Subscriptions:
- add API credentials
- set up PayPal IPN URL
- check the box Enable PayPal Standard for Subscriptions:

Debugging IPN issues
↑ Back to topAs mentioned above, Instant Payment Notifications (IPN) are sent from PayPal when you receive a payment, issue a refund or a chargeback or cancellation.
The below steps can be taken if IPN is not updating your orders. While working on these problems you may want to prevent pending (unpaid) orders cancelling automatically so you have a chance to manually confirm payment without IPN. To do this, go to WooCommerce > Settings > Products > Inventory and set the “Hold Stock (minutes)” option to nothing (leave the field empty).
Please also note, you can check the IPN history page for more information on IPN deliverability here, after logging into your PayPal account: https://www.paypal.com/us/cgi-bin/webscr?cmd=_display-ipns-history
Are you testing locally?
If you are testing locally, on MAMP for example, PayPal is unable to talk to your store. This is normal — it will work when you host it on the web.
Check your server has support for fsockopen
↑ Back to topThe gateway must talk to PayPal to check the validity of notifications – for this it needs fsockopen support. The exact function used is https://codex.wordpress.org/Function_API/wp_remote_post
*To check if this is supported by your server, go to WooCommerce > System Status and see the results.
Check if your server has a firewall
↑ Back to topThe gateway talks to PayPal via a https URL. Your firewall needs to have the outgoing port 443 open.
Enable Logging
↑ Back to topAfter enabling logs via the settings, check to see that responses are being received. If they are not, then the problem may be due to your WordPress install or a plugin conflict. Turn off other plugins.
Check Email Addresses
↑ Back to topCheck that the Email Address in the PayPal gateway settings matches the email address passed back by IPN. Use your primary email address for your PayPal account. They need to match.
Failure to do so will cause the IPN response to be rejected. This could result in orders remaining on hold or not completing.
"Payment pending (unilateral). Order status changed from Pending payment to On hold"
Unilateral means that the receiver isn’t an existing PayPal account. Whichever receiver email was used needs to have a PayPal account created with that email or add that email to an existing PayPal account, the transaction will then complete. The email address also needs to be confirmed.
Check for conflicts
↑ Back to topIf the order status is not changing on order complete, check if there is a conflict with W3 Total Cache.
Currency in PayPal Sandbox mode
When PayPal is in sandbox mode and payment is made in a currency other than the sandbox currency:
- The payment is Unclaimed in PayPal, and
- The order is put On Hold in WooCommerce.
Accepting the payment in PayPal will change the order status to Processing.
To avoid having to manually accept payments in PayPal, ensure that the currency you have set in PayPal sandbox is the same as the currency in your WooCommerce store.
Why don’t customers see the link to download products after paying and getting redirected back to my website?
↑ Back to topThis could be a sign that the IPN isn’t working correctly with your website. A possible workaround is to enable Payment Data Transfer (PDT). Within your PayPal account settings, try setting the following:
Once you have saved the settings, go back to the Website Settings page and find the PDT Identity Token:

With the PDT Identity Token copied, you can paste it into the WooCommerce > Settings > Checkout > PayPal field:
Still not working?
↑ Back to topGet in touch with your host. Some hosts are known to have problems with IPN, and this is unfortunately out of our control. Make sure the response from PayPal isn’t blocked by caching, firewalls, or other things in place on your server.