The Pre-Order and Backorder extension for WooCommerce lets you accept pre-orders and backorders for any product in your store. Configure payment options, order rules, email notifications, and more to build a complete pre-order and backorder system for your store.
Installation
↑ Back to top- Download the preorder and backorder .zip file from your WooCommerce account.
- At the WordPress Admin Panel, go to Plugins > Add New and Upload Plugin with the file you downloaded after purchase.
- Install Now and Activate Plugin.
More information is available at Install and Activate Plugins/Extensions.
Setup and Configuration
↑ Back to topAfter activation of the Advanced Pre-Order & Backorders extension, navigate to the plugin settings to customize pre-order and backorder options under WordPress Admin > WooCommerce > Settings > Pre-Order. Here you can configure the following settings:
General Settings
↑ Back to topAfter installing the Pre-Order and Backorder plugin, go to WooCommerce > Settings > Pre-Order > General Settings to configure the following options.
General Options
Configure general pre-order behavior and cart rules.
- Cart Isolation: Prevents customers from adding pre-order and in-stock items to the same cart.
- Mixed Cart Error Message: The message displayed to customers when cart isolation blocks them from adding a restricted item.
- Hide Pre-Order Products: Hides pre-order products from the shop and archive pages.
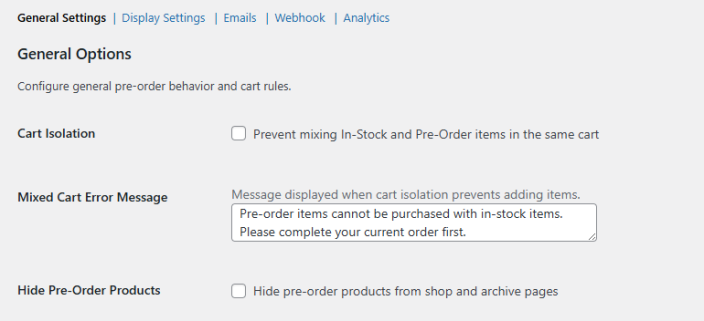
Automation
- Default Discount Percentage: Sets a default discount for all pre-order products when no product-level discount is specified. Set to 0 to disable.
- Cron Run Interval (minutes): Controls how frequently WP-Cron checks for pre-orders to release and payment reminders to send. The default is 30 minutes.
Click on the “Save Changes” button to save the settings.
Display Settings
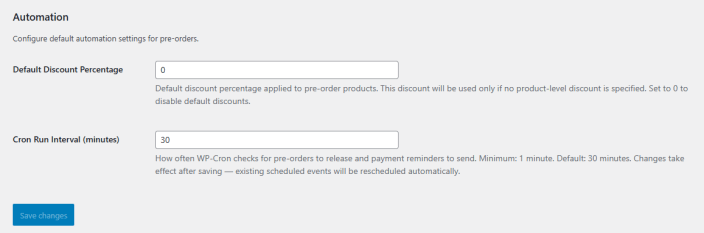
↑ Back to topGo to WooCommerce > Settings > Pre-Order > Display Settings to customize the visual appearance of pre-order elements across your store.
- Enable for Shop Page: Shows pre-order badges on shop, category, and archive pages.
- Enable for Product Page: Shows pre-order badges on single product pages.
- Select Badge Type: Choose between a Text Badge or an Image Badge to display on pre-order products.
- Badge Style: Select the badge style. Available options are Corner Ribbon and Text Pill.
- Badge Text (Global Fallback): Sets the default badge text for all pre-order products. Product-level badge text always takes priority over this value.
- Override Product Badge Text: Forces the global badge text across all pre-order products, ignoring any product-level badge text.
- Badge Text Color: Sets the text color for pre-order badges using a hex color code.
- Badge Background Color: Sets the background color for pre-order badges using a hex color code.
- Countdown Timer Color: Sets the primary color for the countdown timer using a hex color code.
Pre-Order Email Settings
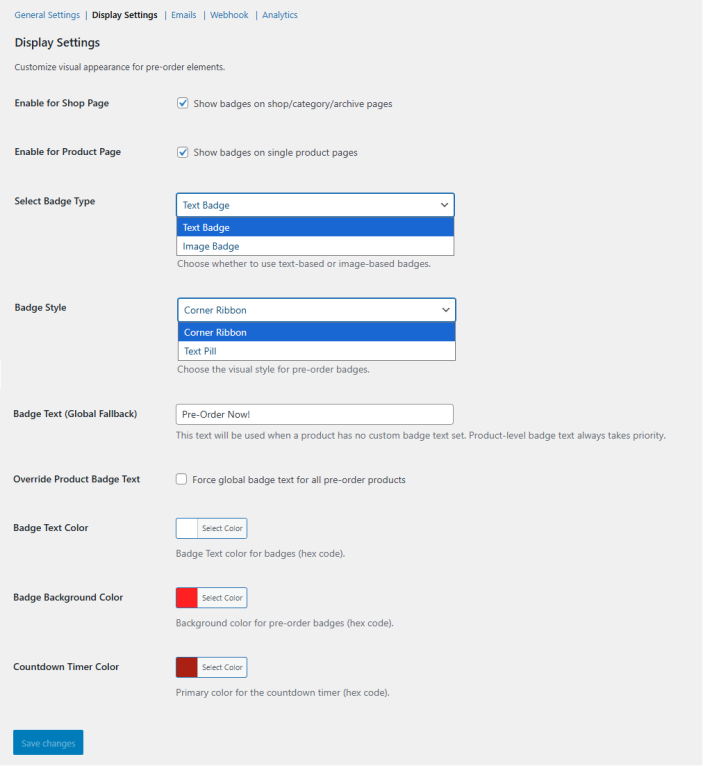
↑ Back to topGo to WooCommerce > Settings > Pre-Order > Emails to configure transactional emails for pre-order functionality. All email settings are managed in WooCommerce > Settings > Emails.
The following pre-order emails are available:
- Pre-Order Confirmed: Sent immediately after checkout when an order contains pre-order items.
- Release Date Changed: Sent when the admin updates the release date for a product with existing pre-orders.
- Product Released: Sent when a product’s stock status changes from out of stock to in stock.
- Payment Reminder (Pay Later): Sent when a product is released and payment is required for Pay Later orders.
Click on Configure Email Settings to enable, disable, and customize each email template.
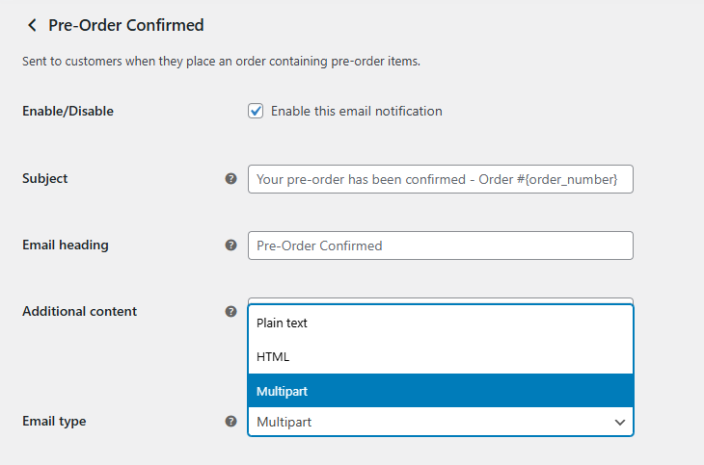
Configure Email Settings
Each pre-order email shares the same set of configuration options:
- Enable/Disable: Enable or disable this email notification.
- Subject: Set the email subject line. Supports dynamic variables such as {order_number}.
- Email Heading: Set the heading displayed at the top of the email.
- Additional Content: Add any extra content to include in the email body.
- Email Type: Select the email format. Available options are Plain Text, HTML, and Multipart.
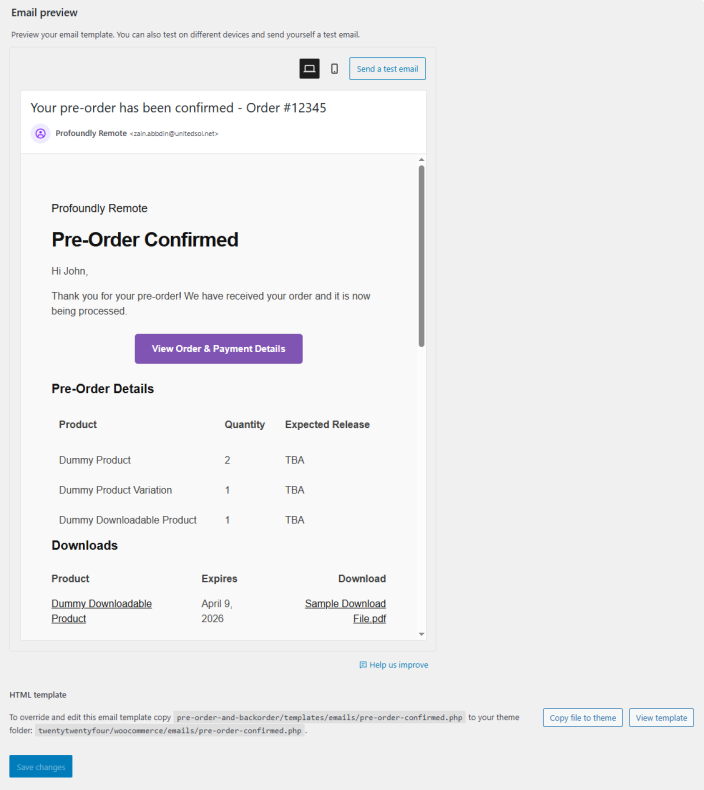
Live Preview and Override Email
Each email also includes a live preview panel where you can see how the email will appear on desktop and mobile, and send a test email to verify the output. To further customize the email template, copy the template file to your active theme folder and edit it directly.
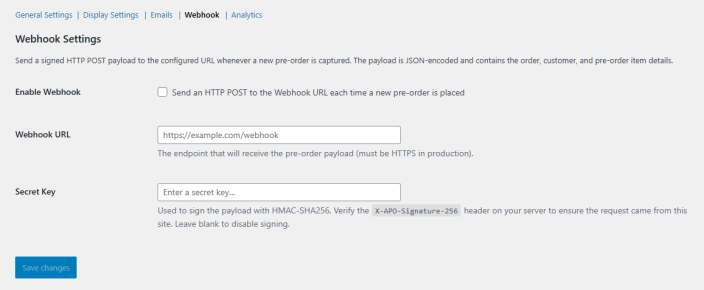
Webhook Settings
↑ Back to topGo to WooCommerce > Settings > Pre-Order > Webhook to configure webhook notifications for pre-orders. When enabled, a signed HTTP POST payload is sent to the configured URL each time a new pre-order is placed. The payload is JSON-encoded and contains the order, customer, and pre-order item details.
- Enable Webhook: Enables sending an HTTP POST to the configured Webhook URL each time a new pre-order is placed.
- Webhook URL: The endpoint that will receive the pre-order payload. Must use HTTPS in production environments.
- Secret Key: Used to sign the payload with HMAC-SHA256. Verify the X-APO-Signature-256 header on your server to confirm the request originated from your site. Leave blank to disable payload signing.
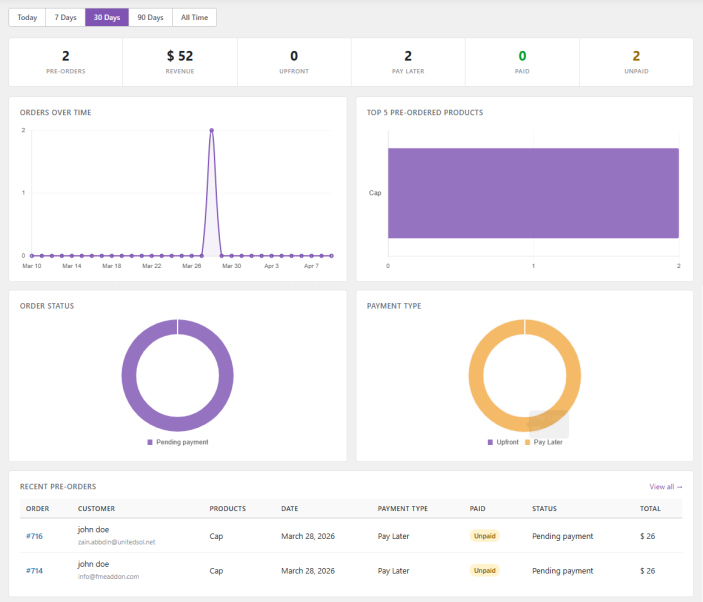
Analytics
↑ Back to topGo to WooCommerce > Settings > Pre-Order > Analytics to track the performance of your pre-orders. Use the date filter at the top to view data for Today, 7 Days, 30 Days, 90 Days, or All Time.
The dashboard displays the following summary metrics:
- Pre-Orders: Total number of pre-orders placed in the selected period.
- Revenue: Total revenue generated from pre-orders.
- Upfront: Number of pre-orders paid upfront at checkout.
- Pay Later: Number of pre-orders placed using the Pay Later option.
- Paid: Number of Pay Later orders that have been paid.
- Unpaid: Number of Pay Later orders with pending payment.
The dashboard also includes the following charts:
- Orders Over Time: A line chart showing pre-order volume over the selected date range.
- Top 5 Pre-Ordered Products: A bar chart displaying the most pre-ordered products in your store.
- Order Status: A donut chart breaking down pre-orders by their current order status.
- Payment Type: A donut chart showing the split between Upfront and Pay Later orders.
At the bottom, the Recent Pre-Orders table lists the latest pre-orders with order number, customer details, product, date, payment type, paid status, order status, and total amount.
Product-Level Pre-Order Settings
↑ Back to topTo enable pre-order for a specific product, go to Products, select the product you want to edit, and navigate to Product Data > Pre-Order. Configure the following settings:
Status
- Enable Pre-Order: Enable pre-order for this product.

Schedule
- Release Date: Set the expected release date and time for this pre-order product.

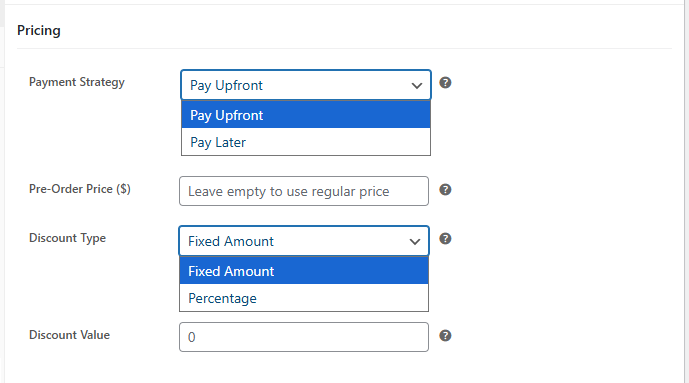
Pricing
- Payment Strategy: Select the payment method for this pre-order. Choose between Pay Upfront, where customers pay at checkout, or Pay Later, where customers place the order and complete payment once the product is released.
- Pre-Order Price ($): Set a custom price for this pre-order product. Leave empty to use the regular product price.
- Discount Type: Select the type of discount to apply. You can choose between a fixed or a percentage discount.
- Discount Value: Enter the discount amount to apply to the pre-order price.
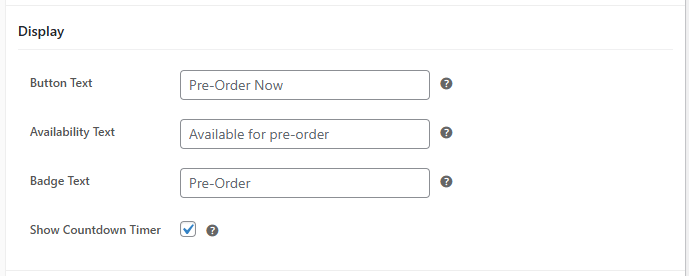
Display
- Button Text: Customize the Add to Cart button label for this product.
- Availability Text: Set the text displayed on the product page to inform customers about pre-order availability.
- Badge Text: Set a custom badge text for this product. Leave empty to use the global badge text set in Display Settings.
- Show Countdown Timer: Enable a countdown timer on the product page showing the time remaining until the release date.
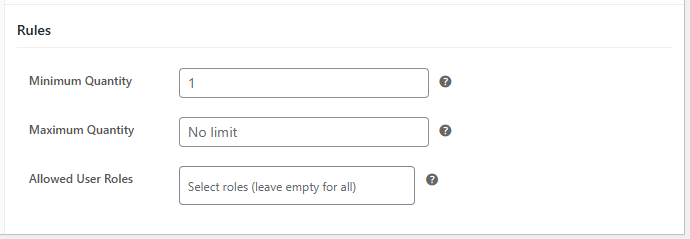
Rules
- Minimum Quantity: Set the minimum order quantity a customer must add to the cart for this pre-order product.
- Maximum Quantity: Set the maximum order quantity allowed for this pre-order product. Leave empty for no limit.
- Allowed User Roles: Restrict pre-order access to specific user roles. Leave empty to allow all customers.
Product Level Backorder Settings
↑ Back to topTo enable backorders for a specific product, go to Products, select the product you want to edit, and navigate to Product Data > Inventory. Configure the following settings:
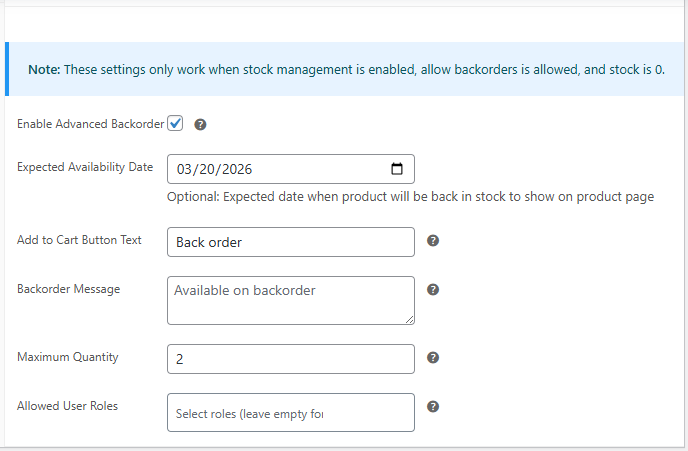
Important Note: These settings only work when stock management is enabled, stock status is selected as “On Backorder”, and stock is 0
- Enable Advanced Backorder: Click the checkbox to enable backorders for the product.
- Expected Availability Date: Choose the expected date when the product will be back in stock to show on the product page.
- Add to Cart Button Text: Choose the text for the add to cart button.
- Backorder Message: Enter the message to be displayed for backorder availability.
- Maximum Quantity: Set the maximum quantity allowed per backorder. (0 means no limit)
- Allowed User Roles: Select if you want to allow backorders for all or specific user roles.
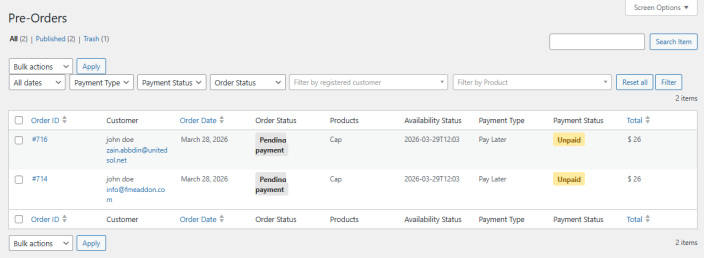
Preorder Listing Table:
↑ Back to topThe extension provides you with a dedicated listing page for pre-orders. You can access the preorders listing table from WooCommerce > Pre Orders. The order grid provides detailed information that can help merchants to fulfil their pre-orders. Here you will find the following information for each preorder:
- Order ID
- Customer (Name and email)
- Order Date
- Order Status
- Products
- Availability Status (Date)
- Payment Type
- Payment Status
- Total (Amount)
Frequently Asked Questions
↑ Back to top1. How do I enable pre-orders for a product in WooCommerce?
↑ Back to topYou can enable pre-orders by editing a product and navigating to Product Data > Pre-Order. From there, enable the “Enable Pre-Order” option and configure settings such as release date, pricing, payment strategy, and quantity rules.
2. Can I set a release date and automatically disable pre-orders afterward?
↑ Back to topYes. You can set a Release Date for each pre-order product. Once this date and time are reached, the pre-order status is automatically disabled.
3. What payment options are available for pre-orders?
↑ Back to topThe extension supports two payment strategies: Pay Upfront, where customers pay at checkout, and Pay Later, where customers complete payment after the product is released.
4. How can I restrict pre-orders to specific customers?
↑ Back to topYou can control access to pre-orders by selecting specific Allowed User Roles at the product level. If no roles are selected, the product is available to all customers.
5. How does cart isolation work for pre-orders?
↑ Back to topCart isolation prevents customers from mixing pre-order and in-stock products in the same cart. If a restriction is triggered, a custom error message is displayed to the customer.
6. Can I track and analyze pre-order performance?
↑ Back to topYes. The plugin includes an Analytics section where you can track total pre-orders, revenue, upfront and pay-later orders, paid and unpaid amounts, and view charts such as orders over time, top products, and payment type distribution.