
Product Image Manager for WooCommerce helps you upload and organize large numbers of product images without assigning each image manually.
Overview
↑ Back to topProduct Image Manager for WooCommerce makes it easier to manage product images for stores with large catalogs. Upload a ZIP file or multiple images, and the plugin automatically matches them to the right products using configurable filename rules.
You can assign featured, gallery, and 360° images, preview imports before making changes, review unmatched images, and revert an import when needed. Additional tools for image optimization, SEO, duplicate detection, and AI-powered background removal help you manage your product images from one place.
Features
↑ Back to top- Bulk image import
Upload multiple product images at once using a ZIP file or drag-and-drop. The plugin processes large imports in the background, helping you manage hundreds or thousands of images more efficiently. - Smart image matching
Automatically match images to your WooCommerce products using SKU, variation SKU, product ID, slug, product name, custom fields, Regex, or fuzzy matching. - Featured, gallery, and 360° images
Use filename rules to identify how each image should be used. Assign images as featured images, gallery images, or 360° product frames. - Dry Run and preview
Want to check everything before making changes? Use Dry Run to preview image matches without modifying your products or media library. Review the results and commit the import when you’re ready. - Manual Review Queue
Images that cannot be matched confidently are sent to the Manual Review Queue. Review suggested products, confidence scores, and image details, then assign the correct product with a few clicks. - One-click revert
Every import records the previous product image state before making changes. If you need to undo an import, use Revert to restore the previous featured and gallery images. - Image optimization
Optimize images as they are imported by resizing and compressing them. You can also convert images to WebP when supported by your server. - SEO image management
Automatically rename image files and generate ALT text, titles, captions, and descriptions using information such as the product name, brand, category, SKU, and image type. - AI background removal
Remove image backgrounds automatically using the optional PhotoRoom integration. The plugin also provides an estimated cost before processing a batch. - Duplicate detection
Detect images that already exist in your media library and choose whether to skip, replace, merge, or manually review them. - Reports and CSV export
Track import results with reports showing processed, assigned, reviewed, and failed images. Export import data to CSV for further analysis. - Background processing
Large imports are processed in the background using Action Scheduler. You can pause, resume, retry, or cancel imports as needed. - Developer tools
Developers and agencies can automate imports using the REST API and WP-CLI, and extend the plugin using documented action and filter hooks. - Compatibility
Product Image Manager supports simple products, variable products, and variations, and is compatible with HPOS, WPML, Polylang, Multisite, and the 360 Product Image plugin.
Installation
↑ Back to topTo start using a product from WooCommerce.com, you can use the “Add to store” functionality on the order confirmation page or the My subscriptions section in your account.
- Navigate to My subscriptions.
- Find the Add to store button next to the product you’re planning to install.
- Follow the instructions on the screen, and the product will be automatically added to your store.
Alternative options and more information at:
Managing WooCommerce.com subscriptions.
Quick start
↑ Back to topYou can start your first image import in a few minutes.
Step 1: Prepare your images
↑ Back to topRename your images using a filename pattern that identifies the product.
For example:
NIKE-AIRMAX_M00.jpg
NIKE-AIRMAX_G01.jpg
NIKE-AIRMAX_G02.jpg
Here:
M00= featured imageG01= first gallery imageG02= second gallery image
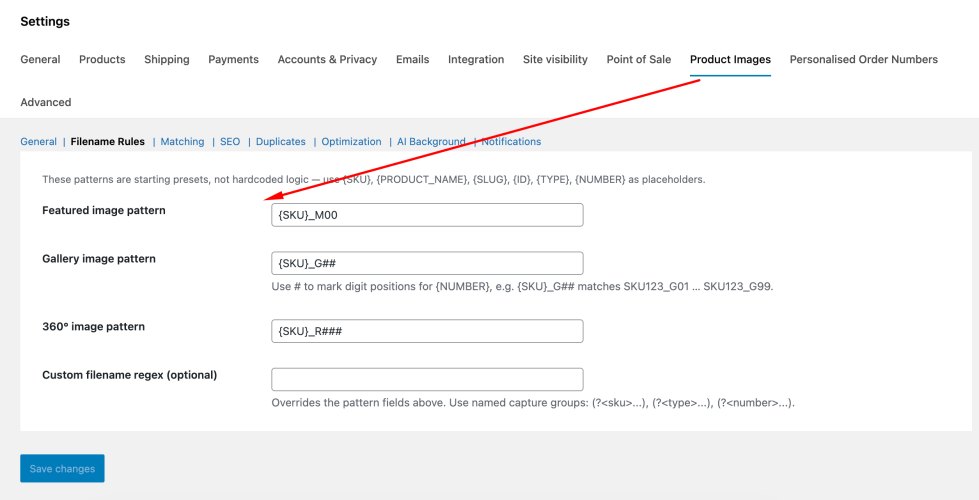
The default filename rules can be changed under Product Images → Settings → Filename Rules
Step 2: Open Bulk Upload
↑ Back to topGo to:
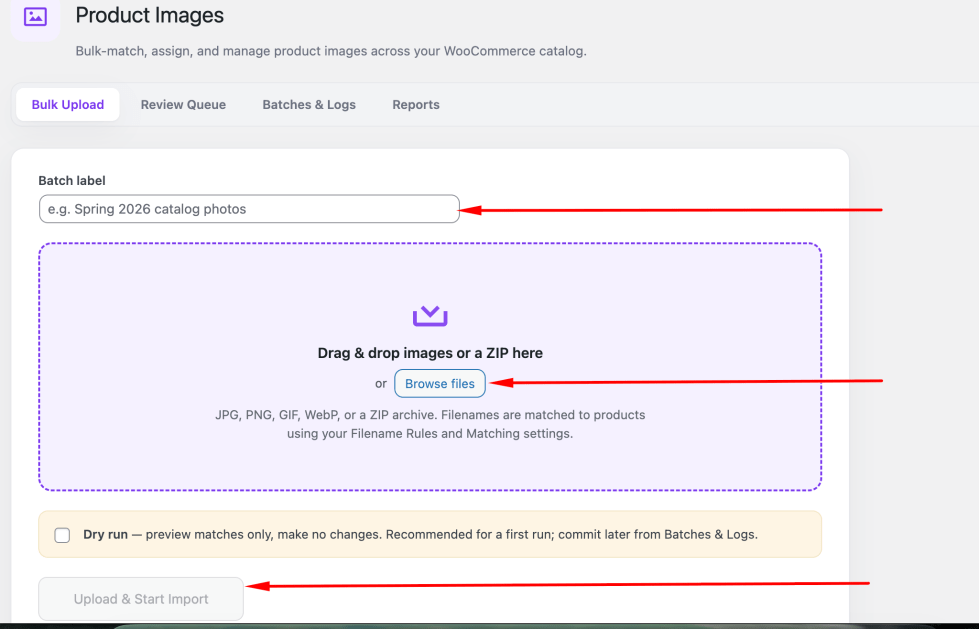
Product Images → Bulk Upload
Enter a label for your import and upload your ZIP file or individual images.
Step 3: Run a Dry Run
↑ Back to topFor your first import, enable Dry Run.
This lets you see what the plugin would do without changing your products or media library.
Step 4: Review the results
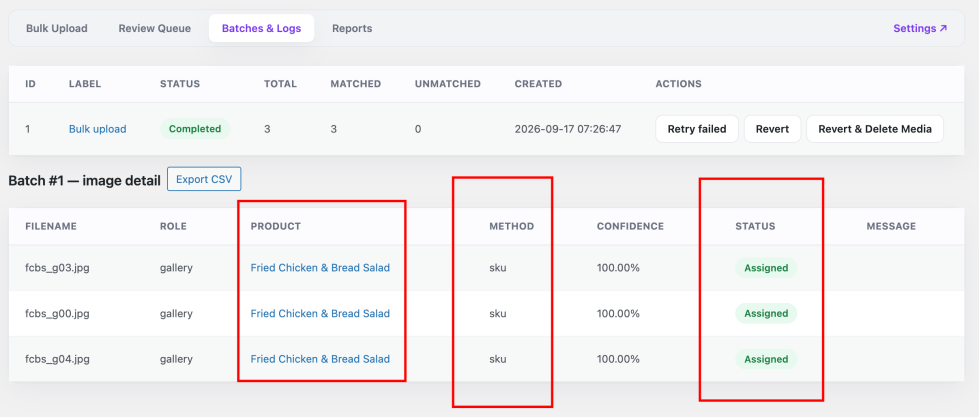
↑ Back to topCheck the matches and any images sent to the Manual Review Queue.
Step 5: Commit the import
↑ Back to topIf the results look correct, click Commit import.
The plugin processes the import in the background.
How image matching works
↑ Back to topProduct Image Manager can use several methods to find the correct product.
Supported matching methods include:
- SKU
- Variation SKU
- Product ID
- Product slug
- Product name
- Custom field
- Regex
- Fuzzy matching
You can enable or disable individual methods under Settings → Matching. Matching methods run in the configured order until a match is found.
Example
If your product has the SKU: ABC123
You could use:
ABC123_M00.jpg
ABC123_G01.jpg
ABC123_G02.jpg
The plugin can identify ABC123 and assign the images according to their roles.
Manual Review Queue
↑ Back to topNot every filename will produce a confident match.
When the plugin cannot confidently determine the correct product, the image is placed in the Manual Review Queue instead of being automatically assigned.
For each image, you can see:
- Image thumbnail
- Filename
- Image dimensions
- Suggested role
- Reason for the review
- Product suggestions
- Confidence score
You can assign a suggested product with one click, search for another product, or mark the image as No product.
This gives you control over uncertain matches instead of forcing an incorrect assignment.
Reverting an import
↑ Back to topEvery image assignment records the product’s previous image state.
If you need to undo an import, go to:
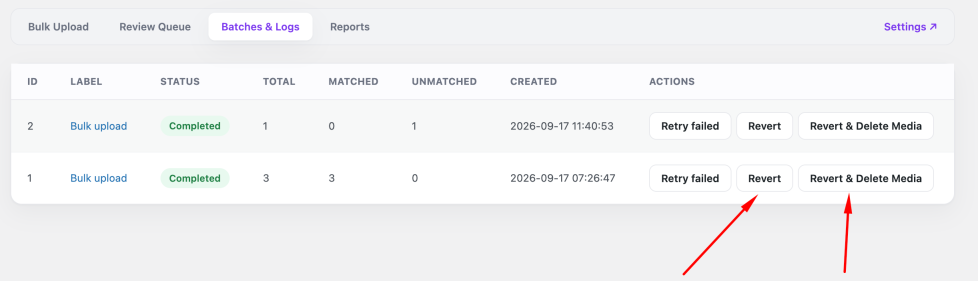
Product Images → Batches & Logs
and select Revert.
The plugin restores the featured and gallery images that existed before the import.
You can also choose Revert & Delete Media to remove attachments created by that import.
AI background removal
↑ Back to topProduct Image Manager can optionally remove image backgrounds using PhotoRoom.
To use this feature:
- Enable AI Background Removal.
- Add your PhotoRoom API key.
- Configure the processing settings.
- Run a Dry Run.
- Review the estimated cost.
- Commit the import when you’re ready.
Background removal is optional and disabled by default. Image data is sent to PhotoRoom only when this feature is enabled and configured.
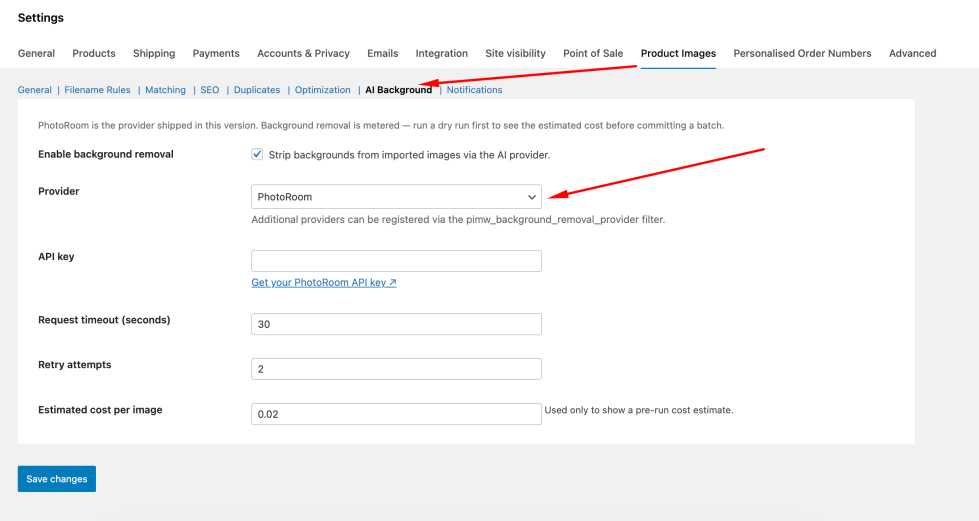
Image optimization
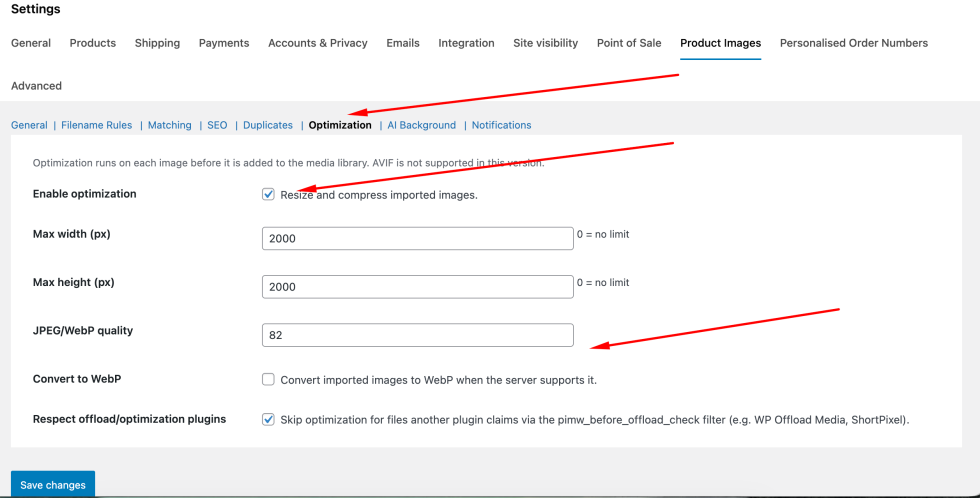
↑ Back to topProduct Image Manager can optimize images during import.
Available options include:
- Resize images
- Compress images
- Convert images to WebP
The plugin uses WordPress’s image editor through the Imagick or GD extension. WebP conversion depends on server support.
SEO image optimization
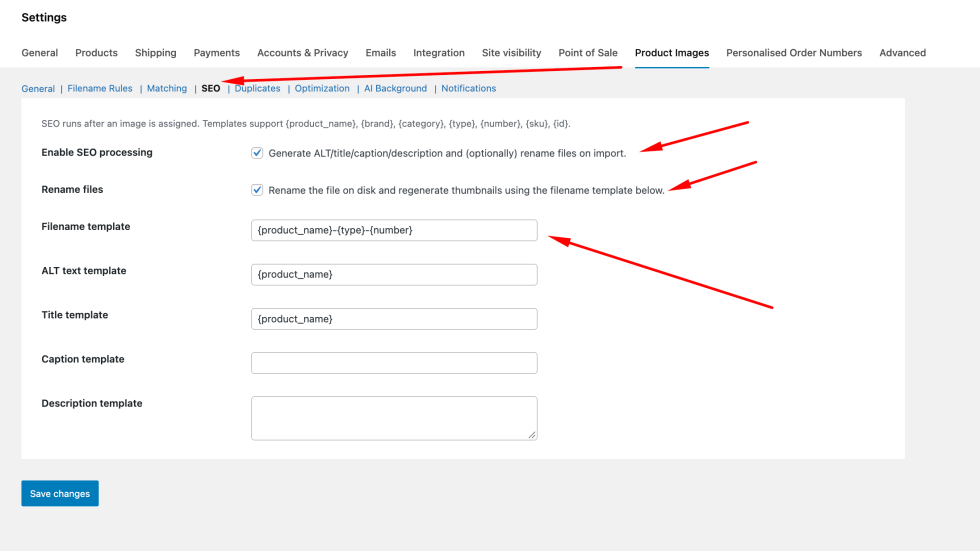
↑ Back to topYou can automatically generate image information during import.
The plugin can:
- Rename image files
- Generate ALT text
- Generate image titles
- Generate captions
- Generate descriptions
Templates can use information such as the product name, brand, category, image type, number, SKU, and product ID.
Duplicate detection
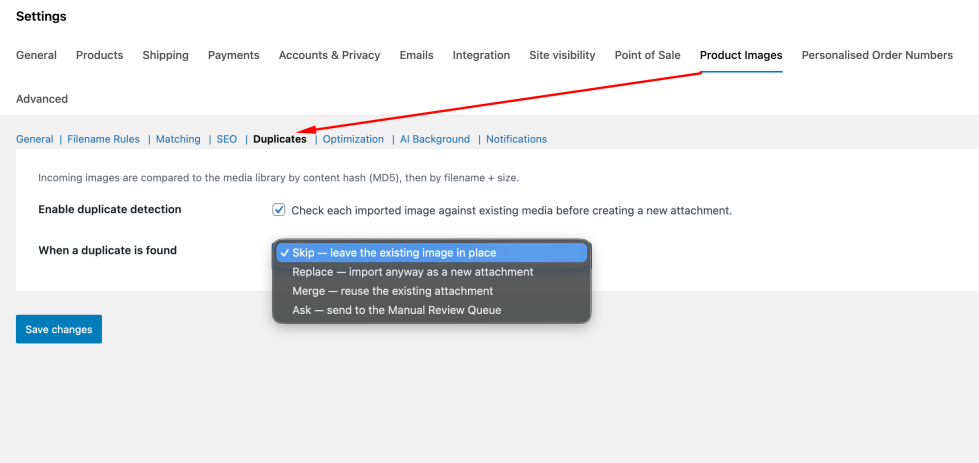
↑ Back to topThe plugin can detect images that already exist in your media library.
When a duplicate is detected, you can choose to:
- Skip the image
- Replace it
- Merge with the existing attachment
- Ask for manual review
This helps prevent unnecessary duplicate media files.
360° product images
↑ Back to topProduct Image Manager supports numbered 360° image sequences.
For example:
ABC123_R001.jpg
ABC123_R002.jpg
ABC123_R003.jpg
The images are stored as an ordered frame set and can be used by a compatible 360° viewer.
The plugin also provides integration with the 360 Product Image plugin when it is installed.
Large imports
↑ Back to topLarge catalogs can be processed in the background using WooCommerce’s Action Scheduler.
You can configure the batch size and control an active import using:
- Pause
- Resume
- Retry
- Cancel
This is designed to help process large image collections without depending on one long-running browser or PHP request.
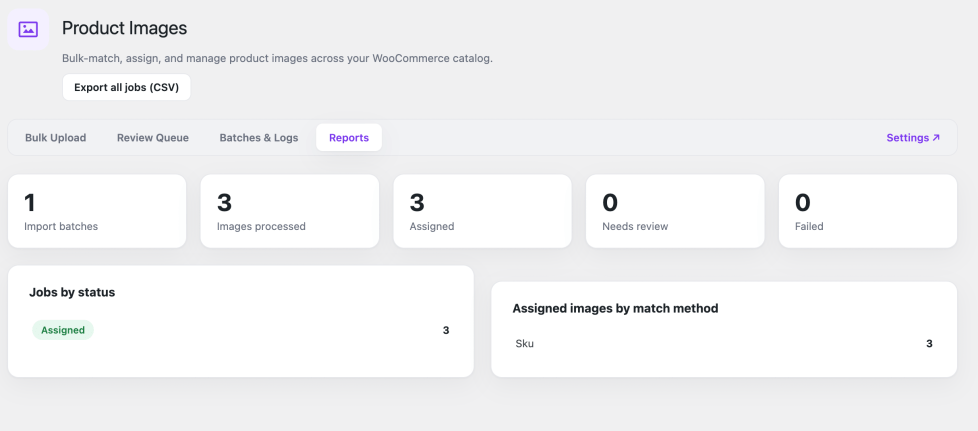
Reports and CSV exports
↑ Back to topThe Reports section provides an overview of:
- Images processed
- Images assigned
- Images requiring review
- Failed jobs
- Batch status
- Matching methods
You can also export import results to CSV for further analysis.
Advanced configuration
↑ Back to topGeneral
↑ Back to top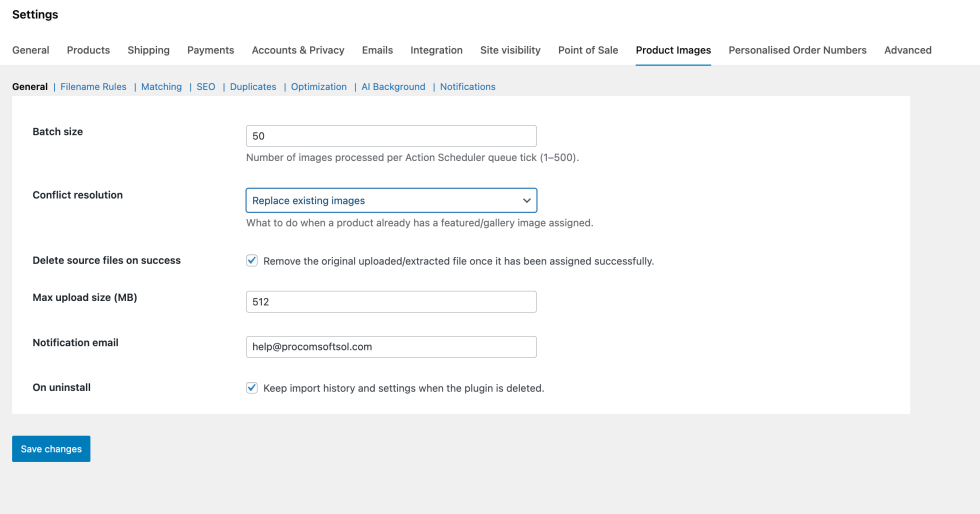
- Batch size: Number of images processed per Action Scheduler queue tick (1–500).
- Conflict resolution: What to do when a product already has a featured/gallery image assigned.
- Delete source files on success: Enable this to remove the original uploaded/extracted file once it has been assigned successfully.
- Max upload size (MB): Manage the max upload size limit.
- Notification email: The upload status will be sent to this email.
- On uninstall: Enable this to keep import history and settings when the plugin is deleted.
Filename Rules
↑ Back to topThese patterns are starting presets, not hardcoded logic – use {SKU}, {PRODUCT_NAME}, {SLUG}, {ID}, {TYPE}, {NUMBER} as placeholders.
- Featured image pattern: Give your featured image pattern starting with the SKU, followed by the number
- Gallery image pattern: Give your gallery image pattern starting with the SKU, followed by the number
- 360° image pattern: Give your 360 ° image pattern starting with the SKU, followed by the number
- Custom filename regex (optional): This will override the pattern fields above. Use named capture groups: (?…), (?…), (?…).
Matching
↑ Back to top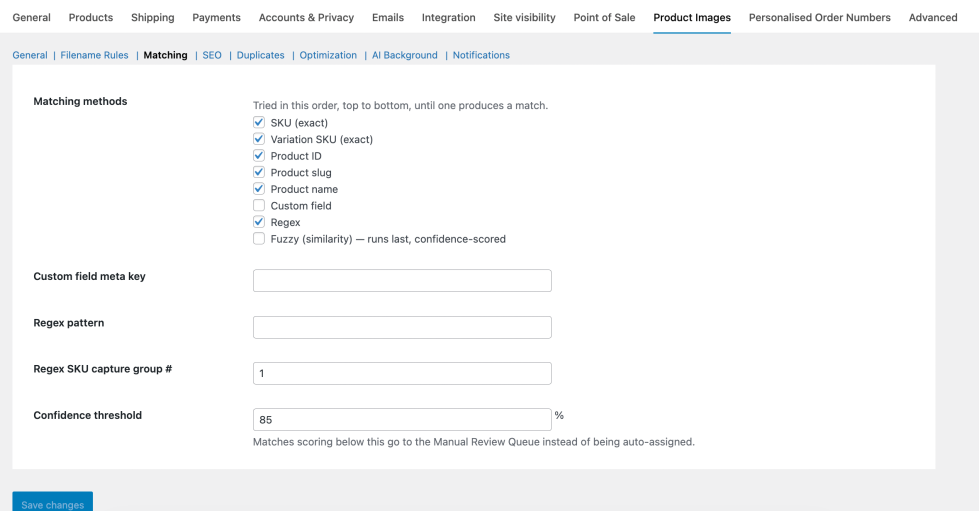
- Matching methods: Matching logic will work in this order, top to bottom, until one produces a match.
- Custom field meta key: Input your custom field meta key.
- Regex pattern: Input your Regex pattern if required.
- Regex SKU capture group #: Enter the regex SKU capture group
- Confidence threshold: Enter the confidence threshold
SEO
↑ Back to top- Enable SEO processing: Enable this to generate ALT/title/caption/description and (optionally) rename files on import.
- Rename files: Enable this to rename the file on disk and regenerate thumbnails using the filename template below.
- Filename template: Input the filename template here.
- ALT text template: Input your ALT text template here.
- Title template: Enter the title template here
- Caption template: Enter the caption template here
- Description template: Enter the description template here
Duplication
↑ Back to top- Enable duplicate detection: Enable this to check each imported image against existing media before creating a new attachment.
- When a duplicate is found: Choose what to happen when a duplicate is found.
Optimization
↑ Back to topOptimization runs on each image before it is added to the media library. AVIF is not supported in this version.
- Enable optimization: Enable this to resize and compress imported images.
- Max width (px): Enter the max width for the images.
- Max height (px): Enter the max height for the images.
- JPEG/WebP quality: Enter the quality for the images.
- Convert to WebP: Enable this to convert the uploaded images into WebP format.
- Respect offload/optimization plugins: Enable this to skip optimization for files another plugin claims via the pimw_before_offload_check filter (e.g. WP Offload Media, ShortPixel).
AI Background
↑ Back to topPhotoRoom is the provider shipped in this version. Background removal is metered – run a dry run first to see the estimated cost before committing a batch.
- Enable background removal: Enable this to strip backgrounds from imported images via the AI provider.
- Provider: Choose the provider. Additional providers can be registered via the pimw_background_removal_provider filter.
- API key: Enter the API key from the provider.
- Request timeout (seconds): Enter the request timeout in seconds.
- Retry attempts: Enter the retry attempts.
- Estimated cost per image: This is used only to show a pre-run cost estimate.
Notifications
↑ Back to top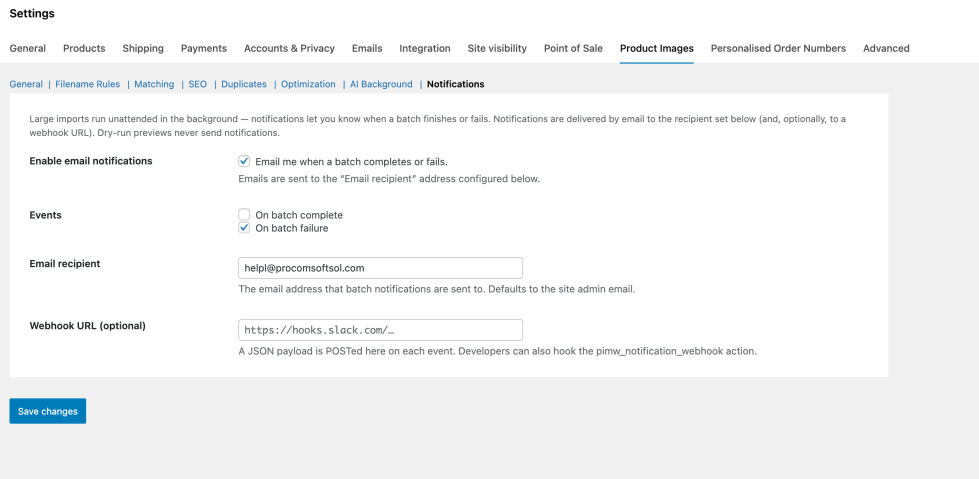
Large imports run unattended in the background – notifications let you know when a batch finishes or fails. Notifications are delivered by email to the recipient set below (and, optionally, to a webhook URL). Dry-run previews never send notifications.
- Enable email notifications: When this is enabled, emails are sent to the “Email recipient” address configured below.
- Events: Choose the events to send emails.
- Email recipient: Input the email address to send the notifications to.
- Webhook URL (optional): A JSON payload is POSTed here on each event. Developers can also hook the pimw_notification_webhook action.
Troubleshooting
↑ Back to topImages aren’t being matched
↑ Back to topCheck:
- Your filename pattern under Settings → Filename Rules.
- The relevant matching method under Settings → Matching.
- That the SKU or other identifier exactly matches your product.
- Run a Dry Run to see why an image was not matched.
A batch is stuck on “Running”
↑ Back to topProduct Image Manager uses Action Scheduler for background processing.
Check that WP-Cron is running. You can also run the Action Scheduler queue using WP-CLI: wp action-scheduler run
If your server has limited resources, try reducing the configured batch size.
Everything is going to the Review Queue
Check your confidence threshold and filename matching.
You can lower the confidence threshold or enable additional matching methods, including fuzzy matching.
AI background removal isn’t working
↑ Back to topCheck:
- PhotoRoom API key
- PhotoRoom account quota
- Timeout setting
- Retry setting
A failed AI request affects the individual image rather than stopping the entire batch.
Privacy and third-party services
↑ Back to topProduct Image Manager does not communicate with external services by default.
The two optional external connections are:
PhotoRoom
↑ Back to topUsed only when AI background removal is enabled.
The image being processed is sent to PhotoRoom for background removal. No customer, order, or personal data is sent by the plugin for this operation.
Notification webhooks
If configured, the plugin sends a small JSON payload containing batch information and image counts to the webhook URL provided by the store administrator.
FAQs
↑ Back to top
Do I need to rename my images?
You need filenames that can be matched using your configured rules. The plugin provides default patterns and supports custom patterns and Regex.
Can I test an import first?
Yes. Use Dry Run to preview the results without modifying your store.
Can I undo an import?
Yes. Completed imports can be reverted from Batches & Logs.
Does it support variations?
Yes. Both products and variations are supported, including variation SKU matching.
Does it require PhotoRoom?
No. PhotoRoom is only required if you want to use AI background removal.
Does it support WebP?
Yes, when WebP is supported by your server’s image editor.

